Week 2 – Video Reflection

Reflection

Throughout my artistic journey, I have learned about the many rules of composition and other elements when it comes to creating an artwork, especially in certain genres. However, more and more artists continue to break these rules, leading to the creation of new genres and pieces of profound meaning and reflection. For this reason, what stood out the most to me was the introduction of  “randomness” to the coding used for the works displayed, such as in the example of the cells where the use of randomness determined what the position and scale of the clusters would be, breaking the order and rules, but at the same time complimenting said order. 

Nonetheless, in my eyes this randomness is a more subtle way of describing chaos. Chaos, the opposite of order, has always been a fascinating concept to me. How it disrupts what brings comfort and despite its unpredictability, its beauty emerges from what encourages artists to twist the horizon of expectations for viewers, offering new perspectives to “cliche” subject matter.   Although I wasn’t foreign to any of these concepts, it was surprising to see them being introduced to systems and codes to produce the works shown. Before this video I always thought that coding relied mostly on the order, the simplicity, the structure, and precision of all the elements presented. This makes me want to explore more of this “randomness” in hope of applying the unpredictable on my codes as I do with my traditional artworks.

Week 2 Assignment_Loops

My concept

This week after learning about loops, for my design I wanted to explore how I could use different shapes and in some way combine or merge them to create different patterns.

For this assignment I created two designs after experimenting the use of loops and shapes. The first one as shown below is composed of a “for ()” loop including two sets of  lines and two sets of ellipses. As shown in the second design, the first layer is a set of lines underneath one set of ellipses which produce a pattern that matches that of scales such of a fish. After this, I explored the use of a second layer of ellipses with a different size for the height and width, thus creating a pattern as shown in the first design.

Highlight code

One of the codes I was most proud of were the loops I used to make the scales. These consisted of lines that followed the code we did in class, but with a slight change in the width, height and their size. The second code was for the scales themselves, consisting of ellipses placed on top of the lines.


/// green lines
   stroke(200,200,200);
  for(let x = 0; x <= width; x += 60){
    for(let y = 0; y <= height; y += 60){    
     line(x, y, x+75, y+75);  
      fill( 235, 0, 255);
    }
  }
  
  
  /// Scales
  for(let x = 0; x <= width; x += 30){
    for(let y = 0; y <= height; y += 30){    
     ellipse( x, y, 50, 50);  
      fill( 225, 100, 230);
    }
  }


Embedded sketch


Reflection and ideas for future work or improvements

One of the things I struggled the most with was getting the loop code right for the lines. At first, I thought it would be the same as we did for the ellipses, however, after testing it out I realized this did not work. Nonetheless, after discussing my situation with the professor, I was able to understand my mistake, and how the code for the lines was different when it came to the variables after the (x, y,), which, unlike the code for the ellipse, required a plus sign to adapt an accurate width and height, resulting in this:

line (x, y, x + 75, y + 75);

For my next project, I will look at more tutorials beforehand to have more preparation and to have a better understanding of the codes I will be using in order to have a more precise result. I will also produce multiple sketches of what I want my final product to be so I can aim towards a specific design in case I don’t have the time to explore different outcomes. Lastly, I would also love to add more animations and movement to my sketches.

Week 2 – Loops

Inspiration: Sound Waves and Chaos

When I first heard the word loops, the first thing that came to mind was sound waves. I imagined smooth, rhythmic waves moving across the canvas, like music frozen in space. I even found a little example of what I hoped to create, but my coding skills weren’t quite ready to match the vision.

 Scrolling through Instagram one day, I stumbled on an image that sparked a new idea. I thought: what if I could combine sound waves with the chaotic little voice in your head when you overthink?  

Concept Development: From Chaos to Calm

The top right of my canvas is extremely chaotic; dense, loud, overwhelming, but as the lines move toward the bottom left, they thin out and eventually fade into empty space. This represents the calm that comes when that inner chatter finally quiets.

This idea lets me visualize the process of overthinking, moving from noise to quiet, using loops and arcs to represent both emotion and structure. 

Coding Process: Adding Randomness

Here’s a snippet I’m proud of:

//arc

for (let x = 250; x <= width; x += 40) {
  stroke(255, random(150, 255), random(100, 255)); // random color
  noFill();
  let randY = 80 + random(-20, 20); // random vertical position
  let randW = 300 + random(-50, 50); // random width
  let randH = 400 + random(-50, 50); // random height
  arc(x, randY, randW, randH, 250, 450);
}

//line

for (let x = 1; x <= width; x += 20) {
  stroke(255, random(150, 255), random(100, 255)); // random green/pink/blue tint
  let endX = width + random(-50, 50);
  let endY = height + random(-50, 50);
  line(x, 1, endX, endY);
}

After watching Casey Reas’ video on randomness, I was inspired to incorporate a bit of chaos into my work. I added randomness to the color and the shape of the arcs, so every frame looks slightly different. This gives the piece a sense of movement and chaos, like thoughts bouncing around in your head—but still following a hidden structure underneath.

Reflection: What I Learned

This project helped me realize that coding can be just as expressive as traditional art—it’s just another medium to visualize thoughts and emotions. I also learned the value of adding randomness, it brought the project to life in ways my original plan didn’t anticipate. I also noticed that art doesn’t always have to be ‘pretty’ it can also be beautifully chaotic. 

Future Improvements

For the future, I’d love to make the sketch more dynamic and interactive, so the patterns could respond to the user’s input or feel more like actual sound waves. I also want to experiment with layering animations to capture the feeling of overthinking versus quiet peace more vividly. I wish one day I could make something as cool as my original inspiration.

Week 2 – Video Reflection

I had to reconsider my approach to structure after watching Casey Reas’ presentation on chance operations and randomness. I have a background in business, so I’ve always thought that control and planning are crucial for projects, schedules, and data analysis. I assumed the same would apply to coding: clearly define the rules and follow them. The 11×11 grid of dots, one of Reas’ examples, showed how controlled randomness functions: each dot moves according to precise rules, but minor variations or “random” steps result in patterns that change from orderly to chaotic. The thought of chaotic work always scared me. He demonstrated how a system can be both rule-based and unpredictable at the same time by describing instructions like moving in a straight line, bouncing off edges, or slightly deviating from a path. It helped me understand that randomness need not imply a lack of control but can be incorporated into a well-organized framework to produce entertaining and captivating results.

I want everything to be flawlessly structured, so as a beginner coder, I frequently question my work. I enjoy doing things the “right” way and abiding by the rules. Reas’s ability to strike a balance between chance and rules has piqued my interest in trying new things. While allowing randomness to dictate specifics like placement, size, or interactions, I hope to establish boundaries in my own projects, such as establishing a color scheme, the quantity of elements, or grid positions. This method seems applicable not only to coding or art but also to business: stability is provided by a clear structure, but creativity and innovation can be stimulated by flexibility and unpredictability.  Reas’ talk taught me that embracing chance within rules doesn’t undermine order; it makes it more interesting, alive, and full of potential surprises.

Week 2 Reading Reflection

For me art and its beauty has always been defined in terms of structure, order ,and algorithmic precision. Coming from a computer science background, I recognized beauty in the patterns that nature presents, like the spirals of sunflowers reflect the Fibonacci sequence. Yet, watching Casey Reas’ Eyeo talk has broadened my perspective.

Reas’ idea of introducing chaos into order struck me as both unsettling and exciting. It reminded me of the games I have created so far, taking me back to the simple bouncing ball game. What if the ball bounces in the exact same way every time? After a few rounds, the game would become predictable and monotonous. What keeps me engaged, in games or in art, is that element of surprise, the small but meaningful ways randomness shifts the experience. Reas framed this randomness not as the enemy of structure, but as its partner, an insight that felt both intuitive and profound once I heard it. Maybe the most memorable experiences emerge when we loosen the grip of order. In fact, Reas’ examples like turning cancer cell reproduction data into patterns made me realize how randomness can still carry intent, even narrative. The rules guide the outcome, but the unpredictability breathes life into it.

In my future work, I aim to set clear rules or structural boundaries for my projects, but within those bounds, I’ll allow random processes to shape outcomes. For example, in an artwork, I might define the color palette and number of shapes, but let their positions, sizes, or interactions emerge randomly every time the code runs. 

Reflecting on Reas’s talk, I believe the optimal balance lies at 60-40: about 60% structure and 40% randomness. The structured part grounds the work, maintaining coherence and intent. The random component injects surprise, transforming an algorithmic process into something truly engaging. This approach enriches both my understanding of art and my development process. By integrating defined rules with elements of unpredictability, I hope to create work that is structured yet lively.

Assignment 1: Self-Portrait using p5.js

Content:

In this assignment, I wanted to create a close digital representation of my favorite childhood cartoon character, SpongeBob SquarePants, using p5.js. I broke down the somewhat complex inspiration image into a sketch of simple shapes and elements such as lines, arcs, circles, squares, and rectangles. I also utilised colors and visual proportions to increase the accuracy of my representation.

Here is my inspiration image for reference:

Code Highlight:

One part of my code I am proud of is how I created the eyes. It wasn’t too complex, but I like how it challenged me to think carefully about visual placements and proportions. I had to make sure that the radii of the inner and outer eyeballs were different and balanced, which helped me practice precision in design and calculation.

//-- Eyes --
fill('white');
noStroke()
ellipse(160, 210, 70, 70);
ellipse(230, 210, 70, 70);

fill('blue');
noStroke();
ellipse(167, 213, 30, 30);
ellipse(224, 213, 30, 30);

fill(0);
ellipse(169, 213, 15, 15);
ellipse(224, 213, 15, 15);

stroke(0)
line(136, 168, 143, 179);
line(153, 163, 153, 175);
line(169, 163, 164, 175);
line(210, 165, 218, 176);
line(228, 162, 228, 174);
line(243, 162, 238, 174);

Embedded Sketch:

Reflections & Future improvements:

This was my first time using p5.js, and since I joined the class late, I initially struggled to write clean code. However, after learning and experimenting with the different functions, I found it rather interesting how basic code could be used to create visually appealing designs. I love how the assignment encouraged me to think ahead about what my portrait should look like and make precise calculations to get the perfect body parts.

If I had more time and experience with p5.js, I would:

    • Create fingers using custom or complex shapes instead of using only a filled circle.
    • Use shadow effects to create a hollow-looking mouth and a custom shape to represent the tongue (I improvised to create a different representation of the mouth from the reference image)
    • Add sponge-like ridges along the body as seen in the reference image.
    • Incorporate animation, such as making the portrait smile and wave when the mouse hovers over the canvas, by using loops and/or conditionals.
    • Reduce repetition in my code by using conditionals and loops.


Week 2 – Reflection

How are you planning to incorporate random elements into your work?
I think Casey Reas’s presentation of how randomness and control are somehow interconnected in computer generated art is quite on point. There is always an underlying algorithm that has some kind of order it follows in order to generate ‘random’. I remember he quoted Gerhard Richter: “Above all, it’s never blind chance: it’s a chance that is always planned, but also always surprising”. From the works I saw, I really liked the ‘Tissue Work’ because it seems to have lot of order and at the same time a little bit of imprecision, which makes those tiny vehicles draw very intricate lines along their path. I would want to incorporate the same idea of leaving a trace after a movement of certain objects, and have them follow a certain type of order as in the ‘Tissue Work’.

Where do you feel is the optimum balance between total randomness and complete control?
Casey showed us some example of Lia’s works, I want to talk about that. The first one with perfect ordered grid, when it starts to deviate somewhere there is definitely a thin line between pure random and complete control. I believe that finding such optimum balance is hard. I would say Fractal Invaders when you add a bit of symmetry to the randomness is an example of how I can create a balance between the randomness and control. Honestly, I think balance is always something audience likes in the artwork, which makes it more appealing and understandable to them. The perfect balance for me is when on one hand elements start to seemingly move randomly, but at the same time when you add more of such elements they form some kind of a pattern like in the ‘Tissue Work’. Otherwise, as I mentioned before, applying a bit of symmetry to the coin flip based randomness of black and white (referring to Lia’s Fractal Invaders) is also a perfect balance between randomness and control.

Week 2 – For loops

Concept
I am continuing the story of Dexter. I tried to incorporate as many things as we learned this week, including for loops, width/2, the mouseIsPressed function, and oscillations using the random function. What the audience sees is unstable because the varying sizes of circles are constantly changing, representing chaos when Dexter Morgan is not himself but is controlled by his inner devil, which he calls the Dark Passenger. The blood slide at the top represents him in this state, showing that he is currently in Bay Harbor Butcher mode. The frameRate is set higher to emphasize how stressed and uncontrollable he is at this point.

By pressing the button, the audience sees calm Dexter Morgan, an ordinary husband with golden wings that symbolize how kind and loving he actually is in real life when the Dark Passenger is absent. He appears more stable, with the random function set to produce smaller differences in circle sizes, and the frameRate is lower to represent that. White represents his good nature, while red represents his killings and dark side..

Highlight of the code I am proud of

if (mouseIsPressed) {
      frameRate(5);
      if(mouseX <= width/2){
      textSize(32);
      fill('rgb(255,255,255)');
      stroke(0);
      text('Dexter Morgan', mouseX, mouseY);
    }
      for (let x = 0; x <= width-460; x += 50) {
        for (let y = 100; y <= height-100; y += 50) {
      fill ('gold');
      randomNumber = random(30, 40);
      rect(x, y, randomNumber);

else {
    frameRate(30);
    if(mouseX <= width/2){
      textSize(32);
      fill('red');
      stroke(0);
      text('Bay Harbor Butcher', mouseX, mouseY);
    }
  // blood
    fill(255, 255, 255, 90);
    rect(225,10,150,80);
    fill('#AC153A');
    circle(300,50,50);
    
    for (let x = 120; x <= width-120; x += 50) {
      for (let y = 350; y <= height; y += 50) {
    fill ('red');
    randomNumber = random(40, 80);
    circle(x, y, randomNumber);}}

I would say I made good use of if and else statements. I wanted the user to press a button to see Dexter’s good side, and when not pressing anything, they would see his dark side. By adding an if (mouseIsPressed) statement along with an else, I was able to make my concept work. Otherwise, I didn’t use else statement, initially, and only had if mouseIsPressed. So, those to visualizations of white & gold overlapped with red.

Sketch

Reflection
I believe Dexter’s unstable character could be developed further. For example, I’d like to incorporate another mouseIsPressed command into his evil character, so that when pressing more, the circles’ oscillations would become faster and grow larger and larger. However, to achieve this, I need to make sure that two mouseIsPressed commands don’t overlap, so I need to come up with a creative solution.

Self portrait – Abdelrahman


Assignment 1: Self-Portrait with p5.js

For this first assignment, I wanted to keep things fun. Instead of trying to make a realistic self-portrait, I went for a cartoon version of myself using only simple shapes in p5.js. I spend a lot of my free time messing around with cartoon animation, so it felt right to make something that leans more toward humor and character design than strict accuracy. To be honest, you can think about it as less “this is exactly me” and more “this could be a funny character version of me.”

While I was building it, I played around with how the shapes stacked and layered, almost like sketching with blocks of color. Gradually, the face started to take shape, and I found myself enjoying the process of tweaking small details until it felt right. One of my favorite parts is the hat and how the patterned brim adds a bit of texture and keeps it from looking too flat. Even though it’s all made from basic geometry, I’ve tried to make the final portrait have a personality that feels a little quirky, and I hope I’ve succeeded in doing so.

Highlight of Code

As I mentioned above, one part I’m particularly proud of is the hat pattern (I have this hat in real life). For it, I used a simple pair of for loops with line() to create a crosshatch effect. It gave the hat texture and visual interest without being too complicated:

// Hat pattern 
stroke(100);
for (let i = 130; i < 270; i += 20) {
  line(i, 120, i, 155);
}
for (let j = 120; j < 155; j += 15) {
  line(120, j, 280, j);
}
noStroke();

It is not 100% likeness, but just enough to provoke the character and the sense of personality I want.

Embedded Sketch

Here’s the live sketch (embedded from p5.js):

Reflection

This assignment was a lot of fun, but also more challenging than I expected. The hardest part for me was getting the proportions and placement to look right. At first the eyes looked uneven, or the body would run off the canvas, and fixing that was mostly trial and error. I spent a lot of time just adjusting numbers a little bit at a time until things felt balanced.

What I liked about this process is that it felt a bit like debugging, but in a more visual way. Instead of checking for errors in the console, I was checking with my own eyes to see if something looked off. That back and forth between logic and aesthetics was interesting and kept me engaged. In the end, I am very happy with how my self-portrait turned out. It is simple and kind of silly (one that I might use in my future animations), but that is what I wanted. More than anything, I enjoyed treating code like a sketching tool instead of just a way to solve technical problems. It was refreshing and utterly intersting.


A workflow of converting pictures into p5js drawing functions

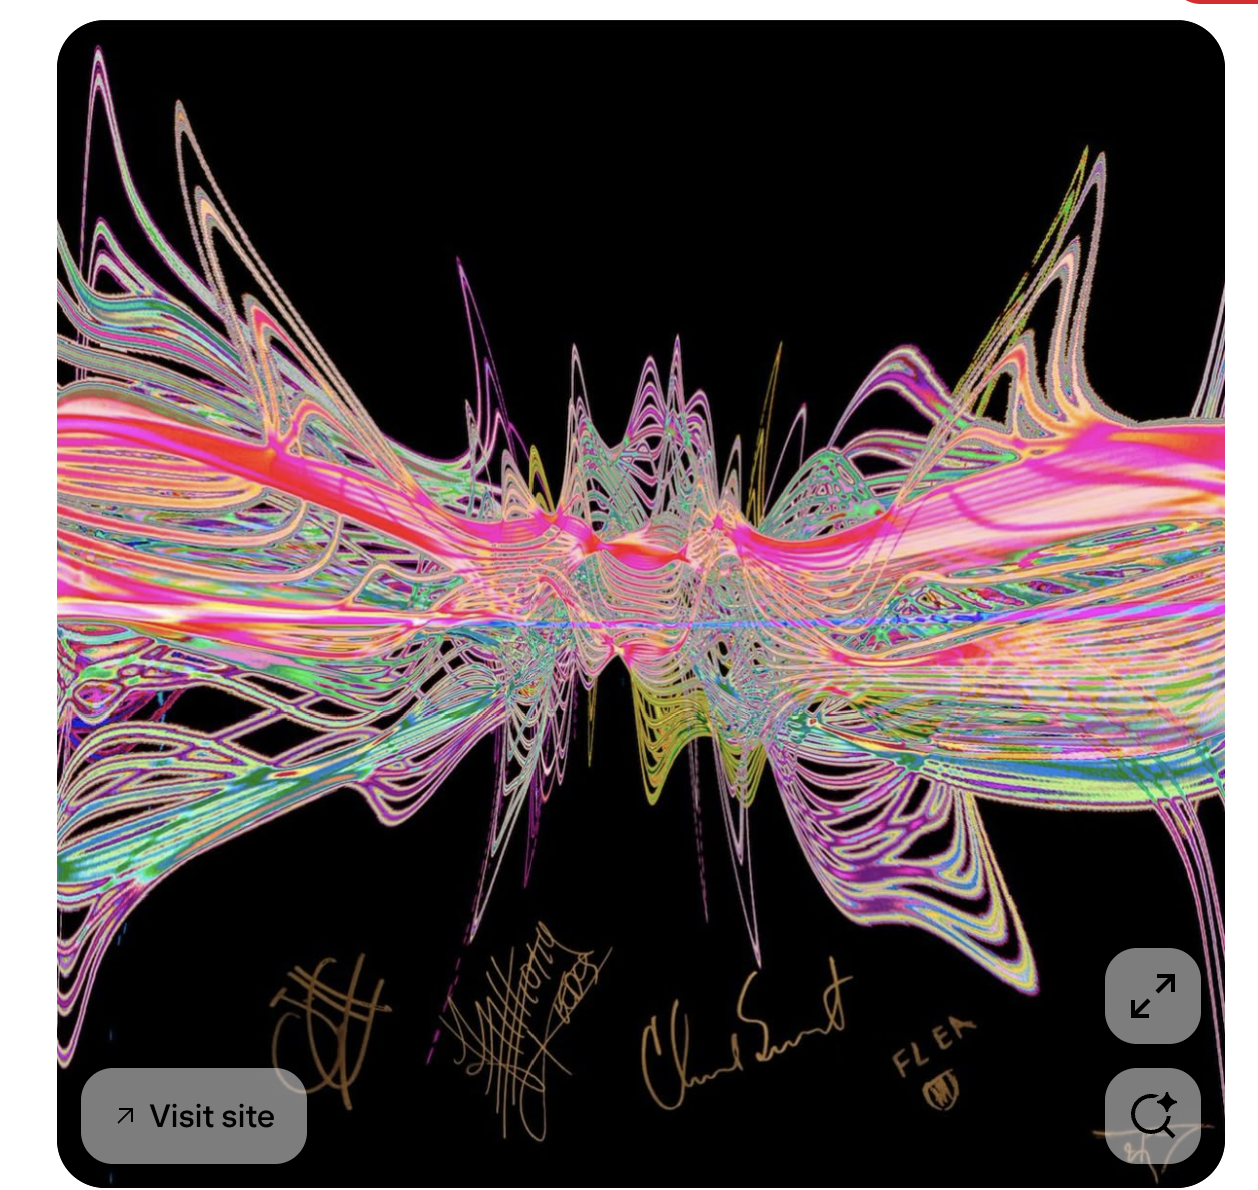
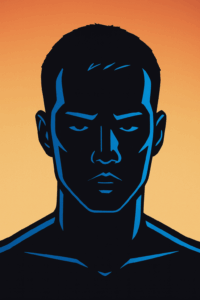
Here’s the final output(hint: try to move the mouse around the portrait).

Inspiration:

From long ago, I watched the Love Death + Robots series produced by Netflix and loved the story of Zima Blue. https://www.imdb.com/title/tt9788510/ . I love the plot and the artistic choice, so when it comes to a chance to digitally create something related to my self-portrait, I decided to draw a painting in the style of Zima Blue.

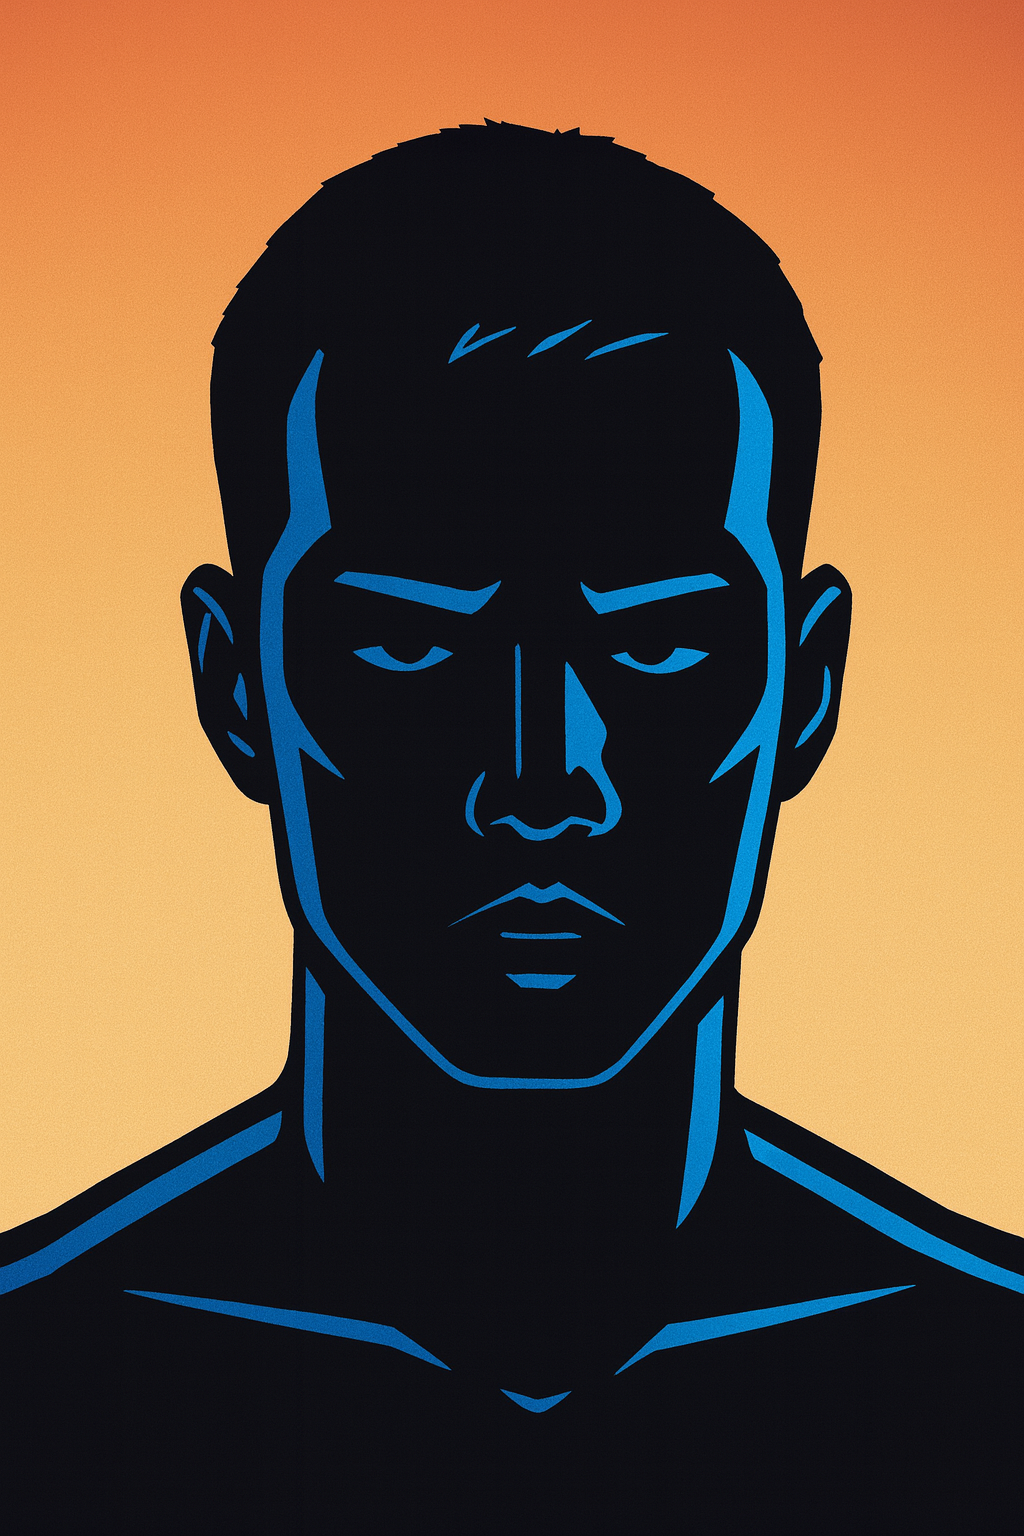
However, I am not good at drawing and learn how to draw picture quickly in p5js almost seems impossible. Thanks to the development of computer vision and the style transfer algorithm(https://en.wikipedia.org/wiki/Neural_style_transfer), I was able to upload my picture and a photo of Zima Blue to ChatGPT and ask it to perform style transfer.

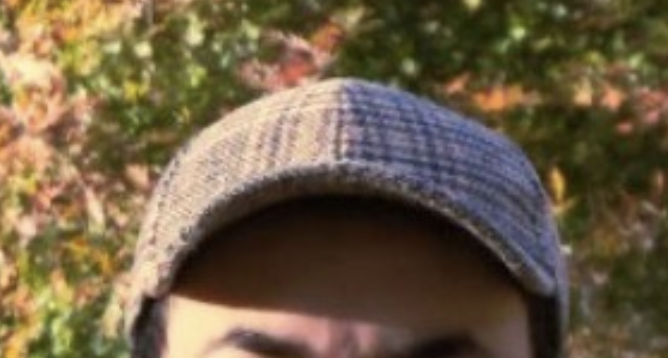
Here’s the Zima Blue original episode screenshot and the photo I obtained after style transferring to one of my photos.

Zima Blue. My most watched episode. : r/LoveDeathAndRobots

(original episode screenshot)

(style-transferred picture)

Work Flow:

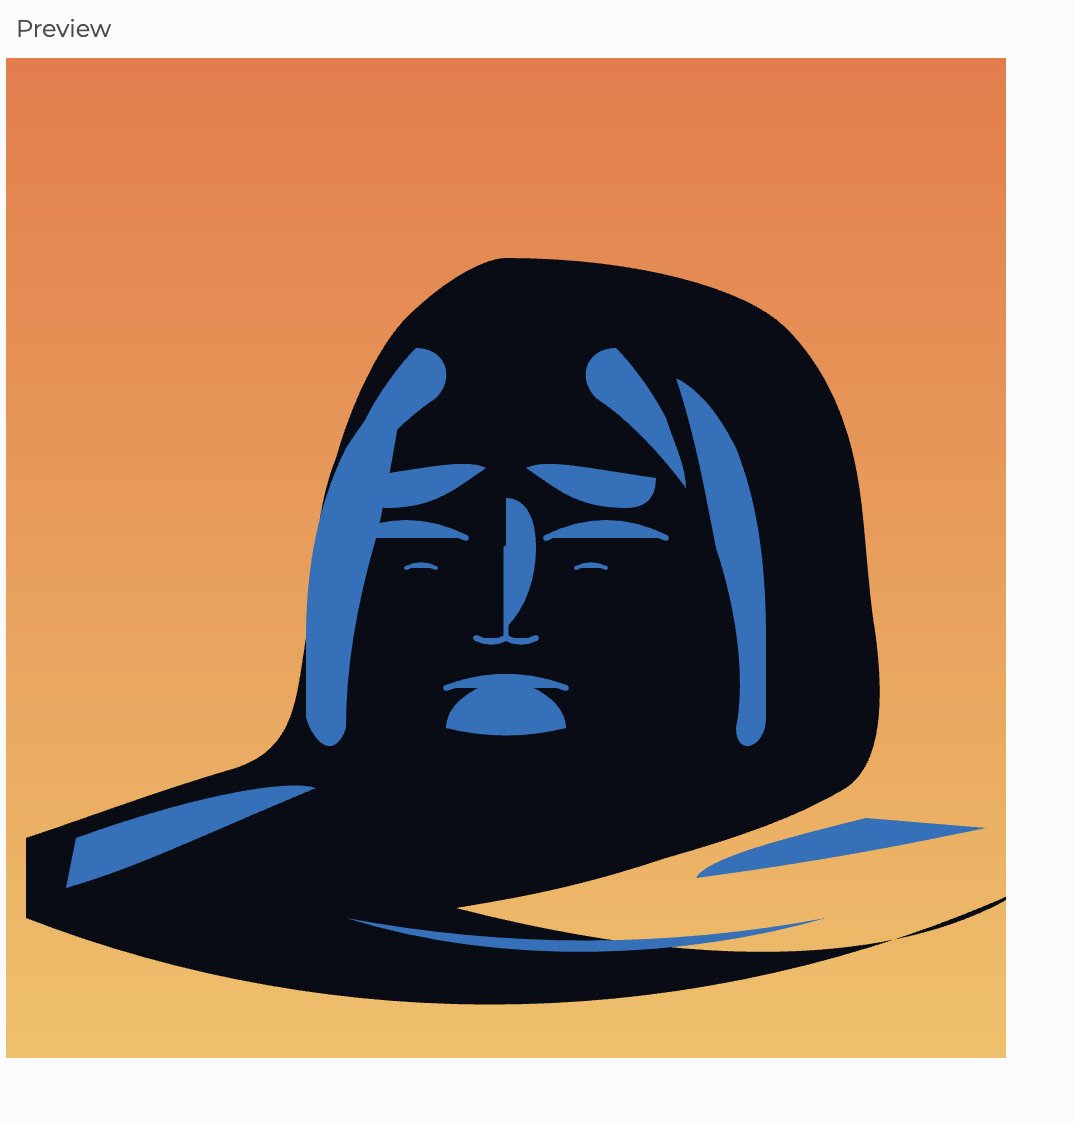
However, the produced format is in jpg style and it is impossible to convert it into drawing functions that are built in p5js. And directly asking GPT to transfer the image to p5js code produces unintended effects.


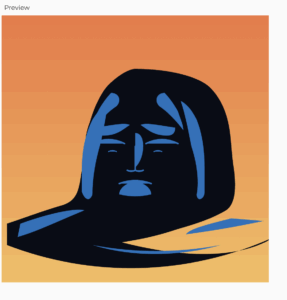
(direct p5js conversion)


I consulted previous student Pi(pi.ko@nyu.edu) for assistance and solution is followed:

  1. upload the jpg file to websites like(https://www.cutout.pro/photo-enhancer-sharpener-upscaler) to increase the number of pixels in the photo.
  2. load the file into Adobe Illustrator use the Make Trace Command to receive the SVG file(https://en.wikipedia.org/wiki/SVG) which contains all the x,y coordinate of the lines so it is possible for it to be converted into built-in functions in p5js(the parser could be found in the appendix)

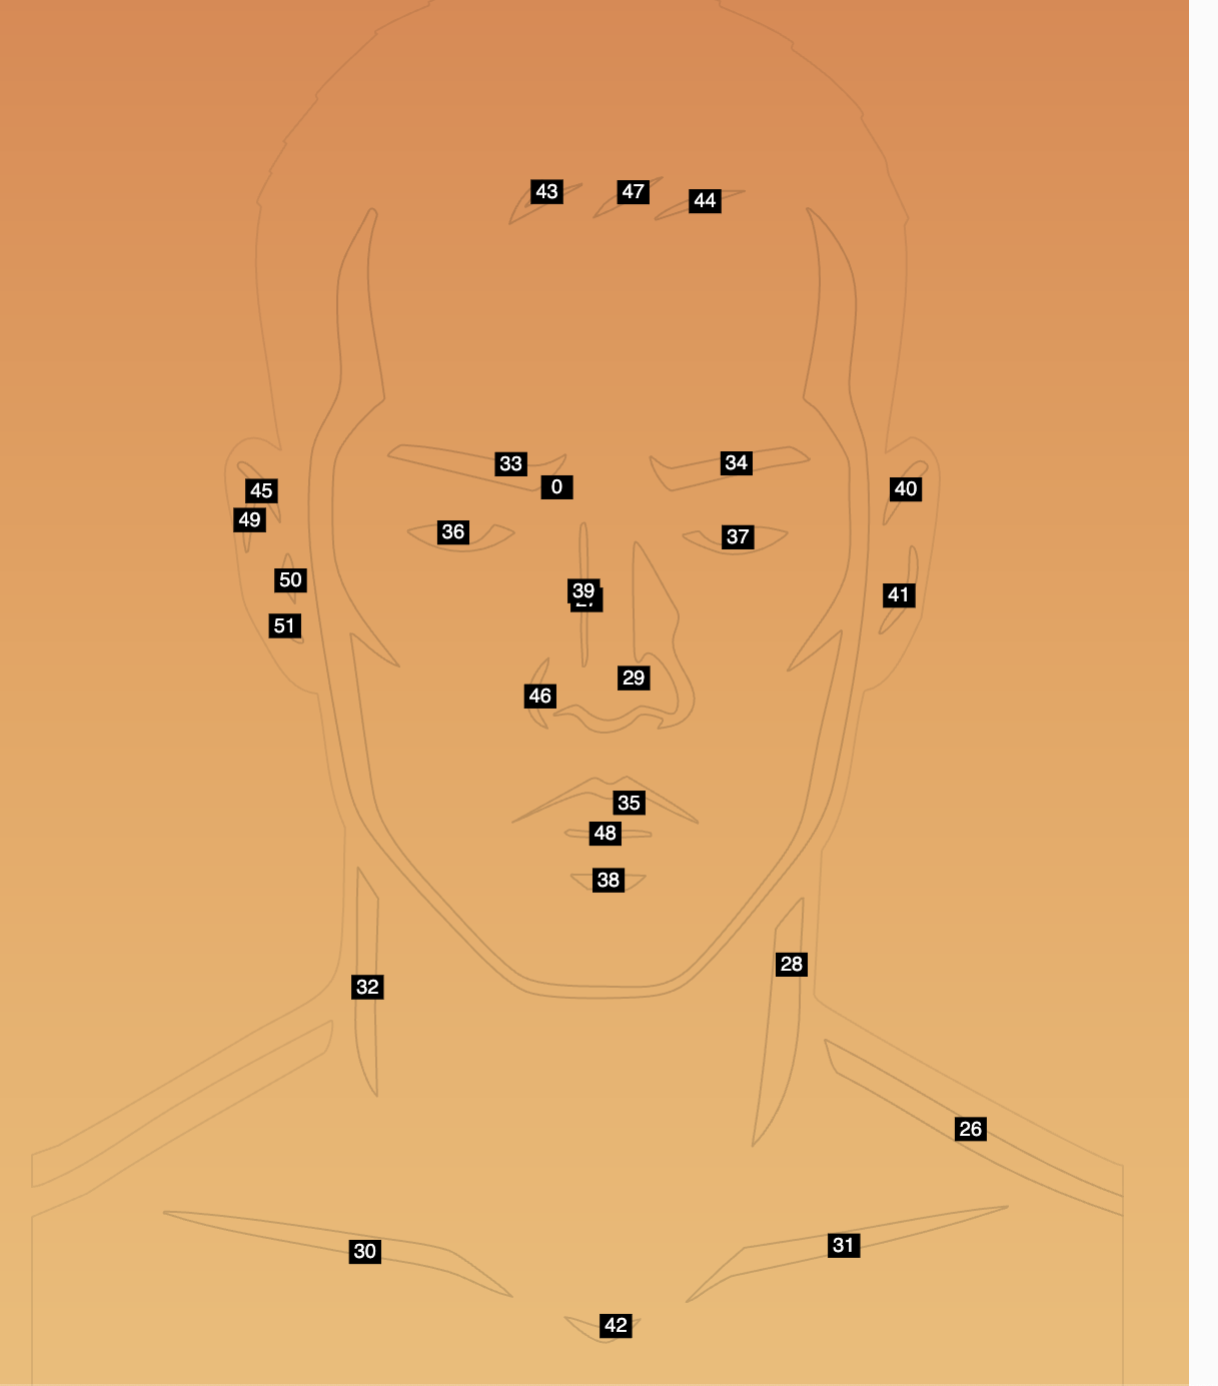
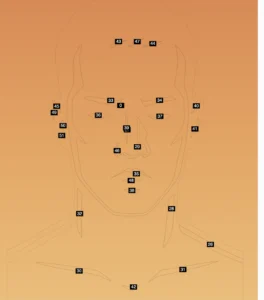
After this, I worked with GPT to color the drawing. Since they are of irregular shapes and the parser convert them into coordinates, it is hard for me to identify which parts to color. So, I ask GPT to write a helper function to label the region of the curves and the coloring comes after.

In the end, I want to add an effect of changing the background color with mouse moving, so the central logic behind is as followed:

// Normalize mouse to 0..1 (works even when mouse is outside the canvas)
const mx = constrain(mouseX / width,  0, 1);
const my = constrain(mouseY / height, 0, 1);

// Use mouseX to steer hue, mouseY to steer saturation/brightness.
// Feel free to tweak the ranges to taste.
const baseHue = map(mx, 0, 1, 20, 220, true);     // left→right: orange → blue
const sat     = map(my, 0, 1, 70, 90,  true);     // bottom→top: more vivid
const bTop    = map(my, 0, 1, 95, 70,  true);     // top band gets darker as you go down
const bMid    = map(my, 0, 1, 90, 65,  true);
const bBot    = map(my, 0, 1, 80, 60,  true);

The complete code and the parser could be found on:

  1. complete code(copy and paste the code into p5js and you will receive what’s above): https://github.com/dr04002/Intro_IM/blob/acaed841ba9257a17bef0dad063c0cf1d1e4a1bb/sketch.js
  2. parser:https://github.com/dr04002/Intro_IM/blob/acaed841ba9257a17bef0dad063c0cf1d1e4a1bb/svg_conversion

Here are future improvements that I could make:

  1. the left shoulder should be blue but they are left blank in this drawing
  2. the size of the canvas should fit the size of the main portrait so there’s no blank on the bottom,