Week2- Reading Reflection

This reading affected me by helping me understand that the coded system itself is the creative act. Which led me to the question “What point does the computer go from being a tool to a collaborator helping in the creative process?” .When randomness is introduced, the outcome is no longer fully controlled by the artist, and this lack of control is actually very intentional. The artist writes instructions, but the results can be unexpected, and that uncertainty becomes part of the artwork. I noticed this idea reflected clearly in the code I wrote for the assignment. I created a system with rules for line width, square size, and color, but each of these elements was randomized within certain limitations. For example, the line width was random between one and four, and the square size was random between 20 and 45. This allowed me to maintain some control over the overall structure while still allowing the visuals to remain unpredictable. The outcome felt more alive and dynamic because it was never exactly the same.I planned to incorporate random elements into my work by using color, line weight, and shape size. As the speaker Cassie Reas explains, us, me, the artist (coder), designs the rules of a system rather than controlling a single outcome, treating the code as a set of rules that guide the work instead of controlling exactly how it turns out.

The optimum balance is achievable by controlling the rules without limiting the outcomes. Setting constraints allows the work to stay coherent while still being unpredictable. I feel that the ideal balance exists when I can predict the behavior of the system, but not the final visual result. In my work, I was able to control what elements could vary and the range in which they changed, but I could not predict the exact combinations of square size, line width, and color that appeared every two frames.

 Casey Reas mentions the term system based art, which is when the artwork functions as a system defined by behaviors rather than a single image. In this approach, the work exists as an ongoing process instead of a finished product. This idea connects closely to my piece, since it generates new variations every time it runs, making no single outcome the definitive version of the artwork.

Assignment 2 :Loop Art

Your concept:

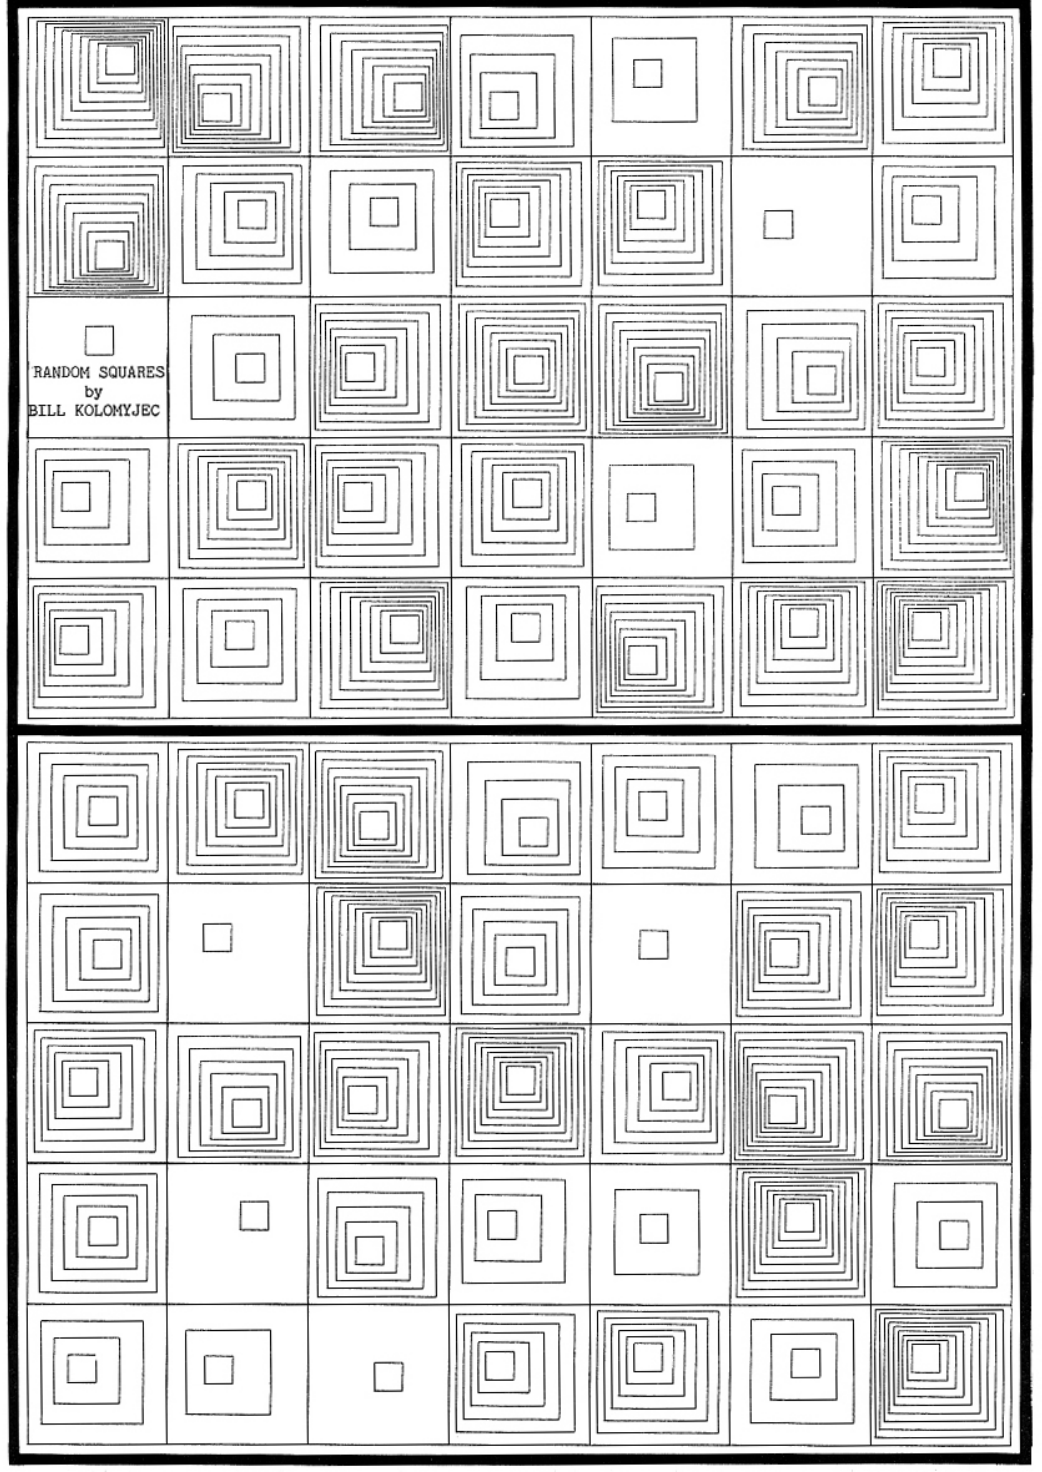
The concept of my drawing comes from the early generative art from the 1970s from the Computer Graphics magazine, specifically pages 14 and 30, which used simple geometric shapes and repetition. Something I liked specifically about this piece was how it used grids, and how I can envision myself using the grid coding we learned in class and apply it. I wanted to create a retro piece using the P5JS tool, focusing on grids, squares, and random variation. The artwork I created changes every 2 frames through random color, random line weight, and random square size, creating a  glitch like pattern. I watched a youtube tutorial which helped me understand how the random() code works which allowed me to apply it to my piece. Instead of static shapes, I wanted the grid to feel unpredictable and constantly changing, but I didn’t want it to be overwhelming, so I set the frame rate to 2.

Another thing I wanted to do was set the background as black, so when you hover over the squares, depending on which square you hover over, it will become black and essentially give the effect of it disappearing. This is the small interactive element of mouse hover, which I adapted from our class code.

Page 14 from the magazine that inspired my work:

A highlight of some code that you’re particularly proud of:

//random square size+lineWidth from youtube video + color from p5.js example
       let squareSize= random(20,45);
       let lineWidth= random(1,4);
       strokeWeight(lineWidth);
       stroke(random(255),random(255),random(255));
       
       
       //When mouse hovers inside the square boundaries the stroke changes to black using the same condition we learned in class
       if(mouseX > x&& mouseX <x + 50 && mouseY > y && mouseY < y +50) {
         stroke (0);
       }
       
       //draw square the first square is the main one for this grid and the second square is smaller and centered within the first square using simple math and experimentation to find the correct placement of the second square 
       rect(x,y,squareSize,squareSize);
       rect(x+10,y+10,squareSize-20,squareSize-20);


A part of the code I’m proud of specifically is how I was able to incorporate the random () effect, especially the part of the code where the squares have random size variation, as well as random stroke weight and color variation . All o these affects become more noticeable because my sketch runs at 2 frames per second.

I’m proud of this because I was able to learn the random size and line weight from a YouTube tutorial and successfully adapt it to my own square design. I used the random color idea from a p5.js example, but I changed it from fill() to stroke() to match my outline based work. By combining all three random elements size, line weight, and color the pattern becomes visually interesting, even though the grid structure stays the same. I’m proud of how I was able to mix what we learned in class with new techniques I found on my own. Im also proud of how I was able to adjust the square sizes using simple math adding to x/y and subtracting from some to create a clean square within square effect.

For the mouse hover condition I was able to adjust it to work inside the grid and change the stroke () to a fill(), as a beginner I was able to take a concept we learned in class and adapt I to my code. I referenced directly from what we coded during class but adjusted it to my code:

    (Code in class)

if (mouseX > 50 && mouseX < 400 && mouseY > 100 && mouseY < 200) {

    fill(‘pink’);

}

In my version I replaced the fixed numbers with the loop variables X and Y so the hover effect works for every square in the grid instead of just one rectangle

Embedded sketch:

Reflection and ideas for future work or improvements:

Working on the second P5JS assignment, I was able to understand how simple shapes can become interesting and how code can become more interesting when it is combined with randomness. Even though the grid I created is very structured, I think the addition of random size, color, and line weight makes every frame feel more unique. Through this assignment, I was able to mix different ideas from different places: inspiration from the 1977 Computer Graphics and Art magazine, the YouTube example, the p5.js example, and the hover condition from our class code. I was also able to acknowledge the importance of the draw loop. Because my sketch runs at two frames per second, I was able to clearly apply and see each new variation. An idea for a future improvement I can make is experimenting with different shapes or mixed geometry to see how randomness affects them. I could also try adding rotation or movement so the squares slowly shift or spin over time and experiment with more complex mathematical code. Another idea is adding more layers of shapes and seeing how I can adapt this style to more complex code.

References:

Inspiration from Graphic magazine:

COMPUTER GRAPHICS AND ART Aug1977 Page 14 and Page 30

Random Color from this example :

https://editor.p5js.org/aferriss/sketches/HJKCR03uG#:~:text=1,let%20shapeColor%3B&text=2,%E2%80%8B&text=3,function%20setup()%20%7B&text=4,createCanvas(400%2C%20400)%3B&text=5

Random Line weight and shape size :

https://youtu.be/POn4cZ0jL-o?si=D8w6gaTpVwLFj8qH

Assignment 1: Self Portrait

Concept:

For the first assignment self-portrait. I decided to create a code for an image of a frog, and the idea was to create it using the 2D primitives, and my goal was to take what we learned in class about how to code using the shapes and implement it into my own piece, changing the colors, the size, and layering of the shapes and experimenting with the code to see what works for the image I had in my mind. The goal was to practice layering and the proportions, and I added small details like the eyelash and the fly to give the frog more detail.

How it’s made:

The image was created entirely using p5.js, I first created the frame size then created the background color and then chose a subject to create which is a frog.

I used basic shapes like ellipse, circle, and lines, and arc to build the frog. I built it from the back to the front, layered it from legs to body to head, then eyes, and lastly the details. I used the color fills and stroke changes to separate different parts of the frog. In addition to the frog i added a small fly to add more detail to the portrait as I felt it was on theme.

A part of the code I’m proud of:

A particular part of the code that I’m proud of is the mouth and the eyelashes. Because they required more precision and experimentation than the rest of the shapes, I would say these parts took me the longest to perfect and be satisfied with the results. The mouth uses an arc function, which requires specific angles to create a smooth curved line, and the eyelashes had to be carefully placed using the line function to angle them naturally around the eye to give the appearance of eyelashes.

The arc required understanding about how the arc worked because it isn’t as straightforward as the ellipse or the circle. I had to experiment and reference to examples from the p5.js to understand how it works more clearly.

https://p5js.org/examples/shapes-and-color-shape-primitives/

https://p5js.org/reference/p5/arc/

Because the mouth needed to sit naturally between the eyes and the end of the face, I adjusted the X position and the Y position multiple times to get the expression right. And I experimented with the width and the height to get the most natural looking smile. I also increased the stroke weight for this part of the feature to give the mouth a bold cartoon like outline to make the mouth stand out without overpowering the eyes.

//mouth
noFill();
stroke(0);
strokeWeight(10);
arc(305,400,150,100,0,PI);

//eyelashes
stroke(0);
strokeWeight(6);

//left eye lashes
line(170,180,150,160);
line(200,170,200,150);
line(230,180,250,160);

//right eye lashes
line(370,180,350,160);
line(400,170,400,150);
line(430,180,450,160);

Reflection:

I’m satisfied with how expressive the frog looks, especially the eyes and the smile and the addition of the fly. It adds more detail, and something I think would be interesting to implement in the future once we learn how complete more complex code, is a blinking animations for the eyes or how to make the code responsive to interaction for example if I click on the fly it starts flying around. Overall, this project helped me understand how coordinate changes can affect the design and how layering can differ the shape placement and how line weight can be played around with and used to advantage and how to code shapes more confidently overall. I look forward to learning more complex codes for the future to help enhance my coding skills.