Concept:
My midterm project is designed as a new interactive game that combines both an artistic experience and an enjoyable gameplay element. The Maze Captures is inspired by the Sheikh Zayed Museum and the Qasr Al Hosn Festival in Abu Dhabi. The artistic aspect comes from the museum, which is modern in design while maintaining a strong historical and cultural connection to the United Arab Emirates. I then developed the game aspect based on the Qasr Al Hosn Festival, which featured a culturally themed escape room, but I adapted this idea into my own concept.
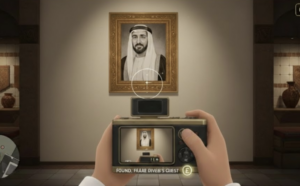
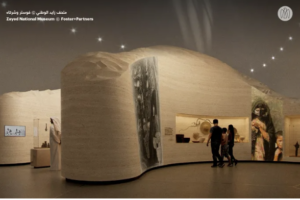
Here is an image that demonstrates my inspiration from the Sheikh Zayed National Museum in Abu Dhabi:
The concept of the game is to allow the player to walk around and experience a museum-like environment filled with Emirati cultural artworks. These artworks are AI-generated interpretations of real pieces found in the Sheikh Zayed Museum. Each time an object is spotted, the player must position it within their camera lens frame and capture it within a specified time to increase their score. Below are two of the 8 actual references used to create the artworks in my game: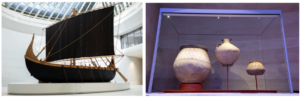
Embedded Sketch:
How it works:
The game begins with an instruction screen, allowing the user to understand what is expected for the game to function properly. When the player presses the space bar, they are positioned at the start of the maze. The player uses the arrow keys to move smoothly and the mouse pad to look around, allowing for easier navigation and a more immersive experience. The maze is structured to provide multiple paths, similar to a traditional maze, with various types of objects, ranging from artworks to cultural items, placed throughout the space. I also included background music inspired by a song about Sheikh Zayed to reinforce the cultural theme and atmosphere of the museum. When an object is spotted, it must be centered within the camera lens frame and captured using the Enter key. A capture sound effect is played to enhance interactivity and create a sense of realism. Each time an object is captured, the player’s score increases depending on how much time remains, the earlier the capture, the higher the score. Once the timer ends, the player can view their final score and press the space bar to restart the game.
In terms of code organization, I used Object-Oriented Programming by creating two classes: one for walls and one for objects. Since these elements are repeated multiple times in different positions, using classes allowed me to keep the code organized and reusable by simply calling them in the sketch and adjusting their positions as needed. I then structured the main sketch using the three game states we covered: a start screen, the gameplay screen, and an end screen where the user can return to the beginning. I handled user interaction through functions such as keyPressed() for keyboard input and mouseDragged() for camera movement. Additionally, I incorporated audio elements, including a capture sound effect and background music, to enhance the realism and overall experience of the game. I also implemented collision detection to ensure that the player cannot walk through walls, which helps maintain the structure and realism of the maze. The project was built using WEBGL mode, which allowed me to create a 3D environment and simulate a first-person perspective using a camera system.
Parts I am proud of:
I am particularly proud of creating the movement of the player, as it initially started as a problem, but I was able to overcome it in the best way possible. The issue was that the arrow keys were not aligned with the movement and would keep switching directions, meaning that sometimes the forward key would move the player backwards and vice versa. I also couldn’t properly look around to decide which direction I was walking in. I then realized that I needed to use sine and cosine to control the direction, and carefully adjust the positive and negative values for each key. This allowed each movement key to function correctly without conflicting with the others. I also used the mouseDragged() function, which we covered in class, to allow the player to look around left and right.
// Allow user to look around left and right, using mouse
  function mouseDragged() {
  angle += movedX * 0.01;
}

// Move forward using the up arrow key
  if (keyIsDown(UP_ARROW)) {
    nextX += sin(angle) * speed;
    nextZ -= cos(angle) * speed;
  }

  // Move backward using the down arrow key
  if (keyIsDown(DOWN_ARROW)) {
    nextX -= sin(angle) * speed;
    nextZ += cos(angle) * speed;
  }

  // Move left the left arrow key
  if (keyIsDown(LEFT_ARROW)) {
    nextX -= cos(angle) * speed;
    nextZ -= sin(angle) * speed;
  }

  // Move right using the right arrow key
  if (keyIsDown(RIGHT_ARROW)) {
    nextX += cos(angle) * speed;
    nextZ += sin(angle) * speed;
  }
Another part I am proud of, which was also challenging at first, was preventing the player from walking through walls. This issue made the game feel unrealistic and not function as intended. By following tutorials on movement in WEBGL, I was able to implement collision detection using a loop and a detection function to stop the player from passing through walls. I also applied this logic to prevent the player from moving outside the boundaries of the game floor. However, I acknowledge that this system is not 100% accurate, as moving too close to a wall can sometimes allow the player to slightly see through it. This is something I would improve in the future.
In the walls class:
//Setup collision detection code to check if user is near a wall
  detect(px, pz, size) {
    return (
      px + size > this.x - this.w / 2 &&
      px - size < this.x + this.w / 2 &&
      pz + size > this.z - this.d / 2 &&
      pz - size < this.z + this.d / 2
    );
  }
In sketch:
let blocked = false;

  // For loop to check collision with all walls
  for (let wall of walls) {
    if (wall.detect(nextX, nextZ, playerSize)) {
      // check position
      blocked = true; // if blocked by wall, stop movement
      break;
    }
  }

  //Prevent moving outside game floor area

  // Floor is centered
  let half = floorSize / 2;

  if (nextX < -half + playerSize || nextX > half - playerSize) blocked = true; // check left and right movement on floor
  if (nextZ < -half + playerSize || nextZ > half - playerSize) blocked = true; // check forward and backward movement on floor

  // Update position of player if no collision
  if (!blocked) {
    player.x = nextX;
    player.z = nextZ;
  }
The part I am most proud of is placing the walls and objects within the maze. Since the project is built in a 3D environment, I had to continuously move around the space to check the positioning, orientation, and visibility of each element. This included making sure that walls were correctly aligned, objects were facing the right direction, and everything was visible and accessible to the player. After several adjustments and iterations, I became much more confident and was able to place elements exactly where I wanted them.
//Layout of the maze

  //Starting hallway
  walls.push(new Wall(-150, 500, 20, 280, 1000)); // left wall
  walls.push(new Wall(150, 500, 20, 280, 1000)); // right wall

  //Split to right and left
  walls.push(new Wall(-290, -10, 300, 280, 20)); //connected to the left
  walls.push(new Wall(290, -10, 300, 280, 20)); //connected to the right
  walls.push(new Wall(0, -190, 530, 280, 20)); // far end at the front

  //Top walls
  walls.push(new Wall(-450, -90, 20, 280, 180)); // left end
  walls.push(new Wall(450, -90, 20, 280, 180)); // right end

  //First room on the left
  walls.push(new Wall(-525, -380, 150, 280, 20)); // bottom wall
  walls.push(new Wall(-590, -280, 20, 280, 200)); // back wall
  walls.push(new Wall(-525, -170, 150, 280, 20)); // top wall

  //First room on the right
  walls.push(new Wall(525, -170, 150, 280, 20)); // bottom wall
  walls.push(new Wall(590, -280, 20, 280, 200)); // back wall
  walls.push(new Wall(525, -380, 150, 280, 20)); // top wall

  //Inner hallways - connected to the centered wall
  walls.push(new Wall(260, -405, 20, 280, 450)); //right hallway
  walls.push(new Wall(-260, -405, 20, 280, 450)); //left hallway

  //Far right section
  walls.push(new Wall(450, -610, 20, 280, 480)); // extended wall

  //Far left section
  walls.push(new Wall(-590, -550, 20, 280, 590)); // long back wall
  walls.push(new Wall(-525, -600, 150, 280, 20)); // divide that wall

  //Inner center section
  walls.push(new Wall(-90, -500, 20, 280, 350)); //vertical wall towards the right
  walls.push(new Wall(0, -330, 200, 280, 20)); // horizontal wall to divide that wall
  walls.push(new Wall(200, -620, 100, 280, 20)); // seperate horizontal wall from the other side

  //Far back wall at the end of the maze
  walls.push(new Wall(70, -850, 1500, 280, 20));

  //Layout of the artworks in the maze

  //Each image placed at a specific (x,z), last value to custom the direction of the artwork

  artworks.push(new ArtWork(0, -179, img1, PI)); // center front wall
  artworks.push(new ArtWork(-500, -300, img2, HALF_PI)); // first left room
  artworks.push(new ArtWork(249, -400, img3, HALF_PI)); // inner center, left wall
  artworks.push(new ArtWork(0, -341, img4, PI)); // inner center, horizontal wall
  artworks.push(new ArtWork(-510, -500, img5, -HALF_PI)); // second left room
  artworks.push(new ArtWork(-510, -700, img6, -HALF_PI)); // third left room
  artworks.push(new ArtWork(-155, -220, img7, 0)); // inner center, main wall towards the right
  artworks.push(new ArtWork(500, -280, img8, HALF_PI)); // first right room
}
Another simple but meaningful aspect I am proud of is my design decisions. I chose to use actual artworks from the museum as references, recreate them as visual elements in the game, and combine them with background music related to Sheikh Zayed. I believe these choices added cultural value and depth to the overall experience.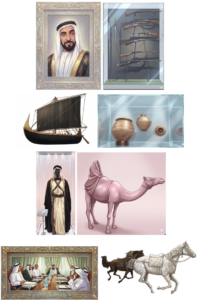
Problems I ran into:
This project was a real challenge, and I had to work through most of the steps independently. As mentioned above, I struggled with player movement, interaction within the 3D space, and the placement of objects throughout the maze, but I was able to resolve these issues through testing and adjustments.
However, there were two features from my initial plan that I decided to leave for future development, as they were slowing down my progress. The main challenge was adding a 2D camera frame that would include the timer and score. I wanted these elements to remain stable and fixed on the player’s screen, but since the project uses WEBGL, it was difficult to achieve. Every attempt resulted in issues such as the player moving through the frame or the timer and score appearing unstable or misplaced. I experimented with different approaches, including using resetMatrix() and attempting to switch between 2D and 3D rendering based on available resources, but I was unable to achieve the desired result within the time I had. Instead, I adapted this limitation into a design decision by encouraging players on the start screen to move quickly in order to achieve a higher score within the 30-second limit, and by displaying the final score at the end of the game.
Areas for improvement:
Overall, I am proud of my project. Working with WEBGL required a significant amount of effort, and I believe I successfully challenged myself and managed to achieve a strong outcome. However, there are several areas I would like to improve in the future, particularly in terms of visual design and graphics.
One key improvement would be implementing the features I originally planned, such as a camera frame with a visible timer and score during gameplay. In addition, I would like to enhance the environment by adding more detailed and advanced visual elements, such as decorative features or more refined structures, to make the experience feel more realistic and immersive. I would also like to expand the environment beyond the interior of the maze by designing an exterior view of the museum, allowing players to explore both inside and outside spaces. Another potential improvement would be adding more interactive elements, such as objects that trigger sounds or actions when interacted with, to further engage the player.
References:
I began by learning about WEBGL mode in order to create my project in the way I envisioned, using the following resources:
https://p5js.org/reference/p5/WEBGL/
https://youtu.be/nqiKWXUX-o8?si=tSUSM77-Ie64E13u
To meet the assignment requirements, I also used the slides covered in class, particularly those from Week 6, which included useful concepts for the project. I referred back to these materials whenever I had specific questions.
Go into fullscreen:
https://p5js.org/reference/p5/fullscreen/
Since I worked in WEBGL mode, I followed tutorials and reference links for different parts of the project:
Setting up the maze, with the floor and walls:
https://youtu.be/6TPVoB4uQCU?si=LFsx9b4IhB0HOYoW
Allowing the player to move around:
https://youtu.be/BW3D9WwalQE?si=144ULyiZDN_HCjMr
https://p5js.org/reference/p5/camera/
https://p5js.org/reference/p5/sin/
https://p5js.org/reference/p5/cos/
Add images and objects in the maze:
https://youtu.be/O1mYw-3Wl_Q?si=4ENHn11BepkQGdqX
https://p5js.org/reference/p5/texture/
https://p5js.org/reference/p5/rotate/
https://p5js.org/reference/p5/rotateY/
https://p5js.org/reference/p5/translate/
Through these videos, I found a sample of a 3D game, which I used as a reference for specific aspects such as object placement and movement. This was discovered through the following video:
Through this video:
https://youtu.be/VoFsB0toORk?si=TB3XRVKkrED6CbsE
I found this code:
https://github.com/jrc03c/queasycam/blob/master/examples/MazeRunner/Maze.pde
I used Gemini to generate the visual assets in my project, including the start page and the artworks. For the artworks, I uploaded images of real pieces and asked for regenerated versions in a specific style, aiming for a modern, clean, anime-inspired aesthetic. For the start page, I specified the text, font, colors, and overall layout I wanted.
I also used ChatGPT throughout my development process to assist with challenges I faced when I could not find solutions through other resources, particularly for debugging and problem-solving as the code became more complex. Below are some clear examples of how I used it:
When working on the placement of walls in the maze, I became confused about positive and negative coordinates. I was guided using the following diagram to better understand the WEBGL coordinate system:
-Z (forward)
↑
|
|
– X (left) ← —— (0,0) —— → +X (right)
|
|
↓
+Z (back)
I also wanted to view the maze from above to better understand the layout and avoid duplicating paths. A temporary solution was suggested, which allowed me to toggle between a first-person and top-down view using a key. I implemented this feature during development and removed it afterward. This helped me understand how to switch perspectives in WEBGL using the keyPressed() function. The code used was:
let topView = false;

In keyPressed();
if (key === 'T' || key === 't'){
topView = !topView;
}

In runGame();
if (topView){
  camera(0, -800, 0, 0, 0, 0, 0, 0, -1);
} else {
  camera(
    player.x,
    -50,
    player.z,
    player.x + sin(angle) * 100,
    -50,
    player.z - cos(angle) * 100,
    0,
    1,
    0
  );
}
Finally, when completing the project, I encountered an issue where pressing the space bar at the end of the game would immediately restart gameplay instead of returning to the start screen. I learned that this was because both game states were using the same key input. I resolved this by restructuring the condition to first check for the key press, and then use if and else if statements to assign different outcomes depending on the current game state.