Week 2 Assignment – Loops

Concept

For this assignment, I took inspiration from the computer graphics pdf attached to this assignment’s description (photo below).

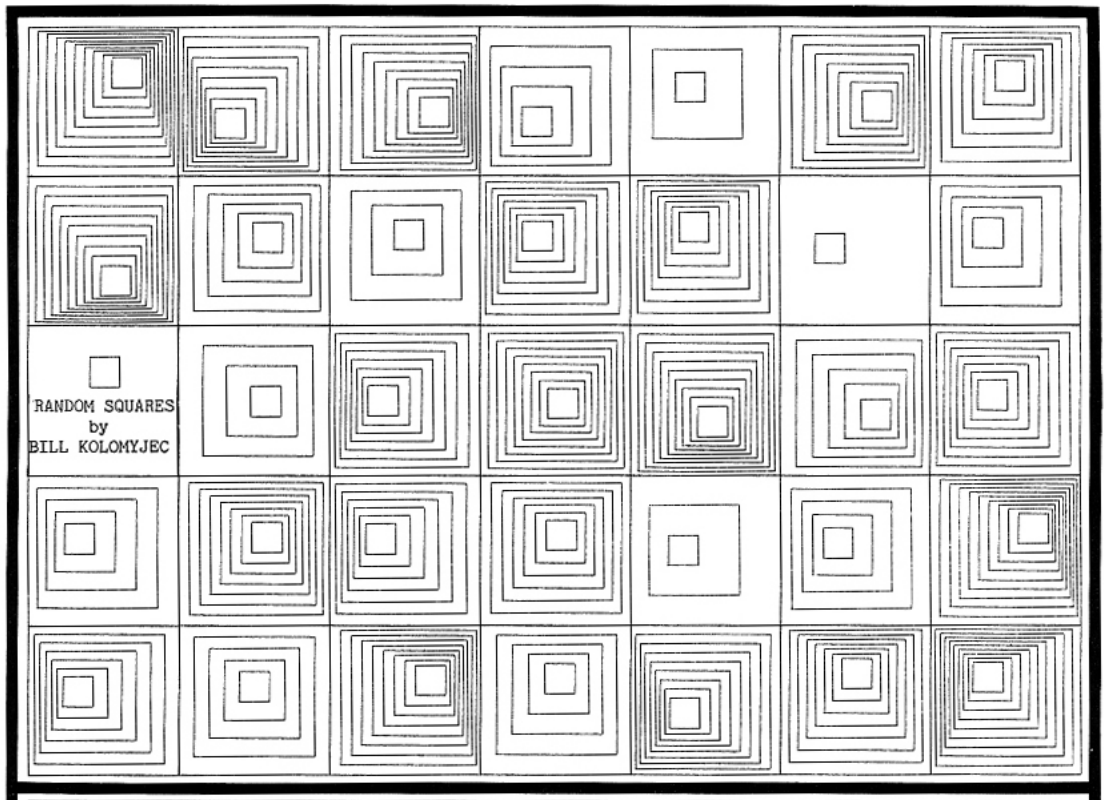
Building on this graphic, I made a simple grid with squares inside it. I initially wanted to create the moving graphics, but I could not figure out how. Therefore, I decided to use some skills we learned in class on changing colors when the mouse is inside the squares. Finally, I ended up with my final design, where the group of squares changes to the colors of the rainbow when the mouse hovers over them, keeping all the other cells still white.

Here is my final sketch:

Code I am Proud of:

for (let r = 0; r < 5; r++) {
    for (let c = 0; c < 7; c++) {
//calculates where each cell should start based on the row and column and shifts by cell size
      let cellX = c * 80;
      let cellY = r * 80;

      square(cellX, cellY, 80);
      square(cellX + 10, cellY + 10, 60);
      square(cellX + 20, cellY + 20, 40);
      square(cellX + 30, cellY + 30, 20);
  }
}

I am particularly proud of my code which creates the grid, because I optimized it. Initially, I set up the grid with four different for() loops, which basically keep printing a grid but make it smaller each time to create the inner squares effect. Then, I realized I could combine them all into a single for loop by storing each outer square’s starting X and Y locations, and then writing multiple square() functions, shifting each one according to how inner the square is. This also allowed me to select a different color for each square when the mouse hovers over it.

Reflection and Future Improvements:

Overall, I am quite happy with my sketch and enjoyed the process of creating it. For the future, I would definitely like to implement some automatic motion into my sketch. I would probably want to recreate the original sketch I took inspiration from, with the moving inner squares. Additionally, I would like to work on a second version of this sketch where the color of the inner squares only changes if the mouse is directly over it, not if the mouse is generally inside any of the squares within that group of squares.

Week 1 Assignment – Self-Portrait

Concept:

For my self-portrait, I was trying to think of a creative way to display my head. I was mainly thinking of a way that would help me avoid drawing my hijab as I was not too sure how to implement that. I also wanted to force myself to use some creativity since I don’t always get the opportunity to do that in my Computer Science classes. I ended up drawing my head in the shape of a cloud using ellipses. I drew this inspiration from my name, which means a rainy cloud in Arabic. I also added the rain effect in the background to complete my name’s translation. As for the tree, I attempted to draw an olive tree, to represent my Palestinian identity.

Implementation:

I mainly used ellipses and rectangles to create everything in the sketch. I used a rectangle for the tree’s trunk, and circles for the bushes and olives. For the cloud, I drew one ellipse in the centre and then drew multiple ellipses around it, placing them in a way that would create a cloud shape. For the smile, I later realized I could have used the arc() function, but for this specific implementation I drew an ellipse and then put a rectangle over it in the same color as the cloud to create a semi-circle. The nose used the line() function, the eyes are ellipses, and the eyebrows are drawn using the arc() function.

For the rain in the background, I watched this YouTube tutorial on how to add it. Considering my computer science background and my familiarity with using classes and functions, I was able to understand the code and implement it.

Code I am Proud of:

//eyebrows
  stroke(0);
  arc(254, 220, 20, 3, radians(180), radians(355));
  arc(315, 220, 20, 2, radians(180), radians(355));

Despite its simplicity, the eyebrows were definitely the most difficult part to implement. I watched a YouTube video to understand further how it works, as I was a little confused. Through this video, I discovered you can typecast from degrees to radians, which made the function much easier to use since radians are a bit difficult to work with.

//array to store all created raindrops
drops = []

class RainDrop{
  constructor(x, y){
    this.pos = createVector(x, y)
    this.vel = createVector(0, random(8, 11))
    this.length = random(20, 40)
    this.strength = random(255)
  }
  
  //displays each rain drop
  show(){
    stroke(255, this.strength)
    line(this.pos.x, this.pos.y, this.pos.x, this.pos.y-           this.length)
  }
  
  //makes the rain fall
  update(){
    this.pos.add(this.vel)
    if (this.pos.y > height + 100){
      drops.shift()
    }
  }
}

function setup() {
  createCanvas(400, 400);
  p = createVector(random(width), 200)
}

function draw(){
  background(173,212,247);
  
  //loop to create many raindrops and store them in an array
  for (let i = 0; i < 5; i++){
    drops.push(new RainDrop(random(width), 0, 0))
  }
  
  //show each rain drop
  for (let d of drops){
    d.show()
    d.update()
  }
}

The other code snippet I am proud of is the rainfall. Despite using lots of help from YouTube, I was proud of coming up with the idea and having it implemented exactly how I wanted it.

Reflection:

Overall, I am quite happy with the final result and truly enjoyed the process of making this. Despite coding frequently in my CS classes, this type of coding felt different and more enjoyable, less algorithmic. It also feels more rewarding as you create your final sketch because you can see results as soon as you type the code. For the future, I would definitely like to explore more with adjusting strokes so that they only outline certain parts of a shape, especially for parts of the sketch developed by layering multiple shapes.