Week 8 Reading – Norman,“Emotion & Design: Attractive things work better”

Don Norman’s essay “Emotion and Design: Attractive Things Work Better”, really made me think about how much our feelings affect the way we interact with everyday objects. Norman explains that when something looks or feels pleasant, it actually makes it easier to use. Positive emotions make us more creative and patient, so small design flaws don’t bother us as much. On the other hand, stress or frustration narrows our focus and makes problem-solving harder, which is why usability is especially important in critical or high-pressure situations. I love how he uses examples like teapots, some ugly but practical, some beautiful but tricky, to show that the context and mood of the user really change which design works best.

What really stuck with me is how this idea goes beyond just making things look nice. Design isn’t only about functionality or efficiency; it’s also about how the product makes us feel. When we enjoy using something, we naturally perform better and feel more satisfied. It reminded me that the best designs are the ones that balance function, usability, and beauty, things that work well and bring a little joy into our daily routines. For me, that’s what makes a product feel complete: it’s not just useful, it’s also a pleasure to own and use. A perfect example for me is my piano keyboard. I’ve used many different keyboards over the years, and the ones that are pleasant to touch, look sleek, and respond just right make me want to play more and practice longer. Even if a slightly cheaper or simpler keyboard could technically produce the same sound, it just doesn’t feel as inspiring. The way it looks and feels actually affects my creativity and focus, making the music I play feel better.

Week 8 Unusual Switch Assignment

My concept: 

For this project, I wanted to create a switch using my elbow as the activator. I set up two coins on the table and connected them to the Arduino with jumper wires, so that when my elbow touched both coins at the same time, it would complete the circuit. The Arduino reads this connection as a “press” and turns on an LED. I liked how this made the human body part of the circuit, creating a physical and playful way to interact with electronics.

The process of connecting the coins, taping the jumper wires, and adjusting the setup taught me that even small details, like how the wires touch the coins and keeping them stable, really affect whether the circuit works. The project was about exploring how we can rethink simple switches and find unexpected ways to trigger electronics.

Video Demonstration: 

elbow switch.mov

Arduino Code: 

// Elbow-activated switch with LED

const int switchPin = 2;   // Pin connected to Coin A
const int ledPin = 13;     // Pin connected to LED 

void setup() {
  // Set Pin 2 as input with internal pull-up resistor
  pinMode(switchPin, INPUT_PULLUP);

  // Set LED pin as output
  pinMode(ledPin, OUTPUT);

  // Start with LED off
  digitalWrite(ledPin, LOW);
}

void loop() {
  // Read the state of the switch
  int state = digitalRead(switchPin);

  // If coins are bridged (elbow touches), state is LOW
  if (state == LOW) {
    digitalWrite(ledPin, HIGH);  // Turn LED ON
  } else {
    digitalWrite(ledPin, LOW);   // Turn LED OFF
  }

  // Small delay for stability 
  delay(50);
}

Reflection:

Building this project was a lot of trial and error, and I learned so much about Arduino inputs, digitalRead, and resistors along the way. I realized that small details, like how the wires touch the coins and keeping the connections stable, make a huge difference. At first, I used a 10k pull-down resistor, but the LED wouldn’t stay on reliably when I touched the coins with my elbow. Eventually, I removed the external pull-down and switched to Arduino’s internal pull-up resistor, which made the switch much more stable and responsive.

I also loved seeing how simple code can control hardware in an immediate way, and how experimenting with the physical setup really affects the digital outcome. It was a fun reminder of how hands-on hardware projects are a mix of coding, problem-solving, and creativity.

Ideas for future work or improvements: 

Later on, I’d love to try using different parts of the body or gestures as switches, not just elbows. I could also add more LEDs or other outputs to make it feel more interactive and playful. It would be interesting to experiment with pressure-sensitive  sensors to make the switch respond more smoothly.

Eventually, I could imagine turning this into a small game or interactive piece, where your body becomes part of the control system. Also, I can imagine how interesting it gets when one could actually use their hands as part of the project where they would have more control on the switches and the whole system.

Github Link: 

https://github.com/deemaalzoubi/Intro-to-IM/blob/8753e3a8fa154b92aa973ab1735085c253a33d30/week%208elbowswitch.ino

Midterm Project – Her Knockout!

Project Concept
For my midterm project, I wanted to create something that’s not only fun but also meaningful and personally significant. I wanted to focus on women’s empowerment, sports, and music—three areas I’m passionate about—and make a project that reflects these interests. My inspiration came from an essay I wrote in my FYWS class analyzing Nike’s “Dream Crazier” ad about women in sports (https://www.youtube.com/watch?v=zWfX5jeF6k4). From there, I decided to focus on MMA as the sport for my game. For the characters, I got them from Canva.

The game begins with the player choosing one of three female MMA characters, then moves into a gameplay section where the player can punch, kick, jump, and move to knock down negative comments. This is meant to symbolize the criticism and negativity that women in sports often face. But I didn’t want the project to end there; I also wanted it to educate. Inspired by typing challenge games like https://typetest.io/, I added a typing game that lets players learn MMA terminology while being entertained and challenged to type each fact correctly. This combination allows the game to be both meaningful and engaging.

How It Works
The game starts with an introduction screen where players can choose from three female MMA characters. Each character has a unique image and a short “thought” bubble that appears when clicked, adding a little personality to the selection. Once a character is chosen, the player enters the main gameplay stage. Here, you can move left and right, jump, punch, and kick to knock down flying negative comments. The goal is to clear enough comments to win, representing overcoming the negativity that women in sports often face.

To make the experience more engaging, I added an upbeat background music track that plays during the game, helping to set the energy and keep players entertained. In the typing game, I also included images for each MMA fact to make it more visual and less plain. These images were sourced from Google, and the music I used is “The Feeling (DNA Rework)” by Massano on SoundCloud. Combining visuals and audio adds another layer of immersion, making the game feel polished and lively.

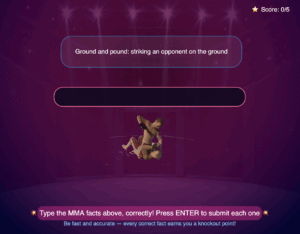
After reaching a winning score, the game transitions into a typing challenge focused on MMA terminology. Players see a word or phrase with a matching image and must type it correctly. Correct answers earn points and trigger a confetti animation, while mistakes display “Wrong!”. The typing game continues until all the facts are completed, combining both entertainment and education. Through this process, I personally learned not only a lot about coding techniques like key press handling, animations, and typing effects, but also about MMA itself—its terminology, techniques, and the skill it takes to compete. The game also includes a restart function, so players can press “9” at any point to reset and start over, keeping it simple and practical.

What I’m Proud Of
I’m really proud of how I used the key press and input functions to make the game interactive and smooth. For example, movement, punching, and kicking are all tied to specific keys, which allows the gameplay to feel responsive and intuitive. I also made the negative comments move in a dynamic way, so the player has to actively engage with the game rather than just stand still.

Another thing I’m proud of is the combination of gameplay and learning. The transition from the action-based MMA game to the typing challenge was a design decision I think worked well. It keeps the player engaged, reinforces learning about the sport, and adds a sense of progression. I also like the small touches, like character thought bubbles, confetti effects, and the animated victory dance, which make the game feel lively and rewarding.

Code I’m Proud Of
I’m especially proud of this part because it implements a smooth “typing effect” for the characters’ thought bubbles:

function drawThoughtBubble(x, y, textContent, charObj) {
  textSize(width / 60);
  let padding = 20;
  let maxWidth = 300;

  // update typing
  if (charObj.displayedLength < textContent.length) {
    charObj.displayedLength += typingSpeed;
    if (charObj.displayedLength > textContent.length) charObj.displayedLength = textContent.length;
  }

  let displayText = textContent.substring(0, charObj.displayedLength);

  let words = displayText.split(' ');
  let lines = [];
  let currentLine = '';

  for (let word of words) {
    let testLine = currentLine + word + ' ';
    if (textWidth(testLine) > maxWidth) {
      lines.push(currentLine);
      currentLine = word + ' ';
    } else {
      currentLine = testLine;
    }

Each word appears gradually using the displayedLength variable, which keeps track of how many letters of the full sentence have been shown. By increasing this number frame by frame, the text “types itself” on the screen instead of appearing all at once, creating that dynamic typing effect.

I also implemented automatic line wrapping, which means that when a line of text gets too wide for the bubble, it automatically moves to the next line. To do this, I check the width of each line using the textWidth() function. This calculates how wide a piece of text will be on the canvas in pixels, letting me break lines before they overflow the bubble.

To calculate the height of the bubble and make sure the text fits neatly, I used  textAscent and textDescent. These functions tell you the distance the text reaches above and below the baseline, respectively, so by adding them together for each line (and including some padding), I could make the bubble the right size for any number of lines.

Finally, I added a small tail to the bubble with simple ellipse() shapes, giving it a classic comic-style speech bubble appearance. Combining all these elements was tricky but worth it. It ensures that the text always looks clean and readable on the screen, adding personality to the characters and making the game feel more polished and interactive.

Areas for Improvement
While the game works well overall, there are a few areas I’d like to improve. For one, the instructions could be clearer for the player, especially for the controls and how to transition between the punching/kicking game and the typing game. It would also be nice to give the user more options to explore, such as an on-screen button to mute the music, or the ability to navigate directly to either game from a menu without having to restart the whole experience. Adding more interactivity and choices could make the game feel less linear and more engaging, encouraging players to experiment and spend more time exploring the content.

Problems I Ran Into

One of the biggest challenges I faced was merging the different sections of the project into a single p5.js canvas. Initially, I had each part—the intro screen, the punching/kicking game, and the typing game—running in separate sketches, and I thought combining them would be straightforward. In reality, it was tricky to adjust all the positioning, scaling, and interactions so everything fit together smoothly. Because of this, I had to change the design of the typing game to make it easier to merge with the other parts. I spent a lot of time tweaking variables like character positions, text alignment, and animation effects to ensure the full project worked as one seamless game. It was a slower process than expected, but I’m proud that I managed to unify all the parts into a playable and polished experience.

(Here, I’ll include a screenshot of the previous version of the typing game to show the original design before I changed it for merging.)

Computer Vision for Artists and Designers Reading Response

Q1: What are some of the ways that computer vision differs from human vision?

Humans see in a flexible and intuitive way. We can recognize a friend even if they’re in the shadows, wearing different clothes, or drawn as a cartoon. Computers, on the other hand, are much more rigid. They need clear cues, like the right lighting, steady backgrounds, and often lots of training data, just to recognize something we would see instantly. Computers don’t bring context or common sense either. If I see someone running, I might guess they’re late or playing a sport; a computer just sees moving shapes. This difference means that in art, computer vision often works best when the artist designs the environment to make it easier for the machine to see, but not to interpret it like humans. 

Q2: What are some techniques we can use to help the computer see / track what we’re interested in? 

On the technical side, artists use things like motion detection (spotting what changes between frames), background subtraction (separating a moving person from a still background), or color filters (tracking a red ball). More advanced tools can follow body joints or estimate a skeleton, which is great for dance or performance. But beyond algorithms, the environment is just as important. If you give the system good lighting, a solid backdrop, or make participants wear bright colors, the system would be able to focus on one thing and spot them more easily. It’s less about forcing the computer to be “smart” and more about designing the whole setup so the vision works smoothly.

Q3: How do you think computer vision’s capacity for tracking and surveillance affects its use in interactive art?

Computer vision’s ability to track people is both a strength and a challenge for interactive art. On the positive side, tracking makes the art responsive, installations can change based on where you move, how you gesture, or even how many people are in the space. This creates a playful, engaging experience that feels alive. But because the same technology is often used for surveillance, it can also make people feel watched. That changes how the audience experiences the artwork, sometimes it’s fun, but sometimes it raises concerns about privacy. Many artists lean into this tension: some use tracking purely for interaction, while others use it to make us think critically about how surveillance works in our daily lives.

Midterm Project Progress


<iframe


Concept

For my midterm, I wanted to make a project that isn’t just fun, but also means something to me, feels useful to create, and reflects my interests, which for me is combining women’s empowerment, sports, and music. Because this project allows so much freedom, my mind kept jumping from idea to idea. I finally decided on a concept that felt meaningful and achievable: an interactive story experience where users guide a female athlete through multiple sports — football, basketball, and martial arts — while overcoming challenges in the form of negative comments from people, culminating in a celebratory dance that reflects the user’s gameplay.

I also wanted to incorporate music, one of my biggest passions, into the gameplay. Each action the user takes (scoring a goal, making a basket, or landing a punch) will add a layer of sound to a final anthem, letting players create a rhythm-based celebration that reflects their journey and success.

To make the experience authentic and inspiring, I decided to use real female athletes as the characters for each stage: Sam Kerr for football, Breanna Stewart for basketball, and Ronda Rousey, the first female UFC champion, for martial arts. Each athlete has a quick introduction before their stage to give context and highlight their achievements and the obstacles they’ve overcome.

My project aims to:

  • Educate users about the basics of each sport.
  • Empower women by breaking stereotypes and highlighting achievements.
  • Engage users through rhythm-based gameplay that integrates music and beats.
  • Inspire users to create a unique anthem reflecting the character’s journey.

Design

I want the design to be interactive and bold. The journey starts with a fullscreen instruction screen, and each stage is preceded by a quick introduction of the athlete, with a short text and a character.

The gameplay is divided into stages:

  1. Football: Users dribble and shoot as Sam Kerr. Negative comments appear as barriers, which shatter when the user scores, adding beats to the anthem.
  2. Basketball: Users control Breanna Stewart, shooting and dribbling while shattering barriers and adding beats to the music.
  3. Martial Arts: Users perform punches and kicks with Ronda Rousey, breaking barriers that add more beats to the anthem.
  4. Celebration / Dance: The beats from previous stages combine into a unique anthem, and character performs dance moves that sync with the rhythm, celebrating the journey.

Visually, I’m keeping the design stylized and clean, using shapes for interactive objects. Sounds, like cheering, percussion, and piano, respond dynamically to user actions, making the experience engaging.

Frightening / Challenging Aspects

There are a few parts of this project that I’m worried might be tricky:

  • Making the rhythm-based gameplay work: I’m unsure about getting the sounds from scoring, punching, or breaking barriers to line up and feel smooth.
  • Creating each sport stage: Each sport has different moves and controls, and it might be hard to make them all work well.
  • Drawing the characters and barriers: Making all the athletes and objects using shapes in p5.js could take a lot of time and get complicated.
  • Combining all the beats into a final anthem: I’m unsure if the sounds from football, basketball, and martial arts will come together nicely to make a fun and satisfying rhythm at the end.

Risk Prevention

To manage the different sports stages, I will use separate layers so only the relevant athlete, objects, and barriers show up at the right time. For example, when the user moves from football to basketball, the football elements disappear and the basketball stage appears. Designing all the characters and barriers from scratch in p5.js could take a long time, so I started making them on separate canvases to work faster and keep things organized before combining them into the full project. As well as I started on the intro page. Making interactions feel natural is also tricky because I need to detect clicks, key presses, or movements on objects made of multiple shapes. I’ve started experimenting with this early to make sure the gameplay will feel smooth.

Assignment 4 Data Visualization

My Concept

I wanted to make a visualization that’s both fun and interactive, inspired by something I love: music. I picked the top 50 Spotify songs of 2023 because I thought it would be exciting to explore popular tracks visually. The idea was to take a simple concept; songs with different features like energy, mood, popularity, and danceability, and show it in a more creative and engaging way, instead of a boring, standard chart. I wanted people to notice patterns and interact with the data while keeping it simple and playful. In my visualization, the size of each circle represents popularity, the color represents danceability, (where pink is the least and blue is the most and purple is the in between), the higher the circle is, the happier the song’s mood, and the further to the right, the more energy the song has. The dataset I used was from Kaggle: https://www.kaggle.com/datasets/yukawithdata/spotify-top-tracks-2023.

A Highlight of Some Code That I’m Particularly Proud Of

One part I’m really proud of is the hover effect that shows the song title and artist. It makes the visualization feel more interactive and personal because you can actually explore the songs instead of just seeing circles on a canvas. The code works by checking the distance between the mouse position (mouseX, mouseY) and the center of each circle (c.x, c.y). If the distance is smaller than the circle’s radius (size / 2), it means the mouse is hovering over that circle, and then the text appears above it. I used fill(0) to make the text black, textSize(12) to set the size, and textAlign(CENTER) so it’s centered nicely over the circle.

The ${} syntax is called a template literal in JavaScript. It lets you insert variables directly into a string, so ${songs.getString(i, ‘track_name’)} pulls the song name from the table and ${songs.getString(i, ‘artist_name’)} pulls the artist. Using it this way makes it easy to combine them into one neat line of text without writing extra code to join them. I like this part because it’s simple, but it really makes the visualization interactive and fun to use.

// if mouse is hovering over the circle, show the song name and artist
    if (dist(mouseX, mouseY, c.x, c.y) < size / 2) {
      fill(0);
      textSize(12);
      textAlign(CENTER);
      text(`${songs.getString(i, 'track_name')} - ${songs.getString(i, 'artist_name')}`, c.x, c.y - size);
    }
  }

Reflection and Ideas for Future Work or Improvements

I’m happy with how the visualization turned out because it’s simple, colorful, and interactive, and you can immediately see patterns in the data. In the future, I’d love to explore adding more interactivity, like filtering songs by genre or letting users compare two songs directly. I could also experiment with different visual encodings, like using different shapes to represent additional variables. Another idea is adding key press options to trigger effects or even including sound, so the circles could play a snippet of the song when clicked or hovered over. Overall, I think it’s a fun way to combine data and creativity, and it shows how you can turn something as tricky as data into a playful visual experience. 

The Design of Everyday Things Reading Response

What’s something (not mentioned in the reading) that drives you crazy and how could it be improved?

One thing that can be a bit frustrating is microwaves with a lot of buttons and a confusing dial. You just want to heat your food, but some have many buttons, like “Popcorn,” “Defrost,” “Reheat”, and then there’s the round knob for setting the timer. Sometimes it’s hard to tell which way to turn it, how to stop it, or how to restart it. It’s not always clear, and you end up taking extra time just figuring it out.

Norman explains in the reading that when things are confusing, it’s usually the design, not the user. This microwave has bad mapping, because the buttons and dial don’t clearly show what will happen, and it gives little feedback, so it’s hard to know if it’s working. A simpler design; fewer buttons, clear instructions for the dial, and a display showing the timer and status, would make it much easier to use.

How can you apply some of the author’s principles of design to interactive media?

I think I could apply some of Norman’s principles of design to interactive media by being organized and guiding the user through the steps. For example, if I’m creating a sketch or an interactive project, I’d make sure it’s clear what the user should do at each stage. I’d also keep in mind that the user might not be familiar with the work, so I’d include hints, feedback, and cues to make it easier to understand. Basically, I’d try to make the experience intuitive while staying open-minded, remembering that just because something makes sense to me doesn’t mean it’s obvious to someone else.

The Art of Interactive Design, Ch. 1

After reading “The Art of Interactive Design” by Chris Crawford, I found it really interesting how he critiques common ideas about interactivity, continuously giving examples while showing why something might initially seem interactive but then explaining why he disagrees. Each time he explains a concept, I think to myself, “Yes, I see this as interactive,” but then he challenges that assumption in a way that convinces me to see it differently. It made me wonder: is interactivity utterly subjective? Can something be called interactive if it only engages one age group, or does it have to be recognized as interactive by most people? Crawford suggests that we can think of interactivity as high, moderate, or low, rather than a simple yes-or-no quality. Interactivity, in his view, is about change, not stagnation; it’s about creating a system that can evolve and respond in better ways, rather than just maintaining the same thing. Like he said, “You can turn up the reaction volume as high as you want, but playing Beethoven’s Ninth Symphony at 20,000 watts does not make it a painting.”

I believe the characteristics of a strongly interactive system are when it is capable of change, not permanent or fixed, and when the person interacting with it can contribute their own personality to the process. I like how he breaks interactivity down into listening, thinking, and speaking; all three need to happen for it to feel real. If one of these is missing, it doesn’t work, just like a conversation falls apart if one person isn’t really listening. Movies, books, or even some games might seem interactive at first, but they fail because they mostly just speak; they don’t listen or think about the user’s input. For me, interactivity is about creating a space where the user can engage fully and shape their experience, making it personal and dynamic. The system isn’t just reacting; it’s part of a back-and-forth process, and that’s what makes it strong and meaningful.

To improve the degree of user interaction in my p5 sketches, I think the key is to make the sketches more responsive to the user’s actions and give them a sense of control over what happens.  For example, I could let users influence multiple aspects of the sketch at once, like color, shape, and movement, so their choices feel meaningful. I could also let the user control some actions from the sketch, like giving them options to choose whether they want one interactive response or another. Later on, when we learn how to include sound features, I could make sketches that track the mouse or input sound continuously and adapt dynamically, rather than only responding at specific moments—which I know might take a long while for me to figure out and really learn how to use.

Assignment 3 – Functions, Arrays, and Object-Oriented Programming

Concept:

For this project, I wanted to make something a bit more playful and fun. I took inspiration from the classic “Why did the chicken cross the road?” joke, but instead of just one answer, I made each chicken have its own punchline inside a speech bubble. This time I wanted to use a more creative inspiration and make it a little comedic by playing with humor and randomness.

I also challenged myself more with the coding. I didn’t just stick to what we already learned in class, but tried to experiment by looking things up, exploring, and figuring out how to make it work. For example, I had to learn how to make the speech bubble size change depending on the sentence length, and how to make sure each chicken gets a unique punchline. It was tricky, but I liked that I was able to understand and fix something new on my own.

So overall, this piece is both about the humor of random answers to the same old joke, and also about me pushing myself creatively and technically.

Highlight of a code i’m proud of:

One part of my code I’m really proud of is how I made sure each chicken gets a unique punchline. I used shuffle(punchlines, true) to mix up all the punchlines randomly so the order isn’t always the same. The true part is important because it tells the program to change the original punchlines array directly, instead of just making a shuffled copy. This way, when I assign punchlines to chickens, the original array is already randomized. Then, I looped through the array with for (let i = 0; i < punchlines.length; i++) to create a new chicken for each punchline using chickens.push(new Chicken(0, 50 + i * 40, punchlines[i]). The 0 makes each chicken start on the left side of the canvas, and 50 + i * 40 spaces them vertically so they don’t overlap. I like this part because it shows how I can combine arrays, loops, and objects to create multiple unique characters on the screen, and it really brings the sketch to life.

// shuffle punchlines so each chicken gets a unique one
  shuffle(punchlines, true); // randomize the order of punchlines in place

  // create one chicken for each punchline
  for (let i = 0; i < punchlines.length; i++) {
    // x = 0 so chicken starts on left
    // y = 50 + i*40 to space them vertically
    // punchlines[i] gives each chicken its own joke
    chickens.push(new Chicken(0, 50 + i * 40, punchlines[i]));
  }
}

Problems I Ran Into: 

   – Speech bubbles being too small
At first, the text didn’t fit inside the bubbles. I fixed this by using textWidth() to measure the punchline and then adding padding, so the bubble grows depending on how long the sentence is.

   – Same punchlines repeating
In the beginning, some chickens had the same joke. To fix this, I used shuffle(punchlines, true) so the punchlines get mixed up randomly, and each chicken gets its own unique one.

– Balancing simplicity and creativity
I didn’t want the code to be too complicated, but I still wanted it to be fun and creative. That’s why I kept the chicken shape simple (just ellipses for the body and a triangle for the beak) and focused more on the concept with the speech bubbles and punchlines.

Reflection and ideas for future work or improvements: 

I really enjoyed making this project because it let me experiment with coding in a creative way, using arrays, loops, and objects together. I learned a lot about how to structure a sketch, how to make multiple objects move independently. 

For future improvements, I’d love to make the sketch even more dynamic and interactive. For example, I could let the user click on a chicken to make it say a new punchline, or have the chickens move at different speeds across a more detailed road scene. I could also experiment with animations in the bubbles, like making them pop up.  Another idea is to add more randomness to the chicken shapes or colors to give each one even more personality. Overall, I’d like to keep exploring ways to make the sketch playful and visually fun while practicing more advanced coding techniques.

Reading Reflection – Week#2

After watching Casey Reas’ Eyeo talk on chance operations, I really connected with his idea that randomness can be a powerful tool in creating art. I agree so much with him that allowing chance into a process can lead to results you might never imagine on your own. For example, in the video he shows sketches where simple rules create shapes, but each time the program runs, the shapes move slightly, overlap differently, or appear in new patterns. Even though the rules stay the same, the randomness makes every version unique and surprising. I found this really inspiring because it shows that art doesn’t have to be completely planned; the program can explore possibilities for you, almost like collaborating with the computer. I also thought about how he balances control and chance, which is something I want to apply in my own work. In the examples, he defines limits for where shapes can appear, what size they can be, or how colors can change, so the random elements stay within a certain framework. This makes the final work look intentional instead of chaotic. Watching this made me think about my own sketches. It’s exciting to see how even small random variations can make something feel more alive and dynamic.

I think the best balance between total randomness and complete control is when you set limits for the random parts but keep the main structure planned. In my own sketches, I could let things like pupils or stars move randomly in a small area while keeping the rest of the portrait fixed. This way, randomness adds fun and surprise without making the piece messy. The talk also raises some questions for me: How do artists decide how much randomness to allow without losing the overall vision? And if a program can produce interesting art automatically, does that mean anyone can make art, or is there still something unique about the artist’s choices? Also how do you design rules that are structured enough to guide the outcome but still leave space for randomness to create interesting variations? These are things I want to explore as I experiment more with random elements in my own work.