
Sketch and video demo below!
(I think you might have to open this on a new table as it doesn’t seem like computer vision sketches are supported by wordpress…)
Concept:
Well, I have always been interested in learning and testing out computer vision, because I have seen really cool effects and my main inspiration is a woman who goes by the.poet.engineer and she has absolutely incredible computer vision work.
To make the tracking as smooth as I could, I used code from this git hub post which I will talk about later in this post. This took me a ridiculously long time to complete since I started learning computer vision the same day I made this, but they end result was worth it.
Implementation:
There is a lot that goes into this, 500+ lines of code, however everything is well commented if you would like to go line by line, I will explain the main concepts for creating this.
A bit of background, this was done using ml5js’s HandPose, and their hand tracker has specific keypoints for parts of your hand which was used to calculate distance, positions, rotation and so on for all the shapes used in this.
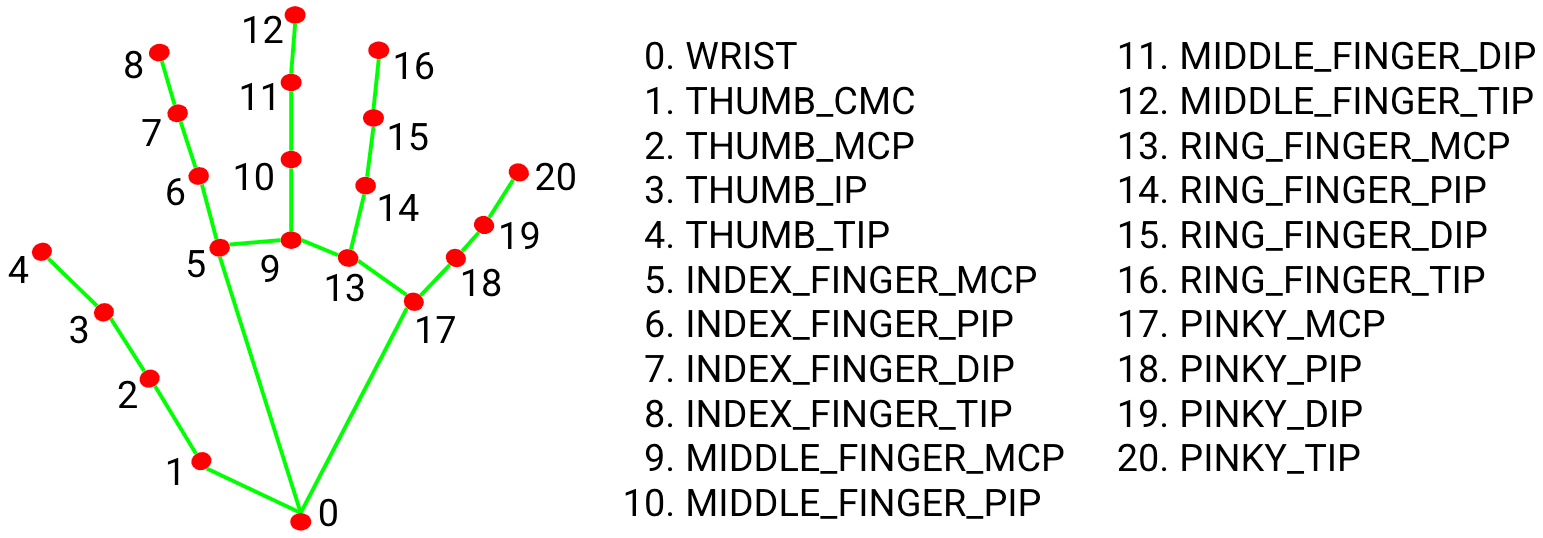
I did not use every connection as in the picture above, I manually selected the keypoints that I wanted to use in these 2 variables:
let fingerconnections = [
  [17, 18],
  [18, 19],
  [19, 20],
  [13, 14],
  [14, 15],
  [15, 16],
  [9, 10],
  [10, 11],
  [11, 12],
  [5, 6],
  [6, 7],
  [7, 8],
  [0, 1],
  [1, 2],
  [2, 3],
  [3, 4],
];
// Using ml5js classification I make a list of the connections I want for a curved line
let singlefinger = [
  [4, 5],
  [17, 16],
  [13, 12],
  [9, 8],
];
The way this works is that every hand that is seen on screen will be added to artInstances, of course I manually just made 2 but this can be scalable and automated for more than 2 hands.. (alien ?)
Each hand is assigned a class object of our class skeletal, which is where quite literally everything happens.
// Function for smoothing, uses linear interpolation to shorten how much we want the detector to move, since I used 0.8 for smoothing that means it only moves 80% of the way from original location to next location.
function gotHands(results) {
  if (activateSmoothing && hands.length > 0 && results.length > 0) {
    for (let i = 0; i < results.length; i++) {
      if (hands[i] && results[i]) {
        let oldHand = hands[i];
        let newHand = results[i];
        for (let j = 0; j < newHand.keypoints.length; j++) {
          newHand.keypoints[j].x = lerp(
            oldHand.keypoints[j].x,
            newHand.keypoints[j].x,
            smoothing
          );
          newHand.keypoints[j].y = lerp(
            oldHand.keypoints[j].y,
            newHand.keypoints[j].y,
            smoothing
          );
        }
      }
    }
  }
  hands = results;
}
This is the smoothing function that I took which I tried simplifying in the comments, it’s simply just linear interpolation so that the distance moved isn’t equal to the distance actually covered.
for (let i = 0; i < hands.length; i++) {
    if (artInstances[i]) {
      // Calling our inbuilt functions for every hand we have on screen
      artInstances[i].drawline(hands[i], singlefinger);
      artInstances[i].drawdoubleline(hands[i], fingerconnections);
      artInstances[i].drawcircle(hands[i], fingerconnections);
      artInstances[i].drawHUD(hands[i]);
      artInstances[i].drawSpeedHUD(hands[i]);
    }
  }

  drawMusicButton();
}
There are 6 methods in our skeletal class:
– drawline
– drawdoubleline
-drawcircle
-drawHUD
-drawSpeedHUD
-drawPopupHUD (this is used in the drawhud function so you won’t see it being called outside the class)
class skeletal {
  constructor(linecolor, circlecolor, hudcolor) {
    // We take the color we want for the line, circle and the hud, as well as initialize the angle and last angle to 0
    this.linecolor = linecolor;
    this.circlecolor = circlecolor;
    this.hudcolor = hudcolor;
    this.hud1angle = 0;
    this.rotationSpeed = 0;
    this.lasthandangle = 0;
    this.popupActive = false;
    this.popupTimer = 0;
  }
There is 8 attributes assigned to each hand, where only the first 3 are you can choose and the rest is assigned to 0 / false by default as they will be changed and used in calculations for our functions.
Before I get into the function I am most proud of, I will briefly talk about what each function does.
drawdoubleline : There was no inbuilt shape that satisfied what I want, so I ended up writing my own shape using BeginShape and EndShape to give me that glitchy double line between most the connections.
drawline: I used the bezier function here, (calculated anchor points by getting the points 1/3rd and 2/3rd of the way from keypoint A to keypoint B) and this was used to connect bases of fingers to the top of the next finger with a curved line.
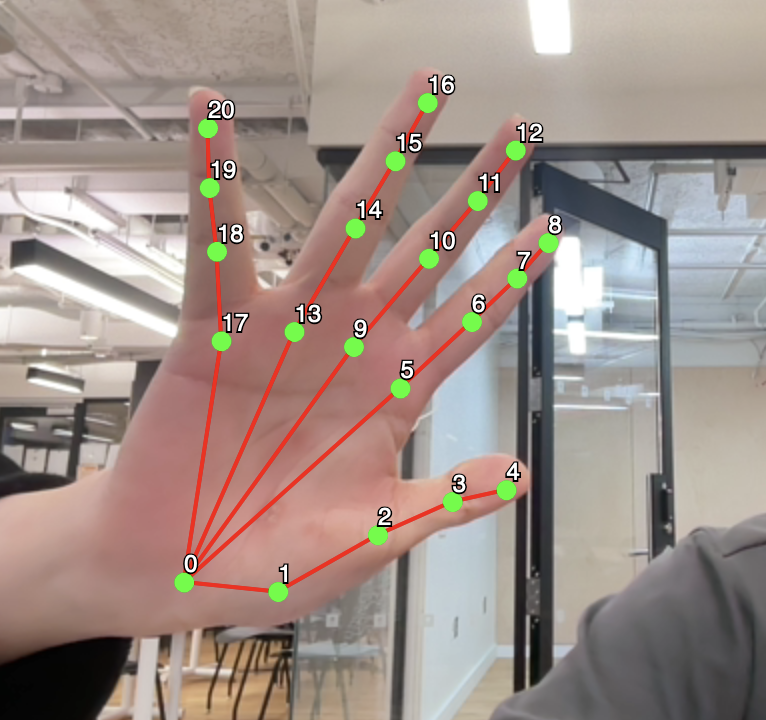
drawHUD: This has 2 elements, the palm HUD, and the exterior HUD, the palm hud is centered by calculating the midpoint the base of the finger (which is keypoint 9) and the wrist (which is keypoint 0), and so the shapes of the HUD is drawed around that point, we use the mapping functions so that it becomes bigger the further away your hand is from the camera, or smaller if it is closer to the camera. This has constraints so the HUD can never be too small or too big.
drawPopupHUD: This HUD is the exterior one, which contains a circle with sound waves along a quarter of it, and this only pops up if the hand rotates at a fast enough speed, and then disappears after a short while. I used Perlin’s noise to give that random sound effect to the waves.
drawcircle: This simply draws a small circle at each keypoint that I saved in the beginning of the program.
Finally the function I am proud of:
drawSpeedHUD(singleHandData) {
    if (!singleHandData) return;

    // We map the keypoints once again to their respective parts.
    let thumbTip = singleHandData.keypoints[4];
    let indexTip = singleHandData.keypoints[8];
    let wrist = singleHandData.keypoints[0];
    let palmBase = singleHandData.keypoints[9];

    if (!thumbTip || !indexTip || !wrist || !palmBase) return;

    // We calculate the palm size and the gap between our thumb and index finger
    let palmSize = dist(wrist.x, wrist.y, palmBase.x, palmBase.y);
    let fingerGap = dist(thumbTip.x, thumbTip.y, indexTip.x, indexTip.y);

    // Check if it is left or right hand to adjust rotation accordingly
    let isLeftHand = singleHandData.handedness === "Left";

    // Calculate the angle of the finger for rotation of the speedometer
    let fingerAngle = atan2(indexTip.y - thumbTip.y, indexTip.x - thumbTip.x);
    // Calculate the rotation and adjust based on left or right hand
    let sideRotation = isLeftHand ? fingerAngle + PI : fingerAngle;

    // Conditions for when the speedometer pops up
    let closeToCamera = palmSize > 80;
    let fingersSpread = fingerGap > 0 && fingerGap < 140;

    if (closeToCamera && fingersSpread) {
      // We create a mapping between the distance of finger and speed, where if the thumb and index are closed the speed is 0 to 50.
      let speed = map(fingerGap, 0, 130, 16, 50, true);
      let needleAngle = map(speed, 0, 140, PI, -PI);

      let midX = (thumbTip.x + indexTip.x) / 2;
      let midY = (thumbTip.y + indexTip.y) / 2;

      push();
      translate(-width / 2 + midX, -height / 2 + midY);

      // Rotate with our hand
      rotate(sideRotation);

      noFill();
      stroke(this.hudcolor);
      strokeWeight(2);
      // Draw the speedometer arc and ticks.
      arc(0, 0, 110, 110, PI + QUARTER_PI, TWO_PI - QUARTER_PI);

      for (let i = 0; i < 10; i++) {
        let a = map(i, 0, 9, PI + QUARTER_PI, TWO_PI - QUARTER_PI);
        line(cos(a) * 45, sin(a) * 45, cos(a) * 55, sin(a) * 55);
      }

      // Draw the needle
      push();
      rotate(needleAngle - HALF_PI);
      stroke(255, 50, 50);
      strokeWeight(3);
      line(0, 0, 0, -50);
      pop();

      // Draw the speed bar which changes with speed and needle.
      strokeWeight(1);
      rectMode(CENTER);
      noFill();
      rect(0, 25, 60, 5);
      fill(this.hudcolor);
      rectMode(CORNER);
      // Using your speed mapping to fill the 60px wide bar
      rect(-30, 22.5, map(speed, 16, 50, 0, 60, true), 5);

      pop();
    }
  }
This is the code for that interactive aspect of this computer vision, the speedometer that moves with your pinching of your thumb and index. The speedometer only pops up if your hand is close enough to the camera and the pinch isn’t too big, and we use the mapping function to spin the needle and change the progress bar. This speedometer also rotates around the hand which leads to it rarely clipping through your hand. This took so much trial and error, checking which angle works, so much time spent due to the needle going under the speedometer and completely opposite of where I would want it, or the speedometer rotating towards the hand clipping through it, overall it was a painful experience of trial and error.
A small addition I have is some background music that you can enable or disable, the song is “Color Your Night” and this is part of the soundtrack for Persona, and is an amazing song.
Reflection:
It was a painful, but incredibly fun experience, I am really happy I challenged myself and dived into computer vision, because if I did not know then I would have never, and I am really happy with the end result. There is endless possibilities of interactive art with computer vision, such as animating characters, or showcasing fluid dynamics and so much more which I would like to compare beyond a simple futuristic interactive HUD.