intro
Again, identifying the challenging aspect of the mission seemed the very first step I would take in approaching a new product. This time, while digitally/analog-ly reading/writing can be achieved easily, finding the right connection between the readings and the writings—in terms of both values and functions is what I’d like to focus on. As I found the light sensor we tried in class interesting enough, I came up with this product by combining the light sensors and a servo.
process
Although theoretically, maybe we should have a clear picture of the final product before getting our hands dirty (and I thought I had), sometimes it did take time to distinguish between ‘think of a function’ and ‘think of a product.’ In the first stage of my development, the ‘rotating to follow the light source’ function was already achieved, while the ‘product’ had only the electronics exposed blatantly:
Later on, the very simple concept of a sunflower following the sun finally popped up in my mind. With one piece of cardboard added to the product, although the concept may seem simpler than ‘Dual Light Sensor Servo Control,’ the gist is much more directly conveyed, I believe. On top of that, the additional layer of cardboard actually brought the bonus of normalizing the light sensors physically by shielding out the ambient light:
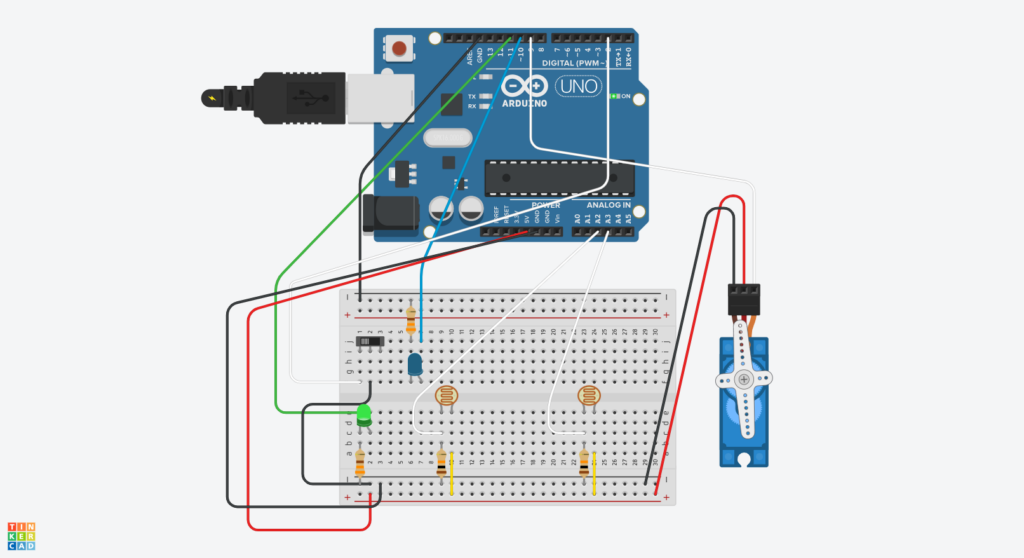
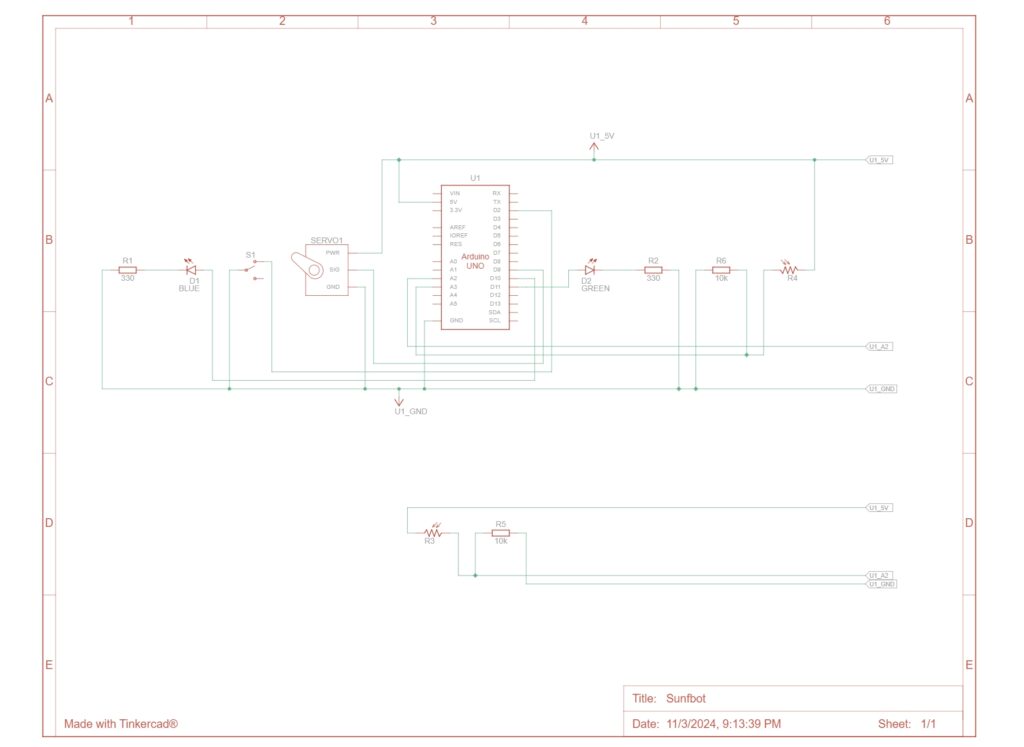
schematics & illustration
Both of the graphs are drawn and generated with TinkerCAD
Code
The servo rotation is based on the difference between the readings of the two light sensors:
/*
‘Sunfbot’
Dual Light Sensor Servo Control
This program controls a servo motor based on the difference between two light sensors.
The servo moves to track the stronger light source.

Components:
- 2x LDR (Light Dependent Resistors)
- 2x 10kΩ resistors for LDRs
- 2x 3300Ω resistors for LEDs
- 1x Switch
- 1x 9g Servo
- 1x Blue LED
- 1x Green LED


reference:
https://www.arduino.cc/en/Tutorial/BuiltInExamples/AnalogReadSerial
https://www.arduino.cc/en/Tutorial/LibraryExamples/Sweep
*/

#include <Servo.h>

// Pin definitions
#define SWITCH_PIN 2      // Toggle switch input pin
#define SERVO_PIN 9       // Servo control pin
#define BLUE_LED_PIN 10   // Blue LED pin (standby indicator)
#define GREEN_LED_PIN 11  // Green LED pin (running indicator)
#define SENSOR1_PIN A2    // First light sensor
#define SENSOR2_PIN A3    // Second light sensor

// Constants
#define SENSOR_THRESHOLD 30  // Minimum difference between sensors to trigger movement
#define SERVO_DELAY 30       // Delay between servo movements (ms)
#define SENSOR2_OFFSET 30    // Calibration offset for sensor 2

Servo myservo;  // create servo object
int pos = 90;    // variable to store servo position

void setup() {
  // Initialize serial communication
  Serial.begin(9600);

  // Initialize servo
  myservo.attach(SERVO_PIN);

  // Configure pins
  pinMode(SWITCH_PIN, INPUT_PULLUP);
  pinMode(BLUE_LED_PIN, OUTPUT);
  pinMode(GREEN_LED_PIN, OUTPUT);
}

void loop() {
  // Read sensors
  int sensor1Value = analogRead(SENSOR1_PIN);
  int sensor2Value = analogRead(SENSOR2_PIN);
  int sensorOffset;

  // Read switch state
  int switchState = digitalRead(SWITCH_PIN);

  if (switchState == LOW) {  // System active (switch pressed)
    // Update status LEDs
    digitalWrite(GREEN_LED_PIN, HIGH);
    digitalWrite(BLUE_LED_PIN, LOW);

    // Apply sensor calibration
    sensor2Value -= SENSOR2_OFFSET;

    // Check if right sensor is significantly brighter
    if ((sensor2Value - sensor1Value) > SENSOR_THRESHOLD) {
      if (pos < 180) {
        pos++;
        myservo.write(pos);
      }
    }
    // Check if left sensor is significantly brighter
    else if ((sensor1Value - sensor2Value) > SENSOR_THRESHOLD) {
      if (pos > 0) {
        pos--;
        myservo.write(pos);
      }
    }
    // If difference is below threshold, maintain position
    myservo.write(pos);
    delay(SERVO_DELAY);

  } else {  // System in standby (switch released)
    // Update status LEDs
    digitalWrite(GREEN_LED_PIN, LOW);
    digitalWrite(BLUE_LED_PIN, HIGH);

    // Return to center position
    myservo.write(90);
  }

  // Debug output
  String message = String(sensor1Value) + " " +
                  String(sensor2Value) + " " +
                  String(switchState) + " " +
                  String(abs(sensor1Value - sensor2Value));
  Serial.println(message);
}
Hindsight
Cardboard Gang YES. While I thought I could use the laser cutter to prepare the parts of this product, it turned out that cardboard allowed the product to be finished on time. It’s still true that laser-cut acrylic may look nicer, but it surely should only be introduced when things are settled.


