
Team Members: Alreem and Aysha:)
Exercise 1-
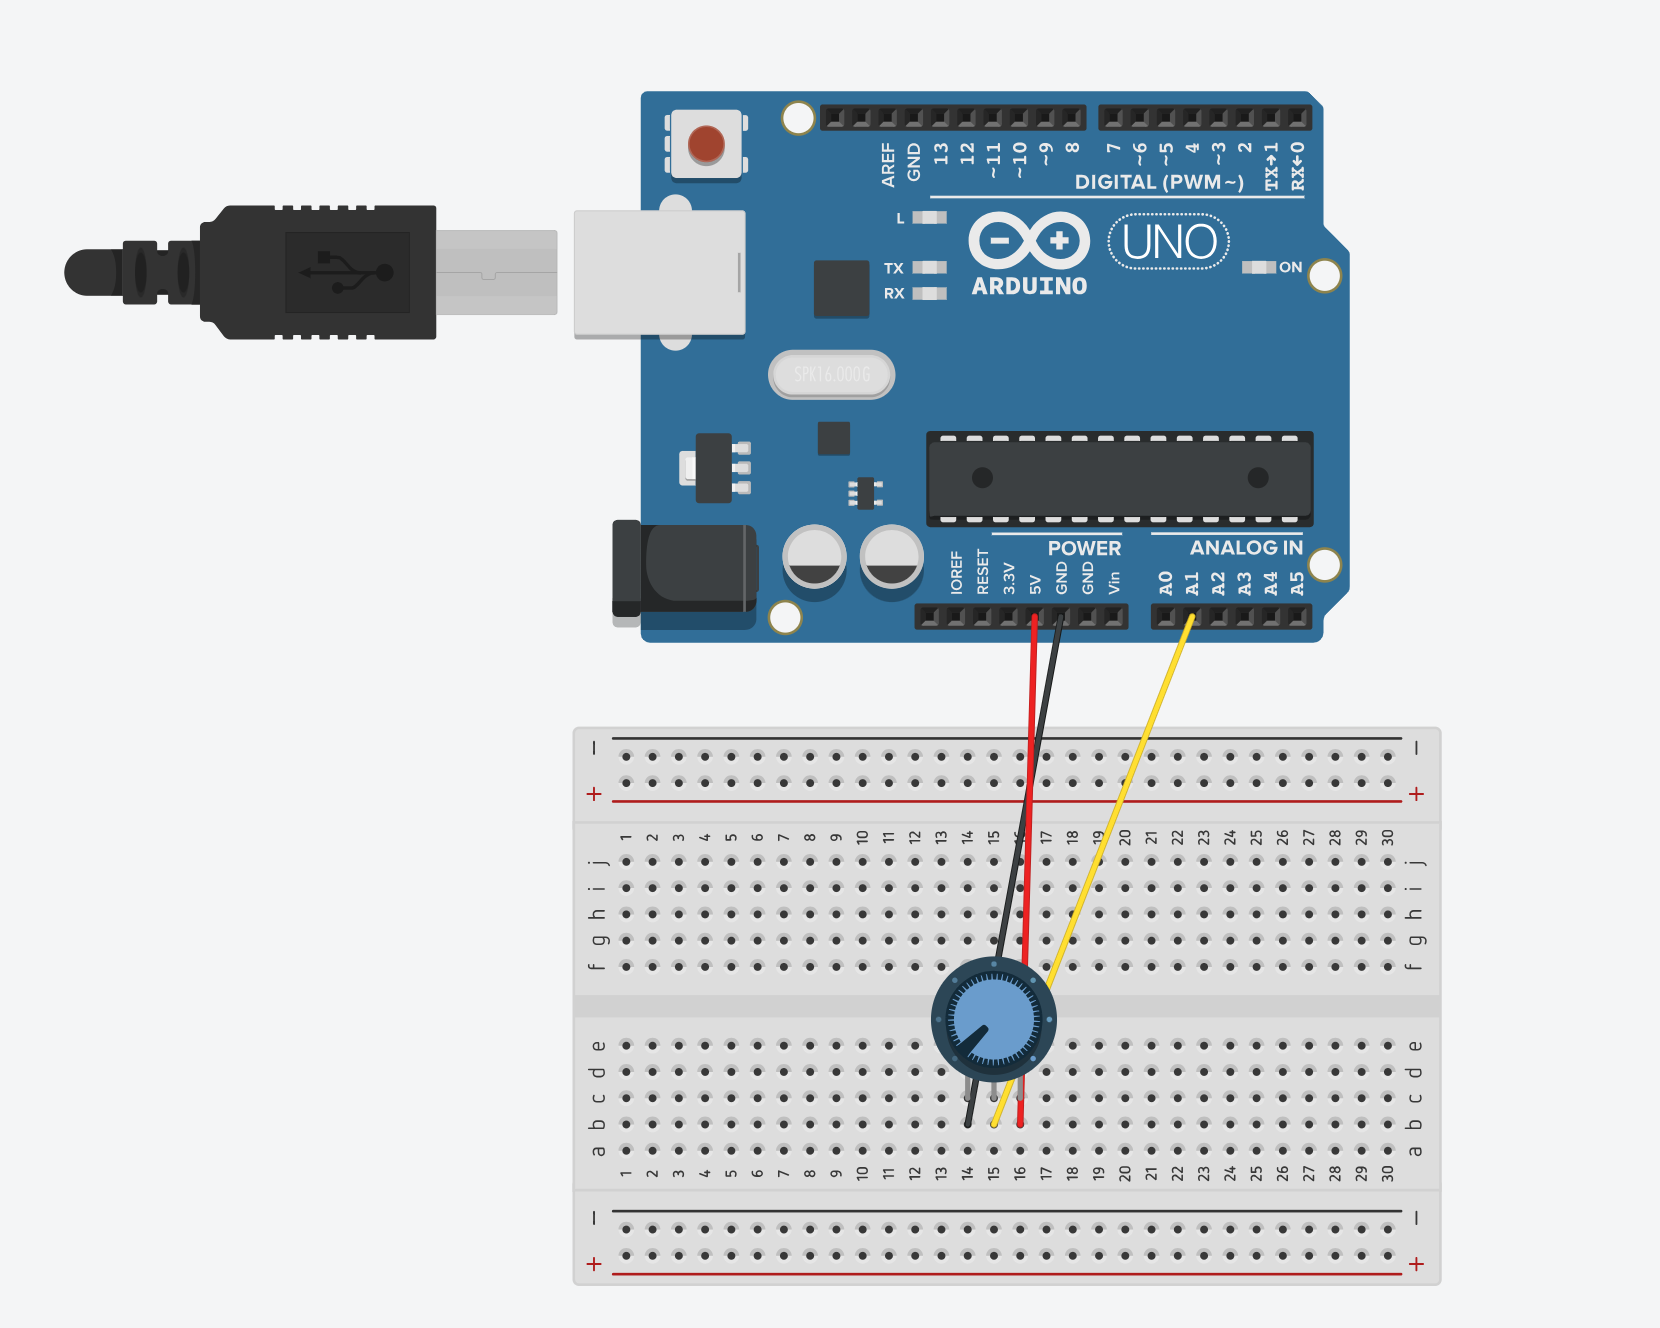
Using a potentiometer, we made an ellipse move left and right on the horizontal axis, ensuring that nothing on the Arduino is controlled by p5.
Schematic
P5js Code
//Variable to declare the ellipse moving acorss the x-axis
let ellipseX;

function setup() {
  //Canvas dimensions
  createCanvas(400, 400);
  //Set text size to 18 pixels
  textSize(18);
  //Initializes ellipse to half the width of the canvas, essentially centers it
  ellipseX = width/2;
}

function draw() {
  //Sets background to a light purple shade
  background("rgb(185,185,228)");
   // SetS fill color for the ellipse
  fill("rgb(142,142,228)");
  // Sets stroke color/outline for the ellipse
  stroke("rgb(91,91,233)");
  // Draw ellipse at ellipseX position, centered vertically, with a diameter of 120 pixels
  ellipse(ellipseX, height / 2, 120, 120);

  // If serial connection is not active, display message to prompt user to select serial port
  if (!serialActive) {
    //Sets fill color to white
    fill('white');
    // Sets stroke color to a gray shade
    stroke('#666666')
     // Display instructions at (15, 30)
    text("Press Space Bar to select Serial Port", 15, 30);
  }
  // If serial connection is active, display "Connected" message
  else {
    // Display instructions at (15, 30)
    text("Connected", 15, 30);
  }
}

// Function to handle key presses
function keyPressed() {
  // If space bar is pressed, call setUpSerial() function
  if (key == " ") {
    setUpSerial();
  }
}

// Function to read data from the serial port
function readSerial(data) {
  // Check if data is not null
  if (data != null) {
    // Split the received data into an array using comma as delimiter
    let fromArduino = split(trim(data), ",");
    // Map the potentiometer value to adjust the position of the ellipse
    ellipseX = map(int(fromArduino[0]), 0, 1023, 0, width);
  }
}
Arduino Code
const int potPin = A1;  // Analog pin connected to the potentiometer
void setup() {
  Serial.begin(9600);
}
void loop() {
    int potValue = analogRead(potPin);  // Read the value from the potentiometer
      // Send the potentiometer value to p5.js
      Serial.println(potValue);
}
Exercise 2-
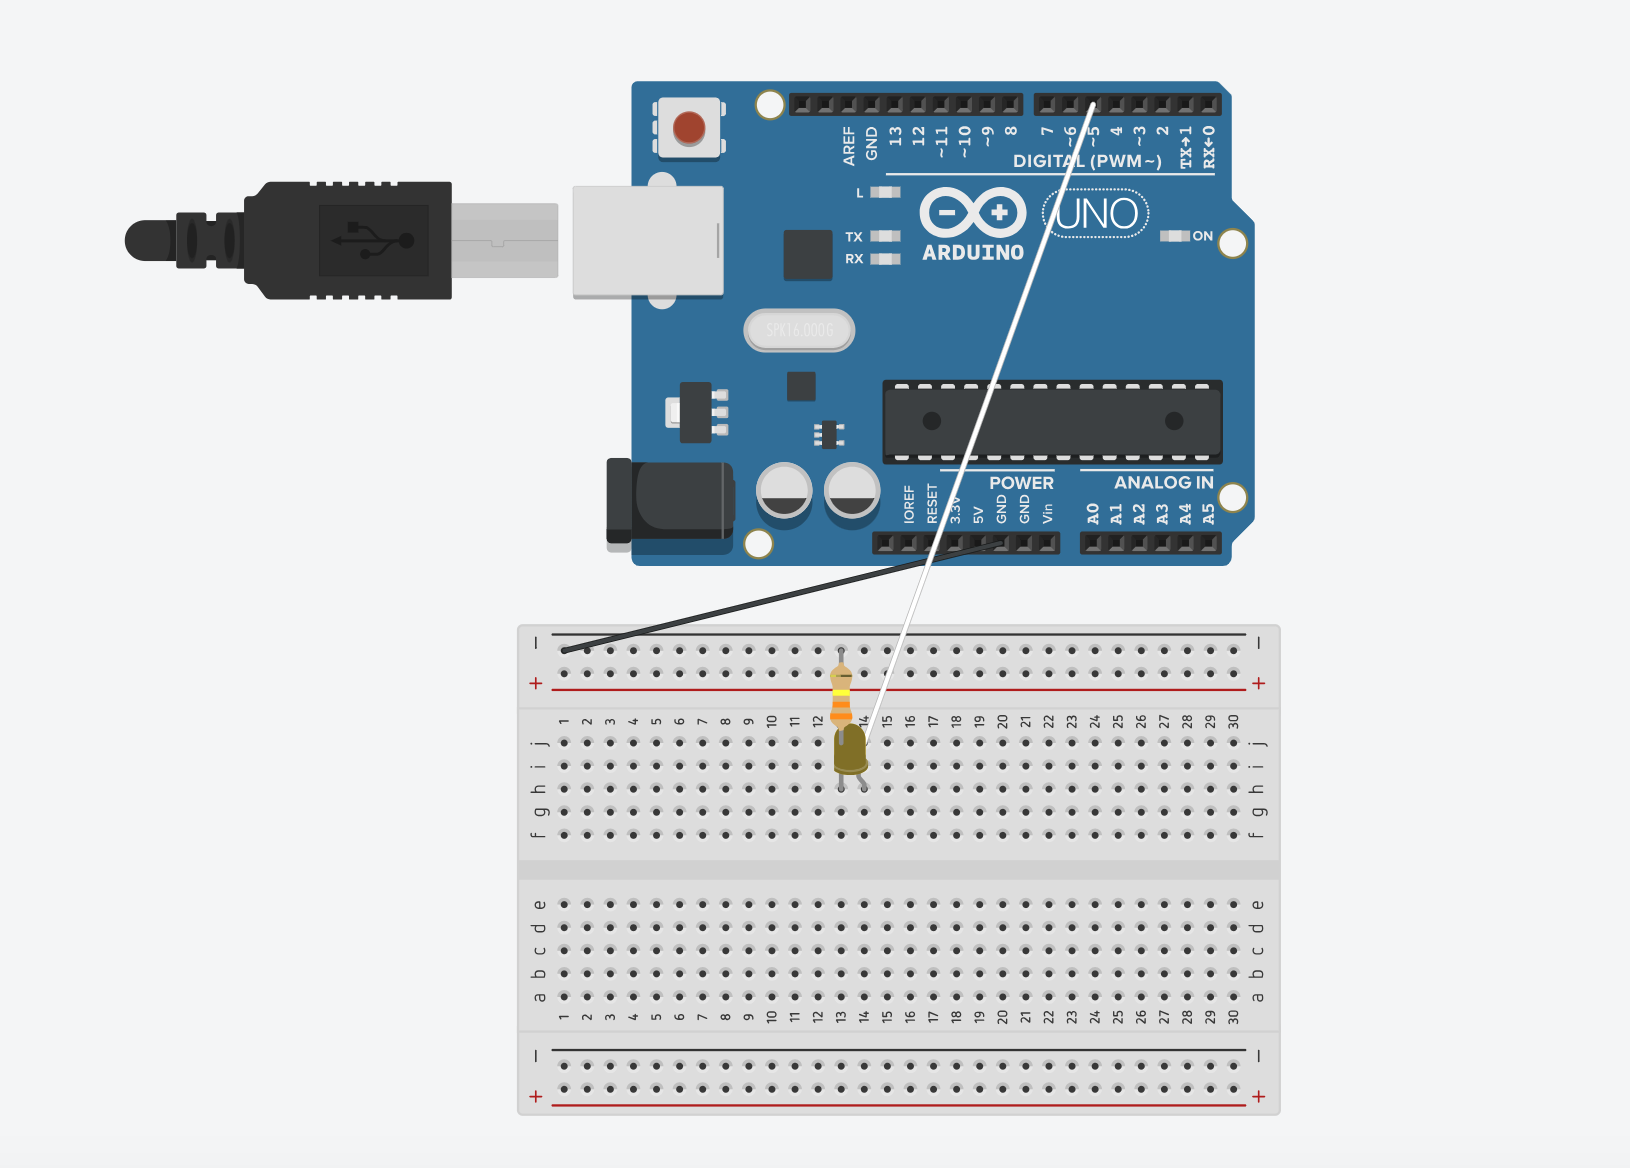
Using a slider, we controlled the LED brightness from p5.
Schematic
P5js Code
// Variable to hold the brightness value
let brightness = 0;
// Variable to hold the slider
let slider;

function setup() {
  //Canvas dimensions
  createCanvas(400, 400);
  // Create slider with range from 0 to 255 and initial value of 100
  slider = createSlider(0, 255, 100);
  // Positions slider horizontally centered and vertically centered
  slider.position(132, height/2);
}

function draw() {
  // Sets background color to a light gray shade
  background('#ADB9C7');
  // Gets  current value of the slider
  let val = slider.value();
  // Updates brightness variable with the slider value
  brightness = val;
  //If brightness is maximum (255), change background color to light blue
  if (brightness == 255) {
    // Changes background color to gold when brightness is max
    background('#DCECFF');
  }

  // If serial connection is not active, display message to prompt user to select serial port
  if (!serialActive) {
    // Set fill color to blue
    fill('#0876FF');
    // Set stroke color to a light gray shade
    stroke('#B2B2B2');
    // Set text size to 16 pixels
    textSize(16);
    // Display instructions at (20, 30)
    text("Press Space Bar to select Serial Port", 20, 30);
  }
  // If serial connection is active, display "Connected" message
  else {
    textSize(16);
    // Display instructions at (29, 30)
    text("Connected",29,30);
  }
}

// Function to handle key presses
function keyPressed() {
   // If space bar is pressed, start the serial connection
  if (key == " ") {
    setUpSerial();
  }
}

// Function to send data to the serial port
function readSerial(data) {
  // Check if data is not null
  if (data != null) {

  //Creates a string to send to Arduino with brightness value followed by newline character (HANDSHAKE)
    let sendToArduino = brightness + "\n";
  // Send data to Arduino
    writeSerial(sendToArduino);
  }
}
Arduino Code
// Define the pin for the LED (PWM PIN)
int LED = 5;

void setup() {
  // Set the LED pin as an output
  pinMode(LED, OUTPUT);
  // Start serial communication at 9600
  Serial.begin(9600);

  // Perform initialization handshake
  while (Serial.available() <= 0) {
    // Send a message to indicate initializing connection
    Serial.println("Initializing Connection");
    // Delay for a short time
    delay(200);
  }
}

void loop() {
  // Wait for data from p5.js sketch
  while (Serial.available()) {
    // Read the brightness value from serial communication
    int brightness = Serial.parseInt();
    // Check if the next character received is a newline character
    if (Serial.read() == '\n') {
      // Set the brightness of the LED using PWM (analogWrite)
      analogWrite(LED, brightness);
      // Send a message to indicate that LED is turned on
      Serial.println("ON");
    }
  }
}
Exercise 3-
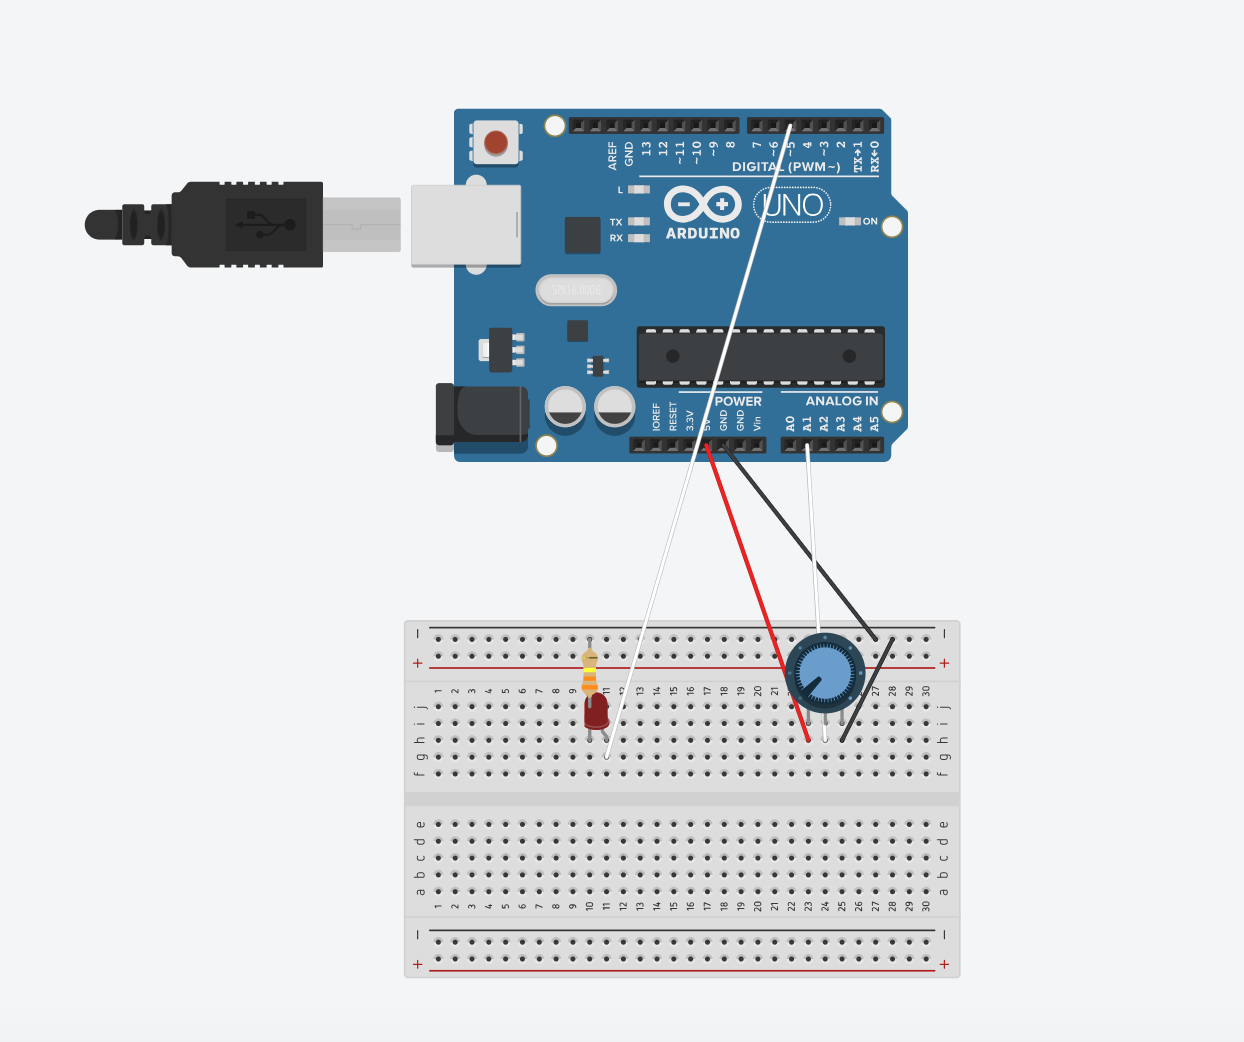
Taking the gravity wind example provided, we made it so that every time the ball bounces and touches the bottom of the canvas, the led lights up and then turns off. We also added a potentiometer in order to control the wind of the ball, helping it move left and right.
Schematic
P5js Code
// Variables for physics simulation
// Velocity vector
let velocity;
// Gravity vector
let gravity;
 // Position vector
let position;
// Acceleration vector
let acceleration;
// Wind vector
let wind;
 // Drag coefficient
let drag = 0.99;
// Mass of the ellipse
let mass = 70;

// Flag to control LED based on ball bounce
let ballBouncing = 0;

function setup() {
  //Canvas dimensions
  createCanvas(400, 400);
  // Set text size based on canvas width
  textSize(width/25);

  // Initialize vectors for position, velocity, acceleration, gravity, and wind
  //Creates vector representing the initial position of the ellipse,set to be horizontally centered (width / 2) and positioned at the top of the canvas (0 on the y-axis)
  position = createVector(width / 2, 0);
  // Creates vector representing the initial velocity of the object,horizontal and vertical components are set to 0, so object is at rest
  velocity = createVector(0, 0);
  //Creates vector representing the initial acceleration of the object,horizontal and vertical components are set to 0, so object is at rest
  acceleration = createVector(0, 0);
  //Creates vector representing the gravitational force acting on the object, set to have a vertical component that depends on the mass of the object, stimulating the effect of gravity pulling the object downwards
  gravity = createVector(0, 0.5 * mass);
  //Creates vector representing the force of wind acting on the object, horizontal and vertical components are set to 0, so no wind affecting the object
  wind = createVector(0, 0);
}

function draw() {
  // Set background color
  background(210, 230, 250);

 // If serial connection is not active, display message to prompt user to select serial port
  if (!serialActive) {
    // Display instructions at (20, 30)
    text("Press Space Bar to select Serial Port", 20, 30);
  }
  else {
    // Apply forces (gravity and wind)
    applyForce(wind);
    applyForce(gravity);
     // Update position
    // Updates the velocity of the object by adding the current acceleration to it
    velocity.add(acceleration);
    //Multiplies the velocity vector by the drag coefficient, reducing its magnitude and stimulating air resistance
    velocity.mult(drag);
    //Updates the position of the object by adding the current velocity vector to it, helps move ellipse based on velocity
    position.add(velocity);
    //Resets acceleration to 0
    acceleration.mult(0);

 // Check boundaries for right and left movement
    //If condition to check if the x-coordinate of the object is exceeding the right boundary of the canvas
    if (position.x > width - mass / 2) {
      //If object's x-coordinate exceeds the right boundary, set the x-coordinate of the object's position to exactly width - mass / 2, placing the object right at the right boundary
      position.x = width - mass / 2;
      // Reverses velocity when hitting right boundary by multiplying it by -0.9, applying a dampening effect to the velocity
      velocity.x *= -0.9;
    }
   //Condition to check if the x-coordinate of the object is exceeding the left boundary of the canvas
    else if (position.x < mass / 2) {
      //If object's x-coordinate exceeds the left boundary, set the x-coordinate of the object's position to exactly width - mass / 2, placing the object right at the right boundary
      position.x = mass / 2;
      // Reverses velocity when hitting left boundary by multiplying it by -0.9, applying a dampening effect to the velocity
      velocity.x *= -0.9;
    }

    // Draw the bouncing ball
    ellipse(position.x, position.y, mass, mass);

    //Check boundary for vertical movement (bottom of the canvas)
    if (position.y > height - mass / 2) {
      //Set the y-coordinate of the object's position so that the bottom of the object aligns with the bottom edge of the canvas
      position.y = height - mass / 2;
       // Reverses velocity when hitting bottom boundary by multiplying it by -0.9, applying a dampening effect to the velocity
      velocity.y *= -0.9;
      //Sets flag to indicate ball bouncing
      ballBouncing = 1;
    }
    //Resets flag if ball is not bouncing
    else {
      ballBouncing = 0;
    }
  }
}

// Function to handle key presses
function keyPressed() {
   // If space bar is pressed, start the serial connection
  if (key == " ") {
    setUpSerial();
  }
  // Change mass and reset ball position when Enter key is pressed
  else if (key == "ENTER") {
    // Randomly set the mass of the object within the range of 15 to 80
    mass = random(15, 80);
    // Set the initial y-coordinate of the object's position above the canvas to simulate it entering the scene
    position.y = -mass;
    // Reset the velocity of the object to zero to ensure it starts from rest
    velocity.mult(0);
  }
}

// Function to send data to the serial port
function readSerial(data) {
  // Check if data is not null
  if (data != null) {
// Parse incoming data
    let fromArduino = split(trim(data), ",");
    // If it's the accurate length, then proceed
    if (fromArduino.length == 1) {
      // Store values here
       // Extract potentiometer value and map it to wind force
      let potentiometerValue = int(fromArduino[0]);
      //Mapping pontentiometer value to wind force
      wind.x = map(potentiometerValue, 0, 1023, -1, 1);
    }
   //Creates a string to send to Arduino with brightness value followed by newline character (HANDSHAKE)
    let sendToArduino = ballBouncing + "\n";
    writeSerial(sendToArduino);
  }
}

// Function to apply force to the object
function applyForce(force) {
  // Newton's 2nd law: F = M * A or A = F / M
  // Calculate the force acting on the object by dividing the applied force vector by the mass of the object
  let f = p5.Vector.div(force, mass);
  // Add the resulting force vector to the object's acceleration to calculate its new acceleration
  acceleration.add(f);
}
Arduino Code
// Define the pin for the LED
int ledPin = 5;
// Define the pin for the potentiometer
const int potPin = A1;

void setup() {
  // Start serial communication at 9600
  Serial.begin(9600);

  // Set the built-in LED pin as an output
  pinMode(LED_BUILTIN, OUTPUT);
  // Set the LED pin as an output
  pinMode(ledPin, OUTPUT);
  // Set the potentiometer pin as an input
  pinMode(potPin, INPUT);

  // Start the handshake
  while (Serial.available() <= 0) {
    // Blink the built-in LED while waiting for serial data
    digitalWrite(LED_BUILTIN, HIGH);
    // Send a starting message to the p5.js sketch
    Serial.println("0,0");
    // Delay for a short time
    delay(300);
    // Turn off the built-in LED
    digitalWrite(LED_BUILTIN, LOW);
    // Delay for a short time
    delay(50);
  }
}

void loop() {
  // Wait for data from p5.js sketch
  while (Serial.available()) {
    // Turn on the built-in LED while receiving data
    digitalWrite(LED_BUILTIN, HIGH);
    // Turn off the LED connected to ledPin
    digitalWrite(ledPin, LOW);
    // Read the integer value representing whether the ball is bouncing
    int ballBouncing = Serial.parseInt();

    // Check if the next character received is a newline character
    if (Serial.read() == '\n') {
      // Read the value from the potentiometer
      int potPinValue = analogRead(potPin);
      // Short delay to stabilize the reading
      delay(5);
      // Send the potentiometer value to the p5.js sketch
      Serial.println(potPinValue);
    }

    // Set LED brightness based on whether the ball is bouncing
    if (ballBouncing == 1) {
      digitalWrite(ledPin, HIGH); // Turn on the LED
    } else {
      digitalWrite(ledPin, LOW); // Turn off the LED
    }
  }
  // Turn off the built-in LED
  digitalWrite(LED_BUILTIN, LOW);
}