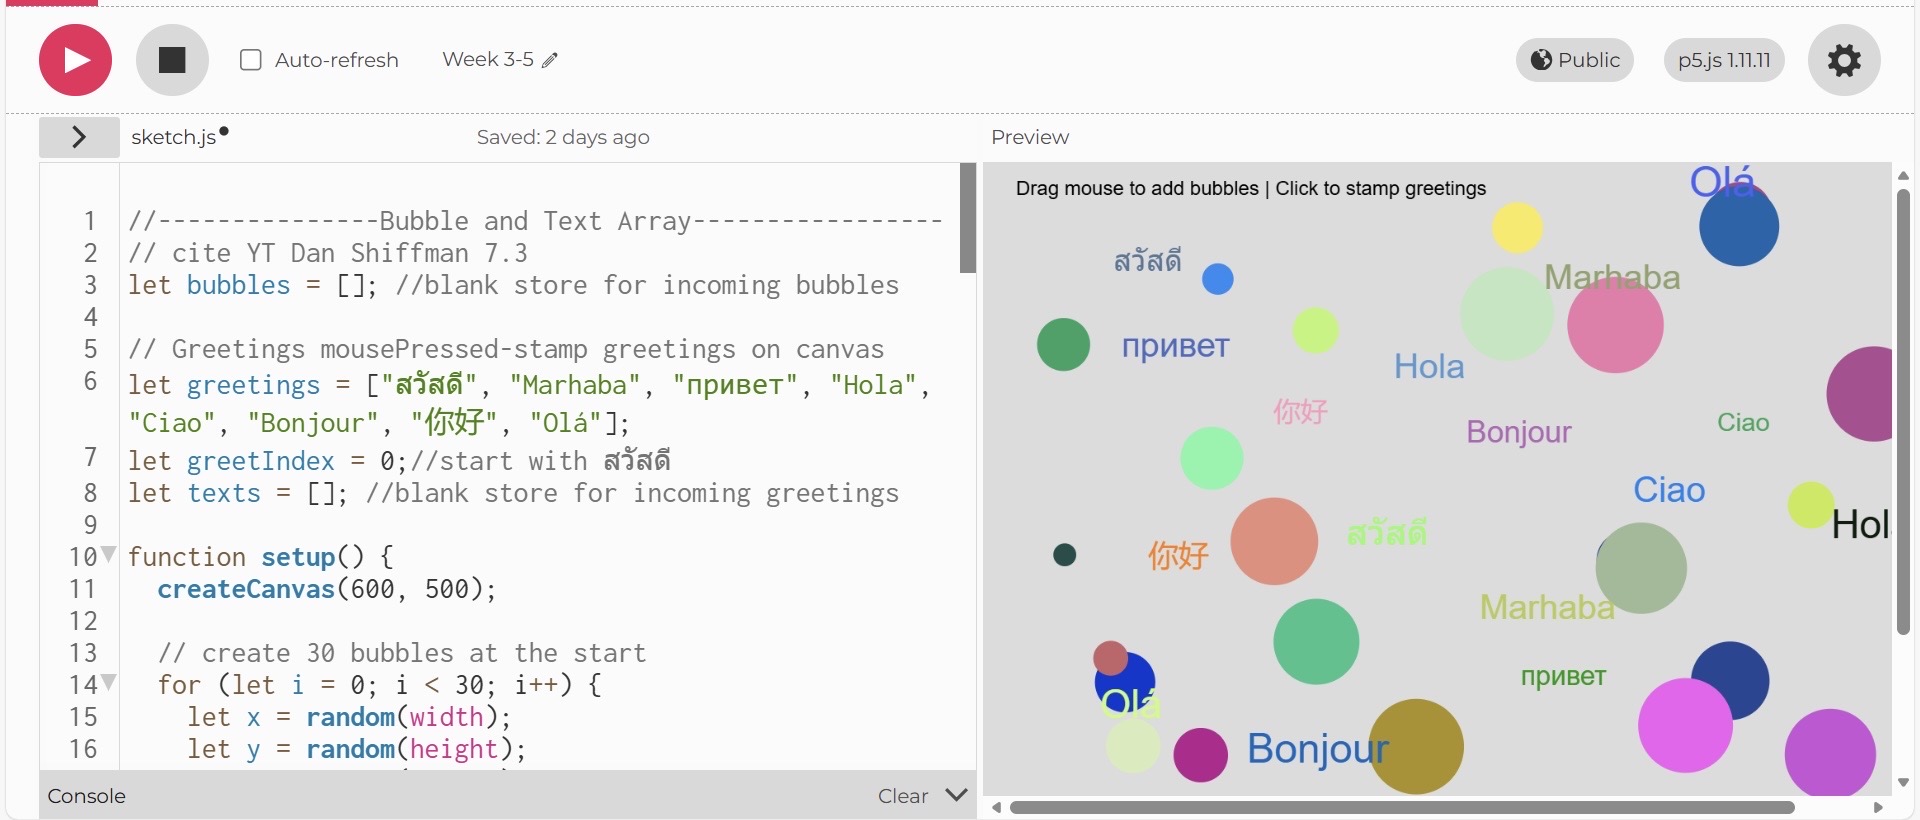
In terms of concept, I created an 600,600 frame animation which has bubbles of random sizes with each bubbles having different widths and heights and that if you drag the mouse along the frame it will form more and more bubbles a bit like what you would see in chemistry reaction. I also added a gimic where it shows hello in 7 different languages. For let x = random width and let x = random height I ended up with function ask different bubbles, at different widths and heights at random place. I commented on specific hard parts of the code such as the bubble class and interaction functions, this makes the logic very easy to follow.
In terms of the code I am particularly proud of the code from the Bubble class section which is lines 42-50 and 53-60. As I set variables X, Y and R where bubbles form at X, Y, R but they are random and that anything within frame of setup will do only once. (Generate 30 bubbles then no more), but anything after background 220 would do and run in the output again. I also set it to move random within the scope (-2,2) so that it could create reaction between bubbles not too fast and not too slow about right. And I chose to fill the bubbles with random colours and also not having stroke for the bubbles to be more beautifully designed. I then realized that I wanted to do (-5,5) but that would mean that the bubble would be reacting to each other too rapidly, so I had to go watch some of the Object-Oriented Programming examples from Dan Shiffman’s coding tutorials from the links below:
//—————Bubble and Text Array—————–
// cite YT Dan Shiffman 7.3
let bubbles = []; //blank store for incoming bubbles
// Greetings mousePressed-stamp greetings on canvas
let greetings = [“สวัสดี”, “Marhaba”, “привет”, “Hola”, “Ciao”, “Bonjour”, “你好”, “Olá”];
let greetIndex = 0;//start with สวัสดี
let texts = []; //blank store for incoming greetings
function setup() {
createCanvas(600, 500);
// create 30 bubbles at the start
for (let i = 0; i < 30; i++) {
let x = random(width);
let y = random(height);
let r = random(10, 60);
bubbles[i] = new Bubble(x, y, r);
}
}
function draw() {
background(220);
// update + show all bubbles (including new ones from mouseDragged)
for (let i = 0; i < bubbles.length; i++) {
bubbles[i].move();
bubbles[i].show();
}
// show all stamped greeting texts
for (let i = 0; i < texts.length; i++) {
texts[i].show();
}
// instruction text
fill(0);
textSize(12);
text(“Drag mouse to add bubbles | Click to stamp greetings”, 20, 20);
}
// ——————– Bubble Class ——————
// cite youtube Dan Shiffman 6.2
class Bubble {
constructor(x, y, r) {
this.x = x;
this.y = y;
this.r = r;
this.col = color(random(255), random(255), random(255)); // random(R,G,B)
}
// ——————Interaction———————–
// Drag mouse: add more bubbles
function mouseDragged() {
let r = random(10, 60);
let b = new Bubble(mouseX, mouseY, r);
bubbles.push(b);
}
// Click mouse: stamp greeting words (store as objects)
function mousePressed() {
let msg = greetings[greetIndex];
greetIndex = (greetIndex + 1) % greetings.length;
let t = new GreetingText(mouseX, mouseY, msg);
texts.push(t);
}
I think what I could improve for the future would be separating different features such as bubbles, greetings, UI text into their own files and clearly labeled section so the sketch stays clean as there is more code. I also think adding more interaction logic, such as limiting how many bubbles can appear, letting users delete objects, or adding animations to the greeting text instead of just putting it there.
The first thing that came to mind when the author was talking about how the word interactivity was used loosely, was AI. Funnily enough it goes hand in hand with interactivity in a lot of tech products, you will see “INTERACTIVE AND AI!!” plastered all around the advertisements when it really uses neither, and are just buzz words to attract customers. I had a similar idea of what interactivity is, to me it is a spectrum, we never say this is either interactive or not. We always say things like “oh this is really interactive,” or “this is somewhat interactive,” and so on. We always treated it as a spectrum, knowingly or unknowingly.
The problem with classifying if something is highly interactive is that, it’s all based on perspective, now what I mean by that is, treat the spectrum of interactivity as a battery with a fixed maximum capacity. A full charged battery would mean it’s highly interactive. The object defines the battery size, while the person’s perspective determines how much of that capacity is meaningful to them. This will make sense in a moment. There is objective traits to something being interactive, but how interactive it is will be subjective, for example, let us use the Nintendo fridge example with the kids and adults. The kids would tap into that battery supply and use most of it, while the adults would simply leave most of the battery unused.
Interactivity needs an initiator. a responder and a balance between that 2 that keeps the interaction in a meaningful interpretive cycle. This is true and can be objectively stated, however it is impossible to write a definition, or write what makes something highly or barely interactive as this will change person to person.
One thing this made me realize is that reactivity is not interactivity, and the sketches that we call interactive are simply just reactive to our inputs. To truly implement interactivity, I am thinking of making the program inputs less obvious, meaning the same input might lead to different actions depending on the context, making the user think about what to do.
After reading Chris Crawford’s perspective on what is considered interactive, I still don’t believe it changed my definition of interactivity. Yes, his idea of interactivity, including listening, speaking, and thinking, was striking; however, it wasn’t enough to change my idea of interactivity. Throughout the text, I was feeling confused about what his true definition of interactivity is. Initially, he mentioned listening, thinking, and speaking; then he went on to describe ideas beyond that scope, and I was left confused. The only thing I would say changed in my perspective is that now I expanded my understanding of the word interactive, and things I wouldn’t have considered to be “interactive” now are (such as conversations).
Yes, I think the fridge lights turning on once the fridge is opened is an interactive element. Perhaps I do agree with Crawford that there are extents to interactivity, since the fridge light turning on and off is not necessarily an intentional interactive element. With that being said, my definition of interactivity is a reciprocated exchange between two parties, and how striking it was to both of them.
In my opinion, I would improve the interactivity of my p5 sketches through expanding the users’ ability to choose exactly what it is they are interacting with. For example, in my balloon-popping sketch, I would like for the users to choose exactly which balloons they want to pop.
Crawford’s reading has spiked my questioning of what we deem is an interactive system and in general interacitivity. Because if I am honest, I do not agree with Crawford’s take on his definition of interactivity. He comes at it from a more simplistic and dumbed down view of the definition, and frankly, doesn’t seem to me is a proper way to define it. Crawford defines interactivity through the following defintion:
I choose to define it in terms of a conversation: a cyclic process in which two actors alternately listen, think, and speak. ~ Crawford, 1950
I mean firstly, isn’t everything we see, hear, touch, smell and feel a “conversation”. Every body of work, is a communication, between the author/publisher and the reader consuming the information. It is quite literally a transfer of information like any conversation. Now for this cyclic process he talks about, there are many holes with it.
I mean, he mentions that two actors are supposed to listen, think and speak. But any program, and especially AI, cannot think independently on its own accord. And the other point was him dismissing the fact that books and movies are not interactive by nature. I’m sorry, but what does Word or Powerpoint or hell, even me writing this article on WordPress, constitue as?? You cannot say, okay if I know what to expect with a book, that it’s a think object with words, that any computer program is much more interactive. I know what to expect when I type on the keyboard in Word or drag around images in Powerpoint. Any interaction I have with a computer program, to similar degree I’m interacting with a book by reading it. Even movies too, they make us think about the characters thinking what action to take given the event in the movie. So it is the same thing and both actions are the same degree of interactivity.
Rant out of the way, what would I define interactivity as in terms of characteristics? I would define it in a way where any action we do with a program, creates a reaction. And no, not where the computer thinks, but where we are actively thinking what the outcome is. I would also say here that interactivity is definitionally having multiple art forms and elements coming together in one. Games are the perfect example of this notion, as they compile together multiple elements, such as text, images, music and user input, in order to form a complete intaractive experience.
In terms of my own p5js sketches, I will add more interaction in terms of keyboard and mouse input and dedicate different functions for different keys. Such as if I did an artwork of some sort, the user would have different effects happen depending on the keys pressed. Another potential option is exploring face tracking or body tracking software, but that might be a challenge in of its own haha.
I won’t lie, I went into the assignment completely blind. This was probably the most challenging assignment for me conceptually. I struggled with understanding the concept of arrays/how they function. After calling four people to come and explain it to me, I got the hang of it.
For my assignment, I was inspired by the idea of popping balloons at a party, and that seemed like something I could replicate through building an array and building a class.
Here is the finished product:
The Process:
Honestly, the process of creating the project began way before I opened the p5 website. I still had a lot of confusion about arrays and how they function, especially with the addition of the “i.” I re-read the lesson’s slides to try to grasp the concept to no avail. I then decided to get help from others who managed to successfully explain the topic.
Since I just got the hang of the topic, I decided that I wanted to create something that encapsulates all of what we did in class this week, from arrays, classes, to interactivity. I first wanted to create a Sudoku game/grid, then a coloring page, but in the end, I decided that the one thing I could do to incorporate the three main things we took in class is through a balloon-popping experience.
I first started by creating a class for my balloons, creating a motion, display, and bouncing function for them. Afterwards, I created an empty array for my balloons and built a for loop to initialize and create my balloons, their parameters, and details. In order to allow my balloons to appear, bounce, and move as intended, I made a for loop within my draw function. Within the same for loop, I made an if statement to allow a text that says “POP!” to appear whenever the user pops a balloon. I incorporated the mousePressed() function as well as mouseX, to boost interactivity and functionality.
Snippet of Code I’m Proud Of:
There isn’t one particular part of my code that I’m proud of. I’m honestly more proud of the entire code in general, because it was a challenge for me to grasp the concepts and integrate them into one idea. For that, I will paste my main sketch’s code:
let balloons = [];
function setup() {
  createCanvas(600, 600);
  for(let i=0; i<9; i++){
    balloons[i]=new Balloon(50*i, random(600), 4+1*i, 4+1*i)
  }

}

function draw() {
  background('pink');
for (let i = 0; i < balloons.length; i++) {
  balloons[i].display();
  balloons[i].move();
  balloons[i].bounce();

   if (mouseIsPressed){
     fill('red')
       textSize(100)
    text('POP!', mouseX, mouseY)
  }

}

}


 function mousePressed(){

  balloons.pop(balloons);


}
Reflections:
I’m satisfied with the end product, however, for future works I would hope to push and challenge myself even more and create specific projects I have in mind like an interactive coloring book that I know could be created using arrays and OOP.
The reading has challenged the way I usually think about the word “interactive.” Before this, I used this term in a very loose way, often assuming that anything involving a computer or screen was automatically interactive. The author argues that true interactivity is more related to a meaningful conversation, when both sides listen, think, and respond within a cycle. This idea made me reflect on my own previous experiences with technology. Many apps and websites that are “interactive” actually feel very one-sided; they simply just deliver information rather than genuinely responding to the user. In my own creative coding projects, I sometimes try to focus more on visual effects than on whether how the program is actually engaging and having meaningful exchange with the user. The author’s definition helps me see why some digital experiences feel alive and others feel dead. I can think of examples from my classes where a project looked impressive but offered little real interaction, hence supporting the author’s argument that interactive is more about quality of exchange, not just the use of buttons or animations.
At the same time, I noticed that the author seems somewhat biased against newer interactive. He writes being confident that his definition is the correct one and dismisses other common uses of the term as misunderstandings. While I find his argument persuasive, I wonder if he overlooks the fact that interactivity might exist on a spectrum rather than a strict category. For example, using simple interfaces can create emotional or imaginative engagement, which might also count as a form of interaction. The reading changed my belief that interactivity is actually a technical feature as I now see it more as a communication process. However, it also raises questions for me such as Who gets to decide what really can be seen as a meaningful interaction? Can a passive experience still be interactive if it affects the user’s thinking? And in art or design, should emotional response matter as much as logical back-and-forth exchange?
After reading this article, I realized that I had been using the word interactive without fully questioning what it actually means. I mostly associated it with responsiveness and just assumed that if something reacted to my input, it was interactive. The author’s examples and definition of interactivity helped me clearly distinguish between interaction, reaction, and even participation. For example, the branch example showed how it was more reactive rather than interactive because there was only one active actor. I also really liked how the author argues that reaction, no matter how intense, never becomes interaction. The example with the dancers made it clear to me that, yes, the dancers were dancing with the music (giving a response), but they did not provide any feedback that changed the music or affected it in any way. This also made me question my own work and whether my sketches are more reactive than truly interactive. For example, in my work, I created sketches where the system responds immediately to the participant (like if they press a button), but I did not make it actually change or adapt based on their behavior. So I think my previous sketches were more about animations rather than interactive ones because, yes, it responds to input, but does not meaningfully listen, think, and respond in the way he describes.
I also like how interactivity was discussed more as a continuous variable rather than binary, especially with the use of the fridge example. I think framing interactivity as high or low rather than interactive or not interactive helped me understand how people can experience the same system differently. I agree with the author’s argument in this case, because it gives designers a more practical way to evaluate the interaction on a scale from high to low, rather than just dismissing the concept altogether. But this has me questioning who gets to define that standard of high or low interactivity, especially when we all can experience systems so differently.
Also, the difference between the user interface and interactivity was clear. At first, I had a hard time distinguishing between them. I usually think visually first, and then add interaction later. But now it is clear that for a strong interactive system, it needs to be heavy on both aspects of interactivity in technology, which is combining both form and function, and should not be separate steps. While I do agree with the author, I think he is somewhat biased towards interaction models that give off human conversations. I think this bias most likely comes from his own experience as an interactivity designer, but I think it also limits how other forms of interaction might be perceived and valued. In future work, I want to design my sketches more intentionally, making sure each element has a functional role in the interaction so it does not look like it was just thrown all together.
(I think you might have to open this on a new table as it doesn’t seem like computer vision sketches are supported by wordpress…)
Concept:
Well, I have always been interested in learning and testing out computer vision, because I have seen really cool effects and my main inspiration is a woman who goes by the.poet.engineer and she has absolutely incredible computer vision work.
To make the tracking as smooth as I could, I used code from this git hub post which I will talk about later in this post. This took me a ridiculously long time to complete since I started learning computer vision the same day I made this, but they end result was worth it.
Implementation:
There is a lot that goes into this, 500+ lines of code, however everything is well commented if you would like to go line by line, I will explain the main concepts for creating this.
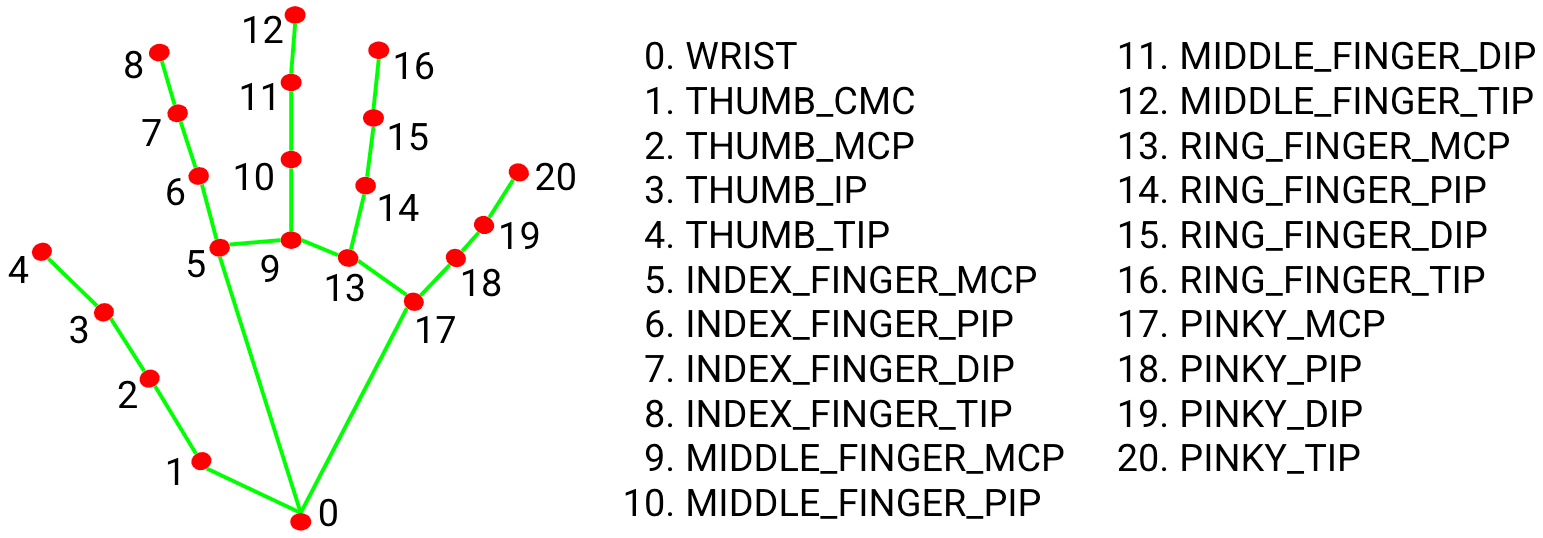
A bit of background, this was done using ml5js’s HandPose, and their hand tracker has specific keypoints for parts of your hand which was used to calculate distance, positions, rotation and so on for all the shapes used in this.
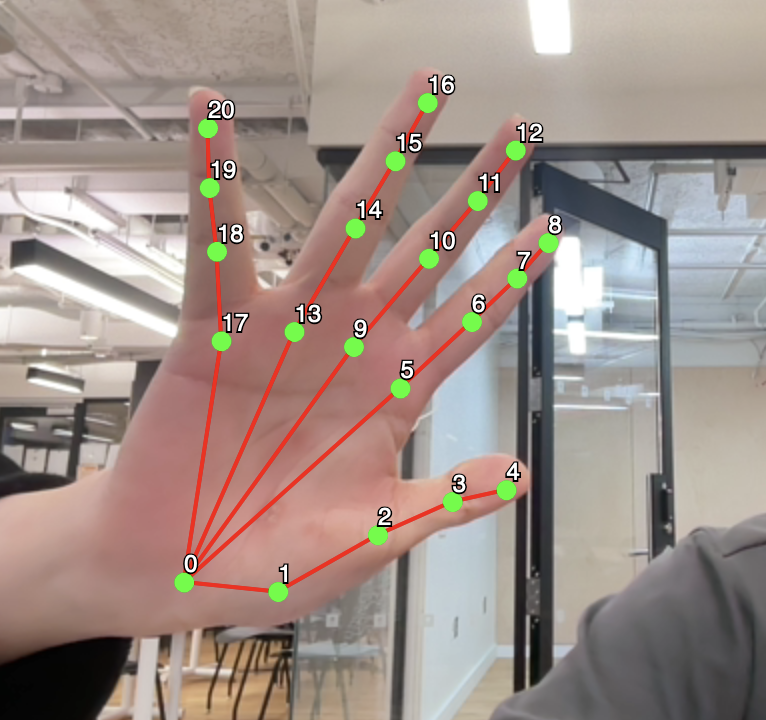
I did not use every connection as in the picture above, I manually selected the keypoints that I wanted to use in these 2 variables:
let fingerconnections = [
  [17, 18],
  [18, 19],
  [19, 20],
  [13, 14],
  [14, 15],
  [15, 16],
  [9, 10],
  [10, 11],
  [11, 12],
  [5, 6],
  [6, 7],
  [7, 8],
  [0, 1],
  [1, 2],
  [2, 3],
  [3, 4],
];
// Using ml5js classification I make a list of the connections I want for a curved line
let singlefinger = [
  [4, 5],
  [17, 16],
  [13, 12],
  [9, 8],
];
The way this works is that every hand that is seen on screen will be added to artInstances, of course I manually just made 2 but this can be scalable and automated for more than 2 hands.. (alien ?)
Each hand is assigned a class object of our class skeletal, which is where quite literally everything happens.
// Function for smoothing, uses linear interpolation to shorten how much we want the detector to move, since I used 0.8 for smoothing that means it only moves 80% of the way from original location to next location.
function gotHands(results) {
  if (activateSmoothing && hands.length > 0 && results.length > 0) {
    for (let i = 0; i < results.length; i++) {
      if (hands[i] && results[i]) {
        let oldHand = hands[i];
        let newHand = results[i];
        for (let j = 0; j < newHand.keypoints.length; j++) {
          newHand.keypoints[j].x = lerp(
            oldHand.keypoints[j].x,
            newHand.keypoints[j].x,
            smoothing
          );
          newHand.keypoints[j].y = lerp(
            oldHand.keypoints[j].y,
            newHand.keypoints[j].y,
            smoothing
          );
        }
      }
    }
  }
  hands = results;
}
This is the smoothing function that I took which I tried simplifying in the comments, it’s simply just linear interpolation so that the distance moved isn’t equal to the distance actually covered.
for (let i = 0; i < hands.length; i++) {
    if (artInstances[i]) {
      // Calling our inbuilt functions for every hand we have on screen
      artInstances[i].drawline(hands[i], singlefinger);
      artInstances[i].drawdoubleline(hands[i], fingerconnections);
      artInstances[i].drawcircle(hands[i], fingerconnections);
      artInstances[i].drawHUD(hands[i]);
      artInstances[i].drawSpeedHUD(hands[i]);
    }
  }

  drawMusicButton();
}
There are 6 methods in our skeletal class:
– drawline
– drawdoubleline
-drawcircle
-drawHUD
-drawSpeedHUD
-drawPopupHUD (this is used in the drawhud function so you won’t see it being called outside the class)
class skeletal {
  constructor(linecolor, circlecolor, hudcolor) {
    // We take the color we want for the line, circle and the hud, as well as initialize the angle and last angle to 0
    this.linecolor = linecolor;
    this.circlecolor = circlecolor;
    this.hudcolor = hudcolor;
    this.hud1angle = 0;
    this.rotationSpeed = 0;
    this.lasthandangle = 0;
    this.popupActive = false;
    this.popupTimer = 0;
  }
There is 8 attributes assigned to each hand, where only the first 3 are you can choose and the rest is assigned to 0 / false by default as they will be changed and used in calculations for our functions.
Before I get into the function I am most proud of, I will briefly talk about what each function does.
drawdoubleline : There was no inbuilt shape that satisfied what I want, so I ended up writing my own shape using BeginShape and EndShape to give me that glitchy double line between most the connections.
drawline: I used the bezier function here, (calculated anchor points by getting the points 1/3rd and 2/3rd of the way from keypoint A to keypoint B) and this was used to connect bases of fingers to the top of the next finger with a curved line.
drawHUD: This has 2 elements, the palm HUD, and the exterior HUD, the palm hud is centered by calculating the midpoint the base of the finger (which is keypoint 9) and the wrist (which is keypoint 0), and so the shapes of the HUD is drawed around that point, we use the mapping functions so that it becomes bigger the further away your hand is from the camera, or smaller if it is closer to the camera. This has constraints so the HUD can never be too small or too big.
drawPopupHUD: This HUD is the exterior one, which contains a circle with sound waves along a quarter of it, and this only pops up if the hand rotates at a fast enough speed, and then disappears after a short while. I used Perlin’s noise to give that random sound effect to the waves.
drawcircle: This simply draws a small circle at each keypoint that I saved in the beginning of the program.
Finally the function I am proud of:
drawSpeedHUD(singleHandData) {
    if (!singleHandData) return;

    // We map the keypoints once again to their respective parts.
    let thumbTip = singleHandData.keypoints[4];
    let indexTip = singleHandData.keypoints[8];
    let wrist = singleHandData.keypoints[0];
    let palmBase = singleHandData.keypoints[9];

    if (!thumbTip || !indexTip || !wrist || !palmBase) return;

    // We calculate the palm size and the gap between our thumb and index finger
    let palmSize = dist(wrist.x, wrist.y, palmBase.x, palmBase.y);
    let fingerGap = dist(thumbTip.x, thumbTip.y, indexTip.x, indexTip.y);

    // Check if it is left or right hand to adjust rotation accordingly
    let isLeftHand = singleHandData.handedness === "Left";

    // Calculate the angle of the finger for rotation of the speedometer
    let fingerAngle = atan2(indexTip.y - thumbTip.y, indexTip.x - thumbTip.x);
    // Calculate the rotation and adjust based on left or right hand
    let sideRotation = isLeftHand ? fingerAngle + PI : fingerAngle;

    // Conditions for when the speedometer pops up
    let closeToCamera = palmSize > 80;
    let fingersSpread = fingerGap > 0 && fingerGap < 140;

    if (closeToCamera && fingersSpread) {
      // We create a mapping between the distance of finger and speed, where if the thumb and index are closed the speed is 0 to 50.
      let speed = map(fingerGap, 0, 130, 16, 50, true);
      let needleAngle = map(speed, 0, 140, PI, -PI);

      let midX = (thumbTip.x + indexTip.x) / 2;
      let midY = (thumbTip.y + indexTip.y) / 2;

      push();
      translate(-width / 2 + midX, -height / 2 + midY);

      // Rotate with our hand
      rotate(sideRotation);

      noFill();
      stroke(this.hudcolor);
      strokeWeight(2);
      // Draw the speedometer arc and ticks.
      arc(0, 0, 110, 110, PI + QUARTER_PI, TWO_PI - QUARTER_PI);

      for (let i = 0; i < 10; i++) {
        let a = map(i, 0, 9, PI + QUARTER_PI, TWO_PI - QUARTER_PI);
        line(cos(a) * 45, sin(a) * 45, cos(a) * 55, sin(a) * 55);
      }

      // Draw the needle
      push();
      rotate(needleAngle - HALF_PI);
      stroke(255, 50, 50);
      strokeWeight(3);
      line(0, 0, 0, -50);
      pop();

      // Draw the speed bar which changes with speed and needle.
      strokeWeight(1);
      rectMode(CENTER);
      noFill();
      rect(0, 25, 60, 5);
      fill(this.hudcolor);
      rectMode(CORNER);
      // Using your speed mapping to fill the 60px wide bar
      rect(-30, 22.5, map(speed, 16, 50, 0, 60, true), 5);

      pop();
    }
  }
This is the code for that interactive aspect of this computer vision, the speedometer that moves with your pinching of your thumb and index. The speedometer only pops up if your hand is close enough to the camera and the pinch isn’t too big, and we use the mapping function to spin the needle and change the progress bar. This speedometer also rotates around the hand which leads to it rarely clipping through your hand. This took so much trial and error, checking which angle works, so much time spent due to the needle going under the speedometer and completely opposite of where I would want it, or the speedometer rotating towards the hand clipping through it, overall it was a painful experience of trial and error.
A small addition I have is some background music that you can enable or disable, the song is “Color Your Night” and this is part of the soundtrack for Persona, and is an amazing song.
Reflection:
It was a painful, but incredibly fun experience, I am really happy I challenged myself and dived into computer vision, because if I did not know then I would have never, and I am really happy with the end result. There is endless possibilities of interactive art with computer vision, such as animating characters, or showcasing fluid dynamics and so much more which I would like to compare beyond a simple futuristic interactive HUD.
Watching Casey Reas’ talk influenced the way I think about randomness in interactive artwork. It made me reflect on how, in traditional art, we often try to control every aspect of every element. I typically do not plan every aspect of my own art pieces; sometimes I go with the flow, and sometimes I see where my thoughts take me. However, Reas’ discussion of “systems” rather than “images” challenges my creative process.
This raises the question of when computational art is truly random, or whether it is our own thoughts and decisions that contribute to the apparent randomness of the work. I wonder how much control I actually have over “chance” in a digital system and whether the unpredictability is generated by the algorithm or by the choices I make in setting up the system. This makes me reconsider the balance between control and randomness in creative processes.
So, I want to say that randomness is still a type of control because I think we will never achieve full randomness. This is evident in chaos theory: in a small picture, it looks chaotic, but as we zoom out to see the full picture, it becomes more evident that it is a longer form of a pattern, more complex, yet there is still some type of control.
Watching this talk, what came to my mind was how deeply rooted the tension between chaos and order is in both art and human history. I found myself reflecting on how, for centuries, artists were expected to create structure and clarity in response to a world perceived as chaotic. This made sense within a Newtonian worldview, where the universe felt stable, predictable, and governed by clear rules. As the speaker moved through moments of scientific disruption and historical trauma, especially the impact of World War I, I began to see how those events made strict order feel insufficient. It became clear to me that the shift toward chance and randomness in art was not a rejection of meaning, but an attempt to better reflect the uncertainty and complexity of lived experience.
What struck me most was the idea that chance is never truly blind. As I watched the examples of algorithmic and generative work, I kept thinking about how these systems are carefully designed yet allowed to behave unpredictably. This balance between control and surrender felt deeply human to me. I realized that using randomness is not about giving up responsibility as an artist, but about trusting processes to reveal patterns that cannot be forced. In that sense, chaos becomes a collaborator rather than a threat. It allows art to remain alive over time, continuously changing while still holding a coherent identity.