Self Portrait Assignment – Dina

My Concept:

In this assignment, I attempted to make a self-portrait using only 2D shapes such as circles, rectangles, lines, and arcs. To start, before beginning the assignment or the course itself, I had little to no knowledge of coding, so this was definitely something outside of my comfort zone and a bit challenging. I mainly wanted the portrait to be an almost realistic vision of what I usually look like, so that was what I went for for the portrait. With that being said, I “styled” certain features with a lot of attention to small details that I think I could’ve gone without (which was time-consuming for me, but I thought the portrait wouldn’t be realistic enough without them). I kept the portrait basic with only the face and shoulders showing, and nothing in the background.

Here is the finished result:

The Process:

The first thing I started with was the face. This was probably the easiest task I did for the portrait; I just inserted an ellipse and changed its color using the RGB hex.

I then moved on to the eyes. I was using a series of arcs to create the round shape I wanted. It was difficult at first since I was dealing with radians, and I noticed the unit circle in p5 is actually in reverse.  I kind of gave up midway through with it and switched over to degrees, which was easier for me. But I realized I can’t always rely on degrees, so I switched back to radians, got the hang of it, and the second (right) eye became much easier to make. I added my usual glasses and gave myself some eyebrows as well.

The nose was particularly interesting to make. I initially made the little bulb (circle) of the nose in the center and built everything else around it. I put in the lines of the nose bridge, the surrounding area near the nostrils using arcs, and finally the nostrils themselves. Since the nostrils I could draw were small, I opted for points rather than an arc, since their sketch would be small. I chose this specific structure of the nose to make the sketch as realistic as possible instead of drawing a few lines or a triangle on the side.

The real challenge for me was drawing the lips and hair.

The lips: Since I was going for a realistic look,  I faced a challenge building the upper lip. For reference, I always begin on the left side of the face for all my features. The first thing I did was draw a straight line that led to almost the center of the face, then I created a small arc connected to it in order to resemble a cupid’s bow. The real challenge was recreating this on the right side of the face with the correct dimensions. It was a huge trial-and-error process, where I constantly adjusted the x and y coordinates to recreate the arc’s dimensions as it connected to the line. Once I figured it out, I added a large arc to seal off the upper lip, and I added another larger arc at the bottom for the bottom lip.

The hair: I realize now that there could have definitely been an easier way to draw the hair, but I started it off on a challenging note. I decided to draw singular curls using arcs and just alternating the arcs and their patterns on the whole head. That was unfortunately extremely time-consuming, and I could’ve gone on an easier path. That’s when I realized I could use large circles, put them around the head, and fill them. This made the process much quicker.

Code Highlight:

I am particularly proud of the way the lips turned out as I managed to recreate the same angles and dimensions on both the right and left side of the mouth.

//lips
  //upper lip
  
  line(175, 240, 192, 235);
  arc(193, 236, 10, 2, -PI, 0);
  arc(203, 236, 10, 2, -PI, 0);
  line(205, 235, 222, 240);
  
  arc(198.6, 240, 47, 12, 0, PI);
  
  //lower lip
  arc(198.7, 241, 47, 30, 0, PI);

Reflection:

It was pretty fun to experiment with code, as I had minimal experience with coding before this. There are definitely things I did that made the task much harder when there was a much simpler alternative (such as using circles for the hair, or I could have just built the mouth using 2 arcs).

Overall, I am pretty satisfied with the outcome, especially considering the trial-and-error and effort it took. If there’s one thing I would take away from this assignment, it is to always look for a simpler, less time-consuming way to do things. In the future, I would like to be able to add some interactive element to my work, or even make it more abstract, to get out of my comfort zone and create something different than what I would usually create.

Here is the final code:

function setup() {
  createCanvas(400, 400);
}

function draw() {
  background(180, 130, 190);
  
  print(mouseX, mouseY); 
  
  //neck
  stroke(0, 0, 0);
  strokeWeight(1);
  fill(241, 223, 210);
  rect(155, 288, 90, 66);
  
  //shirt
  //actual shirt
  fill('rgb(210,5,5)');
  stroke(218, 13, 13);
  rect(20, 350, 360, 70, 30, 30, 30, 30);
   //collar
  fill(218, 13, 13);
  stroke('rgb(185,6,6)');
  strokeWeight(20);
  arc(200, 344, 90, 10, 0, PI);
  //collar lines
  stroke('rgb(164,7,7)');
  strokeWeight(1);
  line(200, 340, 200, 359);
  line(208, 340, 208, 357);
  line(216, 339, 216, 359);
  line(223, 339, 224, 357);
  line(229, 339, 230, 355);
  line(234, 339, 238, 355);
  line(240, 337, 243, 353);
  line(244, 336, 250, 353);
  line(247, 335, 253, 349);
  line(249, 335, 255, 342);
  line(191, 339, 191, 358);
  line(184, 339, 183, 358);
  line(175, 339, 175, 357);
  line(168, 338, 166, 356);
  line(161, 337, 159, 351);
  //face and skin
  stroke(1);
  strokeWeight(1);
  fill('rgb(241,223,210)');
  ellipse(200, 180, 200, 240);
    
  
// left eyes successful radians attempt 1
  fill('white');
  arc(150, 150, 50, 30, -HALF_PI, 0);
  arc(150, 150, 50, 30, -PI, -HALF_PI);
  arc(150, 150, 50, 30, 0, PI);
  
  //left eye color
  fill(140, 155, 100);
  circle(150, 150, 25);
   fill('black');
  circle(150, 150, 15);
  
  
// right eyes successful radians attempt
  fill('white');
  arc(250, 150, 50, 30, -PI, 0);
  arc(250, 150, 50, 30, 0, PI);
  
  //right eye color
  fill(140, 155, 100);
  circle(250, 150, 25);
   fill('black');
  circle(250, 150, 15);


  // eyes attempt radians
    //left eyes shape
 
  //fill('white');
  //arc(150, 150, 50, 30, 0, 2);

  //left eyes shape degrees
  //angleMode (DEGREES);
  //fill('white');
  //arc(150, 150, 50, 30, -90, 0);
  //arc(150, 150, 50, 30, -180, -90);
  //arc(150, 150, 50, 30, 0, 90);
  //arc(150, 150, 50, 30, 90, 180);

  //left eye color
  //fill(140, 155, 100);
  //circle(150, 150, 25);
  
  //right eye shape
  //angleMode (DEGREES); 
  //fill('white');
  //arc(250, 150, 50, 30, -90, 0);
  //arc(250, 150, 50, 30, -180, -90);
  //arc(250, 150, 50, 30, 0, 90);
  //arc(250, 150, 50, 30, 90, 180);
  
  //right eye color
  //fill(140, 155, 100);
  //circle(250, 150, 25);
  
//nose
  stroke('rgb(72,54,24)');
  strokeWeight(1);
  noFill();
  circle(200, 210, 17);
  arc(195, 217, 12, 6, HALF_PI, PI);
  arc(205, 217, 12, 6, 0, HALF_PI);
  
  line(195, 198, 192, 166);
  line(205, 198, 208, 166);
 
 //nostril left 
  strokeWeight(1);
  arc(193, 217, 4, 2, HALF_PI, PI);
  arc(188,207, 6, 16, HALF_PI, PI + HALF_PI);
  
 //nostril right  
  arc(207, 217, 4, 2, 0, HALF_PI);
  arc(212, 207, 6, 16, -HALF_PI, HALF_PI);
  
//lips
  //upper lip
  
  line(175, 240, 192, 235);
  arc(193, 236, 10, 2, -PI, 0);
  arc(203, 236, 10, 2, -PI, 0);
  line(205, 235, 222, 240);
  
  arc(198.6, 240, 47, 12, 0, PI);
  
  //lower lip
  arc(198.7, 241, 47, 30, 0, PI);
  
//eyebrows
  //left eyebrow
  fill('rgb(96,37,37)');
  noStroke();
  rect(132, 120, 42, 6, 0, 3, 0, 0);
  triangle(132, 120, 132, 126, 126, 126);
  
  //right eyebrow
  rect(226, 120, 42, 6, 3, 0, 0, 0);
  triangle(268, 120, 268, 126, 274, 126);
  
//eyelashes
  //left eye
  stroke(1);
  line(127, 144, 120, 138);
  line(128, 141,123, 133);
  line(130, 140, 128, 132);
  line(137, 136, 135, 130);
  line(144, 136, 142, 129);
  line(148, 134, 150, 128);
  line(155, 134, 156, 127);
  line(158, 136, 162, 128);
  line(162, 137, 168, 126);
  line(167, 139, 171, 130);
  line(170, 140, 176, 134);
  
  //right eye
  line(227, 143, 223, 137);
  line(230, 140, 226, 133);
  line(232, 139, 230, 130);
  line(235, 137, 234, 128);
  line(239, 136, 238, 128);
  line(242, 136, 242, 127);
  line(246, 134, 247, 127);
  line(251, 134, 252, 127);
  line(256, 134, 257, 127);
  line(259, 136, 263, 128);
  line(263, 136, 267, 129);
  line(266, 137, 272, 130);
  line(268, 140, 274, 134);
  line(271, 142, 277, 137);
  
//glasses
  noFill();
  strokeWeight(2.7);
  //left lens
  rect(119, 124, 60, 47, 5, 10, 10, 10);
  //right lens
  rect(221, 124, 60, 47, 10, 5, 10, 10);
  //bridge
  rect(179, 139, 42, 1);
  
  
//hair
  fill(96, 37, 37);
  stroke('rgb(96,37,37)');
  strokeWeight(5);
  // arc(199, 77, 60, 10, PI + HALF_PI, HALF_PI);
  // arc(199, 90, 67, 17, PI + HALF_PI, HALF_PI);
  // arc(200, 65, 60, 10, PI + HALF_PI, HALF_PI);
  // arc(200, 78, 67, 17, PI + HALF_PI, HALF_PI);
  arc(240, 70, 69, 19, PI + HALF_PI, HALF_PI);
  arc(262, 88, 69, 19, HALF_PI, PI + HALF_PI);
  arc(240, 109, 69, 19, PI + HALF_PI, HALF_PI);
  arc(262, 109, 69, 19, HALF_PI, PI + HALF_PI);
  arc(227, 65, 60, 10, PI + HALF_PI, HALF_PI);
  arc(227, 95, 67, 17, PI + HALF_PI, HALF_PI);
  arc(243, 72, 60, 10, PI + HALF_PI, HALF_PI);
  arc(229, 70, 67, 17, PI + HALF_PI, HALF_PI);
  arc(290, 102, 60, 20, PI + HALF_PI, HALF_PI);
  arc(247, 81, 67, 17, PI + HALF_PI, HALF_PI);
  arc(290, 84, 60, 20, PI + HALF_PI, HALF_PI);
  arc(276, 91, 67, 17, PI + HALF_PI, HALF_PI);
  arc(278, 114, 60, 25, PI + HALF_PI, HALF_PI);
  arc(260, 95, 67, 17, PI + HALF_PI, HALF_PI);
  arc(267, 67, 60, 10, PI + HALF_PI, HALF_PI);
  arc(279, 69, 67, 17, PI + HALF_PI, HALF_PI);
  arc(272, 113, 60, 10, PI + HALF_PI, HALF_PI);
  arc(284, 126, 67, 17, PI + HALF_PI, HALF_PI);
  // arc(288, 130, 69, 19, HALF_PI, PI + HALF_PI);
  arc(286, 149, 69, 19, PI + HALF_PI, HALF_PI);
  // arc(291, 147, 69, 19, HALF_PI, PI + HALF_PI);   arc(287, 146, 69, 19, HALF_PI, PI + HALF_PI);
  arc(290, 169, 69, 19, PI + HALF_PI, HALF_PI);
  arc(311, 186, 69, 19, HALF_PI, PI + HALF_PI);
  arc(287, 202, 69, 19, PI + HALF_PI, HALF_PI);
  arc(312, 219, 69, 19, HALF_PI, PI + HALF_PI);
  arc(282, 236, 69, 19, PI + HALF_PI, HALF_PI);
  arc(307, 253, 69, 19, HALF_PI, PI + HALF_PI);
  arc(277, 270, 69, 19, PI + HALF_PI, HALF_PI);
  // hair second part copy paste
  arc(303, 183, 69, 19, PI + HALF_PI, HALF_PI);
  arc(320, 203, 69, 19, HALF_PI, PI + HALF_PI);
  arc(288, 168, 69, 19, PI + HALF_PI, HALF_PI);
  arc(307, 253, 69, 19, HALF_PI, PI + HALF_PI);
  
  //circle hair
  circle(260, 109, 27);
  circle(290, 142, 27);
  circle(307, 136, 27);
  circle(274, 88, 27);
  circle(306, 93, 27);
  circle(308, 112, 27);
  circle(263, 67, 27);
  circle(244, 67, 27);
  circle(283, 65, 27);
  circle(302, 182, 27);
  circle(304, 164, 27);
  circle(318, 159, 27);
  circle(313, 133, 27);
  circle(319,109, 29);
  circle(311, 76, 32);
  circle(314,88, 32);
  circle(322, 124, 27);
  circle(325, 97, 27);
  circle(322, 141, 27);
  circle(328, 156, 27);
  circle(332, 141, 27);
  circle(332, 114, 27);
  circle(333, 168, 27);
  circle(335, 187, 27);
  circle(328, 203, 27);
  circle(320, 222, 60);
  circle(322, 242, 60);
  circle(271, 127, 27);
  circle(286, 161, 27);
  circle(211, 65, 20);
  circle(222, 61, 20);
  circle(287, 195, 20);
  circle(285, 205, 20);
  circle(281, 232, 20);
  circle(328, 266, 27);
  circle(339, 272, 27);
  circle(336, 285, 30);
  circle(338, 308, 30);
  circle(340, 326, 30);
  circle(310, 290, 60);
  circle(285, 249, 30);
  circle(283, 267, 27);
  circle(286, 295, 27);
  circle(329, 150, 60);
  circle(343, 183, 60);
  circle(343, 217, 50);
  circle(347, 248, 40);
  circle(354, 270, 50);
  circle(361,232, 40);
  circle(358, 207, 40);
  circle(354, 295, 50);
  circle(351, 316, 40);
  circle(350, 330, 50);
  circle(314, 344, 50);
  circle(286, 325, 50);
  circle(272, 292, 35);
  circle(271, 261, 25);
  circle(223, 77, 27);
  circle(283, 79, 20);
  circle(270, 104, 20);
  circle(224, 91, 20);
  circle(194, 58, 20);
  circle(168, 78, 40);
  circle(177, 56, 20);
  circle(189, 70, 15);
  circle(143, 87, 30);
  circle(124, 101, 30);
  circle(108, 118, 30);
  circle(98, 136, 30);
  circle(107, 136, 30);
  circle(97, 154, 30);
  circle(93, 164, 30);
  circle(98, 178, 30);
  circle(95, 192, 30);
  circle(96, 208, 30);
  circle(105, 185, 30);
  circle(103, 160, 30);
  circle(106, 209, 30);
  circle(104, 225, 30);
  circle(111, 240, 30);
  circle(107, 194, 30);
  circle(114, 251, 30);
  circle(108, 267, 30);
  circle(115, 270, 30);
  circle(139, 97, 30);
  circle(119, 112, 30);
  circle(125, 270, 30);
  circle(121, 288, 50);
  circle(135, 309, 40);
  circle(140, 330, 40);
  circle(139, 350, 40);
  circle(70, 184, 65);
  circle(77, 123, 65);
  circle(72, 233, 65);
  circle(72, 277, 65);
  circle(76, 321, 65);
  circle(109, 314, 65);
  circle(106, 340, 70);
  circle(100, 83, 40);
  circle(129, 69, 30);
  circle(151, 59, 30);


}


Week 1 — Self Portrait

1.   Sketch and Code


Code

2.   Overview

For our first assignment, I developed a sketch that is a non-literal self-portrait. The project features a shark – my favourite animal – swimming through a deep-sea environment. The sketch incorporates procedural animation, gradient rendering, and state-based movement logic.

3.   Concept

My goal of this project was to communicate identity through something other than a human face. I chose a shark because it is my favourite animal. In fact, I own a vast collection of shark themed items in real life, so it felt like the most authentic representation of my personality.

4.   Process and Methods

My process began with translating shark anatomy into geometric shapes:

    • I broke the shark down into a main body (ellipse), a tail (triangles), and facial structure (lines and arcs).
function drawSharkSprite() {
  noStroke();
  fill(160); 
  
  // BODY
  ellipse(85, 60, 150, 50); 
  
  // TAIL
  let tailX = 145;   // Local variable
  triangle(tailX, 45, 185, 60, tailX, 75);  // Connection fin
  triangle(195, 95, 145, 45, 185, 60);      // Bottom tail lobe
  triangle(200, 30, 145, 75, 185, 60);      // Top tail lobe
  
  // FINS
  triangle(90, 15, 65, 40, 95, 40);
  
  // GILLS
  stroke(80); 
  strokeWeight(1);
  noFill();
  for(let i = 0; i < 3; i++) {
    let gx = 65 + (i * 5); // Spacing the gills
    arc(gx, 60, 10, 25, -HALF_PI, HALF_PI);
  }

  // --- HEAD DETAILS ---
  noStroke();
  // Teeth
  fill(255);
  for (let tx = 25; tx < 55; tx += 6) {
    let slantY = map(tx, 25, 55, 72, 65); 
    triangle(tx, slantY, tx + 6, slantY, tx + 3, slantY + 7);
  }
  
  // Slanted Eye
  stroke(0); 
  strokeWeight(3);
  line(25, 58, 35, 52); 
  
  // Slanted Mouth Line
  stroke(166, 58, 55); 
  strokeWeight(2);
  line(22, 72, 58, 65); 
}
    • I studied some p5.js functions to avoid static movement of the shark. Instead of the shark simply sliding across the screen, I used the sin() function to give it a bobbing effect.
// Apply bobbing motion using sin() to the Y translation
translate(shark.x, shark.y + sin(shark.yOff) * 10);
scale(2.0); 
drawSharkSprite();
5.   Technical Details
    • To create depth, I wrote a drawOcean() function that uses a for loop to iterate through the canvas height, and using the lerpColor() function transitions from a darker blue to a lighter blue.
    • For the bobbing motion of the shark, I had to make a sort of mathematical function to make it look like the shark is floating in the water. The y-axis position of the shark is updated in the updateShark() function, which makes it so that the values of the y-offset (animation timer) are altered accordingly to be used in the sine function.
function updateShark() {
  shark.x += shark.vx;
  shark.y += shark.vy;
  shark.yOff += 0.05;    // Increment animation timer

  // Boundary checks
  if (shark.x < 30 || shark.x > 220) shark.vx *= -1;
  if (shark.y < 40 || shark.y > 220) shark.vy *= -1;
}
    • To keep the shark within the visible “ocean” and prevent it from swimming off canvas, I implemented a kind of “bounce” motion with a collision system. Since the shark’s movement is controlled by a y and x velocity, its direction can be reversed by simply flipping the sign of the values if the shark passes a certain x or y value.
    • Rather than drawing each tooth and gill individually, I used loops to ensure that, if the shark’s position changes, the features remain aligned..
    • I used translate() and scale() within the draw() loop to allow the shark to move as a single unit without having to update the (x,y) coordinates for every single shape in the sprite.
6.   Reflection

This project was a significant learning curve in managing coordinates. Initially, my shark would fall apart when it moved because the fins weren’t “attached” to the body’s x and y variables. Learning to use translate() solved this by creating a new local coordinate system for the shark. Also, I had a lot of trouble with the “bounce” mechanism of the shark before properly understanding how the coordinates worked. I am proud of my final result, but I hope that in the future I will be able to complete the coding process quicker now that I’ve better grasped some of the built-in functions and coordinate system.

7.   Resources

Assignment_1: Self portrait

I started the work with directly showing my visible form with basic shapes. I did have to look up a new function “curve” to draw my bangs because the shape the “arc” function formed was not good enough. I drew the edge with the “curve” function and then filled in with the arc.

When it comes to portraying myself I thought of including my identity of being a science student apart from my looks, because I love what I do and it is a big part of me and I love to play with the sterotypes. At first I tried to do that by showing myself in a lab coat, but it was sort of difficult because I honestly didn’t know how to draw a lab coat, and I gave up to make a T-shirt looking thing. Then I included the “blowing things up” interation (which might be a bit inappropriate) because of how we used to joke about such things in lab courses.

I got the idea of eye tracing from the “Embarrassed Koala” example and Self-portrait by Pauline Wee that we were shown in class. But because I had the idea of making the explotion animation already, I thout it would be funnier if I made the eyes go in different dirrections and looked stupid, so I flipped through the p5js tutorials and founs the “variables and change” page which I then based my code on (I tried to look at the codes for the embarrased koala example but something was wrong with by browser and the code couldn’t show up). However what I intended to do was somehow different from the original code so I tried a few things and switched things around until the animation worked.

I like the eye tracking and the mouse click interaction codes so I put them below.

//eye movement
  lefteyeX=170+mouseX%width/26
  lefteyeY=150+mouseY%width/24
  righteyeX=230+(-mouseX)%width/26
  righteyeY=166+(-mouseY)%width/23
  //these codes are for normal (non-stupid) eye tracing
  // righteyeX=213+mouseX%width/26
  // righteyeY=150+mouseY%width/23

These are the codes for the eye tracking. I used -mouseX and -mouseY for the right eye so the direction of movement was oppodite from the left (I just instinctively tried this and found that it works so this likely isn’t the most concise code). It looked fun. I also kept the normal eye-tracking codes just in case I wanted to change into a normal look.

if(mouseIsPressed===true) {
    fill('orange')
    stroke('rgb(254,254,0)')
    strokeWeight(3)
  } else {
   noFill()
    noStroke()
    }
    triangle(170,300,160,276,180,292);
    triangle(179,291,185,271,197,290)
    triangle(197,290,232,278,226,298)
    triangle(179,300,157,317,187,312)
    triangle(179,307,182,338,198,312)
    triangle(197,290,206,263,211,293)
    triangle(198,312,207,328,214,304)
    triangle(214,311,232,324,225,300)
    triangle(225,292,241,295,224,306)
    noStroke()
    ellipse(200,300,57,32)
if(mouseIsPressed===true) {
    textSize(25)
    fill('rgb(197,0,0)')
    stroke('rgb(0,0,0)')
    strokeWeight(4)
  } else {
   noFill()
    noStroke()
    }
    text('BOOM!',164,308);

This is the code for the explosion animation on click. The explosion cloud was sort of bad because I couldn’t really figure out how to draw the fancy anime explosions, so it was just composed of an oval and a bunch of triangles. I learned the “if” “else” code from the Conditionals and Interactivity page of the p5js tutorial.

The final results look like this. My friends and I had a good laugh at it.

The space for future improvement that remains is that a lot of my codes are lengthy and verbose. I think this will be improved as I learn mode codes that will be able to show the same effects in a more consice and controlable way. I should also have researched more on the p5js page to perfect the codes I alread know but I was sort of exhausted by figuring out the curves and animations. And I think I lack some creativity in the thinking process as it took me quite some time to think of doing something other than regular portraying. Maybe spending some time brainstorming before I start assignments would help.

Overall I am relatively satisfied with the outcomes and really did enjoy playing around with codes and animations. And I am looking forward to more interesting activities 🙂

Citations:

  • https://p5js.org/tutorials/conditionals-and-interactivity/
  • https://p5js.org/tutorials/variables-and-change/
  • Pauline Wee Assignment 1: Self Portrait https://intro.nyuadim.com/2022/09/01/assignment-1-self-portrait-6/
  • https://p5js.org/reference/

Assignment 1: Self Portrait

Concept:

For the first assignment self-portrait. I decided to create a code for an image of a frog, and the idea was to create it using the 2D primitives, and my goal was to take what we learned in class about how to code using the shapes and implement it into my own piece, changing the colors, the size, and layering of the shapes and experimenting with the code to see what works for the image I had in my mind. The goal was to practice layering and the proportions, and I added small details like the eyelash and the fly to give the frog more detail.

How it’s made:

The image was created entirely using p5.js, I first created the frame size then created the background color and then chose a subject to create which is a frog.

I used basic shapes like ellipse, circle, and lines, and arc to build the frog. I built it from the back to the front, layered it from legs to body to head, then eyes, and lastly the details. I used the color fills and stroke changes to separate different parts of the frog. In addition to the frog i added a small fly to add more detail to the portrait as I felt it was on theme.

A part of the code I’m proud of:

A particular part of the code that I’m proud of is the mouth and the eyelashes. Because they required more precision and experimentation than the rest of the shapes, I would say these parts took me the longest to perfect and be satisfied with the results. The mouth uses an arc function, which requires specific angles to create a smooth curved line, and the eyelashes had to be carefully placed using the line function to angle them naturally around the eye to give the appearance of eyelashes.

The arc required understanding about how the arc worked because it isn’t as straightforward as the ellipse or the circle. I had to experiment and reference to examples from the p5.js to understand how it works more clearly.

https://p5js.org/examples/shapes-and-color-shape-primitives/

https://p5js.org/reference/p5/arc/

Because the mouth needed to sit naturally between the eyes and the end of the face, I adjusted the X position and the Y position multiple times to get the expression right. And I experimented with the width and the height to get the most natural looking smile. I also increased the stroke weight for this part of the feature to give the mouth a bold cartoon like outline to make the mouth stand out without overpowering the eyes.

//mouth
noFill();
stroke(0);
strokeWeight(10);
arc(305,400,150,100,0,PI);

//eyelashes
stroke(0);
strokeWeight(6);

//left eye lashes
line(170,180,150,160);
line(200,170,200,150);
line(230,180,250,160);

//right eye lashes
line(370,180,350,160);
line(400,170,400,150);
line(430,180,450,160);

Reflection:

I’m satisfied with how expressive the frog looks, especially the eyes and the smile and the addition of the fly. It adds more detail, and something I think would be interesting to implement in the future once we learn how complete more complex code, is a blinking animations for the eyes or how to make the code responsive to interaction for example if I click on the fly it starts flying around. Overall, this project helped me understand how coordinate changes can affect the design and how layering can differ the shape placement and how line weight can be played around with and used to advantage and how to code shapes more confidently overall. I look forward to learning more complex codes for the future to help enhance my coding skills.

Week 1: Self Portrait by Mhara Al Nuaimi

My Concept:

For this assignment, we had to create a self-portrait using only code in p5.js. Instead of making a normal human face, I chose to turn myself into a panda character. I picked a panda because its one of my favorite animals honestly, and i felt like it represented me the most for my portrait. Since this is my first time working with p5, I wanted something simple that still lets me practice shapes and positions.

The whole portrait is drawn using code, not the mouse. I built the panda using basic shapes like circles, rectangles, and arcs. Each part of the panda, like the ears, eyes, nose, and body, is placed using x and y values. My goal was to learn how shapes can work together to form a character instead of just random objects on the screen.

My Portrait:

A part of the code I like is how I created the panda’s face using only circles and one arc. Even though it looks simple, getting the face to look right took a lot of adjusting.

Here is my code: 

function setup() {
  createCanvas(600, 600);
}

function draw() {
  background("rgb(255,151,235)");

  // head
  fill(255);
  circle(300, 260, 220);

  // ears
  fill(0);
  circle(200, 150, 90);
  circle(400, 150, 90);

  // eye patches 
  circle(250, 260, 70);
  circle(350, 260, 70);

  //eyes
  fill(255);
  circle(250, 260, 30);
  circle(350, 260, 30);

  fill(0);
  circle(250, 260, 12);
  circle(350, 260, 12);

  // nose
  circle(300, 300, 20);

  // mouth
  noFill();
  stroke(0);
  arc(300, 320, 50, 30, 0, PI);

  // body
  noStroke();
  fill(255);
  rect(220, 360, 160, 150, 40);

  // arms
  fill(0);
  rect(180, 380, 40, 100, 20);
  rect(380, 380, 40, 100, 20);

  // feet
  rect(240, 500, 50, 40, 20);
  rect(310, 500, 50, 40, 20);
  
  // bamboo
  fill(0,200,0);
  rect(470, 350, 30, 200);
  line(470, 390, 500, 390);
  line(470, 430, 500, 430);

}

Changing just a few numbers made the panda look very different. Sometimes the eyes looked crossed, and sometimes the mouth was too low. Fixing those small things helped me understand how exact the coordinates need to be.

How was this made? : 

First, I created the canvas and chose a background color. Then I made the panda’s head using a large circle and attached the ears to the top. After that, I worked on the face using circles for the eye patches, eyes, and pupils. I kept running the sketch and changing the x and y values until the face felt centered. This part took the longest because small changes made a big difference.

After finishing the face, I added the nose and mouth using a circle and an arc. Then I created the body, arms, and feet using rectangles with rounded corners so the panda looked soft instead of sharp. I also added a piece of bamboo next to the panda using rectangles and lines.

I mainly used what we learned in class, like rect(), circle(), arc(), line(), and fill(). When I forgot how something worked, I checked the p5.js reference. The hardest part for me was thinking in numbers instead of just drawing what I see.

Reflection and future ideas:

This project helped me see how coding can be used for art. At first, it felt strange to draw by typing numbers instead of using a pencil, but after testing and fixing things again and again, it started to make sense.

One thing I learned is that order matters in code, because shapes drawn later appear on top of others. I also learned how careful you have to be with placement, since even moving a shape a little can change the whole look of the character.

If I keep working on this, I would like to add more detail, like clothes or props, and maybe small animations like blinking eyes. I also want to try making the panda react to the mouse or keyboard. Overall, this was a good start for learning p5.js, and I feel more comfortable using shapes and coordinates now than before.

Week 1 – Self-portrait

Concept

In this assignment, I created a cartoon style portrait of myself. I practiced how to create basic shapes such as ellipses and circles, points, curves and lines. I also practiced using colors and changing the thickness of lines and shapes.

I made the portrait interactive by changing the portrait into night mode when the mouse is clicked, changing the background colors into darker colors and adding stars to represent night time.

Code I’m proud of

The part of the code I am most proud is how I change settings from day time to night time by using if condition. When the mouse is pressed, the background colors of the portrait is changed and stars are added to create the effect of change of time

// Declaration of colors
  let a, b, c;

// Change colors when mouse is pressed
    if (mouseIsPressed) {
      a = color(200, 200, 200);
      b = color(0, 100, 0);
      c = color(0, 0, 139);
  } else {
    a = color(243, 243, 25);
    b = color(0, 128, 0);   
    c = color(173, 216, 230);
  }

  // Use background color
  background(c);
  
  // Stars
  if (mouseIsPressed) {
    textSize(90);
    text("✨", 200, 90)
  }

Here is my portrait

Reflection

This was a very fun exercise where I got to explore using p5 to create images. While this is my first time doing something like this, I really enjoyed and opened to exploring it more. I can improve this project by making it more interactive, making the more shapes and customizations and adding more elements to the portraits

Week 1: Self Portrait using p5.js

CONCEPT

Before I started working on my self-portrait, I looked for inspiration on Pinterest and found this photo.

I wanted to create something fun and bubbly, so I began with a simple circle for the head, following the form of my inspiration, and added more shapes to create the features. Initially, I only planned to create a basic head and body figure. However, as I continued working, I struggled with how to design the body and make it visually cohesive with the head. Because of this, I decided to hide half of the character’s body by adding a table and placing the arms on top of it. This solution helped simplify my concern, but it also led to another challenge: I found it difficult to create the hands in between the forearms or the ellipses that I placed on top of the table. To resolve this, I added a phone to fill the space, which allowed the pose to feel more natural.

This decision led me to the creation of a figure that looks like a girl watching something on her phone, an activity that reflects something I do every day. After adding the phone, I felt that the figure was still lacking something. This led me to add animation to the piece. I realized that when people watch content on their phones, light from the screen reflects onto their faces. To create this effect, I used an ellipse to create a light source and hid parts of it under the bangs so that it would appear as though the glow was coming directly from the phone. To make it more realistic, I researched whether it was possible to create a flickering light effect on a loop. I found a video on YouTube that showed me how frame count works, and I asked for guidance from an AI on how to apply this concept to the ellipses I used to represent the phone’s light.

HIGHLIGHT

One of the biggest challenges I faced with this project was creating the hair. Initially, I intended to recreate my current hairstyle, but I found it too complex. As a result, I chose to recreate a previous version of my hairstyle when I had bangs and wavy hair. To achieve this, I experimented with layering ellipses on top of a rectangle to suggest waves and texture in the hair, and I adjusted the rotation of the ellipses to shape the bangs more naturally. Another challenge was animating the phone light so that it would blink continuously on a loop. Even after adding the ellipse that represents the phone’s light, it took me a lot of time to figure out how to animate it in a way that it would really look like the character was watching something on her screen.


//hair
  noStroke();
  fill(0);
  arc(300,242,236,210,360,QUARTER_PI);
  
  fill(0);
  rect(181.5,240,237);
  
  fill(0);
  ellipse (195,305,50,145);
  
  fill(0);
  ellipse (195,405,50,145);
   
  fill(0);
  ellipse (402,305,50,145);
  
  fill(0);
  ellipse (402,405,50,145);

  push();

// bangs
  translate(250, 230);
  rotate(-PI / 6);
  fill(0);
  ellipse(0, 0, 150, 100);

  translate(80, 40);
  rotate(-PI / 6);
  fill(0);
  ellipse(0, 0, 100, 170);

  fill(0);
  triangle(-130,-110,-80,-100,-160,-57);

  fill(0);
  triangle(-70, 100, -2, 50, 10, 87);

  pop();
//light from the phone
  noStroke();
  fill(255, 255, 255, 50 + sin(frameCount * 0.09) * 20);
  ellipse(300, 340, 227, 280);
REFLECTION

After completing the final touches, I felt relieved and satisfied with how the project turned out. Although the final outcome differed from what I originally expected, I believe it was successful, and I genuinely enjoyed the process of creating it.

Here’s the final code:

function setup() {
  createCanvas(600, 600);
}

function draw() {
  background(130);
  
  //window
  fill(192);
  stroke(255);
  strokeWeight(30);
  rect(100,50,400,300,0)
  
  fill(255);
  noStroke();
  rect(275,50,50,150,0)
  
  fill(255);
  noStroke();
  rect(100,180,390,50,0)
  
  //hair
  noStroke();
  fill(0);
  arc(300,242,236,210,360,QUARTER_PI);
  
  fill(0);
  rect(181.5,240,237);
  
  fill(0);
  ellipse (195,305,50,145);
  
  fill(0);
  ellipse (195,405,50,145);
   
  fill(0);
  ellipse (402,305,50,145);
  
  fill(0);
  ellipse (402,405,50,145);
 
  //neck
  noStroke();
  fill('#D5C29B');
  rect(270,400,60);
  
  //head
  fill('rgb(248,229,190)');
  ellipse (300,300,200,240);
  noStroke();
  
  //left ear
  fill('#EBDBB8');
  ellipse (200,310,35,60)
  noStroke();
  
  //right ear
  fill('rgb(248,229,190)');
  ellipse (400,310,35,60)
  noStroke();
  
  //shirt
  fill('#784E80');
  ellipse(300,480,470,100);
  
  fill('#E5D1A6');
  ellipse(300,434,60,27);
  
  //table
  fill(23);
  rect(0,490,600);
  
  //light from the phone
  noStroke();
  fill(255, 255, 255, 50 + sin(frameCount * 0.09) * 20);
  ellipse(300, 340, 227, 280);
  
  //left thumb
  fill('#E5D1A6');
  rect(263,430,20,37,22);
  
  // right thumb
  fill('#E5D1A6');
  rect(323,430,20,37,22);
  
  //phone
  fill(40);
  rect(275,420,55,90,10);
  
  //forearms
  fill('#EBDBB8');
  ellipse(173,480,230,70);
  
  fill('#EBDBB8');
  ellipse(430,480,230,70);
  
  //hands
  fill('#F8E5BE');
  rect(233,450,55,70,22);
  
  fill('#F8E5BE');
  rect(313,450,55,70,22);
  
  push();
  
  // bangs
  translate(250, 230);
  rotate(-PI / 6);
  fill(0);
  ellipse(0, 0, 150, 100);
  
  translate(80, 40);
  rotate(-PI / 6);
  fill(0);
  ellipse(0, 0, 100, 170);
  
  fill(0);
  triangle(-130,-110,-80,-100,-160,-57);
  
  fill(0);
  triangle(-70, 100, -2, 50, 10, 87);
  
  pop();
  
  //right eye
  fill(0);
  circle(252,325,45);
  
  fill(255);
  circle(252,329,45);
  
  //left eye
  fill(0);
  circle(345,325,45);
  
  fill(255);
  circle(345,329,45);
  
  //right pupil
  fill(190);
  circle (343,334,35);
  
  fill (70);
  circle(342,339,25);
  
  fill (255)
  circle(350,337,10);
  
  //left pupil
  fill(190);
  circle (254,334,35);
  
  fill (70);
  circle(255,338,25);
  
  fill (255)
  circle(262,337,10);
  
  //nose
  fill ("#F1DABD")
  triangle (310,370,298,329,290,370)
  
  //left eyelash
  stroke(0);
  strokeWeight(3);
  line(236, 309, 228, 305);
  
  stroke(0);
  strokeWeight(3);
  line(230, 315, 220, 312);
  
  stroke(0);
  strokeWeight(3);
  line(228, 324, 220, 324);
  
  //right eyelash
  stroke(0);
  strokeWeight(3);
  line(364, 314, 375, 308);
  
  stroke(0);
  strokeWeight(3);
  line(368, 320, 382, 316);
  
  stroke(0);
  strokeWeight(3);
  line(369, 327, 379, 326);
  
  //left earring
  fill('yellow');
  noStroke();
  circle(200,345,20);

  fill(0)
  noStroke();
  circle(203,347,11);
  
  //right earring
  fill('yellow');
  noStroke();
  circle(400,345,20);

  fill(0);
  noStroke();
  circle(396,347,11);
  
  //upper lip
  fill('rgb(242,174,186)');
  ellipse(295,388,17,10);
  
  fill('rgb(242,174,186)');
  ellipse(307,388,17,10);
  
  //lower lip
  fill('rgb(242,174,186)');
  ellipse(301,393,35,15);
  
  //lip line
  stroke('rgb(216,146,159)');
  strokeWeight(2);
  line(285,392,316,392);
  
  //left eyebrows
  stroke(20);
  strokeWeight(4);
  line(230,295,276,293);
  
  //right eyebrows
  stroke(20);
  strokeWeight(4);
  line(320,293,370,295);
  
}


Week 1 Self Portrait- Sky

Concept:

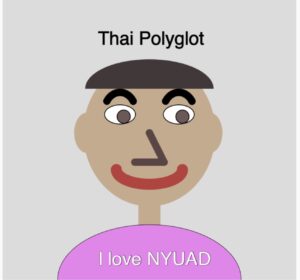
For the very first assignment in Intro to Interactive media, I was able to make a 2D portrait of my own face which also included parts of my identity such as lifted eyebrows, bigger eyes and writing some parts about my identity such as being a polyglot from Thailand for the very first time using coding as I previously don’t have any previous experience in coding.

Below is my finished portrait:

Screenshot

http://<iframe src=”https://editor.p5js.org/po2127/full/E8eNn1n2a”></iframe>

How it’s made:

This portrait was made using p5.js functions using 2D shapes and different functions such as Fill, Elipse, Stroke, Strokeweight, noStroke, Circle, Arc and line, these basic functions help me have a good foundation of what I need to make a realistic face and to explore and add different more specific features such as eyebrows etc.

When I started it was pretty difficult as it took me quite a while to watch the 3 videos available on YouTube and the link provided to get a good basic grasp of the functions of this platform because I haven’t coded much before and which code I need to do to make the shape of each facial features compatible with the body.

Screenshot

I designed my face to be more of starting with face frame using fill and elipse with no stroke, then eye using ellipse, and the eyehole using fill and circle, then eyebrow using arc, and nose lines and more specifically far apart because my nose is more big, lip, hair and ear using arc and neck using lines and shirt using text and stroke.

Later on adjusting more specific details such as arc of lips and eyebrows to make it fit well with how I look and my body proportions or look like me was also another hard step.

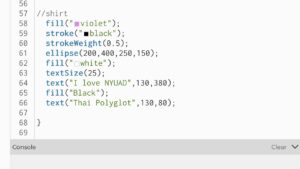
As highlighted code I’m proud of:

The part I am proud of is I was trying to add different parts of my identity to my shirt such as giving purple theme and writing some things that really resonate with me and are part of my identity on the shirt and to be able to write design of NYU shirt on the portrait.

Screenshot

Reflection:

I enjoyed creating my  self portrait, alsthought hroguhout the journey I had some difficulties especially at positioning the shapes and getting used to how the gird works, I was able to get through and I think the main thing I struggled was when to apply the noStroke function and finding the right strokeWeight for specific places such as lips etc.

I think in the future what could have been better is after I get better and more used to program I can add some side effects such as animations, and different gimics into the portrait.  But overall, I think as the first work it was already pretty fun and I feel proud to create my first very own portrait.

Self Portrait

For my self portrait I decided to draw a zombie because I like zombies. I wanted it to look like something I might’ve drawn in MS Paint, so I played around with shapes and colors until it felt and looked right.

The part I’m most proud of is the hair and bangs, since I had to align the points and angles perfectly to the pixel to make it one big coherent shape and honestly it was incredibly painful to do.

 //bangs
strokeWeight(0)
fill('black')
arc(300,225,320,200,PI,0)
triangle(300,220,100,350,150,200)
triangle(280,220,270,400,350,200)
triangle(340,220,500,400,460,220)
triangle(200,220,100,500,150,240)
triangle(80,100,500,300,300,105)
triangle(380,126,550,245,460,240)

I didn’t have any help with this aside from a few tips from the p5 reference page. I just kinda figured things out as I went along. Because of this, there are some aspects of the code that probably could’ve been done more efficiently, so I’ll carry what I learned through trial and error here and apply it to my next project. I’m also thinking of having the colors in her eyes shift so that it looks like it’s spiraling. That’d be pretty cool I think.

Assignment 1: Self Portrait

Concept:

For the very first assignment in Intro to Interactive media, I was able to make a 2D portrait of my own face which also included parts of my identity such as lifted eyebrows, bigger eyes and writing some parts about my identity such as being a polyglot from Thailand for the very first time using coding as I previously don’t have any previous experience in coding.

Below is my finished portrait:

Screenshot

http://<iframe src=”https://editor.p5js.org/po2127/full/E8eNn1n2a”></iframe>

How it’s made:

This portrait was made using p5.js functions using 2D shapes and different functions such as Fill, Elipse, Stroke, Strokeweight, noStroke, Circle, Arc and line, these basic functions help me have a good foundation of what I need to make a realistic face and to explore and add different more specific features such as eyebrows etc.

When I started it was pretty difficult as it took me quite a while to watch the 3 videos available on YouTube and the link provided to get a good basic grasp of the functions of this platform because I haven’t coded much before and which code I need to do to make the shape of each facial features compatible with the body.

Screenshot

I designed my face to be more of starting with face frame using fill and elipse with no stroke, then eye using ellipse, and the eyehole using fill and circle, then eyebrow using arc, and nose lines and more specifically far apart because my nose is more big, lip, hair and ear using arc and neck using lines and shirt using text and stroke.

Later on adjusting more specific details such as arc of lips and eyebrows to make it fit well with how I look and my body proportions or look like me was also another hard step.

As highlighted code I’m proud of:

The part I am proud of is I was trying to add different parts of my identity to my shirt such as giving purple theme and writing some things that really resonate with me and are part of my identity on the shirt and to be able to write design of NYU shirt on the portrait.

Screenshot

Reflection:

I enjoyed creating my  self portrait, alsthought hroguhout the journey I had some difficulties especially at positioning the shapes and getting used to how the gird works, I was able to get through and I think the main thing I struggled was when to apply the noStroke function and finding the right strokeWeight for specific places such as lips etc.

I think in the future what could have been better is after I get better and more used to program I can add some side effects such as animations, and different gimics into the portrait.  But overall, I think as the first work it was already pretty fun and I feel proud to create my first very own portrait.