This project is a voice-controlled Arduino car that allows a user to control a moving robot using simple spoken commands. Instead of buttons, remotes, or apps, the user speaks commands such as “forward,” “turn left,” “reverse,”or “stop.” The car listens and responds in real time.
The system uses the Web Speech API (built into modern browsers) to recognize speech. A fuzzy matching algorithmhelps the system understand different ways of saying the same thing. For example, if the user says “go forward,” “move forward,” or simply “forward,” the system will run the same command.
The computer communicates with the Arduino through serial communication (USB cable). Once the browser identifies the command, it sends a single character (f, b, l, r, s) to the car. The Arduino then interprets the command and drives the motors.
This creates a smooth and natural interaction where your voice becomes the controller.
The implementation is designed to feel natural, simple, and automatic. When the user opens the web page, the system asks for microphone access and immediately begins listening for voice commands once permission is given. It listens continuously, and a microphone icon provides live feedback by turning into a green pulsing circle when actively listening and a gray circle when idle. When the user speaks, the microphone captures the audio, the Web Speech API converts it into text, and a fuzzy matching algorithm chooses the closest valid command, even if the person says it in a different way. The interface then shows what the system heard, which command was selected, whether the Arduino is connected, and the current auto-mode status, helping the user understand what is happening at all times. Once a command is recognized, the browser sends it through USB to the Arduino, which drives the motors using the Motor Shield so the car can move, turn, stop, or reverse immediately.
Parts I’m Proud of
I am especially proud of how smart and flexible the command recognition system is, because the fuzzy matching allows the car to understand many different ways of saying the same command, making the interaction feel natural. I also like that the user experience is very smooth—the system starts listening automatically, works without any extra buttons, and gives clear visual feedback showing what it heard and what command it chose. The error handling is strong as well, so even if the microphone fails, the Arduino disconnects, or a command is unclear, the system continues running and informs the user about what went wrong. The real-time indicators for listening status, recognized text, executed commands, and connection state make the experience easy to follow. I am also proud of the continuous listening design, which removes the need to press a talk button and makes the car react instantly to the user’s voice. Finally, the code is clean and uses modern web APIs and smart algorithms, giving the project a professional and reliable feel.
AI Assistance. : This project used AI tools mainly to support coding, hardware wiring, testing, and final implementation were completed by me. AI was used to help clarify technical concepts. It assisted in explaining algorithms such as fuzzy matching and Levenshtein distance, and in organizing the projects. Any AI-generated text was reviewed, edited, and adapted to fit the actual project work. The creative decisions, programming logic, user testing, debugging, and system design were all done by me, with AI acting only as a supportive tool for communication and explanation.
User testing played an important role in identifying both design and technical issues. I began by testing the project myself. Originally, the controller was designed as a steering wheel, but I quickly realised that due to the limited space between the wheel and the box, the movement felt restricted. Replacing the wheel with a flat record-disc style controller made the rotation smoother and more comfortable. This change improved the overall usability before involving any external testers.
For the first round of user testing, the participant was able to understand the gameplay immediately and interact with the disc without any issues. This confirmed that the core interaction was clear and functional.
The second user test, however, revealed a major issue. At one point in the game, the disc stopped turning, and the player became frustrated since they were aiming for a high score. I later realised that this was due to the physical limitation of the potentiometer, which cannot rotate infinitely. Because there was no visual cue indicating the rotation limit, the user assumed the controller had broken. This highlighted the need to add a clear indicator to show when the disc has reached its endpoint and that the user needs to rotate in the opposite direction.
By the third user test, I explained this limitation to the participant beforehand, and the interaction went smoothly. They played without problems and suggested adding a character, such as a doll or a real figure on the screen, to make the visuals more engaging.
Overall, the user testing process helped refine both the physical design of the controller and the communication within the game interface. The feedback guided improvements that made the interaction more intuitive and reliable.
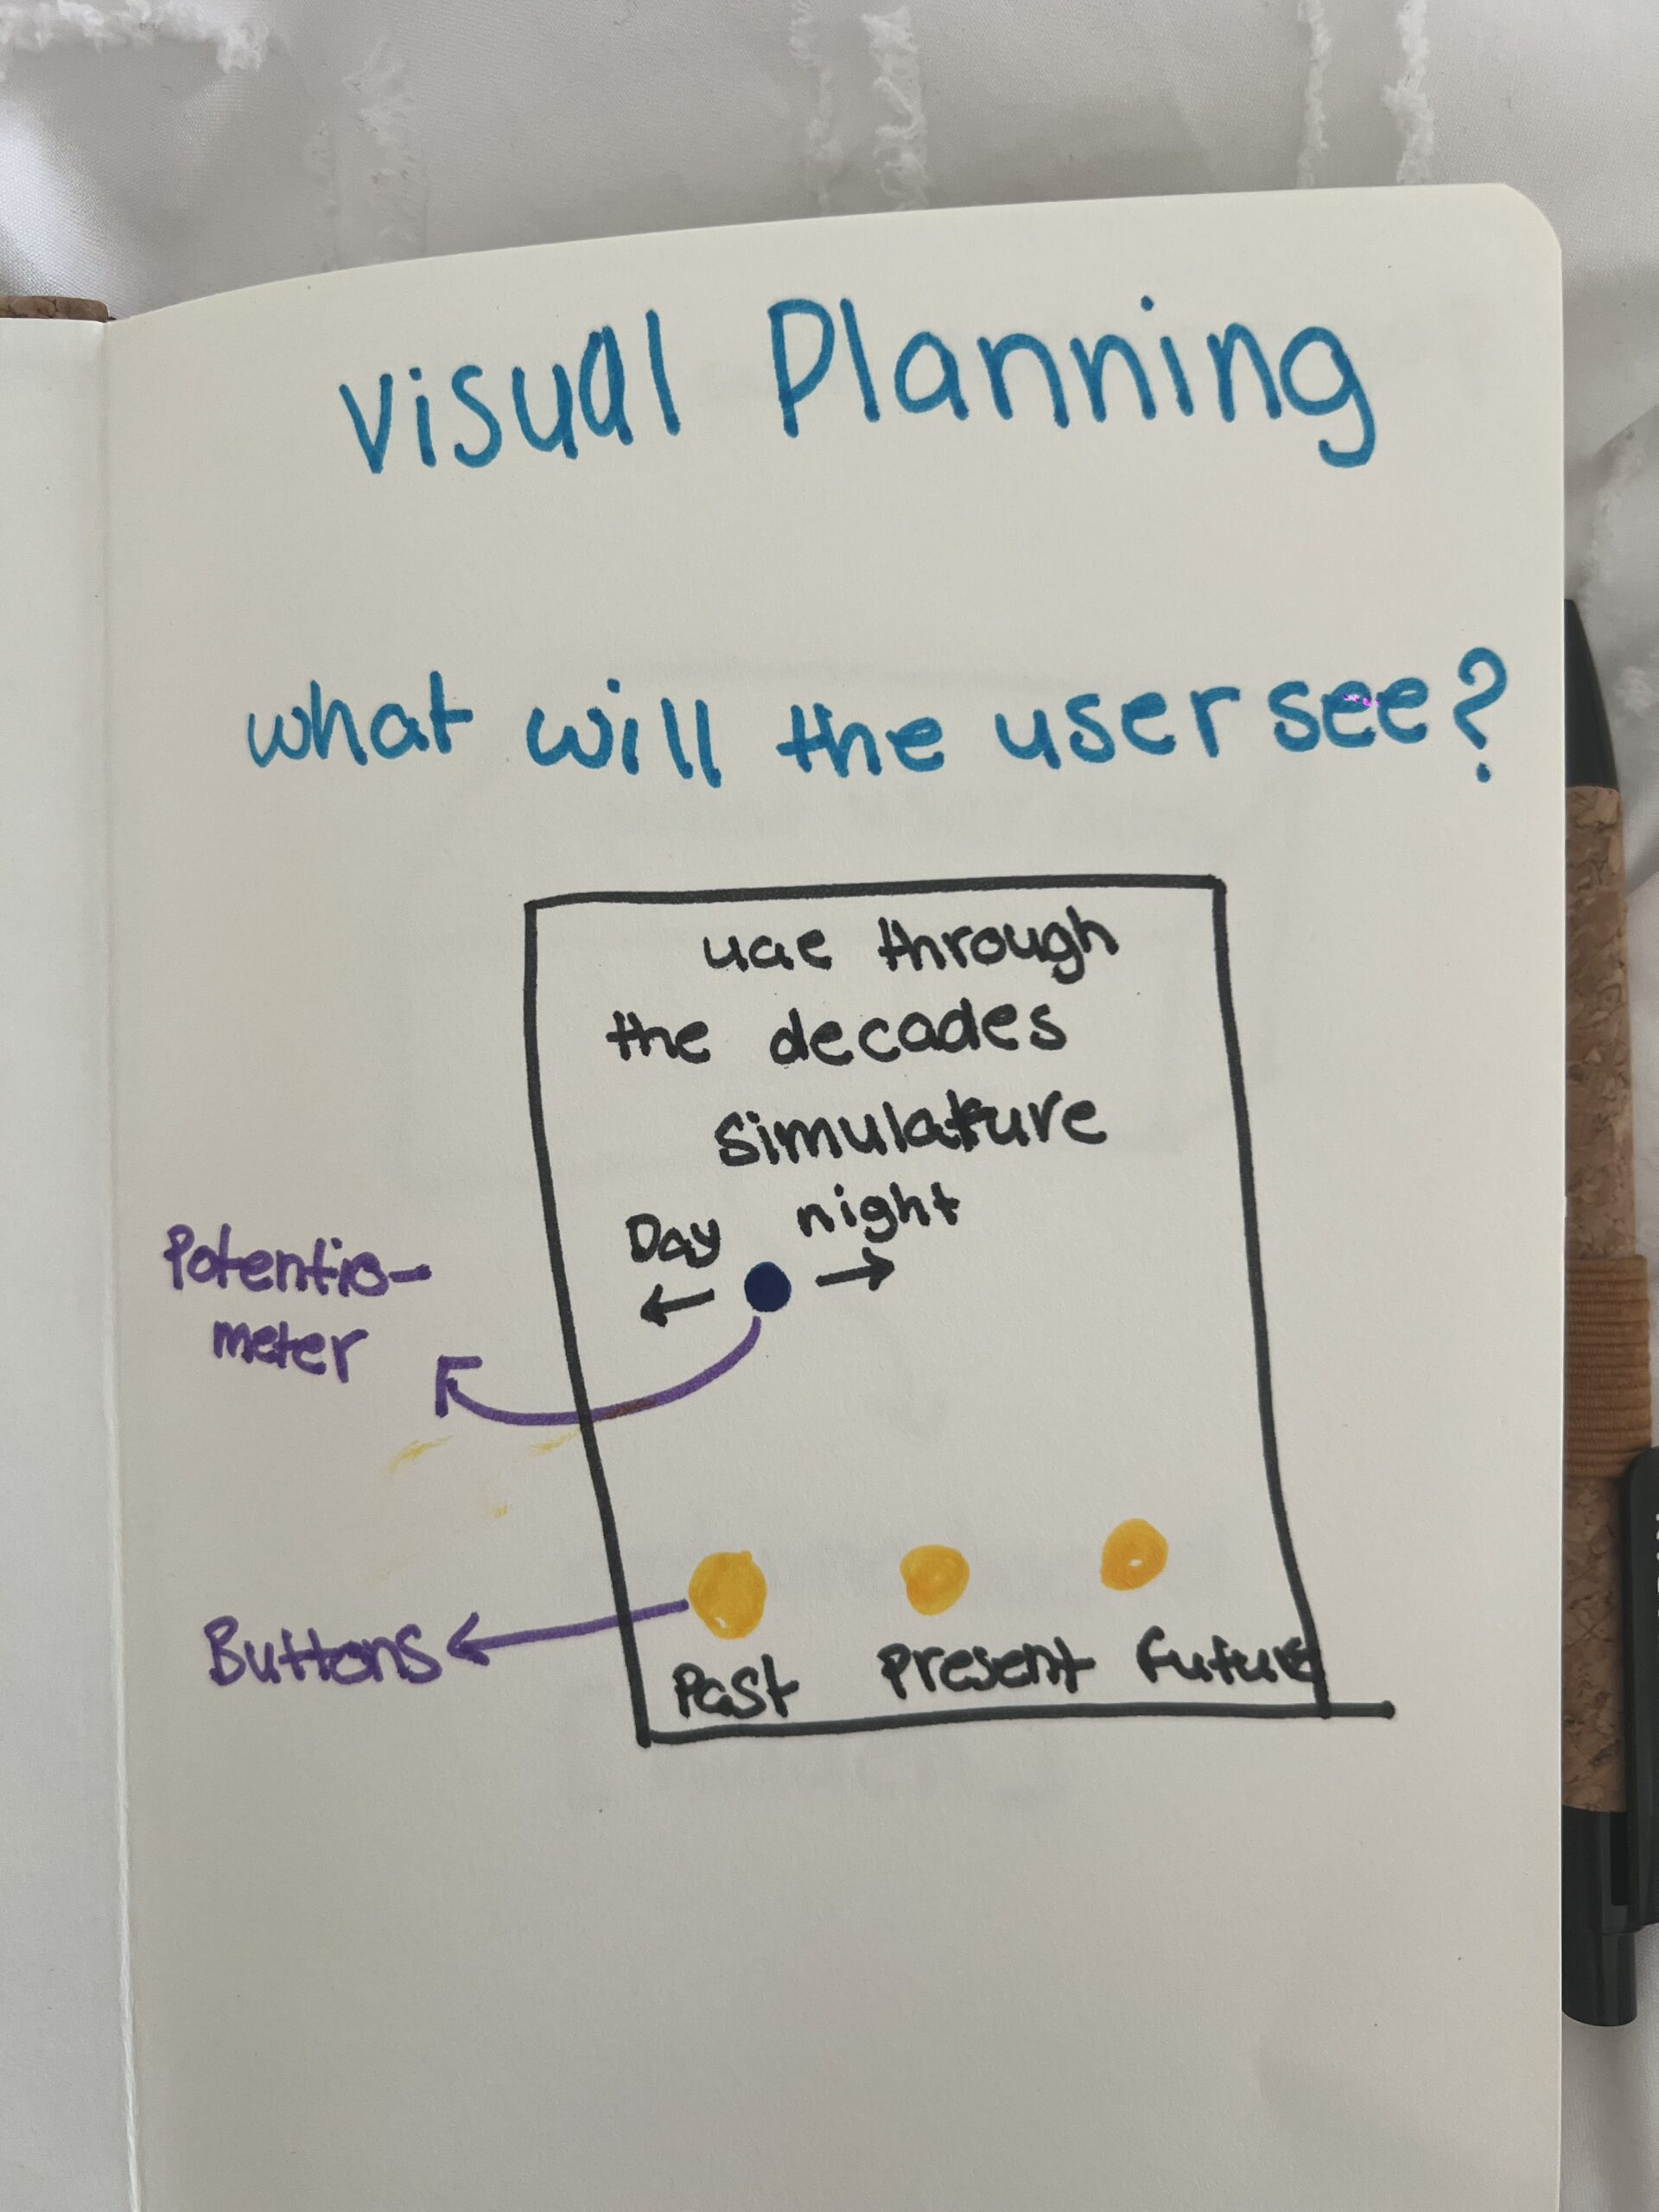
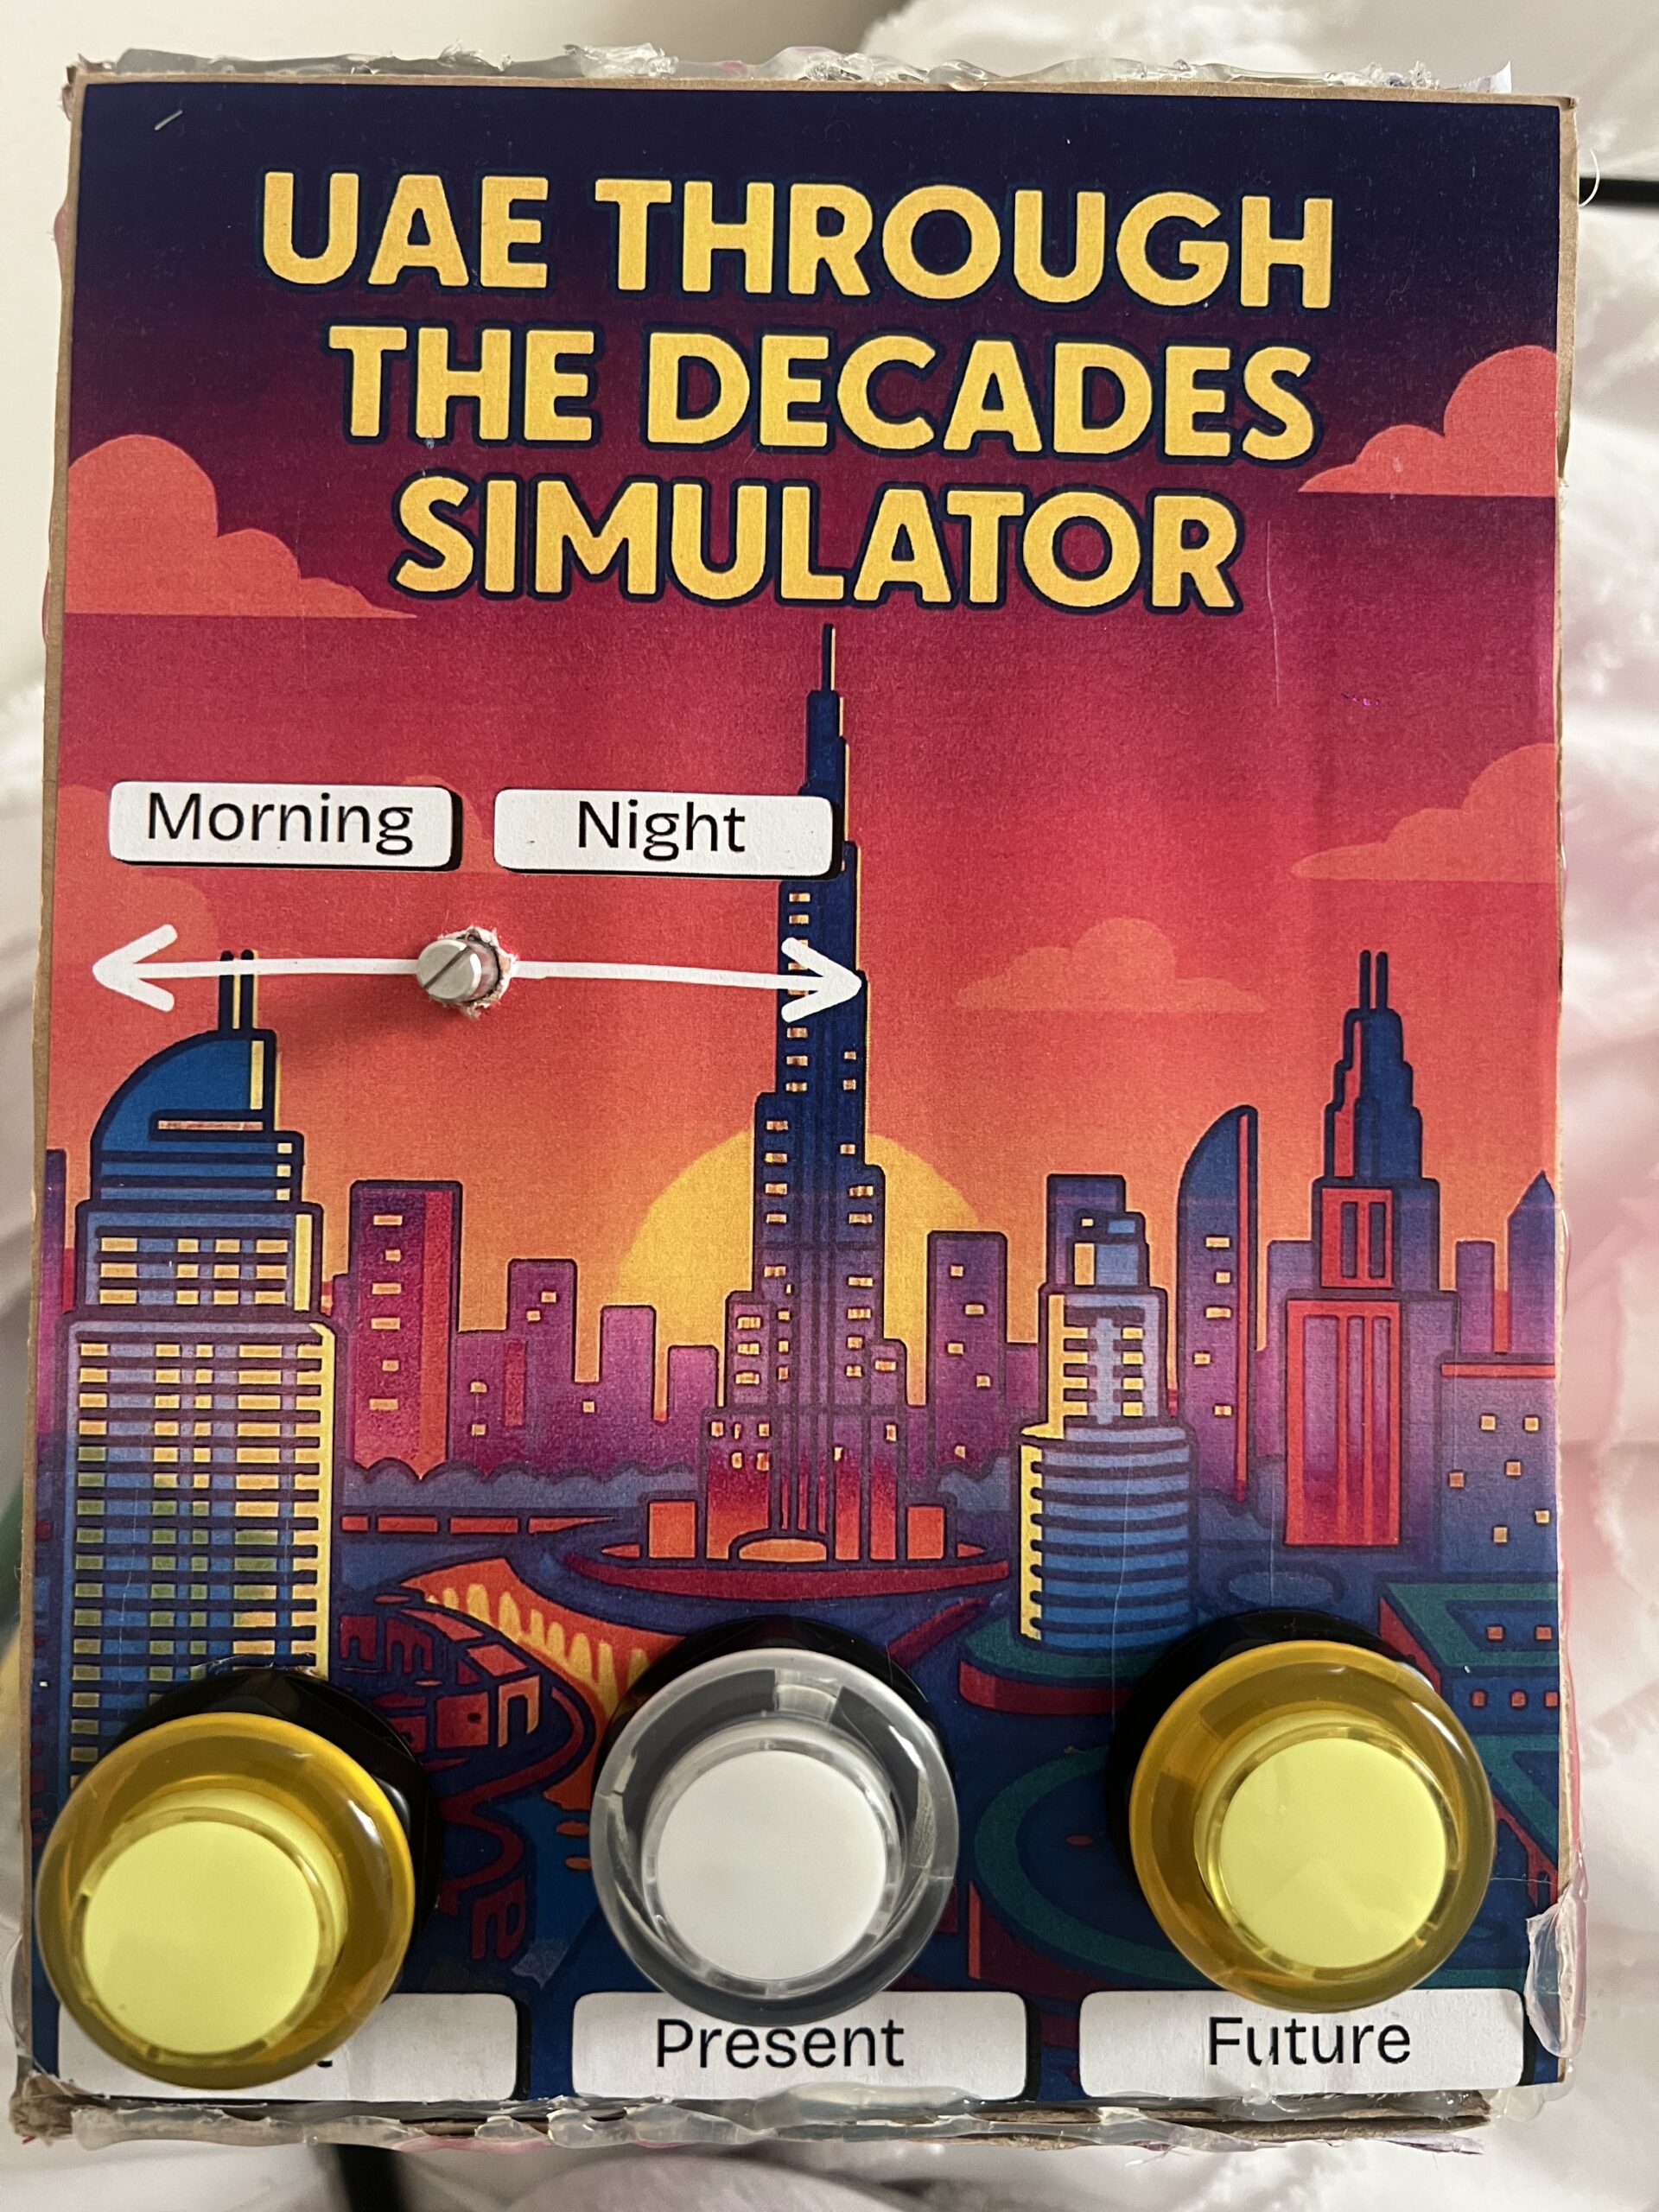
My project is a physical digital simulator that showcases the UAE across three eras: the past, the present, and the imagined future. The idea came from listening to my grandfather’s stories about how he used to live, and how different life is now. Seeing how quickly the UAE developed made me wonder how the future will look. I wanted to create an experience where people can explore this progression visually by interacting with a real physical device.
The simulator lets users switch between the three eras using physical buttons, and then cycle through multiple images for each era. A potentiometer controls the transition between morning and night, allowing people to view each scene in two different lighting conditions. Overall, the goal of my concept is to let users “travel through time” and explore how the UAE evolved and how it might continue to evolve.
How the Implementation Works
The project works through a simple but effective communication between Arduino and p5.js:
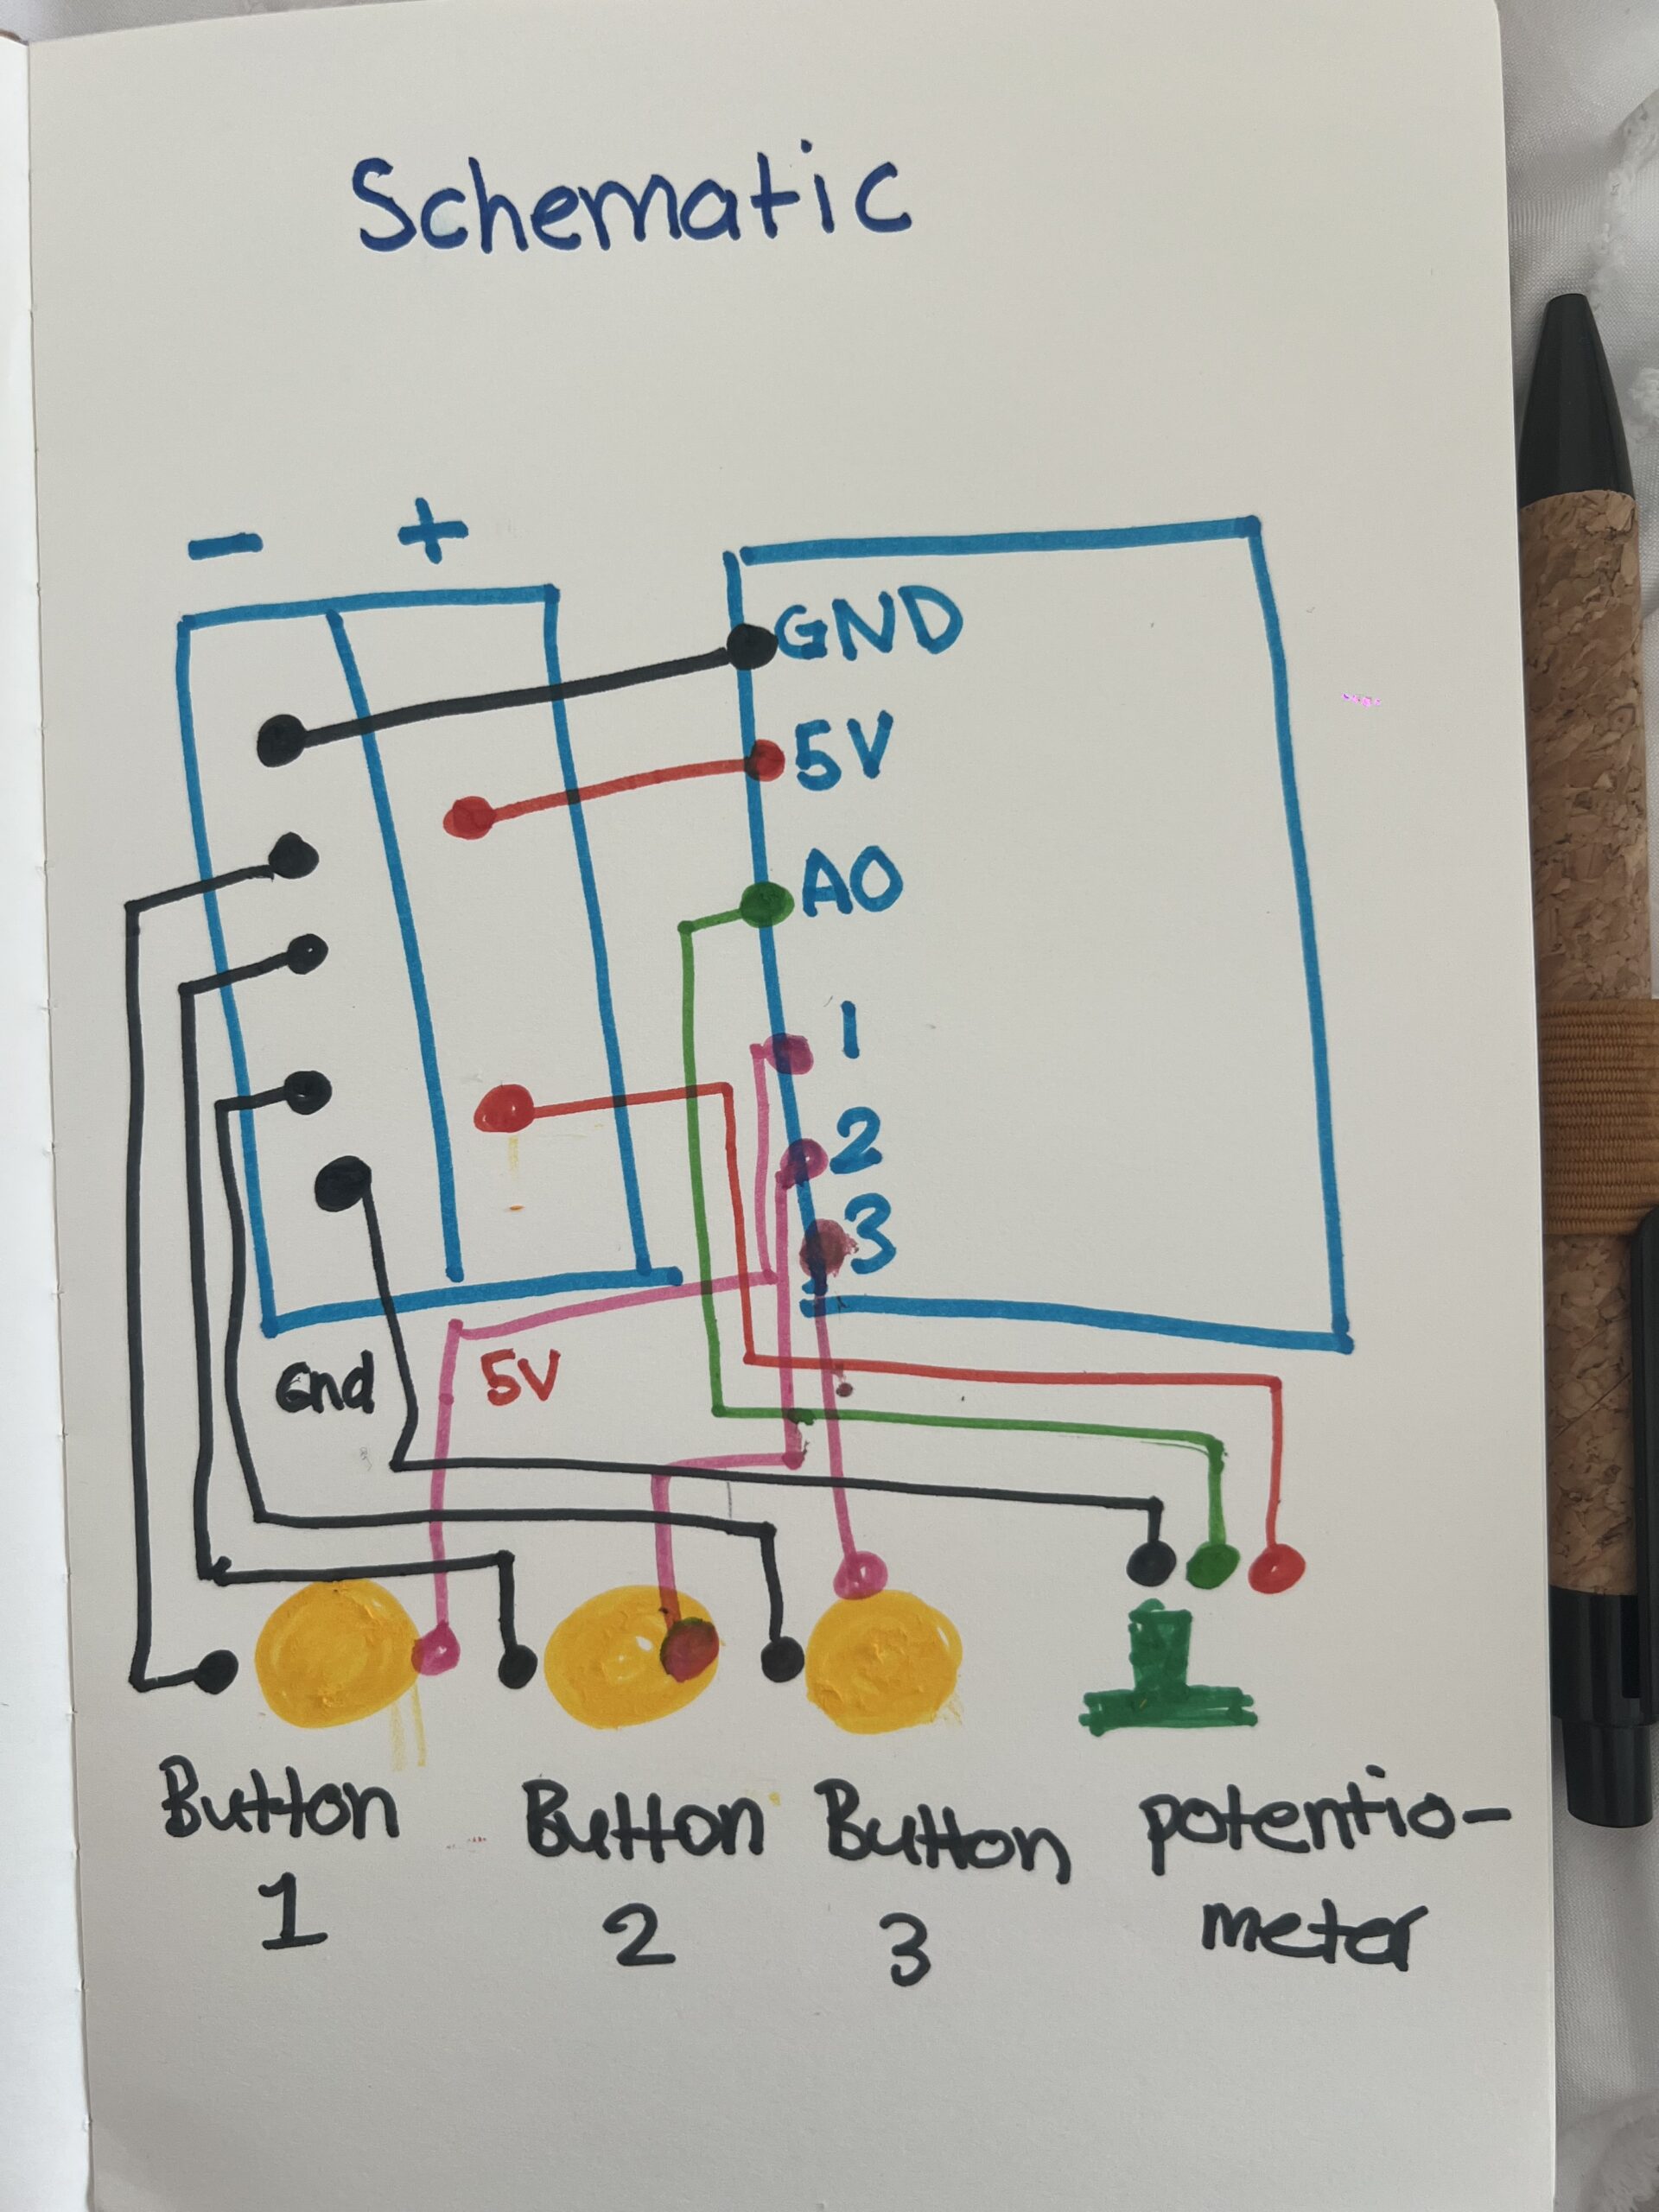
• The Arduino has three buttons (Past, Present, Future) and a potentiometer.
• When the user presses a button, Arduino sends data to p5.js identifying the era and which image should appear.
• When the user turns the potentiometer, Arduino sends a number from 0–1023, which p5.js interprets as morning vs. night.
• p5.js displays the correct image from a set of 18 total images (3 eras × 3 photos × 2 lighting versions).
• Everything is controlled physically the user doesn’t interact with the laptop at all after connecting.
I intentionally kept the interaction simple so it would be easy for younger users (including my younger brother) to understand instantly.
The interaction is entirely physical and designed to be intuitive:
• Three buttons, each labeled clearly: Past, Present, Future.
• Pressing a button cycles through three images per era.
• The potentiometer smoothly switches the scene from morning to night.
• No touchscreen interaction the laptop only displays the images.
My goal was to make the mapping extremely obvious. Every person who tested the project understood the basic interaction immediately because the controls directly match the results on the screen. The only part that took a few seconds to discover was that each button can be pressed multiple times to cycle through all images, but users figured it out naturally by experimenting.
Description of Arduino Code (with link/summary)
The Arduino code is fairly simple. It:
• Reads the state of three buttons using INPUT_PULLUP
• Reads a potentiometer value (0–1023)
• Tracks which era is active
• Tracks how many times the user pressed each button (to rotate through 3 images)
// pins
const int pastBtn    = 2;   // Button 1 Past UAE
const int presentBtn = 3;   // Button 2  Present UAE
const int futureBtn  = 4;   // Button 3  Future UAE
const int potPin     = A0;  // Potentiometer day/night

// variables
int era = 0;       // 0 = past, 1 = present, 2 = future
int imgIndex = 0;  // 0, 1, 2

bool pastPrev    = HIGH;
bool presentPrev = HIGH;
bool futurePrev  = HIGH;

void setup() {
  Serial.begin(9600);

  pinMode(pastBtn, INPUT_PULLUP);
  pinMode(presentBtn, INPUT_PULLUP);
  pinMode(futureBtn, INPUT_PULLUP);
}

void loop() {
  bool pastState    = digitalRead(pastBtn);
  bool presentState = digitalRead(presentBtn);
  bool futureState  = digitalRead(futureBtn);

  if (pastPrev == HIGH && pastState == LOW) {
    era = 0;
    imgIndex = (imgIndex + 1) % 3;
    sendData();
    delay(200);
  }

  if (presentPrev == HIGH && presentState == LOW) {
    era = 1;
    imgIndex = (imgIndex + 1) % 3;
    sendData();
    delay(200);
  }

  if (futurePrev == HIGH && futureState == LOW) {
    era = 2;
    imgIndex = (imgIndex + 1) % 3;
    sendData();
    delay(200);
  }

  pastPrev    = pastState;
  presentPrev = presentState;
  futurePrev  = futureState;

  //  update for the potentiometer
  static unsigned long lastSend = 0;
  if (millis() - lastSend > 200) {
    sendData();
    lastSend = millis();
  }
}
//serial
void sendData() {
  int timeVal = analogRead(potPin); // 0–1023

  Serial.print(era);
  Serial.print(",");
  Serial.print(imgIndex);
  Serial.print(",");
  Serial.println(timeVal);
}
Description of p5.js Code
The p5.js code handles:
• Displaying all 18 images
• Fading transitions between images
• Scaling images to full screen
• Playing different audio for each era
• Reading serial data from the Arduino
• Switching between three states:
• Connect screen
• Intro screen
• Simulator screen
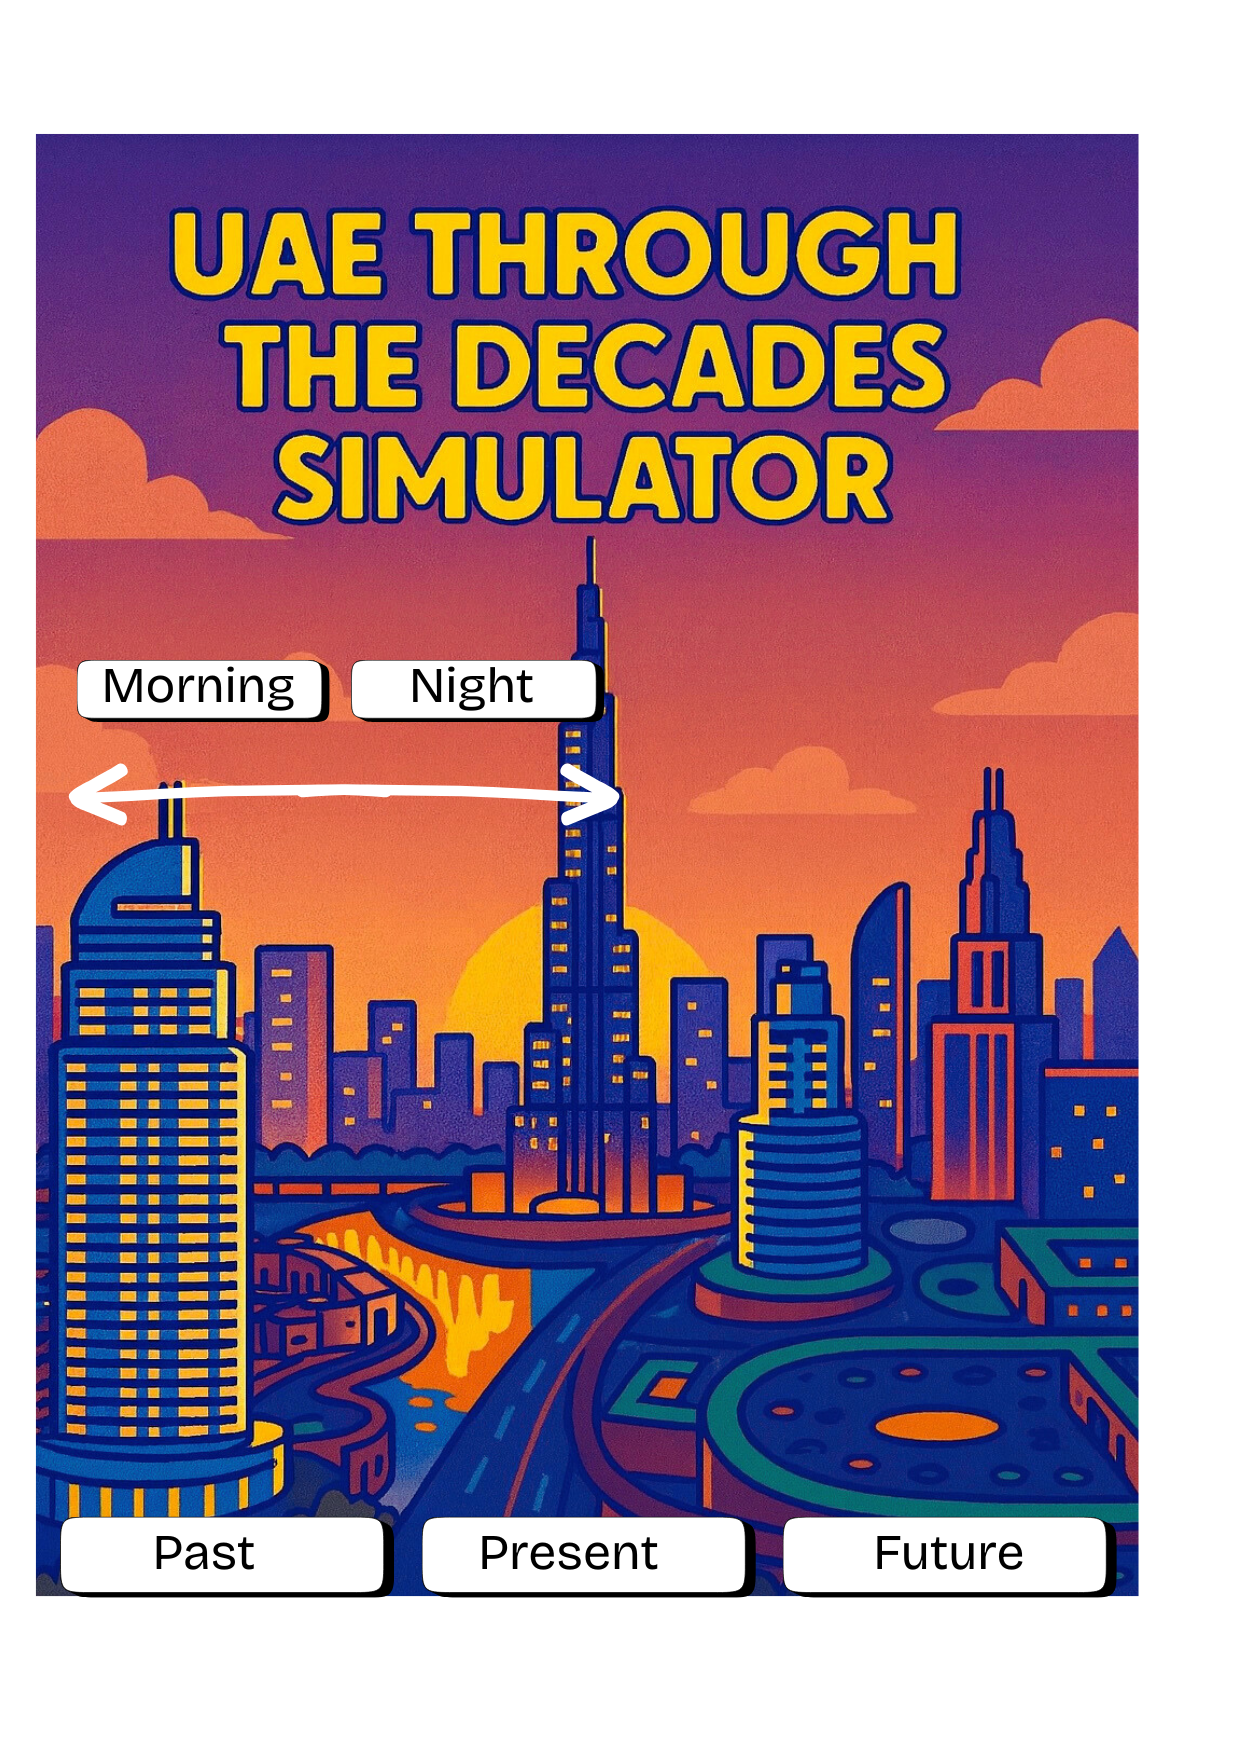
The images are the main content 18 total files (6 per era). They were made by taking real images of the UAE and using generative AI tools to convert them into cartoon versions. p5.js simply loads these files and displays them according to the physical input.
Communication Between Arduino and p5.js
The communication uses Web Serial:
1. The user clicks once to connect.
2. The browser opens a Serial Port window.
3. After selecting the Arduino, p5.js starts receiving lines of text like:
4. p5.js splits the line into:
• era (0 = past, 1 = present, 2 = future)
• imageIndex (0, 1, or 2)
• timeVal (0–1023, used for day/night)
Every change on the physical device immediately updates the display on screen.
It feels similar to using a game controller or a Joy-Con everything is physical, and the screen responds instantly.
What I’m Proud of
I am most proud of how clean and professional the final project looks.
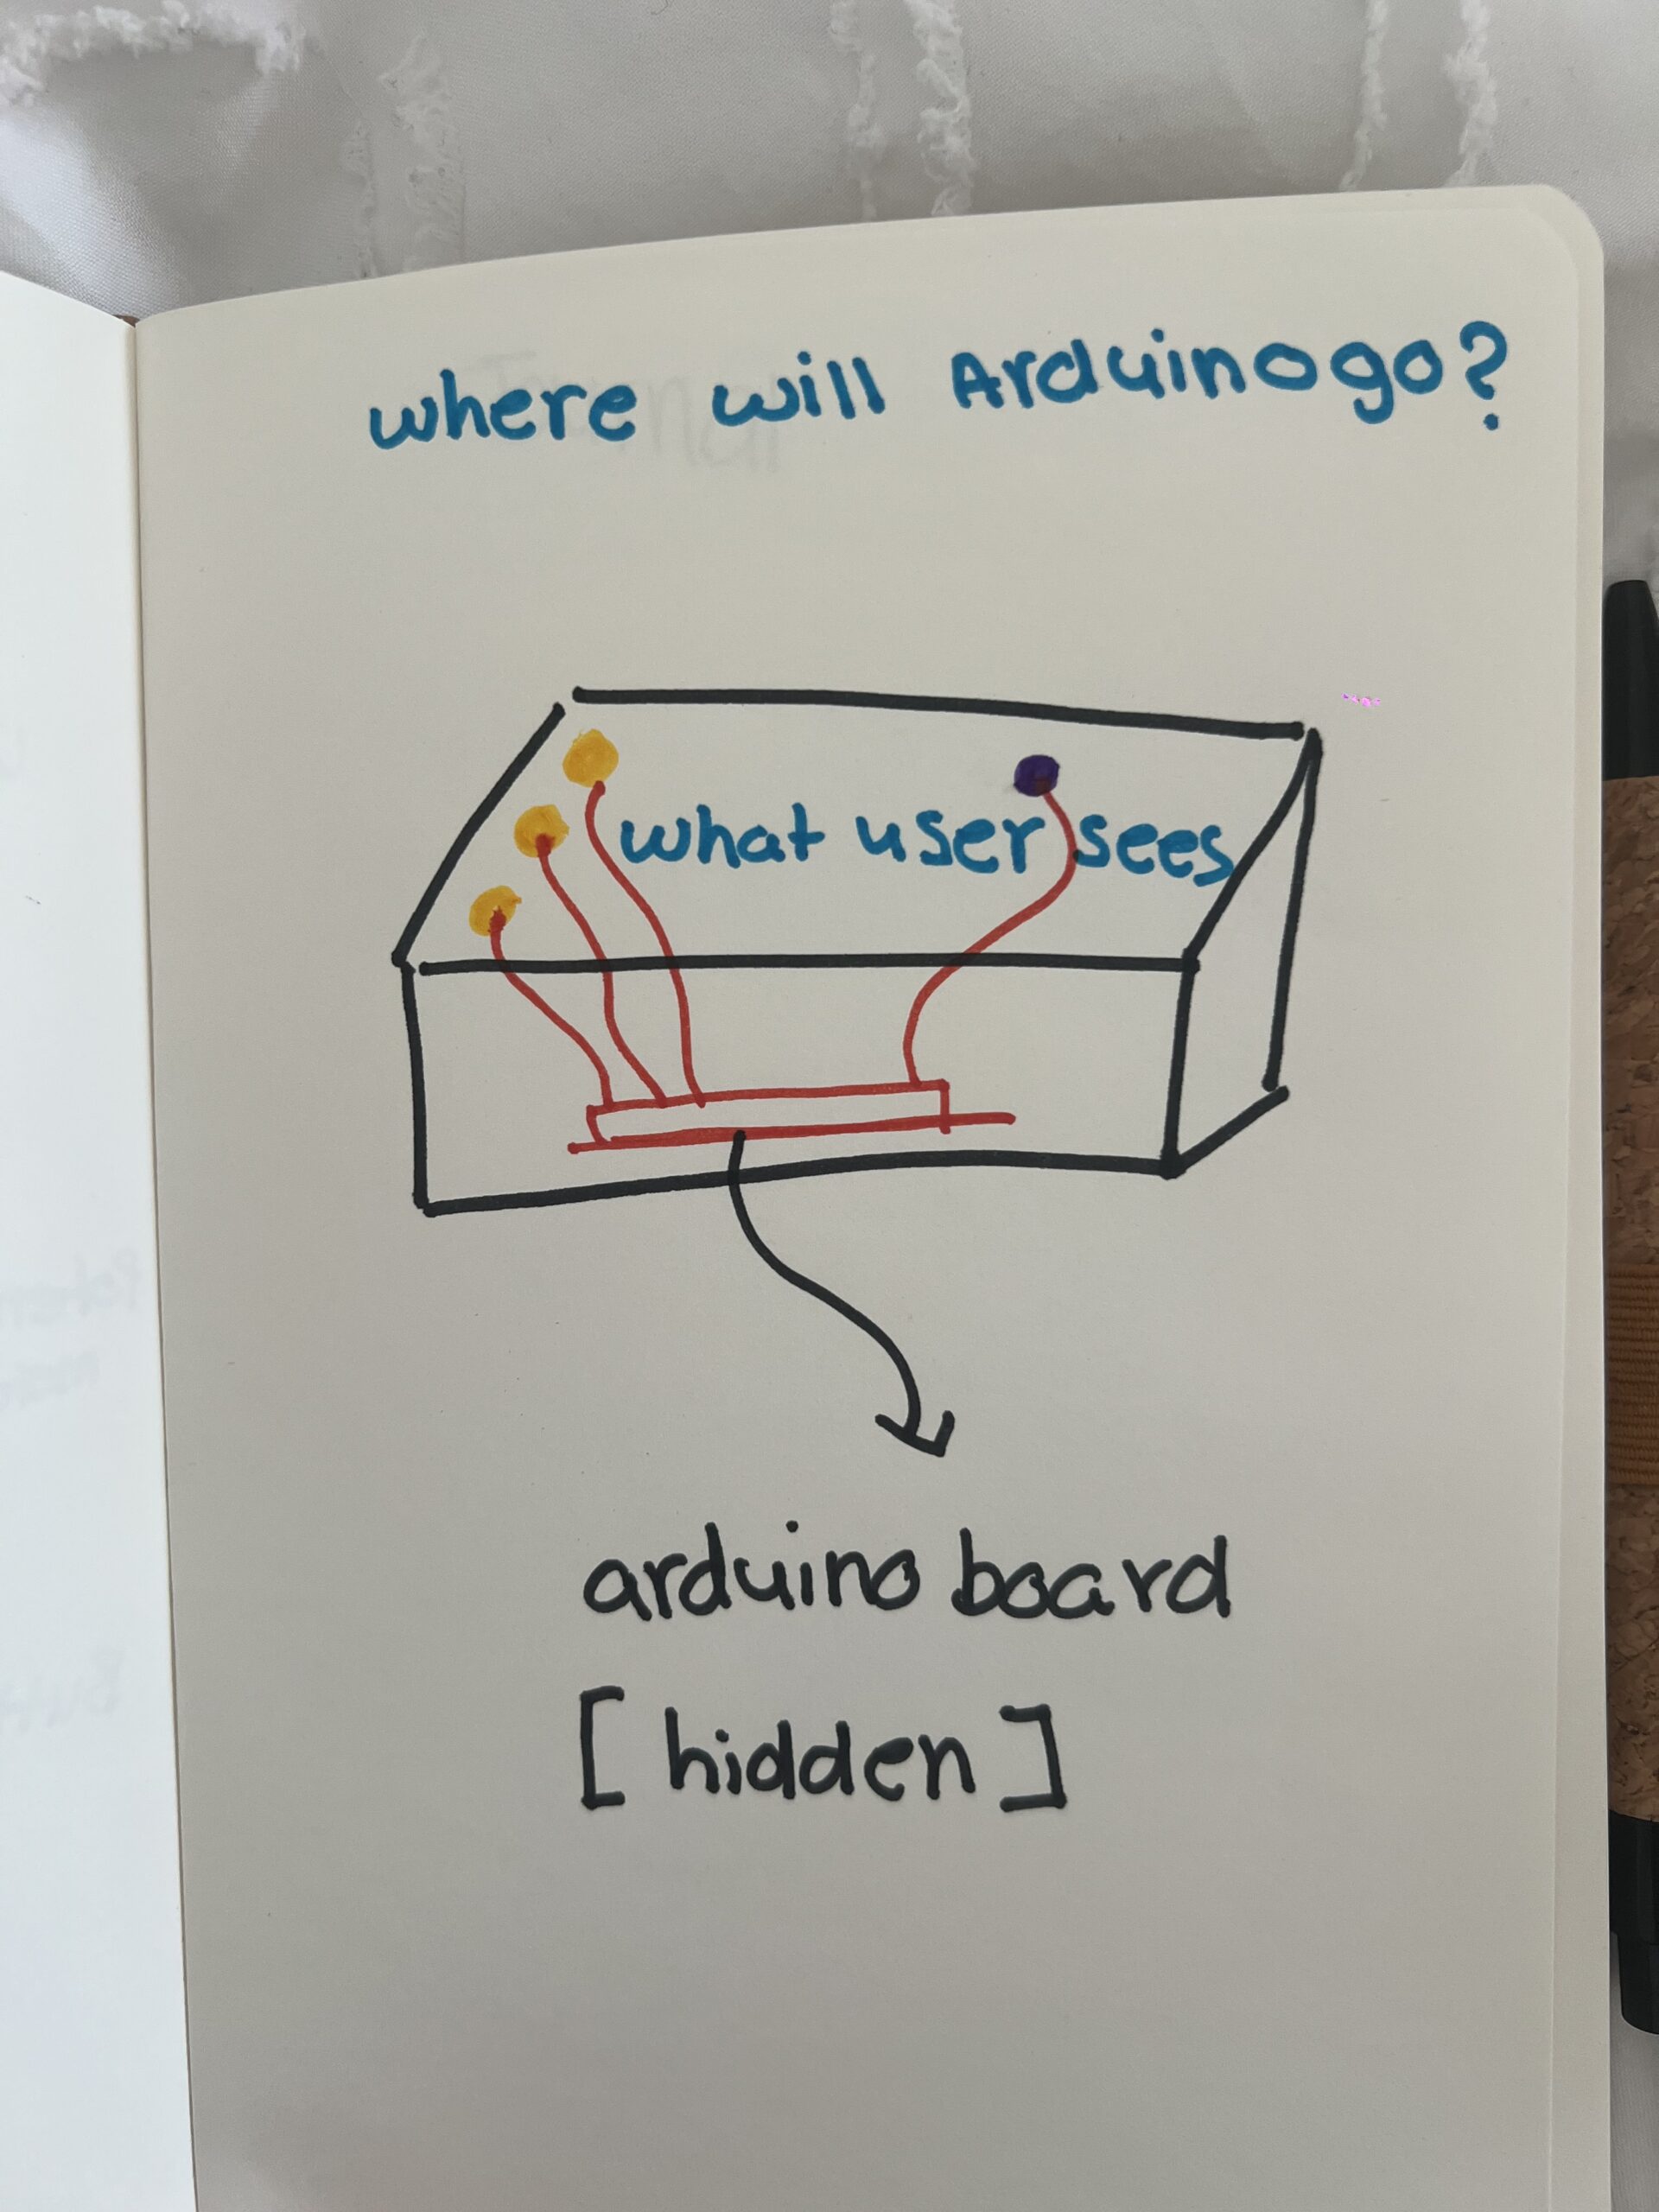
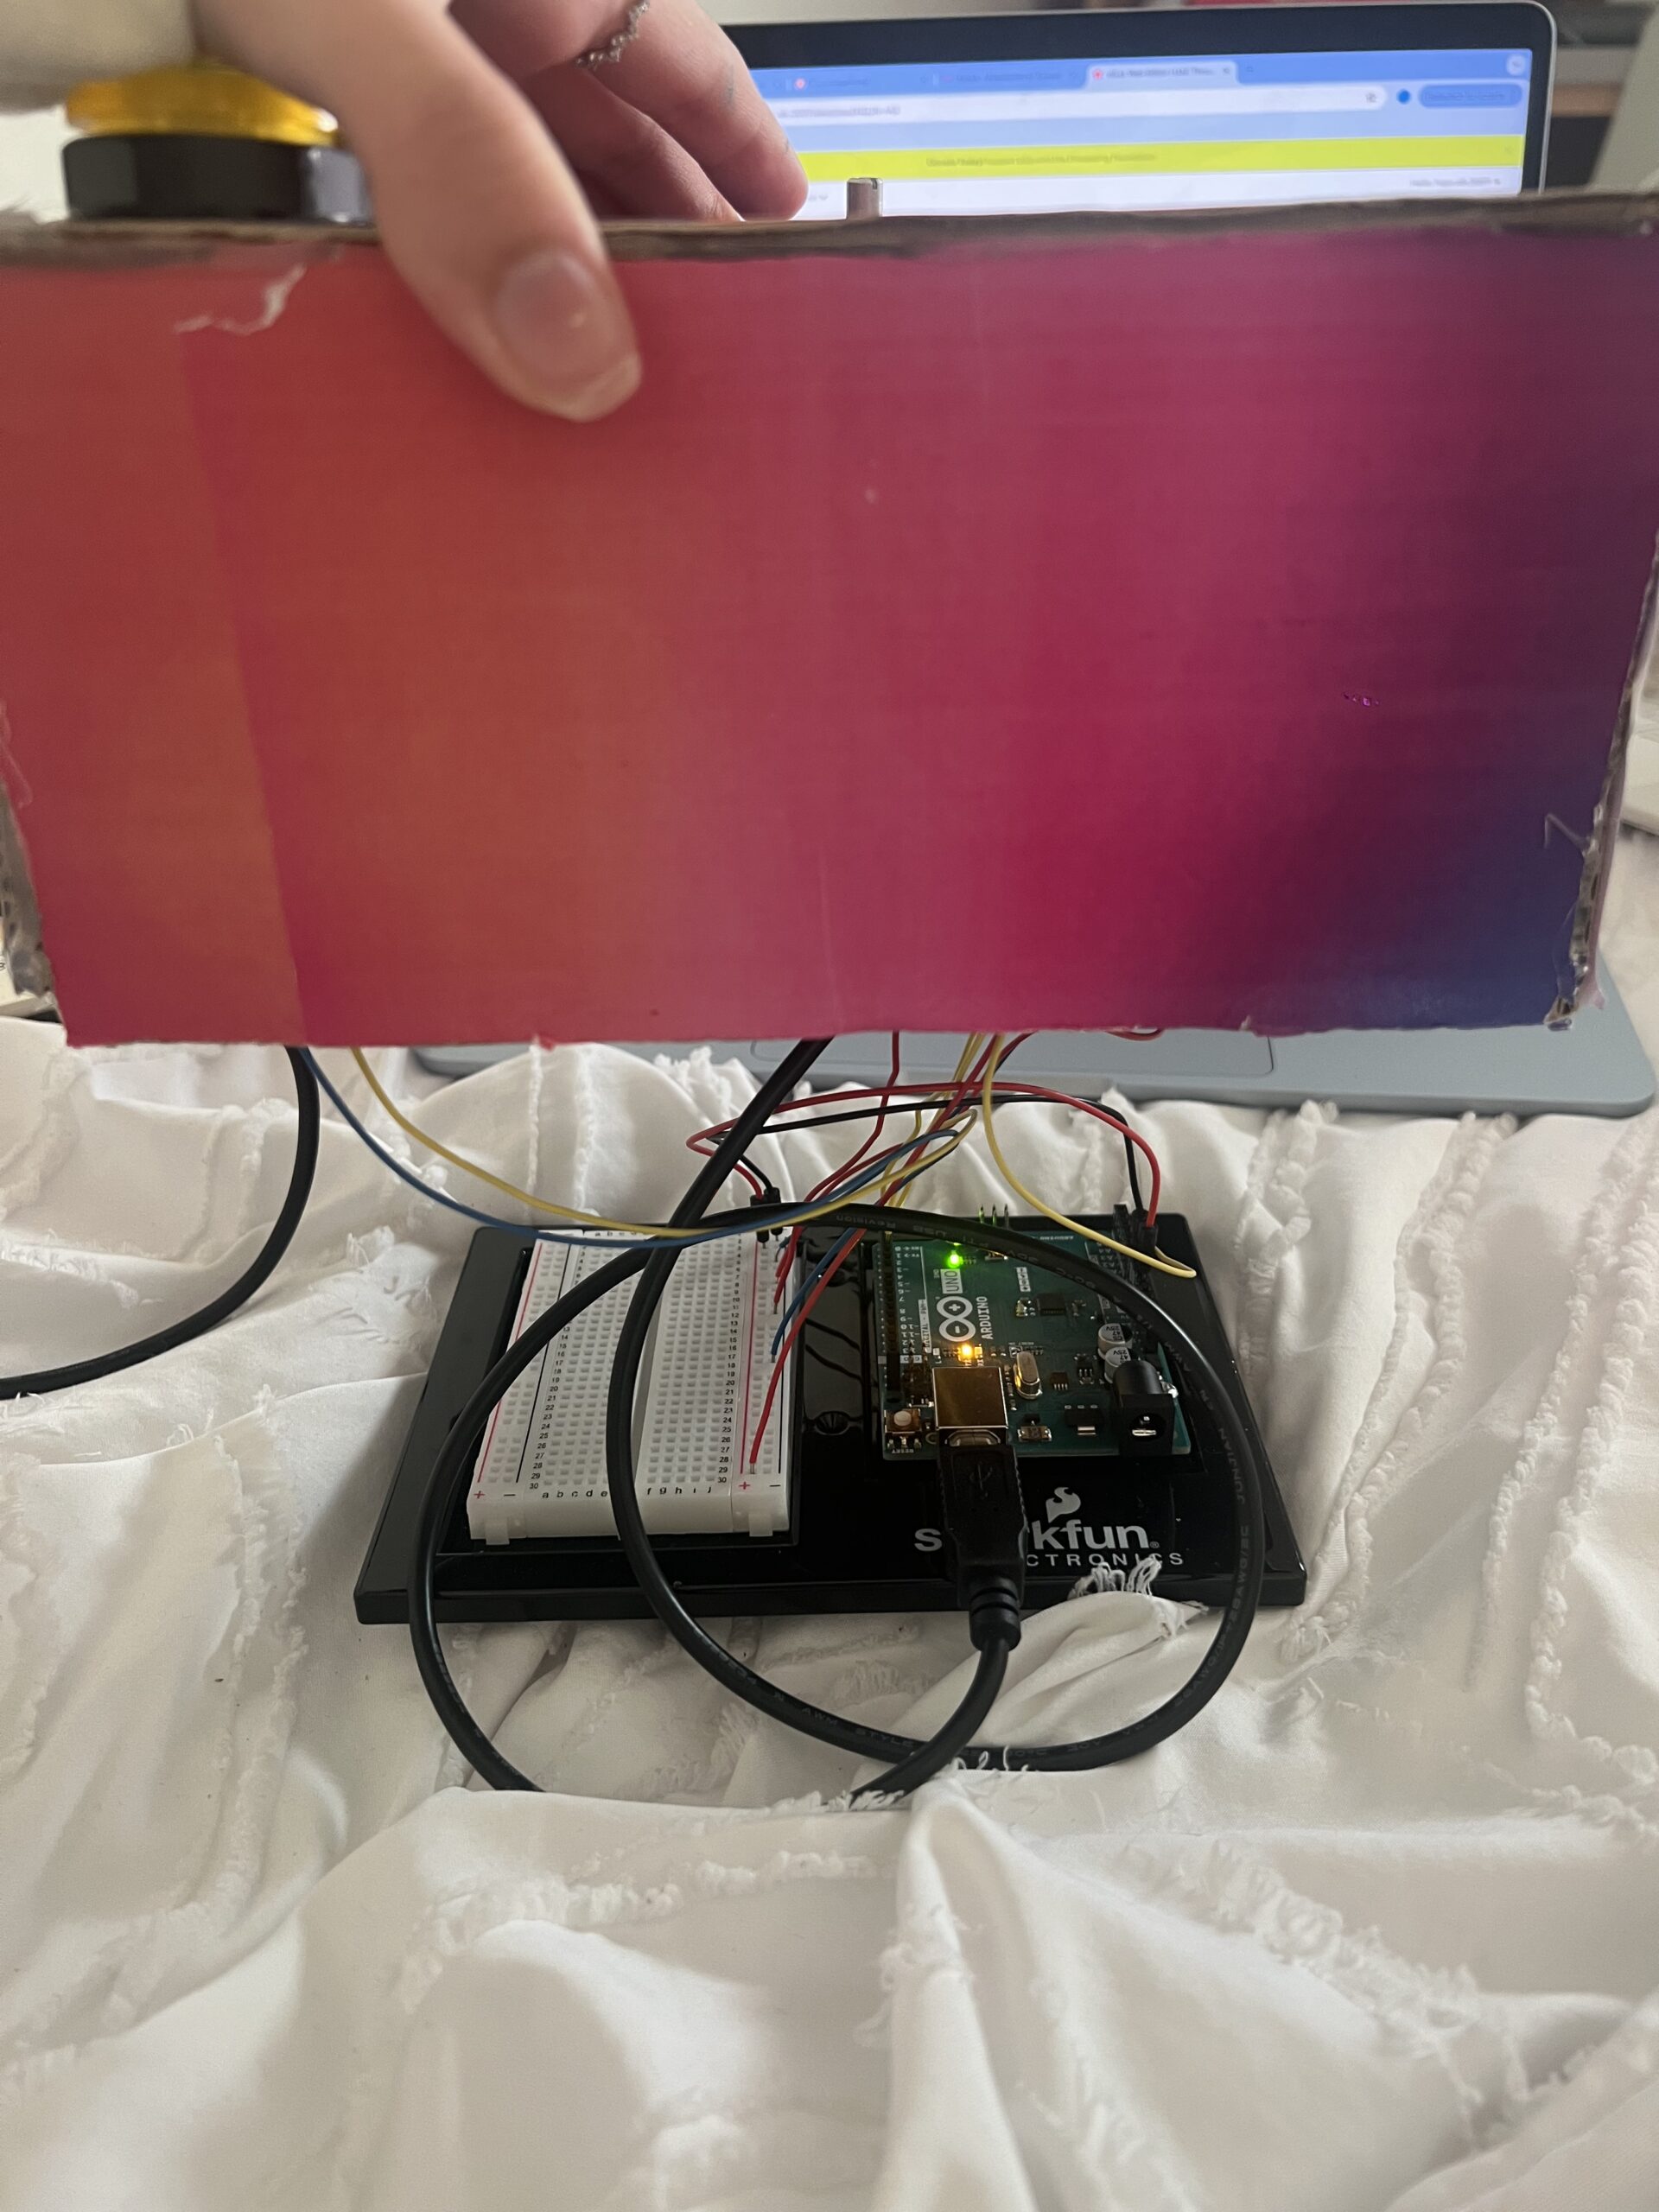
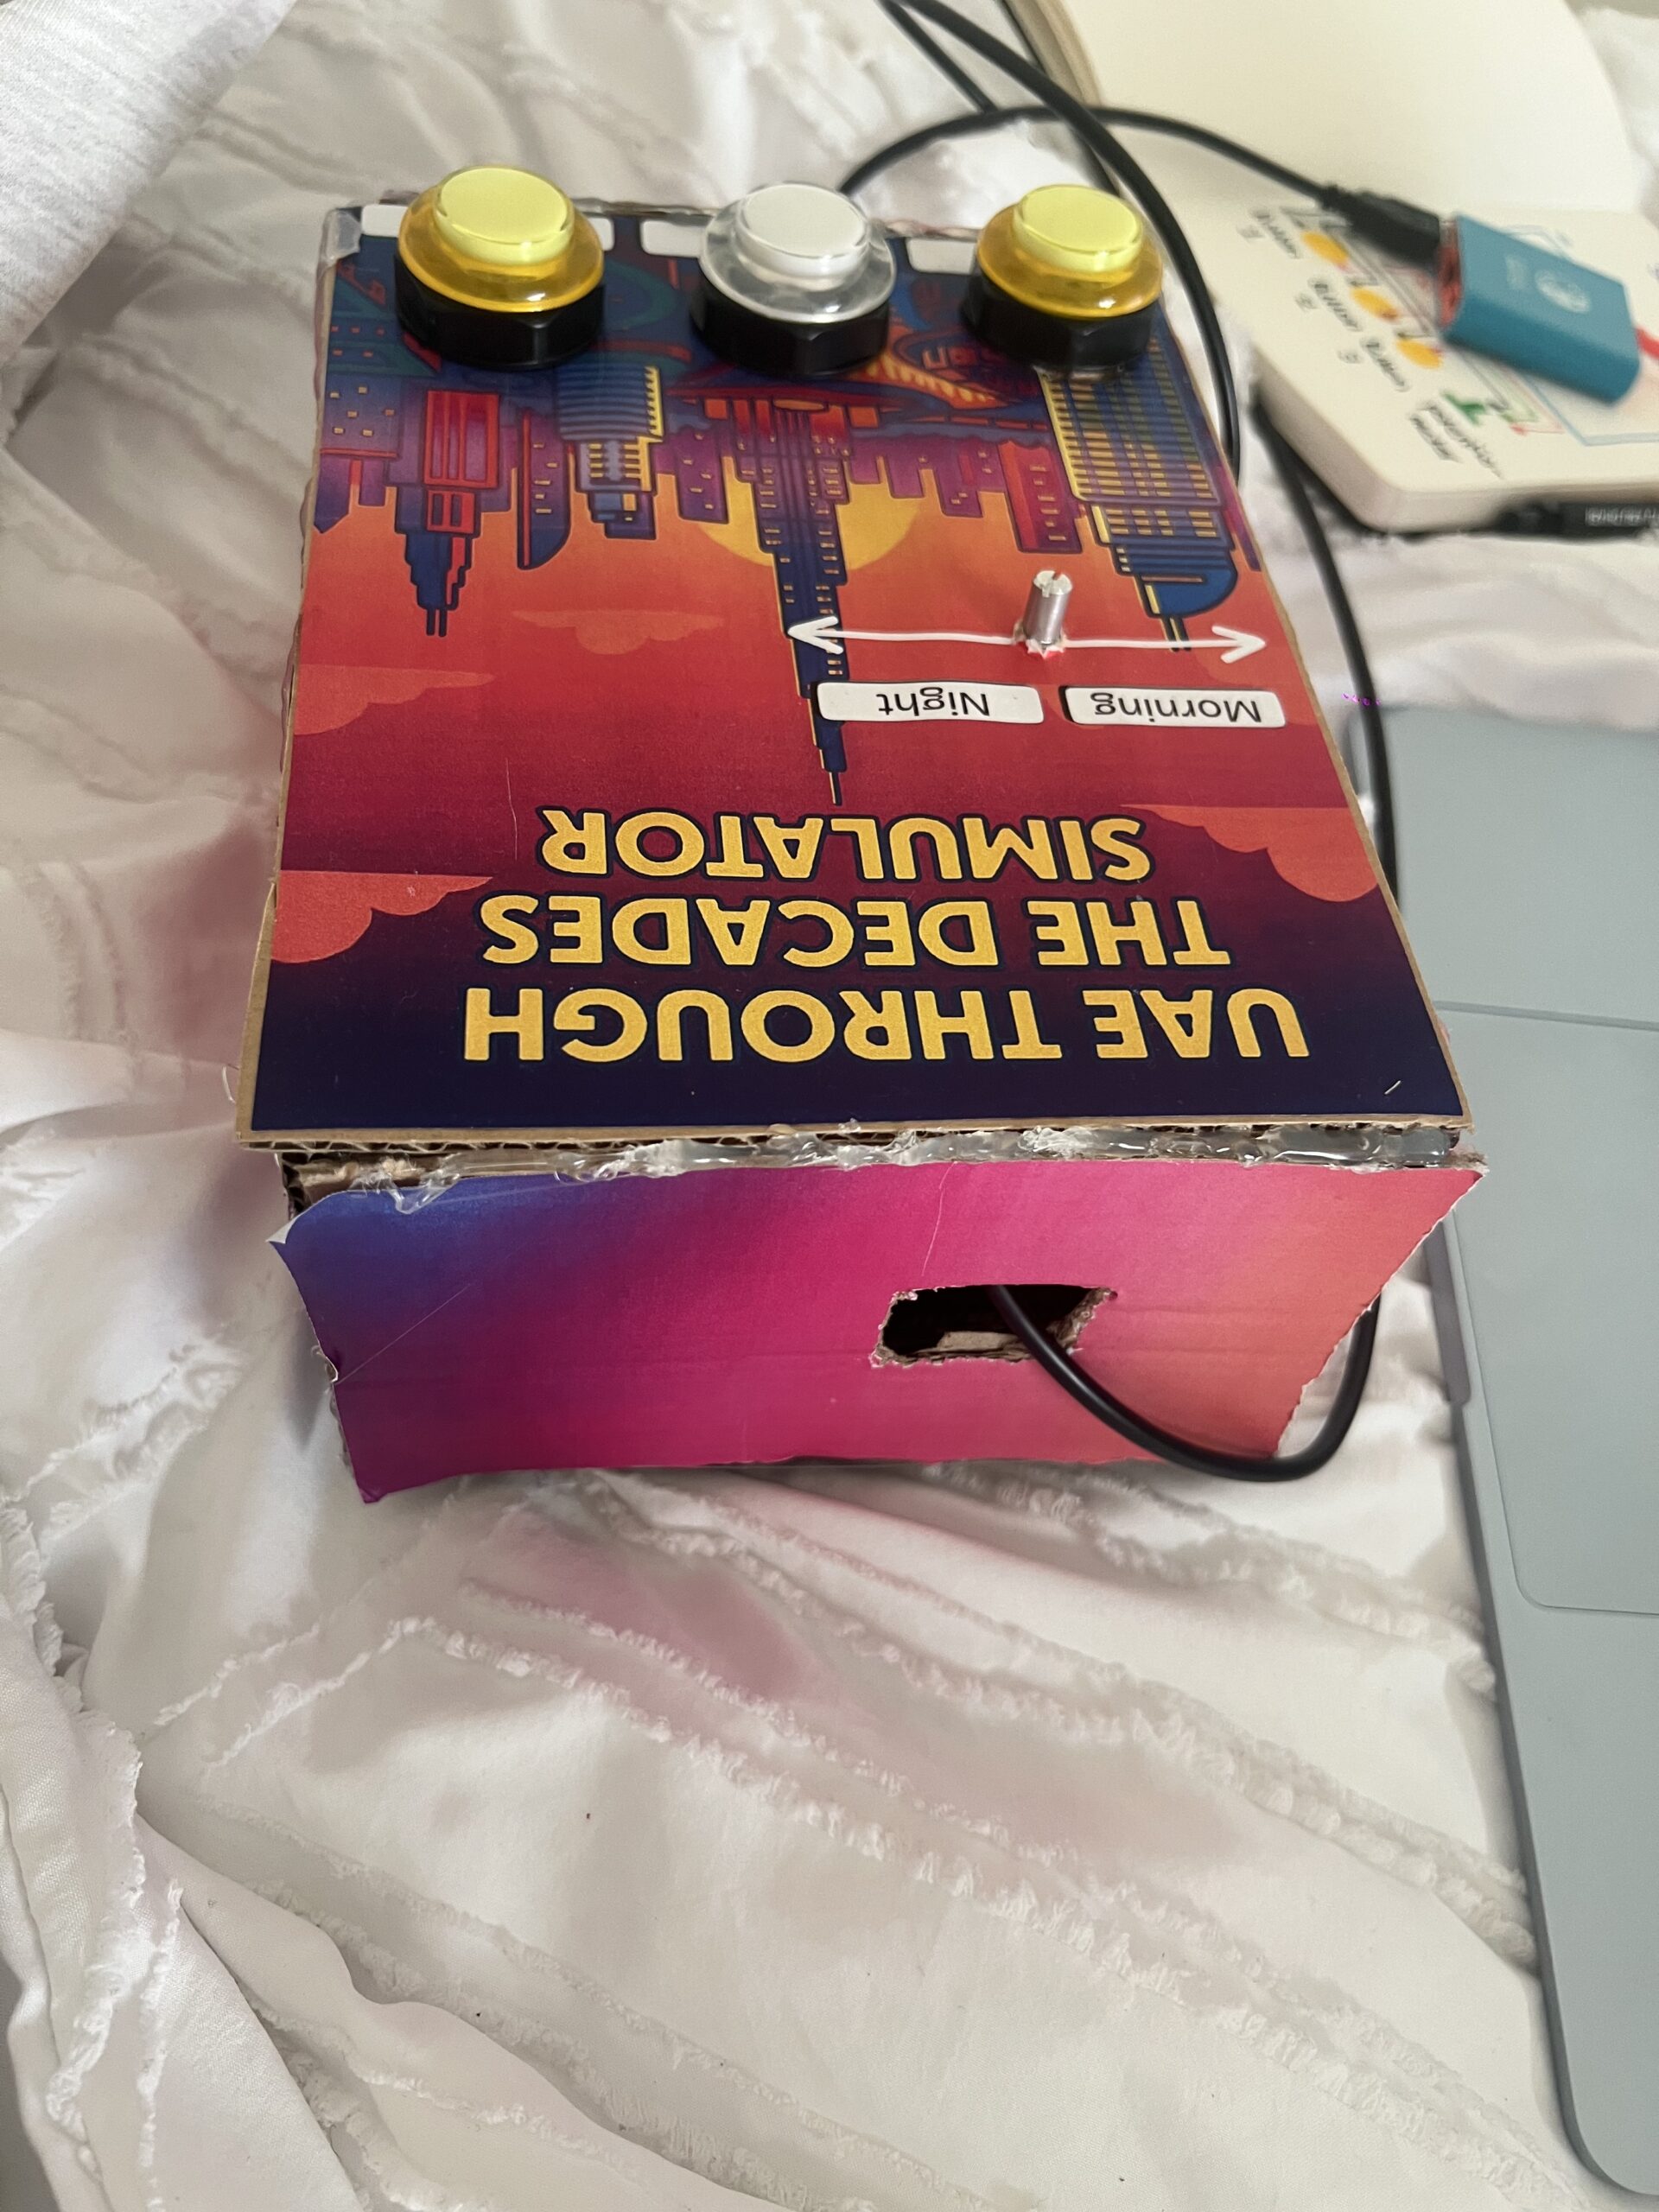
You can’t see any of the wiring I hid everything neatly inside the cardboard housing. The labeling, colors, and layout make the experience very user-friendly. I’m also proud of the fact that people were able to figure it out without me saying anything. When I stepped back and just observed, I realized the design communicated itself very clearly, which was exactly my goal.
Looking back at the entire process, I’m genuinely proud of how much I accomplished and how much I learned along the way. At first, organizing all the images felt extremely tedious because I had so many files 18 images total, each with morning and night versions. I also made a small mistake in the naming of the files, and that one mistake made the whole program stop working. I kept getting errors and I couldn’t figure out why. I had to go through each image name one by one, and because the names were long and similar, it was hard to spot the issue. It took me a very long time to fix something that seemed so small, but once I finally found the mistake and everything started working again, it felt very rewarding. I’m also incredibly proud of the physical construction, especially the welding. This was my first time ever welding metal, and it honestly took me one full hour just to weld the first button. The wires kept slipping, the metal didn’t stick properly, and I felt like I was never going to get it. But after doing it over and over, I suddenly got the hang of it, and by the end I was welding each button in about five minutes. Learning a skill like that felt like a big milestone. It really made me feel like I gained a new hands-on skill something I had never tried before in my life.
In the end, the project came together in a way that made me really proud. The wiring is completely hidden, the design is clean and professional-looking, and people were able to interact with it without any instructions. Seeing the final result made all the tedious moments worth it, and it also made me feel more confident in both my coding and physical building abilities.
How This Was Made
I built the physical simulator using:
Cardboard and printed graphics
Buttons and a potentiometer
Metal wires (which I welded for the first time and it took me one full hour to weld my first button!)
Arduino and jumper wires
Use of Generative AI
I used AI for visual styling. I first found real photos of the UAE (past, present, and future concept images) and then used AI tools to convert them into cartoon-style illustrations. This helped give the project a consistent artistic style.
I also used AI to help me debug an issue in my p5.js code I sent it the error message and it told me that most probably one of my files name was not the same name I put in the code, which was correct in naming one of my images I accidentally made one of the letters capital and in my code it was lowercase so the code wasn’t running
Design
I used Canva to design the visual aspect
Code Writing & Design
Most of the code is simple enough that I was able to write it myself, but I watched a few YouTube videos to help me understand specific parts, such as Web Serial and Arduino button logic:
Sound source
https://pixabay.com/sound-effects/search/mp3/
Areas for Future Improvement
In the future, I would like to:
• Add more images per era to make the experience richer
• Include more interactive controls, not just day/night
• Maybe add animated elements like moving clouds or cars
• Improve the instruction screen so that users immediately know they can press each button multiple times
• Add richer audio or voice narration explaining the history of the UAE
1. Are they able to figure it out? Where do they get confused and why? Do they understand the mapping between the controls and the experience?
When I tested my project with different people, I noticed that the overall interaction was very easy for them to understand. The three buttons were clearly labeled “Past,” “Present,” and “Future,” and the potentiometer automatically felt like a control for changing between morning and night. I designed the layout to be very straightforward on purpose because I wanted even younger users like my younger brother to be able to use it without help.
When I let my friend try it without any instructions, she was able to figure out the basic interaction immediately. She understood the mapping between the labeled buttons and the changes on the screen. The design helped guide her because I placed each label directly under the button, and the screen clearly showed the UAE environment changing based on the chosen era.
The only part that took her a bit longer to discover was that each button could be pressed multiple times to cycle through three different images. She eventually figured it out on her own by experimenting and playing with it. Most of my friends had the same experience: they understood the main controls right away, but it took some time to realize the buttons could be pressed repeatedly to see more images. Even though it wasn’t immediately obvious, they still learned it naturally without any instructions from me, which made me feel confident that the interaction was intuitive.
2. What parts of the experience are working well? What areas could be improved?
Overall, the system worked exactly the way I intended. The clear labels, simple design, and straightforward interaction made the experience smooth for almost everyone who tested it. People enjoyed seeing the UAE change across the past, present, and future, and the morning night movement using the potentiometer worked very naturally.
However, one area I think I could improve is adding a small instruction guide or a simple on-screen hint. Even though most people figured it out, some took longer to realize they could press each button multiple times to explore all the images. A very small, minimal instruction (like “Press again to see more”) could make the experience clearer from the very beginning.
Other than that, the core interaction and design felt strong and easy to understand.
3. What parts of your project did you feel the need to explain? How could you make these areas clearer to first-time users?
At first, I thought I needed to explain everything especially the fact that there are multiple images per era. But when I stepped back and watched people interact with it without saying anything, I realized that they figured it out on their own. The project ended up being much more self-explanatory than I expected, and most of the clarity came from the very clean design and labeling.
The only part that consistently required a moment of discovery was the “multiple press” feature. To make that clearer for first-time users, I could add a small visual cue or a short line of text somewhere on the screen that hints that the user should “press to cycle through images.” This would make the experience smoother for absolutely everyone, even if they don’t experiment as much.
But overall, user testing showed me that the project communicates itself pretty naturally, and I didn’t really have to explain much which was exactly the kind of interaction experience I wanted to create.
I had a grand, academic ambition when I started my final project. My midterm, Pitchy Bird, had successfully used vocal pitch to control a character. For the final, I wanted to escalate the complexity to gamify the Implicit Association Test (IAT). The concept was Flappy IAT, a game where players navigated by physically “bumping” a controller while simultaneously tilting it left or right to categorize words (e.g., “Good” vs. “Bad”) displayed on pipes.
It sounded brilliant on paper, a lesson to learn in practice… A lesson on how an ambitious outlook (conceptual AND technical) can suffocate user experience.
User Testing
My game’s initial prompt for the user was: “Bump to fly, Tilt Left for Green/Good, Tilt Right for Red/Bad.”
There was immediate confusion when I described it to people and even later handed a prototype to them without instructions. The cognitive load was too high to keep the bird afloat WHILE processing semantic text on moving pipes. This has become clear immediately after user testing, even with a keyboard-simulated prototype.
Even when the users understand the game control logic, “Bump” didn’t play well physically. Users weren’t sure if they should tap the device or shake it. The motion was actually a “Wave” and a sudden vertical movement regardless of the angle. I decided to changethe internal and external naming from BUMP to WAVE, which made the game sound nicer and action more intuitive.
Technical Challenges
Behind the scenes, the technical implementation was really a “battlefield”. I was using an Arduino with an MMA8452Q accelerometer sending data to p5.js via Web Serial.
Calibration Nightmare
In the first iteration, I assumed the controller would calibrate itself and has some error tolerance. None. Hardcoded thresholds (e.g., expecting 1.0g on the Z-axis at rest) failed the moment a user held the device at a comfortable, natural angle.
I had to write a manual calibration routine calibrateRestPosition() that runs at startup. It takes 20 samples to establish a “zero” baseline for the user’s specific grip, allowing the game to detect relative changes rather than absolute ones.
Sensitivity Tuning
Initially, the bird was sluggish. Users were waving frantically with no response, or triggering two responses as they waved up AND down. The threshold was set to 1.0f (requiring 1g of force above gravity) and bidirectional. I had to lower this to 0.5f to make the “Wave” detection feel snappy and responsive, and one-directional so you go down to “Bump” the bird up.
Killing the IAT
Note that I had built elaborate logic for stimuli arrays, category pairs (like “Female Doctor”), and complex CSV logging for reaction times. But I looked at the codebase and the user experience. The game wasn’t fun. It was stressful and buggy.
The IAT logic was causing errors in the drawing loop, and the “Game Over” screen was breaking because the state management between the IAT trials and the physics engine was out of sync. Users were dying because they lacked familiarity and the buggy interface.
I commented out the entire IAT part.
I removed the word overlays and the tilt logic.
I optimized the Arduino code to stop listening for X/Y tilt axes entirely to save processing power.
I refactored the name from Flappy IAT to Wavy Bird.
Refining Core Experience
Once I removed the “noise” of the psychological test, I could focus on making the actual game better.
The Tutorial: I noticed users could die instantly upon starting. I introduced a “Tutorial Mode” where collisions don’t kill you but reset the bird position.
The “Game Over” Loop: A persistent bug caused the screen to go blank upon death instead of showing the score. I fixed the state transition so that handleCollision correctly triggers the Game Over screen, allowing for a restart without refreshing the page,.
Conclusion
The project I ended up with is smaller than the one I proposed, but I would say it’s a trade-off, particularly when I am managing three final projects for this semester. By cutting the IAT feature, I could focus more, making the game from a broken research tool to a polished physical game.
If one has to explain the controls for five minutes before someone can play, the design is too complex. Sometimes, we just need to wave.
For user testing, I told my test user to start the game without giving any instructions. The user immediately figured out that the controller was not an ordinary one because it’s just a piece of plastic with nothing on the outside. Luckily the first thing he tried was to tilt the controller, which made the character move, allowing him to complete the first level of the game.
One aspect of the experience that worked surprisingly well was that all my test users somehow knew that that the goal was to move upwards even though I didn’t indicate that the finish line was there. It then became clear that because the bottom boundary of the maze is showing, the users assumed that the finish line was in the other direction.
The biggest area that can and will be improved is the robustness of the controller. It’s currently an accelerometer and vibration motor taped to the controller case, which makes it weak and sometimes makes it fall apart. I plan to use the glue gun to fix this. Another issue is the amount of wires going out of the controller. There are currently 5 wires for the accelerometer and 3 for the vibration motor. While these are essential to make the game work, I can make them less annoying by using tie cables to clamp them all into one single wire.
I didn’t need to explain anything to my test users, however, the game might not be as intuitive for other users. I plan on adding an instruction page in the beginning and some text under the controllers on the box that tells users they’re supposed to tilt them to move.
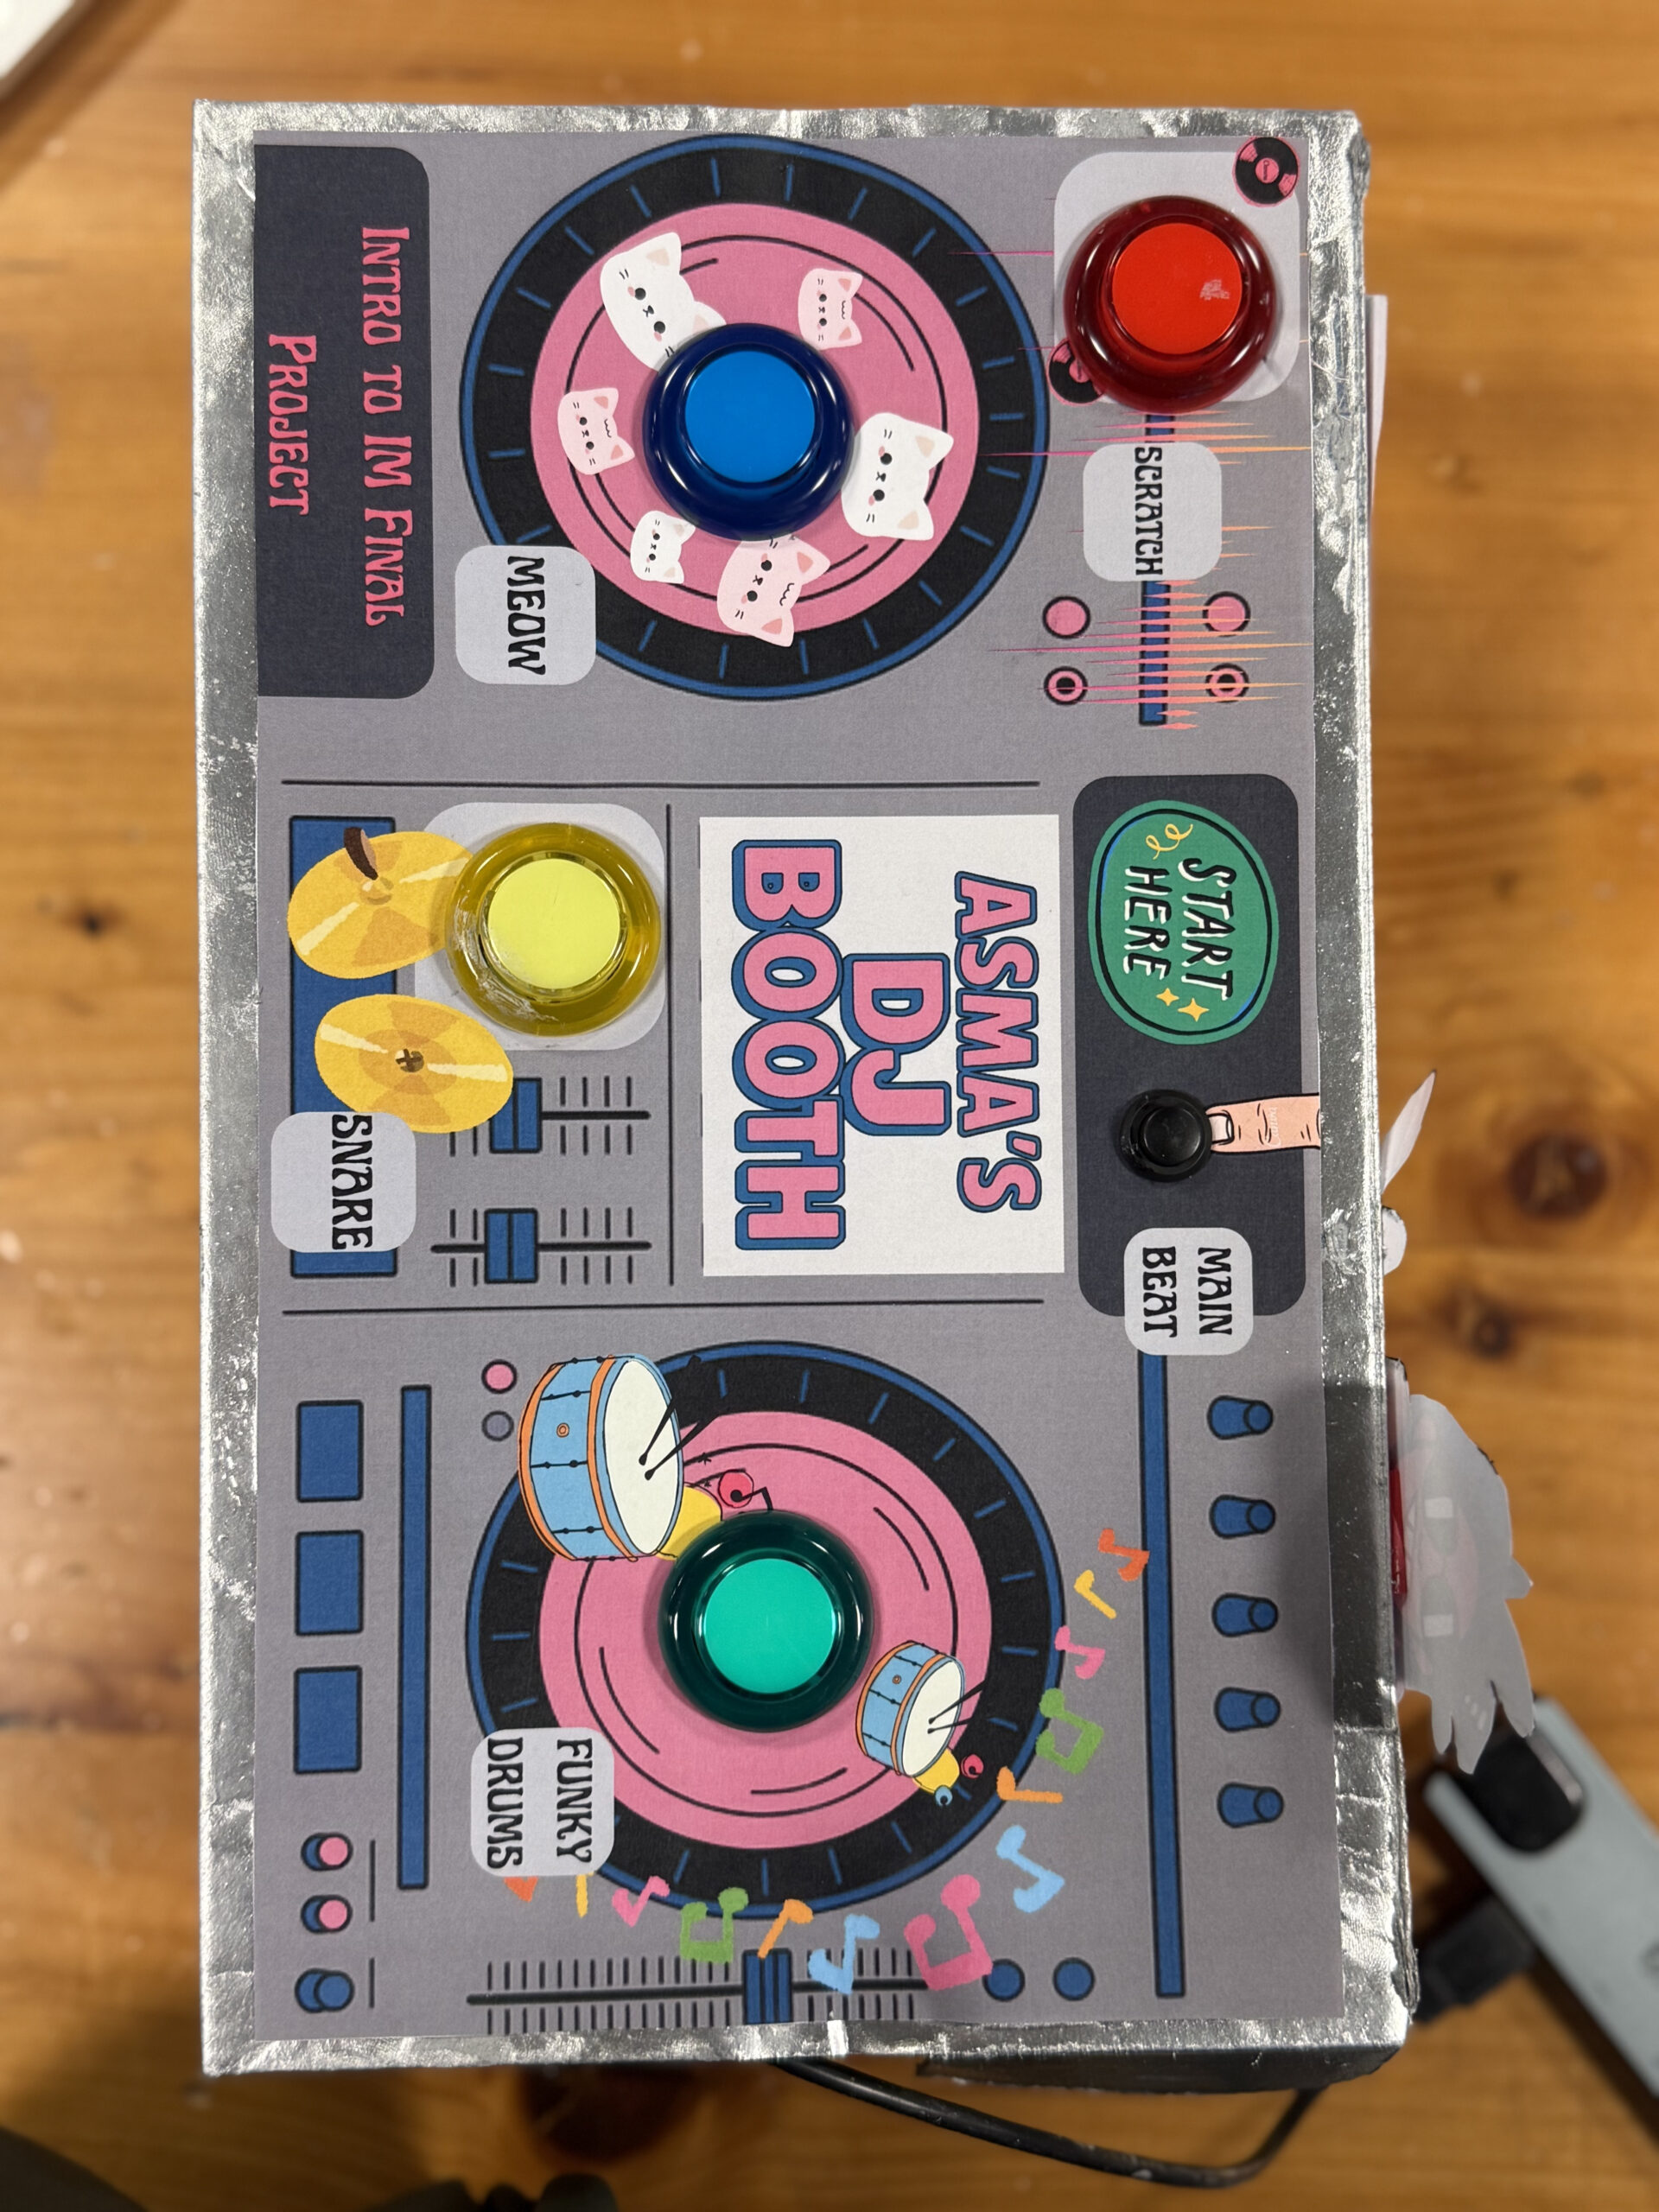
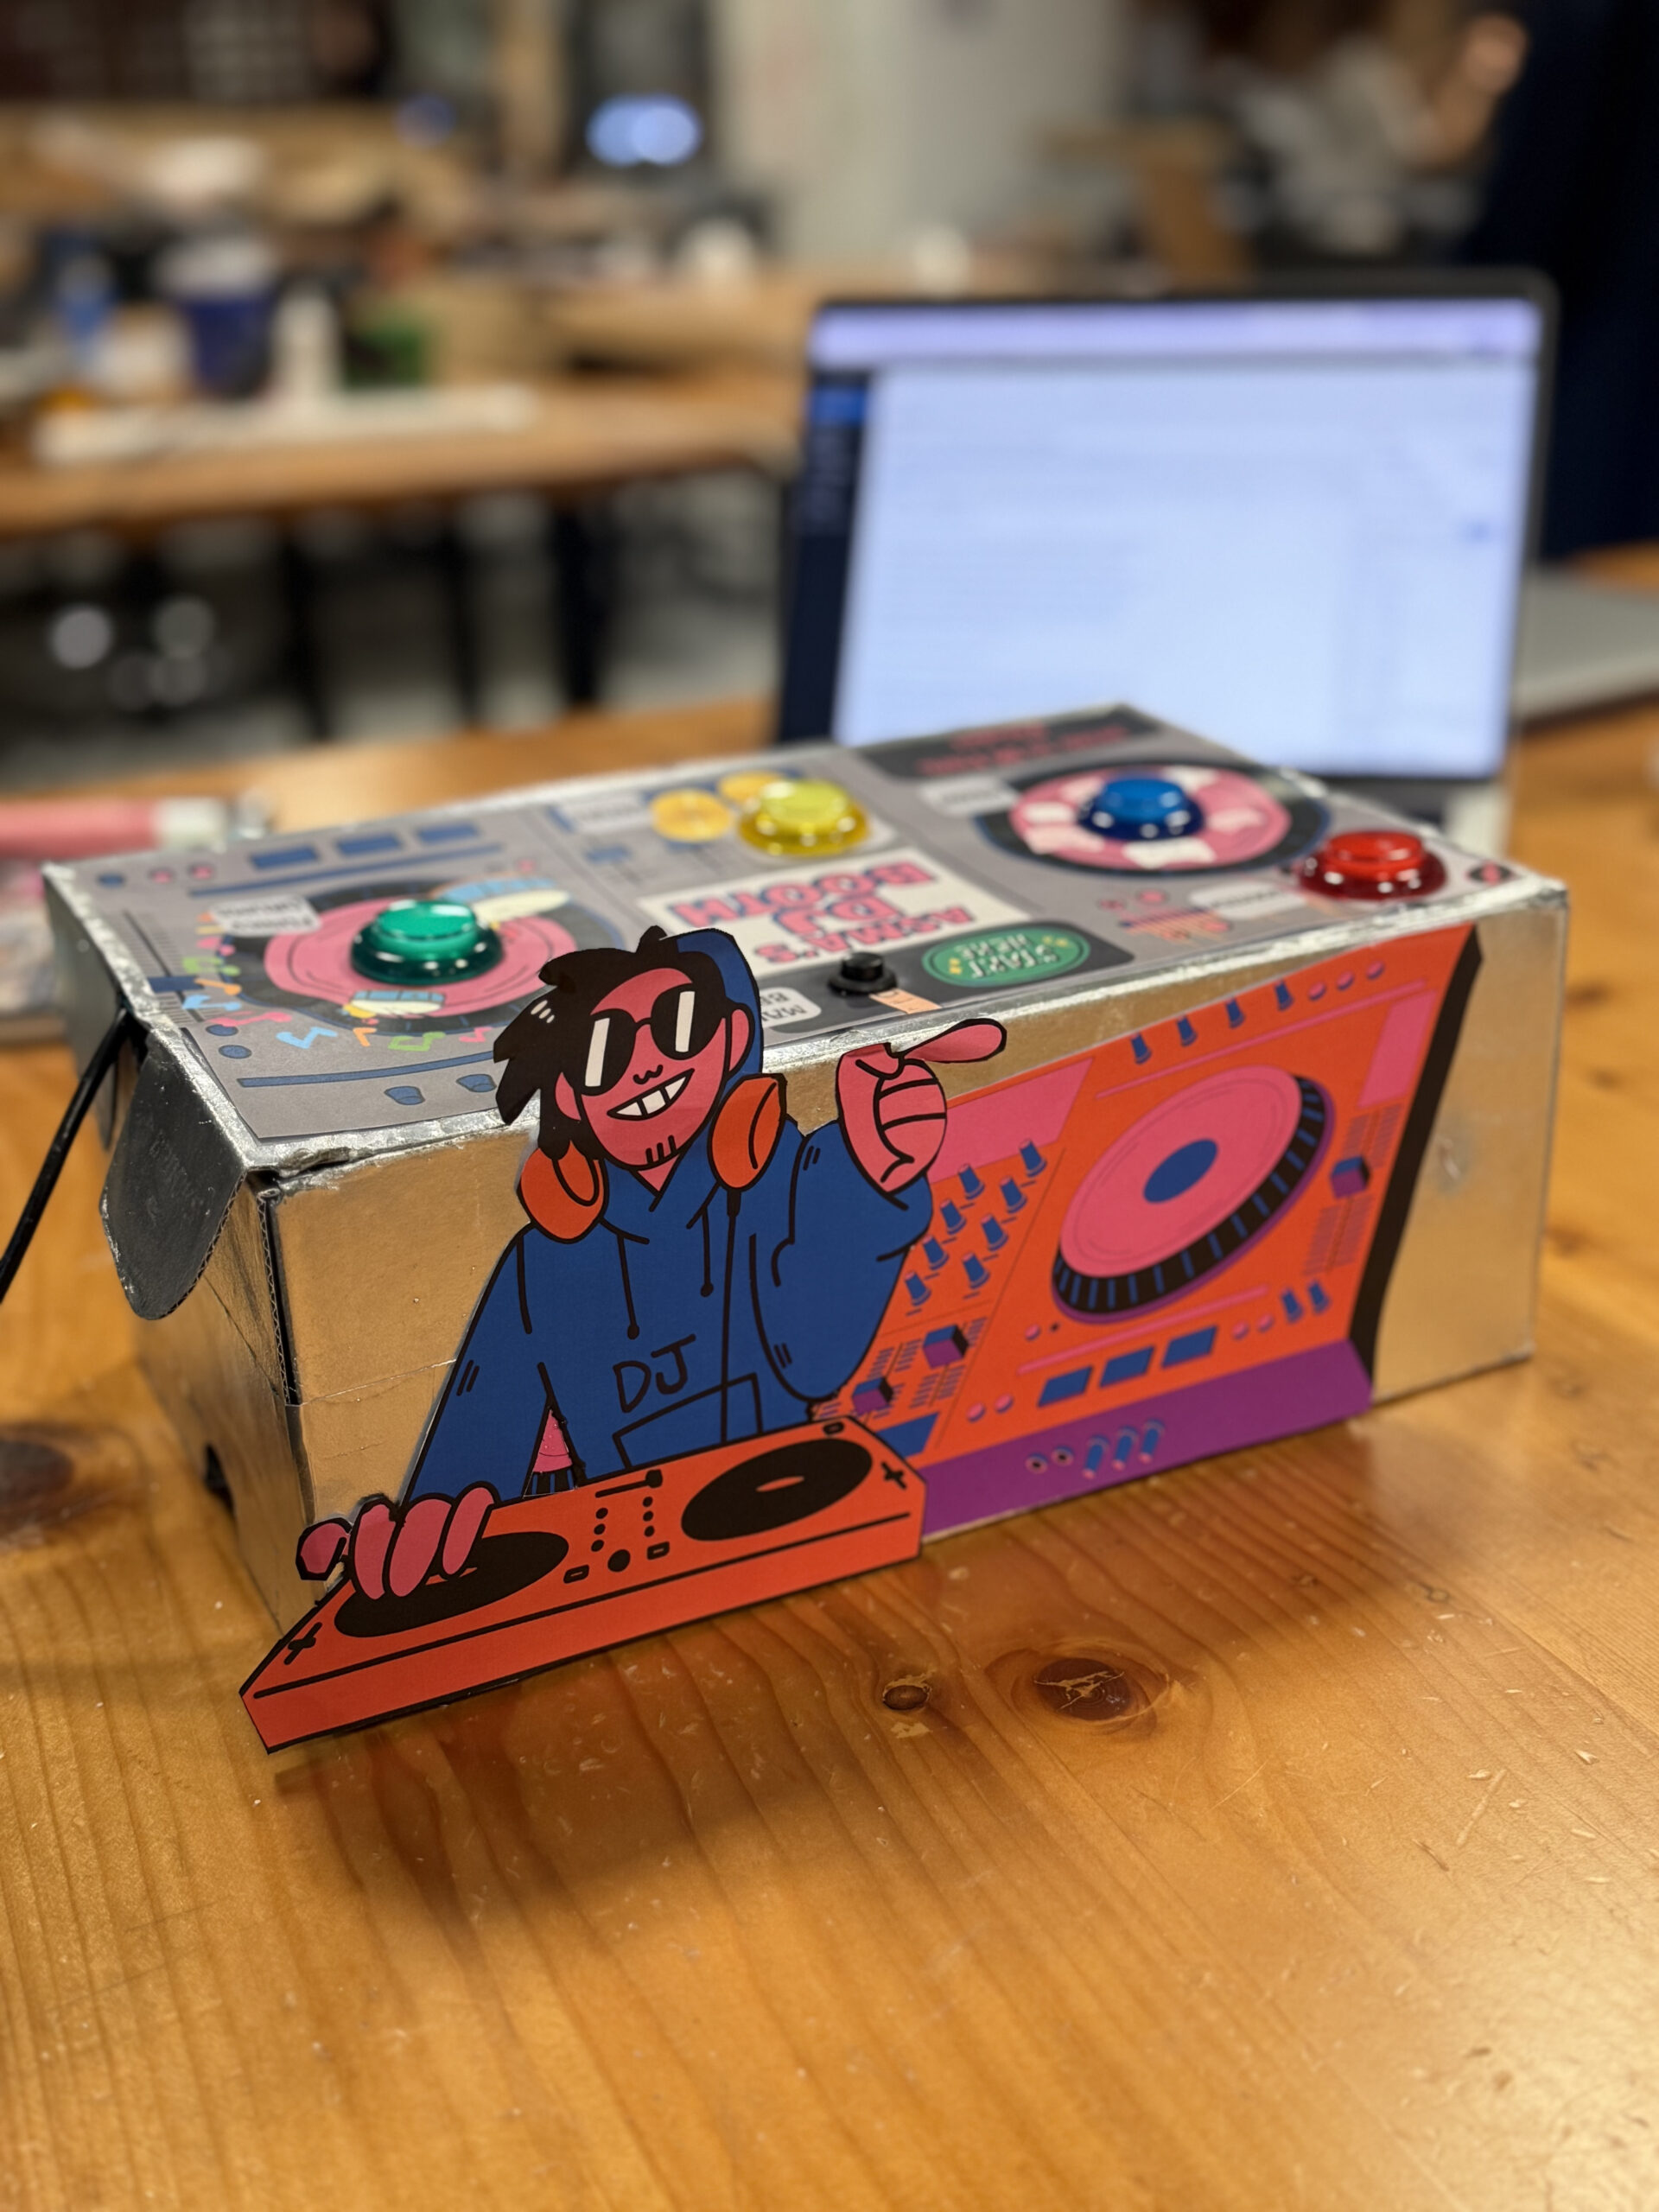
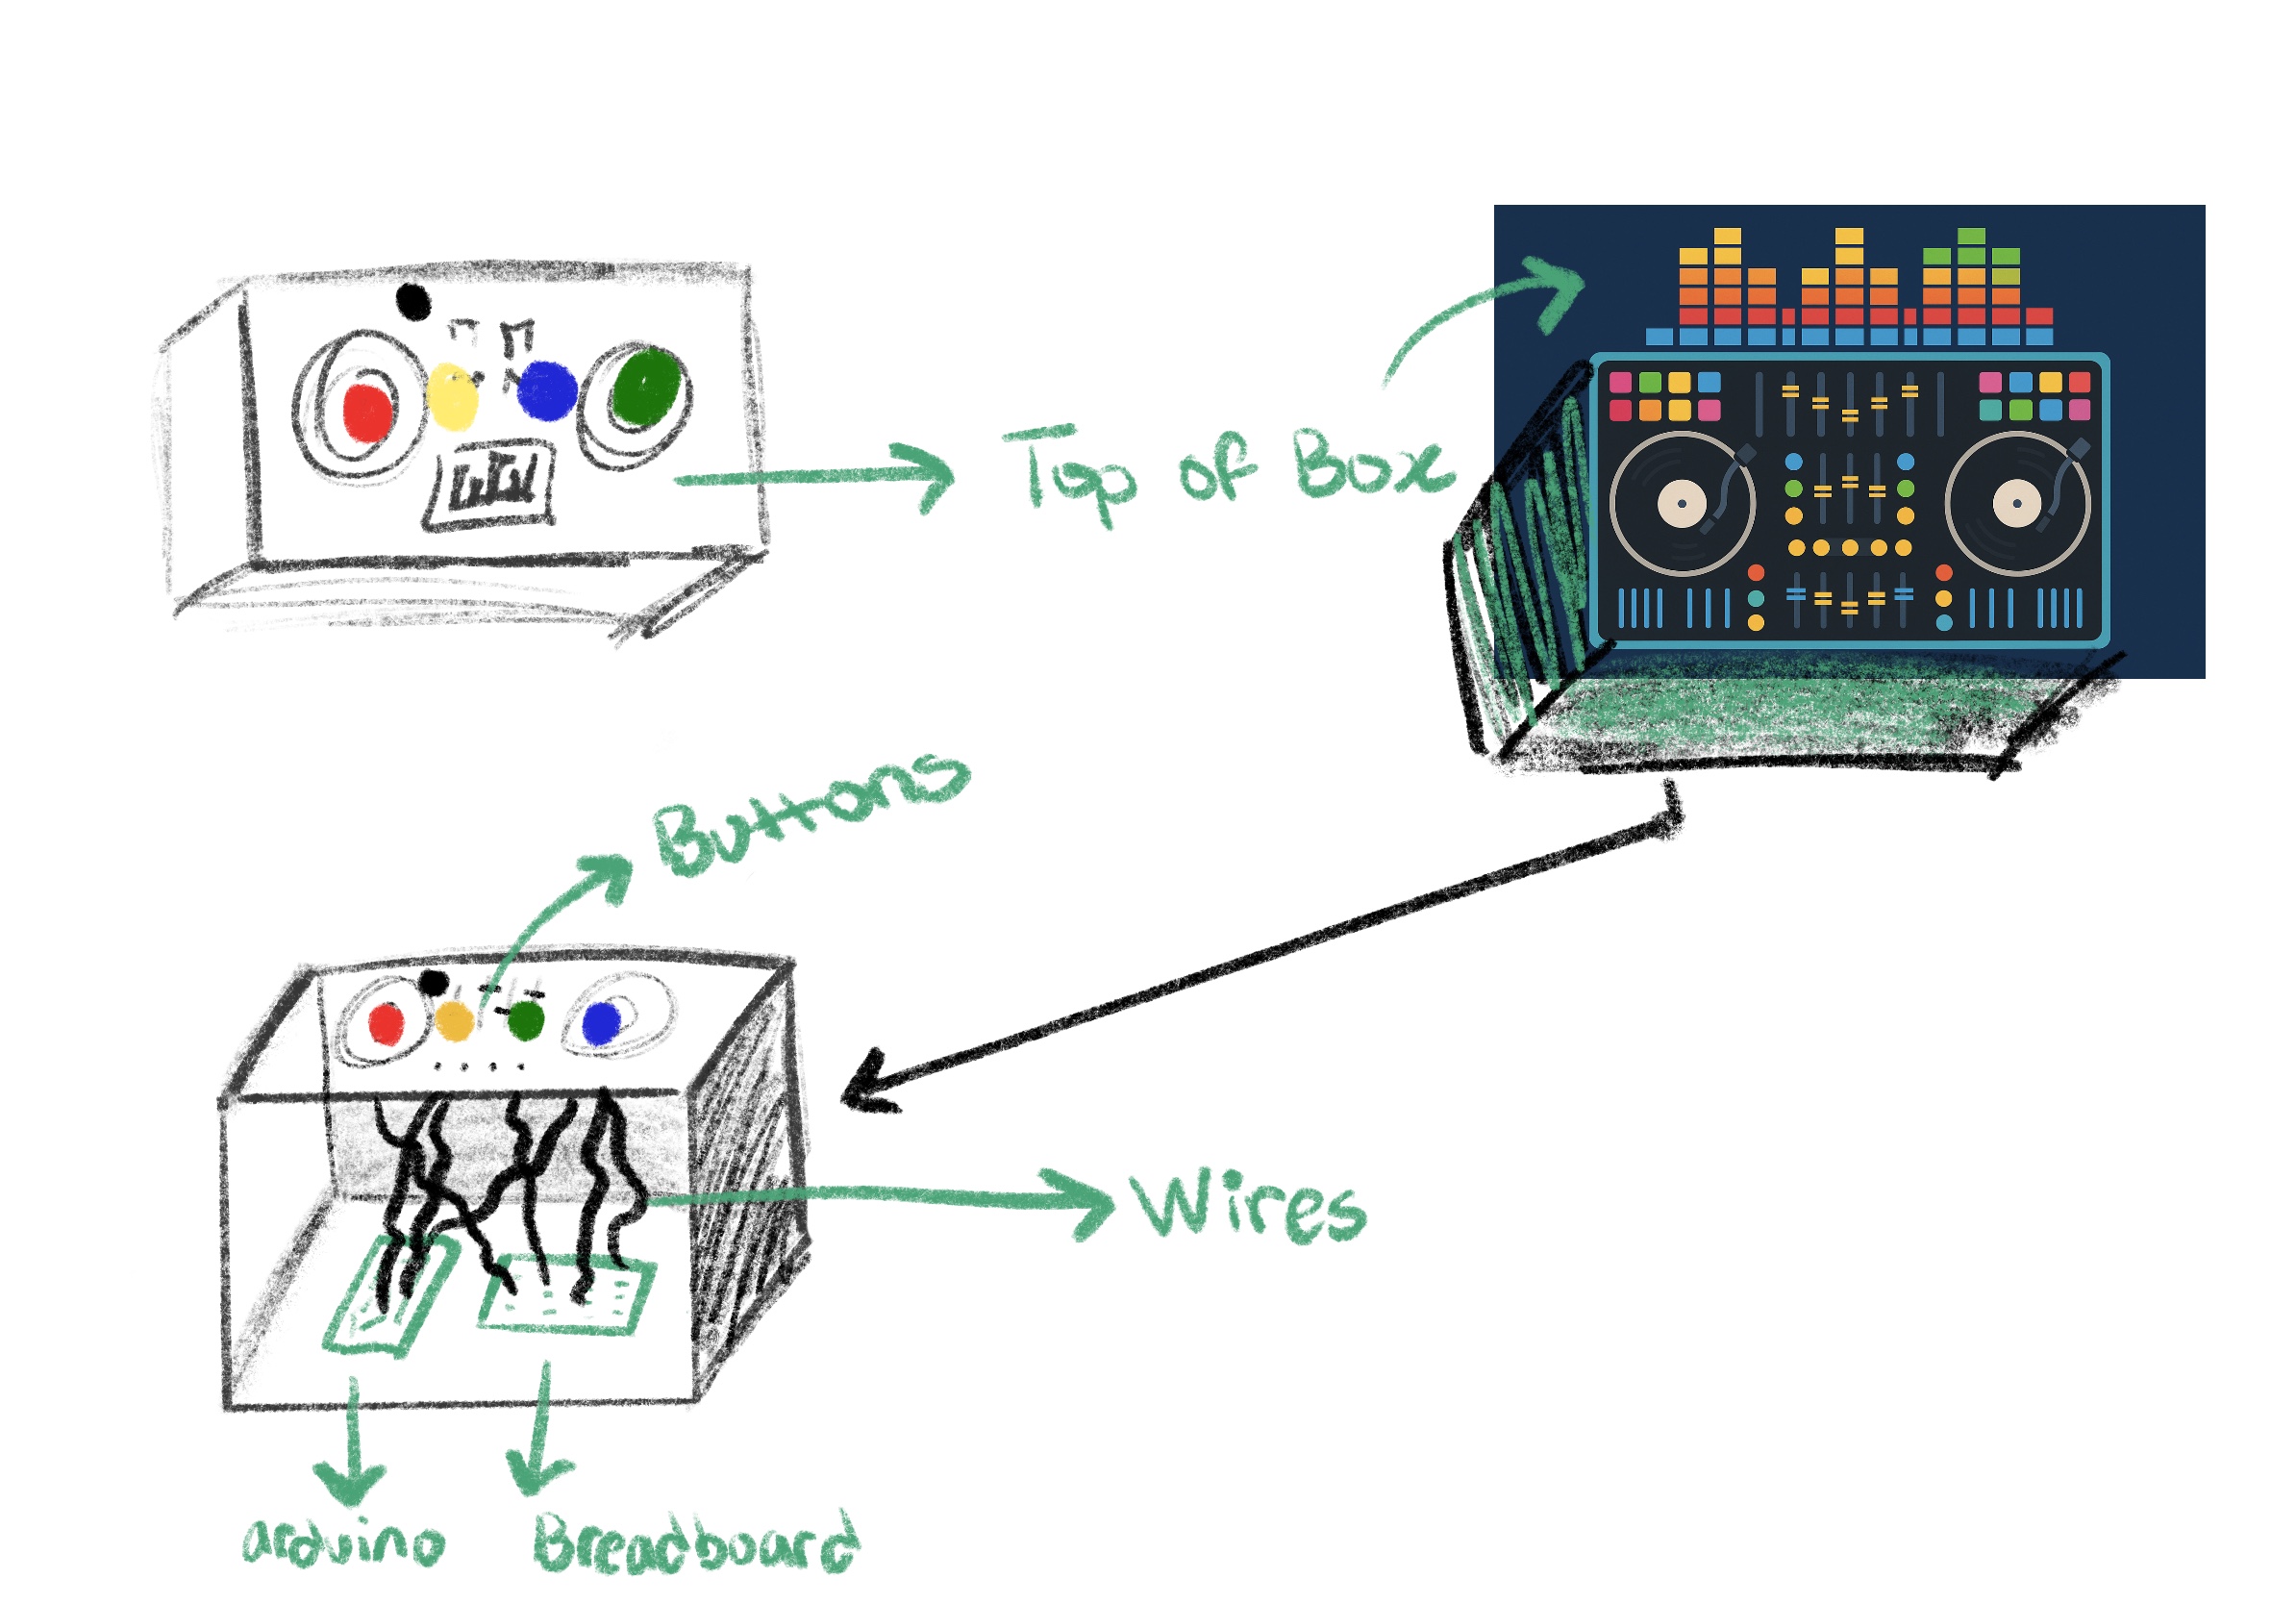
The concept for my project was to create a playful and intuitive physical DJ booth where anyone regardless of technical experience could press buttons and instantly feel like a DJ. My inspiration came from real DJ booths, toy soundboards, and the desire to blend physical interaction with coding and visuals. I wanted something energetic, colorful, and fun that made people smile the second they pressed a button. The design reflects my aesthetic as an IM student: bright colors, cute graphics, and interactive storytelling through sound and visuals.
How the Implementation Works:
The project uses an Arduino Uno connected to five physical switches (four push buttons and one toggle switch). Each button corresponds to a unique sound effect, while the toggle controls a looping background beat. The Arduino sends signals over Web Serial to p5.js, which handles audio playback, a spinning animated record, sparks effects, and screen navigation. Pressing a button triggers communication from the Arduino to the browser, and the p5.js sketch reacts immediately with sound, visuals, and color changes.
Interaction Design:
The interaction design is intentionally simple and intuitive. Users begin with a welcome screen, then view instructions, and finally arrive at the DJ booth environment. During user testing, people instantly understood what to do, if you see a button, you press it. The toggle switch clearly communicates “main beat,” while the colored push buttons invite exploration. The interface includes a spinning record that flashes in the color of the button pressed, along with spark effects that reinforce the beat visually. Everything is designed so that the user feels like they are performing music live, without needing instructions.
Description of the Arduino Code:
The Arduino code uses five digital input pins, each connected to a button or toggle switch. Inputs use “pinMode(pin, INPUT_PULLUP)” so the board can detect when each switch is grounded. When a button is pressed, the Arduino sends a single letter over Serial (e.g., `’B’` for blue, `’R’` for red). For the toggle switch that controls the looping beat, it sends `’L’` when switched on and `’l’` when switched off. This communication ensures fast response times and minimal lag. Every press is immediately transmitted to the p5.js sketch.
// DJ Booth Final Project
const int BTN_YELLOW_PIN = 2;   // meow.mp3
const int BTN_BLUE_PIN   = 3;   // funkydrums.mp3
const int BTN_RED_PIN    = 4;   // snare.mp3
const int BTN_GREEN_PIN  = 5;   // scratch.mp3
const int TOGGLE_PIN     = 6;   // loopbeat.mp3

// Track previous states
int lastYellowState = HIGH;
int lastBlueState   = HIGH;
int lastRedState    = HIGH;
int lastGreenState  = HIGH;
int lastToggleState = HIGH;

void setup() {
  Serial.begin(9600);

  pinMode(BTN_YELLOW_PIN, INPUT_PULLUP);
  pinMode(BTN_BLUE_PIN,   INPUT_PULLUP);
  pinMode(BTN_RED_PIN,    INPUT_PULLUP);
  pinMode(BTN_GREEN_PIN,  INPUT_PULLUP);
  pinMode(TOGGLE_PIN,     INPUT_PULLUP);

  Serial.println("DJ buttons ready");
}

void loop() {
  //Read all current states
  int yellowState = digitalRead(BTN_YELLOW_PIN);
  int blueState   = digitalRead(BTN_BLUE_PIN);
  int redState    = digitalRead(BTN_RED_PIN);
  int greenState  = digitalRead(BTN_GREEN_PIN);
  int toggleState = digitalRead(TOGGLE_PIN);

  // Momentary buttons:
  if (yellowState == LOW && lastYellowState == HIGH) {
    Serial.println("Y");
  }
  if (blueState == LOW && lastBlueState == HIGH) {
    Serial.println("B");
  }
  if (redState == LOW && lastRedState == HIGH) {
    Serial.println("R");
  }
  if (greenState == LOW && lastGreenState == HIGH) {
    Serial.println("G");
  }

  // Toggle switch:
  if (toggleState != lastToggleState) {
    if (toggleState == LOW) {
      Serial.println("L");   // loop ON
    } else {
      Serial.println("l");   // loop OFF
    }
  }

  // Update previous states
  lastYellowState = yellowState;
  lastBlueState   = blueState;
  lastRedState    = redState;
  lastGreenState  = greenState;
  lastToggleState = toggleState;

  delay(10);
}
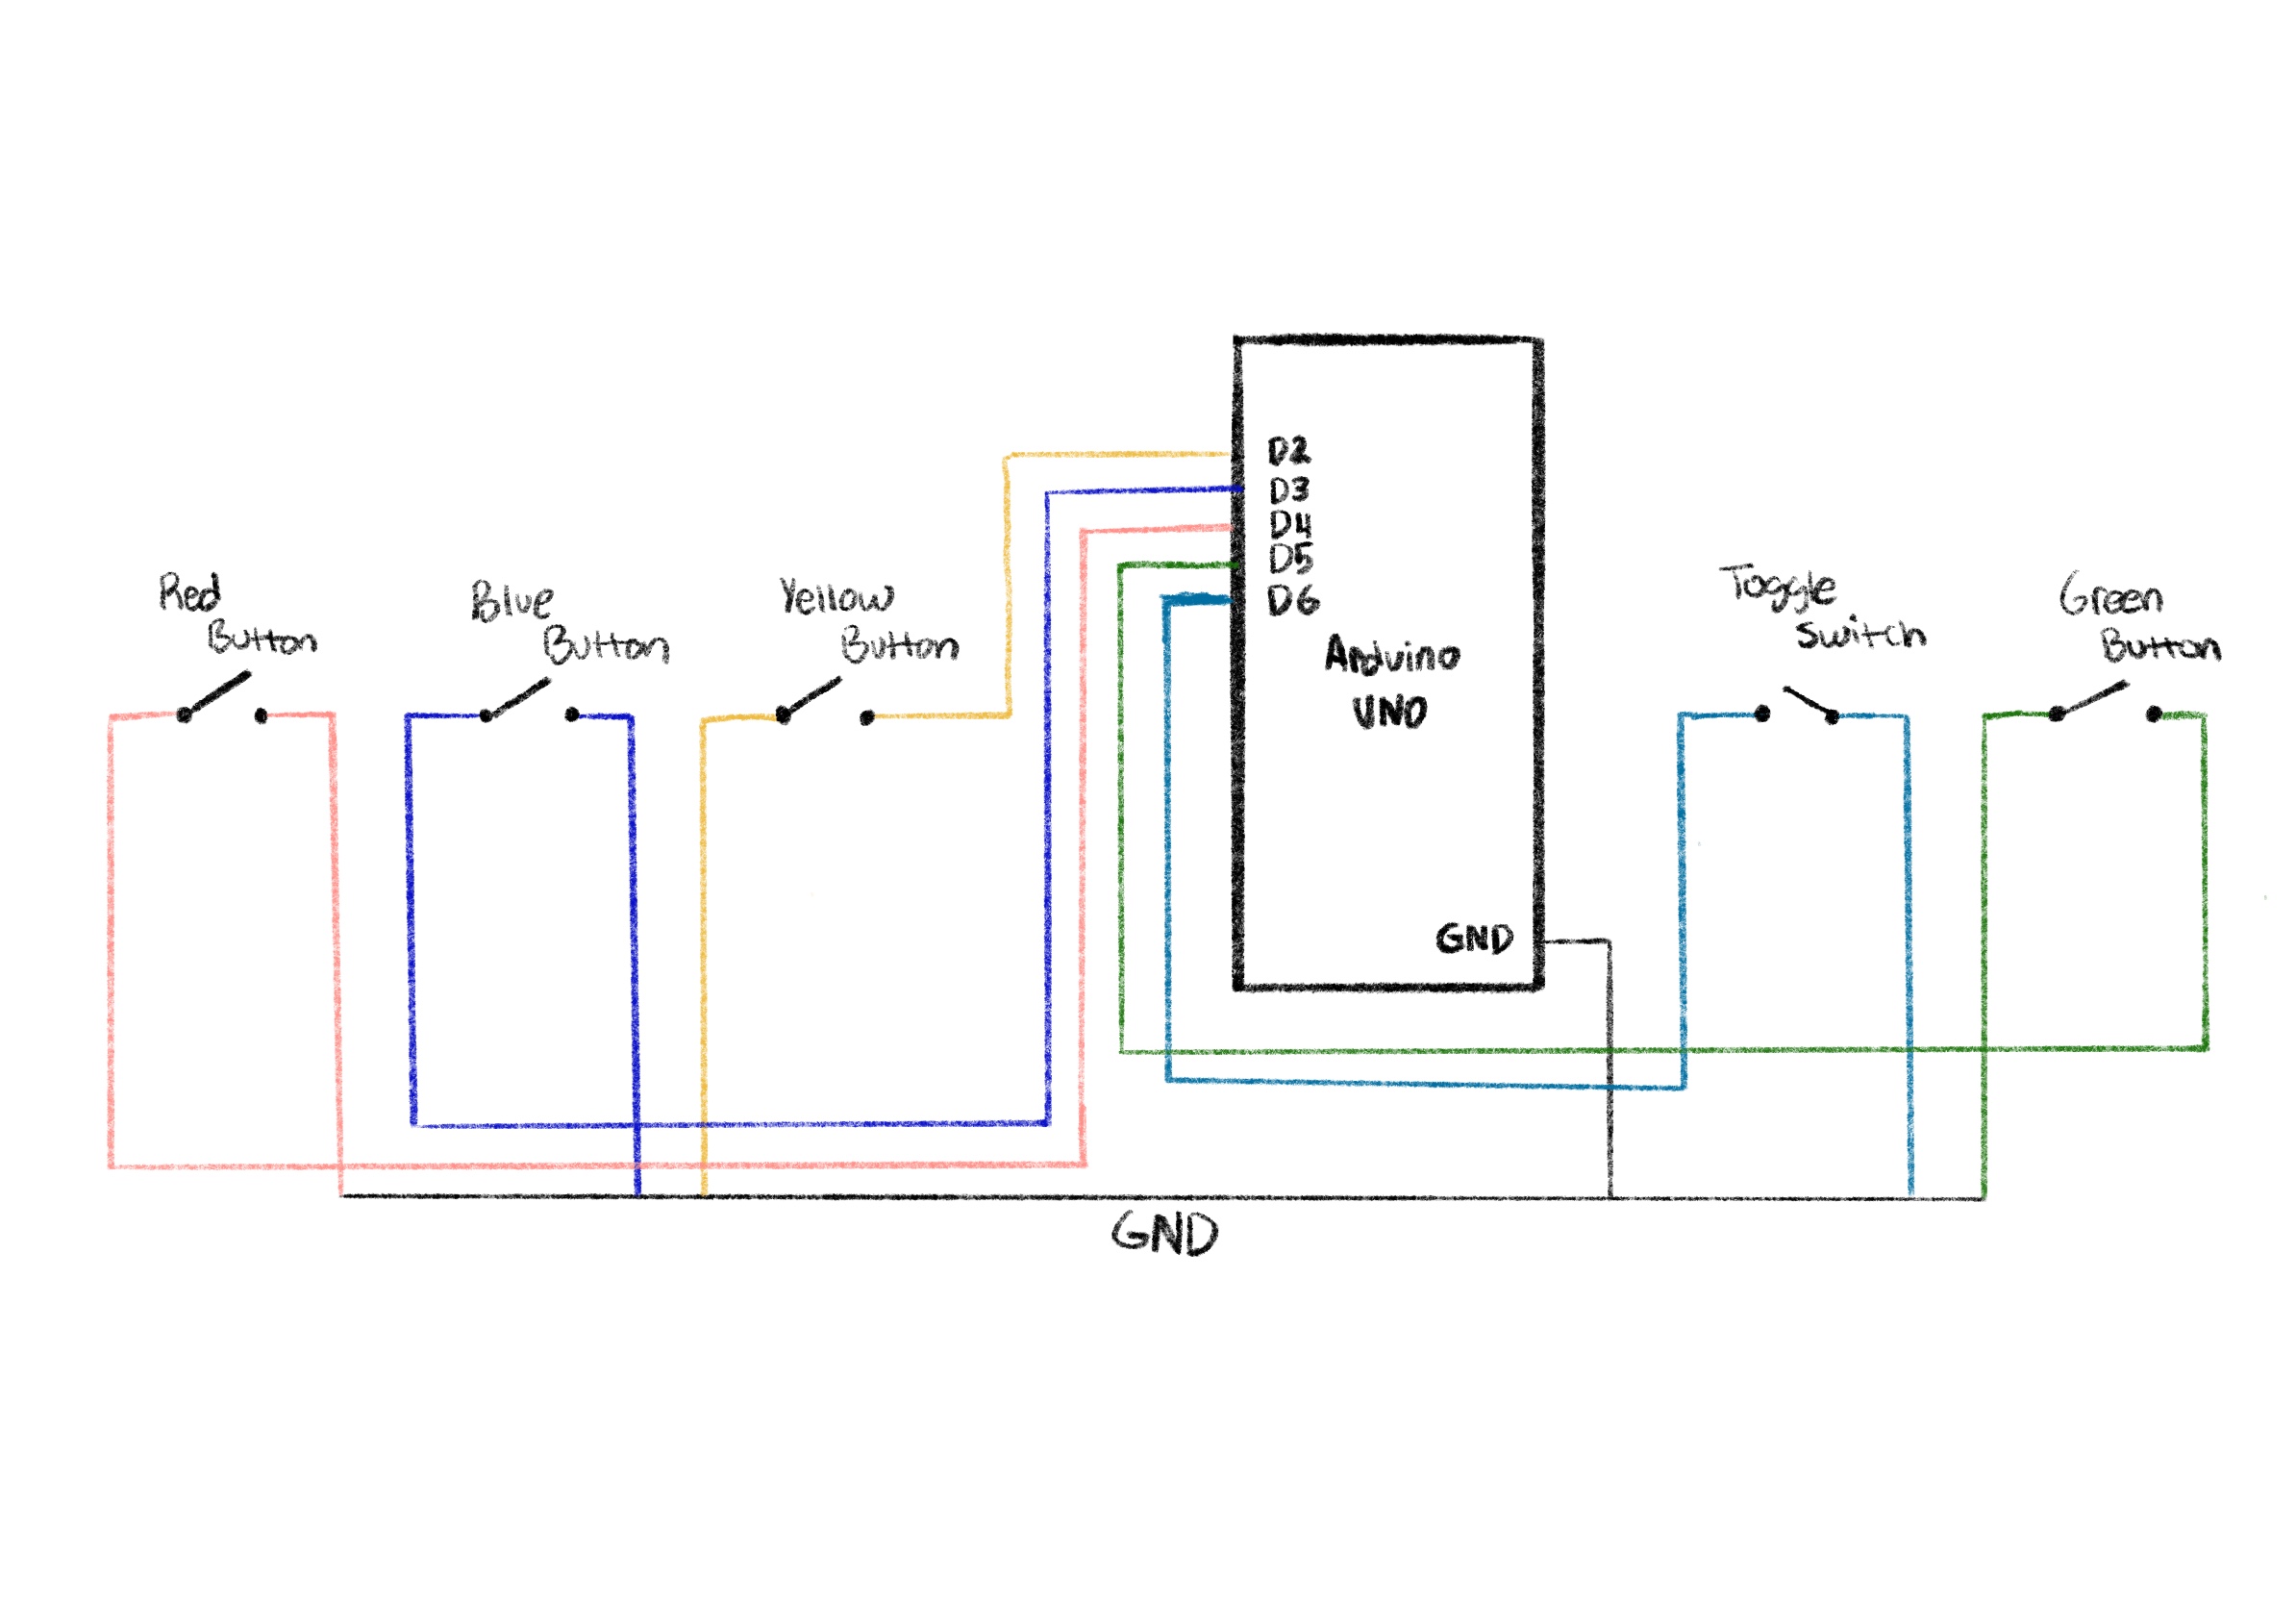
Explanation of the Schematic:
One leg of every button goes to GND
The other leg goes to a digital pin on the Arduino (Red→D2, Blue→D3, Yellow→D4, Green→D6, Toggle→D5).
Because `INPUT_PULLUP` is used, each button reads HIGH when untouched and LOW when pressed.
Thanks to input pull up I didn’t need any resistors which saved me so much time in the wiring
All grounds share a common GND rail.
The toggle switch behaves the same as a button but stays latched, which makes it perfect for a looping beat.
Description of the p5.js Code:
The p5.js code controls the full experience: screen navigation, graphics, audio playback, animations, and effects. It includes three screens: welcome, instructions, and play. For sound, p5.js loads separate “.mp3” files for each button. When a button is pressed, the code plays the sound and triggers a color flash and particle explosion around the spinning record. When the toggle is on, a purple base color is applied to the record and a looping track plays continuously. The code also handles resizing, UI buttons, custom fonts, background images, and smooth animation effects.
Communication Between Arduino and p5.js:
Communication is handled using the Serial Connection, which allows the browser to read Serial data from the Arduino. When the user clicks “Connect to Arduino,” the browser opens a serial port. Every button press sends a letter from the Arduino, which p5.js reads asynchronously inside “handleSerialCommand()”. Depending on the letter received, p5.js plays a sound, updates visuals, and triggers effects. This real-time communication creates a seamless physical to digital interaction.
Aspects of the Project I’m Proud Of:
I’m especially proud of how smooth and responsive the experience feels. The combination of physical buttons, instant audio playback, color flashes, and spark effects makes the project feel alive. The UI design using a custom background and logo gives everything a polished, cohesive aesthetic. I’m also proud of the user testing results, people were genuinely excited to play with it and immediately understood how it worked. I loved how tactile the buttons felt and how the overall design turned out. I’m genuinely very proud that I got the serial connection to work quite easily because that was the part I had least practice with, so it was quite intimidating at the start.
How This Was Made (Tools + Process + AI Disclosure):
This project was created using an Arduino Uno, momentary push buttons, a toggle switch, a breadboard, and the p5.js for visuals and audio. I designed the project through several stages: wiring and prototyping, interface design, audio testing, and finally the integration of everything using serial connection. instruction screen.
For the visuals, the logo and all background illustrations were generated using ChatGPT’s image generation, then edited slightly on procreate and integrated into the p5.js sketch. This allowed the look of the project to match my playful, colorful DJ booth theme.
I also used ChatGPT when I hit my major roadblock with more advanced p5.js visuals. One moment where I relied heavily on AI help was when I wanted the spinning record to generate spark effects every time a button was pressed. I couldn’t find any tutorials or examples online that matched what I wanted. The spark idea was really important for the UI experience because it gives the user instant visual feedback that their button press produced a beat.
ChatGPT helped me write and understand the logic. These are the exact lines of code that were produced with AI assistance and I tweaked it a bit after:
function spawnSparks(col) {
  for (let i = 0; i < 25; i++) {
    let angle = random(TWO_PI);
    let speed = random(2, 6);
    sparks.push({
      x: 0,
      y: 0,
      vx: cos(angle) * speed,
      vy: sin(angle) * speed,
      age: 0,
      life: random(20, 40),
      col: col
    });
  }
}

function updateAndDrawSparks() {
  for (let i = sparks.length - 1; i >= 0; i--) {
    let s = sparks[i];
    s.age++;
    s.x += s.vx;
    s.y += s.vy;
    s.vx *= 0.95;
    s.vy *= 0.95;

    let alpha = map(s.age, 0, s.life, 255, 0);

    if (s.age > s.life || alpha <= 0) {
      sparks.splice(i, 1);
      continue;
    }

    noStroke();
    fill(red(s.col), green(s.col), blue(s.col), alpha);
    ellipse(s.x, s.y, 8, 8);
  }
}
These functions generate a small explosion of colored sparks around the record every time the user presses a button. Without ChatGPT, I wouldn’t have figured it out, and I might not have included it at all; but it became a core part of the experience. All of the actual board design, sound integration, wiring, physical construction, and final design choices were done by me, but AI supported me when I was genuinely stuck and unable to find online resources.
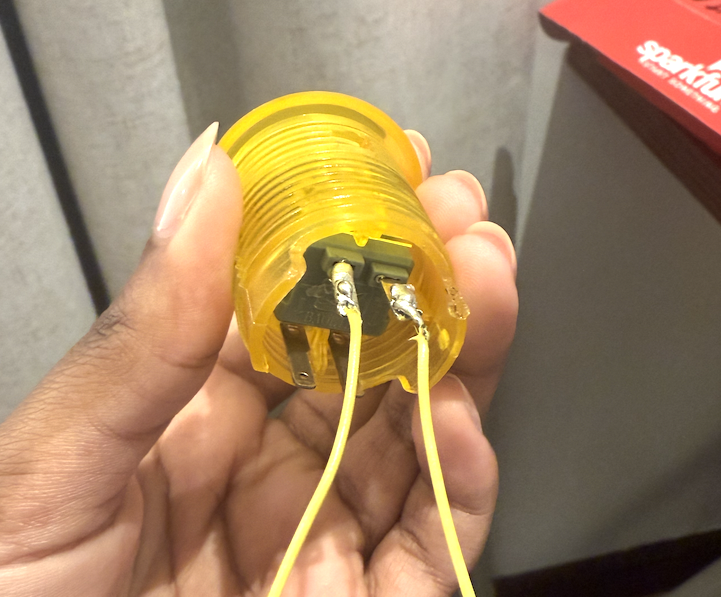
The physical box for my DJ Booth actually started as an old shoebox that I spray-painted and transformed into the final enclosure. I measured each button carefully and cut out holes so they would fit snugly without wobbling, which made the whole build feel more secure and polished. It was also my first time soldering, which was definitely intimidating at first, holding the iron, melting the solder, and checking if it actually was functional with the multimeter was a learning curve. But once I printed and attached the buttons to the board design on top, everything finally looked cohesive and intentional.
Before building it physically, I sketched the layout on Procreate so I could plan the shape and spacing of the buttons. That helped me visualize how the final booth should feel. For the code, I worked on it in clear chunks because I wanted the experience to stay minimal (just three pages) but still feel smooth, refined, and complete. This structured approach made the project feel much more manageable and allowed the hardware and UI to come together cleanly. I wrote the code in clear, manageable chunks so I wouldn’t get overwhelmed by trying to build everything at once. I started with the basics, getting the Arduino buttons to send the correct serial messages, then moved on to the p5.js screens, audio, and visuals. After that, I added more advanced elements like the sparks, color changes, and the spinning record. Breaking it up this way helped me stay organized and made the entire project feel polished and intentional.
Credits/Inspiration:
The logo and backgrounds were generated on chat GPT
Inspiration: I was inspired by the Pioneer DJ All-In-One systems (https://www.pioneerdj.com/en/product/all-in-one-system/), especially their intuitive layouts and the way each button or dial has a clear purpose. I loved how professional DJ booths combine simplicity with powerful control, and I wanted to translate that concept into a playful, beginner-friendly version using Arduino and p5.js. My project recreates the feeling of pressing real DJ buttons and triggering beats, but in a simplified, interactive form that anyone can instantly understand.
Also I was inspired by arcade-style soundboards specifically from https://www.myinstants.com/en/search/?name=arcade. This website really captures the essence of what I wanted my DJ booth to sound and feel like.
Special thanks to Prof. Mang for always answering my questions in class 🙂
Challenges & How I Overcame Them:
Debugging this project took much longer than I expected. At one point, nothing was working, the serial messages weren’t reading correctly, the sounds weren’t triggering, and the interface wasn’t behaving the way it should. I kept trying to fix everything at once, which only made the process more overwhelming. Eventually, I realized the best thing I could do was take a break and step away from the code. When I came back with a fresh pair of eyes, it was so much easier to spot the mistakes I had been missing. Small things like typos, out-of-place brackets, or mismatched variable names were suddenly obvious. That moment taught me how important rest is when troubleshooting; sometimes clarity only comes after giving yourself space to breathe.
Future Improvements:
In the future, I would love to add a recording feature that captures the user’s live performance and lets them play it back. I could also add a volume knob using a potentiometer, though during prototyping I realized it cluttered the interface and confused users. Additional ideas include adding more sound banks, using RGB LEDs for visual feedback, and building a more polished physical enclosure to resemble a small DJ mixer.
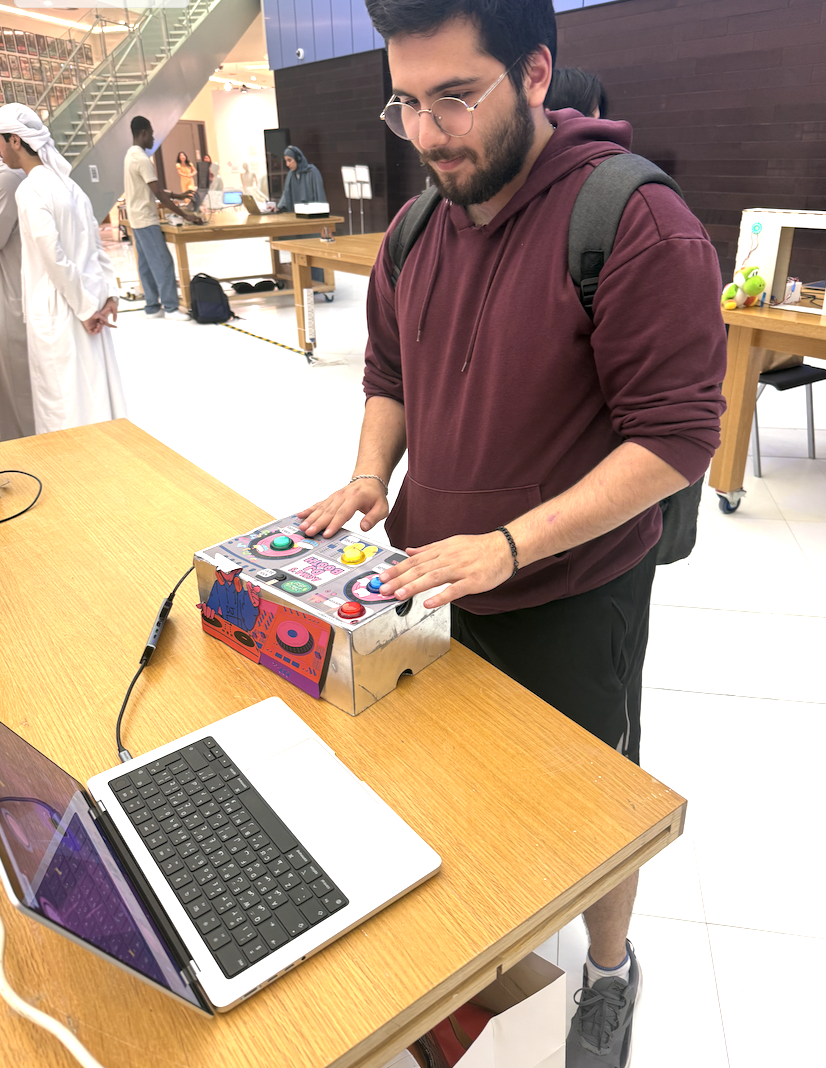
IM Showcase Highlights:
My Interactive Media showcase went really well, people were genuinely excited about my DJ booth, and it felt like everyone wanted a turn to play. What made me happiest was seeing how quickly they understood the user interface without me needing to explain much; the controls felt intuitive, so they could jump straight into the experience and focus on having fun. Watching friends and classmates interact with something I built from scratch was honestly so rewarding, and it made all the time spent designing, testing, and refining the project feel completely worth it. Overall, the showcase experience was both exciting and validating, and it left me feeling proud of how the booth brought people together in such an engaging way.
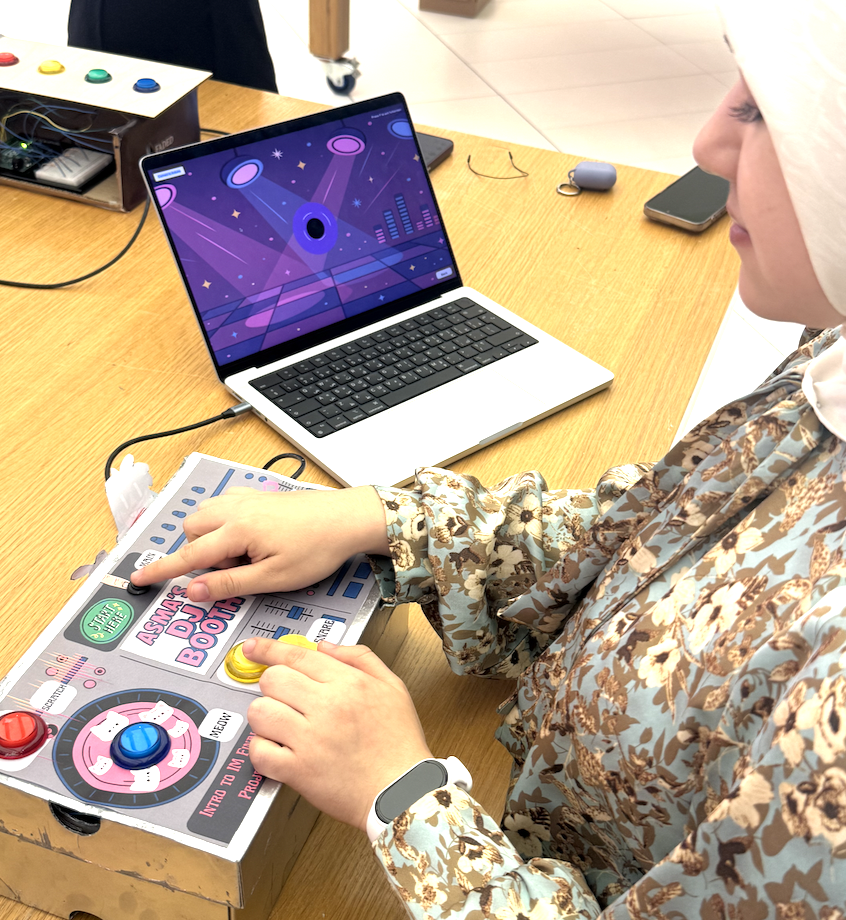
For my user testing session, I asked my friend to try out my project without giving her any instructions. I wanted to see if she could figure everything out on her own just from the way the interface and the game are designed. The first thing I noticed was that she read the instructions on the page and understood the goal immediately, which was honestly a relief. She didn’t ask any questions, so the basic mapping between the buttons and the falling emojis made sense to her. That part of the experience seems to be working exactly how I intended.
Once she started playing, her feedback was really helpful. She enjoyed the game a lot, in fact, she kept wanting to play even after I stopped recording, and she tried beating her own high score multiple times. That told me that the core idea is fun and engaging. But she also pointed out a few things that I definitely need to improve. The main issue she mentioned was responsiveness. Sometimes the game feels a little slow to respond even when she hits the button at the right moment. When multiple emojis fall quickly, pressing two buttons in a short time makes the game slightly laggy. This helped me realize that the input handling needs to be optimized so that the game processes button presses more instantly, especially when things get fast.
She also said that adding sound effects for correct hits would make the experience more satisfying, which I completely agree with. That’s something I want to implement next. Another important improvement is creating a proper end screen with the final score and a high score tracker, because right now the game just keeps going without a clear ending moment. An end page would make the game feel more complete and polished.
On the physical side of the project, I had a few challenges. I wasn’t on campus for most of the week, so I only had Wednesday to work on the hardware. I tried soldering the buttons onto the board, but when I tested them, the connections kept failing. Because of that, I had to temporarily tape them with conductive tape just to get the buttons working for testing. This also means the buttons aren’t fully placed into the holes yet, and 2 leds weren’t working at all, so I had to test it without them. Once I solder everything properly, the inside of the box will look much neater, and the wires will be able to pass through from underneath the LED buttons. After that, I’m planning to close the back of the box, but I’ll leave a small opening so I can still access the components whenever I need to fix or update something.
Overall, this user testing session helped me see what’s working and what still needs attention. The concept, gameplay, and instructions are all clear, and the interaction makes sense even without any explanation. But I also realized that I still have a lot to improve in terms of responsiveness, speed, physical build quality, and overall design. The good thing is that my friend actually enjoyed playing, which reassures me that I’m on the right track, the project just needs more refinement to reach its full potential.
For user testing, I let my sister test out my project. For this test, I didn’t give her many instructions beforehand, so I could observe how intuitive the system is.
User Testing Video:
Observations
My sister was confused at first because the mapping between the physical buttons and the actions on the screen wasn’t obvious.
I had to explain the concept of the project and how the buttons work, which shows I still need to make the controls more self-explanatory. Once explained, she understood the idea of selecting a year and choosing between music or news.
My sister suggested adding a sound effect when the selected decade changes so that the user is aware, she also suggested increasing the value range between the time periods because she felt that they were too close to each other (as seen in the video, she overturned the potentiometer and reached the last time period when she meant to only go to the second one).
She also criticized the play button (plays the music/news) and said that I didn’t really need it since the potentiometer changes the sounds anyway, so it would be redundant. Instead, she suggested having an activation button that “activates” the machine after the start screen.
Overall, it was clear where the experience worked and where it could be improved.
What’s Working Well
The music playback is smooth now, with no lag (that was a big issue until an hour ago).
The LEDs on the breadboard respond nicely to the potentiometer.
Areas to Improve
The “news” button currently requires a long press. I plan to fix this so that a single press triggers the news playback.
I want to add a clear response from P5, for example: the LED on the sketch lights up along with the LED on the board.
I also need to display the selected year on the P5 screen so that my sister could see what they’ve chosen without instructions.
The buttons need labels (“music” and “news”) so users immediately understand their function.
What Needed Explanation
The most confusing part for her was how the selection process works:
How the potentiometer selects the year
How the buttons choose music or news
To make this more intuitive, I plan to:
Clearly display the current year on the P5 sketch
Label the buttons on the breadboard
Possibly add visual feedback cues (lights, animations) so users know their input is registered
Next Steps
Improve the user interface on P5 to show selections clearly
Fix the news button to work with a single press
Add more intuitive labeling and feedback on the hardware
Look for more audio files to make the selection more vast
User testing was extremely helpful: it showed me what’s intuitive, what needs clarification, and how the experience can be improved for someone using it for the first time.
1. Have people try your project without giving them any prompts/instructions and see how they use it.
I let my friend step onto the dance pad and try Foot Loose completely blind. No instructions, no hint about the pads, nothing. I just pressed Start and watched. Right away, she understood the basic idea: arrows fall down their lanes, you step on a matching pad. She wasn’t lost or confused about the “goal” of the game, which was a huge win.
But the moment she tried to play seriously, the weaknesses started showing. She hesitated, second-guessed pads, and kept glancing down because she wasn’t fully sure what counted as a “hit.” The center pad especially caused chaos; it triggered randomly and confused her more than it helped.
2. Are they able to figure it out? Where do they get confused and why? Do they understand the mapping between the controls and the experience?
What she figured out:
Arrows = instructions.
Colors = lanes.
Pads = controls.
Where she got confused (and why):
Instructions were too vague.
She didn’t know exactly when to step. She asked me later: “Do I hit when it touches the line? Or when it’s between the two lines? Or when it’s dead center?”
That hesitation slowed her down.
The center pad was unclear.
It kept triggering even when she didn’t mean to step on it, and she didn’t know what it was for. The “●” symbol made sense in theory, but in practice it caused more accidental hits than intentional ones.
The game felt too fast.
She understood the mapping, but the speed didn’t give her time to react. On easy mode, she still felt rushed.
So yes, she understood the mapping, but the timing window + speed made the experience harder to grasp on her first try.
3. What parts of the experience are working well?
The directional pads (L, D, U, R) worked great.
They triggered reliably and matched the arrows perfectly.
Visual clarity:
The colored lanes + falling arrows made sense instantly. She said, “Oh, okay, I step where it matches.”
The core mechanic:
Hit arrow → get GOOD / MISS → see score go up.
She understood the flow without me narrating anything.
Pacing of feedback:
The “GOOD” and “MISS” flashes were readable and rewarding.
In short, the skeleton of the game works extremely well. The player can understand the entire concept just by watching it for 5 seconds.
4. What areas could be improved?
Instruction clarity:
I need to explicitly say:
“Step when the arrow is inside the dashed zone.”
Remove the center pad from gameplay.
It’s physically useful as a standing spot, but as a sensor it creates noise, misfires, and confusion. It’s not worth the chaos.
Slow the game down on Easy mode.
Beginners need space to understand the rhythm before it speeds up.
Broaden the hit zone.
The current timing window is too strict. Expanding the dashed lines will make the game fairer and easier to enjoy.
All of these changes directly help first-time players “get it” without needing me to explain anything.
5. What parts did you feel the need to explain? How could you make these areas more clear?
What I felt the urge to explain while she played:
“Step ONLY in the dashed zone.”
“Ignore the center pad; it’s just a place to stand.”
“It’s fast, don’t worry, the game is supposed to slow down.”
“You’ll get a GOOD only if you step in the exact timing window.”
Basically, anywhere I wanted to explain was a UI failure, not a player failure.
How I will make it clearer:
Rewrite instructions to be exact, not general.
Remove ●/center input entirely.
Increase the hit zone size.
Slow the spawn rate on easy mode.
Maybe add a small mini-tutorial or animated demo before the game starts (optional).
Final Takeaway
The user testing confirmed that the concept is strong and intuitive, but the details such as timing clarity, center pad behavior, and pacing need refinement. Once those are fixed, the game will be fully understandable on its own, which is the whole point of this assignment.