Week 9: Lock Mechanism (Analog + Digital)

I initially really struggled to come up with a concept for this week’s project. While I understood how to use analog and digital switches, I wasn’t sure how I would use them in conjunction to create something engaging and interesting. I slept on it and woke up with the idea to build off the theme of security from week 8 and make a lock mechanism using analog inputs like the potentiometer.

One of my biggest concerns was that I wasn’t sure how to draw a proper schematic so I looked online and used Tinkercad Circuits for a while but it wasn’t exactly the simple schematic drawing I wanted so I decided to save the site for future use instead.

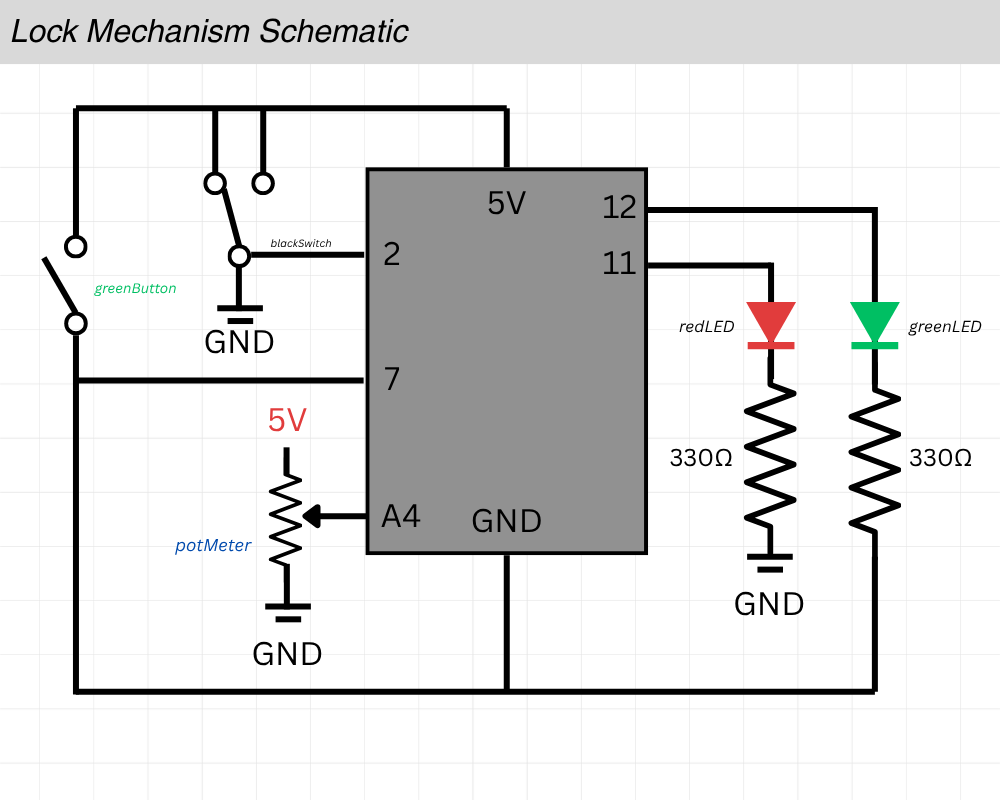
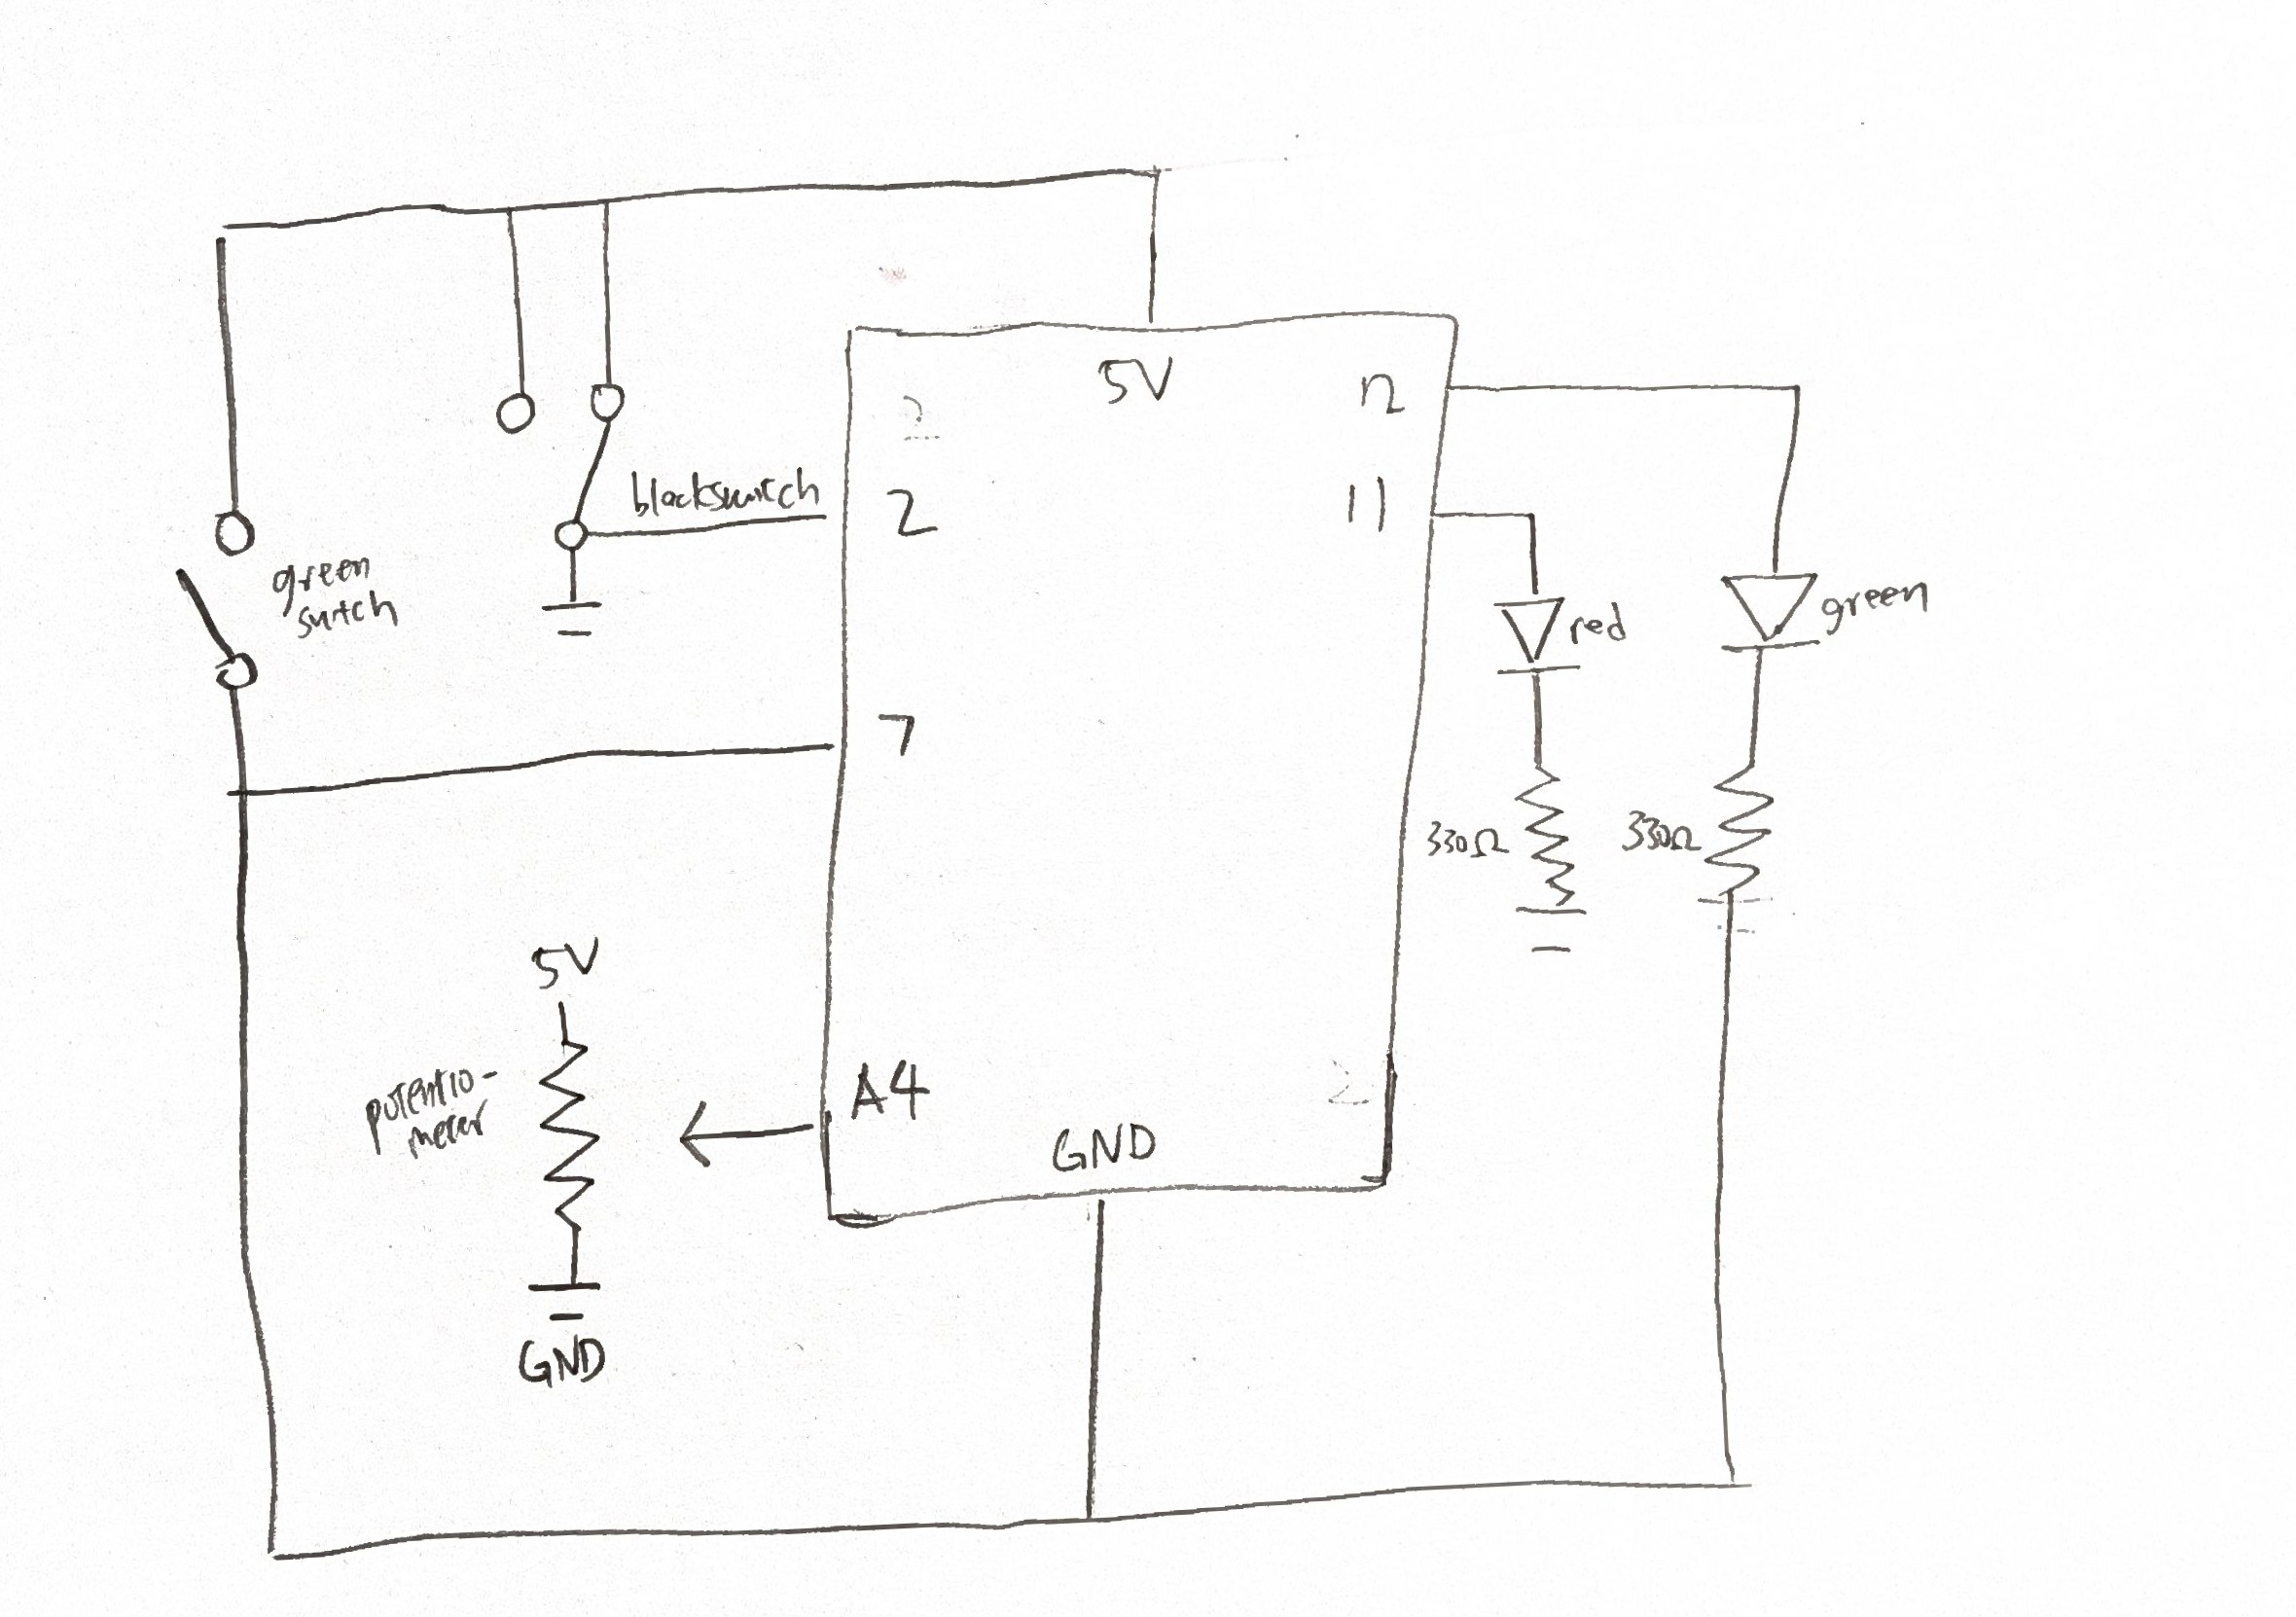
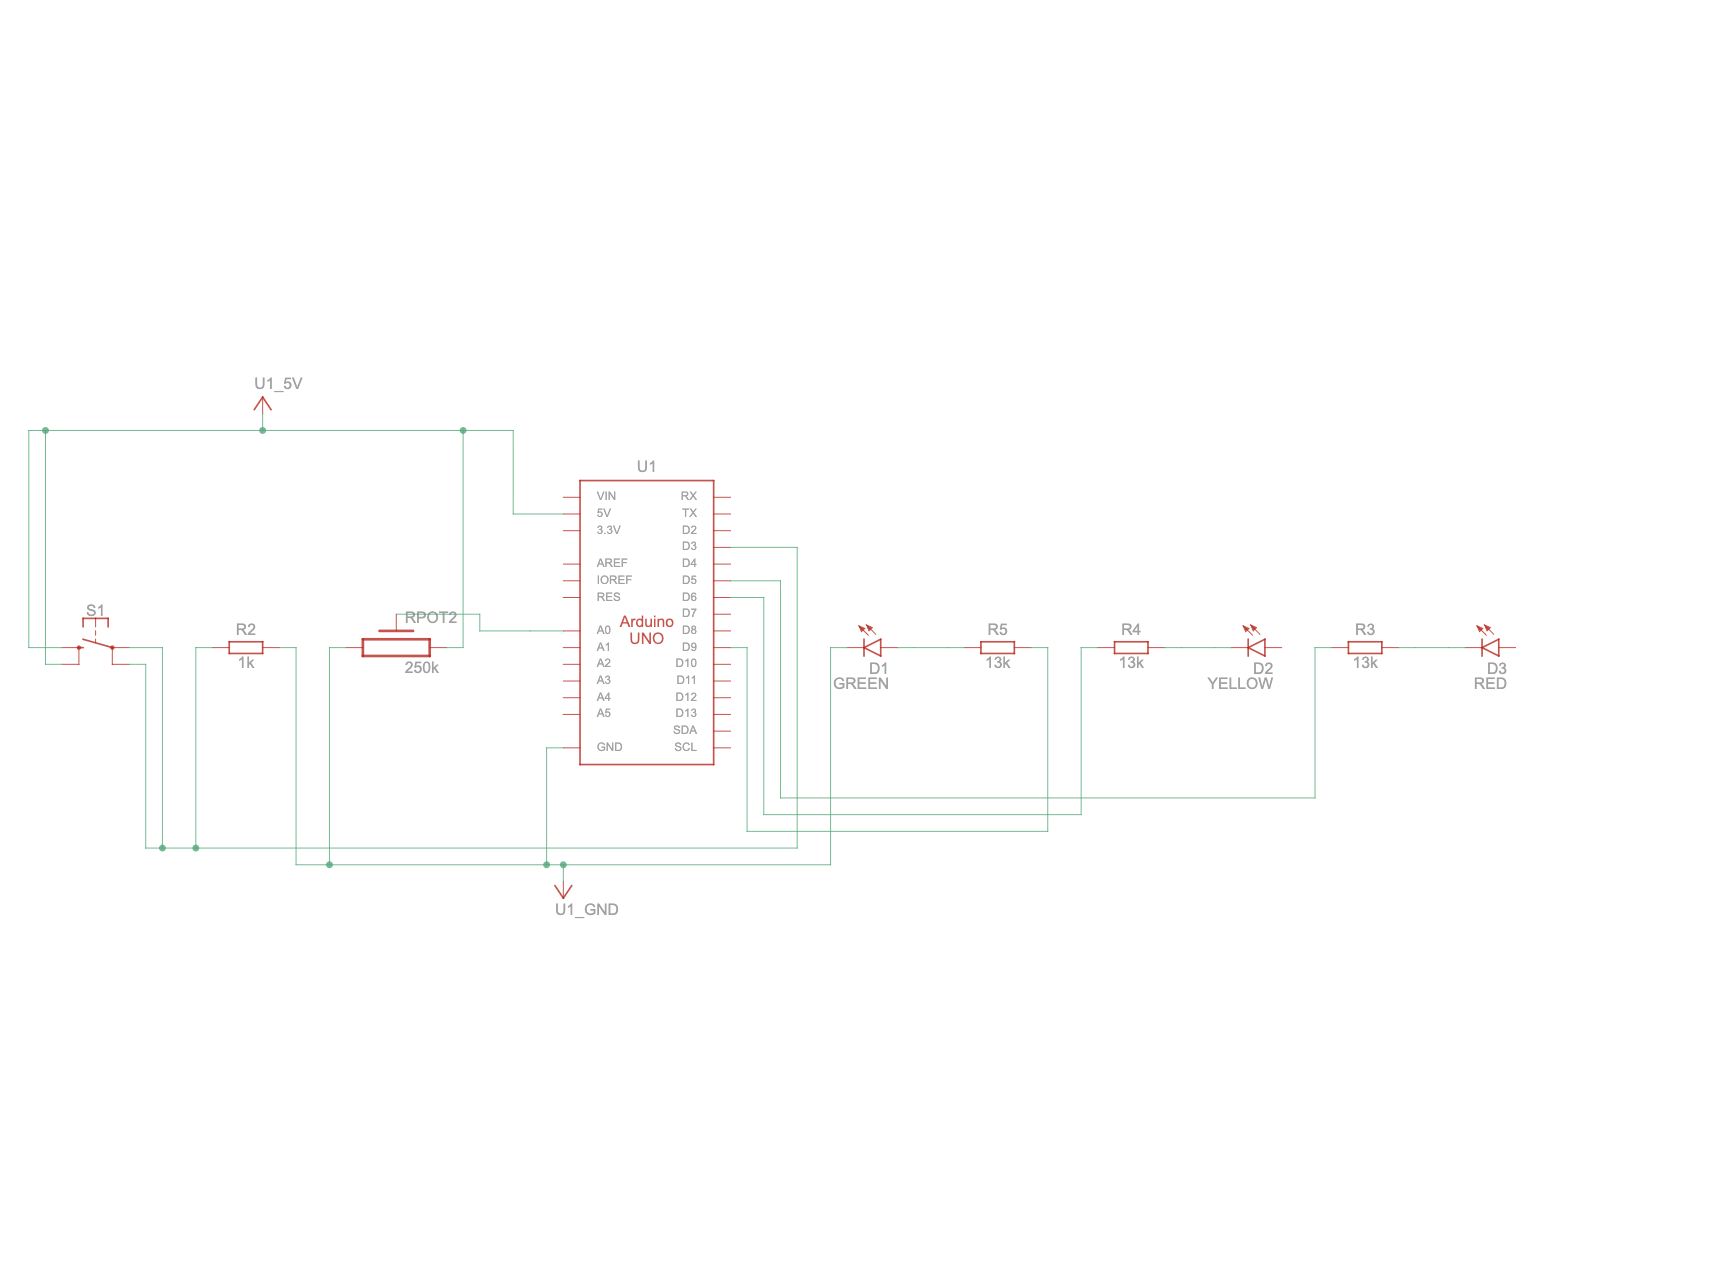
This was the schematic I came up with. I knew I was going to mess up and have to move stuff around so I did it digitally using simple shapes and lines on canvas. I barely knew what I was doing and to be honest it made a LOT more sense to just start putting wires and pieces together on the breadboard but this schematic was how I thought it would look.

And this is how it looked physically with all the relevant pieces attached to the breadboard.

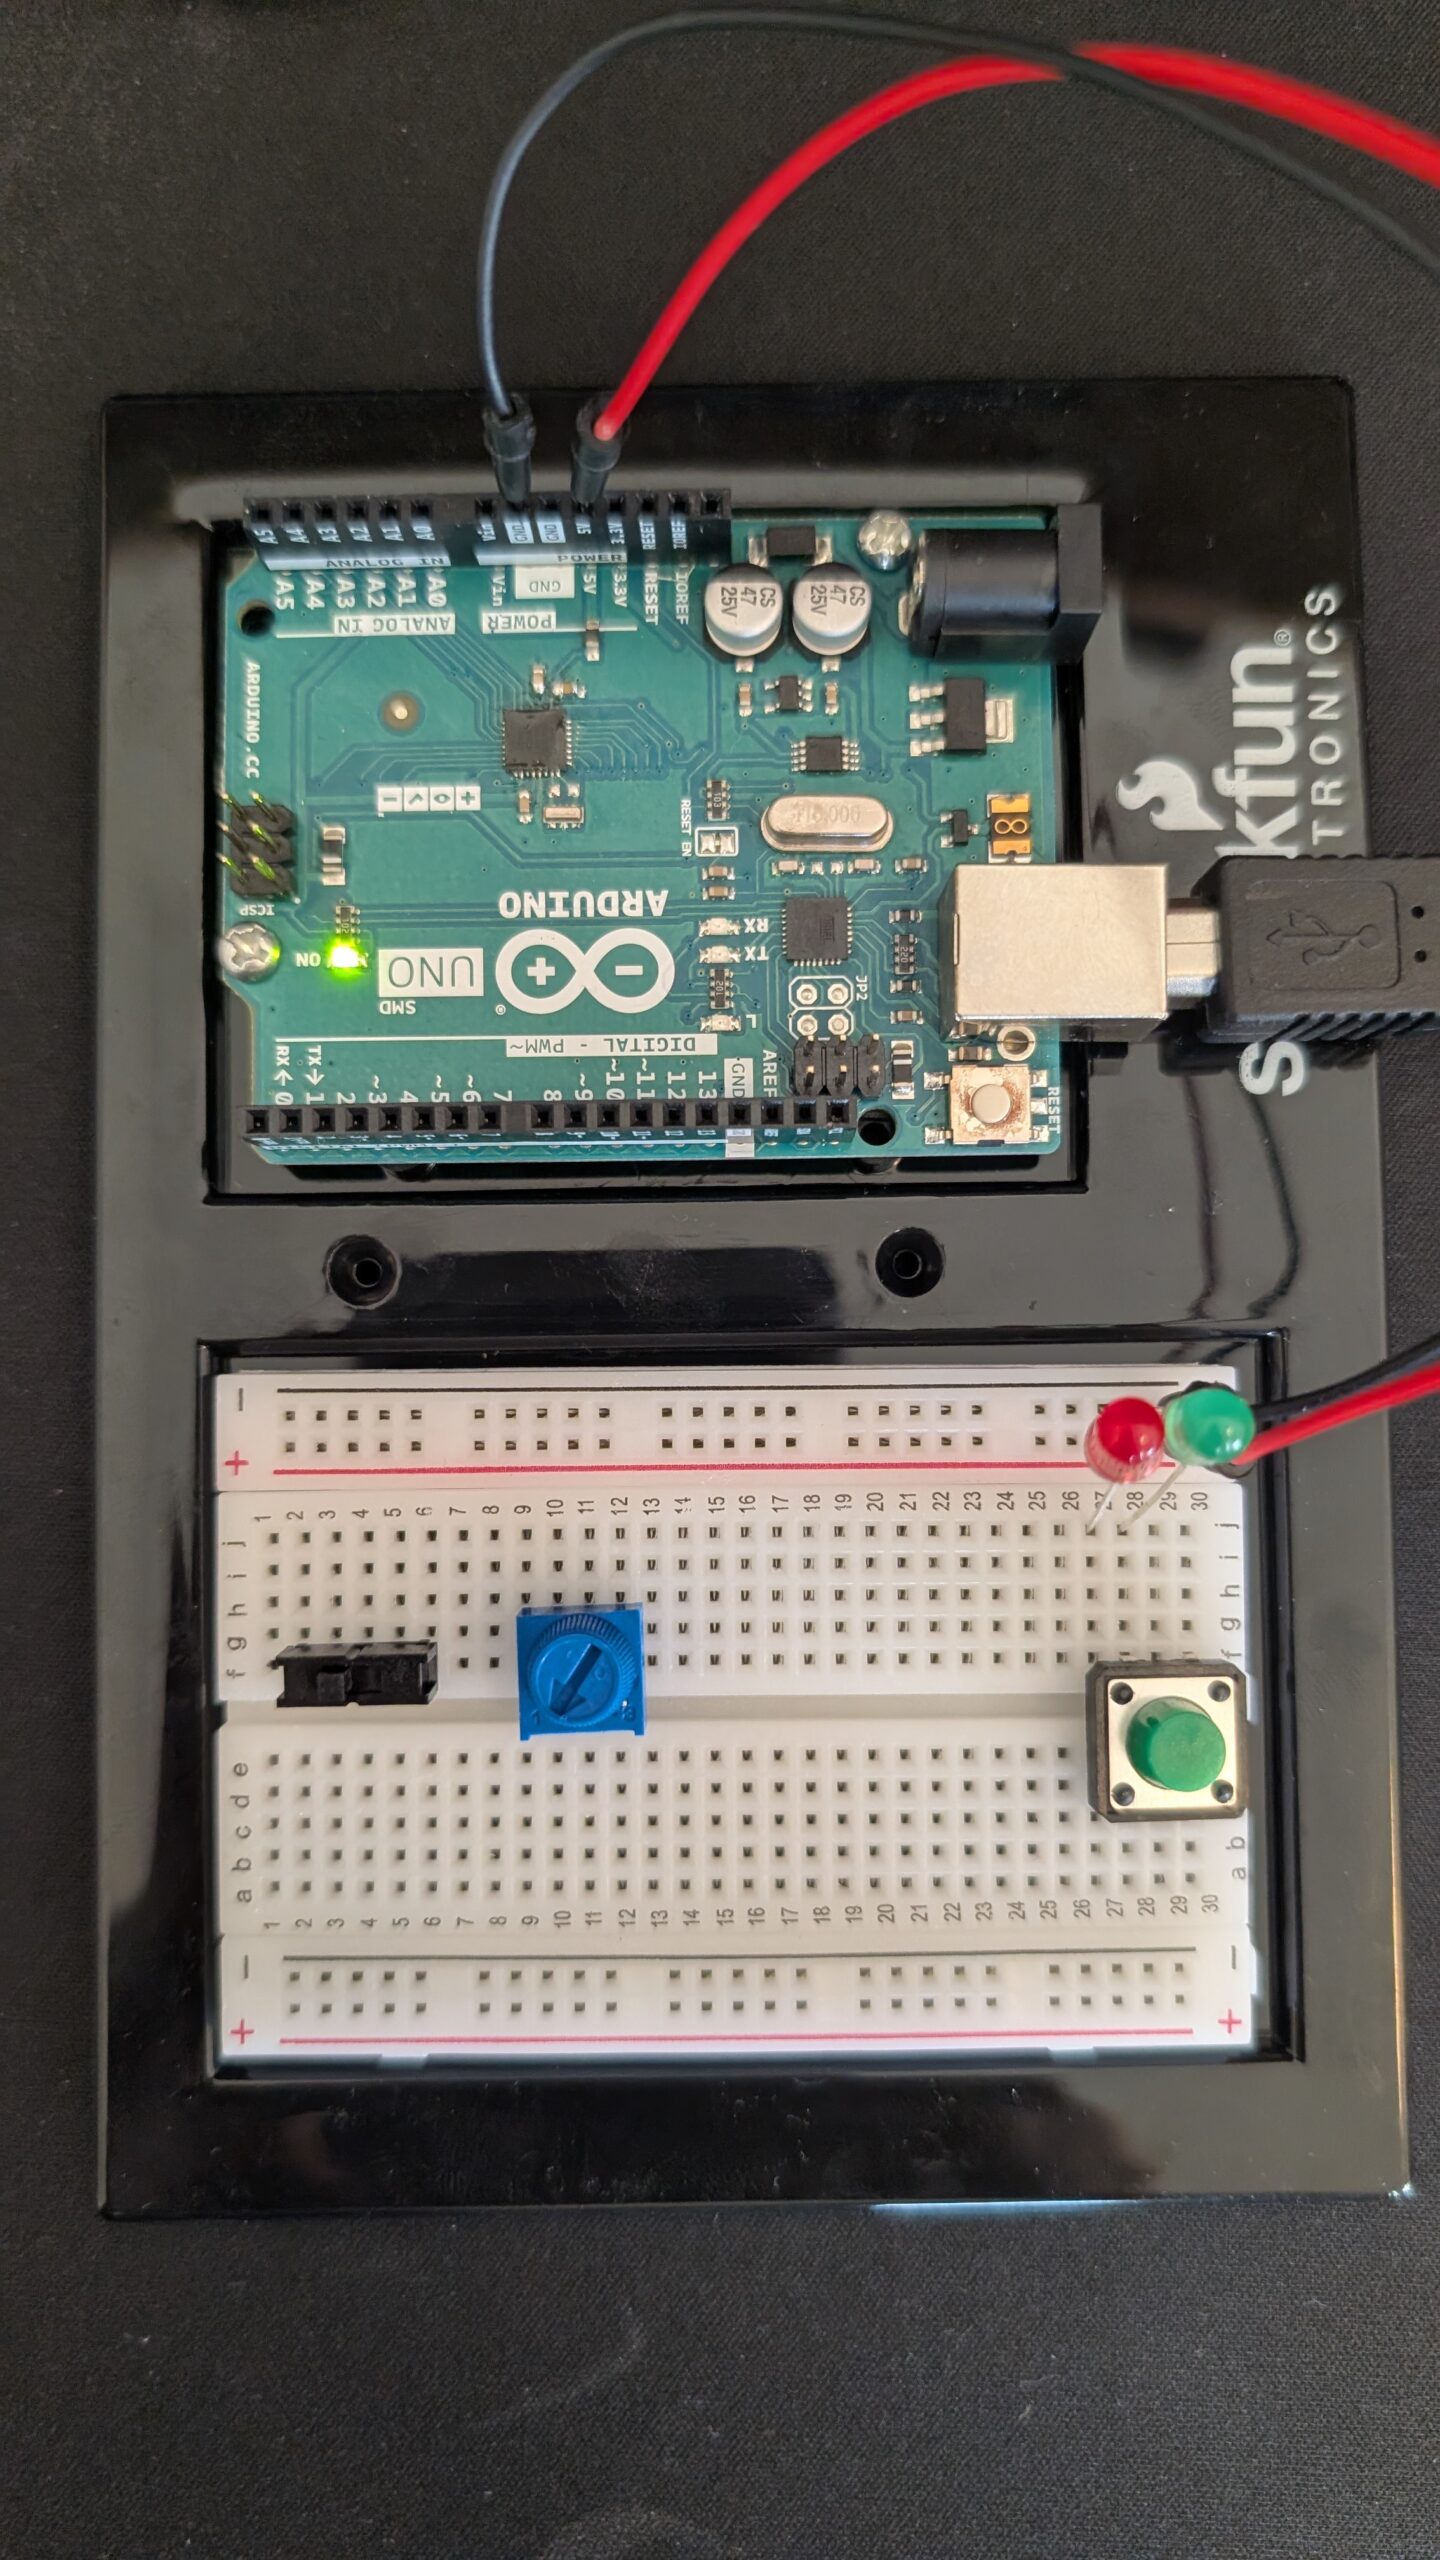
I knew the wiring would get pretty crazy as I started to connect everything so this is how I color-coded them:

    • Red: Power Source (+)
    • Black: Ground (-)
    • Green: Inputs Connections to Arduino Uno (Switch, Pot Meter, etc)
    • Yellow: Output Connections to Arduino Uno (LEDs)

On the code-side, I made sure to declare each pin I was going to use at the very top so I could quickly change it if I needed to swap stuff around.

int greenButton = 7; //button to open lock
int blackSwitch = 2; //part of the lock (the black on/off switch)
int potMeter = A4; //part of the lock (the roating blue one)

int greenLED = 12; //lock is open
int redLED = 11; //indicates lock is still locked

//LOCK COMBINATIONS
int blackSwitchANSWER = LOW;
int potMeterANSWER = 1000; //above X value to be correct

This is what the final product looked like:

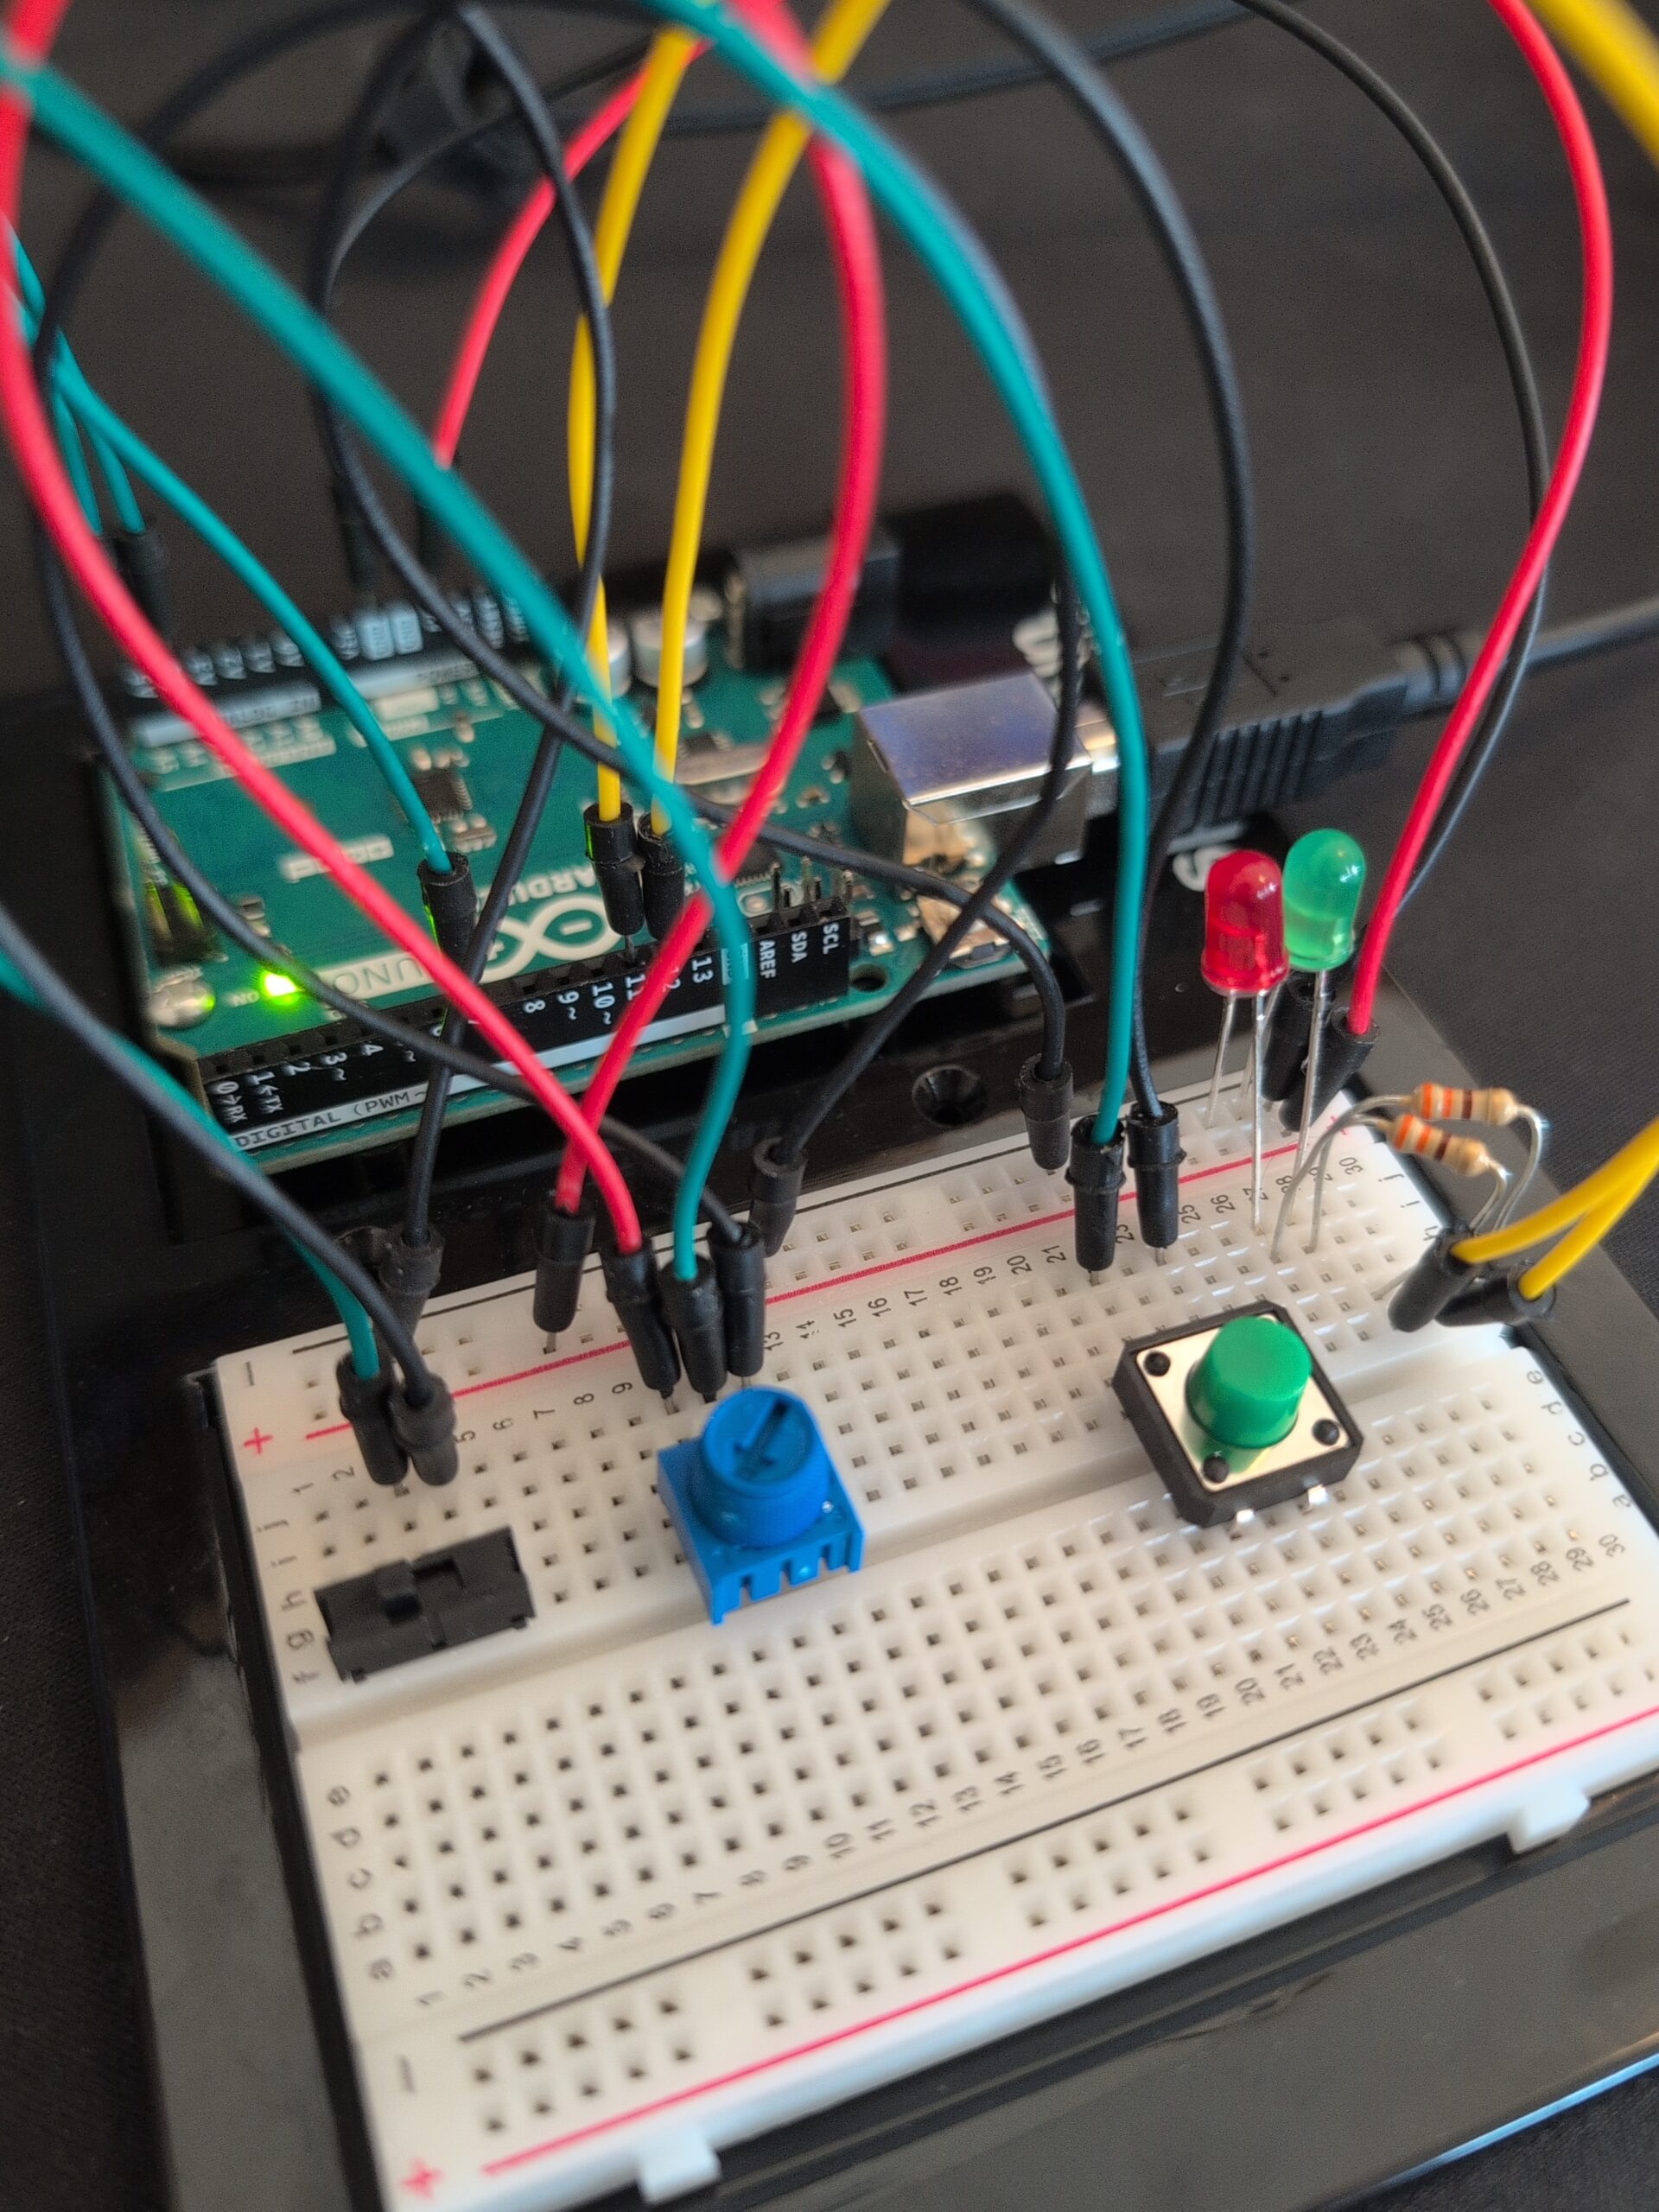
I didn’t run into many bugs when coding but I did initially accidentally set the red light to always be on unless I was holding down the green button. I had to search online how I could fix this and I eventually found I could set the pinmode for the button to “INPUT_PULLUP” which was useful for inputs that otherwise would have no stable value when not pressed.

pinMode(greenButton, INPUT_PULLUP); //INPUT_PULLUP is good for buttons that automatically spring back uppinMode(blackSwitch, INPUT_PULLUP);
pinMode(potMeter, INPUT);

pinMode(greenLED, OUTPUT);
pinMode(redLED, OUTPUT);

I did have a physical difficulty where I was testing different kinds of inputs with the switch and the potentiometer and forgot what the correct combination actually was– and with no way to know if the green light was even going to turn on when it WAS correct. Thankfully a minute of trial and error and making sure the code side of things was correct got me to return to the original combination, but that could’ve been pretty annoying if the lock was any more complicated.

When it came to the LED light responses. I originally had the appropriate light turn on for 2 seconds and then turn off. I felt like this didn’t feel quite right so I made a creative decision to flash the appropriate light as feedback instead; I did this by creating a for loop that would flash the light 5 times with a small delay. This felt a LOT more responsive than the brief moment that the light would turn on previously. Below is the full if-statement that checked whether the confirm button, the green one, was pressed.

if (greenButtonState == LOW) {  
  if (LockIsUNLOCKED == true) { 
    digitalWrite(redLED, LOW); //turn OFF red light
    for(int i = 0; i < 5; i++) {    // flash 5 times
      digitalWrite(greenLED, HIGH);
      delay(150);
      digitalWrite(greenLED, LOW);
      delay(150);
    }

  } else {
    digitalWrite(greenLED, LOW); //turn OFF green light
    for(int i = 0; i < 5; i++) {    // flash 5 times
      digitalWrite(redLED, HIGH);
      delay(150);
      digitalWrite(redLED, LOW);
      delay(150);
    }
  }
}

I am very proud of how it turned out in the end with both the technical difficulties that I solved and how it feels to interact with it. Below is a demonstration of the lock working; you need to toggle the black switch to the right side and twist the potentiometer counterclockwise to the end.

Link to ino File (Google Drive)

Week 9 Reading Response

Physical Computing’s Greatest hits and misses

This blog lists a number of interesting ways of interacting with the art piece. It reminds me part of the reading from previous weeks that try to re-define what is an interactivity for a designed system. From that perspective, these designs provide us with idea to interact other than the usual input(computer text input). Other body components such as hands, eyes, or even our entire bodies are powerful enough tool to provide information that alter the system output. Also, the response from the system or the output from the system could also be varied. From this blog, I seen response including forms of sound, image, and combination of both.

Making Interactive Art: Set the Stage, Then Shut Up and Listen

This blog suggests interactive art artists to let audience dictate the interactive experience. I partially agree. First, I agree that there should be hinted guidance from the art that guides the audience to interact with the device. However, I do not agree that artists should be completely silent in the process. If audiences are not careful enough and they just miss some of the hint, there should be message from either the device or the artist that guides the audience back to the track to the intended interactive experience. A careful or well-designed system should indeed be very informative themselves but for complex enough system, visual hints themselves are not informative enough to guide the correct experience.

Week 8 Reading Response

Norman,“Emotion & Design: Attractive things work better”

The reading provide us with a new perspective on aesthetics design: rather than solely serving a “beauty” function, it improves people’s attention span, positive emotions when interacting with the design, which might end up in improving the problem solving of the product/design. I highly agree with this perspective. For example, when computers were first invented, they dominated with command-line control interface which prevents the majority from using this advanced-system. However, later on, designers of Apple and Microsoft realized this problem and design separately two systems that are heavy with image interfaces. Today, all systems inherit that idea and people today interact heavily with these more well-designed systems.

Her Code Got Humans on the Moon

Other than impressed by the great works done by Margaret Hamilton and her strong spirit that overcomes all the adversaries, I am particular interested in anecdote of the reading where Hamilton proposed that there might be error in the program when preloading P01, her leaders refuse to add error-checking within the software. Though the astronauts are the most well-trained, they still trigger the error during the real mission. This story reminds me the importance of error-preventing programs. Even though something might seem stupid when people first develop them, people might really end up in this “stupid” situation. Luckily, during this mission, the problem is resolved. However, there are numerous examples in history related to how a minor computer error lead to billions of losses.

Week 9 Production

Concept

This piece transforms a simple circuit into a puzzle. The connection between the switches is not obvious. The user needs some time to figure out what makes the LEDs light up.

The red LED changes brightness as you turn the potentiometer. Also, pressing only one of the push buttons does nothing you have to discover the specific “sweet spot” gesture. Only when all conditions align do the LEDs respond.

Video & Image Documentation

IMG_9510

Schematic Drawing

Future Improvements

A single puzzle could evolve into something far more complex by layering additional challenges:

    • Timing urgency: Buttons must be pressed within 2 seconds of entering the sweet spot, or the blue LED only stays lit for 3 seconds before requiring you to solve it again. This adds urgency and makes the victory feel earned rather than permanent.
    • Pattern memory: The blue LED blinks a simple pattern (like short-long-short) at startup. Users must recreate this rhythm with the buttons while in the sweet spot to unlock, transforming a spatial puzzle into a temporal one.

Week 9 Reading Response

The metaphor of interactive art as a directorial process reveals creative control and trust. When Igoe compares designing interactive work to directing actors, it exposes a fundamental tension in the fear of without constant explanation, our vision will be misunderstood or ignored. But this fear might actually be the enemy of good interactive work. Traditional artists can hide behind the permanence of their statement, for example, a painting doesn’t change whether viewers “get it” or not. However, Interactive artists must confront the uncomfortable reality that their work is incomplete without the audience’s participation. The most interesting implication here is that over-explanation isn’t just bad pedagogy. It’s a form of creative cowardice, a way of avoiding the vulnerability inherent in truly collaborative expression.

What strikes me about the “greatest hits” catalog is how it inadvertently maps the evolution of human-computer intimacy. The progression from theremin-like instruments (where gesture has “little meaning by itself”) to gloves (which borrow existing gestural vocabulary) to meditation helpers (which attempt to read involuntary bodily responses) represents increasingly ambitious attempts to collapse the distance between intention and interface. Yet Igoe’s skepticism about certain forms, particularly “remote hugs” and meditation helpers, suggests that some human experiences might be fundamentally resistant to technological mediation. The machine can measure breath rate and skin response, but it cannot know meditation; it can transmit signals between paired objects, but it cannot convey warmth. This raises an uncomfortable question for interactive designers: are we sometimes trying to technologically recreate experiences that derive their meaning precisely from their technological absence?

The recurring critique of projects that confuse “presence with attention” opens up a broader philosophical question about what interaction actually proves. A sensor detecting someone standing in front of a painting tells us almost nothing about engagement, yet many interactive projects treat physical proximity as evidence of meaningful exchange. This seems related to a contemporary cultural anxiety about whether we’re truly connecting with anything. We’ve become so focused on measurable interaction (clicks, views, sensor triggers) that we’ve lost sight of the immeasurable dimension where actual meaning resides. Perhaps the most radical interactive artwork would be one that deliberately resists confirming whether interaction happened at all, forcing both creator and participant to sit with uncertainty rather than seeking the reassurance of sensor data. The blink of an LED becomes a form of emotional comfort: see, something happened, you’re not alone.

Week 9 – Shadow and Light

Concept

For this project, I decided to make a small interactive game called Light & Shadow”. The concept is simple but fun: the yellow LED changes brightness depending on how much light the photoresistor (LDR) senses, and the blue LED only lights up when it’s dark and the button is pressed, basically “catching the shadow.” I liked that idea because it combines analog and digital inputs in a way that feels like a mini game.

The Process

The production process was mostly about setting up the circuit on the breadboard and figuring out how to connect everything correctly. Choosing the right resistors was harder than I expected,  sometimes the LEDs didn’t light up properly, and I had to try a few combinations before it worked. I also spent a lot of time drawing the schematic to make sense of the connections. I must have redrawn it several times to make it at least slightly understandable. Even now, I’m not 100% sure my plan is perfect, but it works!

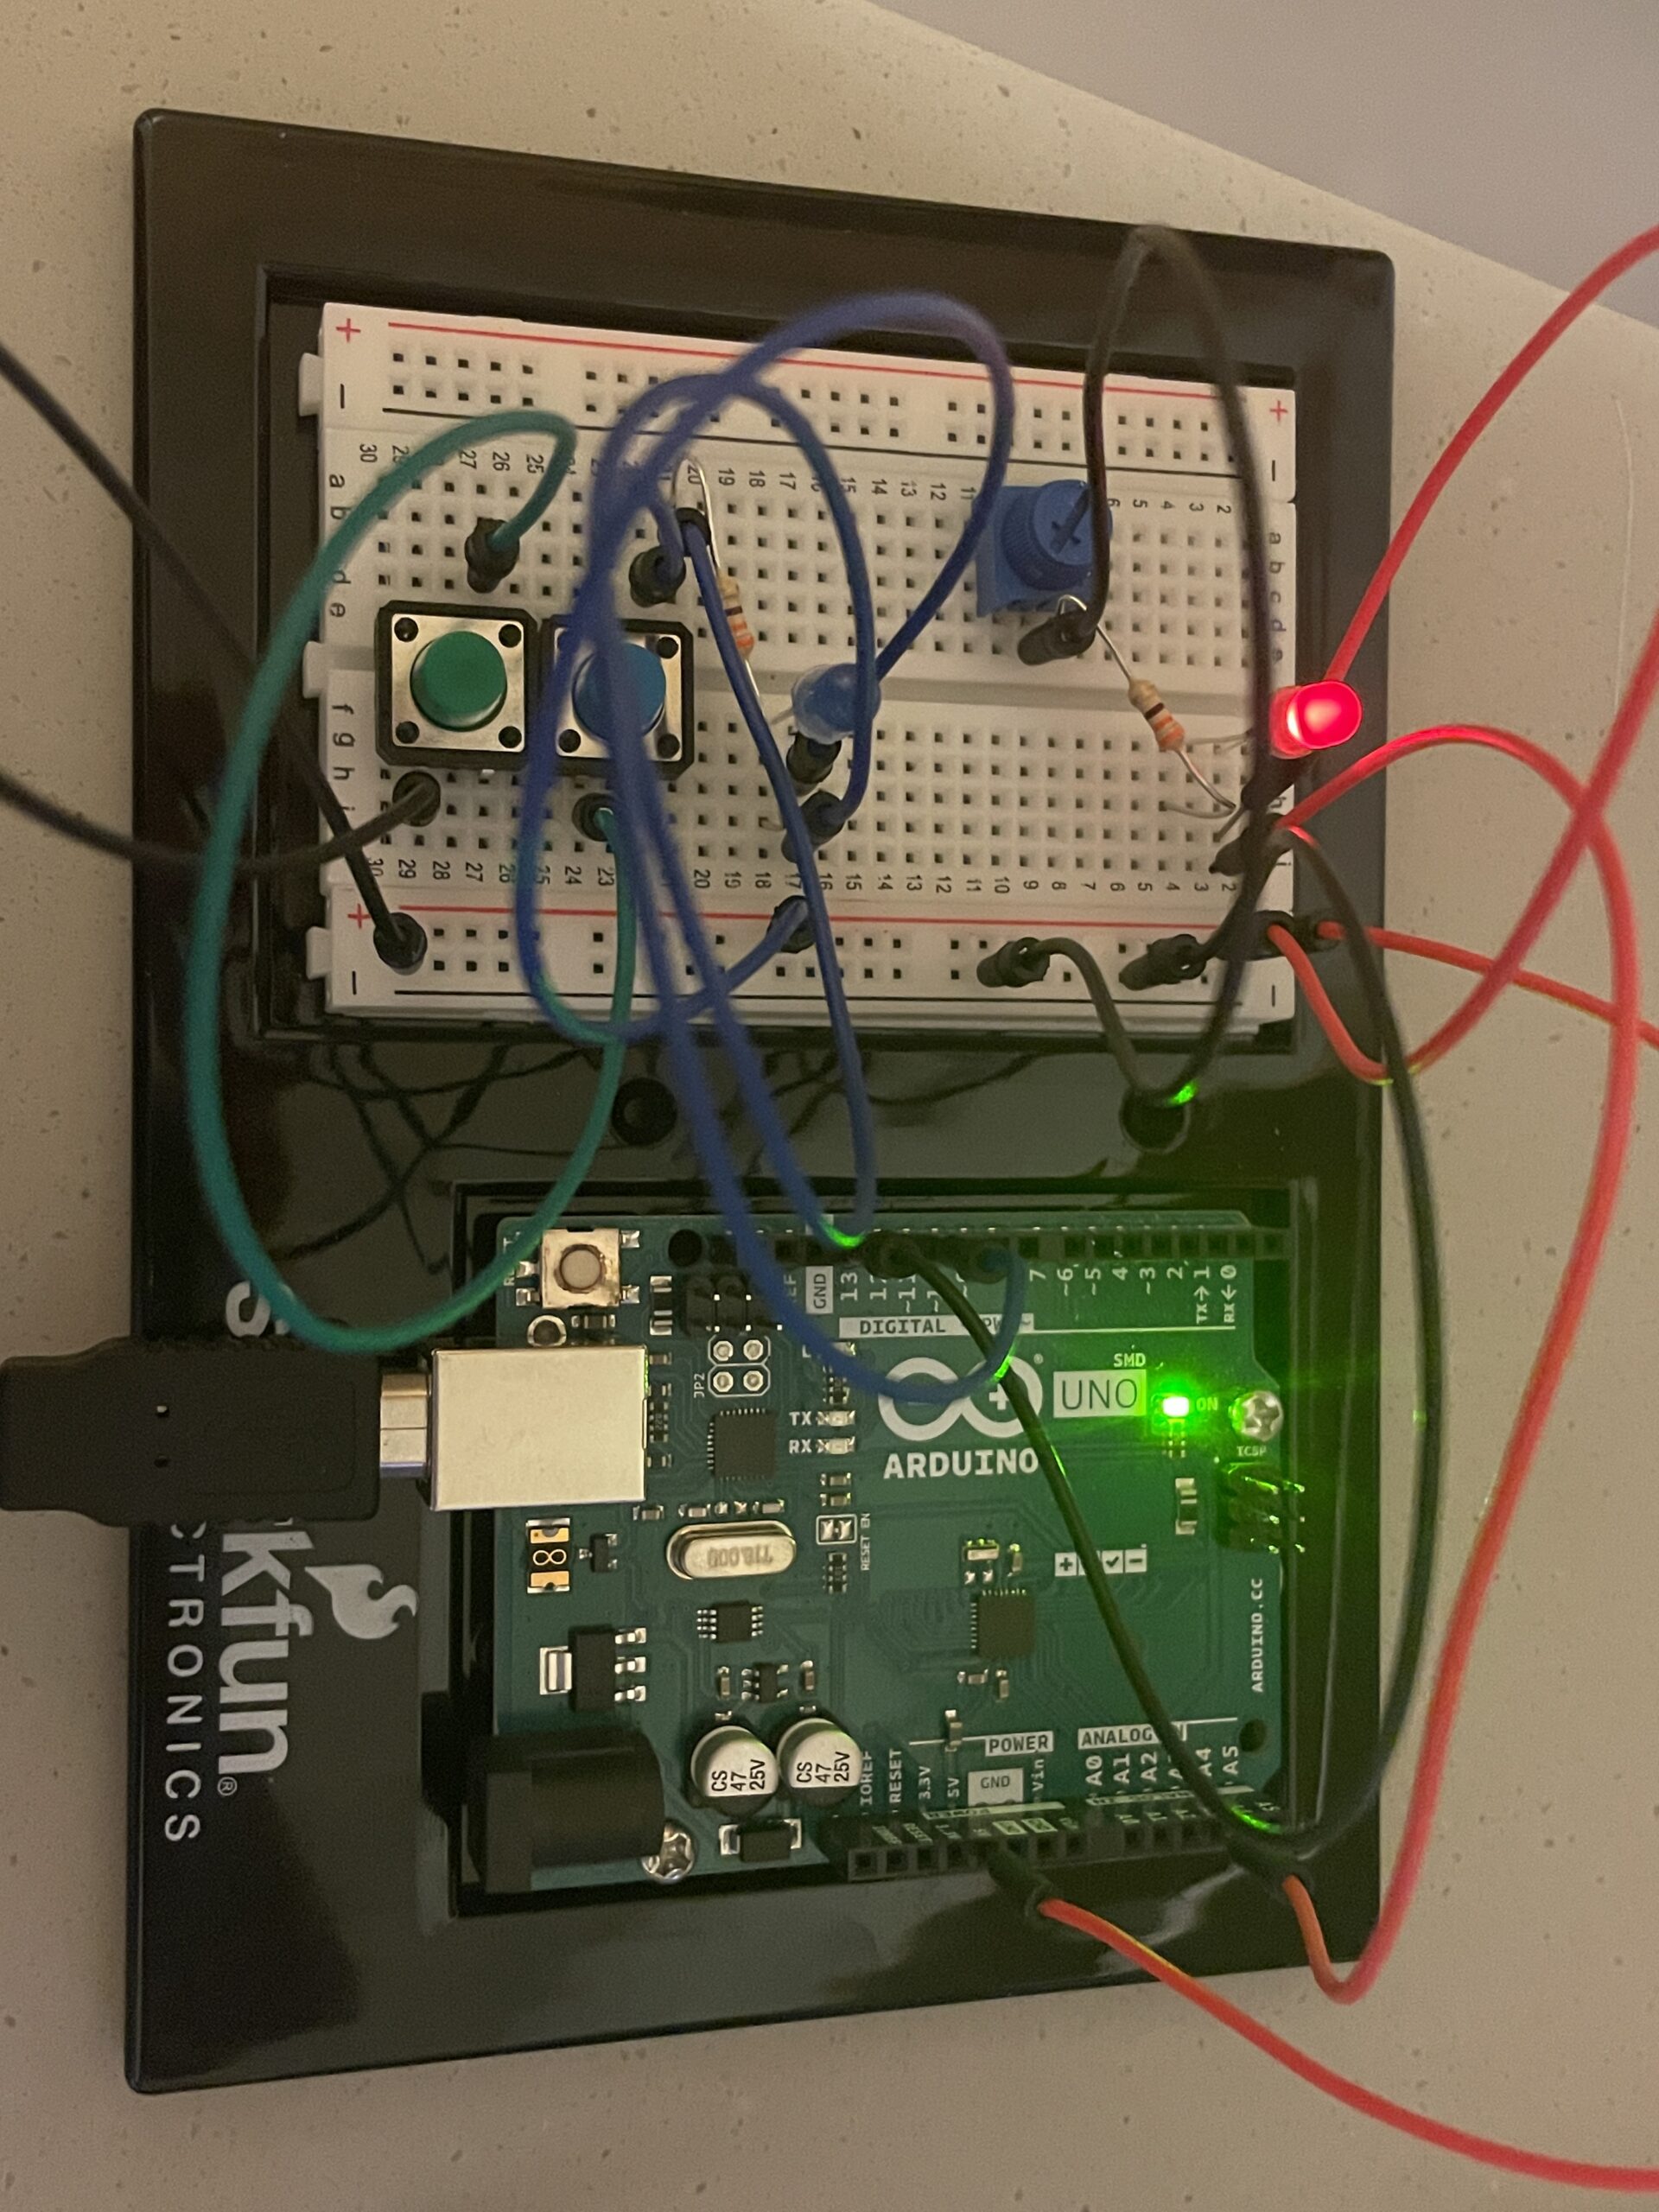
Figure: the process of sketching the plan

The Finalized Sketch

The coding part was fun because it was simple enough to understand but still taught me a lot. I read the analog value from the photoresistor and mapped it to the brightness of the red LED, then used a simple if-statement to check the button and darkness to control the green LED. Seeing the LEDs react in real time to light and button presses made all the work feel rewarding.

int lightSensor = A0;
int buttonPin = 2;
int redLED = 9;
int greenLED = 8;

void setup() {
  pinMode(buttonPin, INPUT);
  pinMode(greenLED, OUTPUT);
  pinMode(redLED, OUTPUT);
  Serial.begin(9600);
}

void loop() {
  int lightValue = analogRead(lightSensor);    // 0–1023
  int brightness = map(lightValue, 0, 1023, 255, 0); // dark = bright
  analogWrite(redLED, brightness);

  int buttonState = digitalRead(buttonPin);

  if (buttonState == HIGH && lightValue < 400) {
    digitalWrite(greenLED, HIGH);
  } else {
    digitalWrite(greenLED, LOW);
  }

  delay(100);
}

Reflection

Overall, this project was a great learning experience. I got hands-on practice with analog and digital inputs, using resistors correctly, and writing basic Arduino code. I also learned patience, both in wiring and drawing schematics. Even though some parts were frustrating or confusing, it felt really satisfying to see the LEDs respond the way I wanted. Next time, I’d probably try adding a buzzer or even a little LCD display to make it even more interactive.

The video demonstration

IMG_8850

Week 9 Reading Reflection

,

In “Making Interactive Art: Set the Stage, Then Shut Up and Listen”,  the author emphasizes the importance of not defining an interactive work, since unlike a traditional art piece, an interactive piece is not just an expression but a medium that will inevitably be interpreted differently by the users. I found myself agreeing with this statement, especially since it does apply to traditional art in some cases as well. There is something exciting about being the viewer or the user, and being able to not only produce our own interpretations of a creative piece, but also being able to engage with it, whether it is through a computer program or something tangible. It also reminds me of when I write creative stories; sometimes it is better to leave certain details unsaid rather than reveal everything about a setting or a character, as readers often enjoy filling in those gaps with their imagination. Ultimately, like any creative work, I agree with the author that an interactive piece can resemble a performance more than a finished painting or sculpture, allowing something beautiful and engaging to emerge. 

Similarly, in “Physical Computing’s Greatest Hits (and Misses)”, I found it interesting how the author notes that when people learning about physical computing realize a particular ideas has been done before, they often give up on it because they believe it’s not worth it since it is no longer original. My first thought was that this happens in art and writing as well. When a writer wants to explore a familiar theme, like reincarnation, they might hesitate because it has been done many times before. Before reading this text, I hadn’t realized that the struggle for originality and authenticity is just as applicable in physical computing as it is in other creative or noncreative fields. Now I feel like I share much more in common with this field than I initially imagined. 


Week 9 – Reading Reflection

Physical Computing’s Greatest Hits (and Misses)

Reading Physical Computing’s Greatest Hits (and Misses) really made me reflect on the role of human presence and movement in interactive design. The article explores recurring motifs in physical computing, such as theremin-style sensors, body-as-cursor interfaces, tilty tables, and mechanical pixels, and evaluates which ideas succeed and which fall short. What struck me most was the idea that interaction alone is not meaningful unless it is framed with intention or context.  I found this insight particularly relevant because gestures, motion, and bodily engagement only carry meaning when integrated into a space or narrative. The article also emphasizes that even commonly used ideas can be made fresh through variation and creativity.

The discussion of emotionally responsive projects, like “remote hugs”, also inspired me to think about the potential of physical computing to create connection and presence. It made me consider designing experiences where participants’ actions are not only triggers for a response but also carriers of meaning, emotion, or narrative. I found myself imagining interactive installations or performance spaces where movement, gesture, and proximity could communicate emotion or tell a story, giving participants a sense of agency and contribution. Overall, the article reinforced the importance of centering human input and intention over technical complexity. It motivated me to experiment more boldly with interactive media, blending technology, space, and human engagement in ways that feel purposeful, immersive, and emotionally resonant.

Making Interactive Art: Set the Stage, Then Shut Up and Listen

When I was reading Making Interactive Art: Set the Stage, Then Shut Up and Listen I noticed a perspective of the audience or participant as a a co-creator, and the creator’s role is to design opportunities for exploration and discovery. The article encouraged setting the stage, providing affordances, and then stepping back to let participants engage on their own terms. This concept resonated deeply with me because I often feel the need to over-explain or control how people interact with my work, whether in interactive media projects, installations, or themed environments. Learning to trust participants’ curiosity and creativity is both challenging and exciting, and it made me rethink how I approach design: sometimes the most compelling experiences arise when the creator resists guiding every step and instead observes how others explore, interpret, and respond.

I also liked the idea  of “listening” to participant interaction. Observing how people engage, adapt, or even misuse an interactive installation can reveal insights the creator never intended, and these discoveries can guide future iterations. This connects to my interests in performance and immersive storytelling because, in both cases, the audience’s reactions shape the experience. It also made me reflect on how I design spaces and experiences outside of class projects, including themed parties or interactive setups, where I can experiment with encouraging participation rather than prescribing behavior. The article inspired me to embrace unpredictability, co-creation, and emergent experiences, reminding me that interaction is not just about technology or novelty, it is about creating a dynamic relationship between the participant, the space, and the narrative. Now, I want to apply this mindset to my projects, designing experiences where participants’ actions carry weight and meaning, and where discovery becomes a central part of engagement.

Week 9 – Analog input & output

Concept:

For my project, I wanted to create a system that could control multiple LEDs in both a digital and an analog fashion, and I drew inspiration from traffic lights. Instead of just two LEDs, I decided to use three LEDs to mimic a simplified traffic light sequence. When the push button is pressed, the system cycles through the lights in order: red → yellow → green, which demonstrates digital control, as each LED turns fully on or off with each button press.

For the analog aspect, I incorporated a potentiometer connected to an analog input pin on the Arduino. By adjusting the potentiometer, users can control the brightness of the LEDs, allowing for smooth, variable light intensity. Together, the push button and potentiometer create an interactive system: pressing the button cycles through the traffic light colors, while turning the potentiometer adjusts their brightness. This combination not only makes the project functional and educational but also connects to the familiar real-world concept of traffic lights.

Arduino Setup and Demonstration: 

Setup

Arduino video

Hand-drawn schematic

Coding:

Arduino File on Github

// Pins
const int POTENTIOMETER_PIN = A0; // Analog input pin for potentiometer
const int BUTTON_PIN = 2; // Digital input pin for push button
const int RED = 5;  // Digital output pin for RGB LED (red)
const int GREEN = 6;  // Digital output pin for RGB LED (green)
const int YELLOW = 9; // Digital output pin for RGB LED (yellow)

// Variables
int potentiometerValue = 0; // Potentiometer value
bool buttonState = false; // Button state
int colorIndex = 0; // Index of current color

void setup() {
  pinMode(POTENTIOMETER_PIN, INPUT);
  pinMode(BUTTON_PIN, INPUT_PULLUP);
  pinMode(RED, OUTPUT);
  pinMode(GREEN, OUTPUT);
  pinMode(YELLOW, OUTPUT);
}

void loop() {
  potentiometerValue = analogRead(POTENTIOMETER_PIN);
  
  // Map potentiometer value to LED brightness
  int brightness = map(potentiometerValue, 0, 1023, 0, 255);
  
  // Set the LED color based on the current color index
  switch (colorIndex) {
    case 0:  // Red
      analogWrite(RED, brightness);
      analogWrite(GREEN, 0);
      analogWrite(YELLOW, 0);
      break;
    case 1:  // Green
      analogWrite(RED, 0);
      analogWrite(GREEN, brightness);
      analogWrite(YELLOW, 0);
      break;
    case 2:  // Yellow
      analogWrite(RED, 0);
      analogWrite(GREEN, 0);
      analogWrite(YELLOW, brightness);
      break;
  }

  // Check button state
  if (digitalRead(BUTTON_PIN) == LOW) {
    if (!buttonState) {
      // Toggle color index
      colorIndex = (colorIndex + 1) % 3;
      buttonState = true;
      delay(200);
    }
  } else {
    buttonState = false;
  }
}

For this code, I created a circuit where I can control three LEDs—red, yellow, and green using a potentiometer and a button. The potentiometer adjusts the brightness of the active LED, while the button lets me switch between the LEDs. Each LED is connected to separate pins on the Arduino (5, 6, and 9), and the potentiometer is connected to the analog input A0. By pressing the button, I can cycle through the colors, and by turning the potentiometer, I can smoothly change how bright each LED glows.

Reflection:

Through this project, I learned how digital and analog inputs can work together to create an interactive system. It was rewarding to see how the push button and potentiometer complemented each other, one controlling the LED sequence and the other adjusting brightness. This helped me better understand how sensors and user inputs can bring a project to life.
For the future improvements, I would say adding a delay or debounce to make the button response smoother and more reliable, or using PWM pins consistently for better brightness control. In the future, I could also expand the project by adding automatic timing to simulate real traffic light behavior or incorporating sensors to make it more dynamic and realistic.

Reading Reflection – Week 9

Physical Computing’s Greatest Hits (and misses)

I agree with Igoe’s idea of recurring “hits and misses,” but I don’t think a project has to be deeply meaningful to count as a hit. Sometimes, a piece can still be successful if it’s creative, interesting, or just fun to interact with. I also think context plays a role in making something feel meaningful, especially through how users receive feedback. For example, the Monsters Inc. scream canisters in Disneyland Paris come to mind. As a kid, I loved screaming into them and watching the energy bar go up to the top, it’s a perfect example of feedback making the interaction more memorable.

I used to get hesitant about working on projects that weren’t completely original, feeling like I needed to come up with something new. But Igoe’s words reminded me that even if an idea’s been done before, I can still make it mine by adding my own personal touch.

Making Interactive Art: Set the Stage, Then Shut Up and Listen

I found Igoe’s idea of “setting the stage and shutting up” really interesting because it shows just how much power interpretation has in interactive art. When artists or designers immediately tell their audience what something means, it limits how people can experience it. I think there’s this sort of psychological effect that once you’re told what something is, it’s hard to see it in any other way. So I think it’s more effective to let users come to their own conclusions, even if it means they interpret the project differently from what was intended.

While making my own projects, I understand how my project works but users might not. By actually watching and hearing how they interact with it, I can figure out what’s confusing or what needs improvement. Feedback like that helps me refine my designs to make them more intuitive and engaging.