Concept

Link to my user testing video:
https://drive.google.com/file/d/1r4EBRKhNevopUEoBOfhuoM1EDaFciAEV/view?usp=sharing
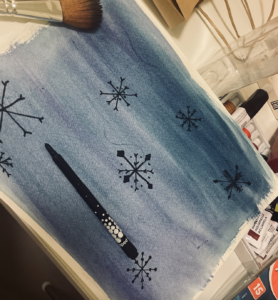
I created an interactive mini-game based on a fairy tale I heard when I was a child. I was told that at night in winter, Ayaz ata(Santa) and his magical helpers painted on the windows, to delight children in morning . Of course, these “patterns” on the windows do not appear by themselves, but when the weather is very cold, the windows freeze and there is a miracle of nature. Lines and patterns are random, so there are numerous ways to interpret them. To recreate this idea, I used the potentiometer as a basis for random and free drawing- specifically to create the pattern by rotating rectangles. Through the potentiometer, the users will be able to control the rotation angle and feel themselves as a character of my childhood fairytale.
Inspo:

Implementation
The implementation process involves the following steps:
The interaction design involves creating a control interface that allows users to rotate the rectangles in order to create patterns on the window. This interaction will be implemented using a potentiometer, which is connected to an Arduino board.
1. Writing the Arduino code:
The Arduino code is responsible for reading the data from the potentiometer and sending it to the p5.js code. This code sets up the Arduino to use 5 LEDs, each connected to a different pin. It then sets up a loop to turn on each of the LEDs one by one and wait for 200 milliseconds before turning on the next one. It then turns off each of the LEDs in a similar way but with a longer wait time of 300 milliseconds. Finally, it reads an analog value from pin A0, maps it between 0 and 255, and sends it over a serial port.
Final Arduino code:
int LED1 = 13;

int LED2 = 12;

int LED3 = 11;

int LED4 = 10;

int LED5 = 9;
// Arduino Code
void setup() {
Serial.begin(9600);
pinMode(LED1, OUTPUT);
pinMode(LED2, OUTPUT);
pinMode(LED3, OUTPUT);
pinMode(LED4, OUTPUT);
pinMode(LED5, OUTPUT);
}
void loop() {
digitalWrite(LED1, HIGH); // turn on LED1
delay(200); // wait for 200ms
digitalWrite(LED3, HIGH); // turn on LED2
delay(200); // wait for 200ms
digitalWrite(LED2, HIGH); // turn on LED3
delay(200); // wait for 200ms
digitalWrite(LED5, HIGH); // turn on LED3
delay(200);
digitalWrite(LED4, HIGH); // turn on LED3
delay(200);
delay(200);
digitalWrite(LED1, LOW); // turn off LED1
delay(300); // wait for 300ms
digitalWrite(LED3, LOW); // turn off LED2
delay(300); // wait for 300ms
digitalWrite(LED2, LOW); // turn off LED3
delay(300);
digitalWrite(LED5, LOW); // turn off LED3
delay(300);
digitalWrite(LED4, LOW); // turn off LED3
delay(300);
int analogValue = analogRead(A0);
byte byteToSend = map (analogValue, 0, 1023, 0, 255);
Serial.write(byteToSend);
delay(50);
}
2. Writing the p5.js code:
The p5.js code is responsible for drawing the rectangles and rotating them in response to the data received from the Arduino board. Moreover, P5js code included background which had a snowflakes behind the pattern. This code sets up a program that displays a colorful background with snowflakes falling in the background. The pattern is made up of different rectangles with randomly selected colors from a list of colors. The snowflakes are made up of ellipses that move down the screen, with gravity affecting their speed(0, so the overall image is not too messy). To control the angle of rotation, a serial port is used to read real-time data. The size of the snowflakes and the number of layers in which they fall is also configurable.
Final Version of p5js:
3. Communication between Arduino and p5.js:
The communication between the Arduino board and the p5.js code is done via serial communication. The Arduino code sends the data from the potentiometer to the p5.js code, which then uses the data to rotate the rectangles. I also used p5.serial control app, since other methods didn’t really work for me.
Additional:
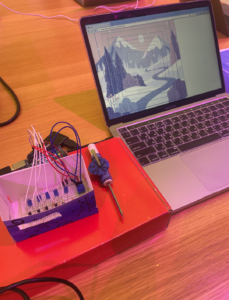
I decided to create little box and the “wand” for the best experience of the user.Moreover I’ve added LED to my board which created sparkling effect in a little house(box).

Once all of the steps are complete, the user will be able to rotate the rectangles to create their own patterns on the window and recreate the magic of Ayaz ata.
Here are the materials that I found useful:
https://editor.p5js.org/shfitz/sketches/n42x2dg8R – rotation of the rectangle
inspo
https://makeabilitylab.github.io/physcomp/communication/p5js-paint-io.html
https://www.youtube.com/watch?v=jsXLMm-FnSY
Reflection
I am happy overall with my experience of creating the interactive aspect of my project. It is a fun way to bring the childhood fairytale to life and interact with it. I think it is a creative way to bring the story to life. I run into a lot of problems, but by trial and error I managed to create my idea.
For future improvement, I think I could add more features to create more complex patterns. Additionally, I could add a timer or a score system to make the game more fun. Moreover, I could work on creating full game, with more elements like joystick for example. Future improvements could include refining the user interface to make it more intuitive and easier to use, as well as adding additional user controls to allow for more varied patterns. Additionally, an option to save or export the patterns could be added, so users can share their final creations with others.
