Exercise 1: make something that uses only one sensoron arduino and makes the ellipse in processing move on the horizontal axis, in the middle of the screen, and nothing on arduino is controlled by processing.
PROCESSING_EXERCISE 1
import processing.serial.*;// serial object library
Serial myPort; //local serial object from serial library
int xPos=0;
int yPos=0;

void setup(){
  size(960,720);
  printArray(Serial.list());
  String portname=Serial.list()[2]; //link processing to serial port
  println(portname);
  myPort = new Serial(this,portname,9600);
  myPort.clear();
  myPort.bufferUntil('\n');
}

void draw(){
  background(255);
  ellipse(xPos,height/2,30,30);
}

void serialEvent(Serial myPort){
  String s=myPort.readStringUntil('\n'); //strips data of serial port
  s=trim(s);
  if (s!=null){

    println(s);
    int value=int(s);

    // locates position of ellipse using potentiometer
    xPos=(int)map(value,0,1023,0, width);

  }
  myPort.write("\n");
}
ARDUINO_EXERCISE 1
void setup() {
  //initialize the serial port and data upload
  Serial.begin(9600);
  Serial.println("0");
}

void loop() {
  //capture data in arduino
  int sensor= analogRead(A0);
  //put data in the serial port
  while (Serial.available()) {
    if (Serial.read() == '\n') {
      delay(1);
      //prints the value
      Serial.println(sensor);
    }
  }
}
Exercise 2: make something that controls the LED brightness from processing.
PROCESSING_EXERCISE 2
import processing.serial.*;
Serial myPort;
int xPos=0;
int Sensor=0;
boolean Red=false;
boolean Green=false;
void setup(){
size(960,720);
printArray(Serial.list());
String portname=Serial.list()[2];
println(portname);
myPort = new Serial(this,portname,9600);
myPort.clear();
myPort.bufferUntil('\n');
}
void draw(){
background(255);
ellipse(mouseX,mouseY,30,30);
if ((mouseX >= 400) && (mouseY >= 600)) {
Red =true;
} else Red = false;
if ((mouseX <= 400) && (mouseY <= 600)){
Green =true;
}
else Green = false;

}
void serialEvent(Serial myPort){
String s=myPort.readStringUntil('\n');
s=trim(s);
if (s!=null){
println(s);
int values[]=int(split(s,','));
if (values.length==2){
xPos=(int)map(values[0],0,1023,0, width);

}
}
myPort.write(int(Red)+","+int(Green)+"\n");
print("0,0");
}
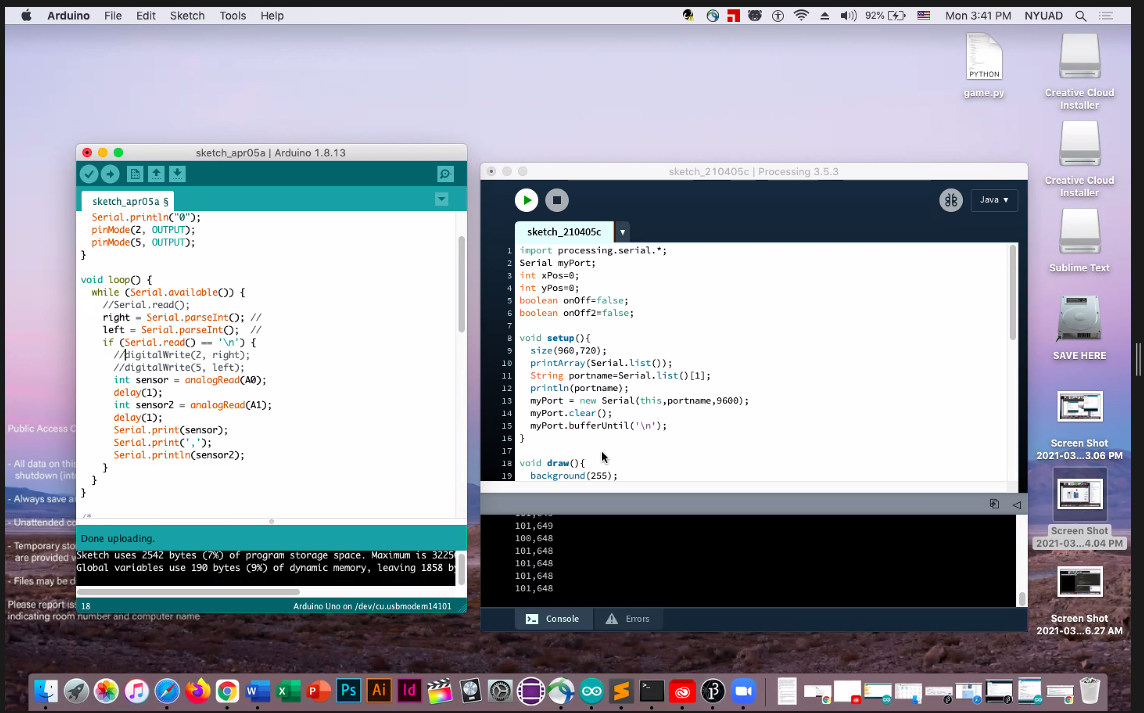
ARDUINO_EXERCISE 2
int left = 0;
int right = 0;

void setup() {
Serial.begin(9600);
Serial.println("0,0");
pinMode(2, OUTPUT);
pinMode(5, OUTPUT);
}

void loop() {
while (Serial.available()) {
right = Serial.parseInt();
//left = Serial.parseInt();
if (Serial.read() == '\n') {
digitalWrite(2, right);
//digitalWrite(5, left);
int sensor = analogRead(A0);
delay(1);
//int LDRPIN = analogRead(A1);
//delay(1);
Serial.print(sensor);
//Serial.print(',');
//Serial.println(LDRPIN);
}
}
}
Exercise 3: take the gravity wind example and make it so every time the ball bounces one led lights up and then turns off, and you can control the wind from one analog sensor.
PROCESSING_EXERCISE 3
import processing.serial.*;
Serial myPort;
int xPos=0;

int Sensor=0;
boolean Red=false;
boolean Green=false;
PVector velocity;
PVector gravity;
PVector position;
PVector acceleration;
PVector wind;
float drag = 0.99;
float mass = 50;
float hDampening;
void setup(){
size(640,360);
printArray(Serial.list());
String portname=Serial.list()[1];
println(portname);
myPort = new Serial(this,portname,9600);
myPort.clear();
myPort.bufferUntil('\n');
noFill();
position = new PVector(width/2, 0);
velocity = new PVector(0,0);
acceleration = new PVector(0,0);
gravity = new PVector(0, 0.5*mass);
wind = new PVector(0,0);
hDampening=map(mass,15,80,.98,.96);
}
void draw(){
background(255);
if (!keyPressed){
wind.x=0;
velocity.x*=hDampening;
}
applyForce(wind);
applyForce(gravity);
velocity.add(acceleration);
velocity.mult(drag);
position.add(velocity);
acceleration.mult(0);
ellipse(position.x,position.y,mass,mass);
if (position.y > height-mass/2) {
velocity.y *= -0.9; // A little dampening when hitting the bottom
position.y = height-mass/2;
Red = true;
}
else { Red = false;
}
}
void serialEvent(Serial myPort){
String s=myPort.readStringUntil('\n');
s=trim(s);
if (s!=null){
println(s);
int values[]=int(split(s,','));
if (values.length==2){
xPos=(int)map(values[0],0,1023,0, width);
// yPos=(int)map(values[1],0,1023,0, height);
}
}
myPort.write(int(Red)+","+int(Green)+"\n");
print("0,0");
}
void applyForce(PVector force){
// Newton's 2nd law: F = M * A
// or A = F / M
PVector f = PVector.div(force, mass);
acceleration.add(f);
}

void keyPressed(){
if (keyCode==LEFT){
wind.x=-1;
}
if (keyCode==RIGHT){
wind.x=1;
}
if (key==' '){
mass=random(15,80);
position.y=-mass;
velocity.mult(0);
}
}
ARDUINO_EXERCISE 3
int left = 0;
int right = 0;

void setup() {
Serial.begin(9600);
Serial.println("0,0");
pinMode(2, OUTPUT);
// pinMode(5, OUTPUT);
}

void loop() {
while (Serial.available()) {
right = Serial.parseInt();
left = Serial.parseInt();
if (Serial.read() == '\n') {
digitalWrite(2, right);
// digitalWrite(5, left);
int sensor = analogRead(A0);
//delay(1);
//int LDRPIN = analogRead(A1);
delay(1);
 Serial.print(sensor);
//Serial.print(',');
//Serial.println(LDRPIN);
}
}
}