
For my final project, I envision creating an immersive and interactive experience, a collaborative music jam that seamlessly combines Arduino gesture sensors with P5.js to transform hand movements into a dynamic and expressive musical journey. It will invite participants to engage in a unique music jam session where their gestures become the driving force behind the creation of a harmonious ensemble. Leveraging Arduino gesture sensors, the system will capture the nuances of users’ hand movements, translating them into musical notes or instrument selections in real-time through the P5.js environment.
All Posts
Reading Reflection: Week 11
The reading offers a compelling intersection of disability, fashion and design. From my perspective, the narrative goes beyond mere functionality, delving into the core principles of inclusion and empowerment, particularly when viewed through the lenses of inclusivity and disability awareness.
Pullin skillfully demonstrates the evolution of assistive technology, including items like glasses and hearing aids, transcending their utilitarian roles to become symbols of fashion and personal identity. The transformation of these tools from mere aids to manifestations of individual style challenges the traditional notion that they are exclusively intended for individuals with particular disabilities.
He emphasizes the importance of designs that seamlessly blend functionality with aesthetic appeal. He underscores the significance of creating visually pleasing and accessible products for those with disabilities, shifting the narrative from mere utility to a combination of style and assistance. He stresses upon the value of maintaining functionality without compromising simplicity, asserting that such designs can benefit a broad spectrum of individuals, regardless of ability.
The reading underscores the inclination to presume we understand what is optimal for individuals with disabilities, shaped by societal stigmas and preconceptions. Consequently, there is a critical need to concentrate on the nuanced aspects that not only improve our own lives but also profoundly influence the lives of those who stand as the primary recipients of these designs.
Week 11: Reading Response
“Design Meets Disability”:
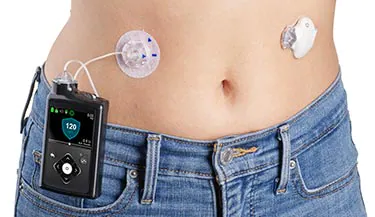
While reading this chapter, one thing kept popping into my mind, the story of my best friend who was diagnosed with diabetes when she was 4. Growing up together, I got to witness all the phases she went through to accept her disability. Her biggest problem wasn’t the illness itself but rather the equipment she had to “wear” as medication. When she was first diagnosed she used to wear an insulin pump that looked like the one in the picture below, except hers had longer tubes and the proportion of the device to her little body was much bigger, so naturally it was very obvious and raised so many questions that she started getting very self-conscious about it because other children were pointing out that she was a robot or that she needed to be charged like their phones:
Fast forward a few years, her insulin pump was upgraded to this one, the Omnipod:
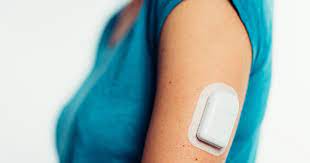
The Omnipod is less obvious and is only visible if she is wearing short sleeved shirts, so it is easier for her to hide it when she wants to and display it when she desires. The change in her mental health was very obvious and she seemed to accept her illness more and slowly she started wearing tank tops to display her pump and show the world her “superpower” as she likes to call it.
I have always wondered why they couldn’t have designed a smaller pump for little children, or made it look nicer so that they wouldn’t be ashamed of it or feel like outcasts wearing it. Lately I have been seeing ads of sticker packs and covers to “style” the Omnipod which makes me wonder if this would make little children more accepting of their illness and less of an outcast.

I have always believed that designers tend to not care about the implications of their design when it comes to designing for disabled people, because for them it’s a need not a want so they would accept whatever is given to them. It was nice to read about examples of design that are more inclusive and more thoughtful of disabled people’s feelings.
Week 11: Final project idea
Interactive drum kit
For my final project I would love to incorporate my love for music by creating a simulation of a drum kit. If possible, I would like to expand my drum kit to include different kits that could be changed by a click of a button on the arduino board. I would use force sensors on the arduino for the input from the users and generate a sound and a corresponding visual on the screen accordingly. When a user strikes one of the physical drum elements, the force sensor detects the impact, and the Arduino sends a signal to the P5.js application. The P5.js app responds by triggering the associated drum sound and displaying visual feedback. In a way to make my drum kit creative, I would like to create different drum kits that incorporate a collection of everyday sounds mixed to sound like a drum sounds.
week 11 – final project idea
Honestly, at this point, I’m still not sure what exactly I want to do for my final project. I know I want to create an immersive and interactive game-like experience, and I have some broad ideas in my mind.
Inspired by our first Arduino assignment (the creative switch) and one of our class readings which talked about body-as-cursor interactions, I know I want my project to be a piece that uses something besides the hands to be played. Two things that immediately come to mind are story-telling through interaction in the real world, such as using the ultrasonic sensor to determine distance and having a p5.js program that responds to it. It could either be a fun dance game where different types of sounds play, or, a story-telling experience where different elements of the story pop up as the user appears closer.
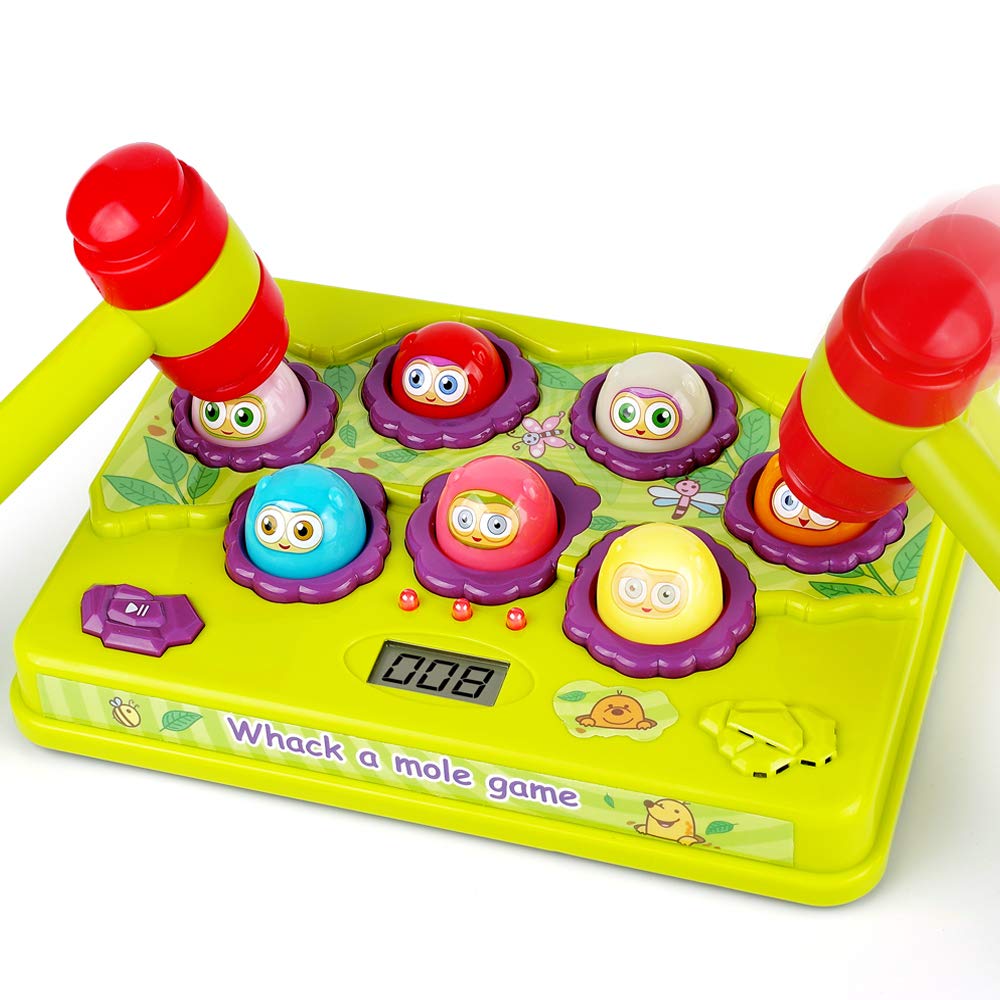
Final project proposal
For my final project I propose to transform the conventional game ‘The Mole’ by incorporating force sensors into an Arduino setup. My goal is to enhance gameplay by introducing a tangible, hands-on interaction using force-sensitive sensors. I envision players engaging with a physical setup, detecting and responding to varying force levels to navigate through game challenges. By fusing classic gameplay with sensor technology, I aim to create an immersive and innovative gaming experience that redefines interaction in gaming environments. This project represents my aspiration to merge traditional entertainment with modern tech, offering players a novel way to engage with ‘The Mole.
I am excited
week 11 – reading reflection
I enjoyed this week’s reading because accessibility is a point that is always brought up when we speak of design and interactivity, whether it was last week’s readings about pictures-under-glass or a broader discussion about the simplicity of design. In this day and age, technological advancements are designed to be so simple that even a toddler could use them. I think instead of simplicity, the foremost thought should be accessibility. In modern design, accessibility is always an afterthought, a sort of ‘add-on’ to an existing design, that often looks unwieldy and takes away from the appearance of the original design. Another reason I strongly believe in everything being accessible instead of simply having accessible alternatives is that I have seen many disabled voices online speak of how having to use ‘alternatives’ is one of the many ways they feel other-ed by society. If everyone, abled or disabled, used the same interfaces and designs, we would be one step closer to a truly inclusive community.
I also love the discussion about the intersection of fashion and accessibility. I, personally, am unsure where I stand on this – I agree in the sense that good design is simple, and that simplicity goes hand-in-hand with universality. However, as someone who is fond of all things camp, a part of me doesn’t agree that all design should direct towards being simple. In fact, I believe that d in design can still be for disability, whilst still exploring aesthetics to their fullest potential.
week 11- reading reflectiom – design meets disability
This book about the collaboration between the Eameses and their creation of leg splints for veterans is a profound exploration of how design transcends its conventional boundaries. What’s truly fascinating is their approach—they didn’t just aim for practicality in their design; they sought to blend functionality with aesthetic appeal.
What’s really interesting is how deeply they considered the human aspect. The Eameses didn’t limit their focus to the technicalities; they delved into the emotional and experiential dimensions of their design. They wanted these splints to not only serve their purpose but also uplift the users’ spirits, ensuring comfort and a sense of dignity.
Their emphasis on inclusive design is remarkable. They didn’t want these splints to be exclusive; they envisioned them as tools accessible to all, irrespective of abilities. It’s a profound statement about the importance of ensuring good design is available universally.
The core message resonating here is that design isn’t just about appearances; it’s about functionality and the impact it has on people’s lives. The Eameses’ venture with these leg splints is a testament to how empathetic design can significantly enhance lives and contribute to a more equitable and inclusive society.
Series Connection
overview:
In this assignment, I worked with Fady John to achieve the three exercises in class
Exercise 1:
p5 js
let left = 0;

function setup() {
  createCanvas(400, 400);
}

function draw() {
  background(220);
  fill("red");
  ellipse(left, 50, 50, 50);
}

function keyPressed() {
  if (key == " ") {
    // important to have in order to start the serial connection!!
    setUpSerial();
  }
}

function readSerial(data) {
  left = map(data, 0, 1023, 0, 400);
}
Arduino:
//// Arduino Code
/*

void setup() {
  // put your setup code here, to run once:
  Serial.begin(9600);

}

void loop() {
  // put your main code here, to run repeatedly:
  int sensor = analogRead(A0);
  delay(5);
  Serial.println(sensor);

}

*/
Exercise 2:
P5 js
let brightnessSlider;
let brightnessValue = 0;

function setup() {
  createCanvas(400, 200);

  // Create a brightness slider
  brightnessSlider = createSlider(0, 255, 128);
  brightnessSlider.position(width/2-50, height/2);
  brightnessSlider.style('width', '100px');
}

function draw() {
  background(255);

  // Get the brightness value from the slider
  brightnessValue = brightnessSlider.value();
}

function keyPressed() {
  if (key == " ") {
    // important to have in order to start the serial connection!!
    setUpSerial();
  }
}

function readSerial(data) {
  console.log(data);
    let dataToSend = brightnessValue + ", \n";
    writeSerial(dataToSend);
}
Arduino:
///Arduino COde
/*

const int ledPin = 9;  // Digital output pin for the LED

void setup() {
  pinMode(ledPin, OUTPUT);

  // Start serial communication
  Serial.begin(9600);
}

void loop() {
  Serial.println("sensor");
  // Check if data is available from p5.js
  if (Serial.available() > 0) {
    // Read the brightness value from p5.js
    int brightness = Serial.parseInt();

    // Map the received value to the LED brightness range
    brightness = constrain(brightness, 0, 255);

    // Set the LED brightness
    analogWrite(ledPin, brightness);
  }
}

*/
Exercise 3:
P5 js
let velocity;
let gravity;
let position;
let acceleration;
let wind;
let drag = 0.99;
let mass = 50;
let led = 0;

function setup() {
  createCanvas(640, 360);
  noFill();
  position = createVector(width/2, 0);
  velocity = createVector(0,0);
  acceleration = createVector(0,0);
  gravity = createVector(0, 0.5*mass);
  wind = createVector(0,0);
}

function draw() {
  background(255);
  applyForce(wind);
  applyForce(gravity);
  velocity.add(acceleration);
  velocity.mult(drag);
  position.add(velocity);
  acceleration.mult(0);
  ellipse(position.x,position.y,mass,mass);
  if (position.y > height-mass/2) {
      velocity.y *= -0.9;  // A little dampening when hitting the bottom
      position.y = height-mass/2;
  }
  if(position.y == height-mass/2 && (velocity.y > 0.5 || velocity.y < -0.5)){
    led = 1;
  }else{
    led = 0;
  }
}

function applyForce(force){
  // Newton's 2nd law: F = M * A
  // or A = F / M
  let f = p5.Vector.div(force, mass);
  acceleration.add(f);
}

function keyPressed(){
  if (key == "n") {
    // important to have in order to start the serial connection!!
    setUpSerial();
  }
  if (key==' '){
    mass=random(15, 80);
    position.y=-mass;
    velocity.mult(0);
  }
}

function readSerial(data) {

  if (data != null) {
    // make sure there is actually a message
    // split the message
    wind.x = data;

    //////////////////////////////////
    //SEND TO ARDUINO HERE (handshake)
    //////////////////////////////////
    let sendToArduino = led + "\n";
    writeSerial(sendToArduino);
  }
}
Arduino:
///Arduino COde

/*

int ledPin = 9;

void setup() {
  // Start serial communication so we can send data
  // over the USB connection to our p5js sketch
  Serial.begin(9600);
  pinMode(ledPin, OUTPUT);
}

void loop() {
  int sensor = analogRead(A0);
  int wind = map(sensor, 0, 1023, -2, 2);
  Serial.println(wind);
  delay(10);
  if (Serial.available() > 0) {
    // Read the brightness value from p5.js
    int touch = Serial.parseInt();
    // Set the LED brightness
    digitalWrite(ledPin, touch);
  }
}
*/
BOUNCING BALL VIDEO
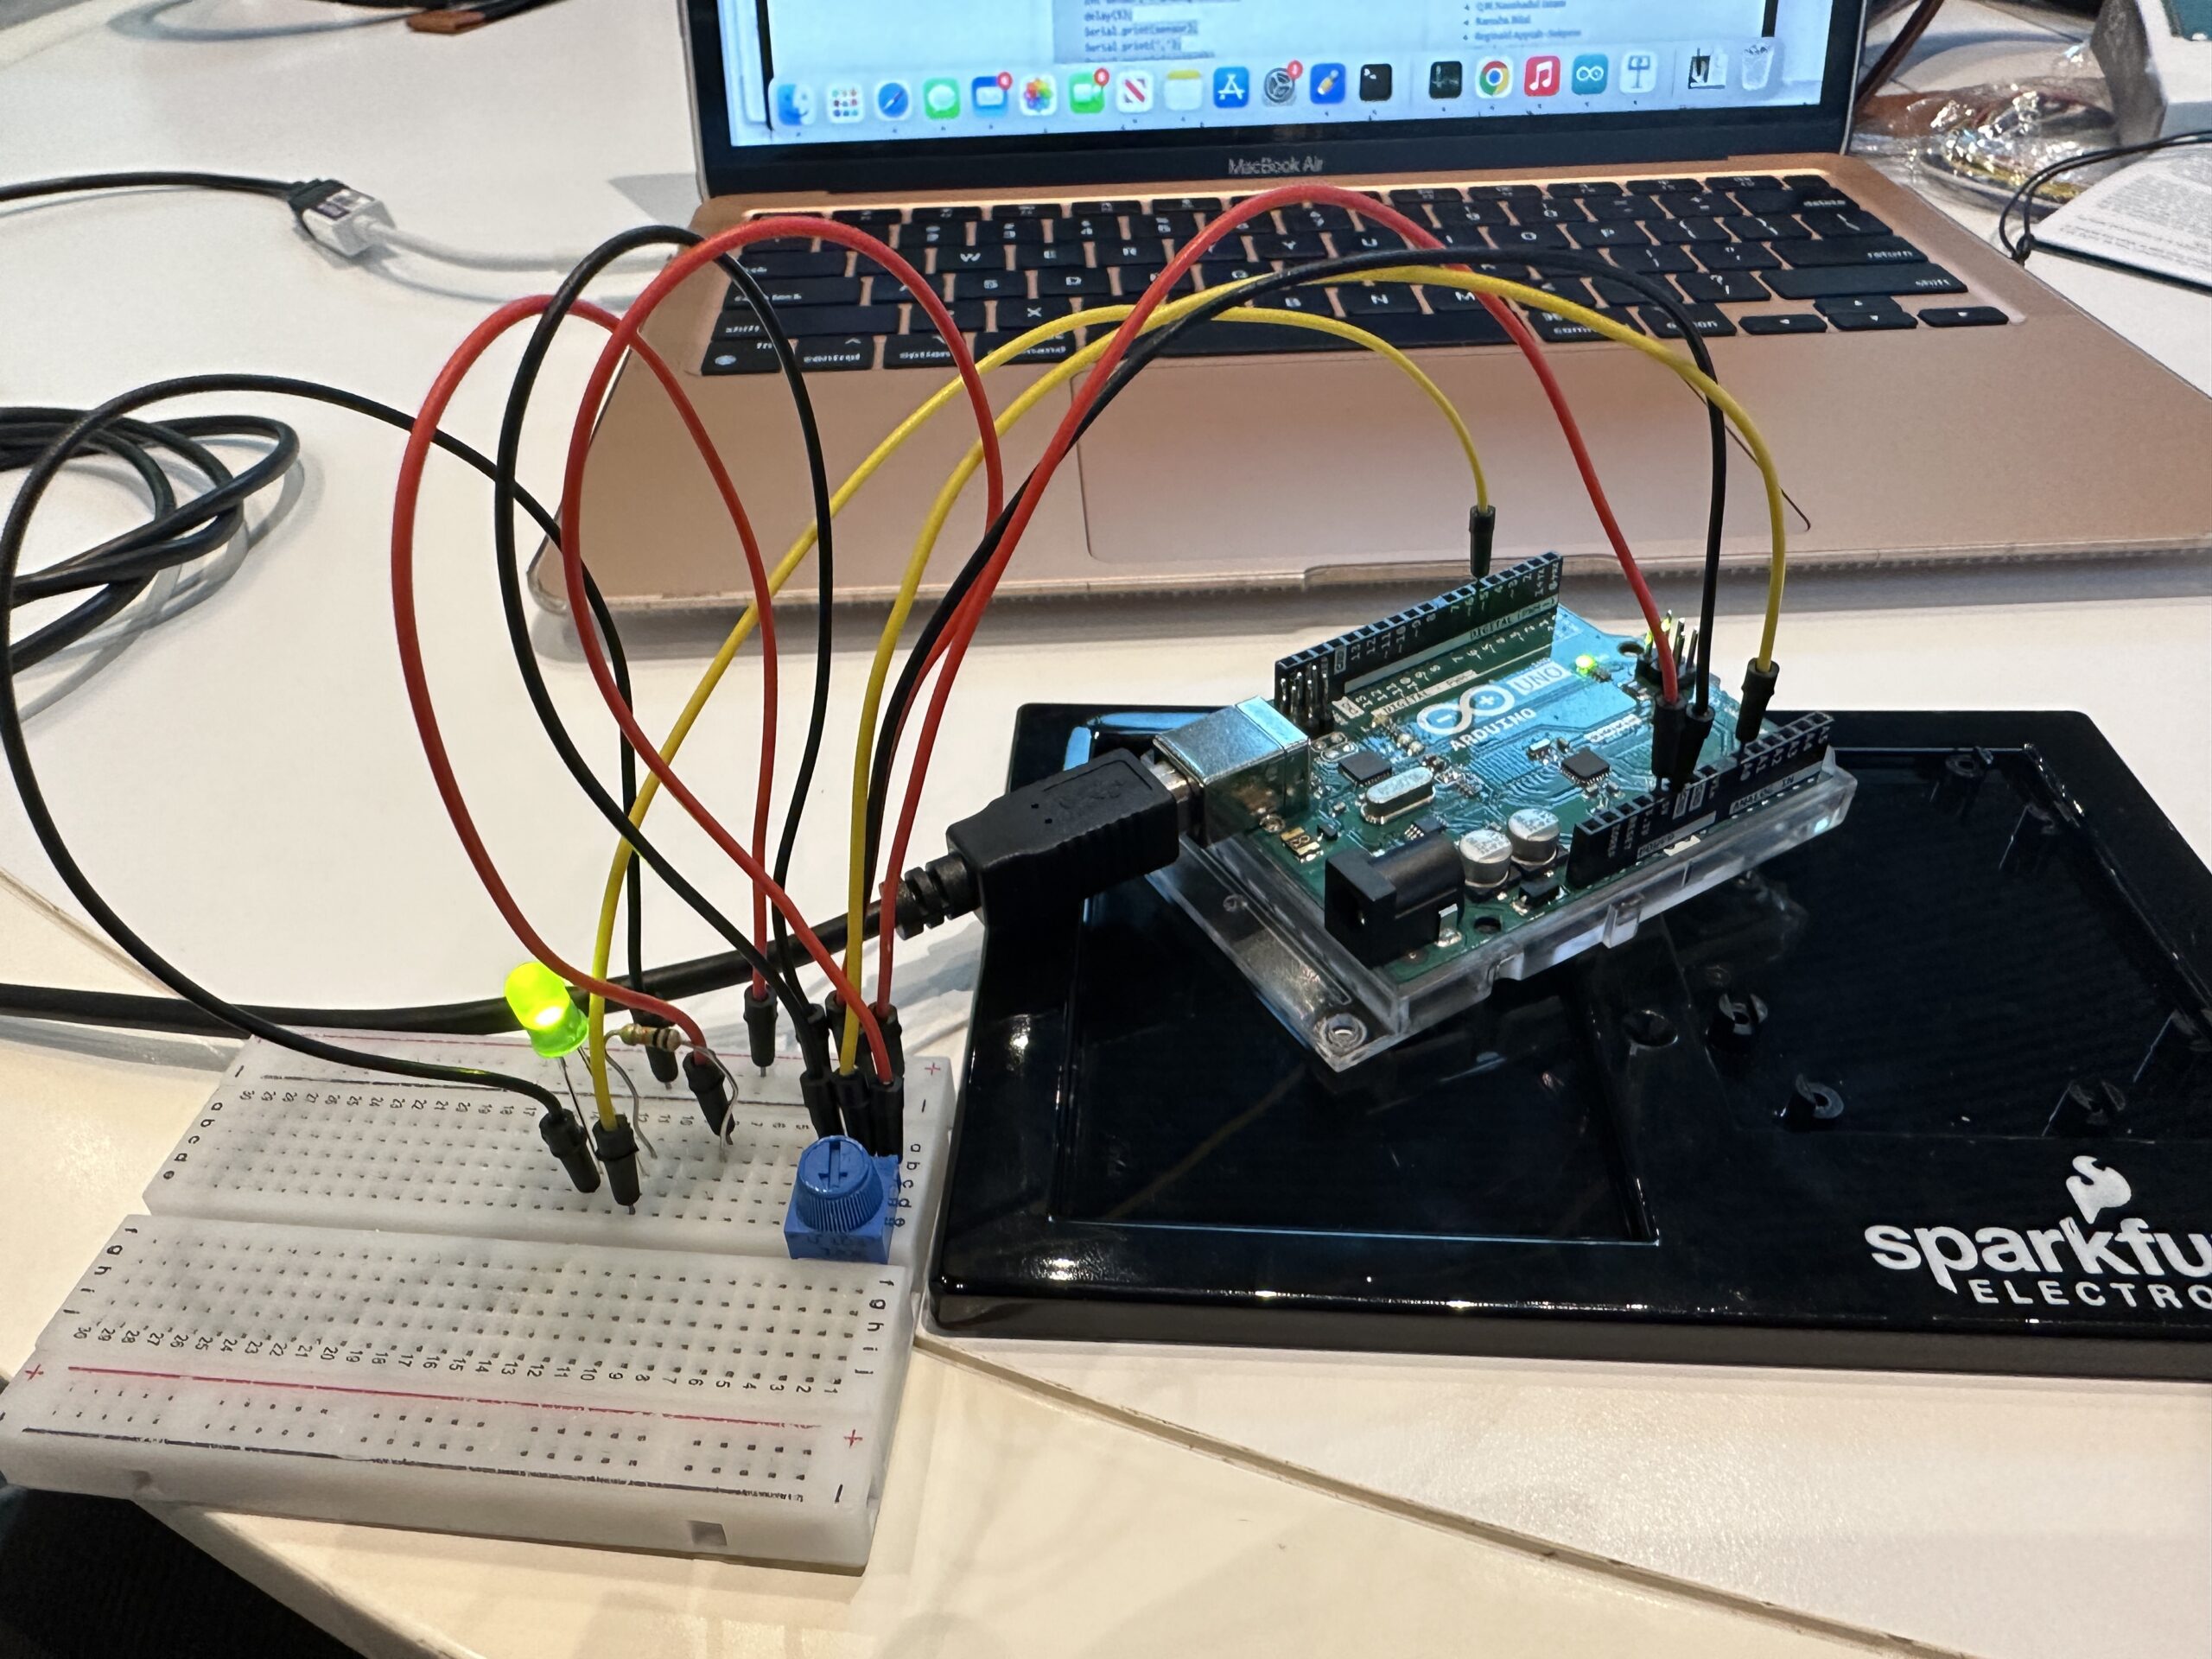
Week 11: Elora and Saiki Assignment
Assignment 1: Move Ball With Potentiometer
I attached a picture of our setup below:
I took the P5JS sketch we used in class and made a few changes, seen here. First, we created the ellipse. When writing the parameters, we made the x value alpha, because the sketch already set alpha as the value that is reading the Arduino board. In order to read Alpha, we had to make sure we mapped the potentiometer range to the range of the P5JS screen. So when you turn the potentiometer, the x value changes, making the ellipse move backwards and forwards. See the important code snippet below:
ellipse(map(alpha, 0, 1023, 0, width),height/2,60);
Assignment 2: Control LED Brightness From P5JS
We took the same P5JS sketch from the slides and altered it, seen here. Here are the changes we made:
let value = map(mouseX,0,width,0,255);
right = int(value);
We created a new variable called value and then mapped the width of the P5JS screen to the LED values, so that as you moved your mouse horizontally across the screen, the LED brightened and dimmed. We used pin 5 because it supports PWM. The LED connected to Pin 5 was the “right” one in the code we used in class, hence why used “right” above to connect the LED and the P5JS bit above. We also had to go into the Arduino code that we had used in class and changed a bit of that as well.
digitalWrite(leftLedPin, left);
analogWrite(rightLedPin,right);
// digitalWrite(rightLedPin, right);
As you can see, we commented out the digitalWrite regarding the right pin and replaced it with analogWrite so that the LED didn’t just turn on or off, but actually got dimmer and brighter on a spectrum.
Assignment 3: Make The LED Turn On When The Ball Bounces
Here is our video. Here is the link to our sketch.
We combined the Gravity Wind example from the slides with the other P5JS sketch from the slides and changed a few things, seen below:
ellipse(position.x,position.y,mass,mass);
  if (position.y > height-mass/2) {
      velocity.y *= -0.9;  // A little dampening when hitting the bottom
      position.y = height-mass/2;

    right = 1;
    }

  else {
    right = 0;
  }
We went to the part of the code where the ball hits the ground, and made it so that the Arduino read the LED as “right,” and the LED turned on (1) and off (0) depending on whether the ball was touching the ground or not.
On a side note, we also made sure that whenever you pressed n, that was how a new circle appeared. Because when we combined the two sketches, it had already been written that pressing the space bar makes the serial bar pop up.
if (key=='n'){
   mass=random(70,80);
   position.y=-mass;
   velocity.mult(0);
Assignment 4: Control Wind With Potentiometer
Last but not least, we made the ball move left and right with the potentiometer by adding this bit of code.
wind.x = map(alpha,0,1023,-1,1);
We mapped the values of the potentiometer onto the wind values already established in the code. So that when we turned the potentiometer right, the ball went right (1) and left (-1) when we turned the potentiometer left.