Final Project

BEATHOVEN

CONCEPT

The concept is inspired by Incredibox, a website first introduced in 2009 that offered a unique experience for creating music. No musical talent or knowledge of music composition is required. It’s designed so that any combination of audio seamlessly works with each other, allowing individuals to create their own music pieces. I found playing music on this website very satisfying and rewarding.

This inspiration drove the concept behind “Beat-Hoven.” Instead of different musical instruments, the music mixed is beatboxing. For the visuals, initially colorless avatars stand idle; once assigned a beatbox, their outfits change accordingly. Additionally, everything is kept in sync with an 8 sec cycle.

IMPLEMENTATION

First, I started by creating the basic mechanism of the project. I researched how buttons worked for the first time and created a small model of a single button that plays a beat when clicked. However, with this first step, I faced many issues. The first button I used was faulty, which took me a lot of time to realize. Next, I realized that a single button press sent multiple true values at once instead of the one return value I was looking for. This caused a lot of issues with the implementation of the button; however, I figured out how to fix the problem.

Next, I started creating the foundation of the project by connecting the button press to start the audio of the intended player. The first issue I faced was how to send an instruction to stop the audio. Since the button only sends a high signal when pressed, I had to interpret it and check if the button pressed was intended to start or stop the audio. I was able to do that with a few checks, if functions, and flags.

After figuring out the start and stop of the audio, it was time to implement it on a larger scale. I started soldering the rest of the buttons and got them ready. Then I started importing the audio assets to each character one by one to p5. After that, I started linking them to the audio and adjusting the Arduino code to accommodate the buttons.

However, the challenges were not over. The next problem was creating the cycle that decides when an audio is played and when it is stopped to keep the beats in sync. Unfortunately, Google wasn’t helpful in any of the problems I faced since everything worked differently in my code. After 3 hours of figuring it out, I moved on to the next problem: Images! Since I had 8 characters, each character had its own audio, image, and logo. It was the image stage, and I faced many issues, especially since I had a background that was refreshing with each loop. The character that appeared when the button was pressed disappeared since the background was called in the next frame. I had to redesign the whole page to accommodate this.

After figuring that out and adjusting it so that the characters change when they’re not playing, I had to find a way to inform the user that the button-pressed signal has been received. I had this problem since the character does not play until the new cycle starts. So, if the user selected a character between cycles, they would not know if the press was successful or not, and they would press again, which would deactivate the character. I decided to use their logos. One would be colored, and the other monochrome, symbolizing that the character is not selected. After implementing it and linking it with a new function, the project started to take its form.

The next step was to work on the aesthetics. I designed a logo for the page, decided on the iconic name “Beat-Hoven,” and designed the homepage. However, the homepage was missing something – music! I found a mix that was created using beatbox and applied it for the background music. Next, I created the info page that explained the game. Now, the code was almost done, and it was time to work on the container design. I designed the box using a template from the web and laser-cut it on acrylic. Next, I assembled everything into the container and drilled a hole for the Arduino data wire. Finally, I printed an image of the characters and attached it to the box to make it stand out. And with this the project was completed.

 For the Arduino code:

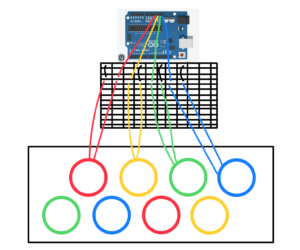
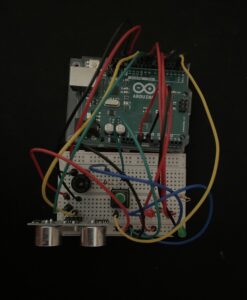
I used 8 buttons which the Arduino received signals from and sent it to p5. It has a delay to only receive one input from the button per press to avoid the spamming of inputs.

For the p5

There are so many checks to ensure the program runs smoothly.
  • receives the input of the button
  • turns the flag related to the character to active if not active and turns it off if active
  • checks to see the next cycle has started
    • if activation flag is active
      • activate the character audio and display the image
    • if flag is deactivated
      • deactivate the character, stop the audio and change the image
  • parallel check
      • if the activation flag is active
        • display the colored logo immediately and do not wait for the new cycle
      • if flag is deactivated
        • display the monochrome logo for the character
      • if the page title is pressed
        • deactivate all characters
        • turn all the flags to deactivated.
        • return to the main page
        • start the background music
      • if the info page is pressed
        • switch the page and do not turn off the background music

Aspects I am particularly proud of

There are so many to mention, but here’s a few

creating a fully functioning game that was created by a team of professionals in a few days and nights

figuring out ways around the obstacles I faced

project turning out to be better than I imagined and not just satisfying the goals

learning how to use a laser cutter and how to solder for the first time

Areas for improvement

I would love to add animation to the phase to be in sync with the audio and maybe another version with different characters.

BEATHOVEN:

Showcase: showcase


Final Draft 1

Concept:

I’ve tentatively decided on a concept for my final project, though I’m not completely set on it yet. I’m considering creating a reaction time game centered around colors, featuring various levels of difficulty. The project involves a platform housing colored buttons capable of lighting up, with two buttons assigned to each of the four colors.

In the first level, a color will display on the screen, prompting the corresponding button to light up. Clicking that button reveals another color, illuminating the alternative button. The subsequent level increases the challenge by lighting up only one of the two buttons of the same color. For the third level, the screen will exhibit the name of the color in a different hue, requiring the player to press the button matching the displayed color rather than its name. This challenge can be reversed, prompting the player to press based on the text rather than the color, adding complexity to the game. a game will be around 10 lights color combination.

p5 interface

Regarding the interface, there will be a welcome screen on the p5 platform featuring a play button as well as an info button. After the player has read the instructions they click the play button. Clicking this will lead to a page displaying multiple levels for the user to select and start the game.

Components:

    • Arduino uno
    • 8 buttons
    • rigid body for the buttons
    • lots of jumper wirds

Arduino (Outgoing Data):

the ardunio would send feedback to p5 about the status of the buttons if pressed or not.

p5.js (Outgoing Commands):

during specific levels, the p5 will signal the Arduino to activate the light for the targeted button.

sketch:


W11 assignments

Assignments

Assignment 1:

P5 Code snippet:

function readSerial(data) {
  ////////////////////////////////////
  //READ FROM ARDUINO HERE
  ////////////////////////////////////

  if (data != null) {
    // make sure there is actually a message
    // split the message
    let fromArduino = split(trim(data), ",");

    // if the right length, then proceed
    if (fromArduino.length == 1) {
      // only store values here
      // do everything with those values in the main draw loop
      
      // We take the string we get from Arduino and explicitly
      // convert it to a number by using int()
      // e.g. "103" becomes 103
      
      
      potentiometerInput = int(fromArduino[0]);
      
      //Maps the potentiometer input value to the width of the canvas.
      circleX = map(potentiometerInput,0,1023,0,width);


    }
    let sendToArduino = "\n";
    writeSerial(sendToArduino);
    
  }
}

Arduino code snippet:

void setup() {

  Serial.begin(9600);

  // start the handshake
  while (Serial.available() <= 0) {
    digitalWrite(LED_BUILTIN, HIGH); // on/blink while waiting for serial data
    Serial.println("0,0"); // send a starting message
    delay(300);            // wait 1/3 second
    digitalWrite(LED_BUILTIN, LOW);
    delay(50);
  }
}

void loop() {
  // wait for data from p5 before doing something
  while (Serial.available()) {
    digitalWrite(LED_BUILTIN, HIGH); // led on while receiving data
      
      delay(5);
       if (Serial.read() == '\n') {
      int potentiometer = analogRead(A1);
      delay(5);
      Serial.println(potentiometer);
      Serial.print(',');
      Serial.println(potentiometer);
       }
    }
      digitalWrite(LED_BUILTIN, LOW);
  }


Assignment 2: Video2

Code snippet Arduino:

while (Serial.available()) {
    Serial.println("0,0");
    digitalWrite(LED_BUILTIN, HIGH); // led on while receiving data

    int value = Serial.parseInt();
    int value2 = Serial.parseInt();

    if (Serial.read() == '\n') {
      analogWrite(ledPin, value);
      analogWrite(ledPin2, value2);
    }
  }

p5 snippet:

function readSerial(data) {
  if (data != null) {
    //////////////////////////////////
  //SEND TO ARDUINO HERE (handshake)
  //////////////////////////////////
  value = int(map(mouseY,0, height, 0, 255));
  value2 = int(map(mouseX,0, width, 0, 255));
  let led1 = value + "\n";
  let led2 = value2 + "\n";
  writeSerial(led1);
  writeSerial(led22);
  print(value);
  print(value2)
    
    
  }

Assignment 3: video3

Arduino snippet:

void loop() {

  // wait for data from p5 before doing something
  while (Serial.available()) {

    // led on while receiving data
    digitalWrite(LED_BUILTIN, HIGH); 

    // gets value from p5
    int value = Serial.parseInt();

    // led switch from p5 value input
    if (Serial.read() == '\n') {
      if (value == 1) {
        digitalWrite(ledPin, HIGH);
      }
      else {
        digitalWrite(ledPin, LOW);
      }
      
      // gets sensor value
      int sensor = analogRead(A0);
      delay(5);

      // sends sensor value to p5
      Serial.println(sensor);
    }
  }

  digitalWrite(LED_BUILTIN, LOW);
  
}


Reading response

Response:

We don’t typically discuss how disability influences design, so this was a very intriguing topic. Indeed, it was fascinating to observe how he connected glasses to disabilities, which influenced the creation of what we now refer to as eyewear.  The author went on to discuss various disabilities and the medical equipment associated with them, as well as how fashion has improved their overall appearance and design. Graham Pullin talks about how important it is to make things like wheelchairs and hearing aids look good and easy to use for people with disabilities. He suggests calling them “chairwear” and “hearwear” to make them seem more like regular things you’d buy, not just medical stuff. But there’s a worry that making these things fashionable might make them more expensive, which could be a problem for people who don’t have a lot of money. Pullin doesn’t talk much about how to keep these cool designs affordable for everyone who needs them. He mentions how glasses used to be cheap for everyone, but now they can cost a lot because they’re seen as a fashion accessory. It’s important that making things look good doesn’t make them too pricey for people who really need them. There should be a balance between looking nice and being affordable for everyone who needs these tools.

Final project ideas

Ideas workspace:

For my final project, I’m considering several ideas but haven’t settled on one yet. One concept is to develop a memory pattern game, similar to the one where you observe a sequence of colors and replicate it in the same order, sometimes with timed intervals between each color—a classic memory challenge. Another option involves utilizing an ultrasonic sensor attached to a servo motor, scanning a 180-degree area to create a game where the player must accomplish a task without triggering detection on the “radar.” Another idea I’m really keen on exploring involves integrating Arduino and sensors to enhance my ongoing midterm project, which took weeks and weeks of work. These are just a few ideas I have for now that I need to look further into.

WEEK 10 – Piano / Synthesizer


Piano / Synthesizer

For this project, our goal was to craft a musical instrument within the constraints of limited resources. Despite the restricted options, we brainstormed various concepts and ultimately settled on developing a hybrid piano/synthesizer. To accomplish this, we repurposed buttons as keys by integrating two types of sensors, analog and digital. Using a breadboard, we configured the keys and delved into the coding phase. Each button was programmed to generate distinct notes, connected to a borrowed speaker from the IM lab for clearer and better sound quality.

As we progressed with the initial setup, the need for an analog sensor arose. We incorporated a potentiometer, not to alter the current, but as a knob to modulate the notes produced by the four buttons. The potentiometer’s range was segmented into three sections, and within the programming loop, an ‘if-else’ construct acted akin to cases, adjusting the notes played in response to the potentiometer’s adjustments.

THE VIDEO

The Code

#include "pitches.h"


const int speaker = 12;


const int tone_G = 2;
const int tone_A = 3;
const int tone_B = 4;
const int tone_C = 5;
const int tone_D = 9;
const int tone_E = 10;
const int tone_F = 11;


int buttonState_G = 0;
int buttonState_A = 0;
int buttonState_B = 0;
int buttonState_C = 0;
int buttonState_D = 0;
int buttonState_E = 0;
int buttonState_F = 0;


int potPin = A0;
int potVal = 0;


void setup() {
 // iterate over the notes of the melody:
 pinMode(tone_G, INPUT);
 pinMode(tone_A, INPUT);
 pinMode(tone_B, INPUT);
 pinMode(tone_C, INPUT);
 pinMode(tone_D, INPUT);
 pinMode(tone_E, INPUT);
 pinMode(tone_F, INPUT);
 
 }


void loop() {
 // no need to repeat the melody.


 potVal = analogRead(potPin);


 buttonState_G = digitalRead(tone_G);
 buttonState_A = digitalRead(tone_A);
 buttonState_B = digitalRead(tone_B);
 buttonState_C = digitalRead(tone_C);
 buttonState_D = digitalRead(tone_D);
 buttonState_E = digitalRead(tone_E);
 buttonState_F = digitalRead(tone_F);


if (potVal < 341)  // Lowest third of the potentiometer's range (0-340)
 {   
 if (buttonState_G == HIGH) {
   // play the sound
   tone(speaker,NOTE_G4);
 }
 else if (buttonState_A == HIGH) {
   // play the sound
   tone(speaker,NOTE_AS4);
 }
 else if (buttonState_B == HIGH) {
   // play the sound
   tone(speaker,NOTE_F4);
 }
 else if (buttonState_C == HIGH) {
   // play the sound
   tone(speaker,NOTE_C3);
 }


 else
  {
   noTone(speaker);
   }
 }


 else if (potVal < 682)  // Lowest third of the potentiometer's range (0-340)
 {
   if (buttonState_G == HIGH) {
   // play the sound
   tone(speaker,NOTE_A4); //random note not matching the name
 }
 else if (buttonState_A == HIGH) {
   // play the sound
   tone(speaker,NOTE_B4); //random note not matching the name
 }
 else if (buttonState_B == HIGH) {
   // play the sound
   tone(speaker,NOTE_C4); //random note not matching the name
 }
 else if (buttonState_C == HIGH) {
   // play the sound
   tone(speaker,NOTE_D4); //random note not matching the name
 }


 else
  {
   noTone(speaker);
   }


 }


 else
 {
   if (buttonState_G == HIGH) {
   // play the sound
   tone(speaker,NOTE_AS4);
 }
 else if (buttonState_A == HIGH) {
   // play the sound
   tone(speaker,NOTE_FS4);
 }
 else if (buttonState_B == HIGH) {
   // play the sound
   tone(speaker,NOTE_GS4);
 }
 else if (buttonState_C == HIGH) {
   // play the sound
   tone(speaker,NOTE_CS3);
 }


 else
  {
   noTone(speaker);
   }
 }
  
 }


Week 10 – response

Weekly Response

We’ve made significant strides in achieving much of what was demonstrated, but it hasn’t reached the level of convenience we hoped for. Take Siri on iPhones, for instance. Despite its heavy advertisements, it’s not as frequently used in reality and isn’t convenient enough to be  highlighted as an important feature. Its limited usability in public or noisy settings restricts its practicality. Similarly, the flashy concept of drawing in the air showcased in the video lacks real-world applicability. In professional settings, more practical, industrial-grade alternatives would likely be preferred.

However, considering the video was made nine years ago, it serves as a benchmark for our progress toward the creator’s vision. The idea of a singular device for all tasks is closer to reality today. Many functionalities showcased, like summoning a taxi, scheduling appointments, using voice commands for messages, and even unlocking a Tesla car, are now accessible through modern phones. While data isn’t projected on transparent glass yet and smart glasses aren’t widely available, we’re moving towards more advanced technologies where convenience triumphs over merely looking impressive. The focus is shifting to inventions that truly serve convenience rather than flashy devices with limited practicality.

Talk Reflection


Reflection

Prof Neil did an amazing job connecting the lines drawing the fuller picture of AI from his perspective. He started by giving a brief intro about AI and its emergence then started sharing some insights about how AI functions simplifying it with visual aid and explanation using examples making it easier to grasp the fuller picture.

The introduction, though aimed at introducing AI to those unfamiliar with it, felt overly lengthy and unengaging. Given that the audience consisted of university students well-versed in AI and its applications, spending more than half the lecture on this basic introduction seemed unnecessary and not relevant to their level of knowledge and daily use of AI.

Geoffrey Hinton’s video on the other hand was incredibly insightful, particularly regarding the concept of AI being smarter than humans because of its ability to share information. This idea resonated and truly made sense to me. It stands out as the most compelling argument I’ve encountered because it highlights how AI’s capacity to accumulate knowledge differs significantly from humans. Instead of the lengthy process of teaching each generation from scratch and hoping for marginal contributions over decades, AI’s continuous accumulation and building upon existing knowledge make it vastly smarter compared to humans.

Week 9: Parking sensor

THE Parking sensor

For this project, we had only two sensor options: the LDR or the ultrasonic sensor. Since we’d already used the LDR before, I wanted to try out something new. So, I looked into the ultrasonic sensor and started working with it. While brainstorming, I came up with various game ideas that used the sensor, but they needed a screen, which wasn’t allowed for this assignment. After more research on ultrasonic sensors, I found they could work well as a car parking alarm to help drivers avoid hitting obstacles. I started writing the code and set up a variable called “time_delay” to control how fast the LED blinks. To make it more like a real parking sensor, I decided to add a buzzing sound and found out how to connect a buzzer to the setup. With these changes, I made a working parking sensor. To meet the assignment’s requirements for a switch and a second LED, I made a switch that, when pressed, turns on a bulb that matches its color.

THE CODE:

const int trigPin = 9;
const int echoPin = 10;

int led = 5;

long duration;
int distance;

const int buzzer = 13;

const int buttonPin = 2;  // the number of the pushbutton pin
const int ledPin = 8; // the second light

int buttonState = 0; // button bool

void setup() {
  // put your setup code here, to run once:
  pinMode(trigPin, OUTPUT);
  pinMode(echoPin, INPUT);
  
  pinMode(led, OUTPUT); //light
  pinMode(buzzer, OUTPUT); // buzzer

 
  pinMode(ledPin, OUTPUT); // initialize the LED pin as an output
  pinMode(buttonPin, INPUT);  // initialize the pushbutton pin as an input
  

  Serial.begin(9600);


}

void loop() {
  //sending the audio pulses
  digitalWrite(trigPin, LOW);
  delayMicroseconds(2);
  digitalWrite(trigPin, HIGH);
  delayMicroseconds(10);
  digitalWrite(trigPin, LOW);
//calculating distance
  duration = pulseIn(echoPin, HIGH);
  distance= duration*0.034/2;

//the warning rate
  float time_delay= (distance *3) +30;

  buttonState = digitalRead(buttonPin);

  // check if the pushbutton is pressed. If it is, the buttonState is HIGH:
  if (buttonState == HIGH) {
    // turn LED on:
    digitalWrite(ledPin, HIGH);
  } else {
    // turn LED off:
    digitalWrite(ledPin, LOW);
  }

  if(distance < 50)
  {
    //the warning / buzzing rate
    digitalWrite(buzzer, HIGH);
    analogWrite(led,0);
    delay(time_delay);
    digitalWrite(buzzer,LOW);
    analogWrite(led,255);

  }
  
  else{
    digitalWrite(led, LOW);
    noTone(buzzer);
  }

  //for feedback
  Serial.print("Distance: ");
  Serial.println(distance);


}


This is how it looked like

Video:


Week 9: Reading Reflection

This might have been the first time I hear this opinion out loud, I always tried to create interactive art works independent and sufficient for the user to be immersed without any prior information or explanation. I totally agree on the idea that an artist need not explain their pov or their vision of the project as a primary part of the experience. “The thing you build, whether it’s a device or a whole environment, is just the beginning of a conversation with the people who experience your work.” Is a statement that caught my attention. In previous classes we discussed the definition of interaction and a definition that we came up with is “the exchanged interaction between two mediums” which is facilitated in conversations for example, hence it is well said that the interaction between the user and the project is like a conversation that one might say between the artist vision portrayed by the project and the user.

I agree with the second reading on “Physical Computing’s Greatest Hits and Misses.” The idea that the next big thing hasn’t come around yet is because people tend to give up on ideas they think have already been done and can’t be improved. The examples in the reading show that you can take something existing, use your creativity and imagination, and turn it into something new. It’s like how we use materials around us to create things – in the same way, we can use existing inventions as a starting point to build upon. The reading emphasizes the importance of not dismissing ideas too quickly and instead seeing them as opportunities to add something unique. By adopting this mindset, we can uncover new possibilities within familiar concepts, contributing to technological advancements and innovative solutions.