All Posts

Reading Reflections – Week 11!

After this thought-provoking read, I wholeheartedly feel that a design should be universally accessible, catering to everyone’s needs. Imagine the convenience of a singular product that eliminates the need for individuals to ponder, “Will this suit my requirements?” or “Is this tailored for a specific group?” Although implementing such universality might pose challenges for designers, the benefits could be substantial.

This approach would eradicate the apprehension associated with designing for differently-abled individuals, as it wouldn’t be perceived as mediocre or subpar when designed for a broader audience. The return of a sense of ‘delight’ in everyday products could be achieved through a more inclusive design, fostering unity rather than segregation. While certain disabilities may require specialized technology, there are aspects we can universalize for everyone.

What particularly intrigued me is the question of whether we should project a positive image or refrain from projecting an image altogether. Striking a balance that avoids exclusion and encourages accommodation is crucial. Examples related to fashion, discretion, and simplicity prompted me to contemplate how, as someone pursuing interactive media, I can contribute to bridging the gap between realism and functionalism. The oldest ipod nano that my father owned used to be my favorite device. The familiarity of the tracker wheel mentioned in the text resonates with me.

Reflecting on my five-year-old self effortlessly navigating it, I realize the design and feedback were exceptionally well-executed. It serves as a possibility of achieving a harmonious intersection of simplicity, functionality, and aesthetics—providing inspiration for designers and me, particularly to aim to strike that delicate balance.The idea of embracing cultural differences in embracing fashion and technology did sound a little strange at first but I agree that it would definitely be a call to action for more innovative and accessible design.

Week 11 | Creative Reading Reflection: Design Meets Disability

Creative Reading Reflection – Design Meets Disability:

Exploring design is closely tied to limitations. Charles Eames wisely said, “Design depends largely on constraints,” suggesting that constraints can drive innovation. This highlights the importance of context and how limitations can guide creative solutions. The contrast between good and bad design is interesting. Bad design is like a jarring composition with elements that clash, while good design can be subtly suggested. This aligns with the idea that discretion in design, especially for special needs, doesn’t have to be invisible and the discussion on eyewear and fashion shows how positive pre-existing images can shape design considerations. The ongoing debate between functionality and design is captivating that engineers often prioritize functionality, but our love for beauty adds complexity.

Design for disability sparks thought. Why should designs mimic the norm when they can go beyond it? This challenges the suggestions that disability design should envision possibilities beyond social expectations. It calls for a shift in norms and embracing diversity in design. Inclusive design is a crucial theme, balancing functionality and simplicity. It raises ethical questions about the responsibility of designers in creating products that cater to diverse populations.

Design goes beyond just physical things. It includes culture, how we see things, and what society values. This challenges us to think not only about making products but also how we see and value design in our everyday lives. When we embrace inclusive design, we’re moving towards a kinder and fairer future. In this future, creativity has no limits, and everyone can enjoy the advantages of design that thinks about the needs of all users.

Week 11: Reading Response

Graham Pullin’s “Design Meets Disability” is an interesting read, as it pushes the idea of not constraining the design of assistive devices with a utilitarian approach. That is, we should not only focus on the overall function of assistive devices for disabled people, but also focus on the design aspect of it.

This reminds me of an earlier reading we did on the balance of form and function, where different teapots were compared in regard to the utility and aesthetic aspects of their design. I agreed with the author that aesthetic choices enhance the overall experience, even adding to the utility aspect of a design. The same principal applies here.

Take glasses for example. Anyone who’s grown up wearing glasses knows the desire to get the frames that fit you the best. There are two reasons for it. Firstly, why not? The glasses will serve the purpose of making you able to see, whether or not they’re fashionable. So why not get something that you love wearing? The second reason adds on to that, and it’s simply that you’ll feel better about wearing your glasses and actually use them, if they fit you and you like the way they look on you. In that sense, the aesthetic and fashion sense add on to the utility of the pair of glasses because it allows you to not feel hindered or lesser just because you have weaker eyesight. The same principle applies for other disabilities as well. People who have access to customizable prosthetics use them to express themselves and feel much more open about their disability. It gives them an avenue to express themselves and accept themselves.

In embracing the fusion of aesthetics and functionality, we acknowledge that design can be a powerful tool in fostering inclusivity and self-acceptance within the realm of assistive technology.

Week 11 : In-class exercises

Exercise 1

Concept

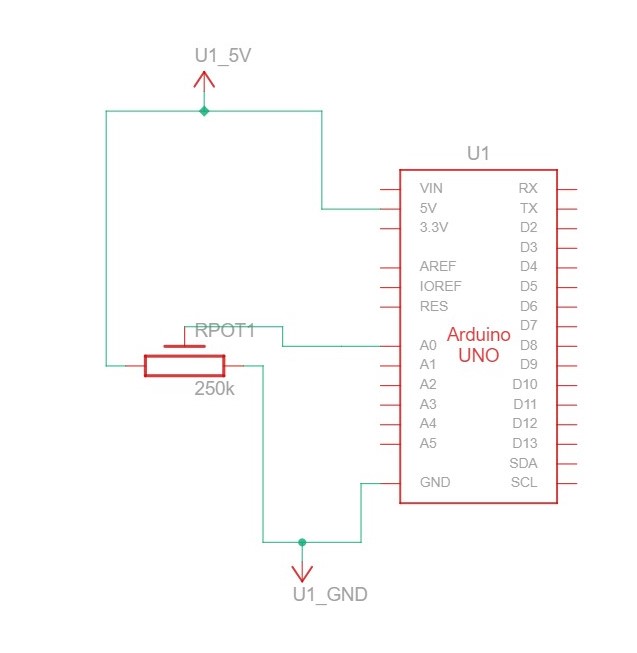
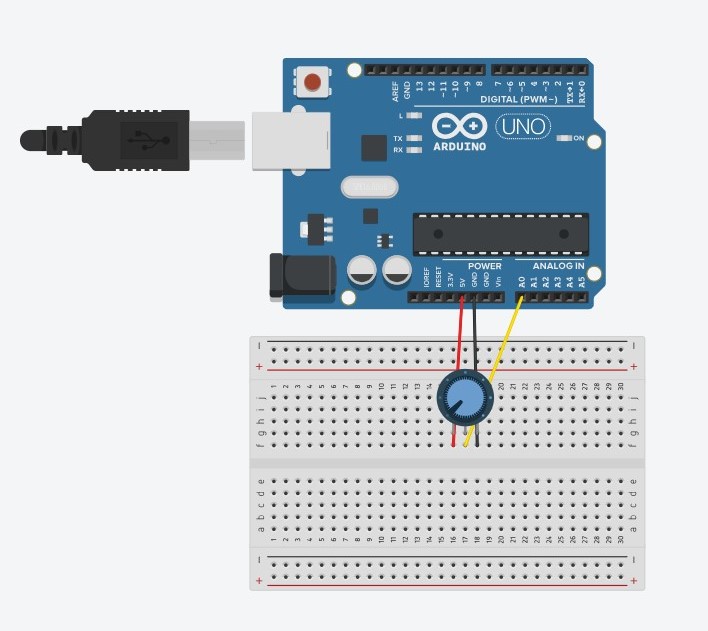
The potentiometer is used to control the x-coordinate of the ellipse drawn in p5.

Code

Arduino:

void setup() {
  // Start serial communication so we can send data
  // over the USB connection to our p5js sketch
  Serial.begin(9600);

  // We'll use the builtin LED as a status output..
  pinMode(LED_BUILTIN, OUTPUT);

}

void loop() {

  // gets sensor reading
  int sensor = analogRead(A0);
  delay(5);

  // indicates data transfer
  digitalWrite(LED_BUILTIN, HIGH);

  // sends data to p5
  Serial.println(sensor);
  
  // indicates data transfer
  digitalWrite(LED_BUILTIN, LOW);
  

}

p5

// variable to control x-coordinate
let circleX = 0;

function setup() {
  createCanvas(640, 480);
  textSize(18);
}

function draw() {
  // sets background
  background(255);
  stroke(0);

  // draws circle on canvas
  // -- circleX is mapped between 0 and the width
  circle(map(circleX, 0, 1023, 0, width), height / 2, 50);
  
  // checks if serial communication has been established
  if (!serialActive) {
    text("Press Space Bar to select Serial Port", 20, 30);
  } else {
    text("Connected", 20, 30);
  }
  
}

// sets up serial connection
function keyPressed() {
  if (key == " ") {
    // important to have in order to start the serial connection!!
    setUpSerial();
  }
}

// This function will be called by the web-serial library
// with each new *line* of data. The serial library reads
// the data until the newline and then gives it to us through
// this callback function
function readSerial(data) {
  ////////////////////////////////////
  //READ FROM ARDUINO HERE
  ////////////////////////////////////
  if (data != null) {
    circleX = int(trim(data));
  }
  
}

Video


Exercise 2

Concept

The brightness of an LED is controlled by the mouseX value from p5 mapped between 0 and 255.

extwo.jpg

exe22.jpg

 Code

Arduino:

// led pin number
int ledPin = 5;

void setup() {
  // Start serial communication so we can send data
  // over the USB connection to our p5js sketch
  Serial.begin(9600);

  // We'll use the builtin LED as a status output.
  // We can't use the serial monitor since the serial connection is
  // used to communicate to p5js and only one application on the computer
  // can use a serial port at once.
  pinMode(LED_BUILTIN, OUTPUT);
  pinMode(ledPin, OUTPUT);

  // checks if led works correctly
  digitalWrite(ledPin, HIGH);
  delay(1000);
  digitalWrite(ledPin, LOW);

  // start the handshake
  while (Serial.available() <= 0) {
    digitalWrite(LED_BUILTIN, HIGH); // on/blink while waiting for serial data
    Serial.println("0,0"); // send a starting message
    delay(300);            // wait 1/3 second
    digitalWrite(LED_BUILTIN, LOW);
    delay(50);
  }

}

void loop() {


  // wait for data from p5 before doing something
  while (Serial.available()) {
    // sends dummy data to p5
    Serial.println("0,0");

    // led on while receiving data
    digitalWrite(LED_BUILTIN, HIGH); 

    // gets value from p5
    int value = Serial.parseInt();

    // changes brightness of the led
    if (Serial.read() == '\n') {
      analogWrite(ledPin, value);
    }
  }
  // led off at end of reading
  digitalWrite(LED_BUILTIN, LOW);
  
}

p5:

// variable to hold led brightness value
let value = 0;

function setup() {
  createCanvas(640, 480);
  textSize(18);
}

function draw() {
  background(0);
  stroke(255);
  fill(255);
  
  // checks for state of serial communication
  if (!serialActive) {
    text("Press Space Bar to select Serial Port", 20, 30);
  } else {
    text("Connected", 20, 30);
  }
}

// sets up serial communication
function keyPressed() {
  if (key == " ") {
    // important to have in order to start the serial connection!!
    setUpSerial();
  }
}

// This function will be called by the web-serial library
// with each new *line* of data. The serial library reads
// the data until the newline and then gives it to us through
// this callback function
function readSerial(data) {
  if (data != null) {
    //////////////////////////////////
  //SEND TO ARDUINO HERE (handshake)
  //////////////////////////////////
    
    // mouseX is mapped to right value before transmitted
    value = int(map(mouseX, 0, width, 0, 255));
  let sendToArduino = value + "\n";
  writeSerial(sendToArduino);
  }

  
}

Video


Exercise 3

Concept

An LED lights up when the ellipse touches the ground. A potentiometer is used to control the wind variable.

exe3.jpg

ex33.jpg

Code

Arduino:

// LED pin value
int ledPin = 5;

void setup() {
  // Start serial communication so we can send data
  // over the USB connection to our p5js sketch
  Serial.begin(9600);

  // We'll use the builtin LED as a status output.
  // We can't use the serial monitor since the serial connection is
  // used to communicate to p5js and only one application on the computer
  // can use a serial port at once.
  pinMode(LED_BUILTIN, OUTPUT);
  pinMode(ledPin, OUTPUT);

  // start the handshake
  while (Serial.available() <= 0) {
    digitalWrite(LED_BUILTIN, HIGH); // on/blink while waiting for serial data
    Serial.println("0"); // send a starting message
    delay(300);            // wait 1/3 second
    digitalWrite(LED_BUILTIN, LOW);
    delay(50);
  }

}

void loop() {

  // wait for data from p5 before doing something
  while (Serial.available()) {

    // led on while receiving data
    digitalWrite(LED_BUILTIN, HIGH); 

    // gets value from p5
    int value = Serial.parseInt();

    // turns on or off the led depending on value from p5
    if (Serial.read() == '\n') {
      if (value == 1) {
        digitalWrite(ledPin, HIGH);
      }
      else {
        digitalWrite(ledPin, LOW);
      }
      
      // gets sensor value
      int sensor = analogRead(A0);
      delay(5);

      // sends sensor value to p5
      Serial.println(sensor);
    }
  }
  // indicates end of reading
  digitalWrite(LED_BUILTIN, LOW);
  
}

p5:

let velocity;
let gravity;
let position;
let acceleration;
let wind;
let value = 0;
let drag = 1;
let mass = 50;

function setup() {
  createCanvas(640, 360);
  noFill();
  position = createVector(width/2, 0);
  velocity = createVector(0,0);
  acceleration = createVector(0,0);
  gravity = createVector(0, 0.5*mass);
  wind = createVector(0,0);
}

function draw() {
  background(255);
  stroke(0);
  fill(0);
  if (!serialActive) {
    text("Press Space Bar to select Serial Port", 20, 30);
  } else {
    text("Connected", 20, 30);
    
    applyForce(wind);
    applyForce(gravity);
    velocity.add(acceleration);
    velocity.mult(drag);
    position.add(velocity);
    acceleration.mult(0);
    ellipse(position.x,position.y,mass,mass);
    
    if (position.y > height-mass/2) {
        velocity.y *= -0.9;  // A little dampening when hitting the bottom
        position.y = height-mass/2;
      
        // sets value to 1 to indicate touching the ground
        value = 1;
      }
    else {
      // sets value to 0 to indicate touching the ground
      value = 0;
    }
    
  }
  
  
}

function applyForce(force){
  // Newton's 2nd law: F = M * A
  // or A = F / M
  let f = p5.Vector.div(force, mass);
  acceleration.add(f);
}

function keyPressed(){

  if (key==UP_ARROW){
    mass=random(15,80);
    position.y=-mass;
    velocity.mult(0);
  }
  if (key == " ") {
    // important to have in order to start the serial connection!!
    setUpSerial();
  }
}


// This function will be called by the web-serial library
// with each new *line* of data. The serial library reads
// the data until the newline and then gives it to us through
// this callback function
function readSerial(data) {
  ////////////////////////////////////
  //READ FROM ARDUINO HERE
  ////////////////////////////////////

  if (data != null) {
    // divides potentiometer value into 2
    // -- increments wind value if value is equal to or greater 
    // -- than 511
    if (int(trim(data)) >= 511) {
      wind.x = 3;
    }
    // -- decrements otherwise
    else {
      wind.x = -3;
    }

    //////////////////////////////////
    //SEND TO ARDUINO HERE (handshake)
    //////////////////////////////////
    let sendToArduino = value + "\n";
    writeSerial(sendToArduino);
  }
}

Video


Week 11 | Final Project Idea

The concept

Embarking on the final project, my vision is to delve into the realms of robotic design and control, materializing as a remotely operated car crafted with P5JS. This innovative creation aims to seamlessly integrate a webcam, offering users a live, visual stream on P5JS that transcends physical boundaries, enabling intuitive remote navigation, even when the car finds itself in a distant locale. A noteworthy feature includes the incorporation of a distance sensor, placed to alert users and avoid potential collisions, enhancing the overall safety and user experience.

The broader implications of this project are both captivating and practical. Beyond the realms of a mere technological endeavor, this remotely controlled car carries the potential to be a transformative tool. One significant application lies in aiding individuals with limited mobility, serving as a conduit for them to virtually traverse diverse spaces.

Week 11 – Reading Reflection

Design Meets Disability

This reading, about how designing for disabilities can change the way we think of design, was extremely well structured and raised many thoughts. Firstly, it was interesting to observe how the evolution of glasses from being perceived as a medical device to a fashion accessory mirrored my personal journey with glasses. I have needed to wear glasses since third grade, and in the first few years I greatly resented them and preferred how I looked without them. My eyes progressively got worse every year, and so I always had to update my glasses. In high school, something shifted and I did not mind much how I looked with glasses anymore, and I began to look forward to the opportunity to get new glasses. As the reading stated, it is having the choice between different options that empowers the consumer to “accessorize” their image. The fact that the accessory is needed to enable human function does not take away from its worth as a fashion statement. Last year I got a new pair of golden framed glasses, and that was the first time I felt happy to be wearing them, as one of my favorite book characters also wears golden framed glasses.

The reading brought up the question of if it is possible to “appropriate” things like eyewear, or in the future, hearing aids and prostheses. Personally, I find it just a tad bit annoying when people wear non-prescription glasses just for the looks, because they have the privilege of not actually needing them to see. In the future, if development in the design of hearing aids follows the trajectory of that of glasses, will people start sporting “hearwear” even if they do not have hearing loss? And how would this be received by Deaf communities? While there is no “community” of people with glasses, there are deaf communities with their own cultures, and so the two situations are not really comparable. And then, what about prostheses?

I also felt that the principle presented in the reading of achieving positive image without invisibility was especially powerful, as it reminded me of discourses within queer history about how the goal should not be to assimilate (into heteronormative culture) in order to gain acceptance, but to have the freedom of visibility without receiving harm for it.

Week 11 – Final Project Idea

Final Project Idea

I have two ideas in consideration for my final project. The first is a physical recreation of the onion-chopping mini-game from Wii Party. When I was a kid, my friends and I would always play Wii Board Game Island, and this was one of my favorite mini-games. The user moves their Wii remote down in a chopping motion, and whoever “chops” the most number of times within the time limit wins.

For an Arduino/P5 recreation, I am imagining a chopping board covered in foil, and a knife made out of metal or wood covered in foil/copper tape, so that whenever the knife comes into contact with the chopping board, a switch is activated (similar to our “creative switch” assignment). There would be two players and two chopping boards hooked up to different pins on the Arduino, and these pins would send signals to the P5 screen, which would be a scoreboard. Every time the switch activates (a person chops once), their score would increase by one. The p5 program would also be running a stopwatch for one minute and beep when the minute is up. One issue is that I don’t know what I would use as the thing to be chopped, because unless I use real knives, which would be too dangerous, it would be impossible to actually cut through much. An alternative is to simply not have any object to be chopped, and to simply erect a picture of the Wii Game next to my setup so that people understand the concept.

My second idea is to make a “psychic hotline”, which would kind of be like these Magic 8 balls,

except that it would be a cardboard phone that is hollow inside, to allow for a servo motor and an attached spinning wheel. The phone buttons would be Arduino buttons, and depending on the last button that the user presses, the spinning wheel would rotate until the designated psychic message shows through a cutout in the cardboard. The whimsy of this project would mostly be the aesthetic and the intricacies of cardboard construction, which I have been enjoying in making my previous projects. P5 would function as a backdrop with twinkling stars, instruct users on which number to dial for which type of psychic question (love, career, self-improvement, etc.) and provide error messages if the user has not inputted the correct phone number. The limitation of this project is that there would only be a few interactions before the user gets bored, because the spinning wheel can only accommodate so many messages.

Week 11 | Reading Reflection

The reading looks into the complicated world of inclusive design, examining the obstacles and trade-offs involved in developing products that appeal to a wide range of abilities and needs. The conflict between universality and simplicity is a reoccurring subject, presenting serious concerns about the delicate balance required to achieve both accessible and user-friendly designs.

One argument highlights the difficulties and conflicts involved in designing for disability, especially in the context of universal or inclusive design. On one hand, there’s a commercial rationale for not fragmenting the market by developing specialized designs for tiny populations. In contrast, inclusive design seeks to meet the unique needs and goals of the whole population while taking into account varying abilities and preferences. I see that inclusive design is a good approach designers should always seek regardless of the financial objectives. I feel like it’s our commitment to create products and environments that are welcoming and functional for a diverse range of individuals. We don’t always have to choose between simplicity and universality; instead, we might achieve a balance that meets both needs. I think that Apple’s invention of the iPod device is a good example of this balance.

The reading also looks at examples of radios developed for specific purposes, such as assisting dementia patients. It highlights the importance of design in developing things that are not only usable but also aesthetically beautiful and emotionally engaging, even for those who have cognitive challenges. For me, it is not only about design, but about enhancing the quality of life and making daily experiences accessible for everyone.

Week 11 – Serial Communication Exercises

Serial Communication Exercises

  1. Make something that uses only one sensor on Arduino and makes the ellipse in p5 move on the horizontal axis, in the middle of the screen, and nothing on Arduino is controlled by p5:

I kept the Arduino and p5 code from the handshake example intact, and added this line of code in p5 to take the value obtained from the potentiometer to control the x-position of the circle.

// draw a circle, alpha value controls the x-position of the circle
circle(map(alpha, 0, 1023, 0, 640), 240, 50)

2. Make something that controls the LED brightness from p5:

Again using the Arduino and p5 code from the handshake example, I added some code to the “keyPressed” function in p5, so that different values would be sent to the “left” LED in Arduino, changing its brightness.

function keyPressed() {
  
  // set up connection with p5:
  if (key == " ") {
    setUpSerial();
  }
  
  //control the brightness of the LED by sending different values to "left"
  if (key == "1"){
    left = 10;
  }
  
  if (key == "2"){
    left = 100;
  }
  
  if(key == "3"){
    left = 255;
  }
}

Exercise 2 P5 code

3. Take the gravity wind example and make it so every time the ball bounces one led lights up and then turns off, and you can control the wind from one analog sensor:

Video demonstration

I transplanted all the code of the gravity wind example into the handshake example, and then added two bits of code to complete the assignment. The first part sends either a “1” or a “0” to the “left” LED in Arduino to turn on and off the LED when the ball bounces.

//send value to "left" LED in arduino 
   // depending on y-position of ball 
  
  // if y-position is greater than 330, light up the LED
  if(position.y >= 330){
    left = 1;
  }
  
  // if y-position is greater than 335, turn off the LED
  if(position.y <= 335){
    left = 0;
  }

The second bit maps the potentiometer values to 1 and -1, allowing the user to control the wind by turning the potentiometer.

//control wind with potentiometer
wind.x = map(alpha, 0, 1023, -1, 1);

Exercise 3 P5 code


Resources:

Izah and Zion’s code helped me in completing this assignment.

Final Project Idea- Dodge It!

For my final project, I am considering working on an interactive game where users can move a floating ball left and right using a physical knob, and their objective is to dodge incoming rectangles and any other objects on the way. The game will have multiple difficulties in which more objects will pop up, the ball can get much faster, etc. The motivation behind this game is a game that I played as a child that had the idea of dodging falling objects, and so I decided to create a game similar in its competitiveness but had a novel idea of the ball itself floating rather than objects falling down.

I will be using move communications from P5 to Arduino and vice versa. Communication from Arduino to p5 will be about the input of the ultrasonic sensor that senses the distance of the knob from a fixed point and moves the ball in the screen. Whereas, the interaction from p5 to Arduino will be about the blinking speed of an LED that is dependent on the score- the higher the score, the faster it’ll brink showcasing tension and just giving off an overall feel of pressure to the user. There will also be a sound beat playing using a speaker, the higher the score, the more it’ll beat to create this environment of tension and pressure.