All Posts

Week 11: In-Class Exercise

Exercise 1:

make something that uses only one sensor on Arduino and makes the ellipse in p5 move on the horizontal axis, in the middle of the screen, and nothing on Arduino is controlled by p5

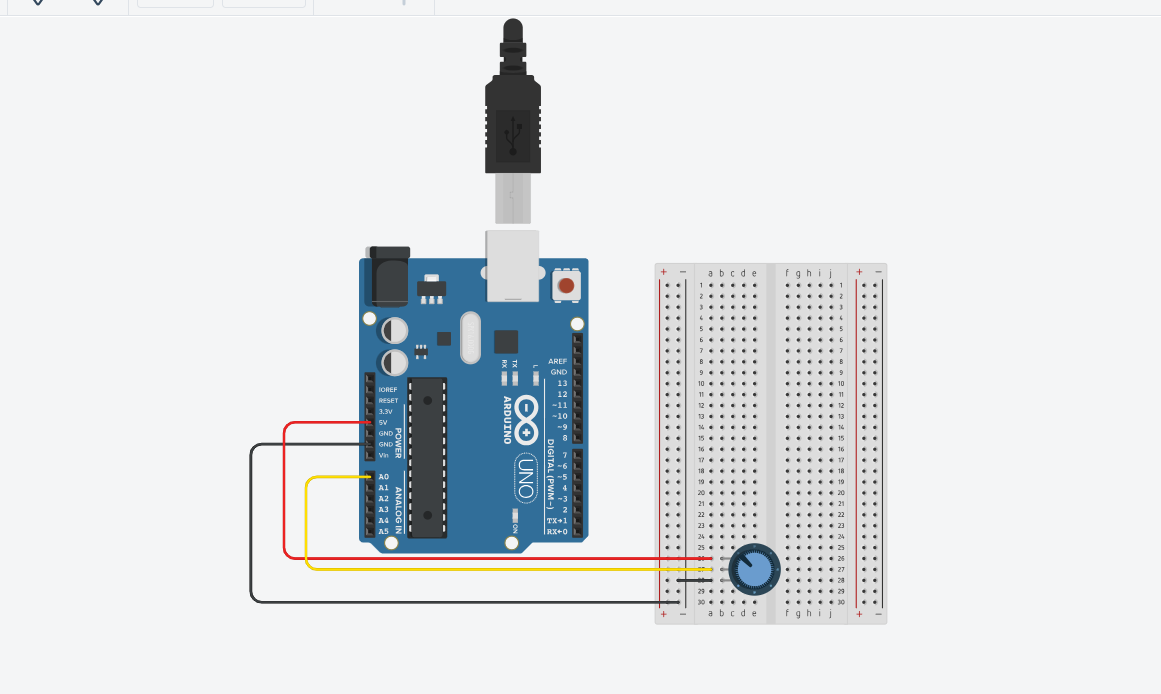
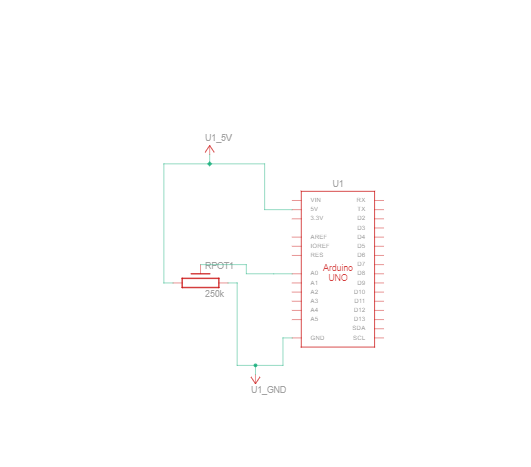
For Arduino, I used a potentiometer to change the position of the ellipse in the p5js sketch. The ellipse starts from the left of the canvas, and it moves horizontally as the values from the potentiometer increase. The values from the potentiometer are mapped to the x coordinates of the ellipse, moving it across the horizontal axis in the middle of the screen.

//// Arduino Code


//void setup() {
  // put your setup code here, to run once:
  Serial.begin(9600);

//}

//void loop() {
  // put your main code here, to run repeatedly:
  int sensor = analogRead(A0);
  delay(5);
  Serial.println(sensor);

//}


let left = 0;

function setup() {
  createCanvas(400, 400);
}

function draw() {
  background(220,110,250);
  fill("green");
  ellipse(left, 50, 50, 50);
}

function keyPressed() {
  if (key == " ") {
    // important to have in order to start the serial connection!!
    setUpSerial();
  }
}

function readSerial(data) {
  left = map(data, 0, 1023, 0, 400);
}


Exercise 2:

make something that controls the LED brightness from p5

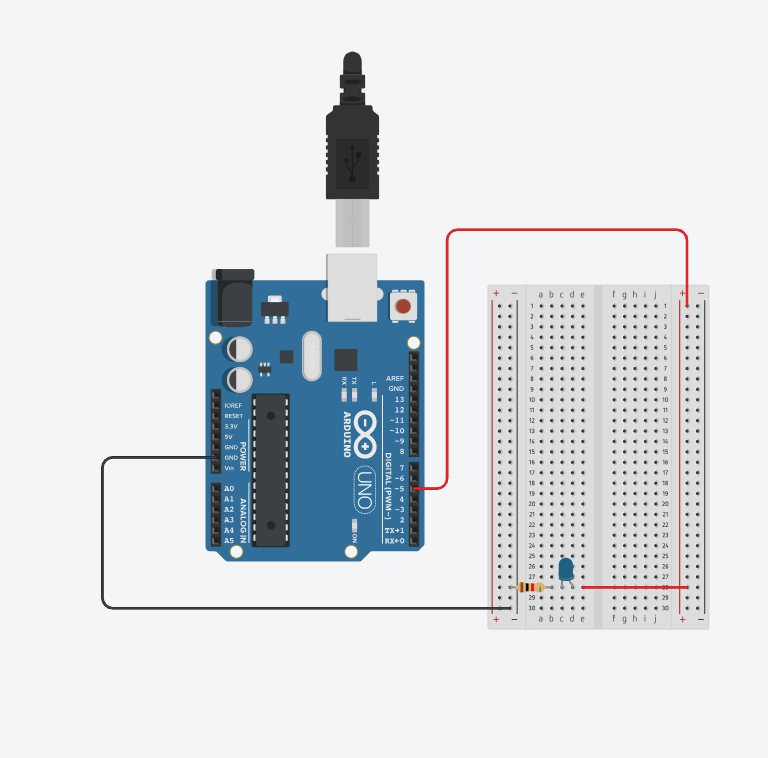
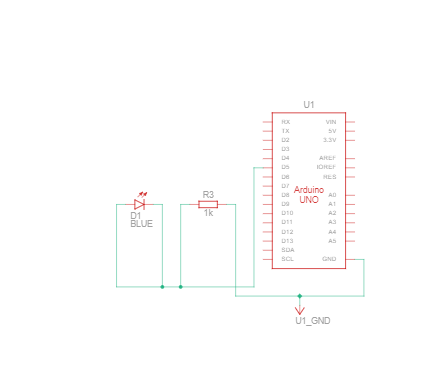
In this p5.js sketch, moving the mouse horizontally controls the brightness of an LED, represented by the variable `mybrightness`. The canvas background changes in shades of blue with the mouse’s x-position. Pressing the space bar initiates a serial connection to the Arduino, enabling real-time communication. The `readSerial` function reads data from the Arduino, and the current brightness value is sent back by appending a new line character. This simple interaction allows the LED brightness to respond in real time to the horizontal mouse movement on the canvas.

Arduino Code:

// - 5 - LED
int ledpin=5;//pin for led to be used

void setup() {
  // Start serial communication so we can send data
  // over the USB connection to our p5js sketch
  Serial.begin(9600);

  pinMode(5,OUTPUT);//setting mode as output
  pinMode(LED_BUILTIN, OUTPUT);
}

void loop() {
  // wait for data from p5 before doing something
  while (Serial.available()) {//while we read from serial
    digitalWrite(LED_BUILTIN, HIGH); // led on while receiving data
    int brightness=Serial.parseInt();//the brightness is gotten from data from p5
    if (Serial.read() == '\n') {//if we read \n,
      analogWrite(ledpin, brightness);//turn on the led based on the intensity gotten from p5
      Serial.println();//send \n
    }
  }
  digitalWrite(LED_BUILTIN, LOW);//if it is not reading, turn of checker light
}


P5 js Code:

let mybrightness=0;
function setup() {
  createCanvas(255,255);//make the canvas size 255 by 255
  textSize(18);//set text size to 18
}

function draw() {

  background(0,0,mouseX);//background be shades of blue
  fill(255);//text be white

  if (!serialActive) {
    text("Press Space Bar to select Serial Port", 20, 30);
  } else {
    text("Connected", 20, 30);
    
  }
  mybrightness=mouseX;//equate the mouseX to mybrightness
}

function keyPressed() {
  if (key == " ") {
    // important to have in order to start the serial connection!!
    setUpSerial();//when space is pressed connect to arduino
  }
}

// This function will be called by the web-serial library
// with each new line of data. The serial library reads
// the data until the newline and then gives it to us through
// this callback function

function readSerial(data) {
    let sendToArduino = mybrightness+'\n';
    writeSerial(sendToArduino);//send mybrightness to arduino
}

Exercise 3: 

take the gravity wind example and make it so every time the ball bounces one led lights up and then turns off, and you can control the wind from one analog sensor

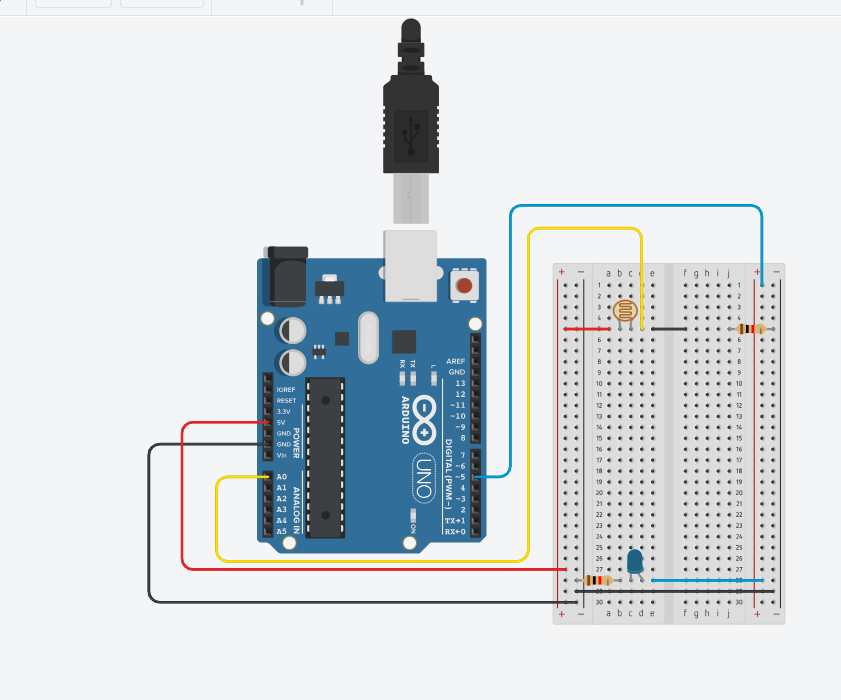
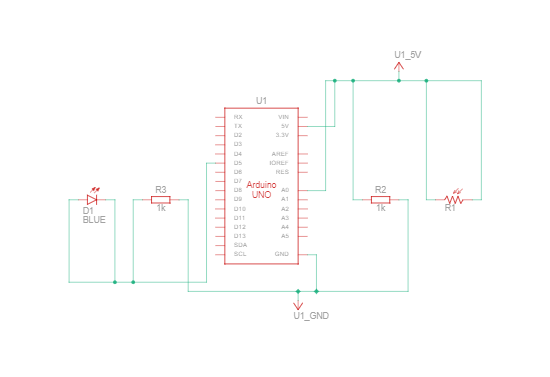
The p5.js sketch features a blue ball that bounces on the canvas, and a corresponding LED turns on whenever the ball hits the floor. The wind effect on the ball’s movement is controlled by an analog sensor connected to the Arduino. When a ‘d’ key is pressed, a serial connection is established between p5.js and the Arduino. Pressing the space bar creates a new bouncing ball with a random mass and resets its position. The Arduino reads the wind intensity from an analog light sensor, and the LED is turned on or off based on the received brightness value from p5.js. The wind strength is then sent back to p5.js, completing the real-time interaction between the bouncing ball simulation and the Arduino-controlled LED.


Arduino Code:

int LedPin = 5;//pin to display light

void setup() {
  // Start serial communication so we can send data
  // over the USB connection to our p5js sketch
  Serial.begin(9600);

  // We'll use the builtin LED as a status output.
  // We can't use the serial monitor since the serial connection is
  // used to communicate to p5js and only one application on the computer
  // can use a serial port at once.
  pinMode(LED_BUILTIN, OUTPUT);

  // Outputs on these pins
  pinMode(LedPin, OUTPUT);//set pin as output

}

void loop() {
  // wait for data from p5 before doing something
  while (Serial.available()) {//while we read from serial
    digitalWrite(LED_BUILTIN, HIGH); // led on while receiving data for checker
    int bright = Serial.parseInt();//read data from p5 and store in bright
    if (Serial.read() == '\n') {//if the serial read is \n,
      digitalWrite(LedPin, bright);//turn on or off led depending on the value of bright
      int windsens=analogRead(A0);//read the windspeed from lightsensor
      delay(5);//wait small to get reading
      Serial.println(windsens);//send windspeed to p5
    }
  }
  digitalWrite(LED_BUILTIN, LOW);//if not active turn checker led off
}

P5 js Code:

let velocity;
let gravity;
let position;
let acceleration;
let wind;
let drag = 0.99;
let mass = 50;
let led=0;//variable controlling the led

function setup() {
  createCanvas(640, 360);
  fill(0,0,255);//ball to be blue
  position = createVector(width/2, 0);
  velocity = createVector(0,0);
  acceleration = createVector(0,0);
  gravity = createVector(0, 0.5*mass);
  wind = createVector(0,0);
}

function draw() {
  background(0,50);//background black with transperacy 50
  applyForce(wind);
  applyForce(gravity);
  velocity.add(acceleration);
  velocity.mult(drag);
  position.add(velocity);
  acceleration.mult(0);
  ellipse(position.x,position.y,mass,mass);
  if (position.y > height-mass/2) {
      velocity.y *= -0.9;  // A little dampening when hitting the bottom
      position.y = height-mass/2;
    }
  if(position.y==height-mass/2){led=1;}//if the ball touches the floor, turn on led
  else{led=0;}//otherwise turn led off
}

function applyForce(force){
  // Newton's 2nd law: F = M * A
  // or A = F / M
  let f = p5.Vector.div(force, mass);
  acceleration.add(f);
}

function keyPressed() {
  if (key == "d") {//when d is pressed create connection
    // important to have in order to start the serial connection!!
    setUpSerial();
  }
  if (key==' '){//when space is pressed create new ball and call bounce effect
    mass=random(15,80);
    position.y=-mass;
    velocity.mult(0);
  }
}
function readSerial(data) {
    wind.x=map(int(data),0,1023,-2,2);//map the value gotten from the arduino to wind.x
    let sendToArduino = led+'\n';
    writeSerial(sendToArduino);//send the value of led to the srduino
}


Reading Response – Week 11

In this text, the author asks the question: How often do we excuse the design of things that cater to disabled people because of the market for which it is intended? The design of such objects, it seems, mostly tries not to portray a positive image but no image at all, as if to hide disability or to regard it as shameful. We’ve come from an era where it wasn’t outrageous to say things like “medical products should not be styled” [p. 16] when talking about glasses to an era where glasses are stylized and in some contexts even considered fashionable. It is interesting how we’re slowly progressing with some disabilities to make the design of aiding instruments more “acceptable” to abled people instead of trying to hide the disability through design. For example, contact lenses could make bad eyesight invisible to the observer, but most people still choose to wear glasses over lenses, in part because of the accessibility of their design. Even then, there are disabilities where advancement in aiding technology is constrained by the need for invisibility (like with hearing aids), which I think is a shame. The author wants such instruments to also follow the blueprint of glasses, so that advancement is favored over discretion. However, at the same time, the pressure of making the design of aiding instruments universal means there is a serious risk of designers going too far as to sacrifice functionality over design. The first priority, I think, should be functionality, and then design, in the case of such instruments, so the overall user experience is better.

Final Project!!!

For my final project, I’m initially thinking about expanding my midterm project’s functionality physically, so that you’ll be able to control the music player through components of the arduino kit (next, previous, volume control, slider, shuffle), and the music player will communicate back with the arduino with maybe a light show or something to go with the music. I’ll have to look into a cool physical design as well along with code design to make it realer. That’s the idea for now, anyway!

AeroMaestro- Preliminary Final Project Draft

Concept: “AeroMaestro”

My friend and I visited the Louvre Museum in Abu Dhabi on Sunday. Every night for the entire month, I would see objects lighting up the sky in patterns when I went out late. Upon closer inspection, I quickly discovered that these were drones operating a drone show at the Louvre. But on this specific day, we were positioned on the Louvre terrace, which provided us with the ideal height from which to watch the drone show. After giving it some thought, I’ve decided that this is the theme I want to explore for my final project because we were so close that we could even hear the drones whirring. I’m not sure how I’m going to do it, but I’d like to incorporate this into P5 and have a physical component on Arduino.

Setup:

Your touches on the joystick will translate into a language that the drones can understand thanks to an Arduino Uno and a joystick module. Your motion serves as a cue to them, influencing their formations and flight patterns. The drones will use P5.js as their gateway. The drones would receive commands from Arduino that would essentially give them life and allow their movements to be seen on screen. As the drones fly, every tilt and every movement of the joystick will be reflected in real time.

Interaction:

The user will be interacting with the drones by taking on the role of the conductor and essentially controlling their rhythm, motion, patterns, and position. I want it to feel more like an interactive art experience where you can use P5.js as a canvas and your gestures as the brush, rather than like operating a remote-control car.

Week 11 – Final Project Concept

Growing up, I used to love playing with pinball machines in malls and carnival parks, so I would like to recreate the same fun that I had as a kid in my final project. My concept revolves around replicating a traditional pinball machine using Arduino and P5.js. By combining the power of Arduino and P5.js, I will be able to create a physically and digitally interactive pinball game, and I hope to bring the joy and challenge of playing pinball into a more modern and unique setting.

Pinball machine

Through switches that control the flippers on P5.js, users will have the objective of scoring as many points as possible before losing the ball, just like in a classic arcade setting, being able to mimic the experience of playing a pinball machine. Many dynamics could be added to the game, and I am excited to explore sensors that I could potentially use.

Week 11: Initial Final Project Idea

I visited Manar Abu Dhabi last week. My favorite installation was a field of lights that pulsed with the audience’s heartbeat. When I saw it, I felt like I was in Elysium. It stole all the wind from me. Here’s a video of it here. I know I want to create an installation that involves a heartbeat, using sensors, and that’s the Arduino component. As to what detecting the heartbeat will do, I’m still iffy.

I’ve been having a lot of conversations with my dad these days about how disconnected we are from each other and from ourselves. I want to create a project that brings people more in tune with their inner selves and surroundings, using the heartbeat, which is, naturally, already a very intimate thing.

My first idea is maybe when two people’s hearts get in sync, something appears on P5JS screen. And when they’re not in sync, images appear that represent the dissonance that is happening. Or, instead of going that route, everyone’s individual heartbeat draws a unique picture that is added to a larger picture of everyone’s similar but different looking heartbeats. I’ve also been trying to come up with ways I could add poetry/words into this installation the way Andrew Schneider did with his. He did it perfectly.

Or, I’m seeing a circle that pulses on the screen with your heartbeat in something that looks like a universe (like what Pierre did). Something that gets the message of being a pulse in the universe across, and as steps are went through, new poems/words pop up.

Here’s a project called “Text Rain.” I could incorporate words this way, perhaps. Maybe every time the circle pulses, words pop out, but how to make it more interactive so that it’s the audience’s words instead of my own…still unsure. Either way, I’m gonna put a moldboard below. I love Instagram archive pages. Because they have text like this. I want to capture the feeling these images evoke:

It’s a lot. But there’s a vibe. It should be more fleshed out but, things must come together eventually.

Reading Response – Week 11

This week’s reading, titled “Design meets disability,” intrigued me with its exploration of the intersection between design and the needs of individuals with disabilities. Prior to this, I hadn’t given much thought to the design aspects of products catering to the disabled community. My initial perspective was primarily focused on functionality, deeming it sufficient. However, the author emphasizes that functionality alone may not be the sole consideration. The incorporation of aesthetic appeal in design plays a crucial role in enhancing the user’s self-image.

The author delves into the analysis of various items such as spectacles (now referred to as eyewear), prosthetics, and other adaptive “equipment” designed for individuals with different abilities. It made me reflect on the challenges of introducing fashion into this realm, especially considering the diversity of needs. Unlike spectacles, which serve users regardless of eyesight effectiveness, prosthetics and hearing aids pose unique challenges. How can someone without amputation use a prosthetic, or how can individuals without hearing impairment benefit from hearing aids?

The transformation of spectacles into trendy “eyewear” appears to have been a successful evolution, but I question whether similar success is feasible for other assistive devices tailored for individuals with special needs. The reading has prompted me to consider the intricacies and complexities involved in merging design and functionality, particularly in the context of products meant to aid those with disabilities.

Week 11 – Final Project Idea

Concept: A Digital Petting Zoo

For the final project, as we are required to combine both Arduino and p5js, I decided to do a digital petting zoo. I take the inspiration from an actual petting zoo, which looks like this:

Petting zoos under threat following health inquiry

In this digital petting zoo, the p5js will act like a map of the zoo and shows the information about the animals. The visitor will be able to navigate the zoo using controllers connected to Arduino. In this zoo, I plan to have three to four animals. For these animals, I plan to make physical prototypes using cardboards and other materials. These physical prototypes will be equipped with different sensors according to different animals so that the visitor can interact with them. For example, some shy animal may have a distance sensor while outgoing one might have a light sensor so that it can sense the petting of the visitor.

Additionally, to add some fun to the experience, there will be some tasks for the visitor to complete, such as feeding them, petting them, etc. This sort of imitates the famous old device, a Tamagotchi:

The user interface should represent something like this:

MatchyGotchy Z on Steam

Therefore, this project aims at making the visitor feel like walking around a petting zoo as well taking care of the animals there using Arduino and p5js.

Week 11 : Reflection

The writer says that in the past, people thought it was better to keep disabilities hidden when making things, and that’s not good. It doesn’t just hide a part of the person but can also make them feel like they should be embarrassed about their disability, which is a part of who they are.

They talk about things made for people with disabilities, like glasses. Glasses show how some people don’t follow the old way of thinking. There are many types and styles of glasses, so people can choose what feels comfy and looks good to them. Some people even wear glasses just because they like how they look, even if they don’t need them to see better. But when they talk about something like a fake leg for someone who lost a leg, some people might think it doesn’t look good and hide it, even if it works fine. I really think this should change. No one should feel bad about having a disability.

I think the main problem isn’t the disability itself; it’s more about the places and things around that make it hard for people with disabilities. When places don’t have things that make it easy for them, it’s tough for them to do things like everyone else. So, if we make places easy to use for everyone and remove things that make it hard, it can help people with disabilities do things more easily and feel like they’re a part of everything.

Lastly, I agree that these things should be simple. When we make things for people with disabilities, the main goal is to help them. The things should be easy for them to use without making them feel stressed.

3 Examples

Process:

For this assignment, we had to finish the three in-class examples that connect p5js and Arduino. In the beginning, I thought I understood the code and the connection but then I realized that I did not fully understand it. So I decided to review it line by line and try to understand the communication between Arduino and P5js.

Then Yupu and I decided to work together on these three examples we divided them so that he worked on the first one I worked on the second and we both worked on the third together. We helped each other debug the code and figure out how to implement it together. Honestly, this process of debugging helped me understand the communication between the two (P5js and Arduino) better.

Example 1: Circle Moving


// Week 11.2 Serial port - Light sensor, ball and light example 1 


int leftLedPin = 7;
int rightLedPin = 4;


void setup() {
 // Start serial communication so we can send data
 // over the USB connection to our p5js sketch
 Serial.begin(9600);


 // We'll use the builtin LED as a status output.
 // We can't use the serial monitor since the serial connection is
 // used to communicate to p5js and only one application on the computer
 // can use a serial port at once.
 pinMode(LED_BUILTIN, OUTPUT);


 // Outputs on these pins
 pinMode(leftLedPin, OUTPUT);
 pinMode(rightLedPin, OUTPUT);


 // Blink them so we can check the wiring
 digitalWrite(leftLedPin, HIGH);
 digitalWrite(rightLedPin, HIGH);
 delay(200);
 digitalWrite(leftLedPin, LOW);
 digitalWrite(rightLedPin, LOW);


 // start the handshake
  while (Serial.available() <= 0) {
    digitalWrite(LED_BUILTIN, HIGH);  // on/blink while waiting for serial data
      Serial.println("0,0");            // send a starting message
    delay(300);                       // wait 1/3 second
    digitalWrite(LED_BUILTIN, LOW);
    delay(50);
  }
}


void loop() {
 // wait for data from p5 before doing something
 while (Serial.available()) {
   digitalWrite(LED_BUILTIN, HIGH);  // led on while receiving data


   if (Serial.read() == '\n') {


     int sensor = analogRead(A1);  //potentiometer
     Serial.println(sensor);
   }
 }
 digitalWrite(LED_BUILTIN, LOW);
}


Example 2: LED Brightness

// Week 11.2 Example LED brightness


int leftLedPin = 6;

void setup() {
  // Start serial communication so we can send data
  // over the USB connection to our p5js sketch
  Serial.begin(9600);


  // We'll use the builtin LED as a status output.
  // We can't use the serial monitor since the serial connection is
  // used to communicate to p5js and only one application on the computer
  // can use a serial port at once.
  pinMode(LED_BUILTIN, OUTPUT);

  // Outputs on these pins
  pinMode(leftLedPin, OUTPUT);

  // start the handshake
  while (Serial.available() <= 0) {
    digitalWrite(LED_BUILTIN, HIGH);  // on/blink while waiting for serial data
    Serial.println("0,0");            // send a starting message
    delay(200);                       // wait 1/3 second
    digitalWrite(LED_BUILTIN, LOW);
    delay(200);
  }
}


void loop() {
  // wait for data from p5 before doing something
  while (Serial.available()) {
    digitalWrite(LED_BUILTIN, HIGH);  // led on while receiving data

    int brightness = Serial.parseInt();
    analogWrite(leftLedPin, brightness);
    if (Serial.read() == '\n') {
      Serial.println("0,0");
    }
  }
  digitalWrite(LED_BUILTIN, LOW);
}


Example 3:  Gravity, Ball, and LED

// week 11 example 3 sensor analg and digital light and abouncing ball 

int leftLedPin = 7;
int rightLedPin = 4;


void setup() {
 // Start serial communication so we can send data
 // over the USB connection to our p5js sketch
 Serial.begin(9600);


 // We'll use the builtin LED as a status output.
 // We can't use the serial monitor since the serial connection is
 // used to communicate to p5js and only one application on the computer
 // can use a serial port at once.
 pinMode(LED_BUILTIN, OUTPUT);


 // Outputs on these pins
 pinMode(leftLedPin, OUTPUT);
 pinMode(rightLedPin, OUTPUT);


 // Blink them so we can check the wiring
 digitalWrite(leftLedPin, HIGH);
 digitalWrite(rightLedPin, HIGH);
 delay(200);
 digitalWrite(leftLedPin, LOW);
 digitalWrite(rightLedPin, LOW);


 // start the handshake
  while (Serial.available() <= 0) {
    digitalWrite(LED_BUILTIN, HIGH);  // on/blink while waiting for serial data
    Serial.println("0,0");            // send a starting message
    delay(300);                       // wait 1/3 second
    digitalWrite(LED_BUILTIN, LOW);
    delay(50);
  }
}


void loop() {
 // wait for data from p5 before doing something
 while (Serial.available()) {
   digitalWrite(LED_BUILTIN, HIGH);  // led on while receiving data


   int LED_STATE = Serial.parseInt();
   //int right = Serial.parseInt();
   if (Serial.read() == '\n') {
     digitalWrite(rightLedPin, LED_STATE);
     int sensor2 = analogRead(A1);
     delay(5);
     Serial.print(sensor2);
     Serial.print(',');
     Serial.println('Y');
   }
 }
 digitalWrite(LED_BUILTIN, LOW);
}