
Category: Spring 2019
Week 3 Circuits & Code – Analog Read and Blink Without Delay
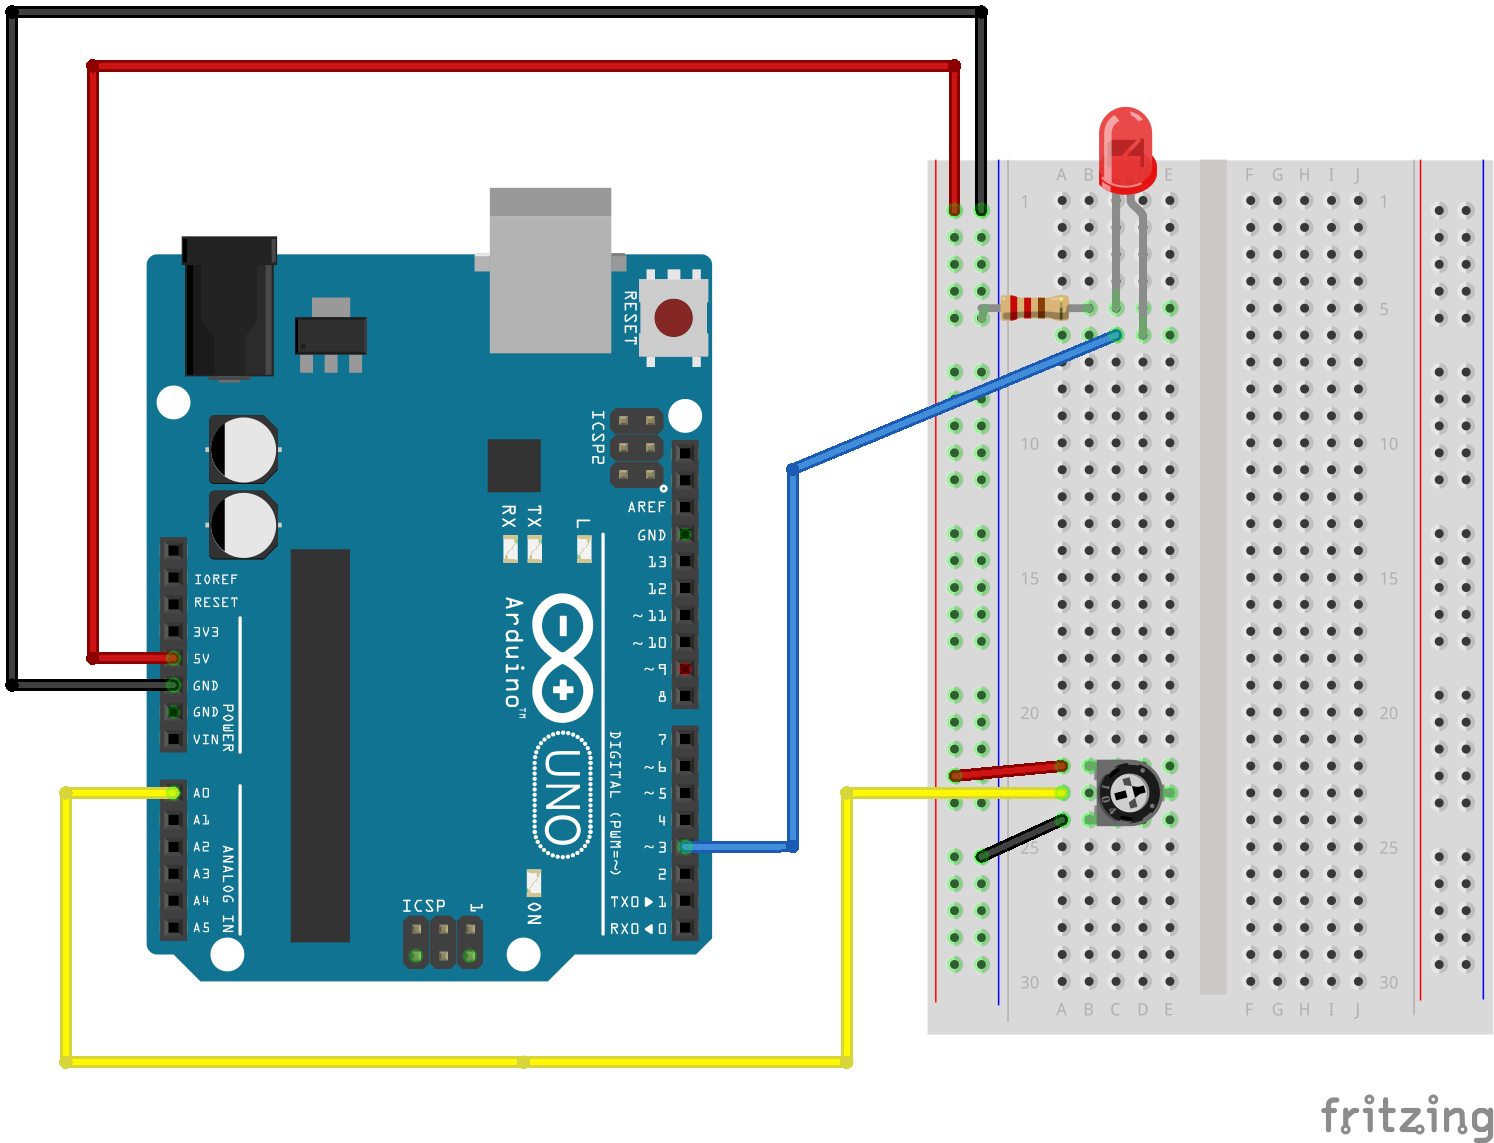
Potentiometer:
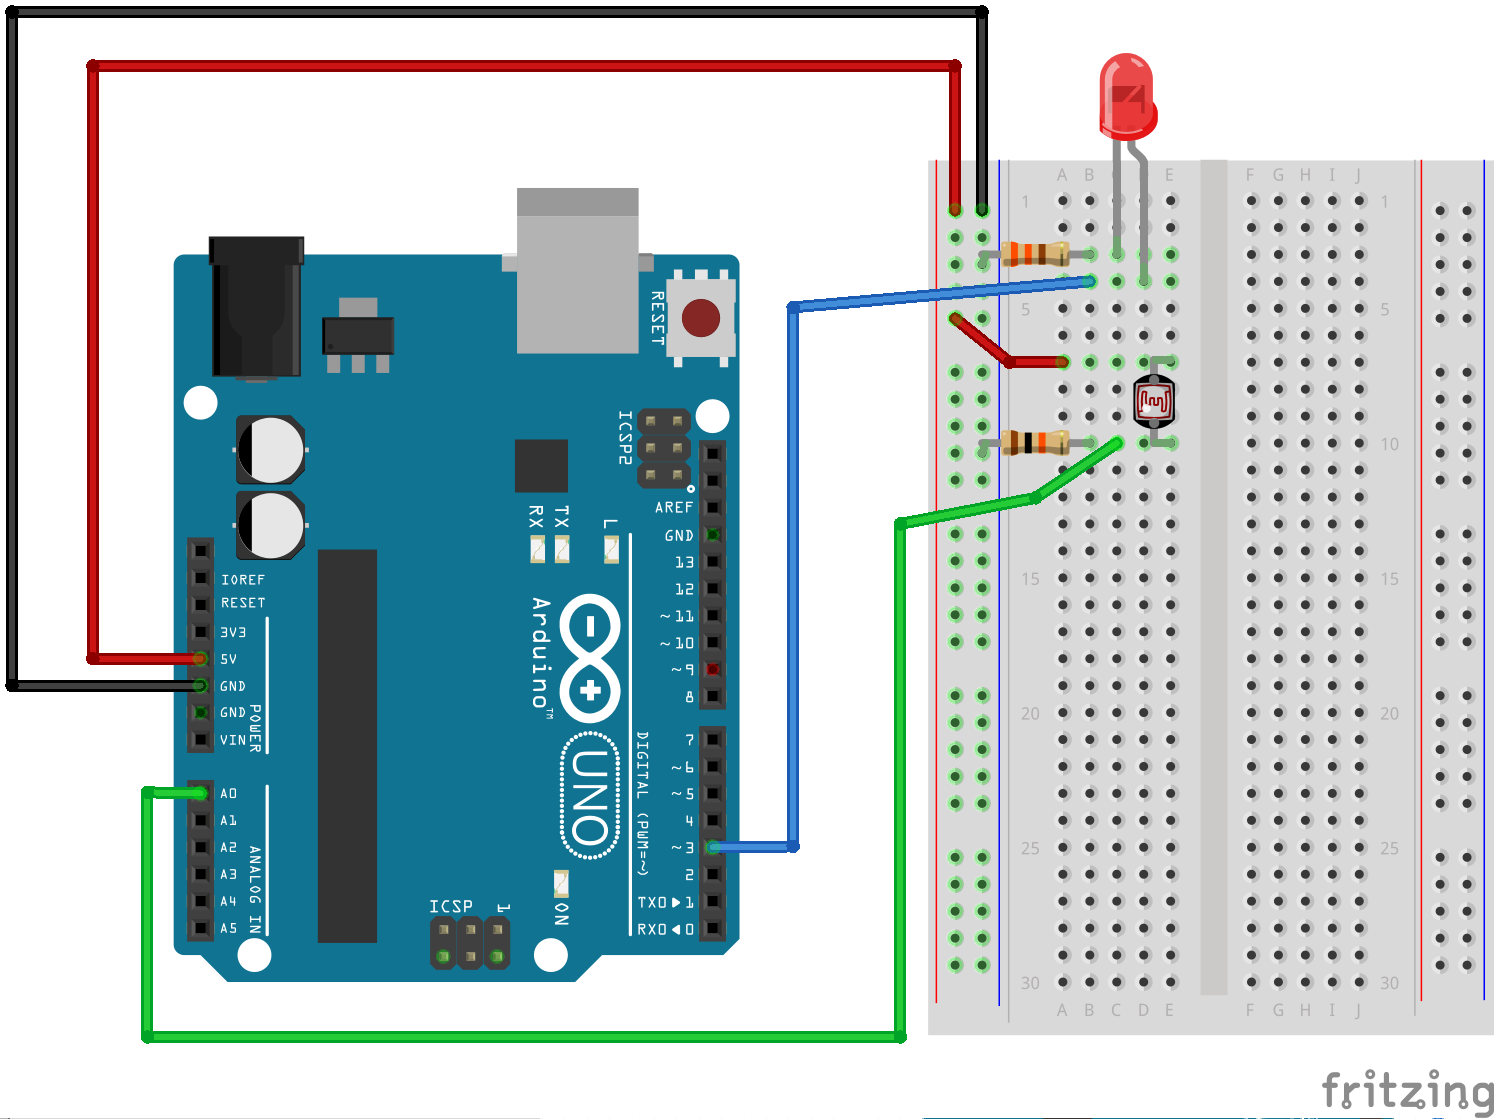
Photoresistor:
const int ledPin = 2;
bool ledState = LOW;

// a really longer number with no + or - sign
unsigned long toggleTime = 0;
int triggerInterval = 500;

void setup() {
  pinMode(ledPin, OUTPUT);
  Serial.begin(9600);
}

void loop() {
  // read the analog input
  int knobValue = analogRead(A0);
  // map that input to a range appropriate for our use
  // in this case, we take the range of the photocell and map it to millis between 10 & 500
  // this is the blink interval for the LED
  triggerInterval = map(knobValue, 190, 860, 10, 500);

  // print out the original value and the mapped value on the same line
  Serial.print(knobValue);
  Serial.print(" ");
  Serial.println(triggerInterval);

  // if the current time (millis) is more than the exact time when we are supposed to toggle
  if (millis() > toggleTime) {
    // flip the LED to the opposite of what it was
    ledState = !ledState;
    // set the next time the LED should toggle
    // to the current time + whatever the blink interval amount of time is
    toggleTime = millis() + triggerInterval;
  }

  // turn the LED on or off based on the ledState vaviable
  digitalWrite(ledPin, ledState);
}
Week 2 Assignment – Tilt Sensor
For this assignment, I had to combine a switch that doesn’t require the use of hands as well as produce multiple inputs and/or outputs. The main challenge for me was actually settling on a concept for the project. I went over several iterations of the project before deciding on building a scale-like structure that acts as an indicator for the water level. The circuit included a tilt center, which acts as a switch or trigger for the code to run. The code then alternates between blinking red and blue lights, depending on which side is tilted. The first iteration of the model included a simple wooden structure with the breadboard attached to one side. There was a certain flaw in the balance of the structure, however, as the side with the breadboard kept leaning to the side. The only solution at the time was to place random objects on the opposite end of the wooden panel, and that didn’t seems like a very efficient solution.
The final iteration of the project included a plastic cup attached to the side opposing the breadboard with hot glue. Pouring water into that cup would allow the wooden piece to lean to the other side, so the effect of the tilt sensor can be observed in its full glory.
int tilt = 2;
int redled = 6;
int blueled = 7;


void setup() {
  // initialize serial communication at 9600 bits per second:
  Serial.begin(9600);
  // make the pushbutton's pin an input:
  pinMode(tilt, INPUT);
  pinMode(redled,OUTPUT);
  pinMode(blueled,OUTPUT);
}

// the loop routine runs over and over again forever:
void loop() {
  // read the input pin:
  int buttonState = digitalRead(tilt);
  if (buttonState){
    digitalWrite(redled,HIGH);
    digitalWrite(blueled,LOW);
  } else {
    digitalWrite(redled,LOW);
    digitalWrite(blueled,HIGH);
  }
  if(buttonState){
    digitalWrite(redled,HIGH);
    delay(500);
    digitalWrite(redled, LOW);
    delay(500);
  } else {
    digitalWrite(blueled,HIGH);
    delay(500);
    digitalWrite(blueled, LOW);
    delay(500);
  }
  // print out the state of the button:
  Serial.println(buttonState);
  delay(1);        // delay in between reads for stability
}
Assignment #2 if statements, some buttons, and a buzzer
My little device plays 4 different notes, (one when each of the buttons is pressed). I initially tried to write a program in which a tone would be played depending on the number of consecutive buttons pressed, but I found that difficult to work with> it also did not have the functionality i wanted. I researched online about how to make each function work, then slowly stitched it together. I programmed the notes, bu looking up how many Hertz each of my desired notes was, and plugging it into the program.
const int buttonPin1 = 2;
const int buttonPin2 = 3;
const int buttonPin3 = 4;
const int buttonPin4 = 5;// the number of the pushbutton pin
int Buzzer1 = 6;
int Buzzer2 = 7;
int Buzzer3 = 8;
int Buzzer4 = 9;
int led1 = 10;
int led2 = 11;
int led3 = 12;
int led4 = 13;
int led4State = LOW;

// variables will change:
int buttonState1 = 0;
int buttonState2 = 0;
int buttonState3 = 0;
int buttonState4 = 0;
// variable for reading the pushbutton status

void setup() {
  // initialize the piezo as output:
  pinMode(Buzzer1, OUTPUT);
  pinMode(Buzzer2, OUTPUT);
  pinMode(Buzzer3, OUTPUT);
  pinMode(Buzzer4, OUTPUT);
  pinMode(led1, OUTPUT);
  pinMode(led2, OUTPUT);
  pinMode(led3, OUTPUT);
  pinMode(led4, OUTPUT);
  // initialize the pushbutton pin as an input:
  pinMode(buttonPin1, INPUT);
  pinMode(buttonPin2, INPUT);
  pinMode(buttonPin3, INPUT);
  pinMode(buttonPin4, INPUT);
}

void loop() {
  // read the state of the pushbutton value:
  int buttonState1 = digitalRead(buttonPin1);
  int buttonState2 = digitalRead(buttonPin2);
  int buttonState3 = digitalRead(buttonPin3);
  int buttonState4 = digitalRead(buttonPin4);


  // check if the pushbutton is pressed.
  // if it is, the buttonState is HIGH:
  if (buttonState4 == LOW)
  {
    noTone(Buzzer1);
    digitalWrite(led4, LOW);
  }
  else if (buttonState4 == HIGH)
  {
    //digitalWrite(led2, LOW);
    digitalWrite(led4, HIGH);
    tone(Buzzer1, 261);
  }

  if (buttonState3 == LOW)
  {
    noTone(Buzzer2);
    digitalWrite(led3, LOW);
  }
  else if (buttonState3 == HIGH)
  {
    //digitalWrite(led2, LOW);
    digitalWrite(led3, HIGH);
    tone(Buzzer2, 349);
  }

  if (buttonState2 == LOW)
  {
    noTone(Buzzer3);
    digitalWrite(led2, LOW);
  }
  else if (buttonState2 == HIGH)
  {
    //digitalWrite(led2, LOW);
    digitalWrite(led2, HIGH);
    tone(Buzzer3, 392);
  }

  if (buttonState1 == LOW)
  {
    noTone(Buzzer4);
    digitalWrite(led1, LOW);
  }
  else if (buttonState1 == HIGH)
  {
    //digitalWrite(led2, LOW);
    digitalWrite(led1, HIGH);
    tone(Buzzer4, 440);
  }
Also, my post about the reading:
Despite initially finding myself strongly disagreeing with the author’s definition of Interactivity, I eventually found myself drawn in by his argument. The author has a very specific definition of interactivity: a cyclic process in which two actors alternately listen, think, and speak. In other words, in his eyes at least, an interaction is like a conversation. He then proceeds to explain that a person cannot have a conversation with an object that does not speak back in any way, does not think, or cannot listen. (The way he says this is rather cheeky, and his self-importance gets on my nerves, but I’ll let it slide). He discusses variability in the level of interactivity a thing can have. The line that won me over was “How many times has your heart protested as you watched the protagonist in a movie do something disastrous?” I related to my lack of ability to have a conversation with a movie. That being said, I believe the author’s definition, as he defines it, is valid.
Here is a cheeky little picture I found one time that reminded me of the reading 🙂

Daito Manabe Videos – Week 3
A heart falling in love – heart beat generator – love story part 1
This valentine’s day, save money on chocolates and flowers and make people fall in love with you with a simple button.
For this project, I used 10 LED lights, and put them into a piece of poster board in the shape of heart. I used different circuits for each LED as well as the button. At first I tried to solder the LEDs to the wires before poking them into the surface, but then found that this made the LEDs not stand up straight and move around due to the large hole. Therefore I decided to solder the LEDs after having put them into the board. I soldered the power and ground side of each LED separately, therefore using a total of 20 wires for the soldering. I considered having the button on the board too but decided that I want it to be eventually framed and still be able to use the button, so it would be better to have it separate. In order to make them fixed on the board, I glue gunned the LEDs from the back on to the board.
In order to fulfill the condition of having more than one input or output, I had 3 different speeds, to replicate the heart beat getting faster (this is how you know the button has made your special someone fall in love with you, their heart beats faster when you are around 😉 ) as well as an on/off option.
I used the blink code, firstly adjusting it to make it blink like a heartbeat (with a short delay and then a longer delay), then using for loop to make all the LEDs do the same action at the same time. I used index, with {0, 200, 100, 30}; as the delays, to make the button increase the speed of and turn on/off the lights.
int ledPin1 = 3;
int ledPin2 = 6;
int buttonPin = 2;
int index = 0;
int prevButtonState = LOW;
int lowDelay[4] = {0, 200, 100, 30};
unsigned long toggleTime = 0;
int triggerInterval = 500;
int buzz = 13;

//  Blink

//  Turns an LED on for one second, then off for one second, repeatedly.
//
//  Most Arduinos have an on-board LED you can control. On the UNO, MEGA and ZERO
//  it is attached to digital pin 13, on MKR1000 on pin 6. LED_BUILTIN is set to
//  the correct LED pin independent of which board is used.
//  If you want to know what pin the on-board LED is connected to on your Arduino
//  model, check the Technical Specs of your board at:
//  https://www.arduino.cc/en/Main/Products
//
//  modified 8 May 2014
//  by Scott Fitzgerald
//  modified 2 Sep 2016
//  by Arturo Guadalupi
//  modified 8 Sep 2016
//  by Colby Newman
//
//  This example code is in the public domain.
//
//  http://www.arduino.cc/en/Tutorial/Blink
//*/

// the setup function runs once when you press reset or power the board
void setup() {
  // initialize digital pin LED_BUILTIN as an output.
  for (int i=3; i<=12;i++){
    pinMode(i,OUTPUT);
  }
  pinMode (buttonPin, INPUT);
  Serial.begin(9600);
}

// the loop function runs over and over again forever
void loop() {
  int currentButtonState = digitalRead(buttonPin);
  int knobValue = analogRead(A0);
  Serial.println(knobValue);

if (knobValue <50) {
  index = 0;
  }

  if (currentButtonState == HIGH && prevButtonState == LOW) {
    index = index + 1;
    if(index >= 4){
      index = 0;
    }
//    Serial.println(index);
  }

  if(index != 0){
    for (int i = 3;i<=12;i=i+1){
      digitalWrite(i, HIGH);
    }

    delay(100);

    for (int i = 3;i<=12;i+=1){
      digitalWrite(i, LOW);
    }

    delay(lowDelay[index]);

    for (int i = 3;i<=12;i++){
      digitalWrite(i, HIGH);
    }

    delay(100);

    for (int i = 3;i<=12;i++){
      digitalWrite(i, HIGH);
    }

    delay(1000);

    for (int i = 3;i<=12;i++){
      digitalWrite(i, LOW);
    }

    delay(lowDelay[index]);

    for (int i = 3;i<=12;i++){
      digitalWrite(i, HIGH);
    }

    delay(100);

    for (int i = 3;i<=12;i++){
      digitalWrite(i, HIGH);
    }
  } else {
    for (int i = 3;i<=12;i++){
      digitalWrite(i, LOW);
    }
  }
  prevButtonState = currentButtonState;

//    for (int i = 3;i<=12;i++){
//     if (knobValue == 0)
//       {
//        digitalWrite(i,LOW);
//       }
//    }

    int LIGHT = analogRead(13);
    if (LIGHT < 100){
      tone(buzz, 3000, 50);
    }

}
Reading response 1
Its interesting to understand the definition of interactivity and that not everything that we interact (react) to is interactive. The writer says that a cyclic process in which two actors alternately listen, think,and speak is an interaction. This is interesting because when asked in one of the first lessons to go out of the class and find things that are interactive, most of us came up with things that would, according to this text, not actually be interactive. For example we were going to initially choose a bench/table that several of us thought was interactive, due to need for an even number of people to be sat on it to balance it and its ability to spin, however Crawford would likely disagree. However we ended up choosing the coffee machine, which I am not entirely sure if Crawford would disagree with or not, as when we listen (seeing the options), think, and speak (choosing coffee), and the machine listens (to our request input), thinks (processes it), and speaks (prepares chosen coffee), this seems to me to be interactive due to Crawford’s logic as well.
Hey throw that ball in this thing
Boy was I in for a treat this morning when I strolled on down to the IM lab to finish my project. I was sure it would only take five or so minutes. I just needed to add some parts that I didn’t have in my room.
Nope. Definitely not. I got to the lab and, half an hour later, had discarded my entire project. Hours spent in my room, fiddling with compelx codes and multiple inputs and outputs, all gone. So, yeah, I don’t think this project is exactly what Aaron was looking for with this assignment, but I think I twiddled enough in my room to understand the concepts we needed to grasp.
My original idea was to have my sunglasses come down, as they did before, and then I would snap some finger guns and suddenly, LED lights would come on, blinking “S W A G” in morse code.
Instead, I have this…
#2: Switch with coding
For our second assignment, we were asked to use code within our switch to do something creative with the LED lights. I decided to create a car game of sorts (however, having run of time, it was reduced to a lesser parody).
I coded 3 different LED lights to turn on as a traffic light would. This took a lot of help and I ended up learning new methods I hadn’t used before. I also wanted to attach a button pin to turn the traffic lights on and off which proved to be very difficult.
Lastly, I also wanted lights to turn on once the car touched the finish line – I did this using a simple circuit using foil and without any code.
If I had more time, I would have liked to build a proper traffic light and circuit and also two cars that could actually race.
int red = 2;
int yellow = 3;
int green = 4;
int buttonPin = 5;
// boolean variable to keep track of whether our sequence is on or off
bool start = false;

// variable to keep track of our prevous button state
int prevButtonState = LOW;

// a very large container of memory used as a variable for numbers that continually increase (Like time)
unsigned long triggerTime = 0;

// the interval between light changes
int interval = 2000;

// which light are we currently activating
int whichLight = 0;

void setup() {
  pinMode(red, OUTPUT);
  pinMode(yellow, OUTPUT);
  pinMode(green, OUTPUT);
  pinMode(buttonPin, INPUT);
  Serial.begin(9600);

}
void loop() {


  // read our button (switch)
  int currentButtonState = digitalRead(buttonPin);

  // if the button is currently being pressed and during the last frame it was not pressed then continue
  if (currentButtonState == HIGH && prevButtonState == LOW) {
    // flip start on or off
    start = !start;
    // reset our trigger time to the current time so we can trigger immediately
    triggerTime = millis();
    // reset our light sequence to the beginning
    whichLight = 0;
  }

  // if sequence is activated then call changeLights()
  if (start == true) {
    changeLights();
  } else { // otherwise turn everything off
    digitalWrite(yellow, LOW);
    digitalWrite(red, LOW);
    digitalWrite(green, LOW);
  }

  // remember the current button state so we can have a previous button state the next time through loop
  prevButtonState = currentButtonState;
}

// the actual sequence of light changes
void changeLights() {
  // boolean to trigger the next light or not, start off by not triggering
  bool triggerLight = false;

  // get our current time
  unsigned long currentMillis = millis();

  // if the current time is greater than the time when we should trigger, THEN LET'S TRIGGER!
  if (currentMillis >= triggerTime) {
    triggerLight = true; // LET's TRIGGER
    triggerTime = currentMillis + interval; // reset the trigger time for 2 seconds later
  }

  // if we're triggering the next light
  if (triggerLight == true) {
    // which light are we on
    if (whichLight == 0) { // red
      digitalWrite(red, HIGH);
    } else  if (whichLight == 1) { // yellow
      digitalWrite(yellow, HIGH);
    } else if (whichLight == 2) { // green
      digitalWrite(yellow, LOW);
      digitalWrite(red, LOW);
      digitalWrite(green, HIGH);
    } else if (whichLight == 3) { // then turn everything off
      start = false;
    }

    // increase the sequence to the next light, only to be triggered after the triggerTime == currentTime
    whichLight = whichLight + 1;
  }
}
Response to Reading #1
Chris Crawford begins the chapter with his own definition of interactivity:
a cyclic process in which two actors alerternaty listen, think, and speak.
I have read his definition of interactivity in another text he wrote and I agree with him and with the degrees of interactivity that he goes on to point in this chapter. Listening, thinking and speaking are all important aspects of an interface. Both sides need to be equal and while I agree with him on a lot of things, I don’t agree with his statement that books and dancing are not interactive. I personally think that you can have types of texts that are interactive and thus the term- hypertext. An example of hypertext could be “The Garden of Forking Paths”. I do, however, agree that movies are not interactive, nevertheless, there has been some progress in producers trying to make films interactive. A good example of that would be Netflix’s Bandersnatch. 