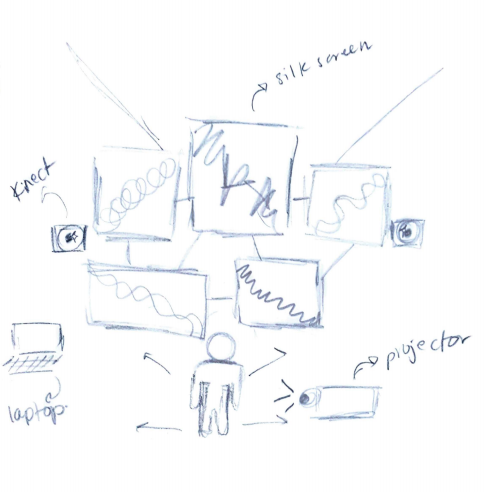
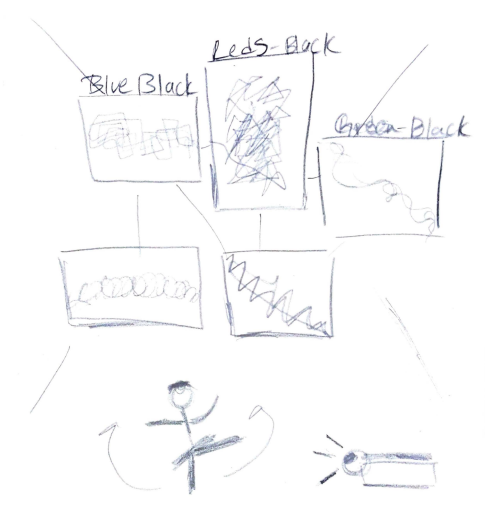
I made small changes to my final project idea conceptually, and in terms of certain technicalities. So in plain terms, I aim to design a piece of interactive and performative art installation, where the audience shape/silhouette and movements are translated into different complex patterns and colors onto different transparent surfaces. I will still be using a Kinect in order to detect the movement of the audience, and program a Processing sketch that will analyze the data from the Kinect and translate that into patterns and colors. Conceptually, my project aims to explore issues of surveillance in our modern world, where people place a lot of trust in technology and a lot of our personal data is present and recorded on clouds. Through choosing to interact with the installation, the audience are giving information about their movements, which will be recorded by the Kinect. This doesn’t necessarily imply that sharing our data is in inherently good or bad, but rather to make the audience think about the larger implications of that prospect.
I believe some of the complicated or challenging aspects of the project will be:
Separating the data from the Kincet into three sections, since I want each section to present a change of patters as the user moves along the width of the screens.
Programming the Kinect into detecting more than one body at a time rather than solid surfaces
Assigning specific colors to each section and each pattern
I have decided to scrap my initial idea for a final project, and have instead decided to create a simple multistage game.
This game is intended to be an educational experience about the environment and human history. The game starts with a player in a forest, the style and POV of which is similar to an early Pokemon game, and the player is able to navigate the forest, which is also populated by animals. The player must walk about and interact with the trees, which will be “chopped” down to make a vehicle. The player can also interact with the animals, who will react positively.
Once the vehicle is completed, the player is taken to a world map and can go to three other stages, collecting resources for more complex and modern vehicles. However, as the player moves on to the other stages, interacts with more animals and constructs more vehicles, the environment reacts more and more negatively, with the animals becoming hostile and the landscape burning and becoming desolate. Eventually, the player is left alone on the planet, free to explore the desolate landscapes of the world alone.
I plan on creating a physical controller, similar to the nunchuck on the original Wii with a x-y joystick and one button. I also hope to create the controller using clear acrylic, with LEDs inside that change according to how much destruction the player has caused the environment, starting with a green controller, to a yellow one and finally to a red one.
The materials I need are:
Clear Acrylic
Several RGB LEDs
One X-Y Joystick
One Push Button
One Arduino
One Prototyping Board
Screen or TV to present game
I think that the most challenging parts of creating this project will be creating the game, because I am not so confident in coding the game mechanics and am sometimes not confident in my programming logic skills. I am also worried about the game design and the assets I use, especially the visuals and the music/audio. I want this game to be simple but effective in immersing the user into the meaning of this game. Lastly, I am in the process of creating the game and everything is going relatively smooth. However, I want the game to be coded efficiently so that I do not have hundreds or even thousands of lines of code. I want to be able to replicate stages and objects’ behavior properly so I do not have to copy code between different classes.
Concept of the Project:
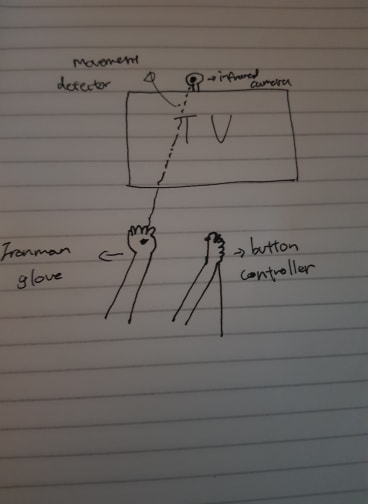
After the feedback received in class, the concept of the remains the same. We will make a 3D video game that simulates that the user is using the iron man glove to shoot at objects.
Materials Needed:
– Infrared WebCam
– Infrared Light
– IronMan Cable
– A bluetooth arduino that send instructions to the infrared light(if it exist)
– If the above material does not exist, then batteries and a small plastic box that allow us to put the arduino in the glove without causing any accident.
– T.V or projector to screen the video game
Building the project:
The building process will be divided in two main parts: Physical Computing and creating the video game environment. The physical computing consists of building a remodeling of an iron man sensor with an infrared light that allows an infrared webcam detect the location of the glove. The glove will need to be as similar as possible as the iron man glove to create a better experiences with the user. The user in the other hand will have a button that allows them to shoot wherever they are aiming with the glove.
Creating the video game environment consists of using processing to create video game interaction. Our Processing program will receive the location of the glove and will map it to an aiming box that will show up in the screen and will move according to the glove movement. The background will recreate an iconic landscape from one of the Iron Man or Avengers movies in order to immerse the user into the story. Iconic Iron Man enemies will show up for a few seconds and these will be the targets that the user must destroy to earn points. Also, to bring more activeness to the user in the video game, AC/DC and Iron Man music will be played while the user is playing the game.
Biggest Challenges:
– Many Marvel fans have always wanted to know how does it feel to be iron man, and we hope that the interactivity of this game would have enough quality to cause that sensation.
– One of the biggest challenges will be to build a glove that gives the sensation to the user that is an actual iron man glove. That would be a key to achieve the interactivity that we want
– Another challenge is to create a video game environment that causes the user to feel that he or she is part of the Iron Man Universe. We do not only want the user to feel that they are inside of the iron man suit but also that they traveled to the MCU universe
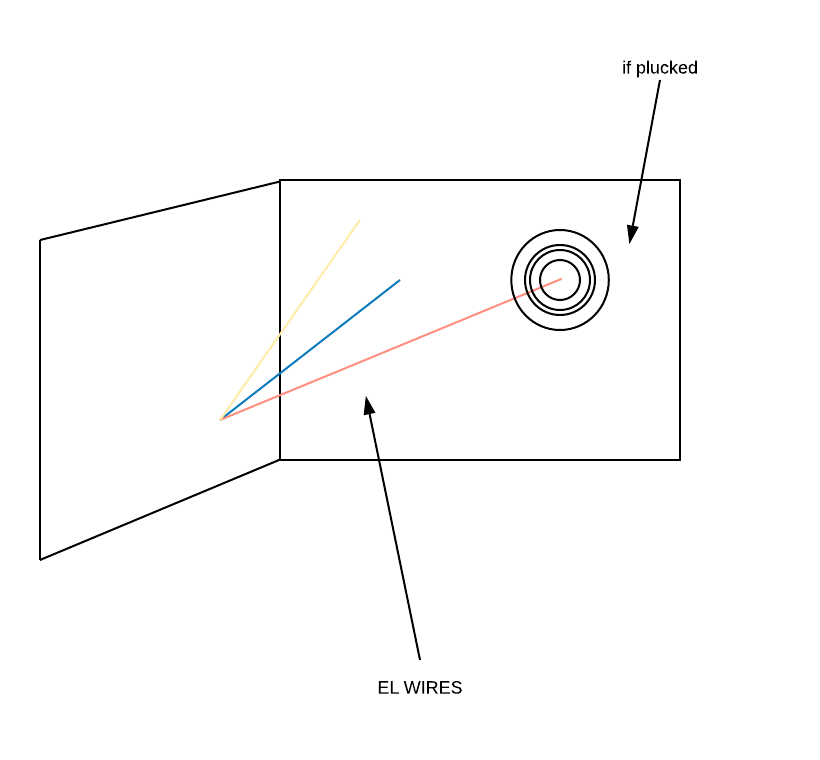
Since the last post, I’ve changed my idea from the Morse code game to an interactive installation where people can interact with the art displayed by plucking at the El wires. Each of the El wires are attached to different points on the wall and the other end of the wire will be tied down so there is enough slack. Once a wire is touched, it should vibrate and triggers the Arduino to connect with Processing so that it can display drawings on the wall. The El wires would also glow when this happens and when it’s idle, the wires won’t light up, so ideally, this project would be placed in a dark room.
What I Need:
El Wires (different colors if possible)
Hooks for walls to tie the wires onto
(Not-too-sensitive) vibration sensor — possibly analog vibration sensor?
Projector
Speaker (for music) — may or may not need it depending on whether I can find the right sound for the plucking of wires
Top 3 Difficult Problems I Might Run Into:
1. Connecting El Wires to Arduino
I have to solder the El wires to the Arduino and since the El wires come with an inverter, I’m worried about how that works too since I’ve never used one before. With that also comes with the trouble of programming these wires to do exactly what I want. I’m thinking the wires can come in at an angle so maybe I would need a corner of the room.
2. Projection mapping of effects onto specific locations of the wall
I think the way to make sure the wires hit the right spot on Processing art on the wall would be trial and error. Depending on where I put the projector, the size of the screen may change, so I’m worried about having to readjust the projector every time I’m testing. I also have to think about where I should put the projector so that the user isn’t blocking anything.
3. Making sure the Arduino doesn’t detect movement of El Wire when no one is touching it.
From previous experience, I have a feeling that the vibration sensor would let me down by detecting very small vibrations or by being very sensitive. I also have to find where the best place to attach the sensor is and how I should attach it so that it doesn’t end up falling after a while.
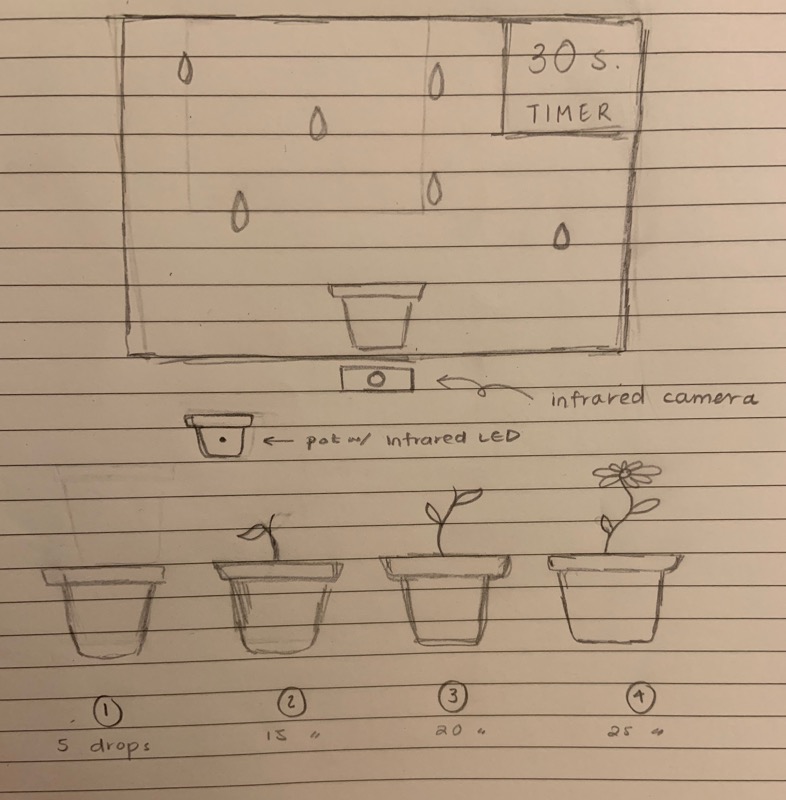
After more research into my project and from the feedback I got in class, I would like to create a game where through Processing, on the screen, there appears rain drops, an empty pot and a timer. Outside of the screen, the player will also be holding a similar looking pot that has an IR LED attached to it and below the screen will be an IR camera. I would like the IR to detect the persons movement on an x-axis/horizontal movement so that the pot on screen appears to move with the person. The goal of the game is to collect as many water droplets in a specified amount of time to grow your plant – this will happen in approximately 4 stages, e.g. 15 droplets will produce a sprout, 25 will produce a flower bud and so on.
Equipment and construction needs:
IR camera and LED
Screen
Plant pot with IR LED
Programming:
Program a timer that starts and stops
Raindrops that fall across the screen but stop once they ‘enter’ the pot
The pot itself that will move across the x-axis and also its changing states of growth
3 most difficult, complicated, frightening aspects:
Being a novice at coding, my first and biggest fear is the software coding aspect of the project (and that basically sounds like the whole thing but) I have not yet worked at all with IR sensors and processing so I know I will find this very difficult. I’m not sure how aligning the visuals with the IR will work yet.
Making the transitions between each phase of the plant growth seem natural.
Making the droplets fall into the ‘pot’ for a desired number and restarting the game once at full capacity etc.
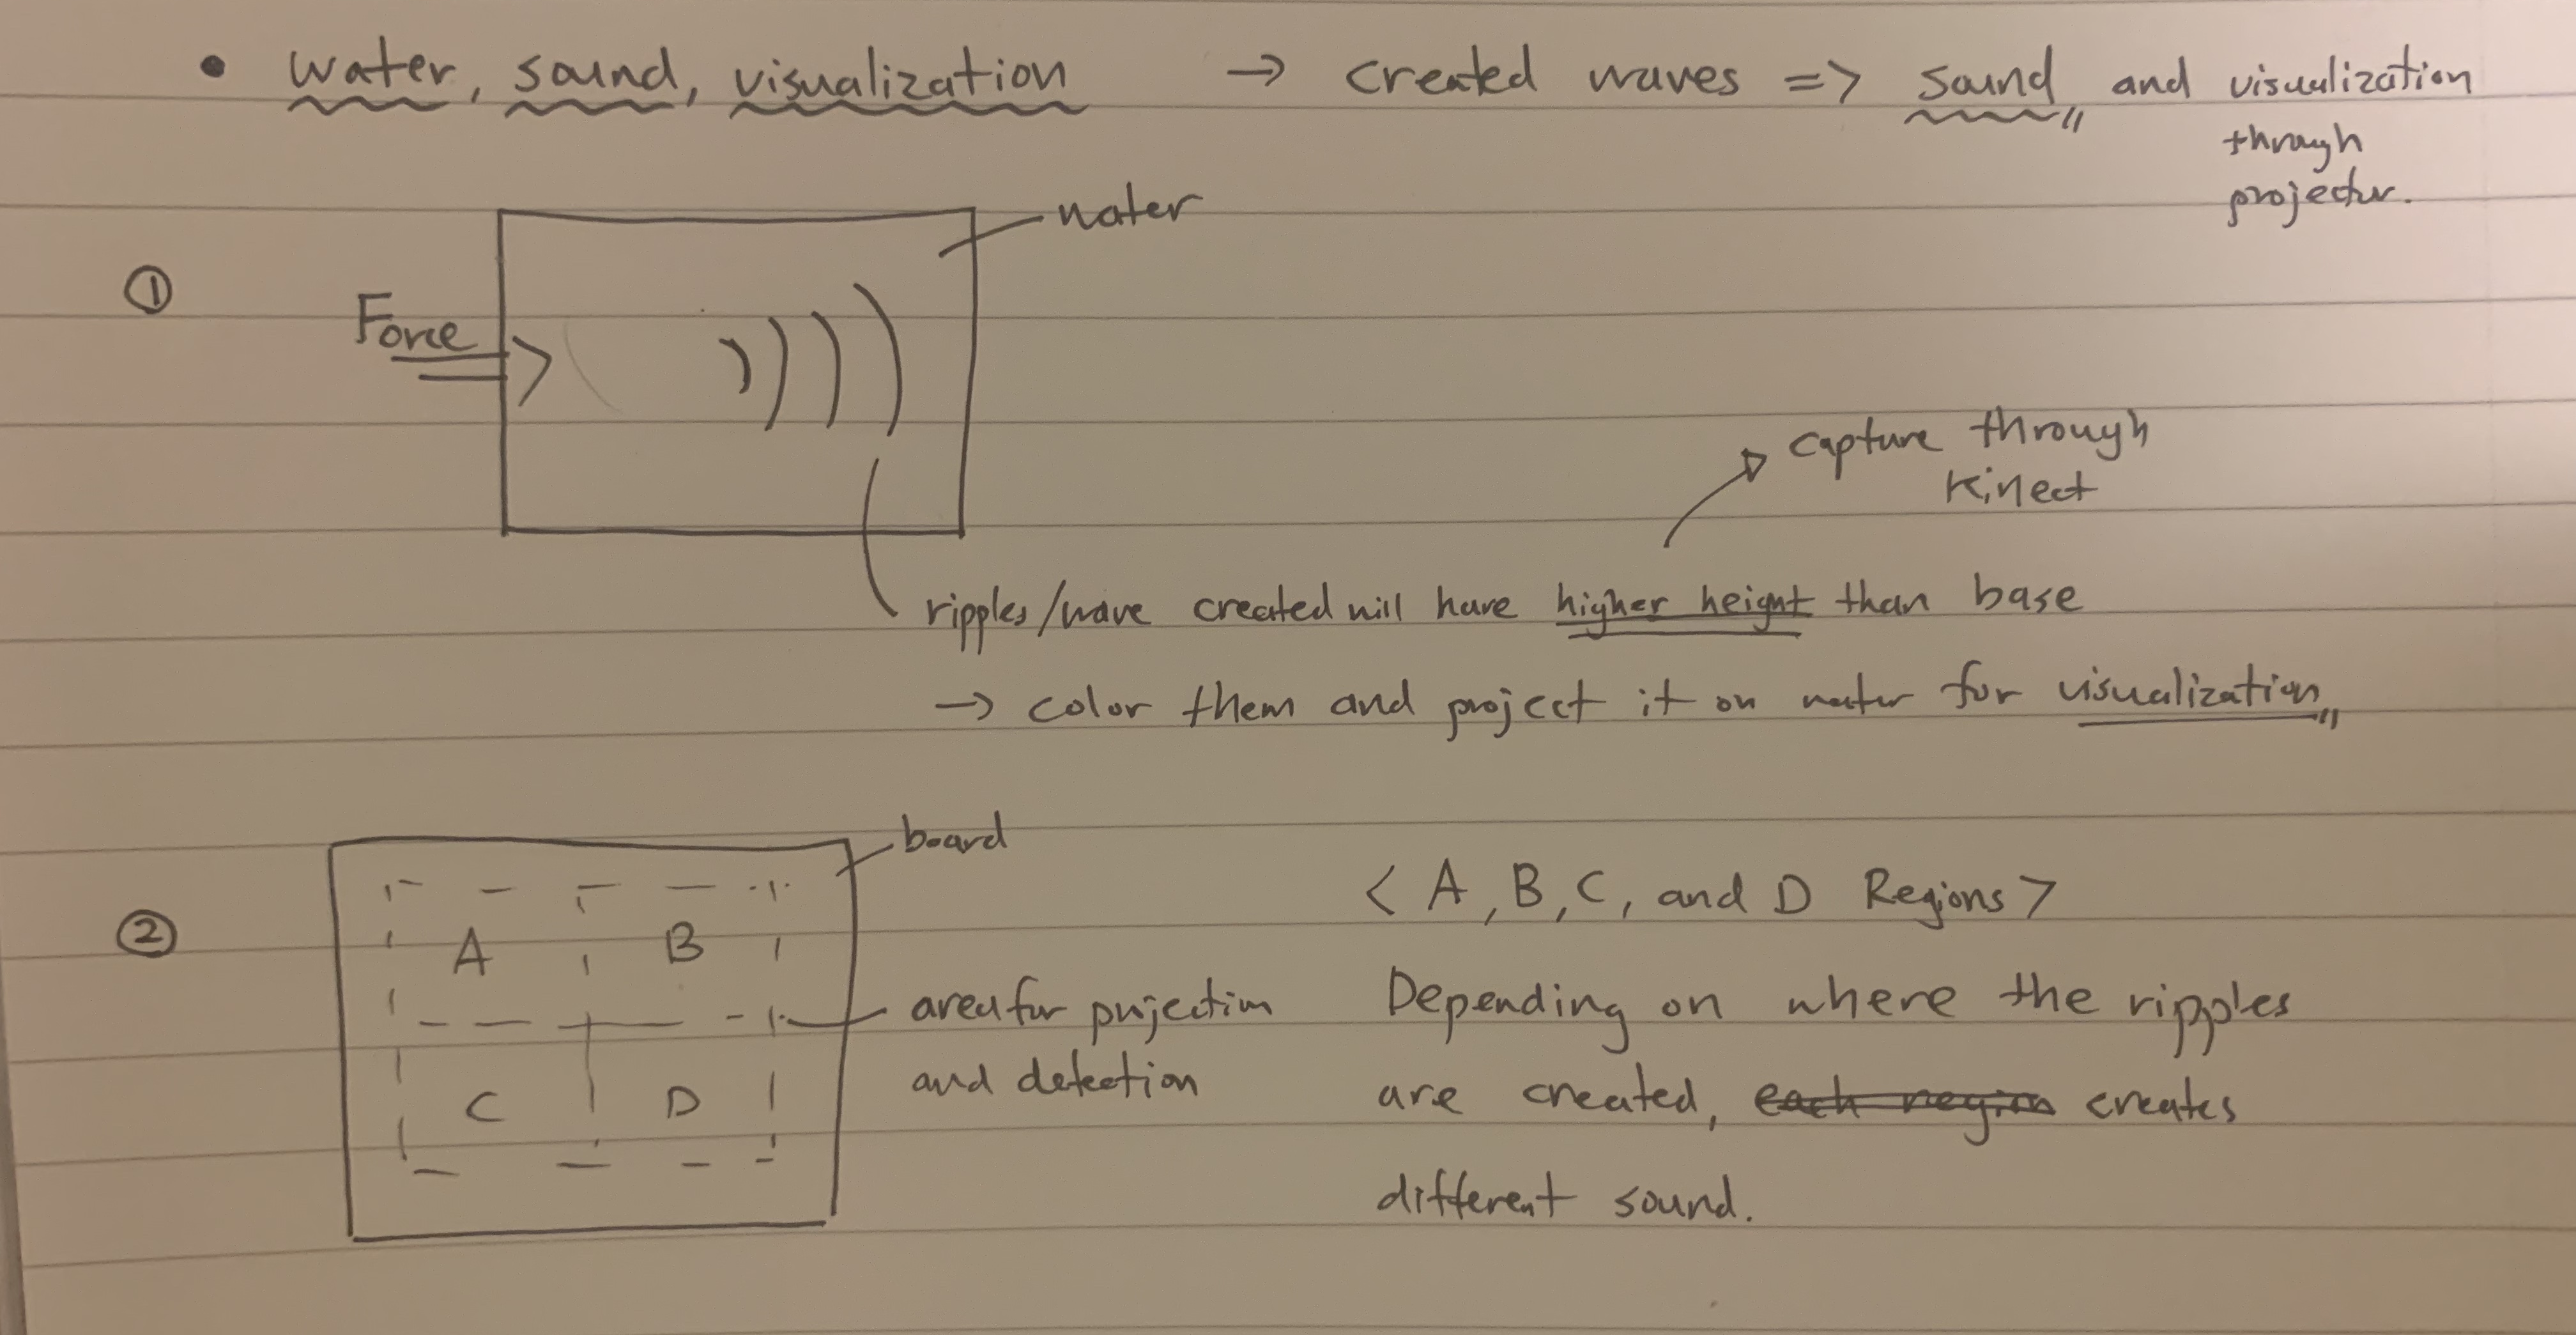
I have always been fascinated with using nature as a medium for interaction and a source for new creation, especially in the area of music. And, for the final project, I want to focus on using water as a medium to create music and visualize the flow and beauty created with manipulating the dynamic features of water. Ripples and waves are often easily created by an external force, but I wanted to insert something more into those movements that can be appealing both visually and audibly.
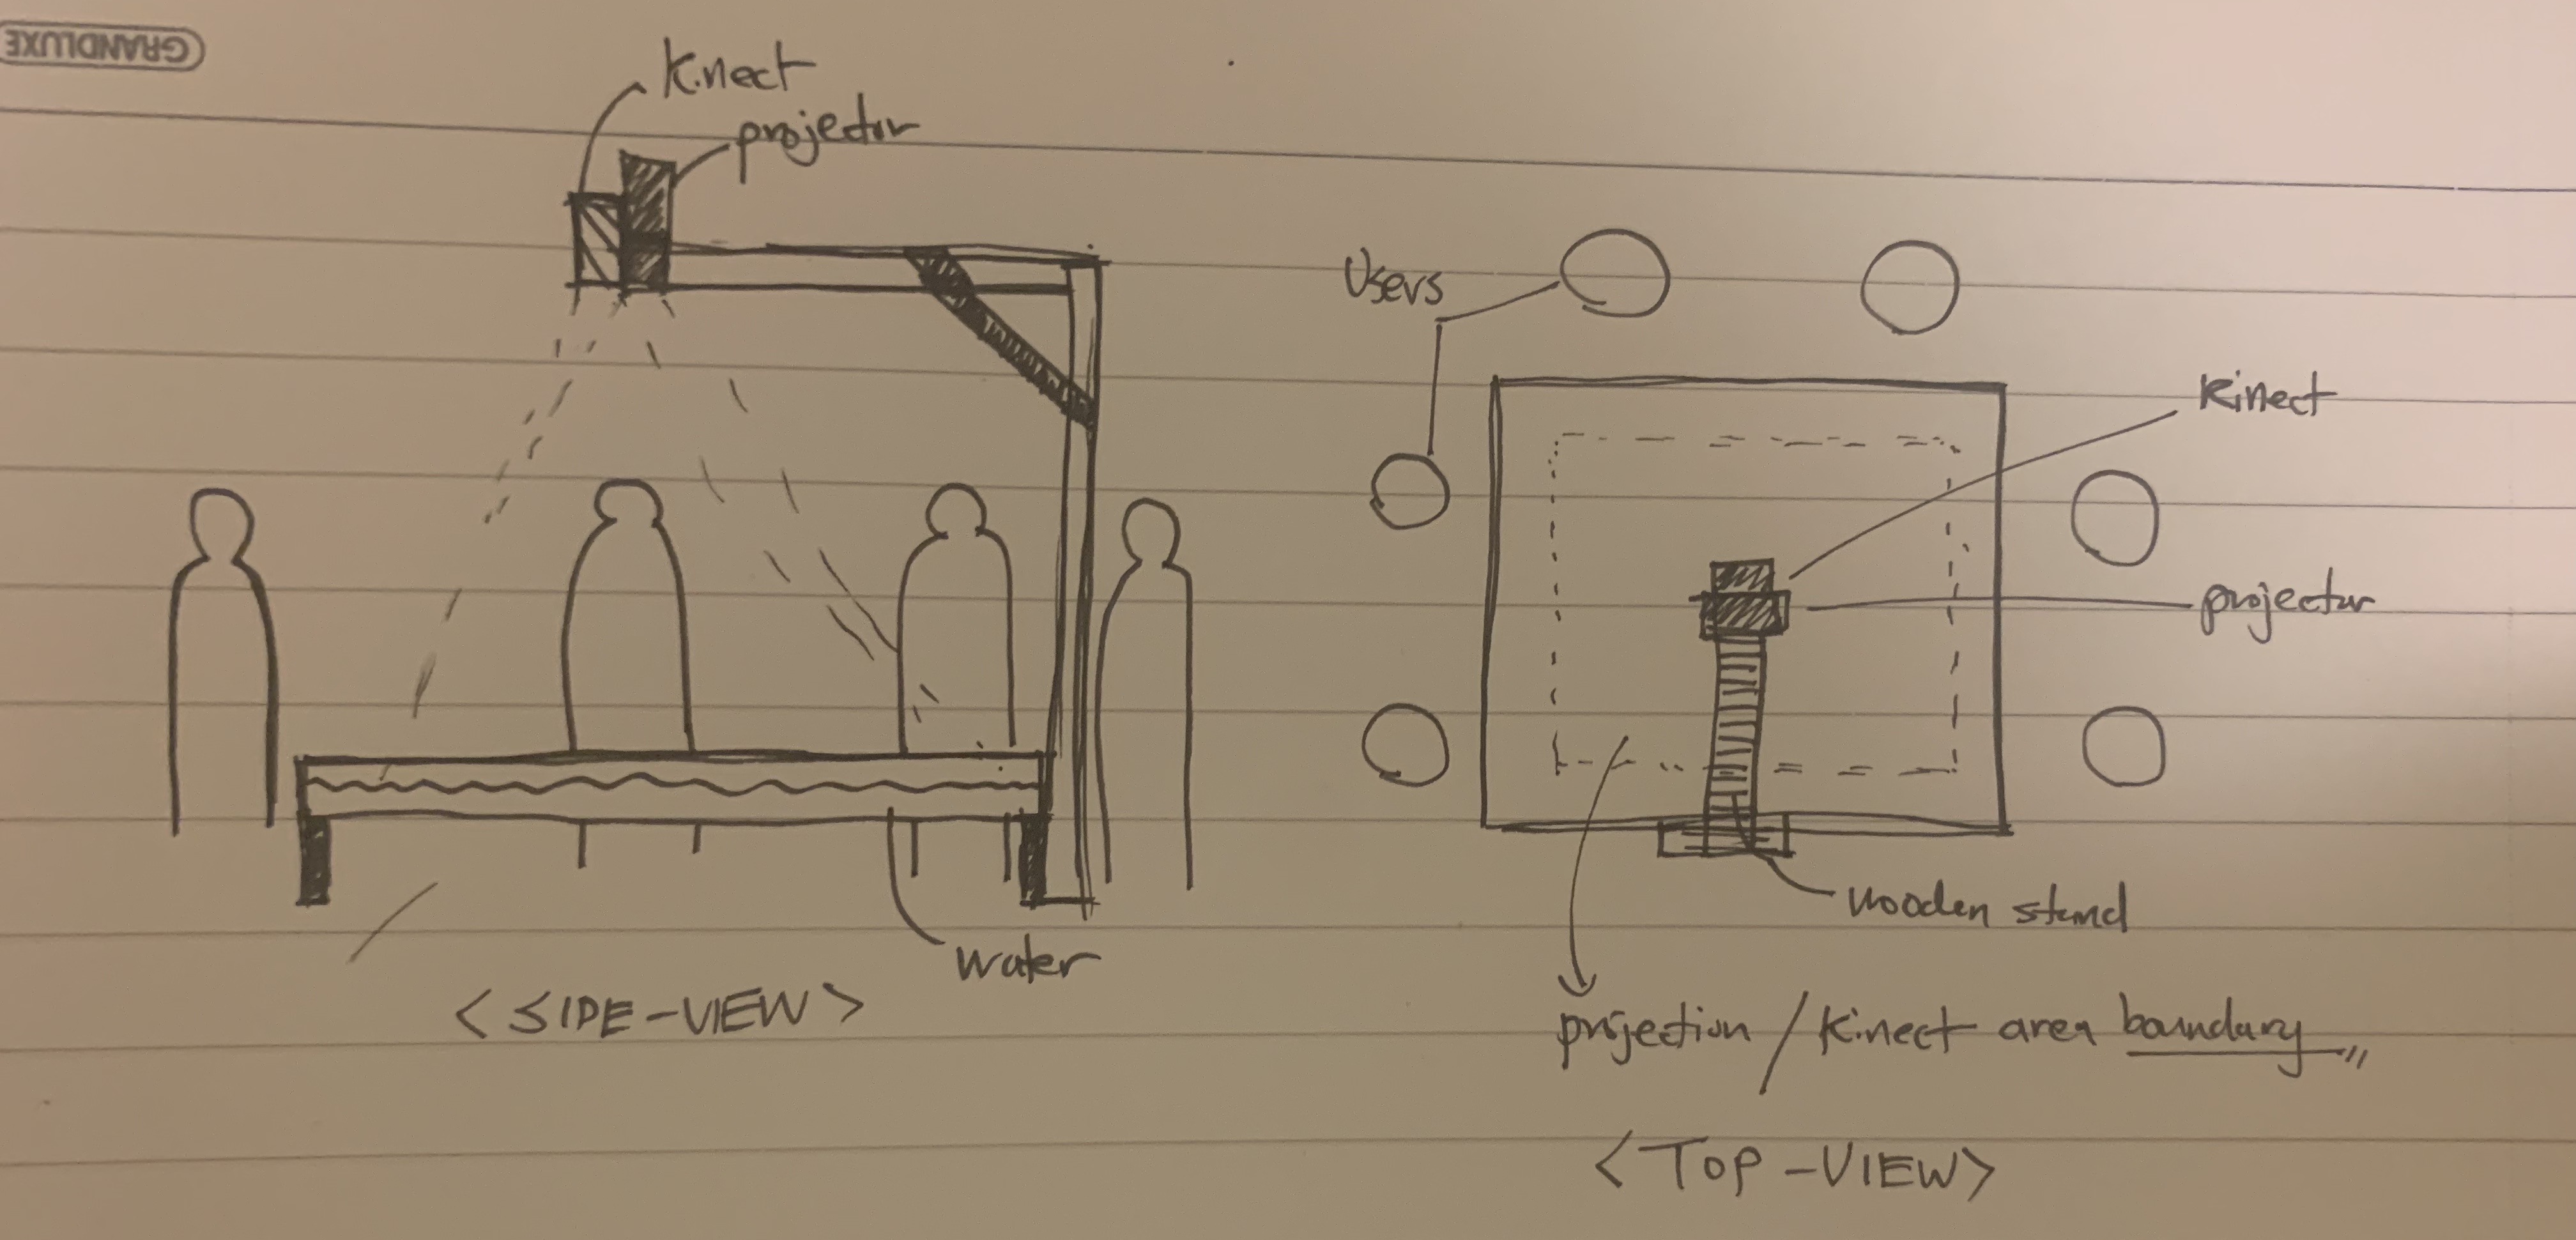
In terms of technical side, the project entails the use of a projector, a kinect, a container to contain shallow level of water, and a stand that will hold the project and kinect in place above the container.
The ideal instance of a user interaction would be where users would play around with the water on the sides of the container, creating different waves and ripples on the surface. The kinect will capture the depth of the water, and color the points that are at higher level than the base level of the surface, which will be projected on the water through the projector.
Meanwhile, depending on the location of the ripples/waves, either a recorded or a set of notes will be played in a loop. The more waves created will lead the music either playing faster or at a higher pitch.
The area of projection and detection for the projector and kinect will be smaller than the area of the container (as seen in the figure below) in order to reduce the instances of where hands are detected as waves or ripples.
The expected size of the board would be 120cm x 120cm x 20cm. I would still need to calculate and see the level of the support for the projector and the kinect, but the area that the kinect and the projector will cover the area for 100cm x 100cm. I will mainly be using Processing for the program, in attention to the sound library and the library for connecting kinect with processing.
Four most difficult, complicated or frightening aspects:
Detecting water waves/ripples using Kinect
Playing sound depending on the location of particles/points on a certain dimension
Changing the pitch of the sound depending on the number of points in a certain area
Aligning the Kinect with the projector in terms of visuals
As a conceptual focus for our Final Project, Jana and I are considering the complex social fabric of our university. Namely, the heavy focus on our perceptions of perfection and our ideas surrounding productivity. Vox Media created a video essay on the nature of our perceptions of productivity, describing how we often consider forms of self-care as precursors and necessary acts for the sake of our own professional, academic and all-around utilitarian productivity. This notion is frequently reproduced at NYUAD as we witness many slouched students scattered around our campus stressing about the next assignment due, or whether they have a worthwhile internship lined up for summer.
As a conceptual attendance sheet, our project would be placed one of the entrances to the exhibit, asking visitors to input data pertaining to their relationship to leisure, self-care, and perceptions and indicators of productivity.
As a way of measuring these relationships, we collect the following data from visitors: level of stress (pressure sensor), hours of sleep (typed input). We also want to understand the current state of mind an individual is experiencing upon entry to the show. To determine this, we will use Paul Ekman’s five foundational emotions (joy, sadness, disgust, fear, anger). Here we will use a keypad or coloured buttons.
Libraries; sound, minim.
This data, after testing, will be visualized into a live animation. The three biggest fears with anticipating are
1) coding simple data into a visually compelling form;
2) creating reliable and durable forms of input;
3) collecting cumulative data that relies on user involvement.
Classwork:
PImage source;
int increment=10;
float diam;
float z;
void setup() {
  size(512, 512, P3D);
  source = loadImage("baboon.png");
  noStroke();
}

void draw() {
  background(0);
  rotateY (0.5);
  source.loadPixels();
  for (int y=0; y<height; y+=increment) {
    for (int x=0; x<width; x+=increment) {
      int loc = x+(y*width);
      color pix=source.pixels[loc];
      diam = map(brightness(pix), 0, 255, 1, 5)*map(mouseX, 1, width, 10, 30);
      pushMatrix();
      translate (x, y, diam);
      fill(pix);
      box(diam/5);
      popMatrix();
    }
  }
  source.updatePixels();

}
Notes on Final Project:
A toggle button to see the path of movement of the objects in space, as opposed to the objects themselves. Also between showing a transparent fill, or just stroke.
With this weekly assignment, I attempt to create a Digital version of the analogue crossbow that I designed for my midterm, using the same 2 potentiometer, 1 button remote controller.
I spent quite a while fiddling with the code in the original handshake example, trying to get it to input data from multiple sensors connected to my Arduino. That being said, when I found the sketch that gave me the syntax to do it properly, I had most of the inputs properly formatted.
I ended up having to Add a third input to the code (for my button). Basically it would register pressed as a 1 and unpressed as a 0, then send it into the processing sketch, where I could make an if statement in order to draw a mark.
void setup() {
  Serial.begin(9600);
  Serial.println("0,0,0");
  pinMode(3, OUTPUT);
  pinMode(5, OUTPUT);
  pinMode(trigPin, INPUT);
}

void loop() {
  while (Serial.available()) {
    right = Serial.parseInt();
    left = Serial.parseInt();


  int trigRead = digitalRead(trigPin);
  if (trigRead == HIGH) {
    fire = 1;
  }
  else {
    fire = 0;
  }
//  Serial.print(trigRead);

  if (Serial.read() == '\n') {
    digitalWrite(3, right);
    digitalWrite(5, left);
    int sensor = analogRead(A0);
    delay(0);
    int sensor2 = analogRead(A1);
    delay(0);
    Serial.print(sensor);
    Serial.print(',');
    Serial.print(sensor2);
    Serial.print(',');
    Serial.println(fire);

  }
}

}
At the end, I attempted to make an array list in order to save points on the target that I had shot, but could not figure out how to make it work with my code.
As an initial idea for my final project, I wanted to create an interactive art installation that would act as a parallel universe to the audience’s body. Conceptually speaking, I am intrigued by the prospect of combining technology and computing with visual arts and performance. The project also acts as an exploration regarding certain dynamics – relationship between colors, space, and the audience to each other. This could also be done through a change in graphics and patterns when to people experience the installation together. The main dynamic of the project would be the camera detecting the movement of the user and then generating colorful geometric patterns to follow the movement of the body. Each section of the projection should display a different color if the user stands in front of that specific section.