Week 11 – Reading Reflection

This reading made me rethink how much design pretends to care about “everyone” while actually designing for some imaginary default person. The whole debate about hiding versus showing assistive devices hit me the most. The hearing aid example frustrated me. It reminded me of how often people, including me at times, feel pressured to tone themselves down just to blend in. Seeing designers hide assistive devices made that pressure feel even more obvious. If a device supports someone’s life, why shouldn’t it be allowed to exist proudly?

I liked how the reading returned to the idea that objects carry identity. Even in my IM projects, I can feel that tension between making something perfectly sleek or letting it look like something I actually touched. My work always ends up somewhere in the middle: functional, but still a little sentimental, a little messy, a little me.

The idea of bringing artists and fashion designers into accessibility design made complete sense. It made assistive tech feel less like “equipment” and more like something that can match someone’s personality. A prosthetic can be a tool, but it can also be a statement. A hearing aid can be medical, but it can also be stylish. That’s the kind of design I actually care about: things that work, but also let people feel like themselves.

Week 11 – 3 Exercises

The 3 tasks we worked on were practice on how to make both Arduino and P5j work together.

Group: Deema Al Zoubi and Rawan Al Ali 

Exercise 1 :

let connectButton;
let port;
let reader;
let sensorValue = 0;
let keepReading = false;

function setup() {
  createCanvas(600, 400);

  // Create a connect button 
  connectButton = createButton('Connect to Arduino');
  connectButton.position(10, 10);
  connectButton.mousePressed(connectSerial);

  textAlign(CENTER, CENTER);
  textSize(14);
}

async function connectSerial() {
  // If already connected, close first
  if (port && port.readable) {
    await closeSerial();
    connectButton.html('Connect to Arduino');
    return;
  }

  try {
  
    port = await navigator.serial.requestPort();
    await port.open({ baudRate: 9600 });

    console.log('Port opened', port);
    connectButton.html('Disconnect');

    const decoder = new TextDecoderStream();
    // Pipe the readable stream from the port to the decoder
    port.readable.pipeTo(decoder.writable);
    reader = decoder.readable.getReader();

    keepReading = true;
    readLoop(); // start read loop
  } catch (err) {
    console.error('Error opening serial port:', err);
    alert('Could not open serial port. Make sure your device is connected and try again.');
  }
}

async function closeSerial() {
  keepReading = false;
  try {
    if (reader) {
      await reader.cancel();
      reader.releaseLock();
      reader = null;
    }
    if (port && port.close) {
      await port.close();
      console.log('Port closed');
    }
    port = null;
  } catch (err) {
    console.warn('Error closing port:', err);
  }
}

async function readLoop() {
  let partial = '';
  try {
    while (keepReading && reader) {
      const { value, done } = await reader.read();
      if (done) {
        console.log('Reader closed');
        break;
      }
      if (!value) continue;

      // split by newline
      partial += value;
      let lines = partial.split(/\r?\n/);
      // Keep the last partial line in buffer
      partial = lines.pop();

      for (let line of lines) {
        line = line.trim();
        if (line === '') continue;        
        const num = parseInt(line, 10);
        if (!Number.isNaN(num)) {
          // clamp to expected range in case of weird data
          sensorValue = Math.max(0, Math.min(1023, num));
          console.log('sensorValue:', sensorValue);
        } else {
          console.log('non-numeric line ignored:', line);
        }
      }
    }
  } catch (err) {
    console.error('Read loop error:', err);
  }
}

function draw() {
  background(240);

  let x = map(sensorValue, 0, 1023, 25, width - 25);
  fill(100, 150, 240);
  ellipse(x, height / 2, 50, 50);
}
window.addEventListener('beforeunload', async (e) => {
  if (port && port.readable) {
    await closeSerial();
  }
});

We used one sensor (a potentiometer) on the Arduino to control the horizontal position of an ellipse in p5.js. The ellipse stayed in the middle of the screen vertically, and all movement was controlled by the Arduino sensor, p5 didn’t send any commands to Arduino.

Video 1: IMG_1012

Schematic 1:


Exercise 2:

let connectButton;
let port;
let writer;
let slider;

let targetBrightness = 0;
let currentBrightness = 0;

function setup() {
  createCanvas(400, 200);

  connectButton = createButton("Connect to Arduino");
  connectButton.position(10, 10);
  connectButton.mousePressed(connectSerial);

  slider = createSlider(0, 255, 0);
  slider.position(10, 60);
  slider.style('width', '300px');

  textSize(16);
}

async function connectSerial() {
  try {
    port = await navigator.serial.requestPort();
    await port.open({ baudRate: 9600 });
    writer = port.writable.getWriter();
    connectButton.html("Connected");
  } catch (err) {
    console.error("Connection error:", err);
  }
}

function draw() {
  background(230);

  // Slider sets the target brightness
  targetBrightness = slider.value();

  // Gradually move toward target (both up and down)
currentBrightness = lerp(currentBrightness, targetBrightness, 0.15);

  // Snap to 0/255 when very close so it truly turns off/on
  if (abs(currentBrightness - targetBrightness) < 1) {
    currentBrightness = targetBrightness;
  }

  fill(0);
  text("LED Brightness: " + int(currentBrightness), 10, 110);

  // Send brightness
  if (writer) {
    writer.write(new Uint8Array([int(currentBrightness)]));
  }
}

We created a slider in p5.js to control the brightness of an LED connected to the Arduino. Moving the slider to the right gradually increased the LED brightness, and moving it back to the left gradually turned it off.

Video 2: https://intro.nyuadim.com/wp-content/uploads/2025/11/IMG_1030.mov

Schematic 2:


Exercise 3:

let velocity;
let gravity;
let position;
let acceleration;
let drag = 0.99;
let mass = 50;

let brightnessValue = 512; // potentiometer value (0–1023)
let ballDropped = false;
let ledOn = false;

let port, writer, reader;
let serialActive = false;
let serialBuffer = '';

function setup() {
  createCanvas(640, 360);
  textSize(18);

  position = createVector(width / 2, 0);
  velocity = createVector(0, 0);
  acceleration = createVector(0, 0);
  gravity = createVector(0, 0.2 * mass);

  // Connect button
  let btn = createButton("Connect to Arduino");
  btn.position(10, 10);
  btn.mousePressed(connectAndStart);
}

function draw() {
  background(255);

  // Show instructions before dropping ball
  fill(0);
  if (!ballDropped) {
    text("Press B to drop the ball", 20, 30);
    return; // stop here until ball is dropped
  }

  // Show serial status
  if (serialActive) {
    text("Connected", 20, 30);
    text(`Potentiometer: ${brightnessValue}`, 20, 50);
  } else {
    text("Serial Port Not Connected", 20, 30);
  }

  // Apply gravity
  velocity.y += gravity;
  velocity.y *= drag;

  // Horizontal control from potentiometer
  let windX = map(brightnessValue, 0, 1023, -2, 2);
  velocity.x = windX;

  position.add(velocity);

  // Bounce on floor
  if (position.y >= height - mass / 2) {
    position.y = height - mass / 2;
    velocity.y *= -0.9;

    // Flash LED
    if (serialActive && !ledOn) {
      writeSerial("F");
      ledOn = true;
    }
  } else if (ledOn) {
    ledOn = false;
  }

  // Bounce on top
  if (position.y - mass / 2 < 0) {
    position.y = mass / 2;
    velocity.y *= -0.9;
  }

  // Keep ball inside canvas horizontally
  position.x = constrain(position.x, mass / 2, width - mass / 2);

  // Draw ball
  fill(100, 150, 240);
  ellipse(position.x, position.y, mass, mass);
}

function applyForce(force) {
  let f = p5.Vector.div(force, mass);
  acceleration.add(f);
}

function keyPressed() {
  if (key == "B" || key == "b") dropBall();
}

function dropBall() {
  position.set(width / 2, 0);
  velocity.set(0, 0);
  mass = 50;
  gravity = 0.05 * mass;
  ballDropped = true;
}

// Serial functions
async function connectAndStart() {
  try {
    port = await navigator.serial.requestPort();
    await port.open({ baudRate: 9600 });

    writer = port.writable.getWriter();

    const decoder = new TextDecoderStream();
    port.readable.pipeTo(decoder.writable);
    reader = decoder.readable.getReader();

    serialActive = true;

    // Start reading
    readLoop();
  } catch (err) {
    console.error("Serial error:", err);
  }
}

async function readLoop() {
  while (serialActive && reader) {
    const { value, done } = await reader.read();
    if (done) break;
    if (value) parseSerial(value);
  }
}

function writeSerial(msg) {
  if (writer) writer.write(new TextEncoder().encode(msg + "\n"));
}

function parseSerial(data) {
  serialBuffer += data;
  let lines = serialBuffer.split('\n');
  serialBuffer = lines.pop();

  for (let line of lines) {
    let val = parseInt(line.trim());
    if (!isNaN(val)) brightnessValue = val;
  }
}

We made the ball bounce continuously up and down in p5.js, and connected an LED on the Arduino that lights up briefly every time the ball hits the floor. A potentiometer on the Arduino was used to control the horizontal movement of the ball: turning the knob to higher values moves the ball to the right, and lower values move it to the left. The potentiometer’s outer pins were connected to 5V and GND, and the middle pin to A0. Using Web Serial, we read the potentiometer values in p5 and mapped them to the horizontal position of the ball while it keeps bouncing.

Video 3: IMG_1030

Schematic 3:

Reflection: 

These exercises helped us understand how p5.js and Arduino can work together. We saw that Arduino can send real-world sensor data, like potentiometer values, to p5 to control visuals or simulations, and that p5 can also send commands back to Arduino, like turning an LED on or off. This gave us a clear idea of how much influence p5 can have on Arduino outputs, and how Arduino inputs can drive digital interactions in p5. Practicing this will be really useful for our final project, as it shows how to combine physical sensors, real-time controls, and visual feedback in a simple interactive system.


3 exercises – Week 11

The 3 tasks we worked on were practice on how to make both Arduino and P5j work together.

Group: Deema Al Zoubi and Rawan Al Ali 

Exercise 1 :

let connectButton;
let port;
let reader;
let sensorValue = 0;
let keepReading = false;

function setup() {
  createCanvas(600, 400);

  // Create a connect button 
  connectButton = createButton('Connect to Arduino');
  connectButton.position(10, 10);
  connectButton.mousePressed(connectSerial);

  textAlign(CENTER, CENTER);
  textSize(14);
}

async function connectSerial() {
  // If already connected, close first
  if (port && port.readable) {
    await closeSerial();
    connectButton.html('Connect to Arduino');
    return;
  }

  try {
  
    port = await navigator.serial.requestPort();
    await port.open({ baudRate: 9600 });

    console.log('Port opened', port);
    connectButton.html('Disconnect');

    const decoder = new TextDecoderStream();
    // Pipe the readable stream from the port to the decoder
    port.readable.pipeTo(decoder.writable);
    reader = decoder.readable.getReader();

    keepReading = true;
    readLoop(); // start read loop
  } catch (err) {
    console.error('Error opening serial port:', err);
    alert('Could not open serial port. Make sure your device is connected and try again.');
  }
}

async function closeSerial() {
  keepReading = false;
  try {
    if (reader) {
      await reader.cancel();
      reader.releaseLock();
      reader = null;
    }
    if (port && port.close) {
      await port.close();
      console.log('Port closed');
    }
    port = null;
  } catch (err) {
    console.warn('Error closing port:', err);
  }
}

async function readLoop() {
  let partial = '';
  try {
    while (keepReading && reader) {
      const { value, done } = await reader.read();
      if (done) {
        console.log('Reader closed');
        break;
      }
      if (!value) continue;

      // split by newline
      partial += value;
      let lines = partial.split(/\r?\n/);
      // Keep the last partial line in buffer
      partial = lines.pop();

      for (let line of lines) {
        line = line.trim();
        if (line === '') continue;        
        const num = parseInt(line, 10);
        if (!Number.isNaN(num)) {
          // clamp to expected range in case of weird data
          sensorValue = Math.max(0, Math.min(1023, num));
          console.log('sensorValue:', sensorValue);
        } else {
          console.log('non-numeric line ignored:', line);
        }
      }
    }
  } catch (err) {
    console.error('Read loop error:', err);
  }
}

function draw() {
  background(240);

  let x = map(sensorValue, 0, 1023, 25, width - 25);
  fill(100, 150, 240);
  ellipse(x, height / 2, 50, 50);
}
window.addEventListener('beforeunload', async (e) => {
  if (port && port.readable) {
    await closeSerial();
  }
});
void setup() {
  Serial.begin(9600);
}

void loop() {
  int sensorValue = analogRead(A0);
  Serial.println(sensorValue);
  delay(50); // ~20Hz
}

We used one sensor (a potentiometer) on the Arduino to control the horizontal position of an ellipse in p5.js. The ellipse stayed in the middle of the screen vertically, and all movement was controlled by the Arduino sensor, p5 didn’t send any commands to Arduino.

Video 1: IMG_1012

Schematic 1:

Exercise 2:

let connectButton;
let port;
let writer;
let slider;

let targetBrightness = 0;
let currentBrightness = 0;

function setup() {
  createCanvas(400, 200);

  connectButton = createButton("Connect to Arduino");
  connectButton.position(10, 10);
  connectButton.mousePressed(connectSerial);

  slider = createSlider(0, 255, 0);
  slider.position(10, 60);
  slider.style('width', '300px');

  textSize(16);
}

async function connectSerial() {
  try {
    port = await navigator.serial.requestPort();
    await port.open({ baudRate: 9600 });
    writer = port.writable.getWriter();
    connectButton.html("Connected");
  } catch (err) {
    console.error("Connection error:", err);
  }
}

function draw() {
  background(230);

  // Slider sets the target brightness
  targetBrightness = slider.value();

  // Gradually move toward target (both up and down)
currentBrightness = lerp(currentBrightness, targetBrightness, 0.15);

  // Snap to 0/255 when very close so it truly turns off/on
  if (abs(currentBrightness - targetBrightness) < 1) {
    currentBrightness = targetBrightness;
  }

  fill(0);
  text("LED Brightness: " + int(currentBrightness), 10, 110);

  // Send brightness
  if (writer) {
    writer.write(new Uint8Array([int(currentBrightness)]));
  }
}
int ledPin = 9; // LED connected to PWM pin 9
int value = 0;  // variable to store incoming brightness

void setup() {
  pinMode(ledPin, OUTPUT);
  Serial.begin(9600); // match the baud rate in p5
}

void loop() {
  if (Serial.available() > 0) {
    // read incoming string until newline
    String data = Serial.readStringUntil('\n');
    data.trim(); // remove whitespace
    if (data.length() > 0) {
      value = data.toInt();          // convert to integer
      value = constrain(value, 0, 255); // keep within PWM range
      analogWrite(ledPin, value);   // set LED brightness
    }
  }
}

We created a slider in p5.js to control the brightness of an LED connected to the Arduino. Moving the slider to the right gradually increased the LED brightness, and moving it back to the left gradually turned it off.

Video 2: https://intro.nyuadim.com/wp-content/uploads/2025/11/IMG_1030.mov

Schematic 2:

Exercise 3:

let velocity;
let gravity;
let position;
let acceleration;
let drag = 0.99;
let mass = 50;

let brightnessValue = 512; // potentiometer value (0–1023)
let ballDropped = false;
let ledOn = false;

let port, writer, reader;
let serialActive = false;
let serialBuffer = '';

function setup() {
  createCanvas(640, 360);
  textSize(18);

  position = createVector(width / 2, 0);
  velocity = createVector(0, 0);
  acceleration = createVector(0, 0);
  gravity = createVector(0, 0.2 * mass);

  // Connect button
  let btn = createButton("Connect to Arduino");
  btn.position(10, 10);
  btn.mousePressed(connectAndStart);
}

function draw() {
  background(255);

  // Show instructions before dropping ball
  fill(0);
  if (!ballDropped) {
    text("Press B to drop the ball", 20, 30);
    return; // stop here until ball is dropped
  }

  // Show serial status
  if (serialActive) {
    text("Connected", 20, 30);
    text(`Potentiometer: ${brightnessValue}`, 20, 50);
  } else {
    text("Serial Port Not Connected", 20, 30);
  }

  // Apply gravity
  velocity.y += gravity;
  velocity.y *= drag;

  // Horizontal control from potentiometer
  let windX = map(brightnessValue, 0, 1023, -2, 2);
  velocity.x = windX;

  position.add(velocity);

  // Bounce on floor
  if (position.y >= height - mass / 2) {
    position.y = height - mass / 2;
    velocity.y *= -0.9;

    // Flash LED
    if (serialActive && !ledOn) {
      writeSerial("F");
      ledOn = true;
    }
  } else if (ledOn) {
    ledOn = false;
  }

  // Bounce on top
  if (position.y - mass / 2 < 0) {
    position.y = mass / 2;
    velocity.y *= -0.9;
  }

  // Keep ball inside canvas horizontally
  position.x = constrain(position.x, mass / 2, width - mass / 2);

  // Draw ball
  fill(100, 150, 240);
  ellipse(position.x, position.y, mass, mass);
}

function applyForce(force) {
  let f = p5.Vector.div(force, mass);
  acceleration.add(f);
}

function keyPressed() {
  if (key == "B" || key == "b") dropBall();
}

function dropBall() {
  position.set(width / 2, 0);
  velocity.set(0, 0);
  mass = 50;
  gravity = 0.05 * mass;
  ballDropped = true;
}

// Serial functions
async function connectAndStart() {
  try {
    port = await navigator.serial.requestPort();
    await port.open({ baudRate: 9600 });

    writer = port.writable.getWriter();

    const decoder = new TextDecoderStream();
    port.readable.pipeTo(decoder.writable);
    reader = decoder.readable.getReader();

    serialActive = true;

    // Start reading
    readLoop();
  } catch (err) {
    console.error("Serial error:", err);
  }
}

async function readLoop() {
  while (serialActive && reader) {
    const { value, done } = await reader.read();
    if (done) break;
    if (value) parseSerial(value);
  }
}

function writeSerial(msg) {
  if (writer) writer.write(new TextEncoder().encode(msg + "\n"));
}

function parseSerial(data) {
  serialBuffer += data;
  let lines = serialBuffer.split('\n');
  serialBuffer = lines.pop();

  for (let line of lines) {
    let val = parseInt(line.trim());
    if (!isNaN(val)) brightnessValue = val;
  }
}
int ledPin = 9; // LED connected to pin 9
int potPin = A0; // potentiometer connected to A0
int potValue = 0; 

void setup() {
  pinMode(ledPin, OUTPUT);
  Serial.begin(9600); // match baud rate with p5.js
}

void loop() {
  // Read potentiometer (optional if p5 reads directly)
  potValue = analogRead(potPin);
  Serial.println(potValue); // send to p5 for horizontal control

  // Check for serial input from p5
  if (Serial.available() > 0) {
    char command = Serial.read(); // read single character
    if (command == 'F') {        // 'F' = flash LED
      digitalWrite(ledPin, HIGH);
      delay(100);                // keep LED on briefly
      digitalWrite(ledPin, LOW);
    }
  }
  
  delay(10); // small delay for stability
}

We made the ball bounce continuously up and down in p5.js, and connected an LED on the Arduino that lights up briefly every time the ball hits the floor. A potentiometer on the Arduino was used to control the horizontal movement of the ball: turning the knob to higher values moves the ball to the right, and lower values move it to the left. The potentiometer’s outer pins were connected to 5V and GND, and the middle pin to A0. Using Web Serial, we read the potentiometer values in p5 and mapped them to the horizontal position of the ball while it keeps bouncing.

Video 3: IMG_1030

Schematic 3:

Reflection: 

These exercises helped us understand how p5.js and Arduino can work together. We saw that Arduino can send real-world sensor data, like potentiometer values, to p5 to control visuals or simulations, and that p5 can also send commands back to Arduino, like turning an LED on or off. This gave us a clear idea of how much influence p5 can have on Arduino outputs, and how Arduino inputs can drive digital interactions in p5. Practicing this will be really useful for our final project, as it shows how to combine physical sensors, real-time controls, and visual feedback in a simple interactive system.

Reading Reflection — Week 11

After reading Design Meets Disability, I noticed how it sheds light on an ongoing issue with how society views disabilities. The author explains how when design and disability meet, the outcome is always the most intricate and interesting. It’s an opportunity for designers to test out their skills in both creativity and functionality.

I loved the section where he criticizes designers for making many assistive technology (AT) devices, like hearing aids and prosthetics, hidden. I also believe that disabilities should not be shamed, but embraced. By prioritizing the concealment of these devices, we are discouraging disabled individuals rather than empowering them, making them feel like outsiders instead of supporting them. By making AT more visible and beautifully designed, I believe designers can help change how people perceive disabilities.

The idea to bring engineers and designers together (‘solving’ and ‘exploring’) to create AT devices is brilliant because the result will be assistive technologies that are both useful and inspiring. I also think designers will be very useful in coming up with a comfortable device for users, since they’ll be wearing or using them all day (sometimes all night).

I absolutely agree with the enforcement of universal design, meaning designing products that are usable by as many people as possible, which of course also includes people with disabilities. The author mentions that rather than making a device for a very specific disability only, we could make devices with designs that are simple enough to be broadly adapted but smart enough to serve people with different needs. Overall, I believe this approach to design makes devices more accessible and more human.

Week 11 Reading Response

Reading Design Meets Disability made me think about how deeply design shapes the way we see ability and difference. I liked how the book challenged the traditional idea that design for disability should be purely functional. When I saw examples like the stylish hearing aids or the eyeglasses that evolved from medical tools to fashion accessories, I realized how design doesn’t just solve problems—it tells stories about people and identity. I found myself really appreciating how the author described the tension between discretion and expression, especially in how disability devices can either hide or celebrate difference. It made me think about how design always carries a message, even when it pretends to be neutral.

What I liked most was the way the book connected design with emotion and culture. I loved seeing how something as simple as a prosthetic leg could become a work of art, or how Apple’s minimalist products fit into the same conversation about accessibility and beauty. The idea that “good design on any terms” can come from understanding human diversity really stayed with me. I felt inspired by the thought that inclusive design isn’t about charity but creativity—it’s about expanding what we consider beautiful and functional at the same time. This reading made me want to look more closely at everyday objects and think about the values they quietly express.

Week 11 – Preliminary for Final Project

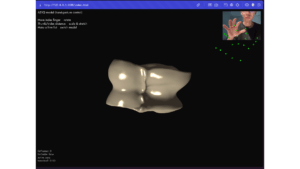
Muiz is an interactive 3D artwork where the user can manipulate Kazakh ornament shapes (such as mүйіз, қосмүйіз, and қыңырмүйіз) using a sensor glove and head movement.

The project uses:
1. Arduino + flex sensors on a glove to read finger bends and hand gestures
2. A webcam to track the user’s head movement
3. p5.js with WEBGL to display the ornaments on a 3D canvas
Basically, the user controls and deforms existing ornament patterns in real time, like sculpting them in the air.

How It Works
Glove with Flex Sensors (Arduino)
– Several flex sensors are placed on the glove fingers.
– When the user bends a finger, the sensor value changes.
– Arduino reads these values and sends them to the computer (to p5.js) via serial communication.

These finger bends and hand gestures are used to control the ornament:
– change size
– twist the shape
– bend or “curl” the pattern
– blend between different ornament types

Head Movement: Camera Tracking
A webcam is used to track the user’s head position and movement (some libraries shown in class will be used)

Head movement can control the view in 3D space:
– turn head left/right → rotate around the ornament
– move head up/down → change vertical angle (look from above or below)
– lean forward/back → zoom in and out
It feels like walking around a floating 3D sculpture.

Initial finger mapping:
1. Index finger bend → scale (make ornament bigger/smaller)
2. Middle finger bend → twist/rotate the pattern
3. Ring finger bend → bend the pattern, make it more “curvy”
4. Small finger bend → thickness of the lines or 3D extrusion
5. Thumb + index pinch → switch ornament type (mүйіз → қосмүйіз → қыңырмүйіз)
6. Fist → reset shape to original form
7. Open hand → start a smooth animation (ornament slowly breathing, pulsing)

Week 11: Final Project Idea

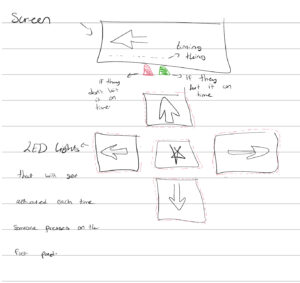
For my final project, I am designing a physically interactive dual-player dance survival game that integrates both Arduino and p5.js.

At the core of the interaction is a physical wheel connected to an Arduino. As the player rotates the wheel, the Arduino continuously reads the wheel’s angular direction using potentiometer (not sure). This sensing becomes the “listening” component of the system. The Arduino then sends this data to p5.js, where it controls the movement of a circle containing two characters.

In the p5 sketch, objects fall randomly from the top of the screen, and the player must rotate the wheel to shift the characters left or right, dodging the falling obstacles. The challenge increases because the wheel controls both characters simultaneously: if either one is hit, the game ends. This creates a dynamic where the player must keep track of two positions at once.

Furthermore, to communicate from p5 to Arduino I plan on lighting a green LED light everytime the player successfully dodges obstacle and red light for when game is over.

Week 11: Reading Reflection

Fashion versus discretion is a central theme in design for disability. Traditionally, assistive products like glasses or hearing aids were often designed to be discreet, hidden away to avoid stigma or social attention. But this reading and my own experience show that disability does not have to mean invisibility or shame.

Having worn glasses almost my entire life, I recall how they were initially seen through the lens of social stigma. Comments like “Oh, she has glasses” or the belief that no one looks beautiful wearing them were common. However, over time, societal attitudes changed, and glasses transformed from a clinical aid to a fashion statement. Through this reading, I realised that this shift is not just about evolving social perspectives but also about the revolutionary change in spectacle design. Modern glasses are so stylish, with diverse frames and colors, that even people without any vision impairment now wear them purely as fashion accessories. This evolution speaks volumes about how disability can be embraced rather than hidden. It exemplifies that disability does not need to equate to discretion, why should we be invisible in our differences?

Moreover, it’s encouraging to see how design progress extends beyond spectacles to products like wireless earphones that made even hearing aids look in style, transforming assistive technology into mainstream accessories.

More than simply designing for disability, companies like Apple have shown how to create products like ipod that work seamlessly for all users, disabled or not. This approach represents the peak of design philosophy; one that emphasises minimalism, accessibility, and universal appeal without differentiating users by ability.

What I deeply take away from this reading is how disability acts as a powerful force in pushing design boundaries. It challenges conventional ideas and fosters innovation, driving designers to think creatively and inclusively.

Final Project- Preliminary Concept Blogpost

Concept

One of my favorite shows of these two last years has been Arcane. The animation, the character designs, the music,  and the story are all beautiful elements combined into a masterpiece. For this reason, for my final project I want to create a reflection of my emotions towards these series.  My audience is intended for those who are fans of the series, but also those who have not watched it yet, and encourage them to do so. Moreover, I also intend to enhance a user experience in which the participant can absorb the parallel between music and visuals, demonstrating the power of these two elements when they are combined in an interactive medium.

“Stabilize the Wild Rune”

How does the project work 

My intentions are to make this project prioritize the experience of the concept while incorporating subtle interactive responses. On the first page, there will be a brief instruction of how the experience works. In simple terms, there will be an animated object floating in the screen once the user clicks one of the keys in the computer. This floating object, inspired by the “Wild Rune” introduced in Season 2 of Arcane, is a colorful sphere floating in a dark space. In the series, this is an unstable, magical object that is constantly distorting and causing chaos around it. For this reason, in my project, this sphere will be open to drastic changes: From changes in size (growing and shrinking).

From Arduino to P5

For the interaction,  I aim to make a series of buttons (three maximum), as part of the Arduino tactile “speaking”.

  • One of the buttons would be to play the music (if this doesn’t work, I would make it the start button instead)
  • To grow the sphere I would make a second button
  • To decrease size I would make a third button.

(Maybe Instead of buttons I could use a slider)

From P5 to Arduino

  • When the player grows the sphere past a certain point they lose and a RED LED light will turn on and turn off as they return to the home page.
  • When the player decreases the sphere past a certain point they lose and a RED LED light will turn on and turn off as they return to the home page.
  • When the player keeps the sphere at a certain size for a specific amount of time (for example 5 seconds), a GREEN LED light will turn on and turn off as they return to the home page.

sidetone: Maybe I give them candy if they win

If there is music, this one would play on its own and reset when it is done playing.

Background Song: (still in progress of decision)

  • To Ashes and Blood – Arcane, Woodkid

Questions to ask:

  • How can I make the buttons affect the size of the object?
  • Can I use the songs or not (because of copyright)
  • How can I start at a different size in the canvas
  • Will there be an end of game or not? If there is, how can I do it?
      • (For this scenario, I would probably follow the storyline where it is necessary to stabilize the wild rune, so if the user makes the sphere too big or too small it would be game over).

Fullscreen Mode Sketch 

Link to sketch: https://editor.p5js.org/imh9299/full/lv73qdahm

Main Inspiration: Arcane Season 2 Clip 

https://youtu.be/8PU2iKx0YtQ?si=qtSexmSyrLLJLWcc


Other student’s work inspiration:
https://intro.nyuadim.com/2025/05/08/week-14-final-project-2/ 


Week 11 – Serial Communication

Exercise 1: Make something that uses only one sensor on Arduino and makes the ellipse in p5 move on the horizontal axis, in the middle of the screen, and nothing on arduino is controlled by p5. 

Concept: When a person covers the light sensor, the reduced light makes the ball move horizontally in p5. The player controls the ball simply by changing how much light reaches the sensor.

P5 Code:

let address = 0;

function setup() {
  createCanvas(600, 600);
  noFill();
}

function draw() {
  background("purple");
  stroke("white");

  // Convert the incoming sensor reading (0–1023) into a horizontal screen position
  ellipse(map(address, 0, 1023, 0, width), height / 2, 100, 100);

  if (!serialActive) {
    // Show a connection screen while serial communication hasn’t started yet
    background("rgb(70,9,70)");
    stroke("white");
    textSize(50);
    text("Press Space Bar to select Serial Port", 20, 30, width - 30, 200);
  }
}

function keyPressed() {
  // When the space bar is pressed, begin the setup process for the serial port
  if (key == " ") setUpSerial();
}

function readSerial(data) {
  // If valid data arrives from the Arduino, save it for use in draw()
  if (data != null) {
    address = int(data);
  }
}

Arduino Code:

int LED = A0;

void setup() {
Serial.begin(9600);
pinMode(LED, INPUT);
}

void loop() {
int sensorValue = analogRead(A0);
Serial.println(sensorValue);
delay(5);
}

Github Link

Setup and Schematic:


Video Demonstration

Exercise 2: Make something that controls the LED brightness from p5

Concept: When the player touches the trackpad and increases the sketch’s color from black to white, the LED also gets brighter.

// Holds the brightness value we will send to the Arduino
let brightness = 0;

// Stores any data received back from Arduino (not used, but required)
let latestData = "";

function setup() {
  // Create the canvas where visual feedback will appear
  createCanvas(600, 400);
  noStroke();
}

function draw() {
  // Clear the screen each frame with a black background
  background(0);

  // Convert trackpad/mouse X position (0 → width) into brightness (0 → 255)
  brightness = int(map(mouseX, 0, width, 0, 255));

  // Draw a rectangle whose fill intensity matches the brightness value
  fill(brightness);
  rect(0, 0, width, height);

  // If a serial port is active, send the brightness value to the Arduino
  if (serialActive) {
    writeSerial(brightness + "\n"); // "\n" ensures Arduino reads full numbers
  }

  // If serial is NOT open, show instructions to the user
  if (!serialActive) {
    background("purple");
    fill("white");
    textSize(28);
    text("Press SPACE to choose Serial Port", 20, 40);
  }
}

function keyPressed() {
  // Press SPACE to open the Web Serial port selection dialog
  if (key === " ") {
    setUpSerial();
  }
}

// This function is REQUIRED by p5.webserial
// It receives data sent from Arduino (even if unused)
function readSerial(data) {
  if (data) latestData = data;
}

// Sends data to Arduino IF the writer is available
function writeSerial(value) {
  if (writer) {
    writer.write(value);
  }
}

Arduino:

int ledPin = 9;
int brightness = 0;

void setup() {
  Serial.begin(9600);
  pinMode(ledPin, OUTPUT);
}

void loop() {
  if (Serial.available() > 0) {
    brightness = Serial.parseInt();
    brightness = constrain(brightness, 0, 255);
  }

  analogWrite(ledPin, brightness);
}

Github link

Setup and Schematic:


Video Demonstration

Exercise 3:  Take the gravity wind example and make it so every time the ball bounces one led lights up and then turns off, and you can control the wind from one analog sensor

Concept: As our ball bounced, and the red LED lit up. Using the potentiometer, the player controlled the wind, making the ball move from one side to the other.

P5 Code:

let velocity;
let gravity;
let position;
let acceleration;
let wind;
let drag = 0.99;
let mass = 50;
let on = 0;

function setup() {
  createCanvas(640, 360);
  //noFill();
  position = createVector(width/2, 0);
  velocity = createVector(0,0);
  acceleration = createVector(0,0);
  gravity = createVector(0, 0.5*mass);
  wind = createVector(0,0);
}

function draw() {
  background(255);
  
  if (!serialActive) {
    text("Click on the Screen to select Serial Port", 20, 30);
  } else {
    text("Connected", 20, 30);
  }
  
  applyForce(wind);
  applyForce(gravity);
  velocity.add(acceleration);
  velocity.mult(drag);
  position.add(velocity);
  acceleration.mult(0);
  ellipse(position.x,position.y,mass,mass);
  if (position.y > height-mass/2) {
      velocity.y *= -0.9;  // A little dampening when hitting the bottom
      position.y = height-mass/2;
  }
  // turn on the LED only when it's on the ground or hits the ground
  if(position.y == height-mass/2){ 
    on = 0;
  }else{
    on = 1;
  }
}
function applyForce(force){
  // Newton's 2nd law: F = M * A
  // or A = F / M
  let f = p5.Vector.div(force, mass);
  acceleration.add(f);
}
function keyPressed(){
  if (key==' '){
    mass=random(15, 80);
    position.y=-mass;
    velocity.mult(0);
  }
}
function mousePressed() {
    setUpSerial();
}
function readSerial(data) {
  if (data != null) {
    // make sure there is actually a message
    // split the message
    wind.x = data;
    //////////////////////////////////
    //SEND TO ARDUINO HERE (handshake)
    //////////////////////////////////
    let sendToArduino = on + "\n";
    writeSerial(sendToArduino);
  }
}

Arduino Code:

const int LED = 9;
const int POT = A0;


void setup() {
Serial.begin(9600);
pinMode(LED, OUTPUT);


// Test the LED
digitalWrite(LED, HIGH);
delay(500);
digitalWrite(LED, LOW);
}


void loop() {
int p_value = analogRead(POT); // read from the potentiometer
int move = map(p_value, 0, 1023, -1, 2); // map the value to -1, 0, and 1
Serial.println(move);


if (Serial.available() > 0) {
// read from p5.js
int touch = Serial.parseInt();
// set the LED command
if (touch == 1) {
digitalWrite(LED, HIGH);
} else {
digitalWrite(LED, LOW);
}
}
}

Github file

Setup and Schematic:


Video Demonstration

Reflection: Across all three projects, I learned how different sensors can shape the experience through serial communication and p5. Working with light, the trackpad, and the potentiometer showed me how physical input can smoothly translate into visual changes on the screen. In the future, I would improve the responsiveness and make the serial connection more stable so the interactions feel smoother and more reliable.