Final Project – Submission Post

Group: Vladimir, Dariga

Concept

We initially proposed a Box Musician Game that was intended to be a rhythm game with a physical controller and notes to play. Though, during the implementation process we have decided to move away from the idea of making a project all about the music and use the physical controller for the Chill Adventure game to move across different game levels instead. The concept of moving across different levels while avoiding threats was also inspired by Vladimir’s midterm project.

Interaction design:

The main components behind interaction with the player are the physical board and the physical controller both made of wood. The controller is moved across the board and this movement is then reflected on the game screen. Player needs to use their hand to navigate through their game experience.

The concept behind using Arduino:

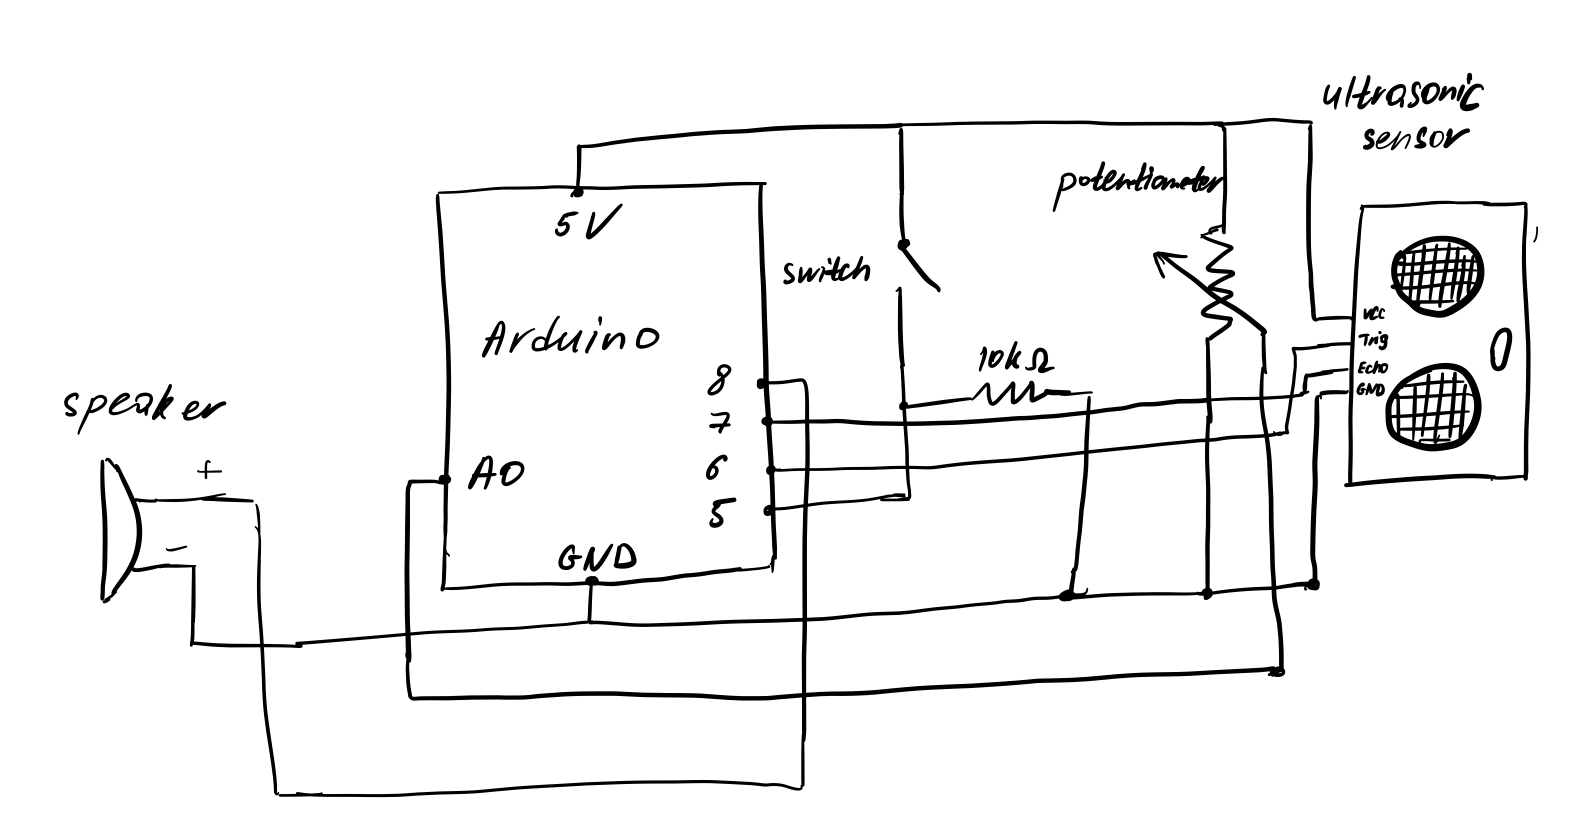
As proposed, we are using 2 ultrasonic sensors to detect the change in the position of the physical wooden controller and make the movement reflected in the p5js game screen. We use the speaker to play tones of different frequencies upon the collection of coins and we use a servo motor to rotate frequently to signal the unfortunate event of the player’s death.

Arduino Code

The concept behind p5.js:

p5.js code implementation handles most of the game design and implementation. Code implementation includes movement across the screen, collision detection, and change of screens when the player has completed a certain level to move to the next one/finish the game, with the possibility to restart the experience. p5.js handles graphics of the game, shapes, text displays, etc. p5.js overall uses the Entity-component system design pattern, which you can read more about in Vladimir’s Midterm Blog Post

The game has several “Scenes”: The Menu scene, the Play scene (the levels), and the End scene. Each scene is completely separate from the others and contains its own logic. The Play scene receives a level (a list of strings) as its parameter and loads every part of the level. This includes walls, tiles, the player, and NPCs. You can see the levels in the folder ‘levels’: ‘level1.txt’, ‘level2.txt’, and so on. These were generated using a Helper Level Generator Script (.py).

For the entities in the levels, we use sprite sheets and even animate some of them (e.g. coins). Also, we implemented an NPC AI that follows the player, as well as a random movement AI that uses Perlin noise to decide the velocity at each moment.

We paid special attention to designing the levels so that they are not too frustrating to complete, considering our unconventional play method. Doubly so after the user testing.

p5.js Full Code

The communication between Arduino and p5.js:

Arduino and p5.js communicate in several ways:

  1. Arduino sends X and Y coordinates mapped from the readings of ultrasonic sensors to p5.js so that position of the player is accurately reflected on the game screen
  2. p5.js send to Arduino info that the player has virtually died and this would trigger the action of rotating servo motor – with the goal of making sound.
  3. p5.js send to Arduino info about the tone and frequency to play from speaker whenever a coin is collected, or similar.

Some of the initial challenges we faced involved tracking the position of the controller. We first thought about placing two sensors in parallel and using the space between their waves to create a coordinate plane, like they do here: 2D tracking using Math. However, after trying this out, we found that we would need a very big area (more than 2 meters squared) and it was still very imprecise and buggy. Therefore we changed our approach to use two sensors which are perpendicular to each other, one tracking X and one tracking Y position.

The final Arduino implementation of how tracking position works in the project is presented below. X and Y from trackPosition () would be sent to p5.js for further processing.

void trackPosition() {
  float d1, d2;

  d1 = getSensorResult(trig1Pin, echo1Pin);
  delay(10);
  d2 = getSensorResult(trig2Pin, echo2Pin);
  
  d1 = constrain(d1, 10, 150);
  d2 = constrain(d2, 10, 150);

  X = mapFloat01((float)d1, 10.0f, 150.0f);
  Y = mapFloat01((float)d2, 10.0f, 150.0f);
}

float getSensorResult(int trigPin, int echoPin) {
  // Send pulse.
  digitalWrite(trigPin, LOW);
  delayMicroseconds(2);
  digitalWrite(trigPin, HIGH);
  delayMicroseconds(10);
  digitalWrite(trigPin, LOW);
  
  // Read pulse duration.
  long duration = pulseIn(echoPin, HIGH);
  
  // Calculate distance from duration.
  float distance = (float)duration * 343.0f / 2000.0f;

  return distance;
}

float mapFloat01(float x, float minX, float maxX) {
  return (x - minX) / (maxX - minX);
}

Code snippet from the communication of p5.js with Arduino from the p5 side:

// Send answer to Arduino.
const isPlayerAlive = this.entityManager.get("player").length > 0;
const collectionDelay = 0.3 * FRAME_RATE;

if (this.shouldSendPlayerDiedSignal) {
  // Send death signal.
  this.shouldSendPlayerDiedSignal = false;
  this.game.sendArduino("2\n");
} else if (
  this.lastNpcCollectionFrame + collectionDelay >
  this.currentFrame
) {
  // Send tone.
  const t = this.currentFrame - this.lastNpcCollectionFrame;
  const f = floor(map(t, 0, collectionDelay, 200, 1500));
  this.game.sendArduino(`3,${f}\n`);
} else {
  // Send OK signal.
  this.game.sendArduino("1\n");
}

The last challenge was to make sure that activation of the rotating servo motor, playing tones from the speaker, and tracking position worked well together. The adjustments were made for use of delay() to not make one operation prevent other ones from working properly for the purposes of the project. To check the final implementation in Arduino, you can refer to the Arduino Code

Embed sketch:


What are some aspects of the project that you’re particularly proud of?

We’re proud of how we made our unconventional controller. Our controller may initially be frustrating to play with, but there is a learning curve, and smooth precise movements are possible with enough practice. We’re also happy that we created an interesting enough, although possibly frustrating, game to play and keep the user’s attention.

Though, we should admit we found the experience of making the game slightly weird, unconventional and to some extent frustrating rewarding and creative in a sense. There are a lot of other games which are easy and relaxing, but for this project, we felt we would want our players to get challenged and driven to succeed through all the tough walls, confusing moves, and undefined threats they face in the game.

What are some areas for future improvement?

A bigger model can be made with better ultrasonic sensors and a larger area. This would enable easier and smoother control. Also, the possibilities in p5 are endless. We can expand our game with new levels, create a completely different type of game, or even create something that’s not a game.

We can also work on making the design of both p5.js start screens and physical components fancier and more appealing, though that was not the goal in our project experiences.

Final Project – User Testing

Group: Vladimir, Dariga

For user testing, we asked Aaron to test our game without giving him any prompts/instructions (thank you, Aaron!). User testing was important to highlight 2 major issues with the project at the moment:

  1. We did not make instructions super clear and eye-catching. Aaron skipped through reading them.
  2. The complexity of the game levels was a bit too much. It was challenging to complete some of them and car movements made it sometimes impossible.

The interesting part of our project involves not so standard way of controlling the movement across screens in p5js. We use a physical wooden piece – controller labelled C. User testing showed that players can get confused and use arrows instead and then use hands, instead of the controller, to move.

After some explanation on the controller part, the experiences with navigating through levels were working well. Some areas of improvement included reducing the complexity. At some levels, the door was not wide enough to be easily passed, or cars made the player die too often and it got annoying quickly.

Post-user testing edits on the project included:

  1. We added more instructions. We have even changed the text colour to include some contrast. The image of the physical component – the board and controller – was included in the p5js entry screen as well.
  2. The complexity of game levels was reduced to make the game experience more enjoyable while intentionally leaving this feeling of being a bit frustrated.

Some demo videos are included below.

Demo video 1:


Demo video 2:

Box Ball Musician – Final Group Proposal

Group: Vladimir, Dariga

Project Idea

A rhythm game where you are given instructions on which notes to play from a song. You must use our physical controller to play these sounds. You must keep up the tempo and always play the correct notes. We plan to prepare one to three songs for the player, which they will be able to select. Also, we can add a ‘freestyle’ mode where the song is generated at every moment.

Arduino: We have a cardboard box with the top open. We also have a ball or other smooth object which we place inside the box. We intend to use 2 ultrasonic sensors to track the ball’s position inside the box. So, for this project, one ultrasonic sensor should track the X position and the other should track the Y position. We have tested the use of two ultrasonic sensors to get (X, Y) coordinates for future use and this works for our project purposes. The distances to the ball from 2 ultrasonic sensors will be sent to p5js which will use these distances to map to (X, Y) coordinates and then associate with the screen regions for the game.

This functionality of Arduino & p5js to map the coordinates has been already implemented and tested:

Arduino code

p5js sketch

p5js: The canvas is divided to include multiple coloured regions that will correspond to a particular sound. Placement of the physical ball within the particular region will trigger a sound to play. One way to define the regions is by a 3×3 grid:

1 2 3
4 5 6
7 8 9


Here, cell 5 could not play a sound, but the others would.

We haven’t decided yet on the particular sounds to play, with the preliminary idea for sounds to represent pre-defined notes.

On the screen, we also show the instructions (sequence of notes) the player has to play. We can also colour-code the notes to make them easier to remember. When the player misses enough notes they lose. Without missed notes, the player completes their music experience and may restart the game. We intend to use a physical speaker to play sounds, though we are open to using p5js as well.

We will work further on the music part of the game as we progress with the final project.

Final Project Idea Proposal

Group: Vladimir, Dariga

Idea

A rhythm game where you are given instructions on which notes to play from a song. You must use our physical controller to play these sounds. You must keep up the tempo and always play the correct notes. We plan to prepare one to three songs for the player, which they will be able to select. Also, we can add a ‘freestyle’ mode where the song is generated at every moment.

Arduino: We have a square wooden box with the top open. We also have a ball or other smooth object which we place inside the box. We intend to use 2-4 ultrasonic sensors to track the position of the ball inside the box. For example in case of 2 sensors, one should track X position and the other should track Y position.

p5js: The canvas will be divided to include multiple colored regions that will correspond to a particular sound. Placement of the physical ball within the particular region will trigger a sound to play. One way to define the regions is by a 3×3 grid:

1 2 3
4 5 6
7 8 9

Here the cell 5 could not play a sound but the other ones would.

We haven’t decided yet on the particular sounds to play, with the preliminary idea for sounds to represent pre-defined notes.

On the screen, we also show the instructions (sequence of notes) that the player has to play. We can also color code the notes to make it easier to remember.

When the player misses enough notes they lose. Without missed notes, the player completes their music experience and may restart the game.


HW | Musical Instrument

Group: Dariga Shokayeva, Vladimir Sharkovski

Concept

We created a musical instrument which plays beats. Our instrument is very versatile:

  • The distance sensor allows you to easily control the frequency of the tone, without having to touch anything. Therefore you can play both very low tones and very high ones.
  • The potentiometer allows you control the duration of the beats, from 20 milliseconds to half a second. Therefore you can play both a rapidfire almost continual beat, or a slow jazzy beat.
  • The button allows you to shift the frequency of the tone to a higher range while the button is pressed. Therefore you can quickly surprise the listener with your melodies.
Circuit Diagram


Video demo
Code
// Pin positions.
const int potPin = A0;
const int buttonPin = 5;
const int trigPin = 6;
const int echoPin = 7;
const int speakerPin = 8;

// Other constants.
const int minDistance = 0;
const int maxDistance = 20;

const int toneDurationMin = 30;
const int toneDurationMax = 500;

const float toneDelayFactor = 1.3f;

void setup() {
  pinMode(potPin, INPUT);
  pinMode(buttonPin, INPUT);
  pinMode(trigPin, OUTPUT);
  pinMode(echoPin, INPUT);
  pinMode(speakerPin, OUTPUT);
}

long getSensorDistance() {
  // Send pulse.
  digitalWrite(trigPin, LOW);
  delayMicroseconds(2);
  digitalWrite(trigPin, HIGH);
  delayMicroseconds(10);
  digitalWrite(trigPin, LOW);
  // Read pulse duration.
  long duration = pulseIn(echoPin, HIGH);
  // Calculate distance from duration.
  long distance = (double)duration * 0.034 / 2.0;

  return distance;
}

void loop() {
  // Get distance and constrain it.
  long distance = getSensorDistance();
  distance = constrain(distance, minDistance, maxDistance);
  
  // Map distance to tone frequency.
  int toneFreqMin, toneFreqMax;
  int buttonState = digitalRead(buttonPin);

  if (buttonState == LOW) {
    toneFreqMin = 20;
    toneFreqMax = 400;
  } else {
    toneFreqMin = 300;
    toneFreqMax = 1500;
  }

  int toneFrequency = map(distance, minDistance, maxDistance, toneFreqMin, toneFreqMax);

  // Calculate time to play the tone based on the potentiometer position.
  int potPosition = analogRead(potPin);
  int toneDuration = map(potPosition, 0, 1023, toneDurationMin, toneDurationMax);

  // Play the tone, then wait some time.
  int waitTime = toneDuration * toneDelayFactor;
  tone(speakerPin, toneFrequency, toneDuration);
  delay(waitTime);
}
Reflection

It was challenging to figure out how the ultrasonic distance sensor worked, because it has 4 pins to set up. We also had to do some math, using the speed of sound, to convert the duration produced by the sensor into a proper distance.

Also, it took a lot of work to figure out the proper ranges for the minimum and maximum frequency for the instrument to play. Too high frequencies were irritating.

One way to improve the instrument is to think about ways to make it easier to use (more accessible). Right now it is a bit awkward to control the potentiometer and button with one hand, while using the other hand with the sensor. Also, it would be convenient to have a way to mute the speaker, or even control its volume.

Sensors | Car Headlights

Concept

In this assignment, I implemented a circuit with an LDR sensor and a switch that were both used to replicate some basic functionality of car headlights.

I built an Arduino circuit that used an analog sensor and a digital sensor to control two LEDs – ‘car headlights’. Using a switch, I made two LEDs blink periodically as long as the switch is still pressed. By default state when the switch is released, two LEDs will have the brightness controlled by an LDR sensor. So, the idea was to reduce brightness when the LDR reading is high and increase it if it is low.

Demo

Code

If the switch is pressed, then 2 LEDs are blinking with some delay. If not, then the code uses the LDR value to set the brightness of LEDs to the appropriate value.

const int switchPin = 3; // the pin that the switch is connected to
const int ledPin1 = 6;   // the pin that the first LED is connected to
const int ledPin2 = 9;  // the pin that the second LED is connected to
const int ldrPin = A0;   // the pin that the LDR sensor is connected to

int switchState = 0;     // variable for reading the switch status
int ldrValue = 0;        // variable for storing the LDR sensor reading
int ledBrightness1 = 0;  // variable for storing the brightness of the first LED
int ledBrightness2 = 0;  

void setup() {
  pinMode(switchPin, INPUT);
  pinMode(ledPin1, OUTPUT);
  pinMode(ledPin2, OUTPUT);
  Serial.begin(9600);
}

void loop() {
  // read the switch state
  switchState = digitalRead(switchPin);

  // blink the LEDs if the switch is pressed
  if (switchState == LOW) {
    digitalWrite(ledPin1, LOW);
    digitalWrite(ledPin2, LOW);
    delay(500);
    digitalWrite(ledPin1, HIGH);
    digitalWrite(ledPin2, HIGH);
    delay(500);
  } else {
    // read the LDR sensor value
    ldrValue = analogRead(ldrPin);

    // map the LDR sensor value to the LED brightness range (0-255)
    ledBrightness1 = map(ldrValue, 0, 1023, 255, 0);
    ledBrightness2 = map(ldrValue, 0, 1023, 255, 0);

    // adjust the LED brightness
    analogWrite(ledPin1, ledBrightness1);
    analogWrite(ledPin2, ledBrightness2);
  }

  // print the LDR sensor value to the Serial Monitor
  Serial.println(ldrValue);

  delay(100);
}

Future changes

I feel that there is a lot of room for improvement in setting the brightness using an LDR sensor. The LEDs actually keep being bright with high LDR values, and it is a bit hard to get LDR values to the low level. Yet, the LDR sensor does make them brighter when the LDR readings become low eventually.

Unusual Switch | Mouth Stick

Inspiration

In my favorite movie “The Intouchables”[1+1, alternatively], the main character Philippe is a disabled person, and he is paralyzed below his neck. There was a moment in the film when it was shown how he uses the mouth stick, instead of hands, to turn pages of the physical book. Mouth stick is a useful tool for those who do not have hand functionality and need assistance with writing, typing, pointing, or turning a page of a book as in the movie.

For this homework assignment, I tried to replicate the idea in a quite abstract way of using mouth to touch a panel and let LED light signal that the touch occurred. It may be useful on an idea basis as the signal to turn the page using digital devices with touch sensors now.

Implementation

Implementation is very similar to the circuit we built in class using LED light. The difference lied in adding two more wires that were also covered in aluminum foil as the conductive material. One of the wires was connected to a cardboard panel covered by foil, while the other one was connected to a plastic straw that I used to replicate mouth stick. The foils/wires had to touch with each other to make circuit complete and let LED turn on. When there was no contact, LED light was off.  Thus, touching panel with mouth stick was signaled by turning on LED light.

Demo


Midterm Project | Survive the Semester Game

Hello everyone! I would share my ideas and implementation of my midterm game in this post.

Sleep, rest, study

Sketch Links

You may check out the code and game overall by clicking this link: https://editor.p5js.org/ds6058/sketches/Wdb9MMOe6

Concept

I wanted to create a game related to academics and our daily life for this midterm project. The narrative behind the game is quite simple and intuitive: the main character is a girl named Arti and her goal in the game is to catch falling objects – namely, sleep, rest (I choose to party with friends as the image), and study sessions to ‘survive the semester’. The game has two bars that measure the main character’s joy and health level. The player’s goal to win the game is to keep them as high as possible till time runs out.

Quality is somewhat poor. Above you may see the main interface of the game above. The simplest way to win is to stay active throughout the game. Skipping catching some objects may get side effects on health and joy, as well as catching some objects may actually harm your character if certain levels are already getting low. Specifically, game logic penalizes skipping sleeping and completing a study session with low health harms both health and joy, while partying is the best way to fastly recover from low joy levels.

Speed of falling changes over time and reaches certain peak periods before dropping to lower speeds. Yet, similarly to how the semester progresses, we start with low speed, and then at some periods, our workload gets heavy before dropping to lower speeds. Though, it does not get back to the initial speeds in the first weeks.

Technical Design

Objects [sleep, rest, study] are predefined in the setup() function and are chosen randomly. So, there is no particular algorithm to select, yet with time allocated and speed it is possible to win the game in different random scenarios.

I use two classes Game and ProgressBar to implement the main functionality of my game. They define the main variables and methods used. Below, is a code snippet from the play_game() method in the Game class. Each frame it runs, it checks if the object is within the screen, whether the player has caught the object, or whether time run out.

if (0 == this.time_left) {
  screen_on = game_won_screen;
}
if (this.y > height) { // if object goes out of screen without being catched
  this.is_caught = "no";
  this.update_bars();
  this.create_new_falling_object();
} else if ( //check if the object is caught by comparing mouseX coordinates and object's coordinates
  this.y > height - 150 &&
  this.x > mouseX - 100 &&
  this.x < mouseX + 100
) {
  this.is_caught = "yes";
  this.update_bars();
  this.create_new_falling_object();
  this.score += 1;
  // play sound of scoring if caught
  score_sound.play();
}

Below, there is a part of the code that controls how objects affect health and joy bars.

  // studying with low health is unenjoyable and unhealthy
  if (this.health_bar.level < this.health_bar.max_level / 2) {
    this.health_bar.level = max(0, this.health_bar.level - 10);
    this.joy_bar.level = max(0, this.joy_bar.level - 10);
  } else {
  // studying with ok health adds to joy
    this.joy_bar.level = min(
      this.joy_bar.max_level,
      this.joy_bar.level + 60
    );
  }
} else if (this.is_caught == "yes" && this.object_generated == "sleep") {
  // sleeping helps to increase health bar level
  this.health_bar.level = min(
    this.health_bar.max_level,
    this.health_bar.level + 100
  );
  // sleeping brings joy
  this.joy_bar.level = min(this.joy_bar.max_level, this.joy_bar.level + 30);
} else if (this.is_caught == "no" && this.object_generated == "sleep") {
// missing sleep reduces health bar level
  this.health_bar.level = max(0, this.health_bar.level - 30);

While the implementation of the code snippets above is not challenging, what I am particularly proud of about them and implementation overall is the ease to extend and make logic much more comprehensive [and personal]. The game logic, for now, is simple, yet it brings ideas about priorities, choices and their consequences. It is technically very easy to add more objects, not limiting ourselves just to sleep, rest, and studying.  Adapting new changes to game logic is also possible and is accessible.

I am also a bit proud that my progress bars are working as need them to. I had trouble understanding why changing the width of the rectangle with set x and y of starting point changes starting point as well while running. It was challenging to fix, yet I found a way to go around it.

Some areas of improvement

  • Adding more sounds. I currently have only one, though, it is used frequently throughout the game when a player catches any item.
  • Developing logic further. This one is particularly interesting for me. It is possible to develop a game from this version that would allow for much more thinking behind connections of game implementation and actual students’ lifestyles.
  • Working more on game design with particular attention to the text. The background image is nice, yet displaying of plain black/white text is unappealing and should be substituted to something more appealing to human’s eye.


Midterm Progress | Survive the Semester

Concept

For the midterm, I want to develop a simple game “Survive the semester”. In this game, a player should catch different items to continue playing until time is over. In case time reaches 0, the player won. For now, my plan is to make game over in cases when player’s health or joy levels reaches 0. I intend to include 2 progress bars reflecting student’s health and joy. Different items will have different effects on the bars, e.g. catching sleep will increase player’s health. Though, the game logic is not yet finalized. I may do it the way that if student fails to catch something, health/joy is deducted.

Design

I chose the NYUAD night picture as a background image. I am a kind of student who does a lot of study-related work at nights, so this choice was a bit relevant to me to reflect the game theme on studying.

Implementation

For me, the most frightening part was to get an idea of what game I want to develop. I would not describe myself as creative, and creating original game takes a lot of effort and time to me. I was also concerned on the progress bars and updates to them. I did not finish their implementation now, but I got the idea on how to work on them and I believe I should be able to finish it well before submitting my work.

I have also implemented the main mechanical part of game – involving falling ball and catching figure. I will  change the image of falling objects and catching rectangle to adjust to my game design objectives. I kept it simple for now to test if it works as it should first.

Future Steps:

I got a lot of ideas on my mind and I am excited to see on what I will end up implemented for this game!

Yet, what I would definitely need to add to my implementation:

  • Sounds. Should be fun experience to select those =)
  • More images. Especially, for falling objects. Falling ball is irrelevant to my game now.
  • OOP. It should not be a problem.
  • Better visuals involving text. Now it is basic, I may need to make the visual part of game provide better UI and UX to the player
  • More enhanced game logic and progress bars!

Link to the sketch: https://editor.p5js.org/ds6058/sketches/1lbHkjJpV


Generative Text with p5js

For this homework, I chose to work with generative text and produce a simple program that will output a poem of my choice in some chaotic fashion. The poem I chose ‘The night, the pharmacy, the street’ is one of quite famous poems in Russian by Alexander Blok, and it is one of very few I can fully recite in Russian. Personally, while this poem has a meaning, it always comes to my mind first when I think of something quite random in literature.

To select which words are going to be displayed in canvas, I use the following function. It first filters poem from double spaces and then randomly selects the first word to display as well as the last word.

function drawWords(x, y) {

  let corpus = poem.split(' ').filter(y => y!="");

  let first_word = floor(random(corpus.length));
  let last_word = first_word + random(2, 8);

  fill(255,233,0);
  text(corpus.slice(first_word, last_word).join(' ').trim(), x, y);

}

The sketch of my final program is shown below:

I chose yellow and black to better match with the scene described: the street in the night with the bright lamppost. For future improvement, I would like to add more complexity to implementation and to make it more random. It feels chaotic as of now, but with addition of randomness in the position and more controlled randomness in the selection of words it should be more accurate in my vision. Also, I wanted to work on graphics a bit and add a lamp with options to turn on and off to match the theme. Overall, this was a fun experience with generative text and I hope future projects are going to be fun as well =)


Link: https://editor.p5js.org/ds6058/sketches/GHtAW9-XW

References:

https://sites.google.com/site/poetryandtranslations/alexander-blok/-the-night-the-pharmacy-the-street-a-blok

https://p5js.org/examples/typography-words.html