My Concept:
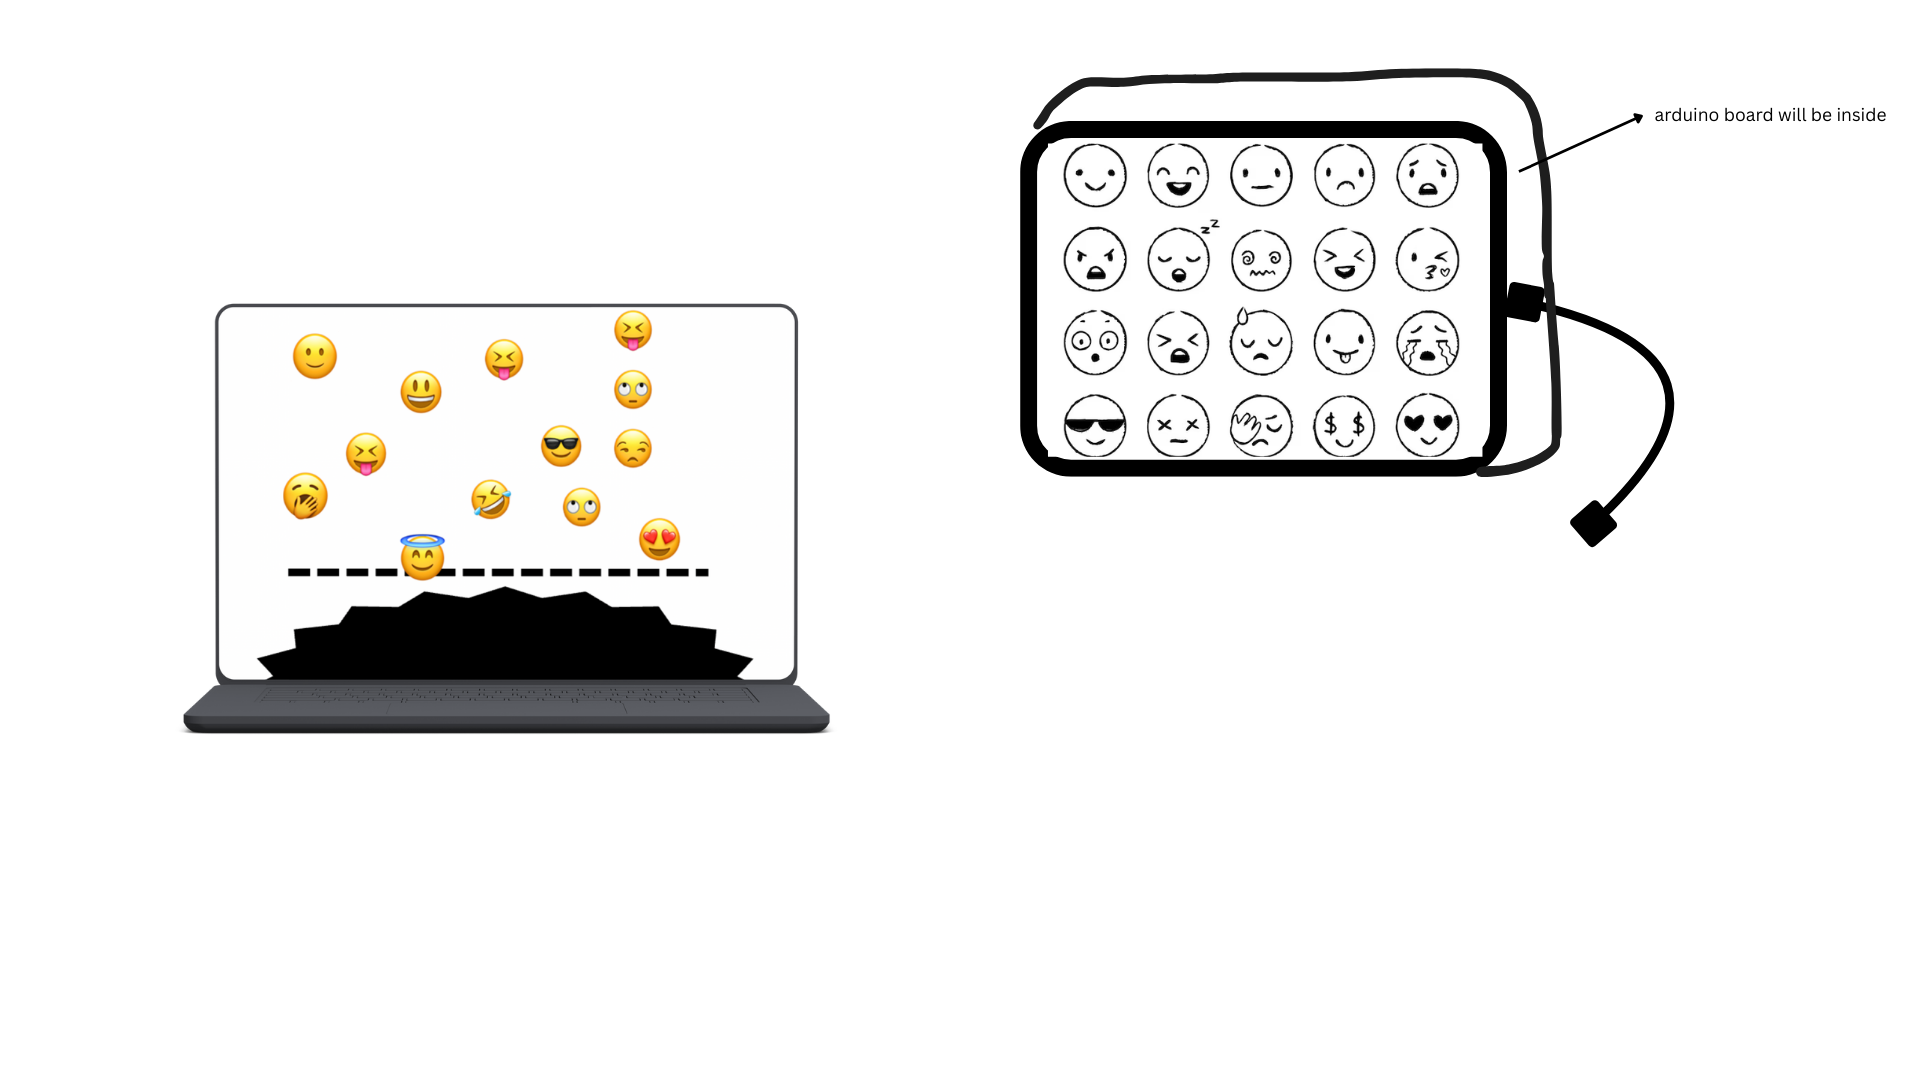
My final project is a rhythm-based game called “Emotional Sprint”. The core idea is simple and fun: emojis fall from the top of the screen along five lanes, and the player has to press the corresponding button at the exact moment the emoji reaches a yellow horizontal line. If the timing is right, the player gains points, and the emoji disappears with a fun particle effect. The game gradually gets faster as the player scores more points and levels up, increasing the challenge while keeping the gameplay exciting.
The game is designed to be visually engaging and interactive, with colorful falling emojis, a dynamic starry background, and playful sound effects. The main goal was to combine a simple, fun game mechanic with a physical interaction component using Arduino buttons, making it a hybrid digital-physical experience. So, it’s easy to pick up and play, but entertaining enough to keep players focused and engaged.
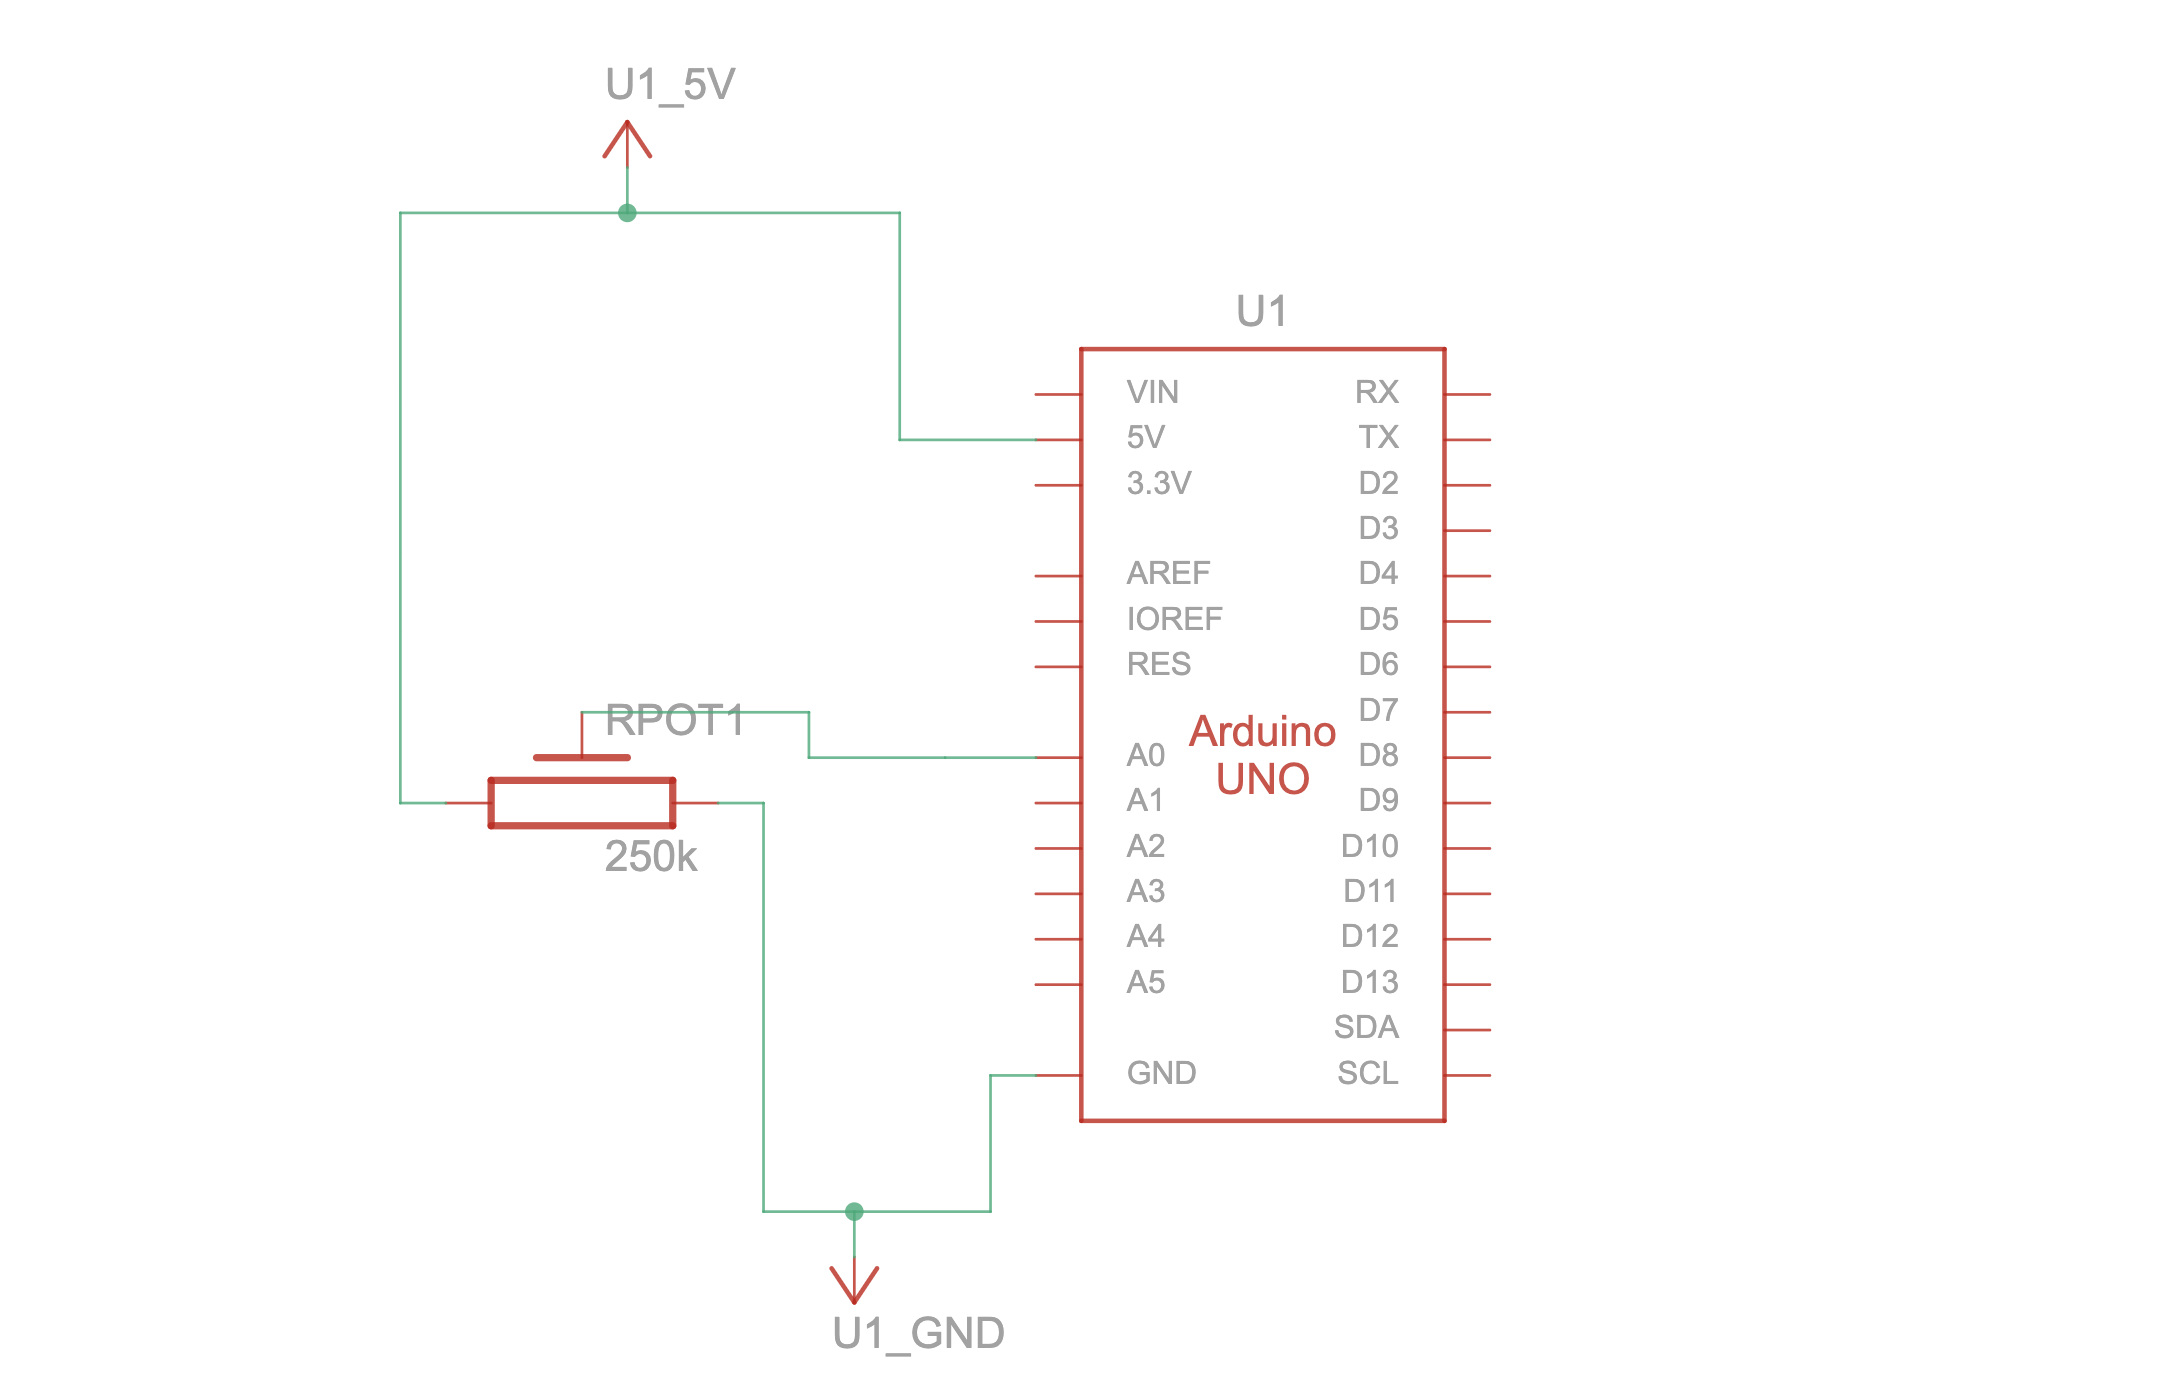
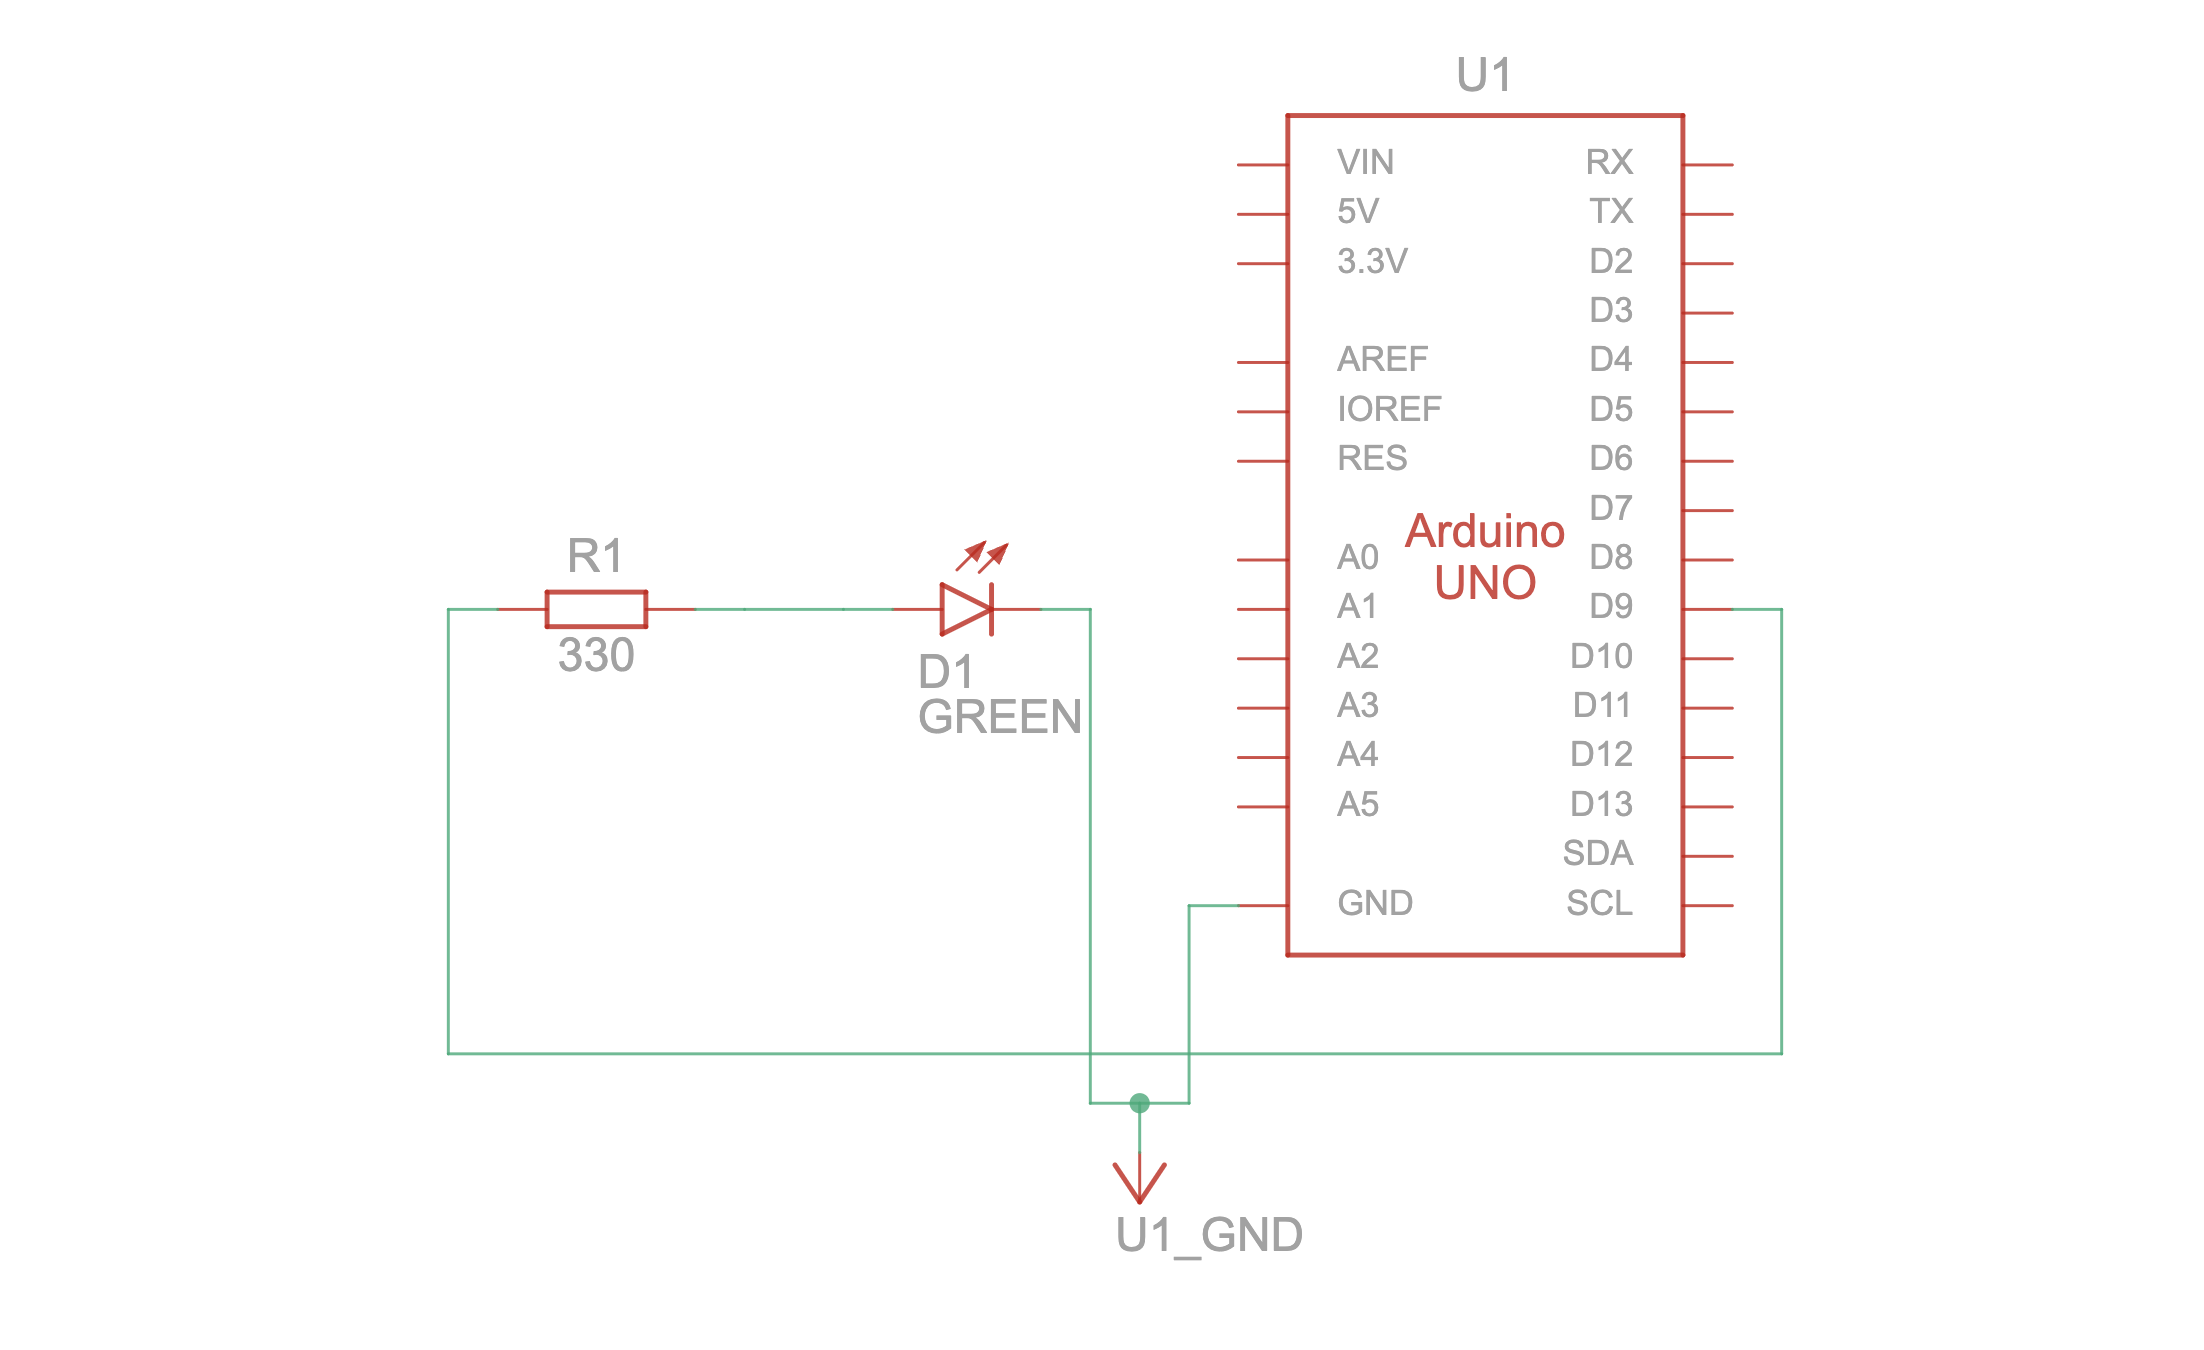
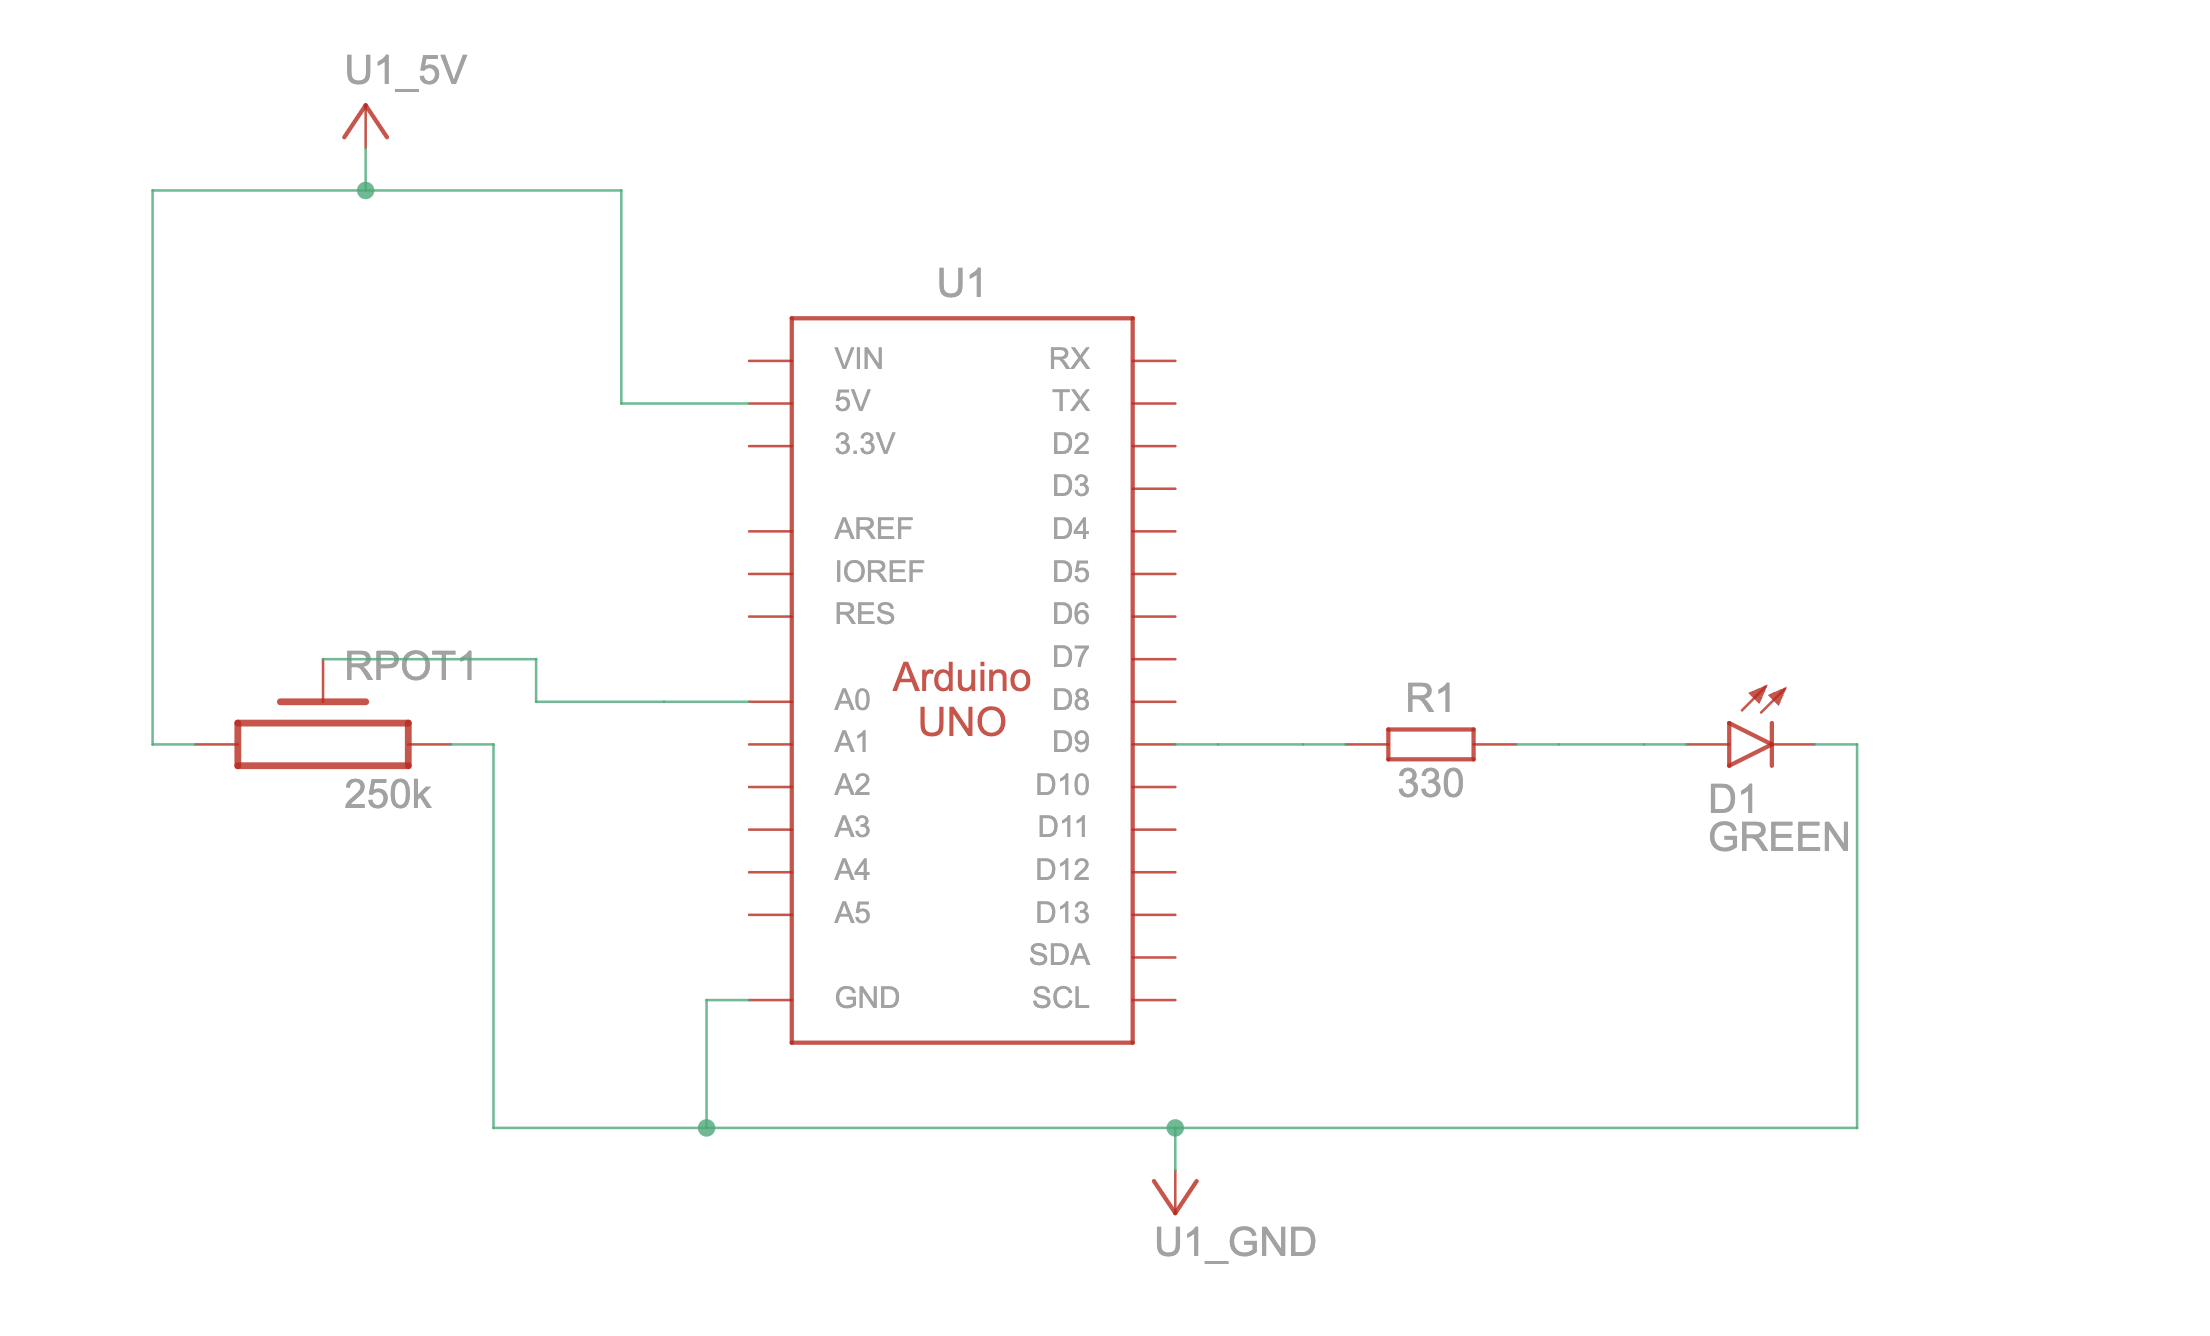
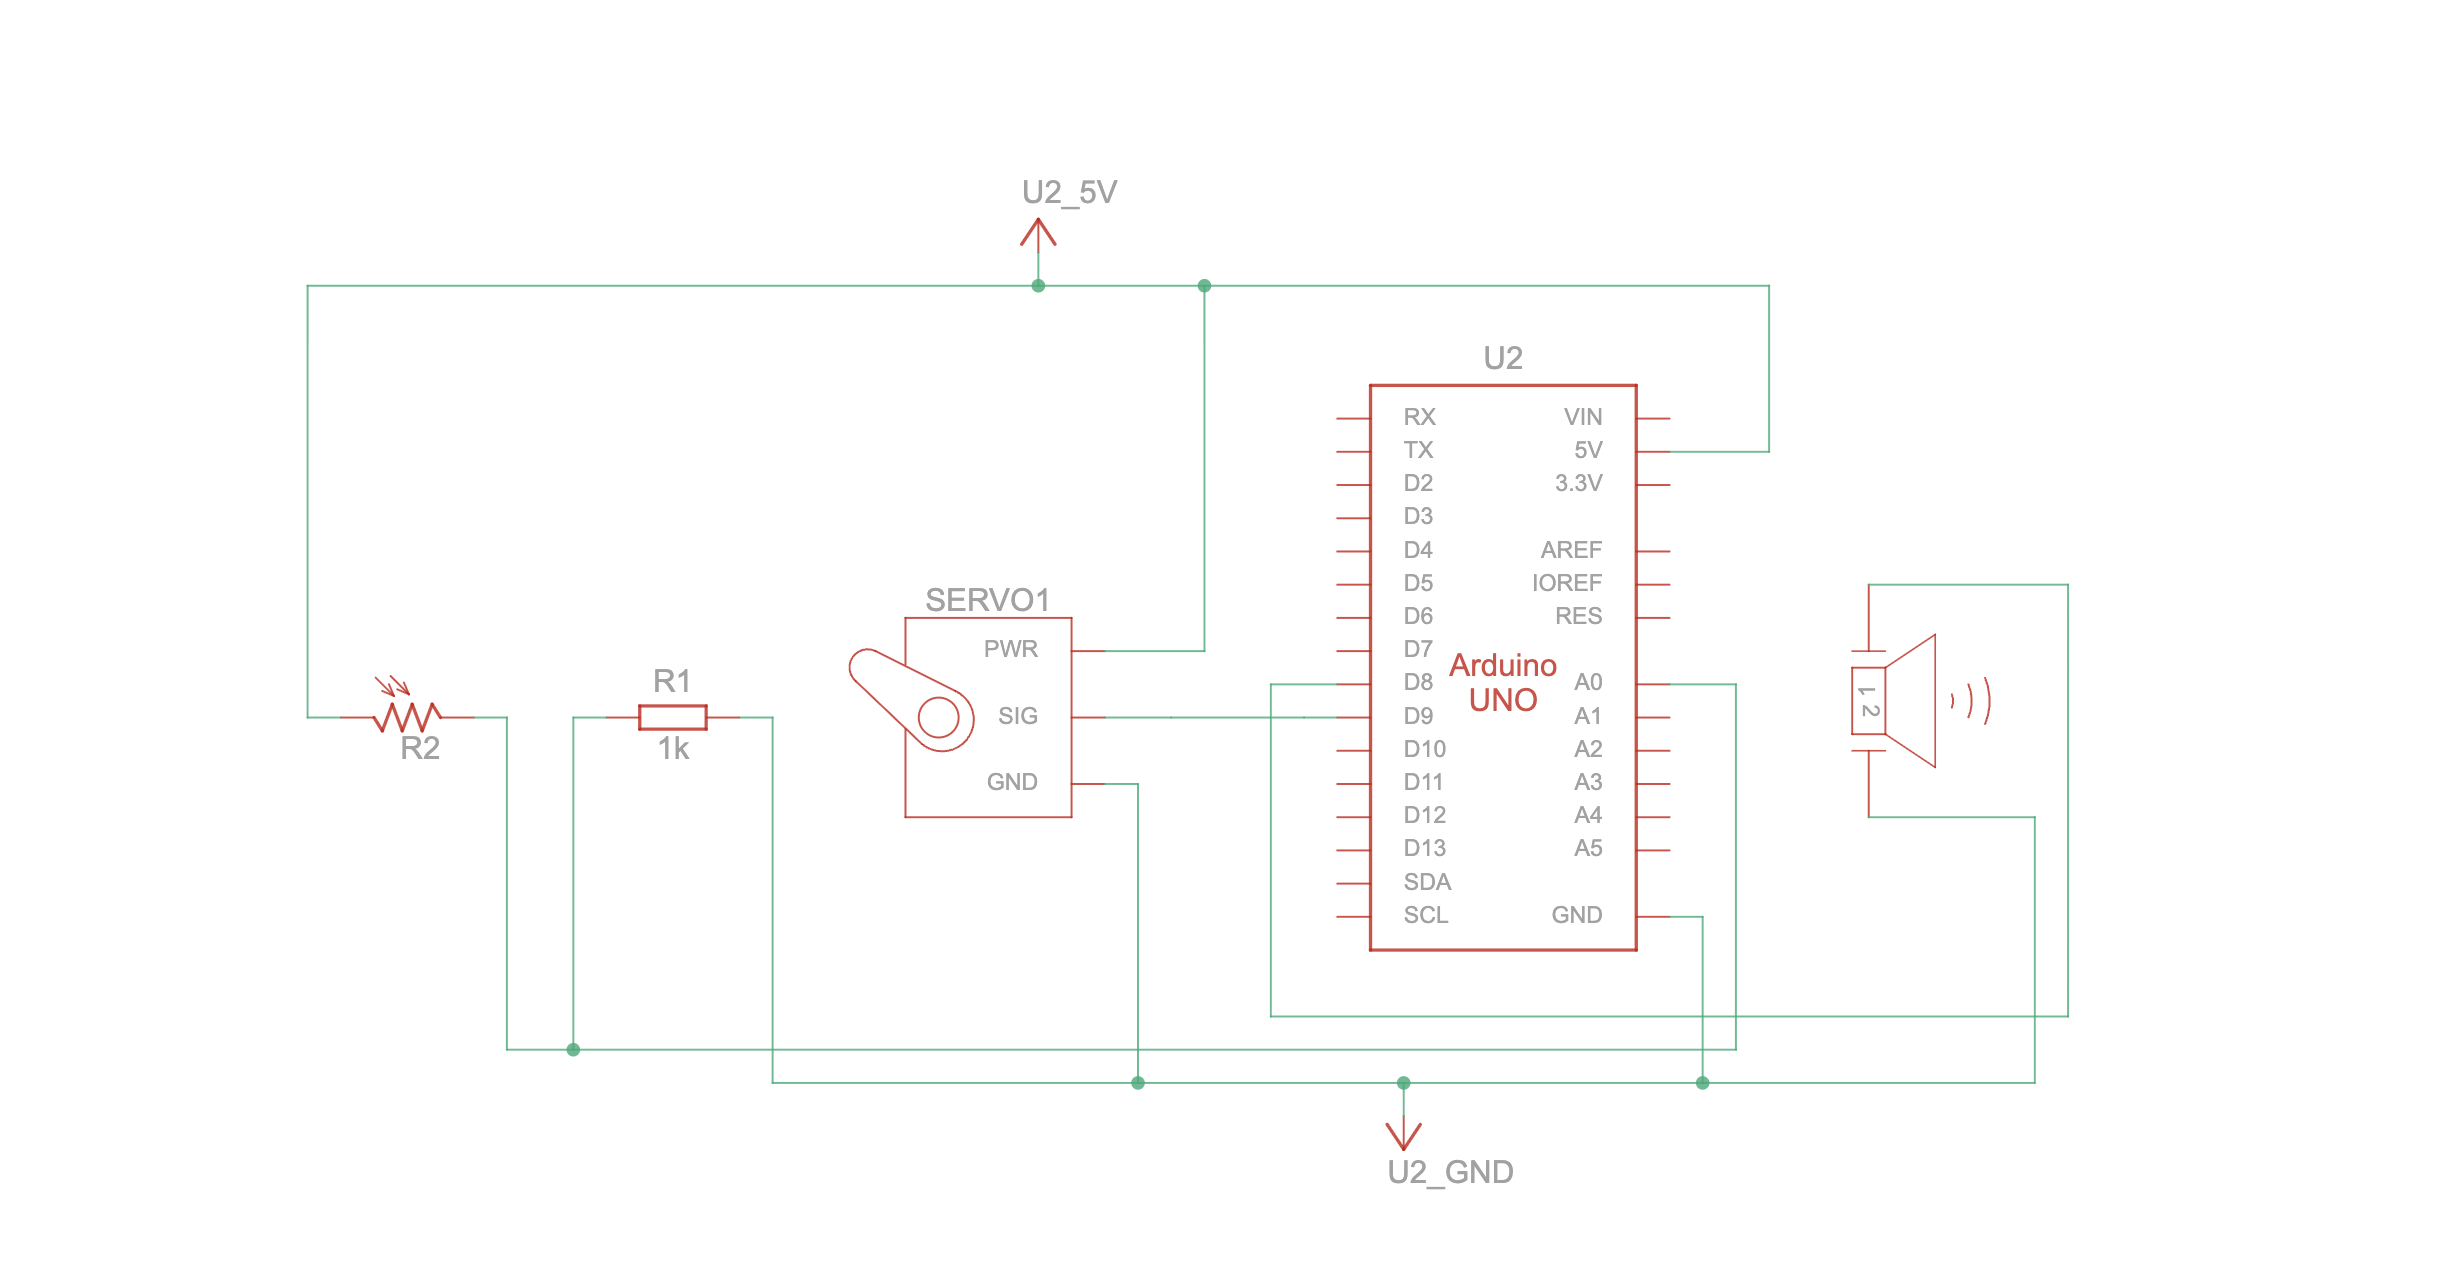
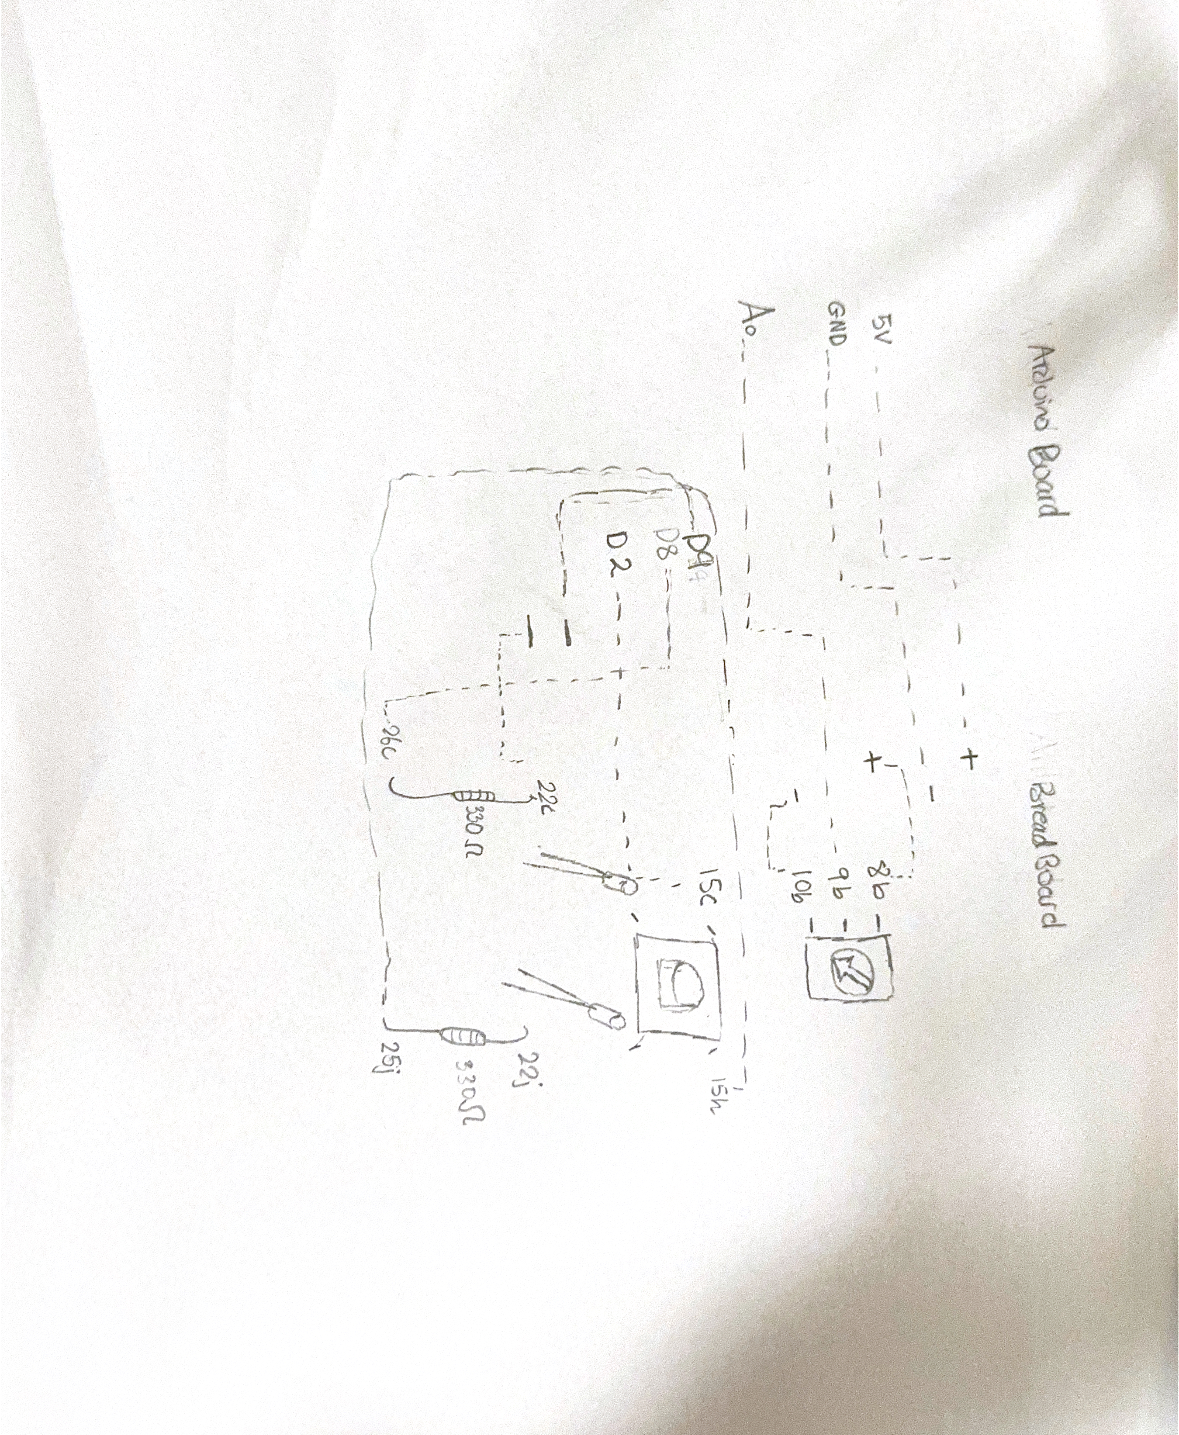
Schematic:

User Testing Video:
How the Implementation Works
Interaction Design
The game starts with a character sleeping on the screen. The player clicks on the sleeping character to wake it up, revealing the start button. When the player presses the start button, the main game begins. Five emojis fall from the top along five lanes. The player must press the correct button on the Arduino when the emoji aligns with the yellow target line. Successful hits increase the score and trigger particle effects for feedback.
The game includes levels, every 10 points the level increases. At level 9, emojis fall faster and spawn more quickly, adding challenge.
Arduino Code
I used Arduino to read button presses from five physical arcade buttons. Each button sends a unique identifier via serial communication to the computer.
void loop() {
  // BUTTON 1
  if (digitalRead(button1) == LOW) {
    digitalWrite(led1, HIGH);
    Serial.println("pressed1");
  } else {
    digitalWrite(led1, LOW);
  }

  // BUTTON 2
  if (digitalRead(button2) == LOW) {
    digitalWrite(led2, HIGH);
    Serial.println("pressed2");
  } else {
    digitalWrite(led2, LOW);
  }

  // BUTTON 3
  if (digitalRead(button3) == LOW) {
    digitalWrite(led3, HIGH);
    Serial.println("pressed3");
  } else {
    digitalWrite(led3, LOW);
  }
Github Link to full code: https://github.com/deemaalzoubi/Intro-to-IM/blob/0398af31655355cbd3d2f9de7d9e1a78c2622cff/final_game11.ino
p5.js Code
The p5.js code handles all graphics, animation, and score tracking. It displays falling emojis, the target line, stars in the background, particle effects, and handles game levels. It also reads the serial data sent by Arduino and calls the function checkButtonPress() to update the score and remove the emoji.
drawInstructions();

  textSize(64);
  fill(200, 180, 255);
  stroke(0);
  strokeWeight(4);
  text(titleText, width / 2, 120);
  noStroke();

  if (!isAwake) {
    image(sleepImg, width / 2 - sleepImg.width / 2, height / 2 - sleepImg.height / 2);
    drawThoughtBubble(width / 2 + sleepImg.width / 2 + 40, height / 2 - 80, "Wake me up to start the game!");
  } else {
    image(helloImg, width / 2 - helloImg.width / 2, height / 2 - helloImg.height / 2);
    startButton.show();
  }
 if (gameEnded) {
      fill(255);
      textSize(50);
      text("GAME OVER", gameWidth/2, gameHeight/2 - 40);
      text("High Score: " + score, gameWidth/2, gameHeight/2 + 20);

      textSize(22);
      fill(255, 200, 255);
      text("Click to Restart", gameWidth/2, gameHeight/2 + 80);
      pop();
      return;
    }
Communication Between Arduino and p5.js
The Arduino sends serial messages to the computer whenever a button is pressed, p5.js reads these messages, then triggers the appropriate game function to remove the emoji and increase the score. This allows for real-time responsiveness, so the player can press a button exactly when the emoji hits the line. There’s also music playing in the background all throughout the game from p5.js.
Aspects I’m Proud Of
I’m really proud of how I made the game responsive right from the very first emoji. When I first tested it, there was a bit of lag at the start, so I worked on the code until hitting a button always worked immediately. I also love how I was able to combine the Arduino hardware with the p5.js graphics so they work together smoothly, it feels really satisfying to press a physical button and see the emoji react on the screen. I added particle effects and a dynamic background to make the game more visually fun and engaging, and I created a difficulty system where the game gets faster and more challenging as you level up. I’m also really proud of the physical design of the game box itself, I made it using laser cutting, then painted it, and carefully made five holes so the buttons fit perfectly.
Resources Used:
-
p5.js
-
Arduino
-
Tinkercard
-
Music download: https://archive.org/details/tvtunes_26709
-
Google Images for background images
- Clipart for Character
- MakerCase: https://en.makercase.com/basicBox
AI Tools
I used AI tools to help debug certain parts of the game and improve responsiveness. Specifically, I used ChatGPT to analyze why the first few emojis weren’t responding immediately and to suggest ways to reduce the time span before the first emoji appears, making the game responsive from the very first press. I also used AI to explore solutions for particle lag and handling serial input from the Arduino more efficiently, which helped me implement the 150-particle limit and asynchronous button press handling. AI helped me also figure out how to make the timing window easier but still precise, so players could hit the emoji exactly on the horizontal line without frustration. These suggestions were then applied and tested in my own code to fit the project.
Challenges and Solutions
One of the main challenges I faced was making the game responsive right from the start. At first, the first few emojis didn’t respond when pressing the buttons, but I solved this by spawning an emoji immediately when the game starts instead of waiting a few frames. Another issue was particle lag, having too many particles on screen caused the game to slow down, so I limited the particle count to 150 to keep it smooth. I also had to deal with Arduino debounce and serial timing, because some button presses were being missed. I fixed this by adding a short delay for debounce. On the physical side, covering the wires neatly inside the box was tricky, but I managed it. Having the project mostly done, around 99%, by Thursday’s class was a really helpful thing because it let me spot these issues early and gave me time to improve everything before the final version.
Areas for Future Improvement
- I can add more levels or emoji types to increase complexity.
- Adding different music tracks or sound effects for hits and misses.
- Improving visual feedback for misses, not just hits.
- Adding pause and restart buttons without relying on click-to-reload.
- Optimizing serial communication for faster multi-button presses.
Videos from the IM Showcase!
https://drive.google.com/drive/folders/1IsNAQcgxkhg4DA2ArCCk11TqhhDdyMRy?usp=sharing
Finally, it has been such an amazing and extradorinary time of working on a final project like this. The amount of new things I got to learn and implement are outstanding and from this project specifically it has given me more confidence to continue working on my skills related to P5 and Arduino and further improve on them. This was a very exciting semester of projects overall! Thank you!!