Concept
Our project is a musical instrument that uses an ultrasonic sensor to measure the distance between the sensor and an object and plays different notes based on the distance. A note is played when a push button is pressed. The distance measurement is then mapped to an array of notes to play on a piezo buzzer.
IMPLEMENTATION
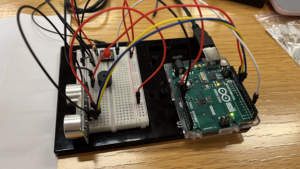
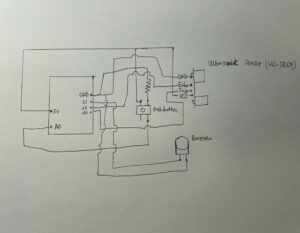
We have started from setting up a circuit that uses next components: ultrasonic sensor, piezo buzzer, 10 jumper wires, pushbutton, and 10k resistor. The ultrasonic sensor was used to measure the distance of the object from the instrument, and the piezo buzzer was used to play the musical notes based on the measured distance. The pushbutton was used to activate the instrument and play the notes, and the 10k resistor was used as a resistor for the button. We connected all these components using jumper wires to establish a circuit that would form the foundation for the instrument.
We have then moved onto adding a code component. In the setup() function we have set the pinMode for each of the pins used in the circuit. We have also used the Serial.begin() function to start serial communication between the Arduino and the computer, which would allow us to view debug messages.
The first part of the loop function was used to read the distance measurement from the ultrasonic sensor using the pulseIn() function. We then used this distance measurement to calculate which note to play on the piezo buzzer. We mapped the distance to a note by dividing the range of distances by the number of notes we wanted to play (in this case, five).
The code then checked the state of the pushbutton using the digitalRead() function. If the pushbutton was not pressed, the piezo buzzer would not play any sound, and a message would be printed to the serial monitor. If the pushbutton was pressed, the corresponding note would play on the piezo buzzer, and a message indicating the button’s state and the note being played would be printed to the serial monitor.
//
// Project name: "HW7: Musical Instrument"
// Names: Adina & Aibar
// Class: Intro to IM
// Professor: Michael Shiloh
//

int trigPin = 10;
int echoPin = 11;
int buttonPin = 2;
int buzzerPin = 12;

long duration;
long distance;

int buttonState;

void setup() {
  //distance pins
  pinMode(echoPin, INPUT);
  pinMode(trigPin, OUTPUT);
  //button pin
  pinMode(buttonPin, INPUT);
  //buzzer pin
  pinMode(buzzerPin, OUTPUT);

  Serial.begin(9600);
}

void loop() {
  digitalWrite(trigPin, LOW); //triggers on/off and then reads data
  delayMicroseconds(2);
  digitalWrite(trigPin, HIGH);
  delayMicroseconds(10);
  digitalWrite(trigPin, LOW);

  duration = pulseIn(echoPin, HIGH);
  distance = (duration / 2) * .0344; //speed of sound converted into cms

  int notes[5] = {261, 294, 329, 349, 392}; //array of notes
  //          mid  C    D    E    F    G

  buttonState = digitalRead(buttonPin);
  if (buttonState == 0) { //if not pressed
    noTone(12);
    Serial.println("button not pressed");
  }

  else if ((buttonState == 1)) {  //if pressed
    int sound = map(distance, 0, 30, 0, 5);  //map distance to the array of notes
    tone(buzzerPin, notes[sound]);  //play a note
    //checking if works through serial monitor
    Serial.print("button pressed, ");
    Serial.print(buttonState);
    Serial.print(", ");
    Serial.println(sound);
  }
}
Schematic Diagram
VIDEO DEMO
If the video window doesn’t show, use this link to see the demo of the musical instrument.
CHALLENGES AND SOLUTIONS
Our biggest challenge was ensuring that the distance reader could detect the object in front of it accurately. When the reader did not detect the object correctly, the instrument played a weird sound that sounded like a very high pitch, which was not the sound we were hoping to achieve. It took several attempts to get the distance reader to work correctly. A solution that we came up with was decreasing the max distance when mapping the sound to the distance and using a solid object like the back of the phone, rather than a hand. By decreasing the maximum distance for the object, we were able to make sure that the distance reader could pick up on the object’s presence.


