The 3 tasks we worked on were practice on how to make both Arduino and P5j work together.
Group: Deema Al Zoubi and Rawan Al Ali
Exercise 1 :
let connectButton;
let port;
let reader;
let sensorValue = 0;
let keepReading = false;

function setup() {
  createCanvas(600, 400);

  // Create a connect button
  connectButton = createButton('Connect to Arduino');
  connectButton.position(10, 10);
  connectButton.mousePressed(connectSerial);

  textAlign(CENTER, CENTER);
  textSize(14);
}

async function connectSerial() {
  // If already connected, close first
  if (port && port.readable) {
    await closeSerial();
    connectButton.html('Connect to Arduino');
    return;
  }

  try {

    port = await navigator.serial.requestPort();
    await port.open({ baudRate: 9600 });

    console.log('Port opened', port);
    connectButton.html('Disconnect');

    const decoder = new TextDecoderStream();
    // Pipe the readable stream from the port to the decoder
    port.readable.pipeTo(decoder.writable);
    reader = decoder.readable.getReader();

    keepReading = true;
    readLoop(); // start read loop
  } catch (err) {
    console.error('Error opening serial port:', err);
    alert('Could not open serial port. Make sure your device is connected and try again.');
  }
}

async function closeSerial() {
  keepReading = false;
  try {
    if (reader) {
      await reader.cancel();
      reader.releaseLock();
      reader = null;
    }
    if (port && port.close) {
      await port.close();
      console.log('Port closed');
    }
    port = null;
  } catch (err) {
    console.warn('Error closing port:', err);
  }
}

async function readLoop() {
  let partial = '';
  try {
    while (keepReading && reader) {
      const { value, done } = await reader.read();
      if (done) {
        console.log('Reader closed');
        break;
      }
      if (!value) continue;

      // split by newline
      partial += value;
      let lines = partial.split(/\r?\n/);
      // Keep the last partial line in buffer
      partial = lines.pop();

      for (let line of lines) {
        line = line.trim();
        if (line === '') continue;
        const num = parseInt(line, 10);
        if (!Number.isNaN(num)) {
          // clamp to expected range in case of weird data
          sensorValue = Math.max(0, Math.min(1023, num));
          console.log('sensorValue:', sensorValue);
        } else {
          console.log('non-numeric line ignored:', line);
        }
      }
    }
  } catch (err) {
    console.error('Read loop error:', err);
  }
}

function draw() {
  background(240);

  let x = map(sensorValue, 0, 1023, 25, width - 25);
  fill(100, 150, 240);
  ellipse(x, height / 2, 50, 50);
}
window.addEventListener('beforeunload', async (e) => {
  if (port && port.readable) {
    await closeSerial();
  }
});
void setup() {
Serial.begin(9600);
}
void loop() {
int sensorValue = analogRead(A0);
Serial.println(sensorValue);
delay(50); // ~20Hz
}
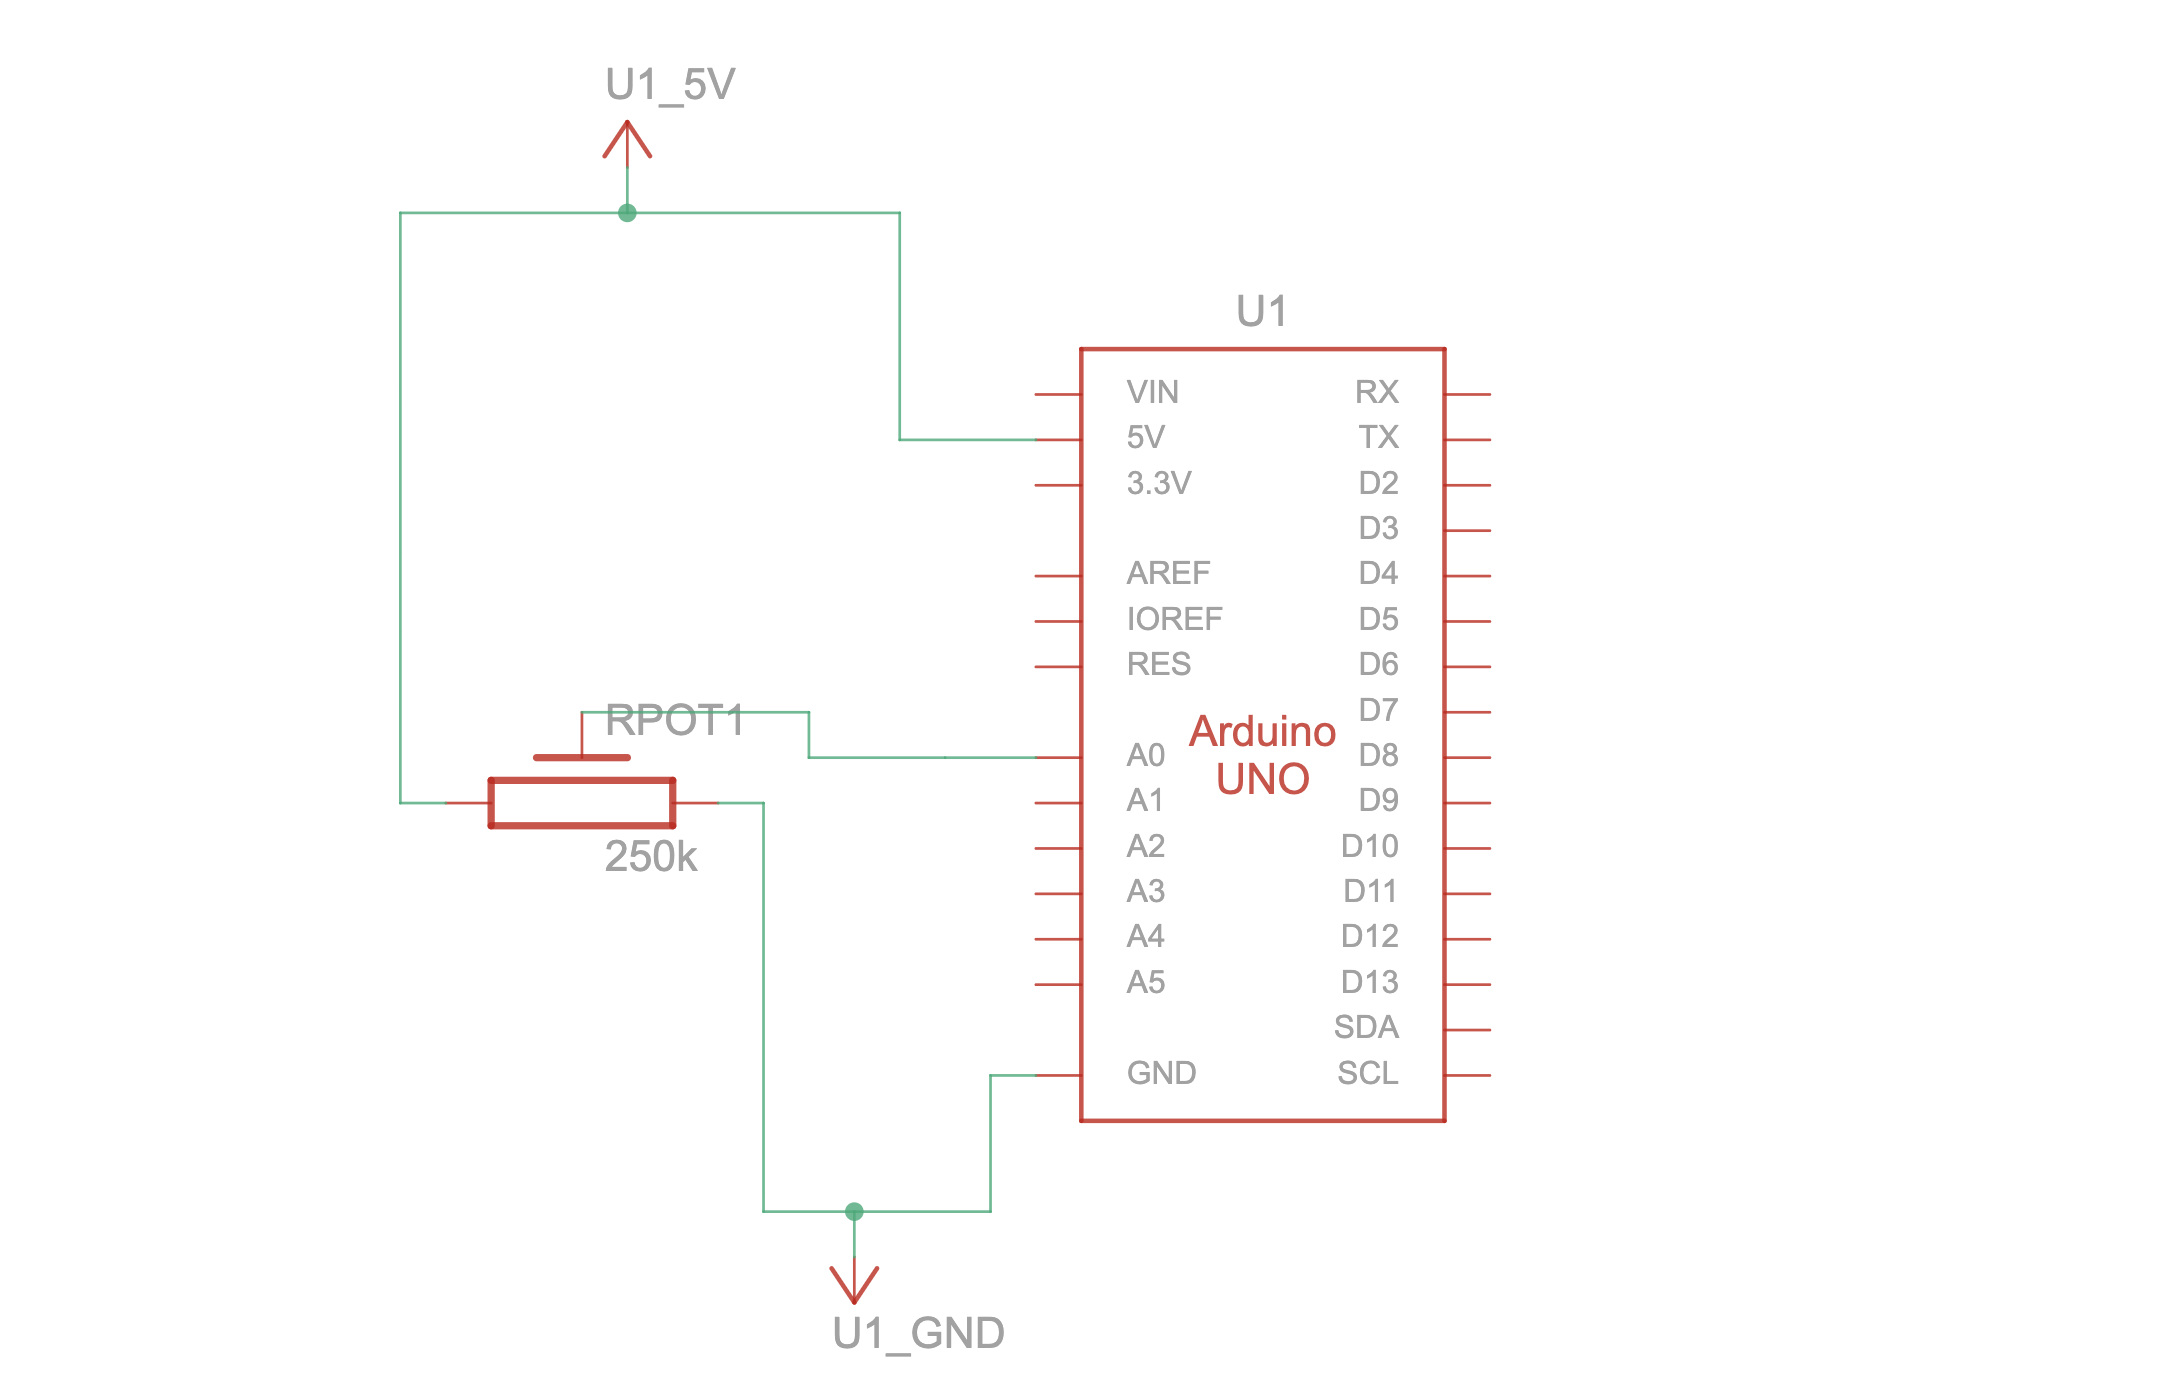
We used one sensor (a potentiometer) on the Arduino to control the horizontal position of an ellipse in p5.js. The ellipse stayed in the middle of the screen vertically, and all movement was controlled by the Arduino sensor, p5 didn’t send any commands to Arduino.
Video 1: IMG_1012
Schematic 1: 
Exercise 2:
let connectButton;
let port;
let writer;
let slider;

let targetBrightness = 0;
let currentBrightness = 0;

function setup() {
  createCanvas(400, 200);

  connectButton = createButton("Connect to Arduino");
  connectButton.position(10, 10);
  connectButton.mousePressed(connectSerial);

  slider = createSlider(0, 255, 0);
  slider.position(10, 60);
  slider.style('width', '300px');

  textSize(16);
}

async function connectSerial() {
  try {
    port = await navigator.serial.requestPort();
    await port.open({ baudRate: 9600 });
    writer = port.writable.getWriter();
    connectButton.html("Connected");
  } catch (err) {
    console.error("Connection error:", err);
  }
}

function draw() {
  background(230);

  // Slider sets the target brightness
  targetBrightness = slider.value();

  // Gradually move toward target (both up and down)
currentBrightness = lerp(currentBrightness, targetBrightness, 0.15);

  // Snap to 0/255 when very close so it truly turns off/on
  if (abs(currentBrightness - targetBrightness) < 1) {
    currentBrightness = targetBrightness;
  }

  fill(0);
  text("LED Brightness: " + int(currentBrightness), 10, 110);

  // Send brightness
  if (writer) {
    writer.write(new Uint8Array([int(currentBrightness)]));
  }
}
int ledPin = 9; // LED connected to PWM pin 9
int value = 0; // variable to store incoming brightness
void setup() {
pinMode(ledPin, OUTPUT);
Serial.begin(9600); // match the baud rate in p5
}
void loop() {
if (Serial.available() > 0) {
// read incoming string until newline
String data = Serial.readStringUntil('\n');
data.trim(); // remove whitespace
if (data.length() > 0) {
value = data.toInt(); // convert to integer
value = constrain(value, 0, 255); // keep within PWM range
analogWrite(ledPin, value); // set LED brightness
}
}
}
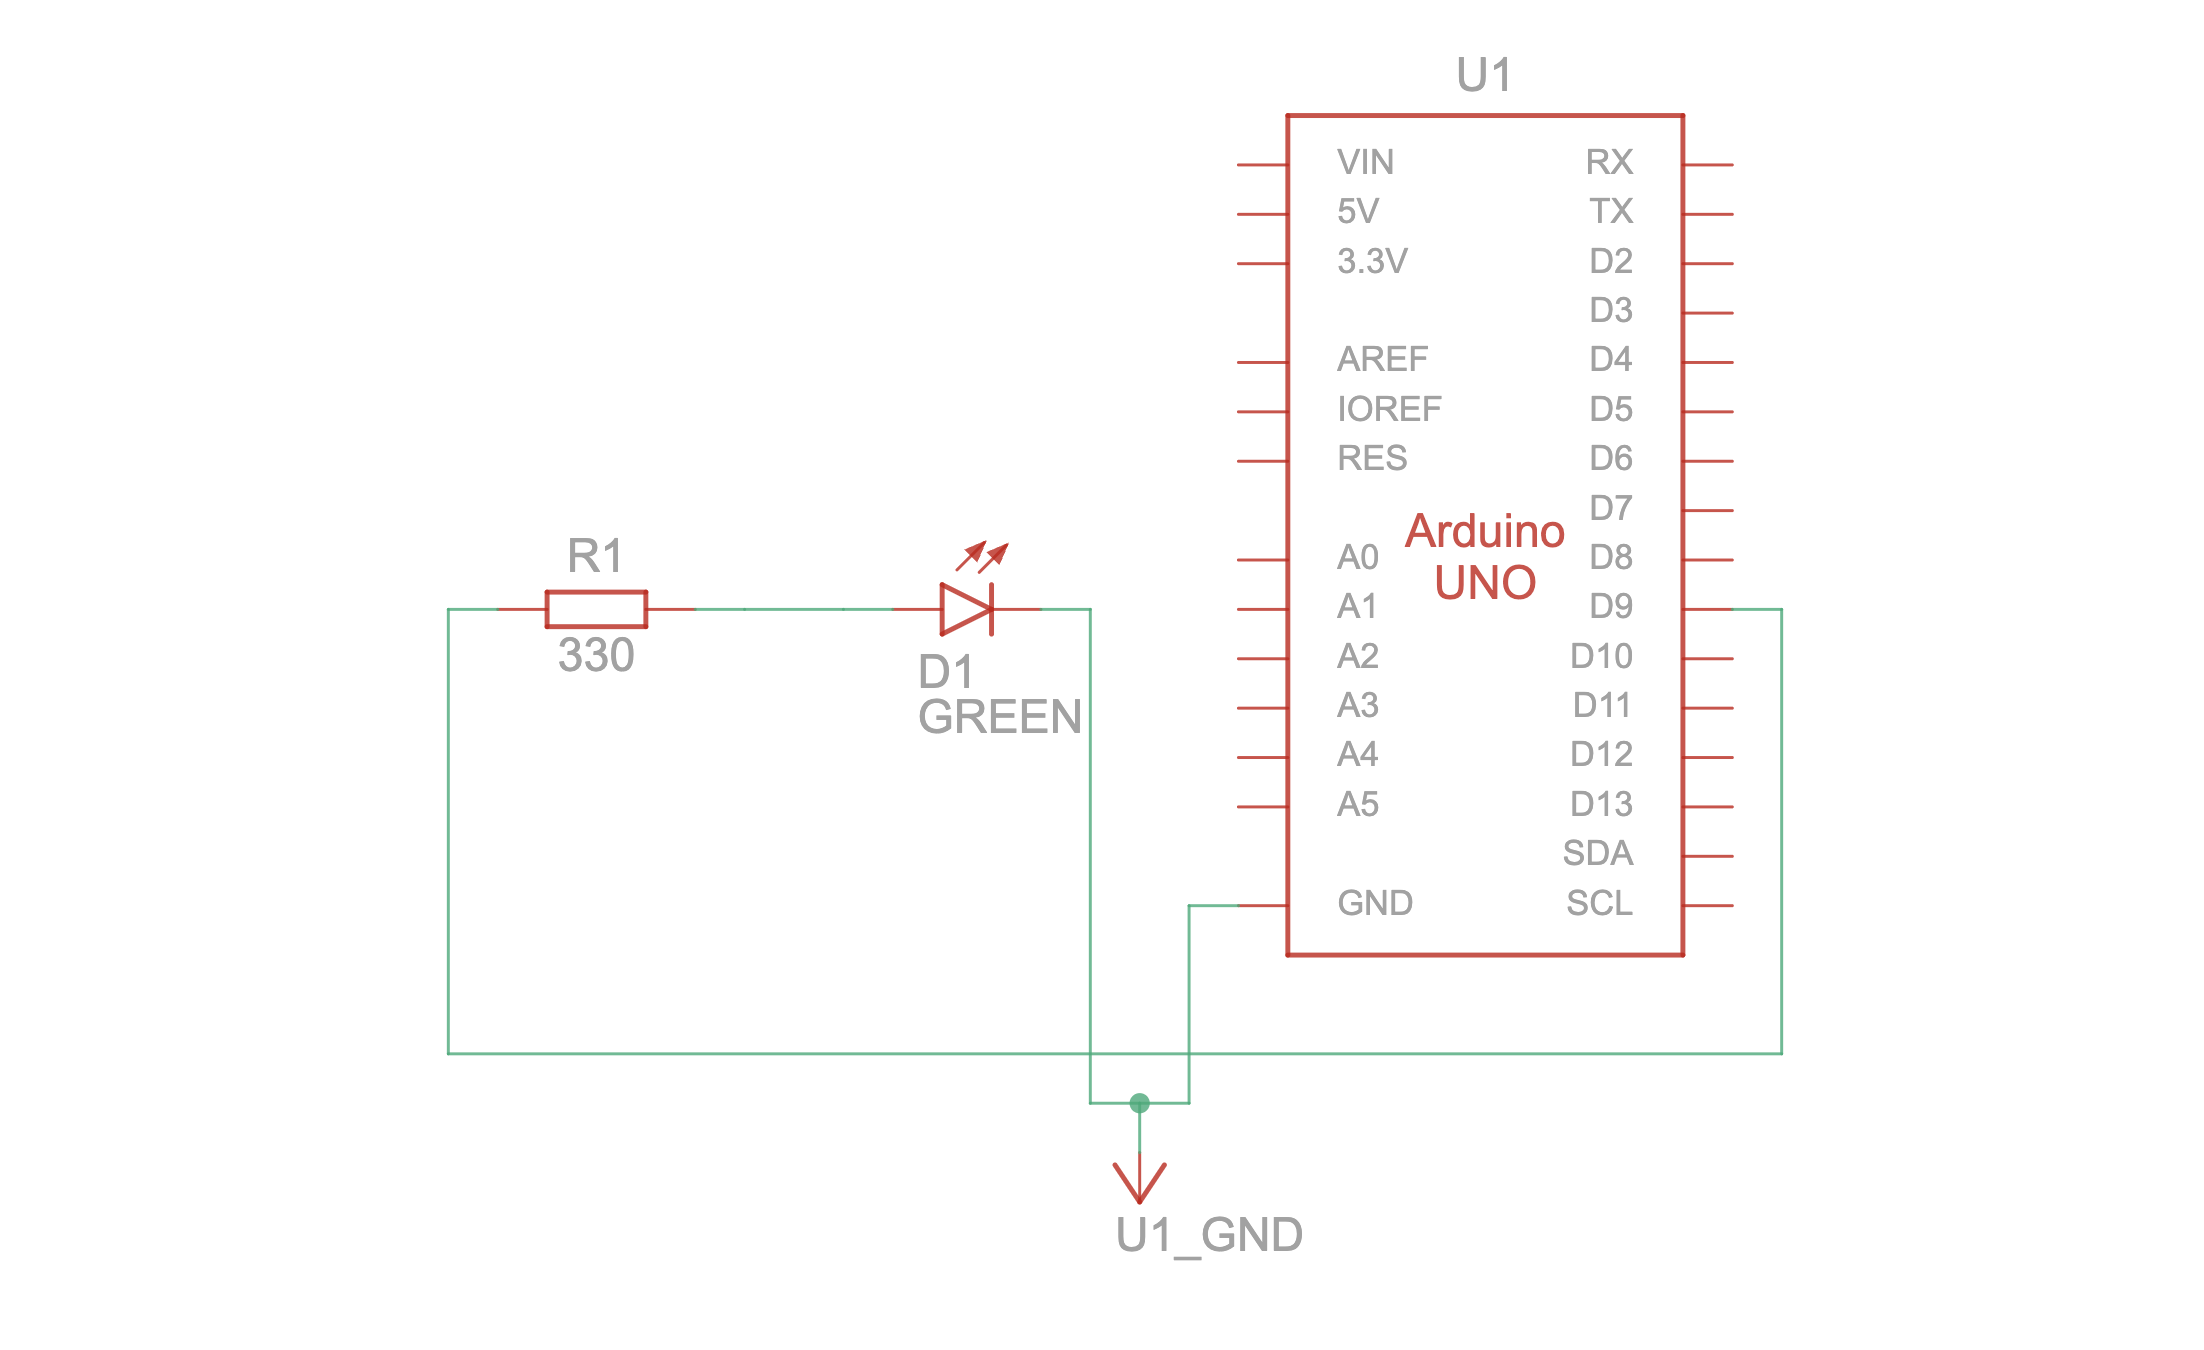
We created a slider in p5.js to control the brightness of an LED connected to the Arduino. Moving the slider to the right gradually increased the LED brightness, and moving it back to the left gradually turned it off.
Video 2: https://intro.nyuadim.com/wp-content/uploads/2025/11/IMG_1030.mov
Schematic 2: 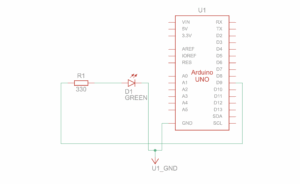
Exercise 3:
let velocity;
let gravity;
let position;
let acceleration;
let drag = 0.99;
let mass = 50;

let brightnessValue = 512; // potentiometer value (0–1023)
let ballDropped = false;
let ledOn = false;

let port, writer, reader;
let serialActive = false;
let serialBuffer = '';

function setup() {
  createCanvas(640, 360);
  textSize(18);

  position = createVector(width / 2, 0);
  velocity = createVector(0, 0);
  acceleration = createVector(0, 0);
  gravity = createVector(0, 0.2 * mass);

  // Connect button
  let btn = createButton("Connect to Arduino");
  btn.position(10, 10);
  btn.mousePressed(connectAndStart);
}

function draw() {
  background(255);

  // Show instructions before dropping ball
  fill(0);
  if (!ballDropped) {
    text("Press B to drop the ball", 20, 30);
    return; // stop here until ball is dropped
  }

  // Show serial status
  if (serialActive) {
    text("Connected", 20, 30);
    text(`Potentiometer: ${brightnessValue}`, 20, 50);
  } else {
    text("Serial Port Not Connected", 20, 30);
  }

  // Apply gravity
  velocity.y += gravity;
  velocity.y *= drag;

  // Horizontal control from potentiometer
  let windX = map(brightnessValue, 0, 1023, -2, 2);
  velocity.x = windX;

  position.add(velocity);

  // Bounce on floor
  if (position.y >= height - mass / 2) {
    position.y = height - mass / 2;
    velocity.y *= -0.9;

    // Flash LED
    if (serialActive && !ledOn) {
      writeSerial("F");
      ledOn = true;
    }
  } else if (ledOn) {
    ledOn = false;
  }

  // Bounce on top
  if (position.y - mass / 2 < 0) {
    position.y = mass / 2;
    velocity.y *= -0.9;
  }

  // Keep ball inside canvas horizontally
  position.x = constrain(position.x, mass / 2, width - mass / 2);

  // Draw ball
  fill(100, 150, 240);
  ellipse(position.x, position.y, mass, mass);
}

function applyForce(force) {
  let f = p5.Vector.div(force, mass);
  acceleration.add(f);
}

function keyPressed() {
  if (key == "B" || key == "b") dropBall();
}

function dropBall() {
  position.set(width / 2, 0);
  velocity.set(0, 0);
  mass = 50;
  gravity = 0.05 * mass;
  ballDropped = true;
}

// Serial functions
async function connectAndStart() {
  try {
    port = await navigator.serial.requestPort();
    await port.open({ baudRate: 9600 });

    writer = port.writable.getWriter();

    const decoder = new TextDecoderStream();
    port.readable.pipeTo(decoder.writable);
    reader = decoder.readable.getReader();

    serialActive = true;

    // Start reading
    readLoop();
  } catch (err) {
    console.error("Serial error:", err);
  }
}

async function readLoop() {
  while (serialActive && reader) {
    const { value, done } = await reader.read();
    if (done) break;
    if (value) parseSerial(value);
  }
}

function writeSerial(msg) {
  if (writer) writer.write(new TextEncoder().encode(msg + "\n"));
}

function parseSerial(data) {
  serialBuffer += data;
  let lines = serialBuffer.split('\n');
  serialBuffer = lines.pop();

  for (let line of lines) {
    let val = parseInt(line.trim());
    if (!isNaN(val)) brightnessValue = val;
  }
}
int ledPin = 9; // LED connected to pin 9
int potPin = A0; // potentiometer connected to A0
int potValue = 0;

void setup() {
  pinMode(ledPin, OUTPUT);
  Serial.begin(9600); // match baud rate with p5.js
}

void loop() {
  // Read potentiometer (optional if p5 reads directly)
  potValue = analogRead(potPin);
  Serial.println(potValue); // send to p5 for horizontal control

  // Check for serial input from p5
  if (Serial.available() > 0) {
    char command = Serial.read(); // read single character
    if (command == 'F') {        // 'F' = flash LED
      digitalWrite(ledPin, HIGH);
      delay(100);                // keep LED on briefly
      digitalWrite(ledPin, LOW);
    }
  }

  delay(10); // small delay for stability
}
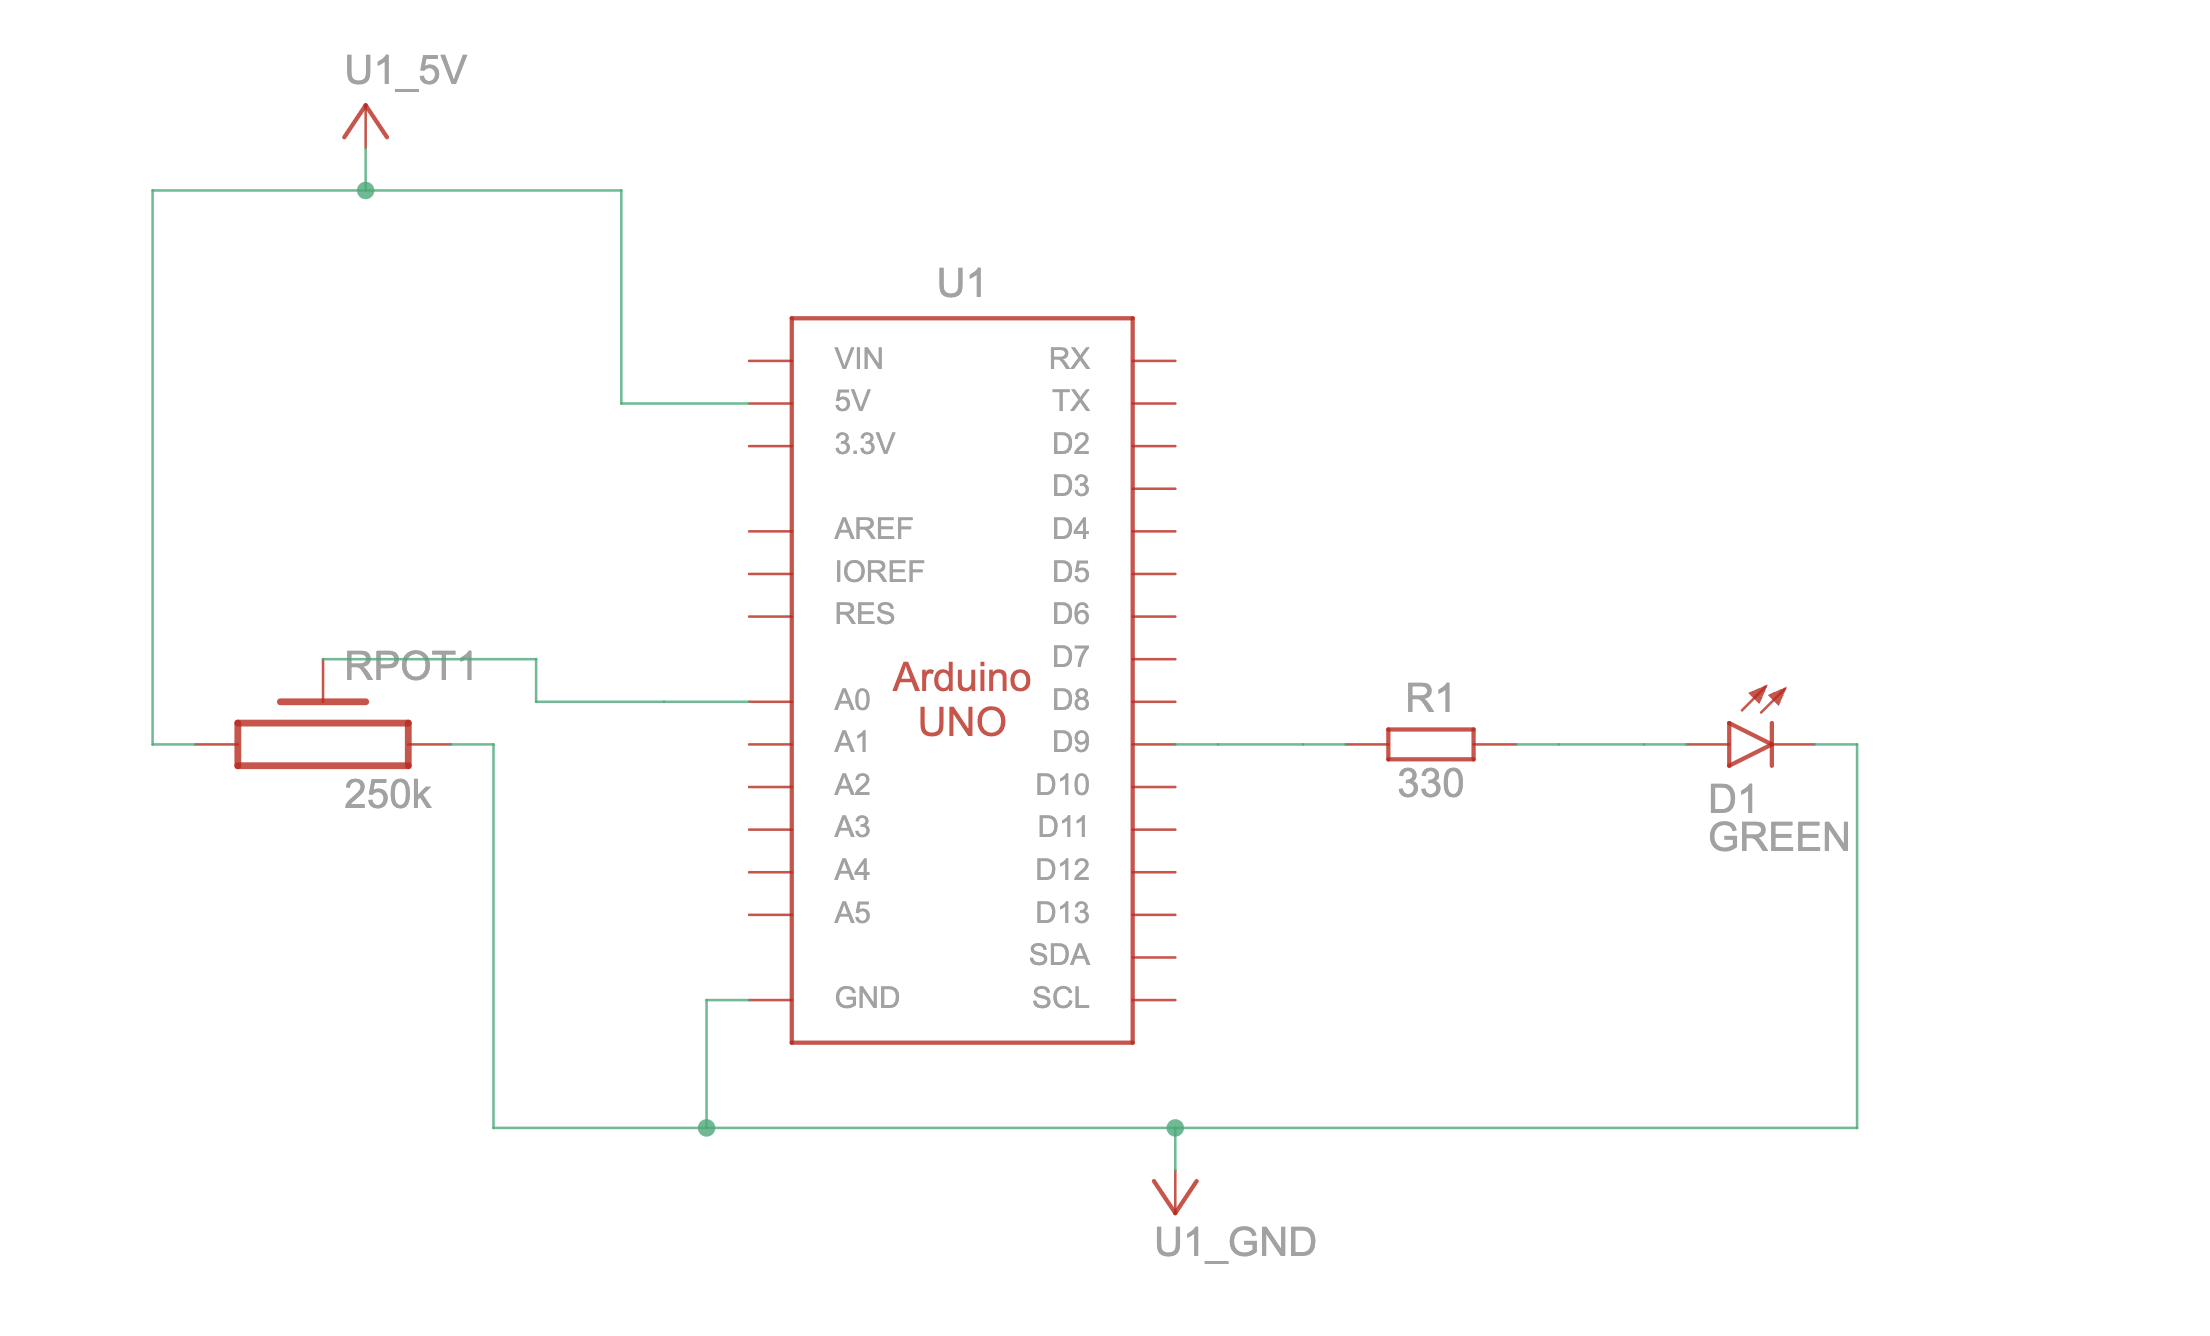
We made the ball bounce continuously up and down in p5.js, and connected an LED on the Arduino that lights up briefly every time the ball hits the floor. A potentiometer on the Arduino was used to control the horizontal movement of the ball: turning the knob to higher values moves the ball to the right, and lower values move it to the left. The potentiometer’s outer pins were connected to 5V and GND, and the middle pin to A0. Using Web Serial, we read the potentiometer values in p5 and mapped them to the horizontal position of the ball while it keeps bouncing.
Video 3: IMG_1030
Schematic 3: 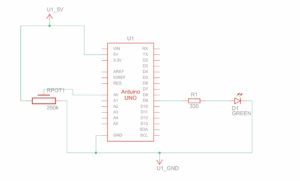
Reflection:
These exercises helped us understand how p5.js and Arduino can work together. We saw that Arduino can send real-world sensor data, like potentiometer values, to p5 to control visuals or simulations, and that p5 can also send commands back to Arduino, like turning an LED on or off. This gave us a clear idea of how much influence p5 can have on Arduino outputs, and how Arduino inputs can drive digital interactions in p5. Practicing this will be really useful for our final project, as it shows how to combine physical sensors, real-time controls, and visual feedback in a simple interactive system.