We decided to create a beat memorizing machine. A simplified version of the loop machine used in beat creation. Essentially, we have button to record the beat, button used to tap the beat and a button used to play the recorded beat.
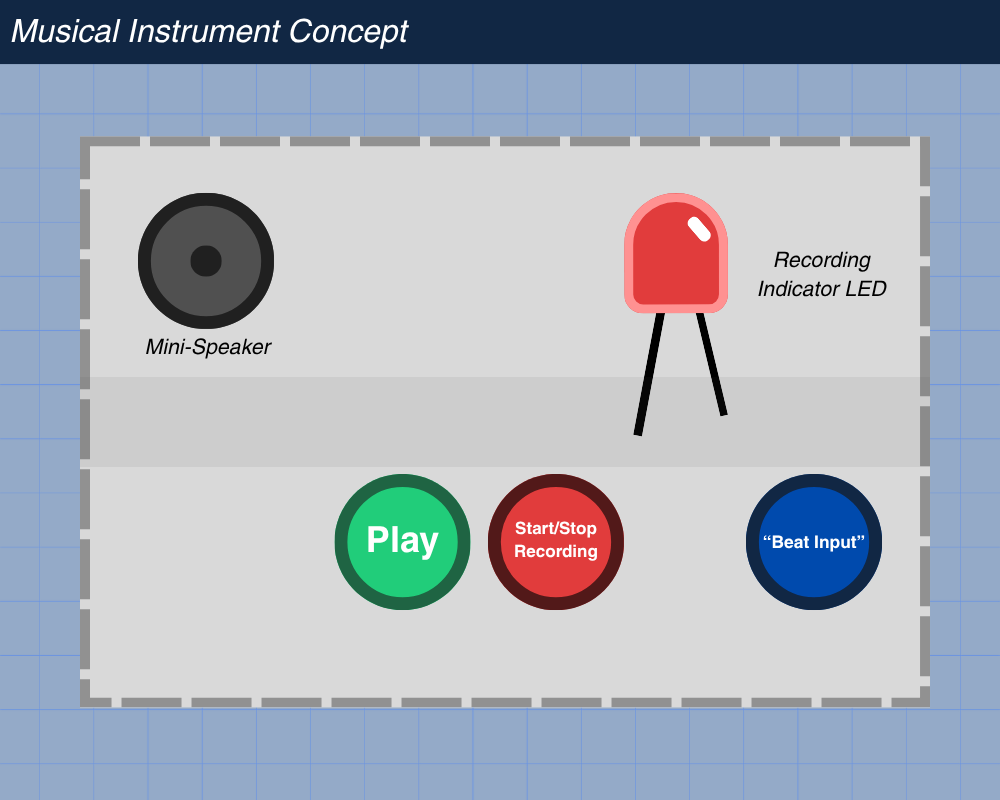
Concept (With Visuals)
After we planned what we wanted to do, I decided to visualize the project first before designing it.
The red button would be to start/stop the recording process. A red LED would indicate whether it was currently recording.
The blue button would be there for the user to tap in their beat.
When you are done with your beat, you can save it by clicking the red button once again. You can see whether it was properly stopped by the indicator turning off. Then you can press the green button to play your recorded beat.
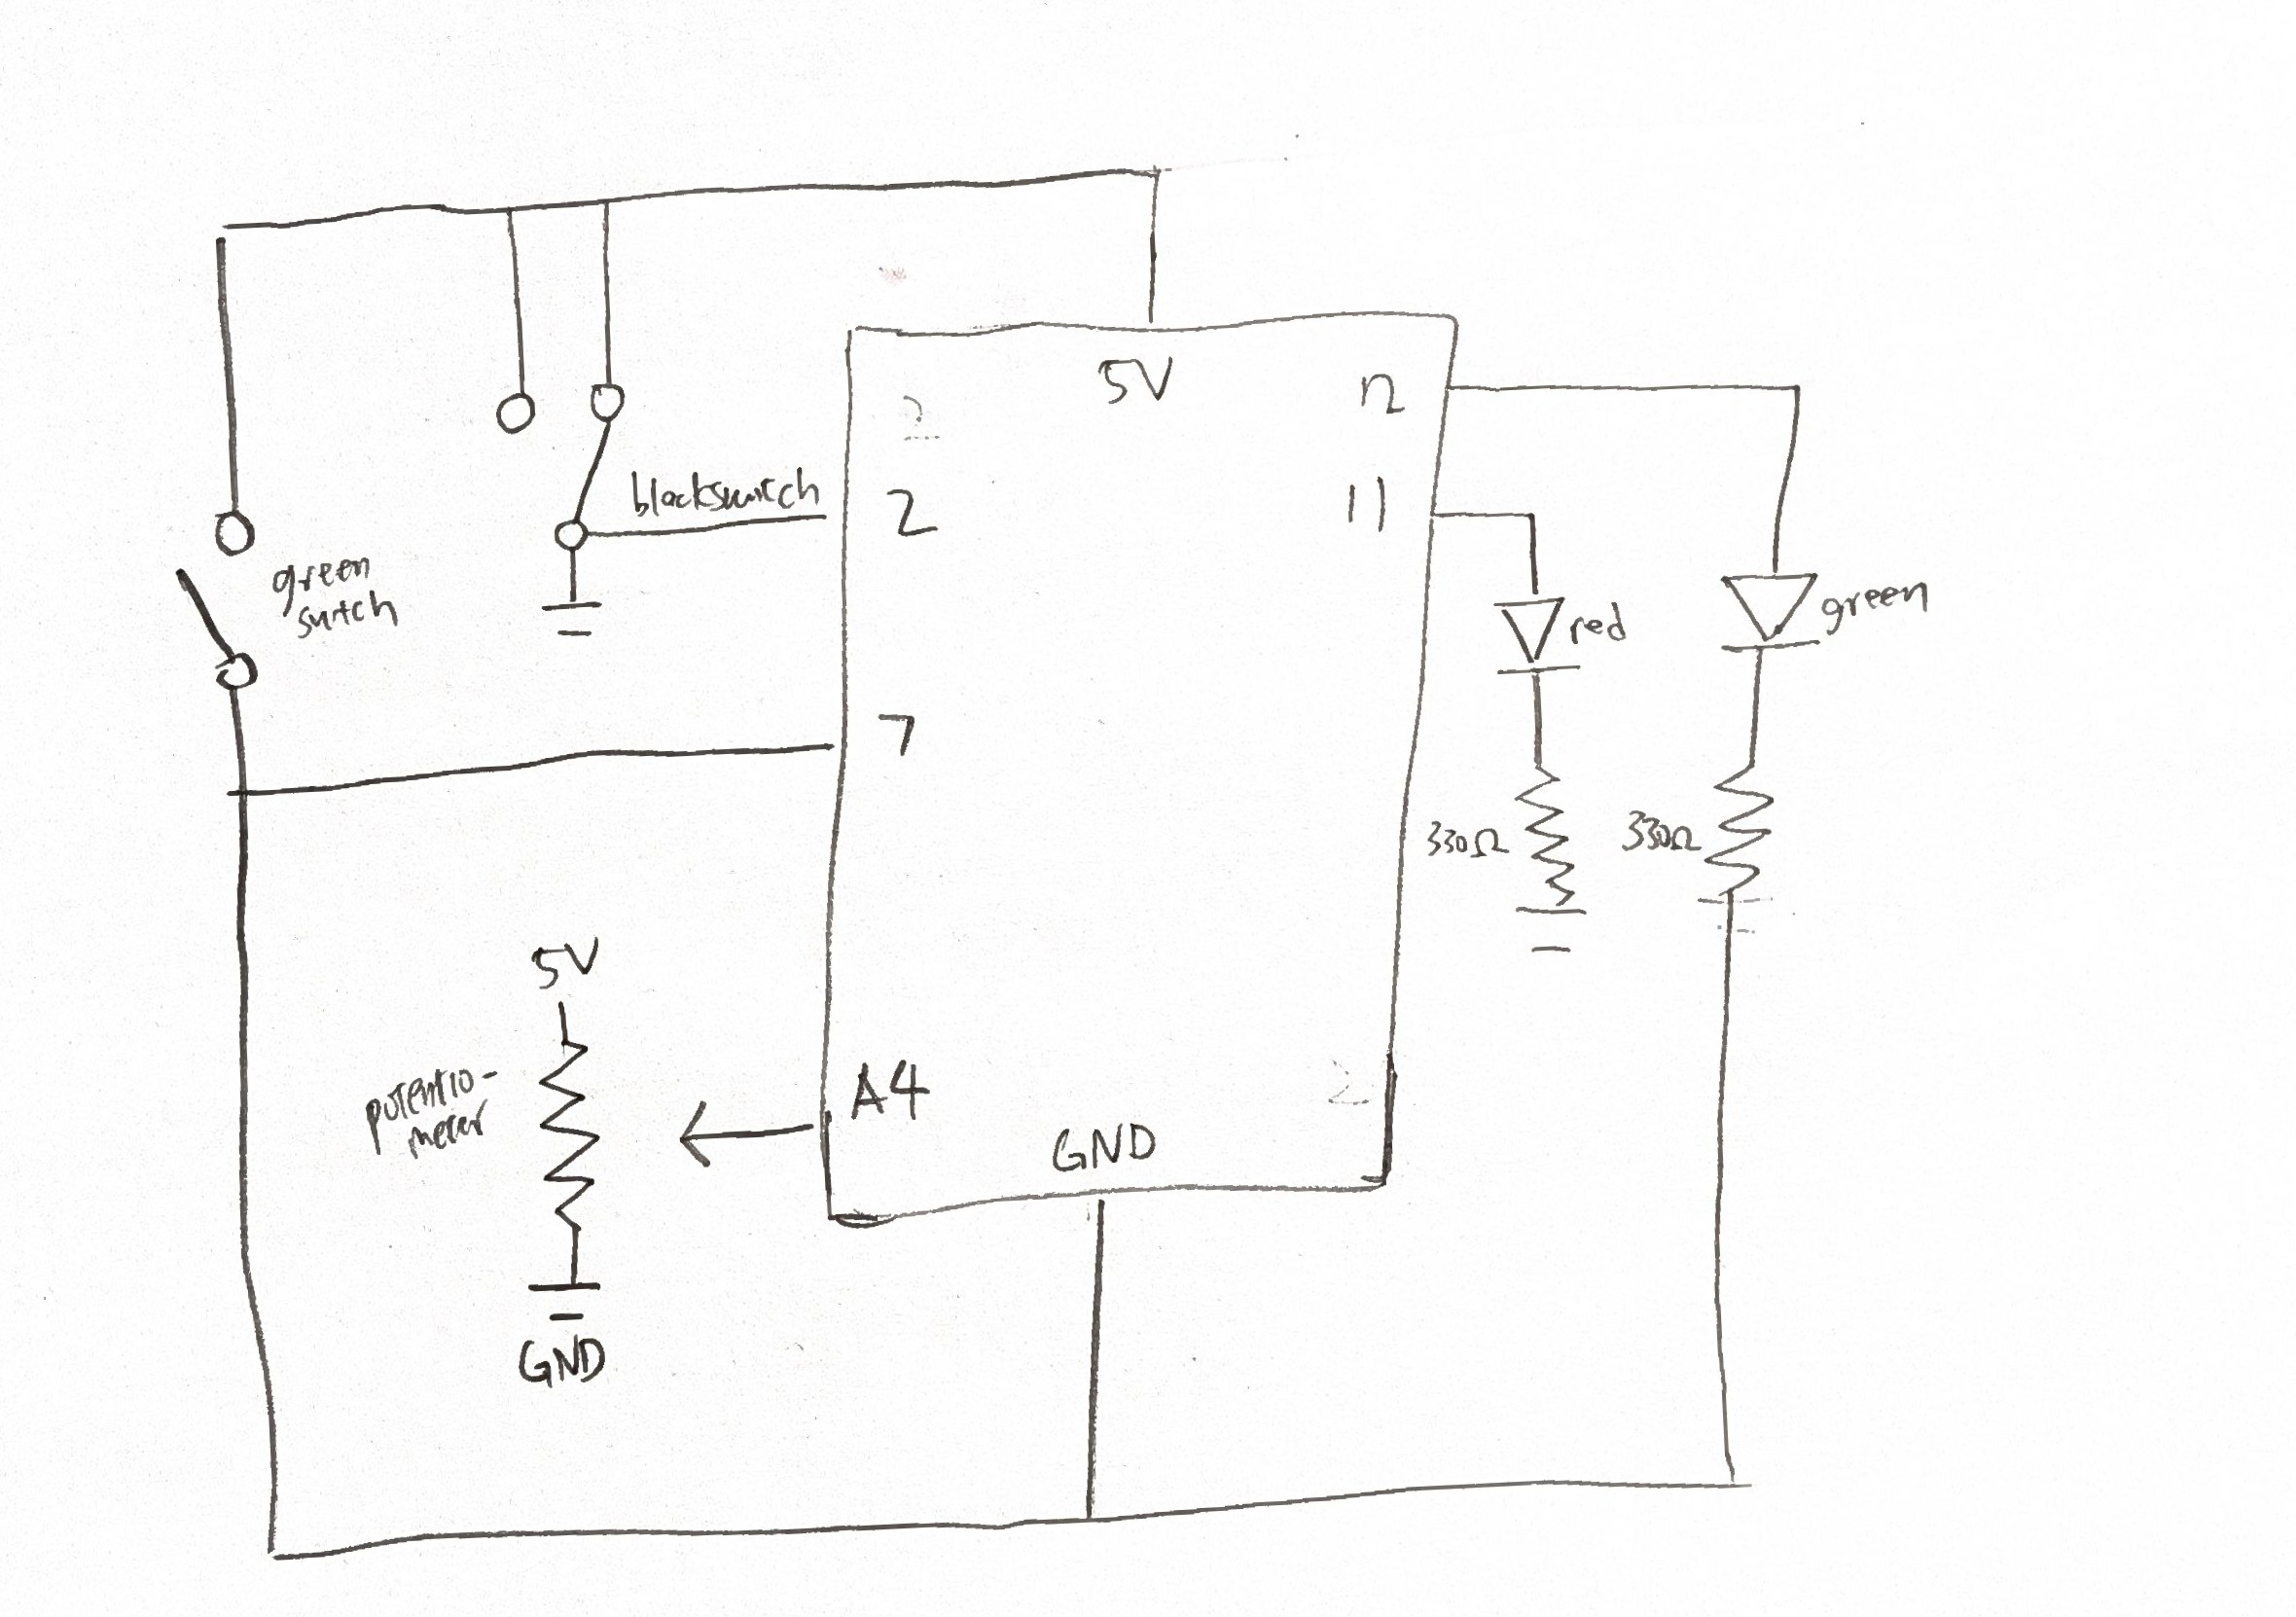
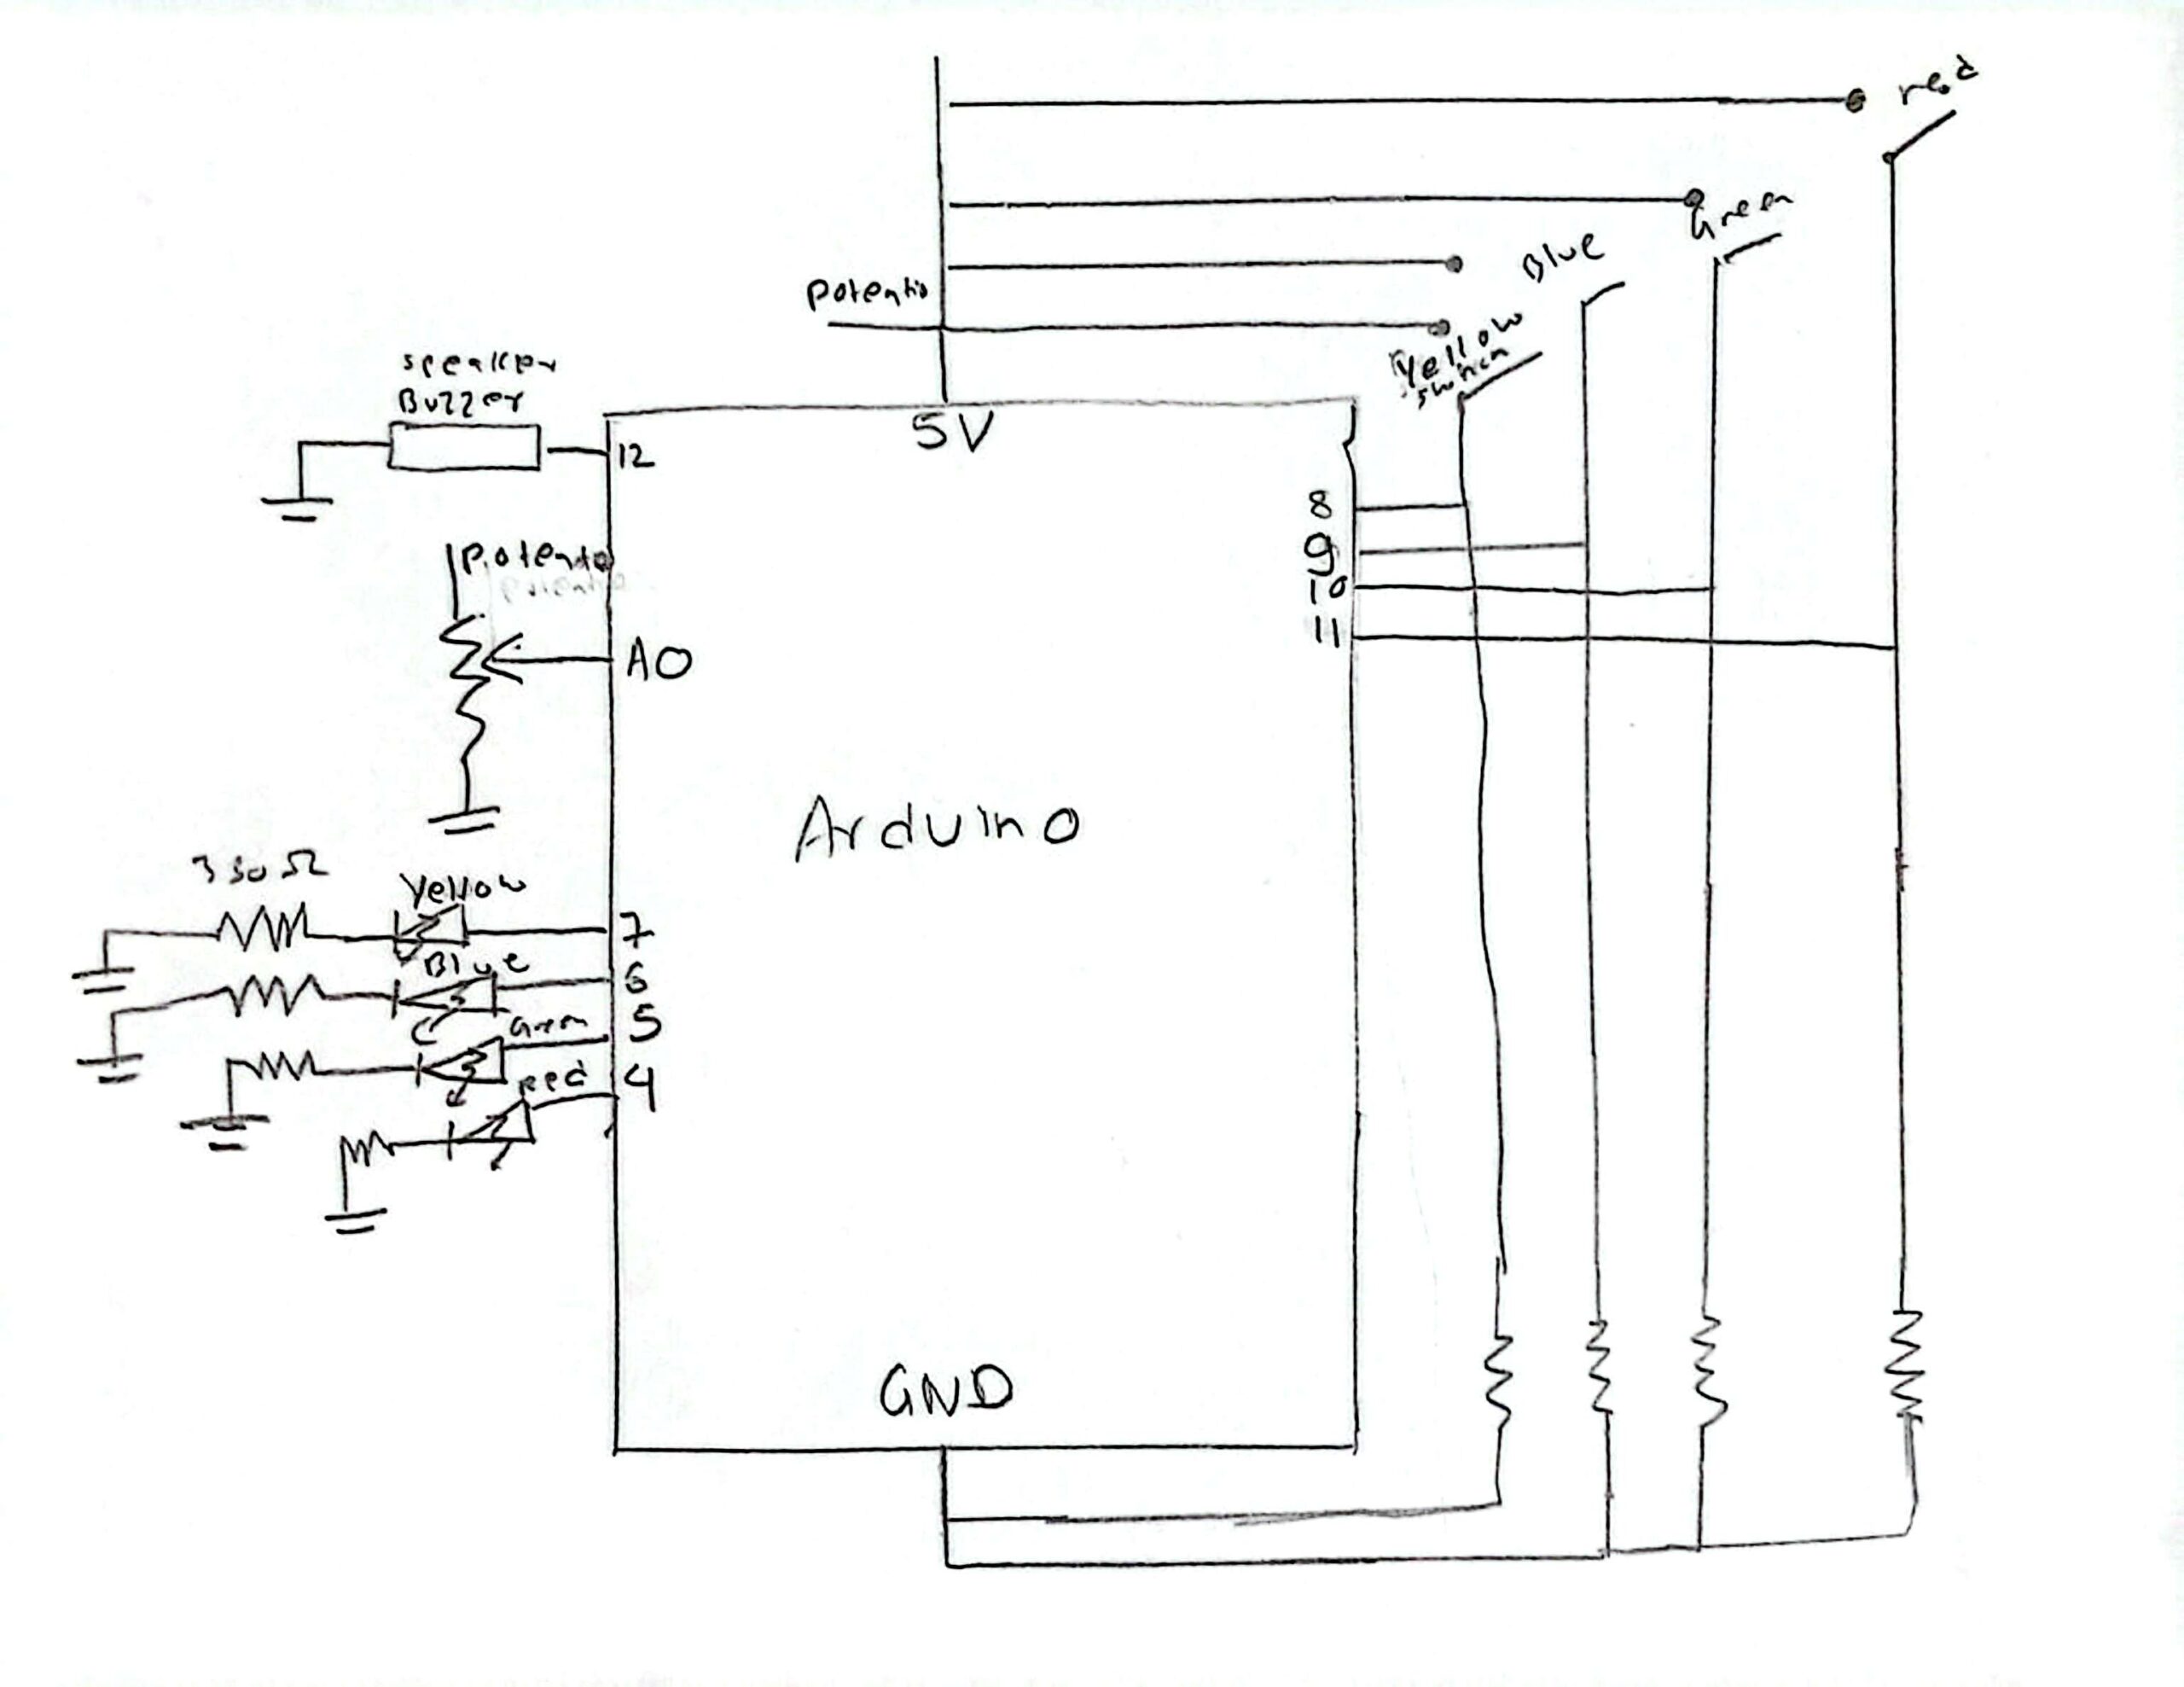
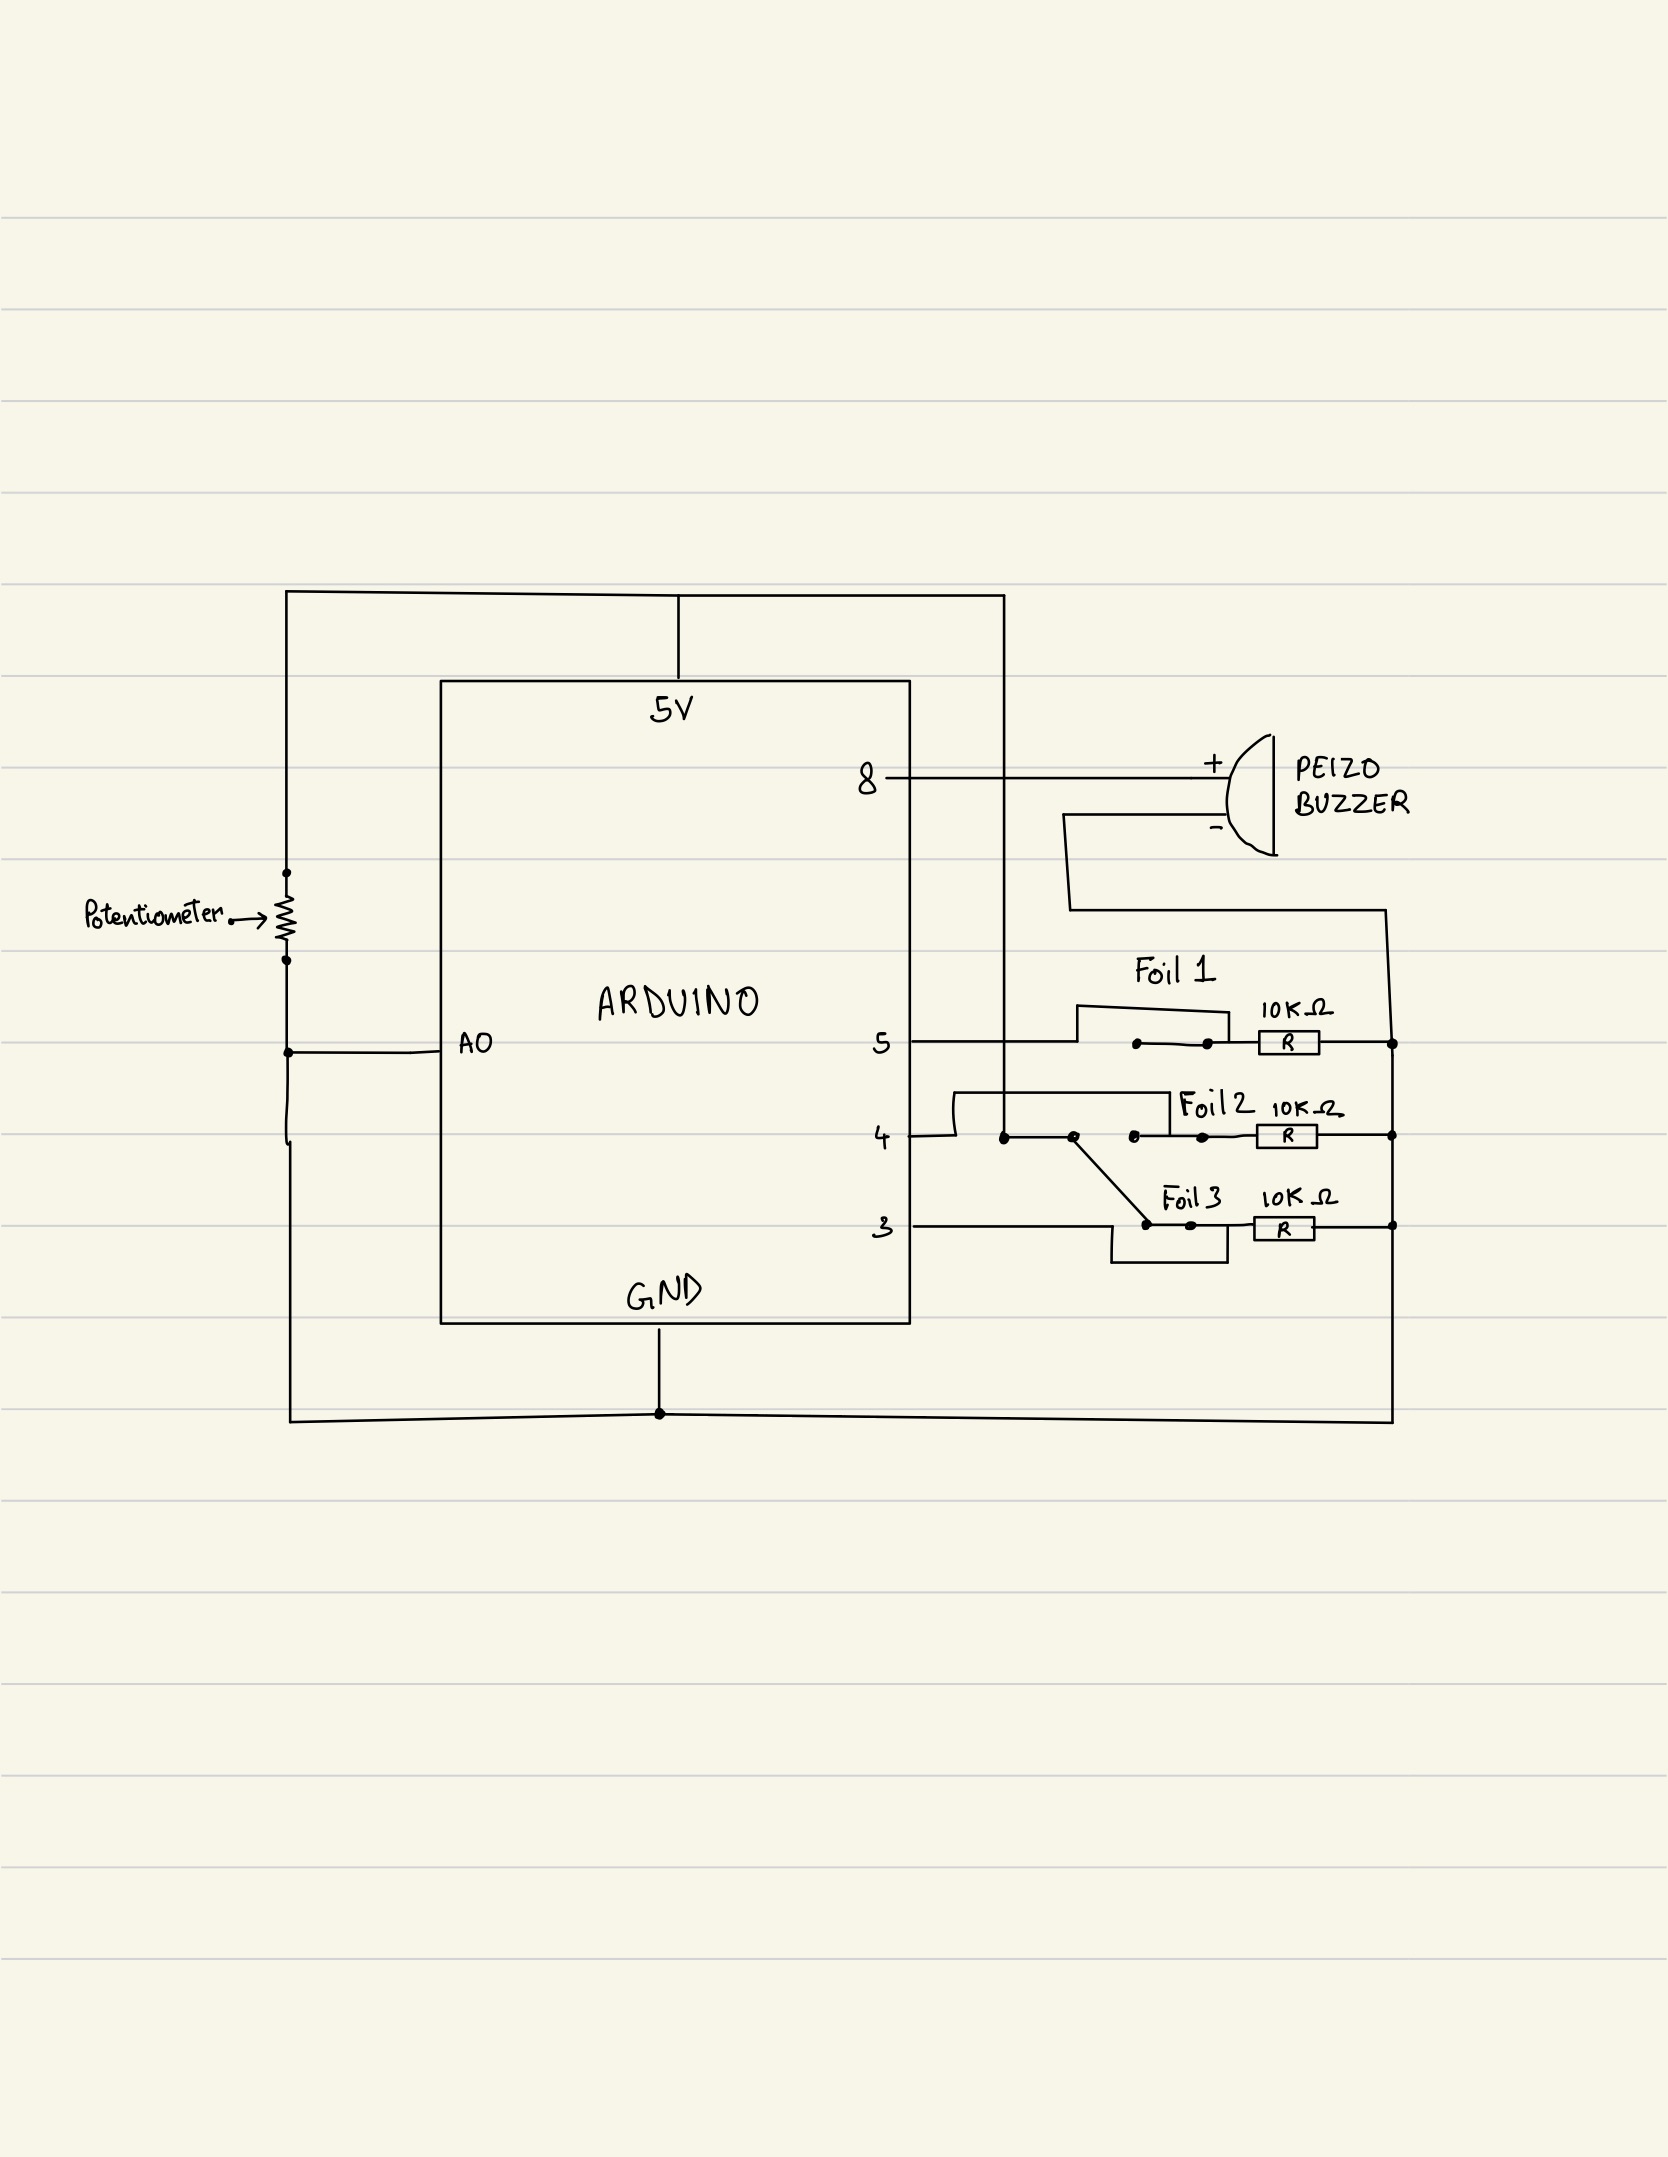
Schematics & Planning – Hubert
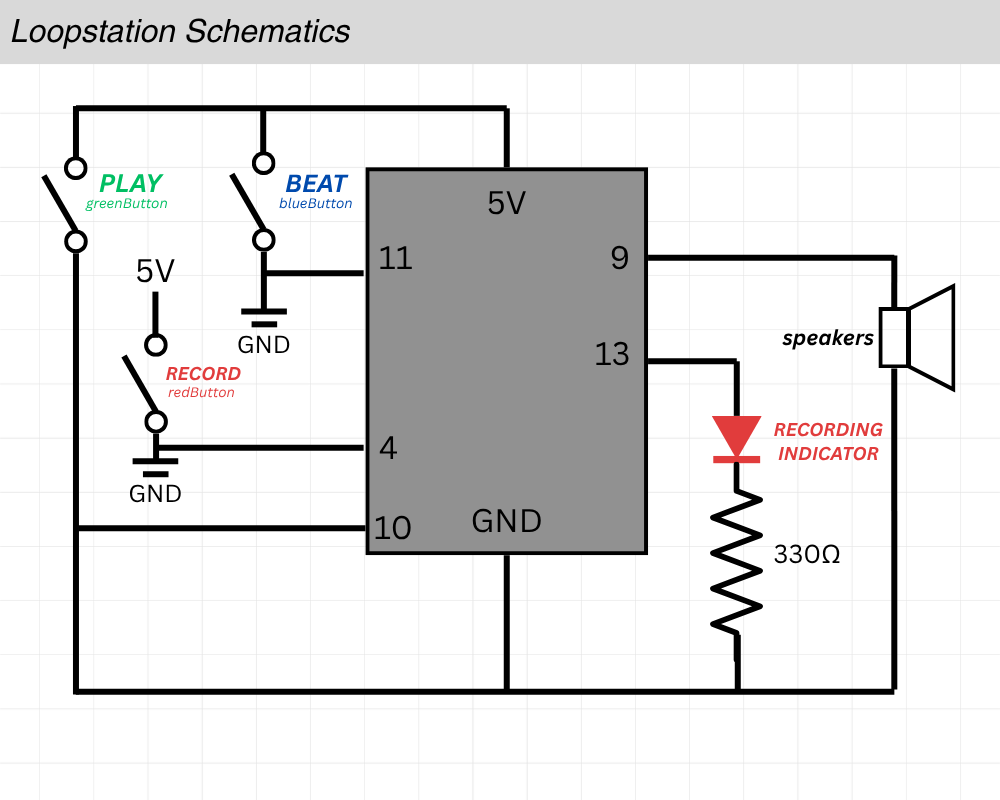
Before we started connecting metal to metal, I made a schematic to quickly map out everything we needed to connect.
Code & Difficulties Encountered
There are 3 main parts to the code.
The first is figuring out debouncing logic, which is used to remove the state when the system is bouncing between true and false when the switch is pressed. The second part is playback, actually playing back the recorded soundLastly, the third which is the hardest part: finding how to store the beat recording.
I’ll start by explaining the hardest part first, which is storing the beat recording.
The beat recording logic works by tracking the time of each button press and release while the device is in recording mode. Every time the beat button is pressed, the program calculates the gap since the previous press (gap = now – tRef) to capture the spacing between beats. When the button is released, it measures the duration the button was held (dur = now – lastPressTime) to record how long that beat lasted. Both values are stored in arrays (gaps[] and durs[]), building a timeline of when each beat starts and how long it plays. Figuring out this logic was the most difficult part.
uint32_t clampToZero(long x) { //used in playback function when sometimes each beat is pressed too quickly and this is used to remove negative timings
  if (x > 0) {                            //for example, to find the silence between each beat, gap[i] represents time since previous press, durs[i-1] is how long it was held
    return static_cast<uint32_t>(x);      //we do gap[i] - dur[i-1] to find the silence between the notes, but when its sometimes pressed very quickly this value becomes negative
  } else {                                //since in playback, we cant delay negative, this is to prevent that
    return 0UL;
  }
}

void playback() {
  if (beatCount == 0) {   //if nothing is recorded exit
    return;
  }
  noTone(speaker); //turn speaker off before we play
  delay(120);       //added delay to make sure nothing is cut off

  for (uint16_t i = 0; i < beatCount; i++) {  //loop through recorded beat
    uint32_t waitMs = gaps[i];

    if (i > 0) {
      long corrected = static_cast<long>(gaps[i]) - static_cast<long>(durs[i - 1]);   //this basically is the logic to finding the true silence between each beat as explained before
      waitMs = clampToZero(corrected);
    }

    delay(waitMs); //delay by true silence

    //play the tone for the recorded duration
    tone(speaker, freq, durs[i]);

    //let the tone run to completion before stopping it
    delay(durs[i] + 2);
    noTone(speaker);
  }
}
Now onto explaining the playback logic. The playback logic is responsible for reproducing the rhythm that was recorded. It does this by reading through the stored arrays of gaps and durations in order. For each beat, the program first waits for the gap time, which is the delay before the next beat begins and then plays a tone on the speaker for the duration that was originally recorded. Because each recorded gap includes the previous beat’s duration, the playback code subtracts the previous duration from the current gap to get the true silent time between beats. This ensures that the playback matches the timing and spacing of the user’s original input, accurately reproducing both the rhythm and the length of each beat. I had to create a logic to turn negative silence time to positive because sometimes it gave errors when the inputs and the durations of beats were too short. This is explained in depth in the comment section of the code.
void update() {   //ran inside the loop to update button state
  bool reading = digitalRead(pin); //read button

  if (reading != lastReading) { //if reading has changed since last time, record when it changed (it means it maybe bouncing)
    lastDebounceMs = millis();
    lastReading = reading;
  }

  if ((millis()- lastDebounceMs) >debounce) { //if the input has stayed the same for more than 20ms, what I set as accept it as real change
    if (reading != stableState) {
      stableState = reading;

      if (stableState== LOW) {
        pressEvent =true;      //we ontl change pressEvent and release Event only when input stayed same for 20ms
      } else {
        releaseEvent =true;
      }
    }
  }
}
Finally, the debounce logic ensures that each button press or release is detected only once, even though mechanical switches naturally produce rapid, noisy fluctuations when pressed. When a button’s state changes, the program records the current time and waits a short period to confirm that the signal has stabilized. Only if the input remains steady for longer than this debounce delay does the program treat it as a valid press or release event. This filtering prevents false triggers caused by electrical noise or contact bounce, giving the system clean, reliable button inputs for recording and playback control. At first, I didn’t have this debounce logic implemented and had a hard time figuring out why the system sometimes failed to recognize button presses or seemed to trigger multiple times for a single press. Once the debounce logic was added, the button responses became stable and consistent.