Week 12 – Documentation on Final Project

The final project is a Mini DJ Booth, a flat cardboard controller styled like a DJ console with painted “records” and four colored buttons on top. The cardboard box houses the Arduino and wiring, while the laptop screen becomes the virtual stage using p5.js. Each physical button represents a different beat or sound layer (for example: kick, snare, base, drums). When a user presses combinations of buttons, they can live-mix these layers while watching synchronized visuals, mimicking the feel of a compact DJ setup.

Generated with Chat GPT

I haven’t started the actual coding yet, but right now I’m more focused on the physical build, especially because this will be my first time soldering and I want to make sure I do it cleanly and safely. During our lab tour, we saw the LED push buttons, and they’re honestly perfect for this project, they’re big, colorful, satisfying to press, and will make the DJ booth feel much more realistic and professional. My plan is to use scrap cardboard from the back of the lab to construct the box itself, painting it to look like a real DJ setup with turntables and controls. Once the physical build is stable, I’ll move on to connecting the buttons to the Arduino and then writing the p5.js code to bring the whole system to life.

On the Arduino side, the program will continuously read the state of the four input buttons using `digitalRead()`. Each button is wired with a pull-down (or pull-up) resistor so the Arduino can reliably detect presses. In the main loop, the Arduino will encode the button states as a simple serial connection  and send this to the computer via USB using Serial.println(). The Arduino will not generate audio; its main role is to sense button presses quickly and transmit clean, structured data to p5.js so there is minimal latency between touch and feedback.

Here is a schematic example that I could potentially adapt for my final project:

Source: https://www.the-diy-life.com/multiple-push-buttons-on-one-arduino-input/

In the p5.js program, the sketch will receive the serial data, log the four button values, and use them to control both sound playback and visuals. For each button, p5 will toggle/keep looping the beat and  (or optionally stop the sound, depending on the final interaction choice). In the p5 sketch I will download four different audio tracks and will generate distinct color schemes and animations for each active button, for example, different color blocks, pulsing circles over each painted “record,” or waveform-style bars that move with the beat. At this stage, communication is mostly one-way (Arduino → p5), but there is room to extend it later (e.g., p5 sending messages back to Arduino to drive LEDs of each button). I just want to note that I havent started working on the p5 visuals yet in terms of code because I’m still planning the overall mood and ambiance I want to set.

I found royalty free beats I could download for the audio:

Week 11~: Production (Arduino + P5)

Production #1: Potentiometer Moves Ellipse

Link to P5 Sketch #1

Production #2: P5 Controls LEDs

Link to P5 Sketch #2

I modified it to also take “A” and “D” keys as input just like the mouse clicks

week 11 – in class exercises

For this week’s assignment, Zeina and I worked on three different exercises that focused on serial communication.

1- Make something that uses only one sensor  on Arduino and makes the ellipse in p5 move on the horizontal axis, in the middle of the screen, and nothing on arduino is controlled by p5

ARDUINO CODE

void setup() {
  Serial.begin(9600);
}

void loop() {
  int sensorValue = analogRead(A1); // 0–1023
  Serial.println(sensorValue);             // send to p5.js
  delay(50);
}

P5 CODE

let port;
let connectBtn;
let baudrate = 9600;
let lastMessage = "";
let sensorValue = 0;

function setup() {
  createCanvas(400, 400);
  background(220);

  //Setting the global variable port to a new serial port instance inside setup:
  port = createSerial();

  // we can open ports we have used previously without user interaction
  let usedPorts = usedSerialPorts(); //array of used ports
  if (usedPorts.length > 0) {  
    port.open(usedPorts[0], baudrate); //if any used port is in the array, open that port with 9600 baudrate
  }

  // any other ports (new ones) can be opened via a dialog after user interaction (see connectBtnClick below)
  connectBtn = createButton("Connect to Arduino");
  connectBtn.position(width/2, 270);
  connectBtn.mousePressed(connectBtnClick);

}

function draw() {
  background("white");
 
  // Read from the serial port. This is a non-blocking function. If a full line has come in (ending in \n), it returns that text. If the full line is not yet complete, it returns an empty string "" instead.
  let str = port.readUntil("\n");
  if (str.length > 0) {   // if str -a string- has any characters
    // print(str);
    lastMessage = str;
    sensorValue = int(lastMessage);  
  }
 
  //draw ellipse mapped to horizontal axis
  let x = map(sensorValue, 0, 1023, 0, width);  
  ellipse(x, height / 2, 40, 40);
 
  // Display the most recent message
  text("Last message: " + lastMessage, 10, height - 20);

  // change button label based on connection status
  if (!port.opened()) {
    connectBtn.html("Connect to Arduino");
  } else {
    connectBtn.html("Disconnect");
  }
}

function connectBtnClick() {
  if (!port.opened()) {
    port.open("Arduino", baudrate);
  } else {
    port.close();
  }
}


2-Make something that controls the LED brightness from p5

DEMO

IMG_8392 (2)

ARDUINO CODE

// Week 12 Example of bidirectional serial communication

int leftLedPin = 2;
int rightLedPin = 5;

void setup() {
  Serial.begin(9600);

  pinMode(LED_BUILTIN, OUTPUT);
  pinMode(leftLedPin, OUTPUT);
  pinMode(rightLedPin, OUTPUT);

  digitalWrite(leftLedPin, HIGH);
  digitalWrite(rightLedPin, HIGH);
  delay(200);
  digitalWrite(leftLedPin, LOW);
  digitalWrite(rightLedPin, LOW);

  while (Serial.available() <= 0) {
    digitalWrite(LED_BUILTIN, HIGH);
    Serial.println("0,0");
    delay(300);
    digitalWrite(LED_BUILTIN, LOW);
    delay(50);
  }
}

void loop() {
  while (Serial.available()) {
    digitalWrite(LED_BUILTIN, HIGH);

    int left = Serial.parseInt();
    int right = Serial.parseInt();

    if (Serial.read() == '\n') {

      // -----------------------
      // ONLY CHANGE IS HERE:
      // -----------------------
      digitalWrite(leftLedPin, left);     // left stays ON/OFF
      analogWrite(rightLedPin, right);    // right is now BRIGHTNESS (0–255)
      // -----------------------

      int sensor = analogRead(A0);
      delay(5);
      int sensor2 = analogRead(A1);
      delay(5);
      Serial.print(sensor);
      Serial.print(',');
      Serial.println(sensor2);
    }
  }
  digitalWrite(LED_BUILTIN, LOW);
}

p5 CODE

let port; // making a var to hold the serial port
let baudrate = 9600; // speed for talking to arduino
let brightnessSlider; // slider to pick brightness
let smoothBrightness = 0; //transition into the brightness instead of jumping

function setup() {
  createCanvas(400, 200); // just making a small canvas for ui
  textSize(18); // bigger test

  brightnessSlider = createSlider(0, 255, 0); // slider from 0 to full bright
  brightnessSlider.position(20, 80); // where it shows up on screen
  brightnessSlider.style('width', '200px'); // make it a bit wider

  port = createSerial(); // create a serial object so we can connect to arduino

  let used = usedSerialPorts(); // check if we already used a port before
  if (used.length > 0) {
    port.open(used[0], baudrate); // auto connect to the last used port
  }
}

function setupSerial() {
  if (!port.opened()) { // if no connection yet
    port.open("Arduino", baudrate); // try to open one
  } else {
    port.close(); // if already open then close it (toggle)
  }
}

function draw() {
  background(240); // light grey

  if (!port.opened()) {
    text("Press SPACE to connect", 20, 30); // tell the user what to do
  } else {
    text("Connected!", 20, 30); // connection message
  }

  let target = brightnessSlider.value(); // get the slider value

  // do transitional brightness
  smoothBrightness = lerp(smoothBrightness, target, 0.07);
 

  text("Brightness: " + int(smoothBrightness), 20, 70); // show the number

  // actually send the brightness to the arduino
  if (port.opened()) {
    let sendString = "0," + int(smoothBrightness) + "\n"; // left=0 right=smooth
    port.write(sendString); // send it over serial
  }
}

function keyPressed() {
  if (key === " ") {
    setupSerial(); // hitting space toggles the port connection
  }
}

3-Take the gravity wind example (https://editor.p5js.org/aaronsherwood/sketches/I7iQrNCul) and make it so every time the ball bounces one led lights up and then turns off, and you can control the wind from one analog sensor

ARDUINO CODE

void setup() {
  pinMode(2, OUTPUT);
  Serial.begin(9600);
}

void loop() {
  int sensorValue = analogRead(A1);
  Serial.println(sensorValue);

  //check for bounce
  if (Serial.available() > 0) {
    //if 1, light up led
    if (Serial.parseInt() == 1) {            
      digitalWrite(2, HIGH);
      delay(100);                          
      digitalWrite(2, LOW);
    }
  }
  delay(10);
}

P5.JS CODE

let velocity;
let gravity;
let position;
let acceleration;
let wind;
let drag = 0.99;
let mass = 50;
let port;
let connectBtn;
let baudrate = 9600;
let lastMessage = "";
let sensorValue = 0;

function setup() {
  createCanvas(640, 360);
  noFill();
  position = createVector(width / 2, 0);
  velocity = createVector(0, 0);
  acceleration = createVector(0, 0);
  gravity = createVector(0, 0.5 * mass);
  wind = createVector(0, 0);

  //Setting the global variable port to a new serial port instance inside setup:
  port = createSerial();

 
  // we can open ports we have used previously without user interaction
  let usedPorts = usedSerialPorts(); //array of used ports
  if (usedPorts.length > 0) {  
    port.open(usedPorts[0], baudrate); //if any used port is in the array, open that port with 9600 baudrate
  }
// any other ports (new ones) can be opened via a dialog after user interaction (see connectBtnClick below)
  connectBtn = createButton("Connect to Arduino");
  connectBtn.position(width/2, 270);
  connectBtn.mousePressed(connectBtnClick);
}

function draw() {
  background(255);
 
  // Read from the serial port. This is a non-blocking function. If a full line has come in (ending in \n), it returns that text. If the full line is not yet complete, it returns an empty string "" instead.
  let str = port.readUntil("\n");
  if (str.length > 0) {   // if str -a string- has any characters
    // print(str);
    lastMessage = str.trim();
    sensorValue = int(lastMessage);    
  }
 

  //wind controlled by analog sensor
  wind.x = map(sensorValue, 0, 1023, -1, 1);
  console.log("Sensor value: " + sensorValue);
 

  applyForce(wind);
  applyForce(gravity);

  velocity.add(acceleration);
  velocity.mult(drag);
  position.add(velocity);
  acceleration.mult(0);

  ellipse(position.x, position.y, mass, mass);

  // Bounce detection
  if (position.y > height - mass / 2) {
    velocity.y *= -0.9; // Dampening
    position.y = height - mass / 2;

    //send bounce signal to Arduino
    port.write("1\n");
  }
// Display the most recent message
  text("Last message: " + lastMessage, 10, height - 20);

  // change button label based on connection status
  if (!port.opened()) {
    connectBtn.html("Connect to Arduino");
  } else {
    connectBtn.html("Disconnect");
  }
}

function applyForce(force){
  // Newton's 2nd law: F = M * A
  // or A = F / M
  let f = p5.Vector.div(force, mass);
  acceleration.add(f);
}

function keyPressed(){
  if (keyCode==LEFT_ARROW){
    wind.x=-1;
  }
  if (keyCode==RIGHT_ARROW){
    wind.x=1;
  }
  if (key==' '){
    mass=random(15,80);
    position.y=-mass;
    velocity.mult(0);
  }
}

function connectBtnClick() {
  if (!port.opened()) {
    port.openDialog(); // user selects port
  } else {
    port.close();
  }
}

Final Project Proposal

I was looking for a room in Baraha to get some work done. However, to check some of the rooms there, I had to manually open the doors to see if they were occupied or not. I found the whole process inefficient, since I had to apologize if the room was occupied. The experience was embarrassing, and I was sure there were better ways to avoid it from happening.

So I decided to build my final project based on this idea: a detection machine that lets people know if the room is occupied or not. I found further inspiration from the parking lights installed in some of the malls in Abu Dhabi. There are lights on top of a parking space, and those lights display colors depending on the availability of the space.

At first, I thought using ultrasonic sensors would work. The idea was to have a sensor installed on the door to check if someone walks across the doorway: if they do, activate the light. However, ultrasonic sensors spread in an arc, so they may cause more errors than I expect. Next, I considered using PIR sensors that detect motion and heat. This is a good approach, but since PIR detects only movement, there are issues when people inside do not move: if they sit still and work on their projects, the sensor would assume the room is empty. This defeats the whole purpose of the project.

So for my sensors, I decided to use IR beam-break sensors. It is a single-line sensor that triggers when something gets in the way, so I thought it would be perfect for this project. If I have two of those sensors, I would also be able to determine whether a person enters or exits the room, allowing me to turn the LED on or off. It would be better to have the IR beam sensor installed at the door and a PIR motion sensor installed inside the room for a two-way detection system to ensure fewer errors, but cost-wise, I found that it was not worth having two sensors. I want to buy the sensors so that I can keep the project for my own use without having to return it later.

For the display, I will either order an LED panel or just use a circular LED display to show the status. Universal language such as red light means it is occupied, and green light means that the room is available. I can get more creative and use LED panels to show art installations, which would make it look more like an interactive media project.

Final Project Proposal: Plant Care Station

Final Project Proposal: Plant Care Station

The final project idea I have in mind is to make a connection between the Arduino and p5.js to take care of plants. Through buttons the user can fill the meter for water (through a blue buttons), then add fertilizer (yellow button), to trim (red button), to move sunlight closeness(yellow buttons one for arrow up one for arrow down).

You can even get a score or a rating based on how well you took care of the plant. Checking each metric. The Arduino part would be multiple buttons and a box that covers these buttons with larger buttons on the wooden box (design is inspired by the beat hoven project displayed in class).

ARDUINO

p5

Final Project Idea

My project idea is to make a game or maybe some kind of art tool that uses a tilt controller I’m going to build myself. I might use an Adafruit Circuit Playground to be the controller, since it has an accelerometer inside to sense which way you’re tilting it. I plan to use the Arduino IDE to program the Circuit Playground and get the accelerometer data. Then, I want to send that data to my computer and use p5.js to make the actual game or art program. I’m not totally sure what the final thing will be, but it could be a maze game where you tilt to move the character, a simple pilot game, or a cool art program where the tilt moves the brush around instead of using arrow keys.

Week 11: Final Project Concept

Main Concept

The main concept for my final project is the “Lock In Buddy.” It basically never lets you stop studying. Your laptop acts as the monitor, and the system uses Arduino sensors and p5 to track your behavior while you are studying. If it detects your phone, it triggers a super loud alarm. If it senses that you’re leaving the table using a distance sensor, it activates the speaker and says, “Come back to the desk. You gotta lock in!” I also want to incorporate the Pomodoro technique, where you study for 25 minutes and take a 5-minute break. A student can press a physical button to start the timer, and press it again to stop it. At the end, the system will give you a score based on how distracted you were by environmental variables, like looking at people walking by, eating, or any other interruptions. Essentially, it becomes your study buddy until you graduate.


Lock In Buddy will have these features: 

    • Phone detection alarm 

It will detect when the user picks up a phone, uses, or brings their phone to a nearby desk. The monitor is always watching the user to make sure that they don’t use their phone. 

    • Leaving the desk detection 

The distance sensor detects when the user moves away from the study area. It plays a warning voice message saying “you gotta lock in buddy. Or you will become homeless”. 

    • Real time distraction detection 

The system detects whether you’re being distracted by environmental conditions. Those include looking at people passing by, eating, chair movement, or noise.

    • Pomodoro timer with physical buttons 

Users can press the button to start, pause and stop the Pomodoro session. Also, it will record how long you have been studying for, which is going to be recorded for the scoring system as well. 

    • Focus score generation 

P5 will calculate the number of distractions, phone usage count, time away from desk, noise levels, and the number of successful Pomodoro sessions.


How to integrate p5 and Arduino

Phone detection + alarm: 

    • p5.js + Webcam + ML5 COCO-SSD 

Or 

    • Arduino light sensor + phone jail box
    • Start playing the warning alarm saying “Lock in” in p5


Eating or talking: 

    • Sound sensor


Pomodoro Timer with physical buttons: 

    • Buttons with arduino


Leaving desk: 

    • Ultrasonic distance sensor 


Focus Score generation: 

    • Arduino continuously reads 
      • Light sensor → phone removed 
      • Ultrasonic sensor → left desk 
      • Sound sensor → eating/talking 
      • Button → start/stop Pomodoro
    • Send those data to p5 and calculate the score 

Week 11: Final Project Preliminary Concept

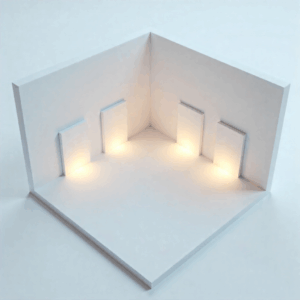
For the final project, I will create an interactive virtual gallery that will respond to the user input through a variety of sensors to guide them to a direction in the gallery. The works themselve are interactive as well, on a smaller scale, where each explore a different output, such as sound and visuals. The concept behind it is exploring the intersection between interactivity and the different themes we explored through class and the reading, to provide a viewer of the work with an engaging experience where they get to see a reflection of their actions, giving them control over the work.

Final Project Preliminary Concept: Motion-Responsive Interactive Art Installation

For my final project, I want to create a motion-responsive interactive installation. The idea is that a user’s movements will be sensed by Arduino sensors, like an ultrasonic sensor, and sent to p5.js, which will process the input and generate dynamic visuals. I haven’t yet decided on the exact type of art to display; it could be abstract particle systems, animated images, or other digital creations. However, the key is that the visuals will respond in real-time to the user’s motion, making the experience immersive and engaging.

A recent trip I made to teamLab Phenomena, where I experienced installations that react to human gestures, is the inspiration behind this project. For example, moving through a space could cause flowers to bloom digitally or change the colors of projected visuals. I want to recreate that sense of wonder and interaction in my own project, where the user feels connected to the digital environment.

This project will be bidirectional.

  • Arduino → p5.js: The user’s gestures are sensed by Arduino and drive the visuals, controlling motion, shape, size, or color of the on-screen elements.

  • p5.js → Arduino: When the visuals reach certain thresholds, for instance, a cluster of particles grows large, or an animated image reaches a boundary, p5.js will send meaningful signals back to Arduino. These signals could trigger LEDs or small motors to give tactile feedback, making the interaction feel alive and responsive. This way, the user sees the effect on screen and feels it physically, creating a continuous loop of action and response.

Week 11: Reading Response

Design meets disability covers an important aspect of assistive technology that is often overlooked by the developers of such devices: design. The design aspect of these devices is built on the societal belief that disability is something to be ashamed of or something that needs to be hidden.  Hence the discretion takes center in the design process, leaving behind aesthetics. Moving away from this belief and centering aesthetics over discretion would contribute to overcoming the stigma behind disability not only on an individual level, but on a societal level. The writer highlights the example of the glasses, that converted an assistive device from just a functional device to a fashion piece that is used as a method of expressing identity.

This shift in perspective that came from the focus on aesthetics caused a significant change on the view of visual impairments, that could be applied to other devices. That can only be achieved when designers begin viewing these devices as an essential part of everyday life rather than medical necessities, focusing on how they can be used by the users to display their identity. Converting devices such as hearing aids and prosthetic limbs to opportunities for expression rather than reminders of their differences. This was an important message as approaching the design of assistive technology with creativity and curiosity, would transform the field of development of assistive technology. Therefore, putting aesthetics in the forefront is not merely a matter of visual aspect. It involves acknowledging the emotional and social aspects of disability and creating designs that respect and promote visibility instead of pushing them into the shadows.