Assignment 1: Self-Portrait

In this assignment, the task was to sketch out our self-portraits. I don’t really draw life forms with features so I choose to do something non-living. It’s a flower!

I started out with the Petals. I used the Ellipse function and drew reasonably sized petals. I then aligned them at one point by rotating them. Then I drew the middle part of the flower i.e. a circle. To add some detail, mainly so that it looks like a sunflower 🌻, I added a few lines and formed a crisscrossed pattern. The colors were changed accordingly. The petals blink after a certain time (actually they change their color). Then, the stem was drawn and leaves were added. I used an ellipse shape to make some grass at the bottom. Also, added some clouds and sun. My glowy sunflower is ready!

Kashyapa Self Portrait

I started off by taking a photograph of myself so I would be able to take a good look at myself and see what I look like. I then paid very close attention to the different shapes I could spot on my face, like the eyes being ellipses for example. By the time I was done with this I had a pretty good idea as to how I would make the self portrait. When I started however, I realized that some aspects of my face would not consist of only one primitive shape and that I would have to combine different shapes.
One of the most challenging parts of this assignment was figuring out how to draw my nose since noses are very oddly shaped. I first wanted to use a combination of arcs but I then decided after browsing through the reference page that using a Bezier curve to draw the side view of the nose would be a lot simpler and would not sacrifice the quality of the portrait. Also, I used a for loop to generate small ellipses in my hair to make it look slightly curly.
Overall, I think this assignment helped me get comfortable with 2D primitive shapes as I often found myself playing around with values to see what would pop up on the screen even though I could have improved certain aspects of like the realism and robustness.
Here is my portrait:

Yunho Week 1 Self-Portrait

The first thing I thought looking at this assignment was the game called “Blue Archive” (2021) from Nexon & Yolstar. In this game, each character has a “Memorial Lobby” where the user can interact with the live2D version of the character.

From this, I decided to create a face of myself with simple shapes and make a simple user interaction where mouse clicks resemble patting the character.

The method of the algorithm was not so complex. All I had to do was draw a different shape when the mouse is clicked and change the shapes’ coordinates according to the location of the mouse on the screen.

However, since the mouse can move anywhere on the canvas, I had to decrease the amount of movement relative to the movement of the mouse using following statement.

let moveX = (mouseX – 200) / 60;
let moveY = (mouseY – 200) / 60;
let facemoveY = (mouseY – 200) / 100;

Through this statement, eyes give a feeling of chasing the movement of the mouse cursor, and the face seems to move in the same direction as the patting.

(try clicking the face below)

Juanma’s Self Portrait (Assignment 1)

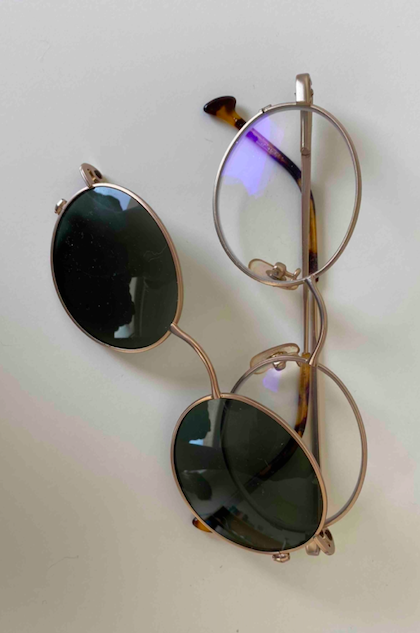
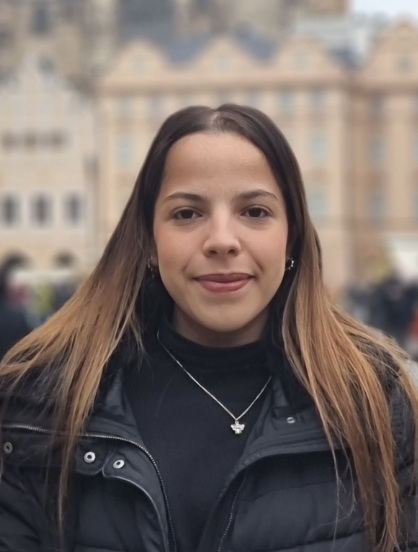
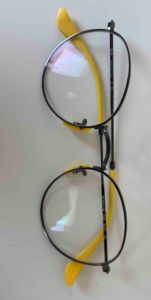
When tasked about developing a self portrait through basic shapes  in .p5js, I was a bit confused as to how to start. I first spent a long time playing arround with shapes to choose a body figure fitting to my vision. However, this body was not a self portrait in any way. It was not me. So, I asked my suit mates which physical elements characterize me. To this, I was told my glasses, my curly hair, my bee necklace and my white T-shirts mark my style. So I decided to focus on these elements as I built an image of myself. Here are some of them: (My hair and clothes you’ll see in class)


I designed my portrait from top down using the following elements:

  1. Hair: My hair was composed of a multitude of circles with “noStroke();” that would illustrate my curly hair. I made three different hair colors to give this element depth and importance in the image.
  2. Face: My face was composed of ellipses for the shape, eyes, and ears; and arcs for the nose, eyebrows and the smile.
  3. Neck: My neck was built with rectangles and an ellipsis.
  4. Body: The body is made with rectangles and lines for the holes between the arms and the core.
  5. Glasses: My glasses are composed of two circles, an arc and to lines.
  6. Necklace: Two lines and two ellipses.

The greatest challenge in designing the portrait was making sure that the elements I included made sense. Sometimes a specific color or shape that I thought would fit in a specific place, looks horrible. In these situations, playing with individual values was the only way I knew how to fix this, and thus was very time consuming.

I also learned the importance of shadows, as adding them had a significant impact on the final product and took much less time than I initially expected.

Furthermore, in an attempt to include an interactive element, I added mouseX and mouseY qualities to the variable defining the color of my glasses so that the user could change it according to their preference.

Here’s my portrait:

Some elements to improve is that I hard coded my body, so if the dimensions of the canvas are changed, my head will adapt accordingly but my body will not. I would have also liked to include a background and more interactive portrait. Regardless, with this exercise being my first experience with .p5js and processing I am very happy with the final result.

So, which color of glasses do you think better fit me?

Assignment #1 – Lily Self Portrait

With this project, I knew that I wanted to play around with rounded corners, ellipses and arcs but when I say I struggled with arc(), I struggled. I somehow could not comprehend how the radians system worked – I initially wanted to do a skirt that used several arcs but I spent hours trying to get the shapes that I wanted and it not coming out the way that I envisioned. I hope though to keep practicing and understanding how it works so that I can play around with it more and expand to more complex shapes.

I was around friends when I started working on my portrait – with every shape that I did, as a replica of ‘Lily’ came to life, I got more and more excited. I would show my screen every few seconds to my friends. Although it looks simple, it took a lot more than I thought it would. I found that using print(mouseX, mouseY) very useful in pin-pointing exactly where I want shapes to be on the canvas.

Here is what my portrait looks like:

I hope that by the end of Intro I can re-do this assignment and see how much I have improved.

Self Portrait

As I began the assignment, thinking about what I wanted the end result to look like made me nervous, so instead, I began by concentrating on specific features and how I could best highlight my features using shapes I had learned to make in class. In a way, while I didn’t have a specific style in mind, as in a more cartoon-looking or abstract, by focusing on these features it became more and more realistic. One thing that was a bit tedious was making my face symmetrical, I went back and for quite a bit, and even used lines the way you would draw a symmetrical face on paper. Throughout the assignment I wanted to “keep it simple” so I avoided the use of variables, which had I used to center my face, I would have had a much more efficient process for making the rest of my face symmetrical. I also found myself going over small details once the main part of the portrait was done, with that I added a background of bright colors, I don’t think it would be an accurate representation of me if that wasn’t included. Overall, I was not only able to apply concepts I learned in class, but also learn new ones, experiment, and truly enjoy creating something.

self-portrait; Assignment 1

I was looking for different simple face illustrations on Pinterest to have an idea of what shapes and face features I would like to use. Also, I wanted to create something as if I was the main character in a cartoon or children’s book.

source: https://www.pinterest.com/pin/122793527330625093/

I played with different shapes and colors.
The main challenge that I had was working with curves and beizers, I could not place coordinates and spent a lot of time trying to figure them out. Particularly I had many struggles while drawing my eyebrows, have never thought that it is going to be the hardest part. I wanted to use beizers and make real eyebrows, yet it took plenty of time. Therefore, I decided to use arc() instead. I need more practice to work with curve(), beizerVertex(), and other shape-creating functions.

I had many creative thoughts for this assignment, but they included some animations and curves… However, I hope to learn more about these functions fully express my ideas in future projects.

Generally, I am satisfied with my first assignment, considering that I have never used JavaScript before. So, here I am 🙂

Assignment 1: Self-portrait

This assignment one of Intro to IM required us to come up with a self portrait using p5.js. The assignment was really fun to do since we had to play with different shapes and get them positioned in a way that looks real and meaningful.

I began by getting a basic sketch and starting with my face it self. The face ears, eyes and nose were not a big challenge since we could have simply used an ellipse. The Arc for the eyebrow and mouth took some time to get them into the position I wanted it to be in.

For the, t-shirt i used a rectangle and two ellipse to make it look realistic. By adding two lines similar to the color of the background i was able to create a gap and separate the arms from the body. I also enjoyed playing with quads to make my replicate the Adidas logo on the t-shirt. I also enjoyed playing around with circles and lines to create the glasses 🤓. I used the alpha value in RBGA to add the transparency to the glasses color.

The hardest part of this assignment for me was the hair itself, after reading documentation about quads I started to try out different sizes and shapes to see which would best suite my own hairstyle.

Something, that I really struggled with was getting the X and Y coordinates correct in order to position my shape. Thus, I came out with a short code that would print the X and Y coordinate on the screen when the mouse is hovered over. I also tried to not hardcode it as much as possible and tried to use height and width throughout the assignment.

For the Background I wanted to get a night-sky view. I started with making the background dark and used the random() feature to place the stars (as points) on the canvas. I used this video as reference to learn about random() https://www.youtube.com/watch?v=POn4cZ0jL-o.

For fading the background I simply used the alpha value for the RGB and set it to 1 so every frame it would slowly fade out. What i found best about the portrait was the shooting star effect that I was able to add with the use of lerp (which I learnt in A.rt Intel). I simply used the line function with lerp for the 4 arguments and using the random generated start and end X-Y coordinates. Lastly I used the increment or step as the smoothness argument for lerp in order to create a fading effect.


Assignment 1 – Self Portrait – Ahsen Saaim

For this assignment I went for a clean, simplistic emoji-esc style for my portrait. I wanted my avatar to be outdoors, so I chose colors that I thought best complimented the light blue sky like white, maroon and yellow. I used different dimensions of ellipses for the sun, face, eyes, body and buttons, while the clouds are a cluster of overlapping ellipses. The nose is a triangle, while the mouth and hair are varying rectangles. Although I liked the aesthetic of my portrait it felt somewhat stiff, so I animated the cloud to move slowly across the sky by changing the x coordinates of the ellipse-cluster slightly with every repetition of the draw function.

This project was fun to work on but it was frustrating not being able to depict my vision onto the canvas. I tried to make my hair more true to life but didn’t suceed so I back peddaled to a simple rectangle. This shows I need a lot more experience to bring my  thoughts to life. In the future I hope to make more intricate projects with a larger arsenal of shapes and animations to work with.

Self Portrait – Assignment 1

For this assignment , I decided to use a reference photo of myself because I wanted to focus on recreating general shapes in p5.js , instead of worrying about design aspects. By doing this, I ended up with an actually pretty detailed version of my picture. While I initially wanted to make the hair gradient to match the picture, I ran into some technical trouble. Instead, I decided to challenge myself by figuring out coordinates for creating lines for things in my code such as “armlines” and “necklace”. Eventually, I did end up using a coordinate finder which really helped familiarize me with how the canvas is setup.