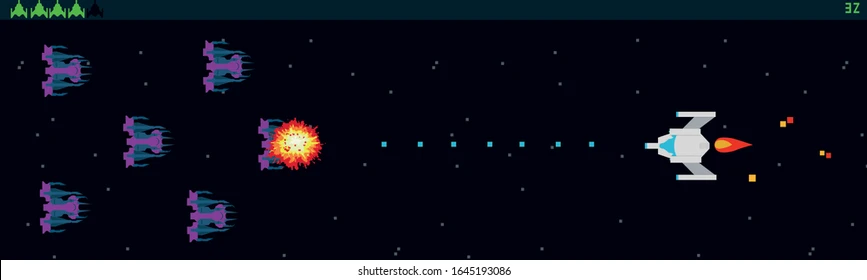
Extra-credit assignment: Flappy Bird

Description:

For this assignment, I tried to recreate an Arduino version of flappy bird using pushbuttons as primary controllers.  The main idea is that the avatar (bird), which continuously moves to the right, has to move through the equally sized gaps (between the pairs of obstacles aka pipes) that are placed at random heights. The bird is affected by gravity and is always pulled down to the bottom, however, the push button allows it to make a sort of jump in the air and therefore move a bit to the top. After every successful passing through the gap, the score is incremented by one. When the avatar hits the obstacle, the game ends, the score is displayed and the user can restart the game by clicking on the second push button.

Process:
Obstacles:

To generate obstacles I have used a class that includes three parameters (float xcoord for the x-coordinate, float first and second for the y-coordinates of the obstacles) and a couple of functions. Generate() generates random values for the y-coordinate of the first obstacle, then adds 140 (for the gap) and gets the y-coordinate of the second obstacle. Create() draws the rectangles on the display window, and whenever the obstacle goes out of the screen, it gets generated again on the other side with different y-coordinates.

class Obstacle {

  float xcoord; // x coordinate
  float first = random(150,450); // top
  float second = first+140; // bottom
  
  void generate(){
    first = random(150,450);
    second = first+140;
  }
 
  void create(){
    fill(#4caf50);
    noStroke();
    rect(xcoord, 0, 80, first);
    rect(xcoord, second, 80, height);
    fill(#9bf09b);
    rect(xcoord+5, 0, 80-10, first-5);
    rect(xcoord+5, second+5, 80-10, height);
   
    if(xcoord < -80) { // if out of screen
      xcoord = width+230;
      generate();
      score++;
    }
  }
}
Movement:

Instead of making the bird move inside the display window, I used an infinite side-scrolling in which the character is static whereas the background moves from the right to the left. 

To add movement to the obstacles, I am decreasing their x-coordinate by a constant amount (speed) inside the draw() loop.

Obstacle obstacle1= new Obstacle(); // generate first obstacle
Obstacle obstacle2= new Obstacle(); // generate second obstacle
Obstacle obstacle3= new Obstacle(); // generate third obstacle
Obstacle obstacle4= new Obstacle(); // generate fourth obstacle

  obstacle1.xcoord=width+(width/3)/2-40; // x coordinate of the first obstacle
  obstacle2.xcoord=width+((width/3)/2-40)+(width/3);  // x coordinate of the second obstacle
  obstacle3.xcoord=width+((width/3)/2-40)+(width/3)*2;  // x coordinate of the third obstacle
  obstacle4.xcoord=width+((width/3)/2-40)+(width/3)*3;  

// create all obstacles
    obstacle1.create();
    obstacle2.create();
    obstacle3.create();
    obstacle4.create();
    // move obstacles
    obstacle1.xcoord -= speed;
    obstacle2.xcoord -= speed;
    obstacle3.xcoord -= speed;
    obstacle4.xcoord -= speed;
Collisions:

To flag when the avatar touches one of the obstacles, I first used an ellipse to limit the area of the avatar, then checked if it overlapped with the obstacle. Meaning that the x and y coordinates of the avatar would be inside the obstacle area.

// check if avatar touches the obstacles
  if((avatar_ycoord-25<=obstacle1.first && obstacle1.xcoord<=avatar_xcoord+25) || (avatar_ycoord+25>=obstacle1.second&& obstacle1.xcoord<=avatar_xcoord+25)){
    stop=true;
  }
  if((avatar_ycoord-25<=obstacle2.first && obstacle2.xcoord<=avatar_xcoord+25) || (avatar_ycoord+25>=obstacle2.second && obstacle2.xcoord<=avatar_xcoord+25)){
    stop=true;
  }
  if((avatar_ycoord-25<=obstacle3.first && obstacle3.xcoord<=avatar_xcoord+25) || (avatar_ycoord+25>=obstacle3.second && obstacle3.xcoord<=avatar_xcoord+25)){
    stop=true;
  }
  if((avatar_ycoord-25<=obstacle4.first && obstacle4.xcoord<=avatar_xcoord+25) || (avatar_ycoord+25>=obstacle4.second && obstacle4.xcoord<=avatar_xcoord+25)){
    stop=true;
  }
  // check if avatar goes out of display window
  if(avatar_ycoord>height || avatar_ycoord<0){
    stop=true;
  }
Gravity:

The gravity is set to 3 and pulls the avatar down constantly. But when the user clicks on the button, the avatar makes a quick jump and its y-coordinate is affected.

Arduino:

On the Arduino ide, I am reading the state of the buttons, and sending them to processing using Serial.println().

int inPin = 3;  // green pushbutton
int inPin2 = 4; // yellow pushbutton
int val = 0;
int val2 = 0;

void setup() {
  Serial.begin(9600);
  Serial.println("0,0");
}
void loop() {
  while (Serial.available()) {
    if (Serial.read() == '\n') {
       val = digitalRead(inPin); // green push button state
       val2 = digitalRead(inPin2); // yellow push button state
       // send the state of the push button to processing
       if (val == HIGH && val2== HIGH) {         
          Serial.println("1,1");
       }
       else if (val == HIGH && val2== LOW) {         
          Serial.println("1,0");
       }
       else if (val == LOW && val2== LOW) {         
          Serial.println("0,0");
       }
       else if (val == LOW && val2== HIGH) {    
          Serial.println("0,1");
       }
    }
  }
}
End game: 

When a collision occurs, or the avatar goes out of the screen, the game ends.

Restart game: 

To restart the game, the user has to click on the second push button.

View post on imgur.com

Code:
Processing:
import processing.serial.*;
Serial myPort;
PImage img; // avatar img

int speed = 3; // speed of game
int avatar_xcoord = 70; // avatar's x coordinate
int avatar_ycoord = 0;  // avatar's y coordinate
int gravity = 3; // gravity effect
boolean stop = false; // boolean var to end game
int score; // score
boolean clicked= false; // boolean var to restard game

Obstacle obstacle1= new Obstacle(); // generate first obstacle
Obstacle obstacle2= new Obstacle(); // generate second obstacle
Obstacle obstacle3= new Obstacle(); // generate third obstacle
Obstacle obstacle4= new Obstacle(); // generate fourth obstacle

void setup(){
  size(900,600);
  obstacle1.xcoord=width+(width/3)/2-40; // x coordinate of the first obstacle
  obstacle2.xcoord=width+((width/3)/2-40)+(width/3);  // x coordinate of the second obstacle
  obstacle3.xcoord=width+((width/3)/2-40)+(width/3)*2;  // x coordinate of the third obstacle
  obstacle4.xcoord=width+((width/3)/2-40)+(width/3)*3;  // x coordinate of the fourth obstacle
  // Get response from Arduino
  printArray(Serial.list());
  String portname=Serial.list()[1];
  myPort = new Serial(this,portname,9600);
  myPort.clear();
  // load image for avatar
  img = loadImage("avatar.png");
}

void serialEvent(Serial myPort){
  String s=myPort.readStringUntil('\n');
  s=trim(s);
  if (s!=null){
    int values[]=int(split(s,','));
    // jump effect for the avatar
    if (stop==false && values[0]==1) {avatar_ycoord -= gravity*0.6;}
    // restart game
    else if (stop==true && values[1]==1) {clicked=true; print("hi");}
  }
  myPort.write("\n");
}

void draw(){
  // check if avatar touches the obstacles
  if((avatar_ycoord-25<=obstacle1.first && obstacle1.xcoord<=avatar_xcoord+25) || (avatar_ycoord+25>=obstacle1.second&& obstacle1.xcoord<=avatar_xcoord+25)){
    stop=true;
  }
  if((avatar_ycoord-25<=obstacle2.first && obstacle2.xcoord<=avatar_xcoord+25) || (avatar_ycoord+25>=obstacle2.second && obstacle2.xcoord<=avatar_xcoord+25)){
    stop=true;
  }
  if((avatar_ycoord-25<=obstacle3.first && obstacle3.xcoord<=avatar_xcoord+25) || (avatar_ycoord+25>=obstacle3.second && obstacle3.xcoord<=avatar_xcoord+25)){
    stop=true;
  }
  if((avatar_ycoord-25<=obstacle4.first && obstacle4.xcoord<=avatar_xcoord+25) || (avatar_ycoord+25>=obstacle4.second && obstacle4.xcoord<=avatar_xcoord+25)){
    stop=true;
  }
  // check if avatar goes out of display window
  if(avatar_ycoord>height || avatar_ycoord<0){
    stop=true;
  }
  
  background(#cdeefd);
  // if game ends
  if (stop==true){
    background(#cdeefd);
    textSize(25);
    stroke(#9bf09b);
    noFill();
    strokeWeight(8);
    rect(width/2-200, height/2-150, 400, 300);
    strokeWeight(4);
    // display score
    text("Game Over!", width/2-60, height/2-70);
    text("Score: " + score, width/2-40, height/2-70 + 40);
    text("Click on yellow", width/2-75, height/2-70 + 80);
    text("button to replay!", width/2-85, height/2-70 + 120);
    // restart game and reset all parameters
    if (clicked){
      stop=false;  // reset boolean var
      clicked=false; // reset boolean var
      score=0; // reset score
      obstacle1.xcoord=width+(width/3)/2-40; // x coordinate of he first obstacle
      obstacle2.xcoord=width+((width/3)/2-40)+(width/3); // x coordinate of he second obstacle
      obstacle3.xcoord=width+((width/3)/2-40)+(width/3)*2; // x coordinate of he third obstacle
      obstacle4.xcoord=width+((width/3)/2-40)+(width/3)*3; // x coordinate of he fourth obstacle
      avatar_xcoord= 70; // x coordinate of avatar
      avatar_ycoord= 0; // y coordinate of avatar
    }
  }
  // if game starts
  if (stop==false){
    // create all obstacles
    obstacle1.create();
    obstacle2.create();
    obstacle3.create();
    obstacle4.create();
    // move obstacles
    obstacle1.xcoord -= speed;
    obstacle2.xcoord -= speed;
    obstacle3.xcoord -= speed;
    obstacle4.xcoord -= speed;
    // display the avatar
    image(img, avatar_xcoord-30, avatar_ycoord-35, 80, 70);
    avatar_ycoord += gravity;
    fill(0);
    textSize(12);
    // display the score
    text("Score: " + score, 820, 20);
  }
}

class Obstacle {

  float xcoord; // x coordinate
  float first = random(150,450); // top
  float second = first+140; // bottom
  
  void generate(){
    first = random(150,450);
    second = first+140;
  }
 
  void create(){
    fill(#4caf50);
    noStroke();
    rect(xcoord, 0, 80, first);
    rect(xcoord, second, 80, height);
    fill(#9bf09b);
    rect(xcoord+5, 0, 80-10, first-5);
    rect(xcoord+5, second+5, 80-10, height);
   
    if(xcoord < -80) { // if out of screen
      xcoord = width+230;
      generate();
      score++;
    }
  }
}
Arduino:
int inPin = 3;  // green pushbutton
int inPin2 = 4; // yellow pushbutton
int val = 0;
int val2 = 0;

void setup() {
  Serial.begin(9600);
  Serial.println("0,0");
}
void loop() {
  while (Serial.available()) {
    if (Serial.read() == '\n') {
       val = digitalRead(inPin); // green push button state
       val2 = digitalRead(inPin2); // yellow push button state
       // send the state of the push button to processing
       if (val == HIGH && val2== HIGH) {         
          Serial.println("1,1");
       }
       else if (val == HIGH && val2== LOW) {         
          Serial.println("1,0");
       }
       else if (val == LOW && val2== LOW) {         
          Serial.println("0,0");
       }
       else if (val == LOW && val2== HIGH) {    
          Serial.println("0,1");
       }
    }
  }
}


Final HeartBeat Monitor/ Music (BEEPS)/ LED project

Description

Finalize your idea,  determine whether it’s going to be a group/solo arrangement,  identify the materials/space you need, and identify what you think will be hardest to complete. Post your progress on the project so far.

Idea

For the final project, I would be creating a heartbeat monitor using a pulse sensor and working with LEDs and a buzzer to generate sounds and lights according to the pulse sensor.

Materials

Pulse Sensor

Jumper Wires

Resistors

Transistors

LEDs

Arduino Board

and other resources while working on the project

Hardest Part

I think the hardest part would be controlling the way heartbeat would be displayed on the processing screen, since I haven’t done that before.

Progress

I have been waiting for the pulse sensor until today, but in the meantime, I was finding alternatives to the buzzer to create sounds. Maybe use the mac speaker and processing to do that work.

Final Project: How fast you can dance

inspiration 

From the dancing games in the arcade, where you step on pads to create sound or match the falling arrows.

Team: solo

game

The game entails 5 pads, each representing one note on the pentatonic scale. In processing, there will be five circles corresponding to the five pads. The game would give you a sequence of notes by lighting up the circles in processing and, through Arduino, the LEDs surrounding the pads. The player would have to recreate the sequence by stepping on the pads. The LEDs and the circles would light up as the player jump between the pads.

FUNCTION

Have players remember the sequence and recreate it. The sequence gets longer as the game progresses.

mATERIALS

  1. LED strips
  2. sponges (non-conductive materials)
  3. force detectors
  4. Arduino
  5. lots of wires
  6. space: a 2m x 2m space to place the pads

challenges

Codes: The hardest part would be recording what the player is doing and checking if it is the same as the displayed demo sequence.

Physical: Making the pads durable enough for people to step on them and still remain functional.

PROGRESS

I’ve been doing research about verifying and checking the notes.  I have sone codes for doing more but will need something more to meet the needs of the game.

Final Project Progress

Description

Finalize your idea,  determine whether it’s going to be a group/solo arrangement,  identify the materials/space you need, and identify what you think will be hardest to complete. Post your progress on the project so far.

Idea

For the final project, I would be creating music or sound visualizer.  There will be two forms of visualization. One on the screen and the other through a LED strip. The project will be reactive to sound made by the user or played by the user. I would be taking the input and analyzing the frequency to create the two visualizations. The LED strip will glow according to the rhythm of the music and the visualization will show the loudness or frequency of the music. Thinking of a very cool visualization.

Materials/ Space

  • A dark or low lit room
  • Laptop screen
  • Multicolored LEDs
  • Jump wires, Arduino, Transistor, Resistors

Hardest Part

Getting the Arduino and Processing to communicate. For now, I am going to use two different sources of input for both processing and Arduino. A sound sensor for Arduino and a computer’s microphone for Processing.

Progress

I have figured how to get input from the computer’s microphone and visualize. I have a ball which grows in size based on the amplitude of the sound

Final Project Progress

Idea:

My project will be a first-person POV diary storytelling simulator-ish. I want to select a theme around which the stories in the diary will revolve. I first thought about WW2 diaries, but I found it difficult to find excerpts from those diaries on the internet. I thought about using fictional diaries, but I will keep this as a choice to consider if I fail to find sufficient diary excerpts for my game. I will also consider themes other than WW2 as I develop my project as I think the theme will not affect the technical part too much.

Materials Needed:

My project’s visual element will run completely on Processing, so I don’t anticipate needing special material for that part. For the interactive part of my project, I would like to have switches/controllers that work similarly to the arduino kit’s potentiometer and digital switches, but are larger and don’t need to be connected directly to the breadboard. For the potentiometer style controller, I’m thinking of a controller with the shape of the sketch below.

View post on imgur.com

The red material will be an insulator. The blue material will be a conductor. To interact with the controller, the player will change the angle of the external insulator part. Each blue pin attached to the insulator will be associated with an angle degree that will be communicated to processing to manipulate the game parameters. For the digital switch type controller, I think I will a box with a squishy material that separate the button from the bottom of the box. On the bottom of the box, there will be a pressure sensor. The player will push the button and the sensor will then communicate numerical values to Processing which will be used to manipulate the parameters of the game.

Difficult Parts:

I think the visual part of the project will be difficult. At first, I thought of changing the speed of writing or change the text being written depending on how the player interacts with the game, but now, I think I will keep the text and speed constant and add different elements into the game such as audio files of the text being read. Additionally, since the game visual is meant to be in a first person POV, I think adding some type of motion to that affects all objects in the game would be more engaging. This would simulate head movements or such. I think it would be strange to have the environment completely still in a first-person POV.

Final Project Commitment

identify what you think will be hardest to complete, and start building it. Post the final idea, material/space needs, group/solo arrangement, and your progress on the project so far.

Idea:

I have committed to the screaming plane simulator as my final project idea, which will be a solo project.

Materials:

I have decided to not use the Orientation Sensor, and instead have the project be a 2D simulation, with pitch controlled from the Arduino. I will need a slider analog input for controlling pitch. I believe that everything else I will need is in the Arduino boxes we already have.

Challenges:

I haven’t made anything with a sprite sheet yet, and in my searches so far I have not found any sprite sheets of airplanes that are what I am looking for. Either I will have to create my own sprite sheet, or look much harder. I also haven’t used my computer microphone for anything yet, and so figuring out how to take in that input will be something I will need to learn.

Work So Far:

So far I have worked out what mechanisms I want to be present in my simulator (ie takeoff from an airport, landing in another airport, a progress bar, high scores, time-reducing tokens, obstacles to be avoided, and sound input to increase speed). I have an early version of my train simulator code from when I had planned to make a version of the Chrome Dino Game which I believe will be useful as a starting point for the Plane Simulator Code.

Final Project Proposal: Gopika and Bhavicka

I know I had a whole set of different ideas, but I have my reasons okay – I love murder mysteries and when Gopika mentioned that she was planning to make one and give it an Indian twist and offered to partner up, I thought it would be more rewarding creatively to work on this project (as appealing as Bollywood DDR might be). I am very very excited to be working on it 🙂 (thank you for the offer once again!!)

Gopika provided a pretty succinct summary of it so I’ll copy that here:

“The interactive murder mystery game would let the user play detective at a murder scene. They will get a sense of the murder scene and characters in the beginning. Followed by this, they can inspect objects from the murder scene and get clues. Finally, the user can select who the murderer is.

As for the storyline, we have developed a pretty vague idea. We want the murder victim to be a rich man who was at their holiday home in a hill station in south India. We want to add in some supernatural elements (like Yakshi) to add to the thrill. For aesthetics, we want to have a soundscape that would consist of typical murder mystery elements like a nursery rhyme out of place,  jumpscares, etc.”

Materials/Space Needed

      • Projector – This could help give more of a horror vibe, but we are unsure how the controls would work with it
      • Slider – to choose the murder suspect at the end (but press a button to confirm)
      • Gloves (which the users will wear and touch the objects with)
      • Aluminium Foil (to put on the gloves, if this doesn’t work, we use switches on the objects)
      • Clue objects which fit the aesthetic of the game, for example a doll if there is a child and some Indian jewellery if possible

Again, Gopika provided the timeline we discussed so I have copied that as it is too:

“Timeline of the Game

      • Set the story – user interaction includes using buttons to go to the next scene and during this part of the game, the player gets to understand the characters, the story, and the motive of the game.
      • Clues inspection – in this part, the user gets to interact with the objects from the murder scene and find clues. The story develops in parallel as the user interacts with the objects to find clues. We were thinking of having the story progress once the user finds, for example, 2 clues. Rather than having a timer to reveal the story. So, the story goes at the pace of the player. Here are some ideas we’ve had for the clues:
        • Morse code with LEDs – have it seem like the supernatural element is communicating the clues to the player
        • Hidden switch in one of the objects to reveal a clue
        • Letters/messages/diary notes are revealed
        • Set up a switch that requires simultaneous pressure on multiple items. We were also thinking of having the pressure points be tapped in a certain sequence and a sequence is revealed by an earlier clue.
      • User chooses their pick – they can reach this phase by either pressing a button mid-game deciding to finalize their pick or after they’ve found all the clues.

The user has access to all the clues they found so far – throughout the game – they can access it by clicking a button. This helps them review all the clues they’ve gotten so far as they progress through the game.”

Hardest Part

I think the hardest part is developing the storyline in a satisfying way, such that it fulfils both our and the players’ expectations. Once we have this in place, setting up the visuals for the aesthetic we have in mind would also take some time, but the logical code should be relatively simple. The clues should be very carefully chosen and actually lead to the conclusion of who the killer is for someone who has no previous idea of the game. The audio and visual and interactive aspects should tie in to give you the whole murder mystery experience!

I think that’s all we have for now, and I can’t wait to start working on this practically!

Week 12 Final Project: Space Tour :) 🚀

Project Description: 

After giving it much thought, I have decided to make my final project on an arcade game the space shooter game such as this one:

However, I would like to bring my own twist to it by making in a way that it is controlled by your motion and instead of the usual gaming controls. I plan on using a pair of latex gloves with photoresistor sensors to control the  different type of shootings in the game and the ultrasonic sensors to detect the motion of the players. I also plan on using the potentiometer to set the level of difficulty (easy/medium/hard) by dividing the input into 3 intervals.

The players will also have lives on the top corner to make it a little more challenging and the opponents for the player will keep changing between alien ships and asteroids with different powers to keep it interesting.

Requirements:

  • Ultrasonic sensors x2
  • photoresistors x3
  • led lights x3
  • potentiometer x1
  • Breadboard and Arduino x1
  • gloves x1 pair
  • jumper and cable wires
  • Aluminium tape

As of now I am working on the game and structure it in a way where it would be easy for me to connect it with the Arduino later. I believe connecting it with Arduino is going to be the toughest part since I believe I have not had enough practice to polish my serial communication skills between Arduino and Processing.

Hence side by side, I am also planning to give enough time to Arduino with a demo programme to see how to go about it.

Final project progress

Final idea:

Thinking of my final project idea, this crossed my mind.We are surrounded by the four classical elements (air, earth, fire, and water) within our environment, we interact with these elements whether we see it or not everyday. I wanted to bring that interaction to life through this project.The idea is to create 4 generative art pieces for each of these elements, that represents them in some way(using different patterns and colors etc..). Then audience member will be asked to choose which element they want to interact with. The processing art piece created for that element will move with the person interacting with it so that they feel like they are controlling the elements in a way or are In harmony with them.

I will be working solo

Material/space needs:

In order for the project to succeeded I will definitely be needing:

  1. Kinect /kinect adapter
  2. projector (space for projector, I need space and a projector because using a small screen to move the generative will be very underwhelming)
  3. speakers (sound effects for each element)

Hardest parts:

I think the hardest parts will be getting he Kinect to accurately locate the person, and to connect it to the processing sketches, hopefully Daniel Shiffman’s videos will come in handy. I have already started working on all the generative art pieces.

Progress so far:

These are what I have in mind for each element’s generative art piece :

For the water  I already start working on it and this is what I have so far:

For the wind I am planning to use perlin noise and create something like this

25 Perlin noise ideas | perlin noise, noise, generative art

For the earth  I plan to use Daniel shieffmens recursive tree as reference, and add more details to it.

For the fire I intend to use the coding train’s challenge #103, and create a fire smoke like effect.

Regarding the Kinect part of the project, I have check out the Kinect from the interactive media lab, but came to realize that I need an adapter that is specific to the Kinect that I don’t have yet. But I did work on the coding aspect of the Kinect to track the average location and this is what I have so far (reference:Daniel Shiffman):

import org.openkinect.freenect.*;
import org.openkinect.processing.*;

// The kinect stuff is happening in another class
KinectTracker tracker;
Kinect kinect;


void setup() {
  size(640, 520);
  kinect = new Kinect(this);
  tracker = new KinectTracker();
}

void draw() {
  background(255);

  // Run the tracking analysis
  tracker.track();
  // Show the image
  tracker.display();

  // Let's draw the raw location
  PVector v1 = tracker.getPos();
  fill(50, 100, 250, 200);
  noStroke();
  ellipse(v1.x, v1.y, 20, 20);

  // Let's draw the "lerped" location
  PVector v2 = tracker.getLerpedPos();
  fill(100, 250, 50, 200);
  noStroke();
  ellipse(v2.x, v2.y, 20, 20);

  // Display some info
  int t = tracker.getThreshold();
  fill(0);
  text("threshold: " + t + "    " +  "framerate: " + int(frameRate) + "    " + 
    "UP increase threshold, DOWN decrease threshold", 10, 500);
}

// Adjust the threshold with key presses
void keyPressed() {
  int t = tracker.getThreshold();
  if (key == CODED) {
    if (keyCode == UP) {
      t+=5;
      tracker.setThreshold(t);
    } else if (keyCode == DOWN) {
      t-=5;
      tracker.setThreshold(t);
    }
  }
}
class KinectTracker {

  // Depth threshold
  int threshold = 745;

  // Raw location
  PVector loc;

  // Interpolated location
  PVector lerpedLoc;

  // Depth data
  int[] depth;
  
  // What we'll show the user
  PImage display;
   
  KinectTracker() {
    // This is an awkard use of a global variable here
    // But doing it this way for simplicity
    kinect.initDepth();
    kinect.enableMirror(true);
    // Make a blank image
    display = createImage(kinect.width, kinect.height, RGB);
    // Set up the vectors
    loc = new PVector(0, 0);
    lerpedLoc = new PVector(0, 0);
  }

  void track() {
    // Get the raw depth as array of integers
    depth = kinect.getRawDepth();

    // Being overly cautious here
    if (depth == null) return;

    float sumX = 0;
    float sumY = 0;
    float count = 0;

    for (int x = 0; x < kinect.width; x++) {
      for (int y = 0; y < kinect.height; y++) {
        
        int offset =  x + y*kinect.width;
        // Grabbing the raw depth
        int rawDepth = depth[offset];

        // Testing against threshold
        if (rawDepth < threshold) {
          sumX += x;
          sumY += y;
          count++;
        }
      }
    }
    // As long as we found something
    if (count != 0) {
      loc = new PVector(sumX/count, sumY/count);
    }

    // Interpolating the location, doing it arbitrarily for now
    lerpedLoc.x = PApplet.lerp(lerpedLoc.x, loc.x, 0.3f);
    lerpedLoc.y = PApplet.lerp(lerpedLoc.y, loc.y, 0.3f);
  }

  PVector getLerpedPos() {
    return lerpedLoc;
  }

  PVector getPos() {
    return loc;
  }

  void display() {
    PImage img = kinect.getDepthImage();

    // Being overly cautious here
    if (depth == null || img == null) return;

    // Going to rewrite the depth image to show which pixels are in threshold
    // A lot of this is redundant, but this is just for demonstration purposes
    display.loadPixels();
    for (int x = 0; x < kinect.width; x++) {
      for (int y = 0; y < kinect.height; y++) {

        int offset = x + y * kinect.width;
        // Raw depth
        int rawDepth = depth[offset];
        int pix = x + y * display.width;
        if (rawDepth < threshold) {
          // A red color instead
          display.pixels[pix] = color(150, 50, 50);
        } else {
          display.pixels[pix] = img.pixels[offset];
        }
      }
    }
    display.updatePixels();

    // Draw the image
    image(display, 0, 0);
  }

  int getThreshold() {
    return threshold;
  }

  void setThreshold(int t) {
    threshold =  t;
  }
}


Final Project Progress

Project Description:

My project is a generative drawing project where the user gets to draw with hands/joystick and then save the work they drew.

I started my work by exploring different shapes and types of brushes to choose one. After some time and looking around I decided it was best to give the user the option to use more than one brush in one piece.

I am still not done with the brush class but after testing the brushes separately, that is my unedited code for the brush class:

Main Class Function:
import java.util.*;

class Brush {

  int brushN;

  float stepSize;
  float angle;
  float x, y, tempX, tempY;
  color col;
  //
  int counter;
  PFont font;
  float fontSize;
  String letters;
  float  fontSizeMin;
  //
  float [] blurX={ -stepSize, -stepSize, 0, stepSize, stepSize, stepSize, 0, -stepSize};
  float [] blurY={ 0, stepSize, stepSize, stepSize, 0, -stepSize, -stepSize, -stepSize};
  //linemoduelw
  PShape lineModule;

  float  linelength=100;
  float [] numX={ -100, -70, 0, 70, 100, 70, 0, -70};
  float [] numY={ 0, 70, 100, 70, 0, -70, -100, -70};

  Brush(int defaultt, float step_size) {
    // 1 blur
    // 2 random cylinder
    // 3 dynamic shapes
    // 4 text lines
    // 5 rotating lines
    brushN = defaultt;
    stepSize = step_size;
    angle = 270;
    x = mouseX;
    y = mouseY;
    col = color(255);
    fontSizeMin=200;

    fontSize=50;
    letters = "It isn't true that my mattress is made of cotton candy. It was the first time he had ever seen someone cook dinner on an elephant. Homesickness became contagious in the young campers' cabin. Every manager should be able to recite at least ten nursery rhymes backward.";
    // for(int i; i<8; i++){
    //   numX = (float)acos()
    // }
  }
  void setbrush(int brushn) {
    brushN=brushn;
  }
  void setSize(int size) {
    stepSize=size;
  }
  void draw() {
    switch (brushN) {
    case 1:
      blur();
      break;

    case 2:
      randomprisms();
      break;

    case 3:
      dynamicShapes();
      break;

    case 4:
      textlines();
      break;

    default :
      rotatingLines();
      break;
    }
  }
  ...
}
class ColorWheel{
}
Blur:
void blur() {
  float diam = 1;
  if (mousePressed) {
    float d = dist(x, y, mouseX, mouseY);

    if (d > stepSize) {
      // gets the angle between the mouse and the location of the brush so that next point is drawn in the right intended location
      angle = (float)Math.atan2(mouseY-y, mouseX-x);

      tempX = x;
      tempY = y;

      pushMatrix();
      //
      translate(x, y);
      rotate(angle);
      noStroke();
      fill(col, 40);

      //
      for (int i=0; i<200; i++) {
        int dir =  int(random(0, 7));
        rotate(random(5));
        tempX=blurX[dir]*random(1, 10);
        tempY=blurY[dir]*random(1, 10);
        circle(tempX, tempY, diam);
      }
      //
      popMatrix();
      x=x+(float)Math.cos((angle))*stepSize;
      y=y+(float)Math.sin((angle))*stepSize;
    }
  }
  col = color(noise(100+0.01*frameCount)*255, noise(200+0.01*frameCount)*255, noise(300+0.01*frameCount)*255, 255);
}

Random Size Prisms Brush:
void randomprisms() {
  if (mousePressed) {
    float d = dist(x, y, mouseX, mouseY);

    if (d>stepSize) {
      // gets the angle between the mouse and the location of the brush so that next point is drawn in the right intended location
      angle = (float)Math.atan2(mouseY-y, mouseX-x);
      for ( int i=0; i<8; i++) {
        numX[i]+=random(0-stepSize/2, stepSize/2);
        numY[i]+=random(0-stepSize/2, stepSize/2);
      }

      pushMatrix();
      //
      translate(x, y);
      rotate(angle+random(-0.1, 0.1));
      stroke(col);
      strokeWeight(stepSize/4);
      // if (frameCount%2 == 0) stroke(100);
      // line(0, 0, 0, linelength*random(0.95, 1)*d/100);
      rectMode(CENTER);
      noFill();
      rect(0, 0, linelength*random(0.95, 1)*d/100, linelength*random(0.95, 1)*d/100);

      // noFill();
      // beginShape();
      // curveVertex(numX[0], numY[0]);///////////////
      // curveVertex(numX[0], numY[0]);///////////////
      // curveVertex(numX[1], numY[1]);//mid
      // curveVertex(numX[2], numY[2]);///////////////
      // curveVertex(numX[3], numY[3]);// mid
      // curveVertex(numX[4], numY[4]);///////////////
      // curveVertex(numX[5], numY[5]);//mid
      // curveVertex(numX[6], numY[6]);///////////////
      // curveVertex(numX[7], numY[7]);//mid
      // curveVertex(numX[0], numY[0]);///////////////
      // curveVertex(numX[0], numY[0]);///////////////


      // endShape();

      popMatrix();

      x=x+(float)Math.cos((angle))*stepSize;
      y=y+(float)Math.sin((angle))*stepSize;
      x=mouseX;
      y=mouseY;
    }
  }
  col = color(noise(100+0.01*frameCount)*255, noise(200+0.01*frameCount)*255, noise(300+0.01*frameCount)*255, 255);
}

void dynamicShapes() {
  if (mousePressed) {
    float d = dist(x, y, mouseX, mouseY);

    if (d>stepSize) {
      //
      lineModule = createShape();
      stroke(col);
      strokeWeight(10);
      noFill();
      lineModule.beginShape();

      lineModule.vertex(100, 0); // first point

      lineModule.vertex(0, 100);// /
      lineModule.vertex(-100, 0);// \
      lineModule.vertex(0, -100);// /
      lineModule.vertex(100, 0);// \

      lineModule.endShape();

      // lineModule = createShape();
      // stroke(col);
      // strokeWeight(10);
      // fill(col);
      // lineModule.beginShape();
      // lineModule.vertex(50, 75); // first point
      // lineModule.bezierVertex(100, 100, 500, 100, 400, 300);
      // lineModule.endShape();
      //
      // gets the angle between the mouse and the location of the brush so that next point is drawn in the right intended location
      angle = (float)Math.atan2(mouseY-y, mouseX-x);


      pushMatrix();
      //
      translate(mouseX, mouseY);
      rotate((angle+PI));
      shape(lineModule, 0, 0, d, noise(1+frameCount*0.0001)*10);
      //
      popMatrix();


      x=x+(float)Math.cos((angle))*stepSize;
      y=y+(float)Math.sin((angle))*stepSize;
    }
  }
  col = color(noise(100+0.01*frameCount)*255, noise(200+0.01*frameCount)*255, noise(300+0.01*frameCount)*255, 255);
}

Text Brush:
void textlines() {
  if (mousePressed) {
    float d = dist(x, y, mouseX, mouseY);
    d= constrain(d, 60, 7000);

    if (d>stepSize) {
      // gets the angle between the mouse and the location of the brush so that next point is drawn in the right intended location
      angle = (float)Math.atan2(mouseY-y, mouseX-x);
      fontSize= fontSizeMin*60/d;
      println("d: "+d);
      font = createFont("Calibri", fontSize);

      textFont(font, fontSize);
      char newLetter = letters.charAt(counter);
      stepSize = textWidth(newLetter);
      fill(col);
      //stroke(col);


      pushMatrix();
      //
      translate(x, y);
      rotate(angle);
      text(newLetter, 0, 0);
      //
      popMatrix();

      counter++;

      if (counter>letters.length()-1) counter=0;

      x = x + (float)Math.cos(angle)*stepSize;
      y = y + (float)Math.sin(angle)*stepSize;
    }
  }
  col = color(noise(100+0.01*frameCount)*255, noise(200+0.01*frameCount)*255, noise(300+0.01*frameCount)*255, 255);
}
Rotating Brush:
void rotatingLines() {

  if (mousePressed) {
    pushMatrix();
    strokeWeight(3);
    stroke(col);
    //
    translate(mouseX, mouseY);
    rotate(radians(angle));
    line(0, 0, linelength, 0);
    //
    popMatrix();

    angle +=1;
    col = color(noise(100+0.01*frameCount)*255, noise(200+0.01*frameCount)*255, noise(300+0.01*frameCount)*255, 255);
    linelength= int(noise(50+0.01*frameCount)*300);
  }
}

Next Steps:

Processing:

1) Workout the user input method

2) Create the user interface and develop a collect pixels mechanism to restore the drawing after the color wheel appears when the user changes colors

3)Save the images and save files with people’s previous images to display images when the user saves the file.

Arduino:

1) Get readings from joyStick for color wheel and possibly brush.

2) Get readings from buttons for save and fader variable resistor for brush