All Posts

Week 1: Self-Portrait

Concept

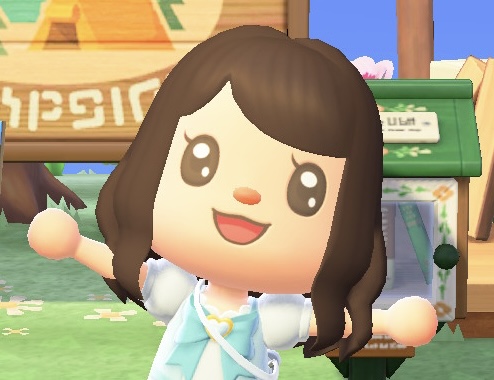
For my self-portrait, I decided to base it on my Animal Crossing Avatar. I thought it would be a fun way to represent myself since my character in the game feels like a version of me. Also, the cartoon style of the avatar fits perfectly for this kind of assignment!

Here’s my character for reference:

Favorite Code

Although I didn’t do anything super complex, I’m especially proud of how the eyes turned out. I think they gave the portrait a lot of personality and helped bring the whole thing together.

//left eye
  fill("black");
  ellipse(175, 225, 38, 50);

  fill("white");
  ellipse(174, 213, 18, 12);
  ellipse(182, 235, 6, 10);

  fill("black");
  triangle(158, 220, 152, 200, 163, 210);

  //right eye
  fill("black");
  ellipse(265, 225, 38, 50);

  fill("white");
  ellipse(265, 213, 18, 12);
  ellipse(274, 235, 6, 10);

  fill("black");
  triangle(248, 220, 241, 200, 251, 210);

Here’s the self-portrait I created:

Reflection and Future Improvements

While working on the portrait, I experimented with different shapes for the mouth and lashes. I tried using curves and Bezier functions, but they didn’t turn out the way I had hoped. In the end, I used an arc for the mouth and a triangle for the lashes, which worked better for the style I was going for.

I also used a semicircle arc for the bangs, but it stuck out a little awkwardly. To fix it, I placed a triangle in the same color as the background on top of the part that was sticking out, but I’m sure there’s probably a cleaner way to handle this.

In the future, I’d like to practice more shapes and figure out better techniques for handling these things.

Overall, this project was a fun way to explore coding and experiment with shapes. I’m excited to keep practicing and see how much more expressive I can make my sketches in the future!

Self Portrait

For this assignment, I wanted to make an interactive self portrait that actually looked like me without overcomplicating it. I began by making the head, hair, neck, ears, and shirt using basic shapes. I wasn’t satisfied with how round the face was, especially at the chin, so I used the beginShape function to create a custom face that was sharper. I used blue and white ellipses for the eyes and a triangle for a simplistic nose. The pupils follow the mouse’s coordinates, but are clamped with the map function so they are forced to stay inside the eye.

Code Highlight

I wanted to make the portrait smile/frown depending on the mouse’s Y coordinate, so I made the mouth’s curve a custom shape that stretches from a predefined vertex to another using the quadraticVertex function. The first and second arguments of the function are the coordinates of the point that will “pull” the curve towards itself, and its Y coordinate depends on the Y coordinate of the mouse.

// Mouth
  stroke(150, 0, 0);
  strokeWeight(5);
  noFill();

  // Fixed corners of the mouth
  let x1 = 170,
    y1 = 285;
  let x2 = 230,
    y2 = 285;

  // Higher mouse = happy 
  // Lower mouse = sad 
  let controlY = map(mouseY, 0, height, 310, 260);

  // Mouth Curve
  beginShape();
  vertex(x1, y1);
  quadraticVertex(200, controlY, x2, y2);
  endShape();

Sketch

Reflection and Ideas

Overall, I’m happy with how the portrait turned out, since it balances simplicity with interactivity. The use of basic shapes combined with custom shapes gave me flexibility while still keeping the code manageable. I especially liked how the mouth animation added a sense of personality and expression to the face. For improvement, I would make the hair more natural by experimenting with arcs, curves, or irregular shapes rather than just rectangles and ellipses. Another possible improvement would be adding subtle shading or color gradients to give the portrait more depth and realism.

Self-Portrait – Shota Matsumoto

Fullscreen sketch

Main Concept / Background:

My original concept was to draw the most beautiful self-portrait that I’ve ever made in my life, because, honestly, I’ve only drawn the worst self-portraits ever my friends used to make fun of. So, I wanted to capture every tiny detail of my face as accurately as possible. This was my first plan. But, once I looked at my passport picture, I realized that it was not going to happen due to the complicated structure of my hairstyle. 

What I struggled with and How I overcame it:

During the ideation phase, I came up with the idea of trying to use as many different shapes as possible for my hairstyle to make it as realistic as possible. For example, I realized that the sides of my hair can be represented by two ovals tilted at 30 degrees to make fluffiness. The top of my hair can be imitated by a trapezoid, and the bottom sides can be represented by two opposite triangles. I also added the feature where users can move the top of my hair up and down because I wanted to incorporate a funny interactive element. At the same time, I embedded my personal wish that I don’t go bald in the future. You can make me bald by moving your cursor downward from the middle of the self-portrait! This is my self-portrait: 

I drew a Japanese flag and cherry blossom at each corner to represent Japan. It was really hard to locate each petal at the correct transformation (position and rotation). I first used for loops but they did not work in a way I wanted, so I calculated each position and rotation one by one.

My Favorite Code:

The part of the code that I particularly like is the sides of my hair composed of two ovals. I struggled to position and rotate them in a way that matched the structure of my face. After about  half an hour of searching methods online, I found three functions that were really useful for controlling transformations of those geometries. These functions are push(), pop(), and translate(). The translate() function allows you to reset the origin, while push and pop() allow you to apply changes only to specific objects you want. 

//sides of hair 
  fill(0); 
  stroke(0); 
  push(); 
  translate(x1, y1);
  rotate(10); 
  ellipse(0, 0, hairWidth, hairHeight); 
  pop();   
  
  push(); 
  translate(x2, y2);
  rotate(-10); 
  ellipse(0, 0, hairWidth, hairHeight); 
  pop();


Reflections & Future Improvements:

Since it was my first time using p5, it took some time for me to get used to some functions. But, after using the same geometry functions multiple times and exploring new functions that I’ve never seen before, I was able to build a solid foundation in how p5 works. Although I believe I could have made a better self-portrait, considering the fact that I am bad at drawing, I think I did relatively well this time!

In terms of future improvements, I think I should use for loops for the cherry blossom part to make the codes more readable and reduce repetition. I tried to auto-generate all five ellipses simultaneously, but due to strange positions and rotations, I was not able to achieve it, even  after I tried multiple times. Also, all the objects are not fully centered, so the shapes are slightly misaligned. Next time I create my self-portrait again, I want to reduce the number of values I use for positions of each shape and use more variables instead to centralize each shape and improve the readability of my code. 

Assignment 1: Self-Portrait

This self-portrait is my attempt to visualize what people might picture when they hear my name, focusing on two key identifiers: coding and my hair bun. I chose to create a simple, stylized sketch to capture these core components in a straightforward way. The character is drawn in a minimalist profile, with the hair bun as the main feature. To represent my passion for programming, the entire scene is set against a dark, digital background filled with binary code.

Here is the link for my sketch


The More I Smile, The Less I See – A Self Portrait

For my project, I decided to present myself from the perspectives of my closest friends. As in, I gathered all the descriptive words and little jokes they’re made about my appearance. Ever since I changed my hair and got bangs, I’ve been called “Dora The Explorer”, hence my avatar is inspired the character from the childhood show. Moreover, I can’t hide my expression, so if I’m feeling something, my whole face contorts to a completely different person, almost. I was told I “look a different race” when I laugh the hardest, with my eyes closed shut and teeth bared out, hence the title.

let currentView; 
//defining a variable, which is going to decide what is going to be displayed 

function setup() {
  createCanvas(570, 400); //making a landscape scene
  currentView = noLaugh(); //the initial view is set to my resting face, variable is defined to a value 

} 
                  
function mousePressed() //when the mouse is clicked 
{ 
  if (mouseX > 212 && mouseX < 350 && mouseY > 285 && mouseY < 400) //setting limits to where you can click to make the view change 
  { 
    currentView = meLaugh(); //initial view changes because the variable is defined to another value 
  }
} 
function mouseReleased() //when the mouse is released 
{ 
  currentView = noLaugh(); //view changes to initial setting 
}

In my work, the snippet that I found the hardest to figure out and code is the angle and rotation of “waves”, nose and basically all the features of my face. But a piece of code that I’m incredibly proud of is making my sketch somewhat dynamic. After watching some youtube videos, I had it down. Since I’m ticklish, I added that element into my avatar, where if you click the mouse in certain parts of my body, the display changes to me laughing, from the usual death stare.

Although creating this project was fairly simple, I’d like to work more on limiting the “mousePressed” coordinate to specific areas, using a nested function if possible, rather than just putting coordinates of a regular rectangle. I would also like to work more on making smoother shapes with shading, instead of blocks of shapes on top of the other.

Self-portrait Prakrati

When I saw the examples in class, I knew I wanted my self-portrait to have an element of fun. A touch of movement to make it more interesting. So after brainstorming I decided to add a small cute wink in it. I didn’t have any answers to how to do it or when it would happen, but I knew starting was the best way to develop the idea.

I started by building the background. I chose a beach scene because it’s bright, fun, and resonates with my personality. Using just four rectangles, I created the sand, sky, and beach.

Next, I focused on the structure of my portrait. I used an ellipse for the face, and for the neck, I initially tried combining a circle and rectangle. After exploring the documentation, I realised a rounded rectangle could give the same effect with fewer shapes, so I went with that.

Then, the sweater collar was created using two triangles, traced easily with the print(mouseX, mouseY) trick taught in class. The body was a simple rounded rectangle to echo the shape of the shoulders. Once the structure was in place, I added details such as the nose, eyes, and sweater textures.

Finally, I added the wink. I wanted the portrait to respond to time or interaction. I decided that whenever the cursor moves to the right side of the canvas, the portrait would wink. Hence, I set the if condition that when position of mouseX is greater than 300 (middle of canvas) then draw a different shape. If condition made this simple because the eye now has two states: open or closed.

if (mouseX > 300) {
    stroke('black');
    strokeWeight(2);
    line(315, 190, 325, 190); // closed eye line
  } else {
    circle(320, 190, 10); // open eye
  }

The hardest part of this portrait was the hair. I initially considered straight hair, but that looked too robotic. After several iterations, I decided on curly hair with circles on the ends to give a flowing effect. By leaving one side slightly incomplete, it adds the sense of wind moving through my hair.

In the future, I’d like to make the portrait even more dynamic: perhaps animated clouds or waves in the background, and more detailed facial features. I also hard-coded most values, so I want to explore making my code more dynamic and flexible, so changes in one area automatically adjust related elements.

Week 1 – The Settled Tree

My idea was to create a portrait that represents growth, experience, and the things that shape us. Instead of a face, I wanted to make my self-portrait a fluid, continuous scene, through which we see the diorama of a life being lived.

  • The Tree: Me. It starts as nothing and grows over time, with its branches reaching out in unique, unpredictable directions. Its placement on the field is random, symbolizing the random circumstances we’re all born into.
  • Yellow Lights: These are the fleeting, positive moments. They could be ideas, bursts of inspiration, happy memories, or moments of creativity. They fall gently, glow for a while, and then fade away, leaving a subtle impression but more deeply, imprints on the tree leaves that catch them.
  • Grey Stones: These represent the heavier, more permanent things in life. They could be foundational beliefs, significant life lessons, or more often than not, burdens and responsibilities. They fall with more weight, and once they hit the ground, they settle and become part of the landscape permanently. A sufficient number of stones would pave a road through the screen, from left to right.

The entire process is automated. I press play, and the code “paints” the portrait for a set amount of time before freezing, leaving a final, static image that is unique every time it’s run.

The choice of background was a key point of hesitation during the creative process. I first tried a pure black canvas, but the branches and their few leaves seemed too sparse and lonely. My next step was a semi-transparent black background, which created lovely trails but didn’t feel quite right visually. I finally settled on a semi-transparent dark grey, as it softened the high contrast while preserving the beautiful “ghosting” effect.

Below is the first version of the background.

One of my favorite tiny discoveries during this project was a simple interactive feature that lets you control the flow of time: By simply holding down the mouse button, the entire animation slows to a crawl, creating a quiet but reflective moment on the scene as it unfolds. It doesn’t alter the final portrait, but it changes how you experience its creation.

// Mouse press animation, simple but I found quite effective
if (mouseIsPressed === true) {
  frameRate(10); // Slow down the animation
} else {
  frameRate(60); // Resume normal speed
}

Self portrait – Khatira

Assignment 1 – Self Portrait

For this weeks assignment, I wanted to create a simple image of myself but have the mood / expression and weather change depending on the user’s interactivity. As a hijabi, I like to change the colour of my hijab and so I wanted it be changeable by the user pressing the mouse. I also enjoy the city life so I wanted to replicate some sort of simple skyline.

Emotions

I decided to go with 4 different emotions inspired from the following emojis.

cheesing. I wanted this one to be me at my happiest with a simple rainbow in the background.

sad. I wanted it to rain in the background and have my facial expression be a simple upside down arc.

neutral. I wanted this one to be me just meh, with nothing interesting in the background.

happy. I wanted this one to be me just normally happy with the sun in the background.

Previous coding experience with p5.js

I took Decoding Nature with Aya so I have had exposure to replicating natural patterns in p5.js so I wanted to replicate the rain pouring down with my old skill set learnt from her class.

For the rain pouring down effect,  I wanted to have simple white lines

// Draw rain
stroke(255, 255, 255); // 'white' rain
strokeWeight(2);
for (let i = 0; i < 20; i++) {
  let x = random(0, 600);
  let y = random(0, 400);
  line(x, y, x + 1, y + 5); // rain drops
}

Here I am generating lines and having their starting (x,y) coordinates randomly generated from any x coordinate of the screen and y coordinates of 0 to 400. I then have the line stretched out a little to the x by one pixel to create a more angled look.

For the eyes, I wanted them to also be interactive so I made them follow the cursor of the user.

else {
      // normal eyes - white background and black pupils that follow cursor
      noStroke();
      
      // white eye 
      fill(255);
      ellipse(270, 180, 25, 25); 
      ellipse(330, 180, 25, 25); 
      
      // black pupils that follow mouse
      fill(0);
      
      // calculate pupil position based on mouse location
      let leftEyeX = 270;
      let leftEyeY = 180;
      let rightEyeX = 330;
      let rightEyeY = 180;
      
      // calculte teh angle from eye to mouse
      let leftAngle = atan2(mouseY - leftEyeY, mouseX - leftEyeX);
      let rightAngle = atan2(mouseY - rightEyeY, mouseX - rightEyeX);
      
      // LIMIT pupil movement within eye bounds
      let pupilDistance = 4;
      
      let leftPupilX = leftEyeX + cos(leftAngle) * pupilDistance;
      let leftPupilY = leftEyeY + sin(leftAngle) * pupilDistance;
      let rightPupilX = rightEyeX + cos(rightAngle) * pupilDistance;
      let rightPupilY = rightEyeY + sin(rightAngle) * pupilDistance;
      
      // drawing the pupils
      ellipse(leftPupilX, leftPupilY, 8, 8); 
      ellipse(rightPupilX, rightPupilY, 8, 8);

From decoding nature, we learnt how to have particles follow our cursor by making use of the mouseX, mouseY variables. I had the pupils initial X,Y coordinates be the same as the white circles and then limit their distance to 4 so that they don’t go out of bound of the white circles.

The use of atan2() is used to calculate the angle from each eye center to the mouse position and returns an angle in radians. It is then used in the sin and cos formulas with basic trigonometry to create a new X,Y coordinate. Because the value of sin and cos will always be between -1 and 1, when multiplied by our pupilDistance (constraint we implemented earlier)  it will never go out of bound of the white part of the eye.

Final solution

Self Portrait- Elyazia Abbas

My Concept:

I wanted to create a self-portrait that depicted my features using colors that i like such as burgundy and pink, and also using the basic p5 shapes. I wanted to make a piece that felt warm and friendly, so I chose soft pink and peachy colors. The goal was to make something that looks like me but also shows my personality through the style and colors.

Most basic shapes were a good fit for the features of the portrait. For instance, basic ellipses of varying sizes were a good fit for the eyes when overlapped with different colours. Additionally for the cheeks, lips, chin, and face shape ellipses were suitable. Thin rectangles were good for the eyebrows as well.

As for the hair, I used a new shape that I used chatGPT to recommend which is the bezier shape. The bezier shape has 8 parameters, every two being an x and y pair. The first and last coordinate pairs control where the bezier starts and ends, and the middle two control the pull of the curve.

60 Pink Color Palette: Best Color Combinations with Codes - Eggradients.com

Code Snippet:

bezier(350, 160, 380, 150, 300, 220, 170, 280);
bezier(300, 160, 320, 180, 380, 220, 155, 310);
bezier(400, 160, 110, 170, 260, 380, 190, 480);
bezier(190, 480, 150, 520, 210, 580, 240, 650);
bezier(240, 650, 200, 690, 260, 740, 230, 810);
bezier(230, 810, 190, 850, 250, 890, 220, 950);
bezier(390, 180, 100, 160, 240, 400, 170, 500);
bezier(170, 500, 130, 540, 190, 600, 220, 670);
bezier(220, 670, 180, 710, 240, 760, 210, 830);
bezier(210, 830, 170, 870, 230, 910, 200, 970);
bezier(400, 160, 115, 170, 280, 370, 210, 470);
bezier(210, 470, 170, 510, 230, 570, 260, 640);
bezier(260, 640, 220, 680, 280, 730, 250, 800);
bezier(250, 800, 210, 840, 270, 880, 240, 940);
bezier(400, 140, 115, 150, 280, 370, 210, 470);
bezier(210, 470, 170, 510, 230, 570, 260, 640);
bezier(260, 640, 220, 680, 280, 730, 250, 800);
bezier(250, 800, 210, 840, 270, 880, 240, 940);
bezier(400, 130, 115, 140, 280, 370, 210, 470);
bezier(210, 470, 170, 510, 230, 570, 260, 640);
bezier(260, 640, 220, 680, 280, 730, 250, 800);
bezier(250, 800, 210, 840, 270, 880, 240, 940);
bezier(400, 120, 115, 130, 280, 370, 210, 470);
bezier(210, 470, 170, 510, 230, 570, 260, 640);
bezier(260, 640, 220, 680, 280, 730, 250, 800);
bezier(250, 800, 210, 840, 270, 880, 240, 940);
bezier(400, 110, 115, 120, 280, 370, 210, 470);
bezier(210, 470, 170, 510, 230, 570, 260, 640);
bezier(260, 640, 220, 680, 280, 730, 250, 800);
bezier(250, 800, 210, 840, 270, 880, 240, 940);

The bezier curve is a new shape that i worked with. It has has four points each of which has 2 coordinates, x and y. First, the Start point: Where the curve begins, End point: Where the curve ends, Two control points: These are like invisible magnets that “pull” the curve in different directions to create the bend.

So in the context of my self portrait the first point would be, the top of my head, the last point would be the tip of my hair, and the middle two points are where the curves occur due to the pulling in those spots.

Embedded Sketch:

Reflections and Future Improvements:

Through this assignment I learnt more about how shapes and colours could overlap in p5.js to make dimension and depth. I also learnt about the bezier shape and it added a very creative element to my sketch.

As for future improvements, I hope to be able to start making for-loops instead of manually repeating the same structures and editing the coordinates. This will not only save time, but it will also give me a less error prone program, and will create some kind of symmetry in my work.

For loop Syntax - GeeksforGeeks

Week 1 – Self Portrait

My look-alike animal I chose to portray myself is an owl. It didn’t have to be an animal, but I chose it simply because I like cute animals. It was tough trying to pick between an owl and a raccoon, but I stuck with an owl because when I during my military service, my teammates called me “angry bird” because of my sharp-looking eyebrows. The fact that I was bold probably made it worse. I combined both “angry bird” and owl to create “angry owl”.

Simplistic, but straight to the point. I added 2 animations during my work on this project. Please feel free to find both of them.

I love working at night because it’s quiet and it’s the time of day when I feel most focused. So if you try to get the owl’s attention by clicking, it will lift its eyebrow as a warning. It’s a do-not-disturb signal.

//eyebrow only moves at night
 if (!morning && eyebrow) {
   move += direction * 1.2; //speed of animation

   if (move <= -20) { //moved distance is max 20, if greater, change direction to go down
     direction = 1;     
   }
   if (move >= 0) { //when it reaches its original position
     move = 0;
     eyebrow = false;   //stop animation
     direction = -1;    //reset direction
   }
 }

That is the animation code for the eyebrows. One of the hardest parts of this code was changing the direction of the movement. If the position changes by 20 pixels, then it changes the sign of the direction so that it goes in the opposite direction. It was also difficult to trigger the animation. I have two animations that are played in different conditions: night and day. So coordinating the timing was probably the most difficult part of coding. I will explain the coordinating part after showing the code for morning animation.

(Explanation of Code, Skip this if this is a bit boring)

move+= direction is for the speed of the animation. But the sign of the direction indicates whether it goes up or down. If the animation moves for 20 pixels upwards, it satisfies the first condition, and the sign is changed. It was set to -1 before. So now, the eyebrow moves downward back to its original position. Since the sign has flopped, move slowly turns positive as it goes through the move+=direction line. At some point, it will reach 0, where the variable named eyebrow, which is set to true when the user clicks on the owl, turns false, and the direction changes to positive.

As you could guess, if you click on the moon, it changes the time of day. Also, if you click on the owl during the day, it will show the ZZZ animation.

function mousePressed() {
  //if position of sun/moon is pressed
  if (dist(mouseX, mouseY, X, Y) <= D) {
    //change day/night
    morning = !morning;
    //stop eyebrow
    eyebrow = false; move = 0; direction = -1;
    return;
  }

  // start Z animation in morning
  if (morning) {
    zActive = true;
    zStart = millis();
    return; // don't trigger eyebrows
  }

  //night means eyebrows haha
  if (!eyebrow){
    eyebrow = true;
  } 
}

I used two flags to trigger the animation: zActive and eyebrow. I set these values to true when the screen was clicked based on the time of day. I also had to carefully coordinate so that the flags were triggered where I wanted them to be.

(Explanation of Code)

When the mouse is pressed, it first checks if the user clicks on the area where the sun and moon are placed. If it is, then moring = !morning changes from day to night, vice versa. When the time of day changed, I made sure once again to reset variables just in case the animation plays. Now, if that was not the case, and the user clicks, it checks if it is morning or night. If it is morning, the zActive variable is set to true, and this sets off the ZZZ animation. If it is not morning, then it sets the eyebrow flag to true, which triggers the eyebrow animation. Figuring out this logic was probably the most difficult part of the code.

Finally, this is my ZZZ animation. 

/ZZZ animation
if (morning && zActive) { //only when morning and user clicked
  const elapsed = millis() - zStart; //measure time

  //number of Zs
  let visible = 0;
  if (elapsed >= 0){
    visible = 1;
  }
  if (elapsed >= 300){ //basically every 300ms, add one
    visible = 2;
  }
  if (elapsed >= 600){
    visible = 3;
  }

  ZZZ(width/2 + 70, height/2 - 120, visible);

  // after all Zs have appeared and held, hide all at once
  if (elapsed >= 3 * 300 + 600) { //600 is extra time just in case
    zActive = false; // disappears together
  }
}

I used millis(), which is used to measure the timing of animation. I wanted the Zs to play out one by one, so I had to time them by 300ms. The logic here is quite straightforward. 

function ZZZ(x, y, count) {
  noStroke();
  fill(0);                
  textAlign(LEFT, BASELINE); //aligns text to left and at baseline of font
  
  if (count >= 1) {
    textSize(20); 
    text('z', x, y); 
  }
  if (count >= 2) { 
    textSize(24); 
    text('z', x + 12, y - 12); 
  }
  if (count >= 3) { 
    textSize(28); 
    text('z', x + 28, y - 26); 
  }
}

This is the helper function to create the ZZZ effect. visible and count shows how many Zs are present, and it is incremented with time elapsed, measured with the millis function. Any further explanation of the code can be provided in class. 

For improvements, I was thinking about adding another condition. For now, when the owl is disturbed, it just repeats the animation. However, adding another animation when the owl is disturbed more than 10 times might be interesting. Owl spreading its wings and flying away sounds good. 

P.S. I was scrolling through the posts and found a post that is quite similar to mine (haha), although the contents were totally different. It was nice to see a fellow owl.