All Posts

Week 8 : Reading Response 1

Reading Donald Norman’s take on affect and design really got me thinking about what we do in physical computing. His idea that attractive things work better made me question the way we usually talk about design. It’s so easy to think that usability is the most important thing, but Norman makes a solid point—aesthetics, usability, and functionality all need to work together, depending on the context. That’s something I really want to keep in mind as we start building our own devices.

With physical computing, we’re not just designing screens or interfaces—we’re making real objects that people will physically interact with. That makes things more complicated because now we have to think about how something looks, how easy it is to use, and what it’s actually meant to do all at the same time. The balance between these depends on what we’re building. If it’s something like a smart home controller, aesthetics matter because it’s going to sit in someone’s house, and they’ll see it every day. But if we’re making a fire escape guidance system, function is everything. No one in an emergency should have to stop and figure out how to use it, it just has to work.

The three teapots analogy really stuck with me too. It’s a great reminder that different users and situations need different design choices. I hadn’t really thought much about how a person’s emotional state affects how they interact with a device, but it makes so much sense. If someone is stressed—like using a medical alert system—they need clear, obvious controls. No distractions, no unnecessary design elements, just pure functionality. But if we’re designing something more creative, like an interactive art installation, we can push the boundaries and make it more about the experience rather than efficiency.

As we start designing our own projects, I don’t want to fall into the trap of just thinking, whether it works or no? Of course, usability matters, but if something feels cold or uninviting, people won’t want to use it.

At the end of the day, physical computing isn’t just about circuits and code but rather about how people feel when they use what we create. A device isn’t just good because it functions. It’s successful when it resonates with people and feels right to use. That’s something I really want to keep in mind moving forward.

Assignment 8: Unique Switches

This is my body-based switch, which turns on when the ultrasonic sensor detects a barrier within its range.

Assignment Brief

  • Create an unusual switch that doesn’t require the use of your hands
  • This should be a switch that opens and closes a circuit
  • You should use digitalRead in the Arduino to get the state of your switch and do something based on that information

Conceptualisation

The idea for this project emerged from my will to create something interactive, something that responds to input and only works when someone makes the active choice to be continually using it. I was considering a domino effect game where an initial topple or roll of a marble caused a chain reaction that connected the contact points. However, I decided to take advantage of the equipment provided, instead, and use the motion sensor. By choosing the motion sensor for this experience, I hoped to make it a more interactive and sustainable, as people are able to enjoy an extent of interactivity without needing to reset the entire set-up every time it is going to be used.

Process

  1. Component Selection: I gathered an Arduino board, an ultrasonic sensor (HC-SR04), LEDs, resistors, and jumper wires

  2. Circuit Assembly: I carefully wired the ultrasonic sensor to the Arduino, ensuring proper connections for power, ground, trigger, and echo pins. I then connected the LEDs to digital pins on the Arduino through a current-limiting resistor

  3. Code Development: I wrote Arduino code to control the ultrasonic sensor and LED. The code sends out ultrasonic pulses, measures the time for the echo to return, calculates the distance, and turns the LED on or off based on that distance

  4. Calibration: I experimented with different distance thresholds to determine the optimal range for triggering the LED. This involved repeated testing and code adjustments

Challenges

  1. Sensor Accuracy: The sensor is limited by the hardware it is made from. Signals may be deflected and so sometimes the sensor won’t receive the signals back. Hence, it only works against flat surfaces

  2. False Triggers: Early versions of the system would sometimes trigger in the wrong order due to mis-labelling and mis-wiring. I addressed this by adjusting the sensor’s sensitivity and implementing a minimum detection time to filter out momentary false positives

Potential Improvements

  1. Multiple Sensors: Incorporating additional ultrasonic sensors could create a more comprehensive detection field, allowing for directional awareness

  2. Variable LED Response: Instead of a simple on/off state, the LED brightness could vary based on the detected distance, creating a more nuanced interaction.

  3. Energy Efficiency: Exploring low-power modes and more efficient components could extend battery life for portable applications.

Source Code

const int echo = 13;
const int trig = 12;

int duration = 0;
int distance = 0;

void setup() 
{
  // put your setup code here, to run once:
  pinMode(trig, OUTPUT);
  pinMode(echo, INPUT);
  Serial.begin(9600);
}

void loop() 
{
  // put your main code here, to run repeatedly:
  digitalWrite(trig, HIGH);
  delayMicroseconds(1000);
  digitalWrite(trig, LOW);

  duration = pulseIn(echo, HIGH);
  distance = (duration/2) / 28.5;
  Serial.println(distance);
}

Week 8:Unusual Switch

Concept

As part of my exploration into unconventional switches and interactive physical computing, I set out to create a hands-free tilt maze that would light up an LED when a metal ball reached the end. The goal was to design a circuit where the ball itself would act as a conductor, closing the circuit when it landed in the final zone. This would be a simple yet effective way to merge an engaging, movement-based game with basic electronics.

Planning & Execution

1. Designing the Maze

I started with a small wooden tray, which served as the base for my maze. Using thin wooden strips, I created walls to guide the ball along a path. The objective was to navigate the ball from the start to the finish zone using only tilting motions, without touching it by hand.

2. Creating the Conductive Finish Zone

The most crucial part of the project was designing the finish zone, where the ball would complete an electrical circuit. I used copper tape to create two separate conductive paths (Pads A & B) with a small gap between them. When the metal ball landed on both pads simultaneously, it bridged the connection and completed the circuit, allowing current to flow and light up the LED.

3. Wiring the LED Circuit

To keep the project simple, I opted for a basic circuit:

  •  Arduino 5V power supply
  • Some LEDs
  • A 330Ω resistor to protect the LED
  • Wires connecting the copper tape pads to the circuit

The LED remained off until the ball touched both pads, acting as a natural switch.

4. Making It Hands-Free

To fully embrace the “hands-free” challenge, I designed the maze to be played by tilting the tray. I experimented with different ways to control the tilt: Holding the tray with some other body part ( added a stick for easy holding later)

The Confusing Part

One of the trickiest parts of the project was ensuring consistent electrical contact when the ball landed on the finish zone. Initially, the ball wouldn’t always complete the circuit properly. Through testing, I identified a few issues:

  • Copper tape alignment: If the gap between the two pads was too wide, the ball wouldn’t bridge them effectively.
  • Surface roughness: Uneven copper tape or debris could prevent a reliable connection.
  • Ball material: Not all metal balls conducted electricity equally well. A steel washer worked best.

and heres “The Video”-

Final Thoughts

This project was a fun way to combine electronics, physical movement, and creative problem-solving. the conductivity issues helped me better understand how to design reliable electrical contacts.

I’m excited to explore more unconventional switch mechanisms in the future. Maybe next time, I’ll design a game that reacts to body heat, breathing, or even sound vibrations!

Will be demonstrating the gameplay on class!

Her Code Got Humans on the Moon

I think this is a fascinating exploration of Margaret Hamilton’s groundbreaking work in software engineering and it shows how crucial her contributions to NASA’s Apollo program were.

First and foremost, what stands out immediately is how Hamilton defied the gender expectations of her time, becoming a pioneer in a male-dominated field during the 1960s. She worked and flourished in an environment where she was unique and would not be blamed for finding hard to work in. Hamilton’s story isn’t just about coding; it’s about breaking barriers and reshaping perceptions of women’s roles in science and technology. The image of Hamilton working late nights with her young daughter sleeping nearby in the office is particularly striking, illustrating the challenges and determination of working mothers in STEM fields.

One of the most interesting aspects of the piece is how it reveals the evolution of software’s importance in the space program. Initially overlooked in budgets and schedules, software quickly became central to Apollo’s success. Hamilton’s work not only helped land humans on the moon but also laid the foundation for modern software engineering practices. The anecdote about her daughter accidentally crashing the simulator, leading to Hamilton’s push for error-checking code, is a powerful example of how real-world experiences informed critical technological developments.

The article also effectively conveys the high-stakes nature of Hamilton’s work. The description of the Apollo 11 landing, where Hamilton’s software prioritisation system proved crucial, highlights how her foresight and technical arguments literally saved the mission. This incident underscores the vital role of robust, well-designed software in complex systems- a principle that remains relevant today.

Norman,“Emotion & Design: Attractive things work better”

I found this to be a very thought-provoking piece that everyone should read to understand the world that they experience. What stands out is Norman’s emphasis on the power of positive effect in design. The idea that positive emotions can make complex tasks feel easier is both intuitive and profound. It’s not just about making things look pretty; it’s about creating an emotional connection that enhances the user’s ability to interact with and utilise a product effectively. This principle is beautifully illustrated through examples like the colour displays in computers, which were once considered superfluous but later became essential for user experience.

I found Norman’s work to be groundbreaking in how it challenges the traditional separation between form and function. By arguing that attractive things actually work better, he’s pushing designers to think beyond mere aesthetics or pure functionality. His concept of the three levels of design- visceral, behavioural, and reflective- provides a comprehensive approach to understanding how users interact with products on multiple levels, from immediate visual appeal to long-term emotional connection. This framework helps designers create products that not only look good but also perform well and foster a lasting bond with users.

One of the most compelling aspects of Norman’s approach is how he integrates cognitive science with design principles. By explaining how our brains process information and how emotions affect our cognitive abilities, he provides a scientific basis for why attractive design matters. This interdisciplinary approach elevates the discussion beyond subjective taste to a more rigorous understanding of human-product interaction. The teapot examples he uses are particularly effective in illustrating the spectrum from purely aesthetic to purely functional design, and how the best designs find a sweet spot that satisfies both. These examples vividly demonstrate how form and function can be harmoniously combined.

The idea that attractive interfaces can make complex software feel more approachable is particularly relevant in our increasingly digital world. Norman’s work predates the smartphone era, yet his insights remain remarkably applicable today. His emphasis on creating products that are not just functional or beautiful, but emotionally resonant and truly user-centered, is a holistic view of user experience that is often overlooked but crucial for success.

This reading is an integration of cognitive science, emotion, and design principles, which cumulatively offer a unique perspective that underscores the importance of balancing aesthetics and usability. By recognising that attractive things indeed work better, designers can create products that are both beautiful and functional, ultimately enhancing user satisfaction and engagement.

Week 8 – Creative Switch

1. Concept

I was inspired by the reading on switches and pushbuttons to get creative with switches. I was especially inspired by the part about several custom switches that, when combined, turn on a light. I wanted to have a fun kind of switch, and integrating a game into the project was a good choice for that.

While I’ve been involved in constructing a circuit to play tetris a long time ago, I had the idea of adapting it so that instead of using hands to press buttons to rotate a shape, move a shape left, move a shape right, or move a shape down, the user could use their feet. It may bring an interesting experience in the way of bringing a bigger challenge for playing tetris. It could also be a fun way that engages users in the process of switching on a light through a game. It could be used in a scenario, where, for example, the light has automatically turned off after undetected vigorous motion in the room, as someone has been studying for an extended period of time, and to take a break, the person could play the tetris game using feet (while resting hands).

The switch is in the form of a pushbutton, with two shoe holders (containing aluminum foil on one side of its surface) with four ground boards (containing aluminum foil on one side of its surface). When a shoe holder comes into contact with a ground board, the switch is closed, otherwise, it should remain open.

2. Highlights

I encountered two major obstacles in the attempt to set the switches/pushbuttons to work:

  1. Initially, I planned to use copper wires to extend the connection between the alligator wires connected to the breadboard, alligator wires connected to the ground boards, and alligator wires connected to the shoe sholders. However, I realized that uncovered copper wires can come into contact with each other and disrupt the ideal circuit flow I had in mind. I decided to extend the connection with just alligator wires.
  2. Initially, I had just two shoe holders with four ground boards. I planned to have each shoe holder used for contact with a pair of ground boards. However, this posed the problem where both ground boards associated with the left shoe holder could incorrectly perform the same action on the shape (go down). Thinking that the functional, original circuit had four independent pushbuttons, I cut out the 2 shoe holders to make 4 shoe holders. I tested this and it was solved the issue!

3. Video

4. Reflection and ideas for future work or improvements

Overall, all my goals were achieved through this project: integrating a game into the switch, having several custom switches that combine to turn on a light, as well as functional switch, buzzer, potentiometer, etc. I definitely gained valuable experience in learning how to use the LCD and how to adapt circuits for purposes I would like.

I would love to integrate ideas for a switch that would involve two people and teamwork. This could be done by directly extending the current project, so that one person has the options to rotate a shape or move a shape left, while the other person has the options to move a shape right, or move a shape down. This could be a great way to help foster cooperation and further engagement with the hopefully creative switch.

Week 8 – Reading Responses

Margaret Hamilton: Her Code on the Moon

Reading “Margaret Hamilton: Her Code on the Moon” deepened my understanding of her pioneering contributions to the Apollo program and the development of software engineering. What struck me is that the article highlights her leadership at MIT’s Instrumentation Laboratory and how it was vital for creating the software for the Apollo guidance computer. I was amazed by the vast scope of the Apollo project, involving more than 400 individuals working on the software by 1968, while Hamilton introduced important innovations such as priority displays and created the term “software engineering” to give credibility to the discipline. I’ve always thought software engineering could come from the Turing Test or other experiments involving web development but hearing it comes from the Apollo project surprised me. The article deepened my comprehension of a software’s essential function in space exploration and I wondered what programming techniques or coding languages were used back then.

Norman,“Emotion & Design: Attractive things work better”

This has taught me on how aesthetics impact not only perception but also functionality and problem-solving. The notion that appealing designs can enhance the perception of task simplicity by aiding cognitive processing is intriguing, yet I recognize how bad usability can occasionally negate that advantage—similar to Michael Graves’ “Nanna teapot,” which is aesthetically pleasing but often impractical. It made me reflect on how frequently I’ve assessed a product based on its look, only to find out later that appearance doesn’t necessarily indicate user-friendliness. The author’s story regarding early computer displays changing in perceived worth over time also caught my attention, demonstrating how aesthetics can influence our evaluations in ways we might not readily acknowledge. I think it’s intriguing to consider what occurs in the brain when appealing things lead individuals to feel more competent. This reading doesn’t exactly alter my opinions, but it enhanced my understanding of how emotion and design connect, particularly in fields such as human-computer interaction, where it is vital to balance aesthetics and functionality.

Week 8 – Unusual Switch

Concept

Link: https://drive.google.com/file/d/19TgW5BmcVSER1t9MUOYlwJh5GEUXzX6o/view?usp=sharing

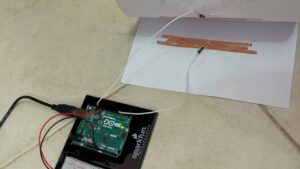
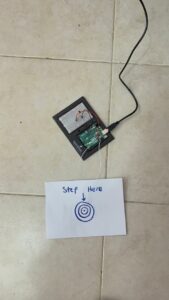
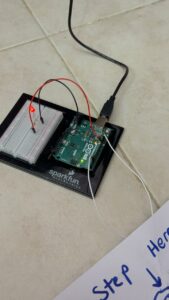
For this assignment, I decided to create a simple light-controlled system using a homemade pressure switch (A foot pedal). This is because I was curious to learn how basic, mundane materials like paper could be used to create an operational input device without using typical components like push buttons. By including this on the Arduino Uno, I could turn an LED on and off with a physical press, demonstrating how simple materials around the house can be repurposed to create interactive electronics projects.

Arduino Code

I changed the original Arduino “Blink” code to make the light not turn on and off by itself, but only turn on when I trigger it using my paper and copper tape switch:

int buttonPin = 2;
int ledPin = 13;

void setup() {
  pinMode(buttonPin, INPUT_PULLUP); // Enables internal pull-up resistor
  pinMode(ledPin, OUTPUT);
}

void loop() {
  if (digitalRead(buttonPin) == LOW) {
    digitalWrite(ledPin, HIGH); // LED ON when pressed
  } else {
    digitalWrite(ledPin, LOW);  // LED OFF when released
  }
}


I connected the switch to one of the Arduino’s pins that has the ability to sense if something is being touched. I also used a built-in function that helps the Arduino become aware when the switch is not being pressed. In the code, I instructed the Arduino to switch the light on when the switch is triggered, and off when it’s not. This ensures that the light will switch on directly due to my homemade pressure switch (A foot pedal).

Challenges

One of the main challenges was creating a functioning switch without a supply of crocodile clips, actual push buttons, or normal conductive material. I used paper, copper tape, and jumper wires with some trial and error to develop consistent electrical connection. Getting the copper strips into perfect alignment and holding them together in use took some experimentation. Also, getting a grasp on how to utilize the internal pull-up resistor is necessary to prevent false firing and ensure that the switch is reliable.

Week 8 Project

IMG_6391


This week I decided to create a switch that worked on the basis of water conducting electricity.

With that, I decided to create a switch turned on by the tears of unviersity students.

It was simple: cry enough into the bowl and the LED will light up.

To do this I attached copper strips inside the bowl so that when the water level inside the bowl was high enough the water would ‘connect’ the two copper tape strips into completing the circuit.

Challenges:

One of the challenges was figuring out even if at wall the current would be strong enough to pass through the water.

Another thing was a stupid ‘bug’ where I had used a photoresistor, not a normal resistor, and pondered for a long time why the circuit was not completing.

Future improvements:

One thing I’d like to improve on is to maybe have different circuits of copper tape in such as way that more LEDs light up the more tears there are in the bowl. with 3 lit LEDs representing a full bowl or something like that.

Week 8 – Creative Switch

Concept

I was thinking about how I could create an unusual and creative switch and also make it fun to use. The one thing that came to mind was the game “Just Dance” in which the user has to step on the correct tile that they see on the screen to simulate dance moves and make the in-game character dance. Due to the time constraint I wasn’t able to create a fully working game, but this is a good start with the hardware part of it mostly done.

How it works and demo

Instead of using the classic button switch, I connected jumper cables to aluminum foils and put sponges between the foils so when they are pressed or in this case stepped on they will detect a signal and light the LEDs.

Here is a short demo of the project:

As for the code, it wasn’t too hard to work on. I found the Serial.println very useful in debugging and testing in general. The hardest part for this project was making all the connections with the wires as the breadboard is small and the cables kept getting into the way of one another so I think I will need to work on my cable management more in the future.

// read the input pin:
int buttonState1 = digitalRead(pushButton1);
int buttonState2 = digitalRead(pushButton2);
int buttonState3 = digitalRead(pushButton3);
int buttonState4 = digitalRead(pushButton4);

// print out the state of the connection:
Serial.println(buttonState1);
Serial.println(buttonState2);
Serial.println(buttonState3);
Serial.println(buttonState4);

I am particularly proud of how the code was clean and well readable in the end even with so many different pins and commands.

Future improvements

In the future I plan to make a full game out of this project and to make a homemade “Just Dance” video game. I also hope to work on cable management a bit more so the board looks a bit more presentable and maybe also switch the sponges for some other material as they haven’t proven to be the most reliable. Overall this was an amazing learning opportunity as well as a very fun project to work on!