All Posts

Week 11 – Serial Communication

Task 1:
Make something that uses only one sensor  on Arduino and makes the ellipse in p5 move on the horizontal axis, in the middle of the screen, and nothing on arduino is controlled by p5

P5js code:

let sensorValue = 0;

function setup() {
  createCanvas(640, 480);
}

function draw() {
  background(220);

  // Map the sensor value (0–1023) to canvas width (0–640)
  let x = map(sensorValue, 0, 1023, 0, width);
  
  // Draw ellipse in center which is moved on the x axis by the potentiometer
  ellipse(x, height / 2, 50, 50);
}

function keyPressed() {
  if (key === ' ') {
    setUpSerial();
  }
}

function readSerial(data) {
  if (data != null) {
    sensorValue = int(trim(data)); 
  }
}

Arduino code:

void setup() {
  Serial.begin(9600);
}

void loop() {
  int sensorValue = analogRead(A0); //read the data from the potentiometer
  Serial.println(sensorValue);      //send it to p5
  delay(20);                        
}
Task 2:
Make something that controls the LED brightness from p5
P5js code:
function setup() {
  createCanvas(640, 480);
  background(0);
}

function draw() {
  background(0);
  
  // Map mouseX to brightness value (0–255)
  let brightness = map(mouseX, 0, width, 0, 255);
  fill(brightness);
  ellipse(mouseX, height / 2, 50, 50);

  // Send to Arduino only if serial is active
  if (serialActive) {
    writeSerial(int(brightness) + '\n');  // Send as string + newline
  }
}

function keyPressed() {
  if (key === ' ') {
    setUpSerial();
  }
}

//need to leave this empty as we are not reading anything from the arduino
function readSerial(data) {
}

Arduino code:

void setup() {
  Serial.begin(9600);
  pinMode(5, OUTPUT);
}

void loop() {
  if (Serial.available()) {
    int brightness = Serial.parseInt();  //read incoming value from p5
    if (Serial.read() == '\n') {
      brightness = constrain(brightness, 0, 255);
      analogWrite(5, brightness);        // set LED brightness
    }
  }
}
Task 3:

Take the gravity wind example (https://editor.p5js.org/aaronsherwood/sketches/I7iQrNCul) and make it so every time the ball bounces one led lights up and then turns off, and you can control the wind from one analog sensor

P5js code:

let velocity;
let gravity;
let position;
let acceleration;
let wind;
let drag = 0.99;
let mass = 50;

let sensorValue = 512; // default before Arduino sends anything
let bounced = false;

function setup() {
  createCanvas(640, 360);
  noFill();
  position = createVector(width / 2, 0);
  velocity = createVector(0, 0);
  acceleration = createVector(0, 0);
  gravity = createVector(0, 0.5 * mass);
  wind = createVector(0, 0);
}

function draw() {
  background(255);

  // Map sensorValue to wind force between -1 and 1
  let windStrength = map(sensorValue, 0, 1023, -1, 1);
  wind.x = windStrength;

  applyForce(wind);
  applyForce(gravity);

  velocity.add(acceleration);
  velocity.mult(drag);
  position.add(velocity);
  acceleration.mult(0);

  ellipse(position.x, position.y, mass, mass);

  // Bounce detection
  if (position.y > height - mass / 2) {
    velocity.y *= -0.9;
    position.y = height - mass / 2;

    if (!bounced) {
      bounced = true;
      if (serialActive) {
        writeSerial("1\n");
      }
    }
  } else {
    bounced = false;
  }
}

function applyForce(force) {
  let f = p5.Vector.div(force, mass);
  acceleration.add(f);
}

function keyPressed() {
  if (key === ' ') {
    setUpSerial();
    position.y = -mass;
    velocity.mult(0);
  }
}

function readSerial(data) {
  if (data != null) {
    sensorValue = int(trim(data));
  }
}

Arduino code:

int ledPin = 5;

void setup() {
  Serial.begin(9600);
  pinMode(ledPin, OUTPUT);
}

void loop() {
  //read potentiometer value
  int sensorValue = analogRead(A0);
  Serial.println(sensorValue);

  //if we receive "1\n" from p5, blink the LED
  if (Serial.available()) {
    int signal = Serial.parseInt();
    if (Serial.read() == '\n' && signal == 1) {
      digitalWrite(ledPin, HIGH);
      delay(100);
      digitalWrite(ledPin, LOW);
    }
  }

  delay(20);
}

Week 11: Final Brainstorming

For my final, I am considering producing an interactive art piece, that expresses some of the growing frustration I have with some of the politics going on back home in the US.

My project is somewhat inspired by what Kyle Adams did for the Lourve Abu Dhabi in the museum takeover day, where he had participants draw art on paper, scanned it, and visualized it all together with a projector. I would like to make something, similar, but more along the lines of a political dialogue, where viewers can write messages. I am also thinking of having them upload portraits, that will be converted to a consistent cartoon-like style for the demo.

The display will be primarily on a laptop or projector (brought by myself), where users can upload their portraits and scans using their phone to a central site. The display will also be interactive, with a control panel tied to the Arduino, which flips through different topical videos.

Week 11 – Reading Response

DESIGN MEETS DISABILITY

This week’s reading was an eye-opener to the interconnectedness of design and disability. It actually got me thinking of some of the very great designs that I encounter often that are solely meant to aid with disability e.g glasses. This affirms the writer’s point that design  depends largely on constraints and that in so many ways disability inspires design. The reading also pointed out some nuanced details concerning disability designs. One, it is noted that a design should aim to enable while attracting minimal or no attention at all. The whole point of design in disability is to close the gap that is between disability and mainstream and therefore when a design attracts too much attention it is very likely to cause stigmatization that undermines the whole goal of the design. Nonetheless, the discretion is at the danger of sending out the message that disability is something to be ashamed of. Therefore to help strike a balance between discretion and attention the writer speaks of how fashion and medical designs have just done so. For instance, just like glasses have evolved from being disability designs to fashion designs, other medical designs should aim at seeking the perspective of the fashion designers and not be too focused on discretion. More confident and less discrete designs will help in promoting a positive image for disability. Also design for disability should aim for social inclusivity and reduced mediocrity in order to remove barriers that cause stigmatization. Additionally, with reference to James Lecker who manufactures furniture for children with cerebral palsy. He states that a furniture design needs to be so complicated such that it intimidates children and their friends therefore beating the whole point of social integration.

Week 11: Serial Communication

1. make something that uses only one sensor on Arduino and makes the ellipse in p5 move on the horizontal axis, in the middle of the screen, and nothing on arduino is controlled by p5
We use the LDR reading to change the wind direction and move the ball horizontally. When the LDR reading is less than 600, the ball moves to the left, otherwise it moves to the right.
let rVal = 0;
let alpha = 255;
let left = 0; // True (1) if mouse is being clicked on left side of screen
let right = 0; // True (1) if mouse is being clicked on right side of screen
let velocity;
let gravity;
let position;
let acceleration;
let wind;
let drag = 0.99;
let mass = 50;

function setup() {
  createCanvas(640, 480);
  textSize(18);
  noFill();
  position = createVector(width/2, 0   );
  velocity = createVector(0,0);
  acceleration = createVector(0,0);
  gravity = createVector(0, 0.5*mass);
  wind = createVector(0,0);
}

function draw() {
  // one value from Arduino controls the background's red color
  background(255);
  applyForce(wind);
  applyForce(gravity);
  velocity.add(acceleration);
  velocity.mult(drag);
  position.add(velocity);
  acceleration.mult(0);
 
  // make everything black
  fill(0,0,0);
 
  // draw bounce ball
  ellipse(position.x,position.y,mass,mass);
  if (position.y > height-mass/2) {
      velocity.y *= -0.9;  // A little dampening when hitting the bottom
      position.y = height-mass/2;
  }

  // horizontal ellipse -- goes across screen based on potentiometer
  circle(map(alpha, 0, 1023, 0, width), height/2, 100);
 
  if (!serialActive) {
    text("Press Space Bar to select Serial Port", 20, 30);
  } else {
    text("Connected", 20, 30);
   

    // Print the current values
    text('light sensor = ' + str(rVal), 20, 50);
    text('potentiometer = ' + str(alpha), 20, 70);
  }

  // bar graph for analog LED
  rect(width-50,0,50,right);
 
  // wind -- change wind direction based on light sensor
  if (rVal < 600){
    wind.x=-1;
  }
  if (rVal > 600){
    wind.x=1;
  }
}

function keyPressed(){
  if (keyCode==ENTER){
    position.y=-mass;
    velocity.mult(0);
  }
  if (key == " ") {
    // important to have in order to start the serial connection!!
    setUpSerial();
  }
}

// This function will be called by the web-serial library
// with each new *line* of data. The serial library reads
// the data until the newline and then gives it to us through
// this callback function
function readSerial(data) {
  ////////////////////////////////////
  //READ FROM ARDUINO HERE
  ////////////////////////////////////

  if (data != null) {
    // make sure there is actually a message
    // split the message
    let fromArduino = split(trim(data), ",");
    // if the right length, then proceed
    if (fromArduino.length == 2) {
      // only store values here
      // do everything with those values in the main draw loop
     
      // We take the string we get from Arduino and explicitly
      // convert it to a number by using int()
      // e.g. "103" becomes 103
      rVal = int(fromArduino[0]);
      alpha = int(fromArduino[1]);
    }

    //////////////////////////////////
    //SEND TO ARDUINO HERE (handshake)
    //////////////////////////////////
    let sendToArduino = left + "," + right + "\n";
    writeSerial(sendToArduino);
  }
}
2. make something that controls the LED brightness from p5
Pressing on the left side of the screen increases the LED brightness, and pressing on the right side dims it.
let rVal = 0;
let alpha = 255;
let left = 0; // True (1) if mouse is being clicked on left side of screen
let right = 0; // True (1) if mouse is being clicked on right side of screen
let velocity;
let gravity;
let position;
let acceleration;
let wind;
let drag = 0.99;
let mass = 50;

function setup() {
  createCanvas(640, 480);
  textSize(18);
  noFill();
  position = createVector(width/2, 0   );
  velocity = createVector(0,0);
  acceleration = createVector(0,0);
  gravity = createVector(0, 0.5*mass);
  wind = createVector(0,0);
}

function draw() {
  // one value from Arduino controls the background's red color
  background(255);
  applyForce(wind);
  applyForce(gravity);
  velocity.add(acceleration);
  velocity.mult(drag);
  position.add(velocity);
  acceleration.mult(0);
 
  // make everything black
  fill(0,0,0);
 
  // draw bounce ball
  ellipse(position.x,position.y,mass,mass);
  if (position.y > height-mass/2) {
      velocity.y *= -0.9;  // A little dampening when hitting the bottom
      position.y = height-mass/2;
  }
 
  // horizontal ellipse -- goes across screen based on potentiometer
  circle(map(alpha, 0, 1023, 0, width), height/2, 100);
 
  if (!serialActive) {
    text("Press Space Bar to select Serial Port", 20, 30);
  } else {
    text("Connected", 20, 30);
   

    // Print the current values
    text('light sensor = ' + str(rVal), 20, 50);
    text('potentiometer = ' + str(alpha), 20, 70);
  }

  // click on one side of the screen, LED will get brighter
  // click on the other side, LED will dim
  if (mouseIsPressed) {
    if (mouseX <= width / 2) {
      if (right < 255) {
        right++;
      }
    } else {
      if (right > 0) {
        right--;
      }
    }
  }
  // bar graph for analog LED
  rect(width-50,0,50,right);
}

function keyPressed(){

  if (keyCode==ENTER){
    position.y=-mass;
    velocity.mult(0);
  }
  if (key == " ") {
    // important to have in order to start the serial connection!!
    setUpSerial();
  }
}

// This function will be called by the web-serial library
// with each new *line* of data. The serial library reads
// the data until the newline and then gives it to us through
// this callback function
function readSerial(data) {
  ////////////////////////////////////
  //READ FROM ARDUINO HERE
  ////////////////////////////////////

  if (data != null) {
    // make sure there is actually a message
    // split the message
    let fromArduino = split(trim(data), ",");
    // if the right length, then proceed
    if (fromArduino.length == 2) {
      // only store values here
      // do everything with those values in the main draw loop
     
      // We take the string we get from Arduino and explicitly
      // convert it to a number by using int()
      // e.g. "103" becomes 103
      rVal = int(fromArduino[0]);
      alpha = int(fromArduino[1]);
    }

    //////////////////////////////////
    //SEND TO ARDUINO HERE (handshake)
    //////////////////////////////////
    let sendToArduino = left + "," + right + "\n";
    writeSerial(sendToArduino);
  }
}
3. take the gravity wind example and make it so every time the ball bounces one led lights up and then turns off, and you can control the wind from one analog sensor
Set left = 0 or left = 1 depending on the y position of the ball to turn off/on the LED.
let rVal = 0;
let alpha = 255;
let left = 0; // True (1) if mouse is being clicked on left side of screen
let right = 0; // True (1) if mouse is being clicked on right side of screen
let velocity;
let gravity;
let position;
let acceleration;
let wind;
let drag = 0.99;
let mass = 50;

function setup() {
  createCanvas(640, 480);
  textSize(18);
  noFill();
  position = createVector(width/2, 0   );
  velocity = createVector(0,0);
  acceleration = createVector(0,0);
  gravity = createVector(0, 0.5*mass);
  wind = createVector(0,0);
}

function draw() {
  // one value from Arduino controls the background's red color
  background(255);
  applyForce(wind);
  applyForce(gravity);
  velocity.add(acceleration);
  velocity.mult(drag);
  position.add(velocity);
  acceleration.mult(0);
 
  // make everything black
  fill(0,0,0);
 
  // draw bounce ball
  ellipse(position.x,position.y,mass,mass);
  if (position.y > height-mass/2) {
      velocity.y *= -0.9;  // A little dampening when hitting the bottom
      position.y = height-mass/2;
  }
 
  // if ball touches ground, make LED light
  if (position.y >= height-mass/2-10) {
    // light up LED if ball touch ground
    left = 1;  
  }
  else {
    left = 0;
  }

  // horizontal ellipse -- goes across screen based on potentiometer
  circle(map(alpha, 0, 1023, 0, width), height/2, 100);
 
  if (!serialActive) {
    text("Press Space Bar to select Serial Port", 20, 30);
  } else {
    text("Connected", 20, 30);
   

    // Print the current values
    text('light sensor = ' + str(rVal), 20, 50);
    text('potentiometer = ' + str(alpha), 20, 70);
  }
}

function keyPressed(){

  if (keyCode==ENTER){
    position.y=-mass;
    velocity.mult(0);
  }
  if (key == " ") {
    // important to have in order to start the serial connection!!
    setUpSerial();
  }
}

// This function will be called by the web-serial library
// with each new *line* of data. The serial library reads
// the data until the newline and then gives it to us through
// this callback function
function readSerial(data) {
  ////////////////////////////////////
  //READ FROM ARDUINO HERE
  ////////////////////////////////////

  if (data != null) {
    // make sure there is actually a message
    // split the message
    let fromArduino = split(trim(data), ",");
    // if the right length, then proceed
    if (fromArduino.length == 2) {
      // only store values here
      // do everything with those values in the main draw loop
     
      // We take the string we get from Arduino and explicitly
      // convert it to a number by using int()
      // e.g. "103" becomes 103
      rVal = int(fromArduino[0]);
      alpha = int(fromArduino[1]);
    }

    //////////////////////////////////
    //SEND TO ARDUINO HERE (handshake)
    //////////////////////////////////
    let sendToArduino = left + "," + right + "\n";
    writeSerial(sendToArduino);
  }
}

arduino

// Week 11.2 Example of bidirectional serial communication

// Inputs:
// - A0 - sensor connected as voltage divider (e.g. potentiometer or light sensor)
// - A1 - sensor connected as voltage divider 
//
// Outputs:
// - 2 - LED
// - 5 - LED

int leftLedPin = 2;
int rightLedPin = 5; // analog

void setup() {
  // Start serial communication so we can send data
  // over the USB connection to our p5js sketch
  Serial.begin(9600);

  // We'll use the builtin LED as a status output.
  // We can't use the serial monitor since the serial connection is
  // used to communicate to p5js and only one application on the computer
  // can use a serial port at once.
  pinMode(LED_BUILTIN, OUTPUT);

  // Outputs on these pins
  pinMode(leftLedPin, OUTPUT);
  pinMode(rightLedPin, OUTPUT);

  // Blink them so we can check the wiring
  digitalWrite(leftLedPin, HIGH);
  digitalWrite(rightLedPin, HIGH);
  delay(200);
  digitalWrite(leftLedPin, LOW);
  digitalWrite(rightLedPin, LOW);


  // start the handshake
  while (Serial.available() <= 0) {
    digitalWrite(LED_BUILTIN, HIGH); // on/blink while waiting for serial data
    Serial.println("0,0"); // send a starting message
    delay(300);            // wait 1/3 second
    digitalWrite(LED_BUILTIN, LOW);
    delay(50);
  }
}

void loop() {
  // wait for data from p5 before doing something
  while (Serial.available()) {
    digitalWrite(LED_BUILTIN, HIGH); // led on while receiving data

    int left = Serial.parseInt();
    int right = Serial.parseInt();
    if (Serial.read() == '\n') {
      digitalWrite(leftLedPin, left);
      analogWrite(rightLedPin, right);
      int sensor = analogRead(A0);
      delay(5);
      int sensor2 = analogRead(A1);
      delay(5);
      Serial.print(sensor);
      Serial.print(',');
      Serial.println(sensor2);
    }
  }
  digitalWrite(LED_BUILTIN, LOW);
}

Week 10 – Reading Response

THE FUTURE OF INTERACTION DESIGN

A very timely article especially with the current pace of technological advancement. I totally agree with Bret Victor that interaction finds its truest meaning when the capabilities of human beings are amplified through the tools/invention used to make work easier. These tools are meant to make work easier and not to do away with it altogether. I think with the growing technological development drawing a line between increasing efficiency and reducing tactility is becoming harder by the day. Interaction at least as I know it has to involve meaning back and forth engagement between the tool and the user. Therefore designers should refrain from “doing everything” for the user in the name of increasing efficiency but like Bret has committed to his readers they should start thinking about how to increase the interaction experience of the users and making them become more aware of their capabilities in an efficient way and not the opposite. As Bret puts it in his follow up article; we need to aim for “dynamic mediums that we can see, feel, and manipulate”


week 11 reading

I just finished reading Design Meets Disability and, wow—what a refreshing shift in perspective. It challenges everything we’ve come to expect from “assistive design” by flipping the script. Instead of treating disability like a design problem that needs to be hidden, it shows how disability can be a source of creative inspiration. And honestly? It makes a pretty solid case for how mainstream design could learn a thing or two from the constraints imposed by disability.

Take that story about the Eames leg splint—can we talk about that for a second? The Eameses didn’t just design a medical device; they pioneered a new design language that ended up defining modern furniture. It’s wild to think that something as utilitarian as a leg splint could evolve into the iconic curves of a Herman Miller chair. That’s not a compromise—that’s a catalyst. It really gets you wondering: how many other innovations have quietly come out of necessity, only to reshape entire industries?

Another thing I loved was how the book dives into the tension between discretion and fashion. Like, who decided that disability needs to be hidden or minimized? Why can’t prosthetic limbs be fabulous? Why can’t hearing aids make a statement? Glasses managed to pull off that transformation—from stigmatized medical device to full-blown fashion accessory. So why are we still designing hearing aids in pink plastic that’s supposed to “blend in” but somehow stands out even more?

And then there’s Aimee Mullins. Her whole vibe completely shatters the binary between function and beauty. Carved wooden legs, eerie glass ones, high-performance carbon fiber? She’s not trying to pass as non-disabled. She’s owning her prosthetics as fashion, as identity, as self-expression. It’s empowering. And her attitude—“Discreet? I want off-the-chart glamorous”—is a mic-drop moment if I’ve ever seen one.

I think what stuck with me most is this: the book isn’t just saying “include disabled people in design.” It’s saying, redefine what design even means. Stop treating it as an afterthought. Don’t just add designers to the team—let them help write the brief. Start at the source, not the symptoms.

Because here’s the truth: we all want beautiful, functional, human-centered design. Whether we’re “disabled” or not, we benefit from objects that are thoughtfully made, intuitively used, and culturally resonant. That’s not niche—that’s universal.

So yeah, Design Meets Disability isn’t just about disability. It’s about dignity, diversity, and damn good design.

week 10 reading

Wow — that was one hell of a ride. And honestly? I’m totally with the author.

This “Brief Rant” is one of those pieces that sneaks up on you — starts with what feels like a critique of tech hype, and then swerves into something deeper, richer, and honestly kind of inspiring. Like, it’s not just about interface design — it’s a call to remember we have bodies. Hands. Nerves. A whole kinesthetic intelligence we’re just not using when we swipe on glass all day.

I really liked how it re-centered the conversation around human capabilities. We always hear “design for human needs,” and sure, that’s important — but what about what we can do? Our bodies have evolved for interaction in a 3D world, not for dragging pixels around on glass rectangles.

The “Pictures Under Glass” metaphor hit hard. It made me think about how normalized numbness has become in tech. The flat, frictionless world of apps and interfaces is convenient, sure — but it’s also dulling. Tactile, responsive interaction? That’s not a luxury. That’s how we’re wired to engage.

And don’t even get me started on the sandwich example — I’ve never thought so deeply about lunch prep. But now? Every time I slice bread, I’ll be thinking “Is this more interactive than the entire iOS interface?” (Spoiler: yes.)

Also, the author’s tone? Perfect balance between fed-up tech veteran and hopeful visionary. No fake optimism, no over-promising. Just: “Here’s what sucks. Here’s why it matters. Let’s not settle.”

It left me feeling two things at once:

  1. Frustrated with how low the bar is for what we call “innovation.”

  2. Excited about the possibilities we haven’t tapped into yet — haptics, tangible interfaces, maybe even something entirely new.

Anyway, this wasn’t just a critique of screens. It was a reminder that vision matters, and that choosing better futures — not just shinier ones — is on us.

week 10 musical instrument

Concept

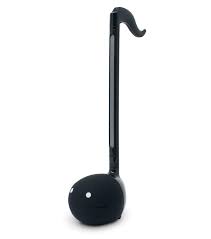
We were thinking a lot about what kind of instrument we want to make and wanted to stray away from the classic, well known ones like guitar and piano and drums and we decided to recreate an instrument many haven’t probably heard of, called Otomatone.

The instrument work by the user pressing the upper longer part of the instrument in different positions and pressing the “mouth” on both sides so it opens. The instrument than creates a sound and makes it look like the character is singing.

Our design

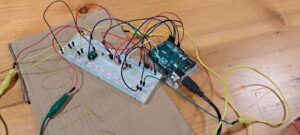
To recreate this we decided to use light resistors as the upper part of the body. The resistors would detect when the user puts their hand over them and create a sound. But the sound wouldn’t be heard until the user pressed on the “cheeks” of the character which had force resistors to detect the force of the press.

Here is the photo of the board and the photoresistors. We also added a button which, if held, will give the sound some vibration while playing. The final design of our Otomatone instrument looks like this:

Code higlight

The code for this instrument wasn’t that complicated. The hardest part was finding the values for all the notes but we used the help of the internet for that.

// Multi-note LDR1
if (ldrVal1 < 500 && duration > 10) {
if (totalPressure < 256) {
activeNote = 440; // A4
} else if (totalPressure < 512) {
activeNote = 523; // C5
} else if (totalPressure < 768) {
activeNote = 659; // E5
} else {
activeNote = 784; // G5
}
Serial.print("LDR1 note: "); Serial.println(activeNote);
}


This is the code for one of the light resistors which as you can see combines the value of the resistor with the total pressure of the force sensors detected and gives us a tone based on those calculations. The code for other light resistors is similar and not too complicated to understand.

Challenges and future improvement

The biggest challenge for this project was, surprisingly, getting the buzzer inside the “mouth” of the instrument. Getting 2 holes in the back of the “head” of the instrument  was very hard, and even though we tried to do it with our hands it prove impossible to do without a drill which in the end, after many attempts, broke the inside of the ball enough for a jumper cable to pass. The idea was to stick the breadboard to the back of the head and in that way recreate the original instrument and also not have the alligator clips inside the mouth, rather have the buzzers nodes sticking out through the holes. Due to the time constraint this sadly wasn’t possible, but I hope in the future we will be able to add it. As for the future improvements I would like to clean up the wires a bit and add a breadboard to the back of the head. Overall we are happy with the final result and we had a lot of fun working on this project and we also learned a lot!

week 11- reading

Reading this made me think about how design for people with disabilities is often overlooked or treated differently from regular products. I was surprised to learn that something as useful as a leg splint could also be inspiring in its design. It showed me that design doesn’t have to be boring just because it’s made for a medical use. I also liked how the author talked about fashion and disability. Glasses are a good example of how something can help people see better but still be stylish and accepted by everyone. The book made me reflect on how design can be both helpful and creative, and how we need more balance between solving problems and exploring new ideas in design especially in the disability world.

Week 11 – Final Project Proposal

Concept
My project will be inspired those old music boxes with spinning ballerinas. Ideally, my project would feature a spinning ballerina or just a figurine, LED’s that would synchronize with the music, and an aesthetic, coded background that adjusts to the mood and rhythm of the music. It would have multiple song options, and based on the song picked the ballerina, LED’s, and screen would change and be synchronized to the tempo and mood of the song.

Implementation

The p5.js component of the project will generate a visual background on a screen that reacts to the mood and rhythm of the music. As the music plays, the background will shift in real-time, creating patterns or abstract shapes that match the mood of the track. For example, more upbeat, energetic songs could produce fast-moving, bright, dynamic visuals, while softer or slower melodies might evoke slower, more tranquil visuals. p5 will also be in charge of the user interaction, the user will be able to  interact with the system through buttons on the screen, where they can select which songs to play.

Arduino on the other hand will serve as the main controller for the mechanical and physical elements of the installation. It will control the motor for the ballerina’s spin and manage the LED lights, ensuring that both respond appropriately to the music.