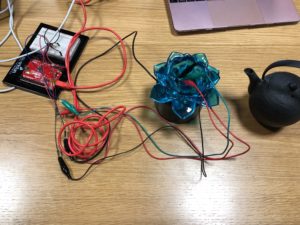
Light of the Lotus- Assignment 3

Light of the Lotus was my idea for project 3. The idea was to have a temperature sensor inside of a glass lotus and when water of a certain temperature was poured into that lotus an LED would Light up from underneath. Initially, I wanted to have the sensor in the lotus, but then I realized this would create a short circuit. So I just manually carefully put the sensor in.


float tempPin = A0;
float maxTemp = 50
;
int led = 2;

float  temp, cel;
void setup() {
   Serial.begin(9600);
   pinMode(tempPin, INPUT); //the input recieved is the water's temp
   pinMode(led, OUTPUT); //the output is the LED, so wether it is low high
}
void loop() { 
     int c = analogRead(tempPin); 
     float voltage = c * 5.0;
 voltage /= 1024.0; 
   c = (voltage - 0.5) * 100 ;  //converting from 10 mv per degree wit 500 mV offset

  if(c > maxTemp) {        // if temp is higher than tempMax
      digitalWrite(led, HIGH);  // turn on led
     } 
     
     else {                    // else turn of led
       digitalWrite(led, LOW);  // turn on led
  }
   Serial.print("TEMP: ");
   Serial.print(c);      // display the temperature
   Serial.print("C");
   Serial.println();
}

float readTemp() {  // get the temperature and convert it to celsius
  temp = analogRead(tempPin);
  return temp * 0.48828125;
}
#refrenced, will add urls later tonight


Project 3: The Green Lamp

For my third project, I decided to play around with the photo-resistor. The goal was to use analog inputs to manipulate LEDs, so what I did was set my LED to first turn on if there was a certain amount of light.

After, I built a small lamp-like device that covered or shadowed my photo-resistor. That way, the LED would remain turned off. Inside my lamp box, there is a small green LED. I programmed so that the switch I had next to it would turn on the green LED, which would provide artificial light to my photo-resistor. Once it detected light, the photo-resistor would provoke my original red LED to start blinking, indicating that my green LED inside was working since the box is so small and it is arduous to look inside.

const int PR = A0;
const int checklight = 3;
const int rlight = 2;
int value;
const int button = 4;
int PBS = LOW;
int checklightstate = LOW;
unsigned long  pm = 0;
const long interval = 1000;
int rlightstate = LOW;
void setup() {
  // put your setup code here, to run once:
  pinMode(checklight,OUTPUT);
  pinMode(rlight,OUTPUT);
  pinMode(PR,INPUT);
  pinMode(button,INPUT);
  
}

void loop() {
  // put your main code here, to run repeatedly:
  value = analogRead(PR);
  int CBS = digitalRead(button);
  unsigned long cm = millis();
  if(value>500){
    if(cm - pm >= interval){
      pm = cm;
      if(rlightstate == LOW){
        rlightstate = HIGH;
      } else{
        rlightstate = LOW;
      }
      digitalWrite(rlight,rlightstate);
    }
  }
  else{
    rlightstate = LOW;
    digitalWrite(rlight,rlightstate);
  }
  
  if(CBS == HIGH && PBS == LOW){
    if(checklightstate ==HIGH){
      checklightstate = LOW;
    }
    else if (checklightstate ==LOW){
      checklightstate = HIGH;
    }
  }
  digitalWrite(checklight,checklightstate);
  PBS = CBS;
}

Interactive Embroidery

After finishing my “star constellation” embroidery piece, I was very disappointed that the supposedly metallic thread almost did not show at all- so the intended contrast between white and metallic thread was completely lost. This was sort of an inspiration to make it a little more interesting with a slightly different medium. I took couple of white LEDs and tried to incorporate them into the piece to achieve the promise that metallic thread did not meet. The idea was to make them blink in a consequent line, increasing the speed if the pressure on the sensor increases.

Since my coding game is very weak, with some help of Youtubers and code forums, I managed to make it work, but it was really lacking the “unexpected element” crucial for this assignment. I had an idea of including another pressure sensor which would reverse the order the LEDs light up in, but struggled to code it. With the incredible help of Jack (thank you again!) who patiently worked with me, I learned my lesson why the “for (LEDpin = 2; LEDpin < 10; LEDpin++)” did not work, if a condition including the second pressure sensor was included.  Instead, the whole code was rewritten, leaving out the “for” command, while increasing/decreasing the LEDpin number in the end of each condition.

And in case you’re wondering- the two pressure sensors are in the two ends of the metallic thread, to demonstrate the very very deep meaning of power dynamics of the two figures.

And here is the code:

int LEDpin = 0;
int pressurePinA = A0;
int pressurePinB = A1;

void setup() {

  for (LEDpin = 2; LEDpin < 10; LEDpin++)
    pinMode(LEDpin, OUTPUT);
  LEDpin = 2;

}

void loop() {
//telling arduino to check the pressure of both pins A and B and if A is bigger then lights go from left to right
//the bigger the pressure, the higher the speed
  if ( analogRead(pressurePinA) > analogRead(pressurePinB) ) {
    digitalWrite(LEDpin, HIGH);
    delay(map(analogRead(pressurePinA), 0, 1023, 1000, 10));
    digitalWrite(LEDpin, LOW);
//telling it to move to the next pin in next loop
    LEDpin = LEDpin + 1;
    if (LEDpin > 9) {
      LEDpin = 2;
    }

//if pressure in B is bigger, the lights go from right to left
  } else {
    digitalWrite(LEDpin, HIGH);
    delay(map(analogRead(pressurePinB), 0, 1023, 1000, 10));
    digitalWrite(LEDpin, LOW);

 //telling it to move to the previous pin in next loop
    LEDpin = LEDpin - 1;
    if (LEDpin < 2) {
      LEDpin = 9;
    }

  }


}


Hot/Cold Game

Over the past week, I figured out how to make lights fade on and using sensors. So naturally, I went a completely different direction. I created a little game that generates a random value between 0-255 and lights up an LED with that value (0 being LOW and 255 being HIGH). The user must then control a photoreceptor so that it falls within a range of the generated value. If they are too high, a red light will come on (HOT) and if they are too low, a blue light will come on (COLD). If they fall within the range, they will be rewarded with a yellow light.

In this game’s production, I fell into some interesting problems and came up with solutions for a few of them. One was that the loop would go so fast that it would constantly be generating new values, thus rendering the game useless. However, I think this would make a great EXTREME MODE for the truly daring player. I fixed this by adding a button. The loop would only generate a new number if the button was pressed.

Here are my video and code 😀

const int ledPinR = 2;
const int ledPinG = 3;
const int ledPinB = 4;
const int ledPinWIN = 6;


int ledRState = LOW;
int ledGState = 0;
int ledBState = LOW;
int ledWINState = LOW;

int button = 7;
int buttonState = 0;

int randNumber = random(1,255);


void setup() {
  pinMode(ledPinR, OUTPUT);
  pinMode(ledPinG, OUTPUT);
  pinMode(ledPinB, OUTPUT);
  pinMode(ledPinWIN, OUTPUT);

  pinMode(button, INPUT);

  Serial.begin(9600);

    randomSeed(analogRead(0));

}


void loop() { 

if (buttonState == HIGH){

  randNumber = random(1,255);
  
}

  Serial.println(randNumber);

  ledGState = randNumber;

  int lightValue = analogRead(A0);


  if (lightValue < ledGState + 250){
    ledBState = !ledBState;
    ledRState = LOW;
    ledWINState = LOW;
  }
    if (lightValue > ledGState + 400){
      ledRState = !ledRState;
      ledBState = LOW;
      ledWINState = LOW;
   } 
   

   if (lightValue >= (ledGState + 250) && lightValue <= (ledGState + 400)){
      ledWINState = HIGH;
//      if in x range, start a timer, once timer is 3 seconds, do whatever
   }
  
digitalWrite(ledPinR, ledRState);
analogWrite(ledPinG, ledGState);
digitalWrite(ledPinB, ledBState);
digitalWrite(ledPinWIN, ledWINState);
buttonState = digitalRead(button);
}


Project #3

This week’s project was to make something using an analog sensor to make an unexpected result. So i basically made a game where you have to turn the buzzer on. I will not include the code, because it can have the answers to how to turn the buzzer on. I use a potentiometer and a light sensor (a.k.a. light resistor). Nothing more to add, everything else you’ll see at the class presentation.

Intruder Detector

For this project, I was especially interested in using a light sensitive resistor as well as the force sensor we briefly discussed during class on Wednesday. My initial thoughts about analog inputs was that they would be extremely useful in detecting changes in the environment around the device, and how they could be used to manipulate outputs once they reached a certain value, or decreased to a certain value. Specifically I thought about how this could be used in a context of a home, how things could be activated without having to flip a switch, but by less explicit actions that would make things much more convenient.

For this assignment, I decided to create an Intruder Detector that would detect changes in light in my model home’s doorway as well as a force sensor discreetly placed below the window of the home. I also decided to incorporate LEDs as well as a piezo buzzer to create different patterns and reactions depending on what was happening in the model home. I soldered the components (except for the buzzer and the force sensor) and taped them onto the house.

Below is a schematic of my model home and how it would be configured with the Arduino
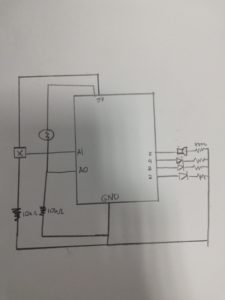
 

By default, the room of the house is set on “tranquil” mode, and the blue LED is turned on while the piezo buzzer remains on silent and the two red LEDs remain off. If the value of the photoresistor decreases below 440, the alarm goes off and the red light on the floor flashes, indicating that a shadow has passed through the doorway. If the value of the force sensor goes over 60, the red light on the wall turns on. However, the buzzer does not go off until the value of the force is at 500, because the owner’s cat weighs a little less than 500, and any value above that would be a bigger object (a burglar!). If the force value is greater than 500 and the photoresistor is less that 440, this indicates that a gang of burglars has laid siege to the house through the two entrances! The buzzer emits a high pitch noise and the two lights flash rapidly.

const int blueLed = 2;
const int forceLed = 3;
const int lightLed = 4;
const int piezoPin = 5;
int forceVal = 0;
int lightVal = 0;
int forceLight = 0;
int lightLight = 0;

void setup() {
  // put your setup code here, to run once:
  Serial.begin(9600);
  pinMode(blueLed, OUTPUT);
  pinMode(forceLed, OUTPUT);
  pinMode(lightLed, OUTPUT);

}

void loop() {
  // put your main code here, to run repeatedly:
  forceVal = analogRead(A1);   // read the input pin
  lightVal = analogRead(A0);   // read the input pin
  if (lightVal < 440) {
    analogWrite(lightLed, lightVal);
    digitalWrite(blueLed, false);
    Serial.println(lightVal);
    tone(piezoPin, 1000, 500);

  }
  if (forceVal > 60) {
    digitalWrite(forceLed, true);
    digitalWrite(lightLed, false);
    digitalWrite(blueLed, false);
    if (forceVal > 500) {
      tone(piezoPin, 100);
      digitalWrite(forceLed, true); 
      }
    else {
      noTone(piezoPin);
      digitalWrite(forceLed, true); 
      
    }
  }

  if (forceVal > 500  && lightVal < 440) {
    analogWrite(lightLed, lightVal);
    digitalWrite(forceLed, true);
    tone(piezoPin, 5000, 500);
    delay(150);
    digitalWrite(lightLed, false);
    digitalWrite(forceLed, false);
    tone(piezoPin, 100, 500);
    delay(150);
    analogWrite(lightLed, lightVal);
    digitalWrite(forceLed, true);
    tone(piezoPin, 5000, 500);  
    Serial.println(forceVal);
    
  }
  if (forceVal < 10 && lightVal > 440) {
    digitalWrite(blueLed, true);
    digitalWrite(lightLed, false);
    digitalWrite(forceLed, false);
  }
}


Response to Norman

Reading Norman’s chapter “The Psychopathology of Everyday Things” feels like finally revealing the obvious. He clearly identifies and points at something that you had right in front of your eyes the whole time, but never really thought of.

Although I have a feeling that Crawford’s definition of interaction would not succeed with most of the cases that Norman brings up as highly interactive, Norman adds another layer to all of it- and that is the triangle between the designer, product and user. While it is not a direct interaction, it is a form of communication, which is crucial to be understood in order to create a successful design.  I am still a bit conflicted about the importance of the categorization and use of specific terms in such a rigid way, yet I still agree with most of both Crawford’s and Norman’s works that critically and academically contribute to such an underrepresented and underestimated field of study.

However, I would strongly disagree with his statement that good design is pleasurable. Usually, when a design works properly, it goes indifferently unnoticed, taken for granted. One would beg to differ that since we are used to bad designs, we would be pleasantly surprised when we encounter a good one and consequently appreciate it. Yet, at least from my experience, I rarely hear someone appreciating something as a well-designed sink stopper. What, on the other hand, I keep hearing constantly, is the irritated complaints about things like bad signaling on doors or badly designed fridge temperature regulators. I would therefore argue that designers should not strive to make the experience pleasurable, as Norman suggests, but most importantly natural, make it feel the way it could not have been designed any other way- as if even no design was needed whatsoever.

What I truly enjoyed reading about is the feedback part about design. However, I would extend the idea not only to product-user interaction, but the more difficult one: designer-user one. Although in today’s world, the wall that prevented designers and users to communicate is becoming thinner and thinner with review websites and pretty much any means of communication. But does it work fast enough and are the users responsive enough? Let’s say that the refrigerator controls were designed very badly and annoy us quite a bit, but not too much. How many of us would actually bother to email the company with feedback? Since designs mostly get replicated and extended – not designed completely from scratch, this is how we end up in a world full of things that have a potential to function well, but do not.

Lastly, the cultural implication is brought up by Norman to signify, how good design is difficult, if not impossible, to create because “natural” means something else in different contexts. For me, the horrible sink stopper design he was talking about, would be a completely natural design that I pretty much grew up with. This is a problem arising with a more globalized market and that sets designers for an impossible task to satisfy everyone- alongside the manufacturers, the purchasers, the sellers and the repair services- and in any cultural context. All of this makes the job extremely difficult, yet even more pressing to give recognition and gratitude to.

I will just end with a reference for an artist that challenges the designs that we take for granted. 

The Uncomfortable by Katerina Kamprani. Source: theuncomfortable.com


Response to Reading #2

In this reading, the author talks about multiple concepts of design. What is good design? Is it to make things more functional and efficient or beautiful with little/ minimal regard to function?

When designing appliances that are sophisticated and complex, we have to work on making them easy to operate, or else the design would’ve lost its value. The reading made me think about how technology and devices are most often than not designed to look pleasing rather than to maximize their function. What is the point of making something beautiful if it’s not going to be used to its full potential?

In the reading there was a mention of devices being the problem and not humans, this reminded me of a sewing machine I got for my 15th birthday. It was described to be a perfect siege into the world of sewing- and yet, I don’t think I’ve ever used it more than three times due to how confusing it was to operate. How can we make devices like the sewing machine easy to use, how can we design them so someone who doesn’t have experience won’t need to scavenge for a YouTube video to do the simplest of things when it comes to that particular device? 

Response: The Psychopathology of Everyday Things

The first reaction I had was a laugh. When I looked at the teapot, and finally realized the joke, I had a grin on my face. What made the beginning more funny was that the “Norman door” thing was actually real, and the doors that bug me every day are actually named after Norman.

One example that reminded me was a flashlight I had back when I was in China. It was very simple, yet as a kid I spent hours and hours to figure out how to turn it on. Since I was so accustomed to thinking that flashlights always had a switch, usually buttons, I was analyzing the object so meticulously that I was almost about to dismember the whole thing. When I almost gave up, I rotated the bottom part of the flashlight (like how you rotate the cap of a water bottle) and it worked! The creative yet unpopular design of the flashlight reminded me of a similar object with low discoverabilility.

One question (and a thought) however, that came to mind while reading this was that I do agree generally that most machines and products that we utilize should have great discoverability and understanding, we should not generalize this and state the ALL products should do so. This is because some are intended for us to question its usage and that curiosity is what makes the product sell. For instance, when I first came to the old market near WTC mall, I bought a wooden box that seemed normal, but had a secret pocket inside to hide my most precious goods. Had most people known this, I am sure that the functionality of the object would have decreased immensely into the state of just being a wooden box with extra slots.

As I scrolled through the photos at the end, another funny example occurred, as I was able to relate to the author. He was in a London hotel where the sink was supposed to be pushed instead of draining automatically or with a lid to cover. That way, the sink was like a switch; once pushed, it would not drain the water, which confused the author as he was accustomed to other designs of sinks. I too had the same problem when I first faced bathroom sinks here at NYUAD, which is why when I saw his example I started laughing as well.

All in all, this was a very enjoyable text for me to read, and really had me thinking again about new categories to define how “good” or how “bad” products are really are, in this case their aim for consumers and how they are designed for these people to use them.

Reading Response – The Design of Everything

The Design of Everyday Things
The Psychopathology of Everyday Things (Chapter 1)
Don Norman

As an individual who views design as a critical part of developing a digital product, I agreed with many parts of Norman’s writing. Indulging in both the front-end area of web development and the logical parts of computer science, I understand the common quarrel between engineers and designers that Norman mentioned in the early parts of the chapter. For instance, Norman’s analogy of engineers and designers reminded me of my experience in working with both developers and designers for building a website. For the most part, the designers would want a certain outlook of the website that they created in regards to the user’s expectations. They would create personas to show the prediction of different interactions and use them to support their designs. On the other hand, the developers will only comment on the practicality or eligibility in putting the design into code – if certain parts are redundant or practically impossible, the developers will not accept the design. Then, the whole arguments falls into a repeated loop.

Moreover, nowadays we see a lot of machines that has no considerations for the users. One example would be an android phone. As someone who has used both an iPhone and an android phone, I felt that the android phones have countless functionalities that are not only hard to use, but also too complicated. A typical Samsung phone would have more than 10 variation of finger motions that were rather discomforting to use and 15  pre-installed applications that I did not know what they were for. When used correctly, these features can be of great use, but they are just futile affordances  without the necessary signifiers.

So, I believe that the human-centered design is a crucial aspect when it comes to any products that we use. If the products were designed based on “the needs, capabilities, and behavior” (Norman, 7) of the users, it will be easier to predict how the users will interact with the product, detect any problems beforehand, and make the overall interaction gratifying. One of the examples I have found was the use of personas. Personas are hypothetical users based on a user type, and personas are used in order to identify the possible user experience scenarios. By using personas, we can design the product centered to the users according to their needs and predicted problems and making”the collaboration of person and the device feel wonderful” (Norman, 7).