Week 10 – Group Musical Instrument

1. Concept and Process of Ideation

At first, we wanted to create the instruments we liked – for Samuel, a drum set, and for Alisa, a violin. However, we encountered large challenges that would take up too much time or complexity within this homework timeframe, so we changed our idea. The next idea has two parts of one piano – so that Samuel’s musical instrument to play the lower notes as you would on a piano with your left hand, which can be paired with Alisa’s instrument that plays higher notes as you would on a piano with your right hand.

However, the last idea was revised again because Samuel’s musical instrument has fast feedback while Alisa’s instrument takes longer to register the orientation and play the correct note accordingly. So, Samuel’s musical instrument plays the higher notes (more soprano) which have much more crisp and clear sounds for the listener, while Alisa’s instrument is the accompaniment that can be used to play each lower note (more bass) for a longer amount of time in general.

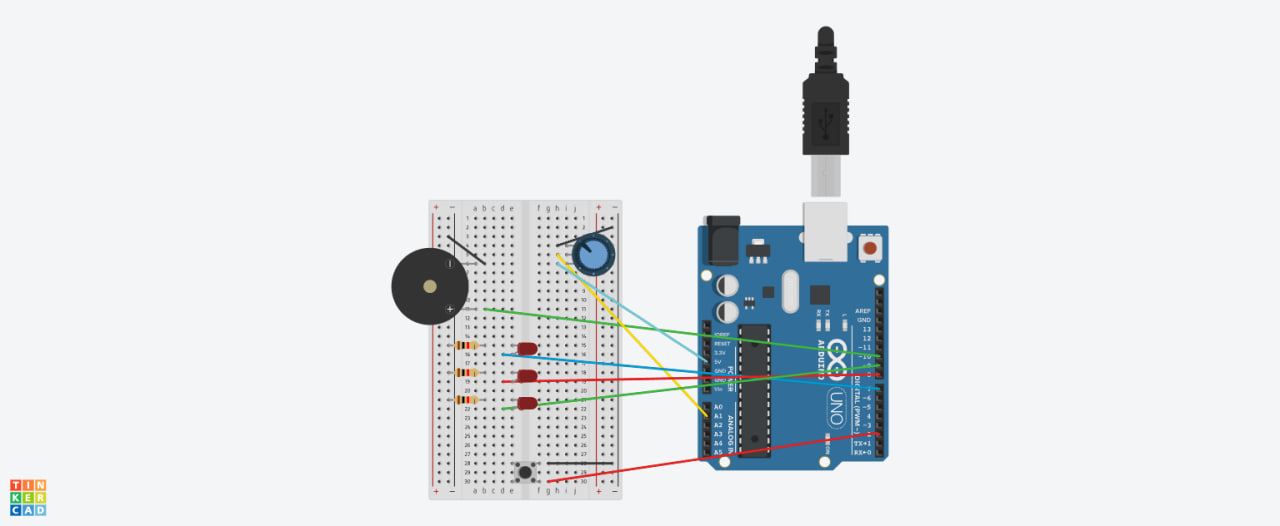
Samuel’s musical instrument is for the “left hand of a piano”, with musical notes C, D, E, F, G, A that can be played using force sensors (analog sensors). In the process of coming up with this idea, we considered which sensors would be similar to a piano, registering presses. Push buttons and force sensors were our options, but we went for the force sensors (for Alisa, it was because she thought she hadn’t tried using the force sensors yet!)

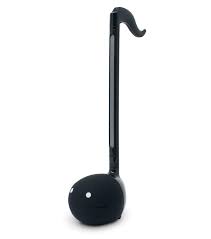
Although Alisa’s musical instrument was considered earlier as for the “right hand of a piano,” it really does look like much more of a music box so it is now a “music box.” In the process of coming up with the music box, we thought of taking the last project with the gyroscope and using a button press to play the sound of musical notes, with the notes differing based on the orientation of the gyroscope. Samuel thought of using the arcade LED button (digital sensor) we found as we looked around the components in the IM Lab, and I thought that if the LED button could light up when being pressed, that would be great feedback for the user.

2. Highlights

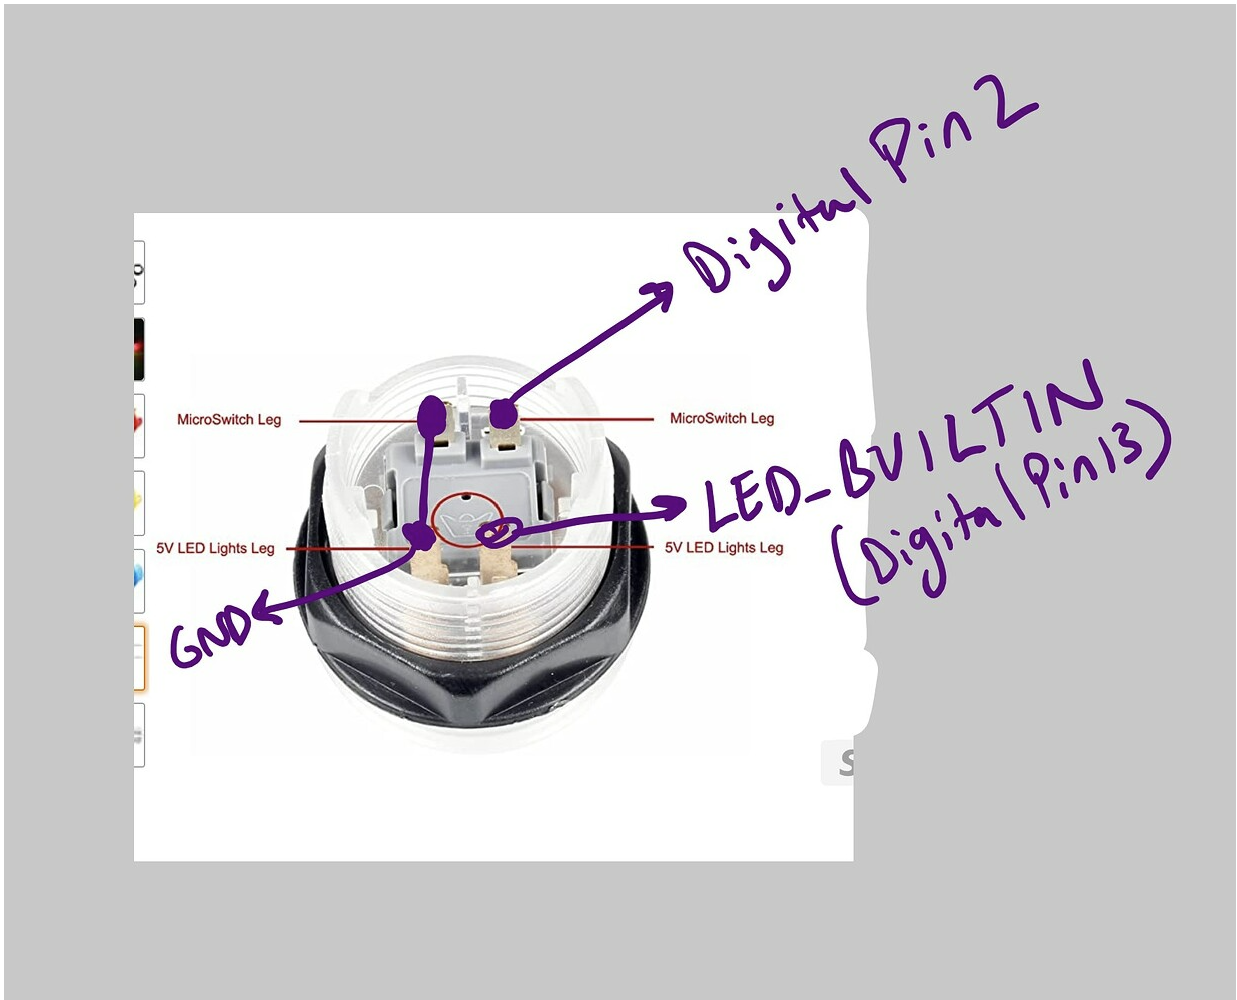
One crucial challenge in creating the “music box,” was that we wanted to use Arcade LED Button but we did not have access to the manual. Alisa tried researching online, and thought it seemed like the LED button needed connections to one positive (+) and GND (-) for the LED, as well as one positive (+) and GND (-) for the button itself. She tried this based on the colours of the cable (2 red and 2 black) she found soldered already. However, upon further research, Alisa found out that these cable colours are misleading…

Alisa inspected the component and found ‘BAOLIAN’ on the component as possibly the brand name. She did further research online and found two useful sources:

  • ezbutton library resource- https://arduinogetstarted.com/tutorials/arduino-button-library
  • https://forum.arduino.cc/t/using-arcade-buttons-solved/677694

One of these sources includes a diagram explaining connections as shown below. Notice the crown – this was also on the component. Given that it was circled, it must be important that the crown was facing upwards. I connected it in this way, edited the code from the forum, and the LED button lights up when I press it!

Arcade Button Connections

I used the gyroscope of the MPU-6050 for my last project, but MPU-6050 contains both a gyroscope and acceleromter. While the gyroscope is smooth (since it uses integration), it has the problem of accumulating errors over time. On the other hand, the accelerometer readings fluctuate very much, but are very accurate. Therefore, to balance accuracy and smoothness, I needed to combine gyroscope readings with accelerometer readings through a  Kalman filter. I used this playlist to help me: the accelerometer calibration must be done manually as in video 14, and video 15 shows how gyroscope and accelerometer readings can be combined.

To have music box play different notes depending on orientation, the code needed to integrate if conditions checking whether the filtered roll angle and filtered yaw angle read from the readings combining gyroscope and accelerometer are within certain ranges.

In making the FSR keyboard some of the challenges we encountered included faulty resistors that detected readings even when not pressed and for this we had to try out each one of the resistors separately and this was very resourceful.

Another challenge was that the buzzer only played one frequency and also because tone() is a non-blocking function at a time and therefore playing a chord as was the original plan became a challenge. We therefore settled to using only notes unless we had a buzzer for each fsr.

3. Video

4. Reflection and ideas for future work or improvements

One key limitation we faced was the Arduino UNO’s constraint of only six usable analog input pins for AnalogRead(), which restricted us to mapping just six musical notes for the FSR keyboard. Ideally, we would have included a seventh note to complete a full octave. In future iterations, we could consider using a mega arduino with more analog input options.

Additionally, a valuable improvement for the music box would be providing real-time feedback to the user indicating which note is currently being played. This could be achieved by incorporating an OLED display, an array of LEDs corresponding to each note, or even serial monitor outputs during development. These enhancements would improve usability and allow for a more intuitive and engaging musical experience.

Week 10 – Reading Response 

Week 10 – Reading Response 


A Brief Rant on the Future of Interaction Design:

This text provides thoughtful critiques of current visions of future technology. The author speaks about reassessing our hands, not as tools for swiping but as instruments of manipulation. One of the points the author made that I found interesting was the contrast between tying shoelaces by touch and trying to do it with numb fingers. This made me reflect on how easily we accept one-dimensional interactions with our devices. However, that being said, the main idea of the text was not to be anti-technology, but rather call for better, more human design. 

After reading this, I reflected on how I think about interactive design. I came to a realization that I have become extremely compliant in accepting the current state of touchscreens and “smart” devices when in reality, they usually feel flat and disconnected from our full human range. It made me question things like why we aren’t advancing into interfaces that are more engaging with the entire body and not just a single fingertip.


Responses: A Brief Rant on the Future of Interaction Design: 

This is a brutally honest text that embraces criticism, clarifying the purpose of the original piece and not proposing the solution, but rather sparking the right kind of thinking. Something I found memorable in this text was the author’s defense of incomplete visions, where rather than pretending to know the future, he leans into uncertainty. This encourages thorough research into unfamiliar areas like tangible interfaces, haptics, and dynamic materials. To me, it served as a reminder that good design doesn’t necessarily come from certainty, but from curiosity and exploration. I appreciated the comparison he made to photography in 1900, black-and-white film was revolutionary then, however, we didn’t stop there. 

This text made me reflect on the fact that valuable critique doesn’t always solve problems directly, but sometimes, it can just help us ask better questions. Additionally, it emphasized how modern design usually overlooks the human body instead of embracing it. We see many instances where rather than crafting tools that align with our physical capabilities, we’re designing around them. Overall, we all need to push ourselves to question what type of future we’re shaping, and if we are ready to imagine something a lot more meaningful than a world controlled by simple swipes and glass screens.

Week 10 – Group Musical Instrument

Week 10 – Group Musical Instrument

Our Concept

For our musical instrument, we were inspired by DJ sets and how DJs interact with their equipment during live performances. We wanted to bring that experience into a smaller format, so we built a mini DJ controller using an Arduino board.

Our DJ set includes:

  • potentiometer to control the volume, just like DJs do when they’re mixing tracks

  • LEDs that react to the sound changes, creating a responsive visual effect

  • piezo buzzer that produces the sound itself

Set-up

Code

GitHub

Week 10 – Reading Resonse

I agree with the rant so much! At first I didn’t really think about how we unknowingly use the feel we get from our fingers to deeply understand everything around us. From the fullness of the cup to the amount of pages of the book we are holding, we constantly see the world through our hands without even knowing it. The tablets and the screens are taking that away from us. The screens do bring us so much good, and are useful in many situation, but they are taking the real world away from us. Newer generations especially are so glued to the screen so they can’t see anything real around them (I’m beginning to sound like my parents). The response to the rant was specifically infuriating to me, not because of the reply from the author, but because of the questions people were asking and the opinions they were giving. There is nothing that makes me more angry then seeing a family out for dinner and their kid staring at their iPad the whole time. The same goes for when the young kids spend their whole day laying down stuck to the screen, watching videos or playing video games. Kids should be kids, explore the world, play around without worry, not spend hours sitting and staring at the screen, there will be plenty of time for that later! I might’ve strayed away from the topic a bit, but overall I do agree that unfortunately technology is taking away our way of seeing the world.

Week 10 – Musical Instrument

Concept

We were thinking a lot about what kind of instrument we want to make and wanted to stray away from the classic, well known ones like guitar and piano and drums and we decided to recreate an instrument many haven’t probably heard of, called Otomatone.

The instrument work by the user pressing the upper longer part of the instrument in different positions and pressing the “mouth” on both sides so it opens. The instrument than creates a sound and makes it look like the character is singing.

Our design

To recreate this we decided to use light resistors as the upper part of the body. The resistors would detect when the user puts their hand over them and create a sound. But the sound wouldn’t be heard until the user pressed on the “cheeks” of the character which had force resistors to detect the force of the press.

Here is the photo of the board and the photoresistors. We also added a button which, if held, will give the sound some vibration while playing. The final design of our Otomatone instrument looks like this:

Code higlight

The code for this instrument wasn’t that complicated. The hardest part was finding the values for all the notes but we used the help of the internet for that.

// Multi-note LDR1
if (ldrVal1 < 500 && duration > 10) {
  if (totalPressure < 256) {
    activeNote = 440; // A4
  } else if (totalPressure < 512) {
    activeNote = 523; // C5
  } else if (totalPressure < 768) {
    activeNote = 659; // E5
  } else {
    activeNote = 784; // G5
  }
  Serial.print("LDR1 note: "); Serial.println(activeNote);
}

This is the code for one of the light resistors which as you can see combines the value of the resistor with the total pressure of the force sensors detected and gives us a tone based on those calculations. The code for other light resistors is similar and not too complicated to understand.

Challenges and future improvement

The biggest challenge for this project was, surprisingly, getting the buzzer inside the “mouth” of the instrument. Getting 2 holes in the back of the “head” of the instrument  was very hard, and even though we tried to do it with our hands it prove impossible to do without a drill which in the end, after many attempts, broke the inside of the ball enough for a jumper cable to pass. The idea was to stick the breadboard to the back of the head and in that way recreate the original instrument and also not have the alligator clips inside the mouth, rather have the buzzers nodes sticking out through the holes. Due to the time constraint this sadly wasn’t possible, but I hope in the future we will be able to add it. As for the future improvements I would like to clean up the wires a bit and add a breadboard to the back of the head. Overall we are happy with the final result and we had a lot of fun working on this project and we also learned a lot!


Week 10: Reading

A Brief Rant on the Future of Interaction Design

“A tool addresses human needs by amplifying human capabilities.” – this quote made me think of how I’ve always thought of tools as things that help us get stuff done, but I never really considered how they’re supposed to work with what we’re already capable of.

The author talks about how a good tool fits both sides: what we can do and what we want to do. But he mentions that most tech today is designed without really thinking about what people can physically do with their bodies, especially their hands. We’ve kind of reduced all interaction down to tapping on a screen, and we’ve just accepted that as a regular thing. But when we try building something physical, there’s a sense of control that I never feel when I’m just doing something digitally.

I also thought about how this idea connects to creativity. So many creative tools like musical instruments, or painting tools are great because they respond to human movement., but a lot of digital tools don’t really do that.

Responses: A Brief Rant on the Future of Interaction Design

Reading through the responses made me notice how many people immediately started to defend current technology, saying things like “We just need better gestures!”. I really liked how the author responded: not defensively, but by clarifying that he’s not against touchscreens or gestures. His point isn’t that modern tools are useless, but that they’re incomplete.

There was a line in the article about the two-year-old who can use an iPad but can’t tie his shoes, which made me think of how humanity made digital interfaces so simple that even toddlers can swipe around. However, this also proves that people don’t see a lot of value in developing actual physical skills.

Another moment that  stood out was when the author said “We’ve almost given up on the body already.” He points to how much of our lives are spent sitting: at work, during leisure, and even while commuting. As a result, we’ve had to create artificial forms of physical activity just to stay healthy. This all just emphasized how our environment  and the tools we design are not supporting our physical well-being

Overall, these responses helped reinforce the author’s main argument: that really effective tools should be designed to serve not just our cognitive abilities, but our physical ones too.

Week 10: Group Musical Instrument

Our Concept

For our musical instrument, we were inspired by DJ sets and how DJs interact with their equipment during live performances. We wanted to bring that experience into a smaller format, so we built a mini DJ controller using an Arduino board.

Our DJ set includes:

  • A potentiometer to control the volume, just like DJs do when they’re mixing tracks

  • LEDs that react to the sound changes, creating a responsive visual effect

  • A piezo buzzer that produces the sound itself

Set-up

Code

GitHub

Week 10 – Reading Response

A Brief Rant on the Future of Interactive Design + Follow-up

The first minute of the Microsoft video envisioning the future seemed really cool to me, but as it went on, the video kept repeating the same ideas over and over again. It felt like our future was limited to one or two movements. The rant definitely opened up my eyes to the subconscious abilities our hands possess. Maneuvers and motions we’ve been doing since young have become so natural we don’t realize just how powerful this sense is. The rant and response to comments made about the rant reminded me of the movie Wall-E where in the distant future, all the humans become so reliant on screens, they become unable to use their body. Living life through a screen when we’re blessed with so many degrees of motion immobilizes you; we see it even now as people get more glued to screens and are constantly sitting or lying down. I do wonder though what some potential solutions to this “picture under glass” future would be. I’m thinking about somehow incorporating textures, weight, and 3D objects because the main problems mentioned were how our hands have the ability to sense and manipulate things from touch, but a 2D glass screen avoids all of that. Or maybe centering designs around actions we can perform like flipping pages, pinching things, twisting, squishing, etc. Maybe even taking inspiration from bigger actions like planting flowers,  steering and feeling the torque of the wheel, or feeling water and how it sways under the force of your hands.

Week 10 — Reading Response

“A Brief Rant on the Future of Interaction Design” made several points and rebuttals to responses that I resonated with. First, the rant itself reminded me of a user testing gig that I did back when I was in New York last semester, doing my studyaway. Although I don’t think I can disclose many details, it was vaguely about swipe mechanisms that would move screens based on a thumb and tap gesture I would do in the air with a watch on. Although I think it’s slightly different from the tech that is shown in Microsoft’s video, since it involves tactile elements, it still encapsulates similar sentiments of swipes essentially being the future of human interaction with tech. Before reading this article, I had never truly considered the idea that our “future” is something we actively choose. This opening thought lingered with me and prompted a deeper reflection. I realized that my perspective on innovation was inherently capitalistic. I had always viewed technological advancements as merely profit-driven responses to market demands. I’m drawn to the idea that we, as individuals within society, are the ones who shape market demand. It’s empowering to think about the influence we hold, and it makes me want to reclaim more autonomy in how I see my role. I’d like to challenge myself to think bigger—to strive to be, or at least attempt to become, more of a pioneer in shaping the world around me.

Furthermore, his responses to the comments on his rant were very coherent. I agree that you don’t need to propose an alternative to point out when something is wrong—doing otherwise risks complacency with the status quo and undermines critical thinking. This ties into a broader issue I’ve noticed: the way technology, particularly AI, is shaping our cognitive abilities. For instance, the quote about children mastering iPads but struggling with shoelaces, or his point on how it is like understanding “Cat in the Hat” but not “Hamlet”, highlights how our tools are often designed for simplicity rather than depth. While accessibility is important, oversimplifying tools for mass appeal can lead to shorter attention spans and a decline in critical thinking. This echoes his point in the article: tools are meant to amplify human abilities, yet the trend of dumbing them down risks doing the opposite—handicapping us rather than empowering us.

Week 10 — Assignment

Concept

Our musical instrument is based off a combination of a both a mechanical and digital noise machine–controlled with a surprisingly satisfying potentiometer that allows us to modify the beats per minute (BPM), and a button that changes the octave of our instrument. We had fun with the relationship between the buzzer and our mechanical servo which produces the other noise, where the two are inversely proportional! In other words,  as the BPM of the buzzer increases, the servo slows down! And vice versa.

Figuring out the right code combination was a bit tricky at first, as we first made the mistake of nesting both the servo trigger and the buzzer tone in the same beat conditional. This meant that we fundamentally could not separate the motor from the buzzer tones. To resolve this, we ended up using two triggers–a buzzer and a motor trigger–which both run independently.

The code below shows how we ended up resolving this problem. Once we implemented this fix, we were able to celebrate with our somewhat perplexing instrument, that requires the user to complement the buzzers various beeping with the servos mechanical changes.

// --- 3. Perform Actions based on Timers ---

// --- Action Group 1: Metronome Click (Buzzer) ---
if (currentMillis - previousBeatMillis >= beatInterval) {
  previousBeatMillis = currentMillis; // Store the time of this beat

  // Play the click sound
  tone(BUZZER_PIN, currentFreq, CLICK_DUR);

  // Print beat info
  Serial.print("Beat! BPM: ");
  Serial.print(currentBPM);
  Serial.print(" | Freq: ");
  Serial.print(currentFreq);
  Serial.print(" | Beat Interval: ");
  Serial.print(beatInterval);
  Serial.println("ms");
}

// --- Action Group 2: Servo Movement Trigger ---
if (currentMillis - previousServoMillis >= servoInterval) {
  previousServoMillis = currentMillis; // Store the time of this servo trigger

  // Determine Target Angle
  int targetAngle;
  if (servoMovingToEnd) {
    targetAngle = SERVO_POS_END;
  } else {
    targetAngle = SERVO_POS_START;
  }

  // Tell the servo to move (NON-BLOCKING)
  myServo.write(targetAngle);

  // Print servo info
  Serial.print("Servo Trigger! Target: ");
  Serial.print(targetAngle);
  Serial.print("deg | Servo Interval: ");
  Serial.print(servoInterval);
  Serial.println("ms");

  // Update state for the next servo trigger
  servoMovingToEnd = !servoMovingToEnd; // Flip the direction for next time
}