Self-portrait

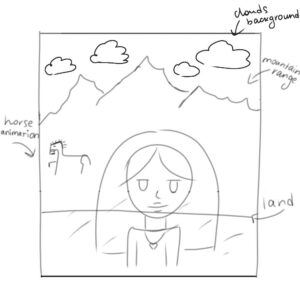
When I was tasked with creating a self-portrait, I realized that my portrait wasn’t simply about representing my appearance, it was more about capturing my background. So, I decided to create a self-portrait set in the background of my hometown in the Northern Caucasus, including elements like the mountains and a horse.

Here’s the initial reference I sketched:

At first, I thought making the self-portrait would be a simple task, but I ended up making it way harder than needed by focusing on the overcomplicated background elements. However, looking back, this pushed me to learn a lot more than if I’d just gone for a simpler face portrait.

The main challenge for me was creating the mountains. For each individual mountain, I used simple triangles, a shape I used to struggle with. However, printing the coordinates helped me figure it out. I also wanted to create a mountain range, but I wasn’t sure how to add something resembling curves. I found this Reddit post that showed me how to do it: Creating Thick Curved Shapes.

Additionally, I wanted to add a gradient sky, which involved using loops to create the desired effect. I found this draft to help me with the technique: Gradient Sky Example.

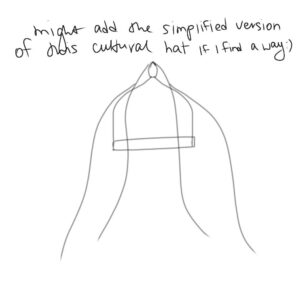
Surprisingly, the most difficult part of the project wasn’t the background: it was trying to create the elements that represented me. I struggled with coding wavy hair, so I opted for a straight hairstyle instead. I also couldn’t figure out how to create side bangs using the arc function, so I decided to leave that out. The other challenge was creating a simple heart. I tried to make it using an arc, but that didn’t work out, so I came up with a solution: two circles and a triangle.

Looking back on this whole process, I really get the “vision vs. reality” thing now. Sketching out ideas and trying to turn them into something real was way more difficult than I thought. But it also pushed me to learn more coding functions, helping bring my vision to life.

Despite all the challenges and endless debugging, I honestly loved the process and the creative side of coding:) As time goes on, I hope I’ll get better at this, and eventually be able to create whatever I envision, with fewer limitations.

Attaching the code:

Week 1; Self-Portrait

Motivation

I’m not much of a social media person, and even on the platforms I’m on, I’m rarely active. Snapchat, in particular, never really interested me until a good friend recommended it and encouraged me to join. During the account creation process, I had to create an avatar that resembled me. Months later, I joined Duolingo and had to do something similar. I found it fascinating to customize every detail—from facial features and skin tone to hairstyle and outfit. Beyond the fun of creating these avatars, I became curious about the logic and methods behind designing such features. When I learned that our first-week assignment was to draw a self-portrait, it therefore felt familiar, but this time, there were no pre-made shapes or preset colors to choose from. Instead, I was responsible for drawing and coloring everything myself using p5.js. I was genuinely excited about the challenge! I therefore drew my inspiration from my snapchat and Duolingo avatar that I think paint a picture of who I am.

Code

Before coding the portrait, I began by sketching it on plain paper to guide me, particularly with determining precise measurements for the coordinates. I worked on a 400×400 canvas with a light grey background (Greyscale: 220). I started by coding the body and gradually worked my way upward. After much thought about choosing a color that closely represents my skin tone, I decided on RGB(79, 41, 3). To keep the code organized, I grouped related features into separate blocks—such as eyes, glasses, ears, and nose. I’m especially proud of how the eyes, ears, glasses, and mouth turned out because positioning and sizing them correctly took a lot of effort and calculations. For the outfit, I settled for a grey zipper jacket, as grey happens to be my favorite color. To add more aesthetics and also to learn something new; sin curves I decided to add a frame on the top and bottom.

Challenges and Areas for Improvement

The entire process was enjoyable, but I did encounter some challenges along the way. While some issues were minor and I managed to resolve them, others were more complex, and I had to settle for alternative approaches. Some of the key challenges I faced included making curves on the edges of quads, maintaining symmetry, and working with arcs. Additionally, I was unable to implement interactivity in this project, but I hope to explore and implement it in future projects. I aim to enhance my skills in adding interactivity to make future projects more dynamic and engaging. Overall, I really enjoyed the process and look forward to creating more projects. I also appreciate how this journey allows me to continuously improve my JavaScript skills as I move forward.


Week 1: Self – Portrait

Concept

For my portrait I didn’t really focus on making the face shape or body similar to mine, I wanted to present my hobby and something I love doing. My goal was to create a drawing of me going on a hike in a forest.

Not focusing on the facial and body features allowed me to focus a bit more on the background and create a mini forest. I also decided to add a backpack and a hat both of which are essential hiking equipment.

Process

I started by initially creating the body and the neck. I then proceeded to create the head and the details for the arms. The face seemed like the most difficult task so I left that for last. I created the background with the trees and the ground and also added the backpack straps so it is clear to the viewers that there is a backpack behind the avatar. The face features turned out to not be so complicated and were done using basic shapes and I am proud the way it turned out, simple yet effective.

//eyes
fill('white');
ellipse(170, 170, 40, 30); // left eye white
ellipse(230, 170, 40, 30); // right eye white

fill('black');
circle(170, 170, 15); // left eye pupil
circle(230, 170, 15); // right eye pupil

//mouth
noFill();
stroke('black');
strokeWeight(2);
arc(200, 230, 50, 30, 0, PI); // smiling mouth

The mouth, even though it used a simple arc was fun to work on and figure out how to set it up properly which took a bit of time.

Reflection and future improvements

I had so much fun working on this mini project and playing with all the shapes and design that p5js allows. In the future I would like to perhaps add more details to the face and the body as well as add some animations which would bring the avatar to life. Also somehow making the art interactive is something that would probably be interesting to incorporate and would further improve the user experience.

Assignment 1: Self-portrait

For this assignment, we were tasked to create a self-portrait using p5.js. In the class, we worked with different shapes and how to check x and y positions on the canvas so that it was easier to place our shapes. I wanted to think about creating something that was really representative of me while also making it fun. So, after going through a couple of ideas, I decided to create a self-portrait of me in my snowboarding attire, with some subtle animation and interactivity on the side.

In the portrait, you can see me in full snowboarding gear with snow falling down. I’m particularly proud of the animated snowflakes because it did take me a bit to animate it. The logic behind it is composed of 4 key elements. First, I initialize/declare an array of snowflakes with the necessary key parameters: x, y, and the size.

let snowflakes = [
  { x: 250, y: 50, size: 20 },
  { x: 50, y: 50, size: 30 },
  { x: 80, y: 90, size: 15 },
  { x: 150, y: 120, size: 30 },
  { x: 200, y: 200, size: 15 },
  { x: 220, y: 1500, size: 20 },
];

Second, in the last part of the draw() function, I include a for loop to create snowflakes based on the specifications of the list of snowflakes. In addition, if the y coordinate of the snowflake is bigger than the height, it is reset to 0 and the x coordinate is randomized:

for (let i = 0; i < snowflakes.length; i++) {
  let snowflake = snowflakes[i];
  drawSnowflake(snowflake.x, snowflake.y, snowflake.size);
  snowflake.y += 1; 
  if (snowflake.y > height) {
    snowflake.y = 0;
    snowflake.x = random(width);
  }
}

The drawSnowflake function utilizes the x, y, and size parameters passed to actually create the snowflake shapes by drawing 6 “arm” lines and 6 perpendicular smaller lines through a for loop. I learned that I need to push() to save the current transformation matrix and then pop() to restore it, such that each snowflake is drawn independently without affecting the transformations applied to other snowflakes or elements on the canvas.

function drawSnowflake(x, y, size) {
  stroke('white');
  strokeWeight(2);

  for (let i = 0; i < 6; i++) {
    push();
    translate(x, y);
    rotate(i * PI / 3);
    line(0, 0, size, 0);
    line(size * 0.5, -size * 0.2, size * 0.5, size * 0.2);
    pop();
  }
}

A fun little Easter Egg is that you can click on my ski mask to remove it to reveal my face! : -> Have a look:

Week 1 – Self Portrait

Concept

For this project, I wanted to focus on representing myself using colors and shapes to convey my personality, rather than just creating an exact lifelike image. I chose bright pastel colors because they represent this sense of calm, warmth, and playfulness, which are qualities I believe reflect who I am as a person.  In terms of the layout, I kept the features rather minimalist, with curves and lines to form a slight sense of structure without making the portrait overly complicated. I used shapes like circles, ellipses, and rectangles to mimic facial features.

Code Highlight

One of the parts of the code that I am proud of is how I created the hair. At first, I was going to use a simple rectangle to represent the hair. However, as I started to mess with the shapes, I noticed that circles and ellipses would work well to create the flowing, softish texture of hair, and I ended up combining these shapes with rounded rectangles to create this illusion.

Here’s the code:

 
//hair
 fill(0, 0, 0);
 rect(107.5, 189, 185, 125, 35);
 ellipse(200, 203, 185, 250, 150);
 fill("black");
 circle(120, 168, 50);
 circle(280, 168, 50);
 circle(280, 168, 50);

//bangs
 push();
 fill("black");
 rotate(75);
 ellipse(100, 202, 120, 50, 70);
 rotate(-75);
 ellipse(235, 147, 95, 54, 70);
 ellipse(235, 130, 70, 54, 70);
 pop();

Ideas for Future Work/Improvements

Looking ahead, I have a lot of ideas for how I could improve this portrait. First, I’d love to animate different aspects of the portrait, so maybe animate the hair to give the illusion that it’s blowing in the wind, or make the eyes blink or shift to make the portrait feel more dynamic. I could also include  more interactive features, like making the background change colors based on the position of the mouse.

Another area I may want to explore is the use of textures. For this project I stuck with solid pastel colors, however I think adding subtle textures to the background or hair could create a more layered and interesting visual effect. I could experiment with gradients, patterns, or even incorporate some visual noise to make the composition feel slightly more textured.

Week 1: Self Portrait


Concept:

For my first assignment I tried to make a self portrait of myself by implementing different functions we learnt in class like ellipse, rect, fill etc. but I also tried to add new functions that I discovered like push, pop and rotate to make it easier to create a different variety of shapes. My inspiration for the self portrait was my iconic ‘eyebrows raise face’ because I thought it would be funny. I made the overall color scheme of the portrait to be grey so that it reflects the emotion shown on the face. 

I first tried to figure out what shapes would best fit the idea I had on my sketch, and from that I started by creating the face and hijab around my head:

Even though I had a specific idea at first, I had to adjust a lot of things so that it worked in the end, like when it came to the hijab. At first i just made it into an ellipse but found that i couldn’t layer the bangs with it so in the end i figured that making it have noFill and increasing the strokeWeight still creates the effect I wanted:

Code Highlight:

When it came to the lips in my portrait I tried to make a realistic lip shape by overlapping the ellipses and triangles to create the shape I wanted. It was particularly hard as i had to adjust the points specifically so that it created the shape i wanted:

//lips
push();
noStroke();
fill(255, 105, 120);
ellipse(195, 250, 15, 8);
ellipse(205, 250, 15, 8);
triangle(218, 255, 211, 247, 200, 252);
triangle(190, 253, 193, 245.5, 181, 254);
ellipse(200, 255, 16, 10);
triangle(190, 248, 195, 259, 181, 254);
triangle(210, 250, 205, 259, 219, 255);
pop();

Reflection and ideas for future work or improvements:

My sketch had basic shapes so I was limited to specific shapes, I could have attempted to make complex shapes from the sketch. But at the same time there were alot of things I could have done in a much simpler way, like when it came to placing and rotating the bangs, i had to play around with the numbers to get it to where i wanted it to be, so i think finding an easier way to do that would benefit me in the future for my other assignments.


Week 1: Self-Portrait

Week 1: Self Portrait

Concept

I wanted to create a self-portrait that reflected my at times chaotic attention span, along with my curly hair. I created a relatively simple portrait, but spent a lot of time tweaking the curls and the eyes (that represent my constantly shifting attention).

Process

Constructing my self-portrait with P5.js was a relatively iterative process, that required bouncing between the provided reference manual and the IDE itself.

Highlight: One of my favorite parts of code is how the curls are drawn. While I was considering what approaches may work, I realized that my multi-variable calculus class could come in handy, representing spirals as parametric equations.

function drawSpiral(centerX, centerY, scale, strokeThickness) {
  let numPoints = 1000;
  let maxT = 6 * PI;
  let step = maxT / numPoints;

  stroke(0);
  strokeWeight(strokeThickness);

  for (let t = 0; t <= maxT; t += step) {
    let x = scale * sin(t) * t;
    let y = scale * cos(t) * t;
    point(centerX + x, centerY + y);
  }
}

Improvements: A potential improvement I would like to implement in the future is to randomize the curls in a more organic way, rather than generating uniformly-random points. For instance, they could be generated using my hair semi-circle, with semi-randomly deviations from a perfect line.

Another potential improvement may be to produce an algorithm that can more efficiently draw the rotating spirals. In it’s current implementation, it appears to be quite computationally expensive, and slows down if too many curls are present.

Code

let size = 600;
let midX;
let midY;
let curlNums = 30;
let curlSpeeds;
let curlSizes;
let curlThiccs;

function setup() {
  createCanvas(size, size);
  midX = width / 2;
  midY = height / 2;

  curlSpeeds = generateRandomArray(curlNums, -5, 5);
  curlSizes = generateRandomArray(curlNums, 1, 2);
  curlThiccs = generateRandomArray(curlNums, 2, 5);
  curlXs = generateRandomArray(curlNums, 150, 450);
  curlYs = generateRandomArray(curlNums, 75, 200);
}

function generateRandomArray(length, min, max) {
  return Array.from({ length }, () => getRandomInRange(min, max));
}

function getRandomInRange(min, max) {
  return Math.random() * (max - min + 1) + min;
}

function drawSpinningSpiral(
  centerX,
  centerY,
  scale,
  strokeThickness,
  rotationSpeed
) {
  push();
  translate(centerX, centerY);
  rotate(frameCount * rotationSpeed * 0.01);
  drawSpiral(0, 0, scale, strokeThickness);
  pop();
}

function drawSpiral(centerX, centerY, scale, strokeThickness) {
  let numPoints = 1000;
  let maxT = 6 * PI;
  let step = maxT / numPoints;

  stroke(0);
  strokeWeight(strokeThickness);

  for (let t = 0; t <= maxT; t += step) {
    let x = scale * sin(t) * t;
    let y = scale * cos(t) * t;
    point(centerX + x, centerY + y);
  }
}

function draw() {
  background(255);

  // Head
  noStroke();
  fill("#FFD58C");
  let headSize = size * 0.6;
  let headSizeW = headSize * 0.95;
  let headSizeH = headSize * 1.1;
  ellipse(midX, midY, headSizeW, headSizeH);

  // Eyes
  fill(0);
  let eyeSize = headSize * 0.1;

  // Movement
  let xOffset = 5 * cos(frameCount / 10);
  let yOffset = 5 * sin(frameCount / 10);

  // Left Eye -- todo - ovals
  let leftEyeX = midX / 1.2 + xOffset;
  let leftEyeY = midY / 1.2 + yOffset;
  circle(leftEyeX, leftEyeY, eyeSize);

  // Right eye
  let rightEyeX = size - leftEyeX;
  let rightEyeY = leftEyeY;
  circle(rightEyeX, rightEyeY, eyeSize);

  // Eyebrows
  let eyeBrowWidth = eyeSize;
  let eyeBrowHeight = eyeSize * 0.2;
  let eyeBrowThicc = eyeSize * 0.2;
  noFill();
  stroke(0);
  strokeWeight(eyeBrowThicc);

  // Left eyebrow
  let leftEyeBrowX = leftEyeX;
  let leftEyeBrowY = leftEyeY - eyeBrowWidth;
  arc(leftEyeBrowX, leftEyeBrowY, eyeBrowWidth, eyeBrowHeight, PI, 2 * PI);

  // Right eyebrow
  let rightEyeBrowX = rightEyeX;
  let rightEyeBrowY = rightEyeY - eyeBrowWidth;
  arc(rightEyeBrowX, rightEyeBrowY, eyeBrowWidth, eyeBrowHeight, PI, 2 * PI);

  // Nose bar
  let noseHeight = headSize * 0.08;
  let noseTopOffset = headSize * 0.04;
  let noseTopX = midX;
  let noseTopY = midY + noseTopOffset;
  let noseBottomX = midX;
  let noseBottomY = noseTopY + noseHeight;
  let noseThicc = headSize * 0.02;
  strokeWeight(noseThicc);
  line(noseTopX, noseTopY, noseBottomX, noseBottomY);

  // Nose arc
  let noseArcSize = headSize * 0.06;
  let noseArcLeftX = noseBottomX - noseArcSize * 0.5;
  let noseArcLeftY = noseBottomY;
  let noseArcWidth = noseArcSize;
  let noseArcHeight = noseArcSize;
  arc(noseArcLeftX, noseArcLeftY, noseArcWidth, noseArcHeight, 0, PI);

  // Smile arc
  let smileArcSize = headSize * 0.4;
  let smileYOffset = headSize * 0.25;
  let smileArcLeftX = midX;
  let smileArcLeftY = midY + smileYOffset;
  let smileArcWidth = smileArcSize;
  let smileArcHeight = smileArcSize / 2;
  arc(smileArcLeftX, smileArcLeftY, smileArcWidth, smileArcHeight, 0, PI);

  // Hair
  let hairTopX = midX;
  let hairTopY = midY;
  let hairWidth = headSize;
  let hairHeight = headSize / 2;
  let hairThicc = headSize / 10;
  stroke(20);
  strokeWeight(hairThicc);
  arc(hairTopX, hairTopY, headSizeW, headSizeH, 1.1 * PI, 1.9 * PI);

  // Curls
  let curlScale = 2;
  let curlThicc = 7;
  let curlSpeed = 3;
  for (let i = 0; i < curlNums; i++) {
    drawSpinningSpiral(
      curlXs[i],
      curlYs[i],
      curlSizes[i],
      curlThiccs[i],
      curlSpeeds[i]
    );
  }
}


Glitch Self Portrait – Week 1

Click on the piece with your mouse!

When coming up with an idea for this project, I wanted some kind of dynamic or interactive image; I feel like a static portrait can’t portray me. The final product ended up being a face made out of typed letters positioned in a way to create an image with animated and random glitches in the background. I also put the entire thing in a computer frame as if I’m trapped in a confined space. Every time the user clicks on the mouse within the canvas, a glitch effect happens where my portrait duplicates in strange ways, as if I’m malfunctioning. This represents my sensitivity to external stimuli. I guess the portrait is conveying that deep down, behind my exterior (behind the screen), there’s a mess boiling up, especially if I’m exposed to overwhelming experiences.

I used the mouseClicked() built-in function to get the interactivity to work:

// when user clicks on mouse, glitch effect with portrait
function mouseClicked() {
  // random offset and color for the portrait 4 at a time to create glitchy effect
  for (i=0; i<4; i++) {
    var newColor = color(random(255), random(255), random(255));
    portrait(newColor, random(-40,40));
  }
}

I also defined my own function to be called throughout the project called portrait() that draws the overall shape of my portrait and takes 2 arguments, textColor and xOffset. Even though the overall shape of the portrait stays the same, the color and position can change because of these arguments.

function portrait(textColor,xOffset) {
  // styling of the text
  fill(textColor);
  textSize(25);
  textStyle(BOLD);
  
  // trapezoid part of hair
  text("hihihihihi", 150+xOffset,100);
  text("hihihihihihihi", 130+xOffset,120);
  text("hihihihihihihihihi", 110+xOffset,140);
  
  // start of the two sides of hair
  text("hihihihi", 100+xOffset, 160);
  text("hihihihi", 230+xOffset, 160);
  
  // two sides of hair looped over and over to create length
  for (let i=0; i<8; i++) {
    text("hihihi", 100+xOffset,180+20*i);
  }
  for (let i=0; i<8; i++) {
    text("hihihi", 250+xOffset,180+20*i);
  }
  
  // face
  text("O", 180+xOffset, 200);
  text("O", 220+xOffset, 200);
  text("3", 200+xOffset, 230);
}

I had some more ambitious ideas that came to mind (that can be applied in the future); I wanted to make the portrait be typed out over time instead of being shown all at once (since the portrait is made out of text, it’d be cool if everything was typed out in a progression). Or, even when the mouse clicking happens, I can generate random letters to populate the portrait instead of just one type of image with the same letters. I think the potential use of random and animations interest me the most for future iterations of this project. In a way, I also want the visual imagery to evoke more of an eerie feeling as well. Having your entire self reside in the digital world and be made up of text feels a little dystopian and out of touch with reality.

Brainstorming/brain dump throughout couple of days (every time I had an idea, I’d write it down):

  • Click on it and the eyes go everywhere, mouth blah blah
  • Interaction inspired the idea
  • Sensitive nature, external stimuli will cause me to internally explode
  • Using text to create drawings and animations
  • Density of characters to shade
  • Use glitchy random background
  • Tv – glitchy colors – glitchy animations

Week 1: Self-Portrait

Concept

I wanted my portrait to be somewhat realistic and visually representative of me to a certain extent, so I put a great emphasis on colors. I pulled up a photo of myself online and used a Chrome extension (ColorZilla) to find the exact colors of my facial features, i.e. eyes, brows, cheeks, lips, skin, hair, and used them in my sketch. The blue background color is taken from a photo of a clear sky I took 2 weeks ago on campus.

Process

I finished a bulk of my sketch before our second class when we learned it is actually possible to find precise coordinates using our mouse.  Even though it was a very tedious process to guess the coordinates of where I wanted my shapes to be and do some rough calculations in my head, in hindsight, I think it was helpful as it led to lots of experimentation that made sketching any shape more intuitive later on.

There are many different ways to draw nose and lips, but I decided to use triangles for both based on sculpting techniques. To sculpt nose and lips, it is very common to create triangular blobs out of the clay first and then shape them delicately with your fingers, so I used that idea in my sketch.

The part I found to be the most difficult was the hair. The first time I created the hair, I was using many individual shapes, which made it not only overly complicated but also unfitting with the rest of the sketch.

//   hair
  fill(56, 48, 47);
  rect(160, 50, 275, 50);
  rect(160, 100, 50, 250);
  rect(385, 100, 50, 250);
  triangle(210, 100, 240, 100, 210, 150);
  triangle(355, 100, 385, 100, 385, 150);
//   hair top edges
  fill(101, 163, 204);
  triangle(160, 50, 210, 50, 160, 120);
  triangle(445, 50, 395, 50, 445, 130);

After trying out different shapes, I realized that I could use the same combination of circle and rectangle I used for my neck for the hair. Sketching the hair this way made it look a lot better, as there were no strange angles and gaps anymore. This also became a reminder that, sometimes, simple solutions can lead to much better outcomes.

//   hair
  fill(56, 48, 47);
  rect(167, 159, 264, 190);
  circle(299, 170, 265);

Finally, I added two musical notes to my sketch to represent my love for music. I wanted my portrait to be symmetrical, so I sketched both notes to be on either side of the sketch to follow the same symmetrical pattern. I had learned to find coordinates using my mouse at this point, so sketching the notes took a lot less time than most of the other shapes on the portrait.

//   left musical note
  fill(0);
  stroke(0);
  strokeWeight(2);
  ellipse(49, 106, 17, 12);
  ellipse(89, 126, 17, 12);
  line(57, 72, 57, 102);
  line(97, 93, 97, 123);
  line(57, 72, 97, 93);
// right musical note
  ellipse(499, 126, 17, 12);
  ellipse(539, 106, 17, 12);
  line(507, 94, 507, 124);
  line(547, 73, 547, 103);
  line(507, 94, 547, 73);

Reflections & Improvements for Future Work

I had a lot of fun working on my portrait. I began working on this assignment quite early without having read through the documentation first to check all of its functionality, so it is mostly based on what we learned in class and is limited to 2D primitive shapes only. Next time, I want to experiment with curves and transformations, and play with the draw function to create animations. As I focused on making the sketch (somewhat?) realistic this time, I hope to explore my creativity and produce more imaginative pieces next time!