Before reading this article, I didn’t know anything about Margaret Hamilton, even though she is the person who basically laid the foundation for software engineering. She literally wrote the code that made Apollo 11’s Moon landing possible, and yet people didn’t realize how groundbreaking that was at the time.
It wasn’t just because she was a woman in tech, but because no one had really seen software engineering as a real discipline yet. It made me think about how when something revolutionary happens for the first time, people often don’t give it much credit because they have no prior knowledge/understanding.
One moment from the article that i remember the most was when Hamilton insisted on including error-handling in the code, even though others thought it wasn’t necessary. During the actual Moon landing, those systems kicked in and saved the mission from being cancelled. It made me think about how forward-thinking she had to be planning for what could go wrong. It also reminded me how invisible certain kinds of work can be. Her code wasn’t visible like the rocket itself, but without it, none of it would’ve worked.
Attractive things work better
In the entire design industry, one area I’ve always had the most interest in was human-centered design. The idea that “products designed for use under stress follow good human-centered design” as stress makes people less good at problem-solving stood out to me. It made me think of when I myself am doing something in a hurry, and if something isn’t designed for ease of access, it forces me to slow down and spend extra effort on something that could be simplified. Whereas products designed for relaxed occasions can enhance usability through aesthetic design. So, it means that if we were to compare those two, usability would prevail over attractiveness.
However, after reading Norman’s article, my perspective shifted. He argues that attractive things work better, not because they have superior functionality, but rather because their visual appeal creates positive emotions that improve cognitive performance, especially in problem-solving.
So, aesthetic appeal can directly support usability, especially under stress. For instance, when I use confusing interfaces (especially when I’m in a hurry), I feel frustrated and mentally over the place. In contrast, using a clean, beautifully designed app like Notion makes tasks feel manageable, even enjoyable, despite any pressure. This made me think about the psychological aspect of good design and that it’s not just about how things work, but how they make us feel.
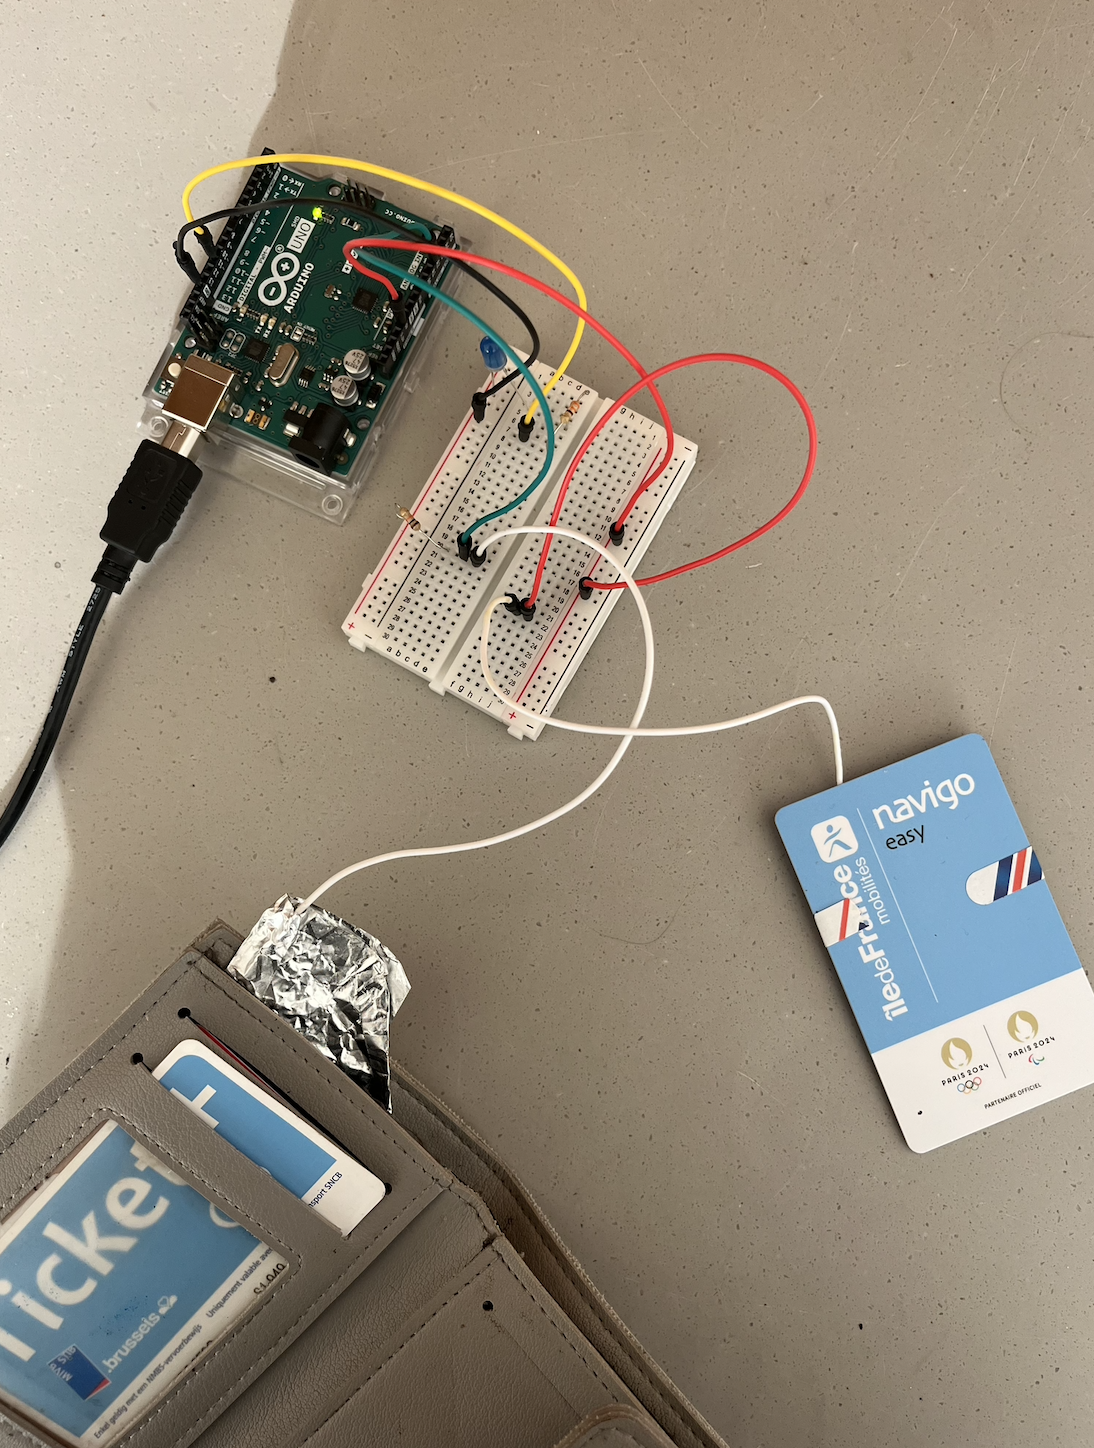
When thinking about this project, I wanted to solve a problem that I constantly deal with. I often bring a different bag or wallet everyday, meaning I have to move all my cards and items to the other bag. However, whether it’s my credit card, metro card, or student ID, I always realize too late that I left something in my other bag and it’s frustrating to get to the subway and not have my metro card or to be at a café and realize my credit card is missing.
So, to fix this, I created a simple switch that tells me if my card is in my wallet. The idea is straightforward, if the card is inside, the circuit is complete, and the LED lights up. If the card is missing, the circuit remains open, and the LED stays off, reminding me to grab it from the other bag before I leave.
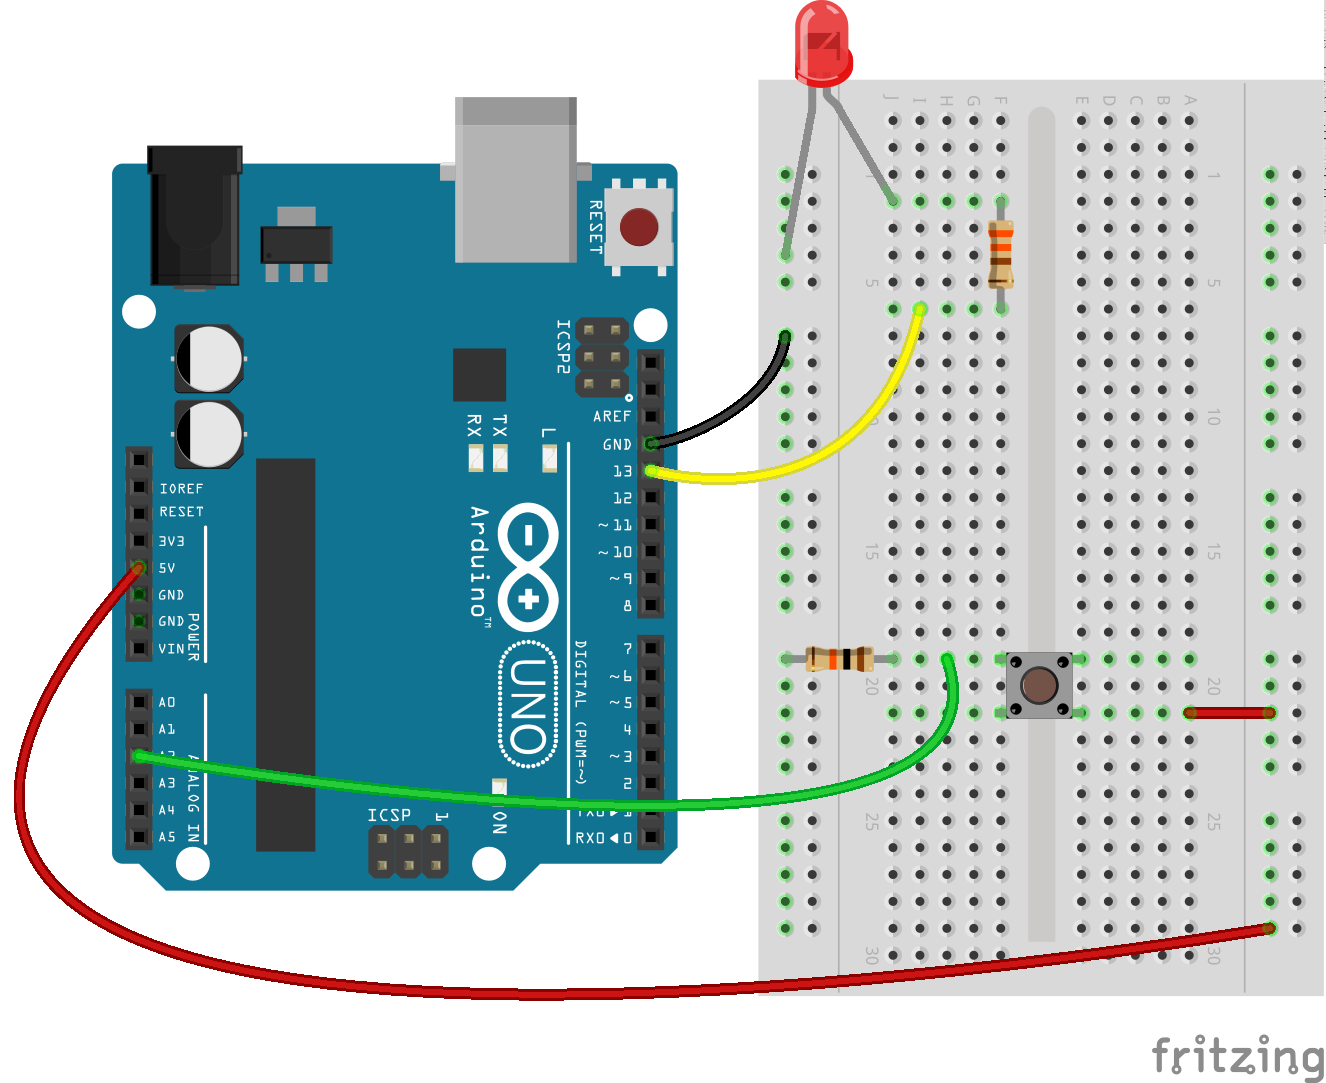
To build the circuit, I mainly based it off of the switch circuit we went over in class, however instead of the button I used two wires, one connected to my wallet and the other to my metro card. I then placed a thin conductive strip of aluminum foil inside my wallet as well as on the metro card to make sure that when I insert the card it completes the circuit, turning on the LED. This way, I can quickly check if I have everything just by looking at the light, no need to rummage through my bag at the last second.
Below is the code I used:
int wireTouch = A2;

void setup() {
  pinMode(11, OUTPUT);
  pinMode(wireTouch, INPUT);   // Button input
   Serial.begin(9600);

}

void loop() {
 int touchState = digitalRead(wireTouch);
 Serial.println(touchState);
  delay(1);

  if (touchState == HIGH) {
    digitalWrite(11, HIGH);  // Turn LED ON if wires touch
  } else {
    digitalWrite(11, LOW);   // Turn LED OFF if wires don't touch
  }
}
Reflection
I think building this project was a fun and practical way to apply the switch circuit we learned in class to a real-life problem. I am pretty happy with the result as the circuit worked as expected, when the card was inside the wallet, the LED turned on, and when it was missing, the light stayed off. However, one challenge I faced was ensuring the conductive strips inside the wallet aligned properly with the card. At first, the connection wasn’t always reliable, and the LED flickered. I had to adjust the placement and use stronger adhesive to keep the strips in place.
In terms of improvements and additional elements, I could maybe add an LCD, so instead of just the LED turning on or off, an LCD display could show a message like “Card Present” or “Card Missing,” which would provide a clearer and more informative response. A sound alert could also be useful, I could add a small buzzer so that it gives a short beep when the card is missing or inserted, providing a more immediate and noticeable notification.
I have a little jewelry plate that I try my best to put all my jewelry on at the end of the day so that it is easier to find them next time. However, sometimes I forget to put my jewelry on it, especially my ring, and then I would have to look around to figure out where I put it last time.
This became my inspiration for creating my unusual switch – to remind myself to put my ring where it is supposed to be. When the ring is put on the plate, it closes the switch circuit and turns on the LED bulb!
My hands are involved in operating this switch, but not in the traditional sense, as it is the ring that is acting as the switch and is the main object, so I decided to continue with the idea.
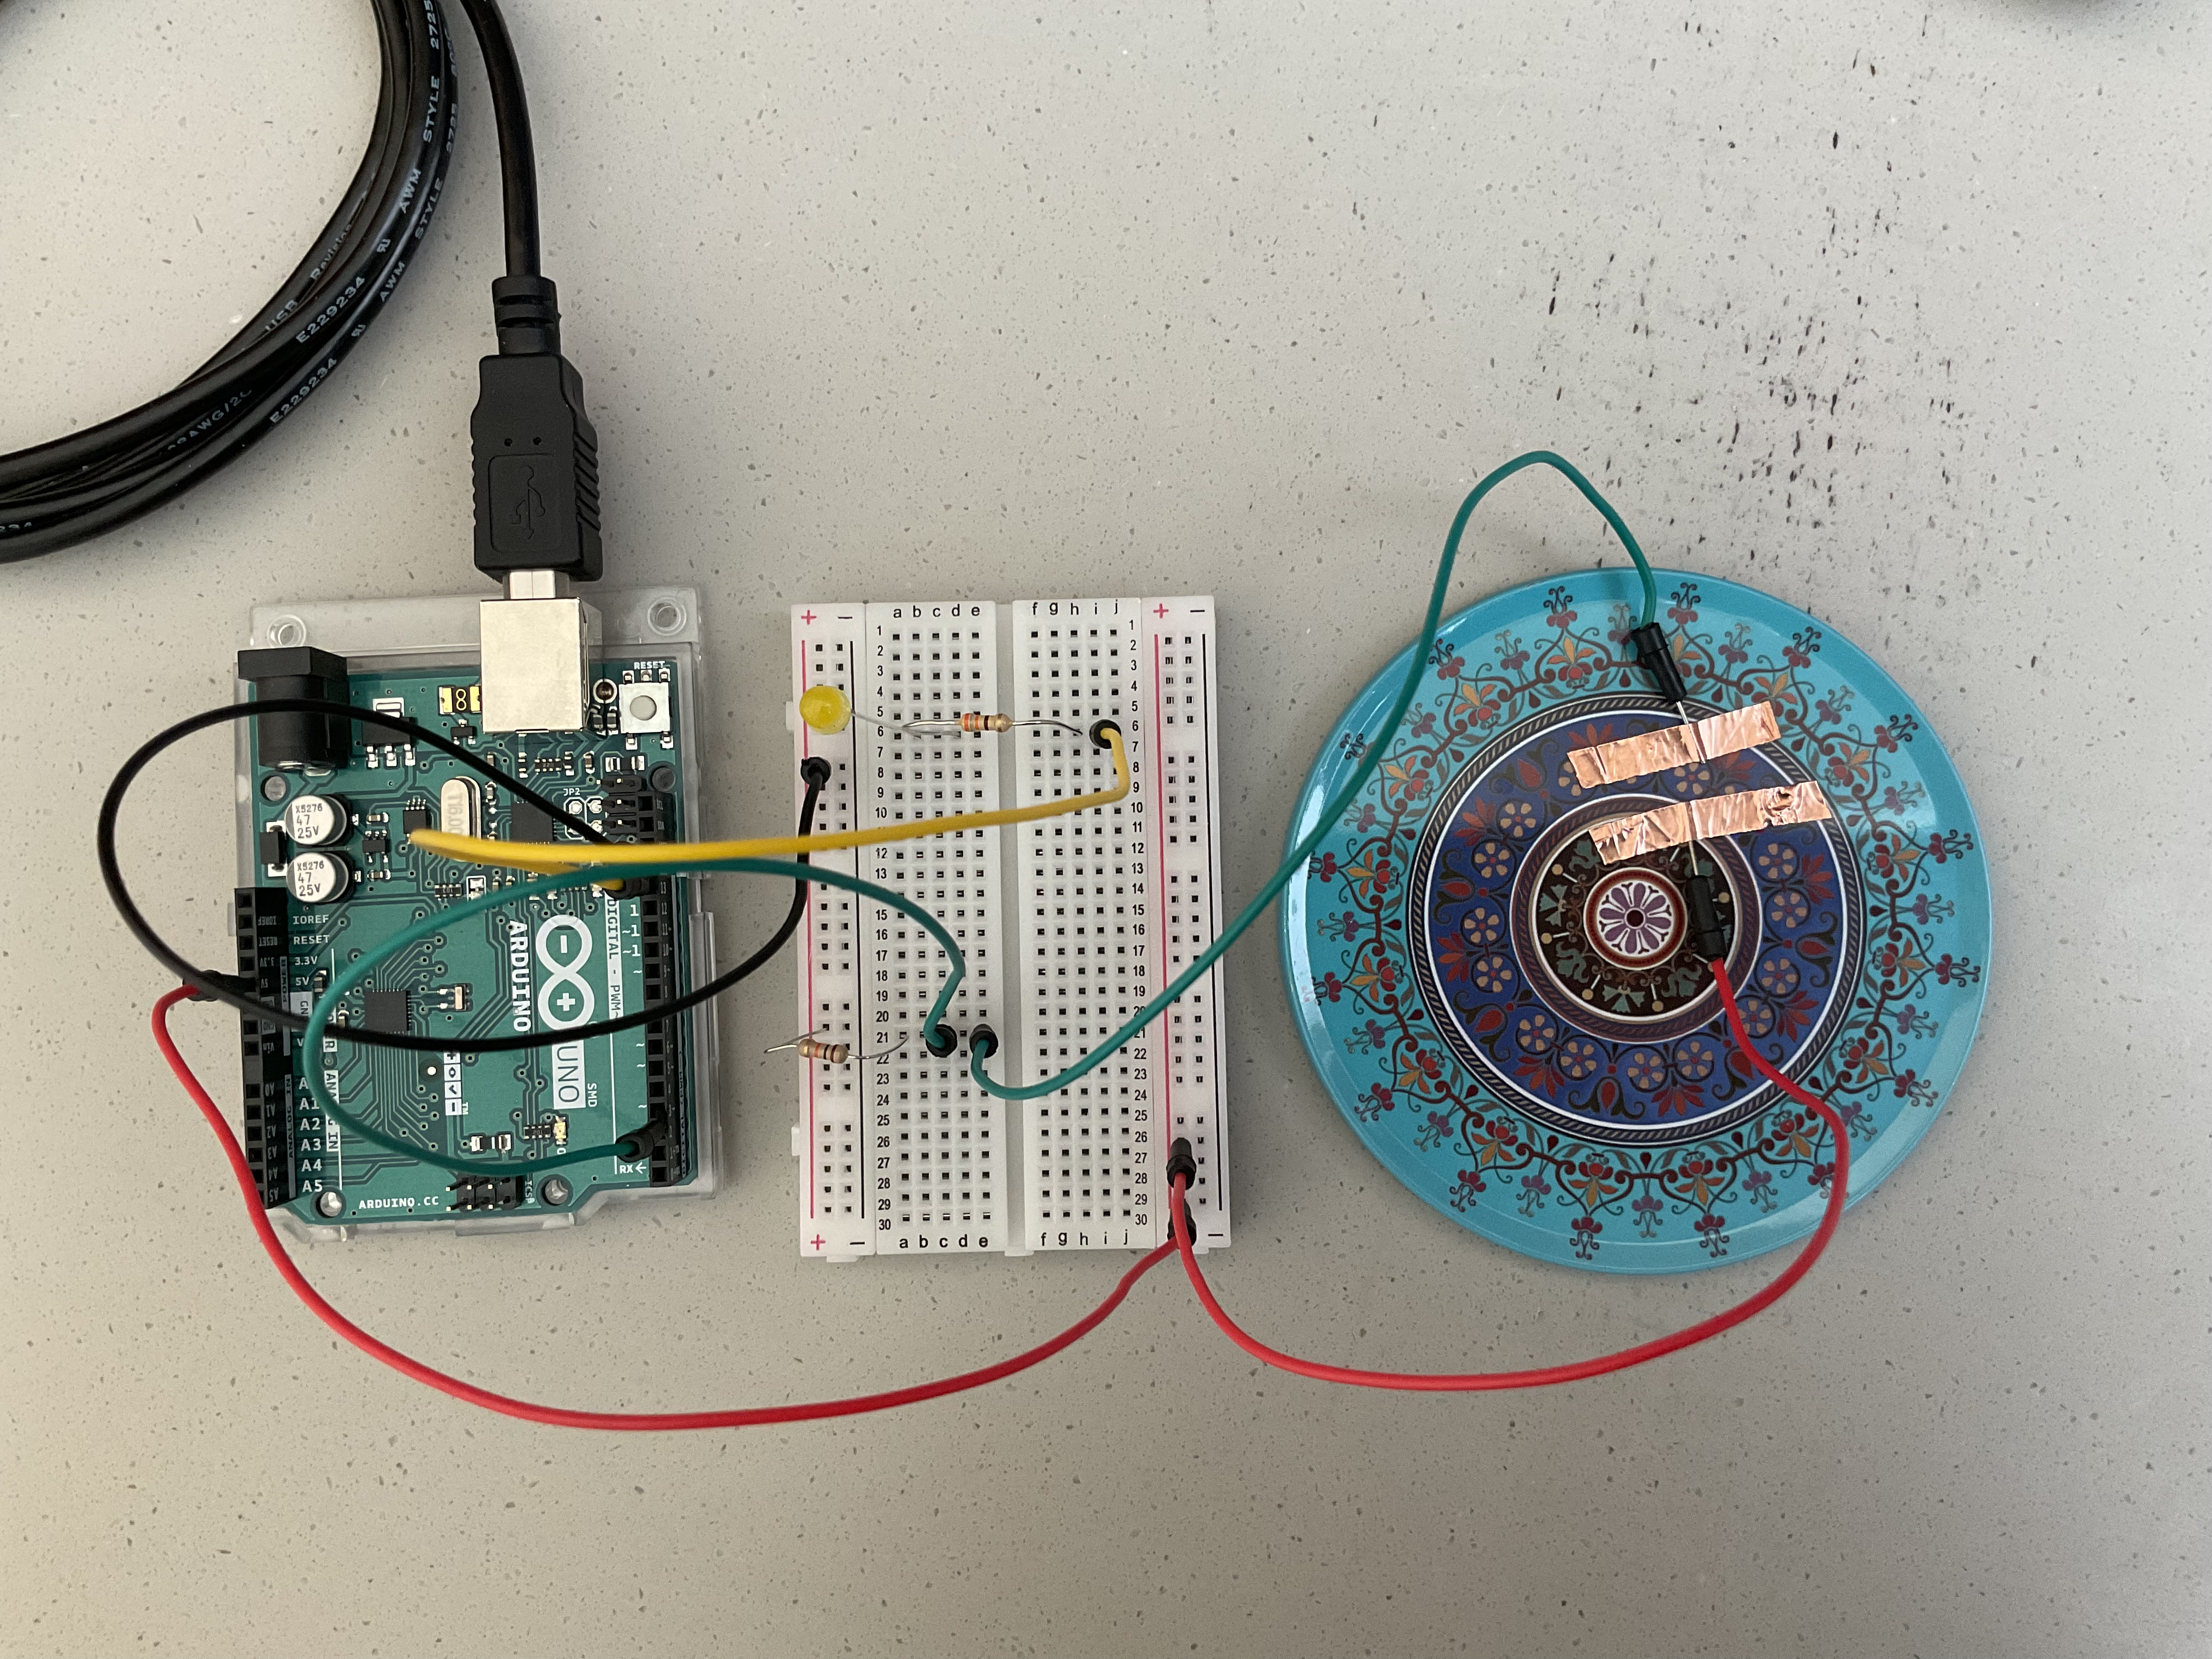
I mainly referred to the switch circuit we saw in class to build my circuit. There are 2 exposed wires on the plate that are not touching. One of the wires is connected to the digital pin 2 and pin 2 is connected to GND with a 10k resistor in between. The other wire is connected to 5V. When the copper ring is put on the 2 wires, it acts as a conductor and closes the circuit.
digitalRead is used on pin 2 to detect when the switch circuit is open or closed. When the circuit is closed (ring is on the plate covering both wires), the LED lights up, and vice versa.
const int switchPin = 2;
const int ledPin = 13;

void setup() {
  pinMode(switchPin, INPUT);
  pinMode(ledPin, OUTPUT);
  Serial.begin(9600);
}

void loop() {
  // read switch state
  int switchState = digitalRead(switchPin);
  if (switchState == HIGH) {
    // turn the LED on when switch is closed
    digitalWrite(LED_BUILTIN, HIGH);
    Serial.println("Ring detected! Circuit closed.");
  } else {
    // turn the LED off when switch is open
    digitalWrite(LED_BUILTIN, LOW);
    Serial.println("No ring detected. Circuit open.");
  }
  delay(100);
}
Challenges and Future Improvements
This week’s project helped me to get a lot more comfortable with building circuits and working with Arduino. I still had to refer back to the schemes we saw in class but I am sure I will get confident to build circuits on my own as we progress.
One of the mistakes I did this week was getting straight into building my circuit before reading again the project description. I glossed over the fact that we had to use digitalRead to get the state of the switch and do something with it. I initially built a circuit with a 330 resistor and an LED that simply closes when the ring is placed and causes the LED to light up, so initially there was no switch at all . After reading through the requirement, I modified the circuit such that there are 2 segments to the circuit: 1) LED circuit that is closed, and 2) switch circuit connected to 5V and a digital pin with a 10k resistor in between that is open and gets closed with the ring. Whether the LED lights up or not depends on the open/closed state of the switch circuit.
As I now write this documentation, I wonder if it would have been more intuitive if the LED turns off when the switch is on (when the ring is placed on the plate), so as to have the lit-up LED as a reminder to put my ring on the plate. Though this change does not alter the concept of the project, I think it makes it more meaningful in terms of usability and intentions. I hope to be more intentional with my future projects; to make things that are well thought out and build things that do actions for a reason, not just for the sake of it.
The story of Margaret Hamilton and her contributions to the Apollo mission’s success highlights perhaps the most important aspect in coding: error-proofing. When I was first introduced to coding through the Intro to CS course, I remember thinking it was silly to write extra lines of code to simple programs for error handling, i.e. if conditions to prevent from wrong input type being passed, when it seemed so obvious that such cases wouldn’t happen.
I have now come to realize, from taking more CS courses and practical experiences, that there will always be bad actors and mistakes are bound to happen. A key responsibility of software developers is to minimize potential failure points and handle them gracefully to make the system robust and prone-to-failure. Murphy’s law reflects the importance of anticipating all possible error scenarios and designing software that can withstand them.
The monumental Apollo mission could have ended in failure due to the absence of error-checking code, had it not been for Hamilton who identified the issue, and her team who found a fix just in time. It is always better to be safe than sorry, and not adding that few extra lines of code could potentially cost way more than we realize.
Attractive Things Work Better
This reading was very very interesting. Even before I read the piece, I silently agreed with the title, that attractive things work better. I have been learning to appreciate and be consciously aware of design of everyday objects around the house, mostly through seeing well designed pieces on my social media and watching videos that break down designs and their intentions behind them. I realize that a good design can truly elevate the user experience, especially now having read the points made by Norman about how positive affect created by good design can actually streamline the efficiency and usability of an object.
Norman’s argument that creative design is not always preferable, and that it depends on the seriousness and urgency of the situation was very insightful and made me reflect on how I personally interact with things. When I am in an extreme hurry (like extreme extreme) or madly stressed, I can not function at all — I find it hard to do some of the things that I can normally do without even thinking, whether that is writing text messages or opening a bottle of drink or tying my shoes. It is not dependent on the design of things; rather it is due my own state of mind. As Norman explains, in these high-stress situations, design should not interfere and instead be highly-tailored and easy to follow. This was an interesting statement that reminded me that intricate design is not always needed and wanted, and sometimes the simple things are indeed the better.
For a while, I couldn’t come up with a creative idea. As I sat at my desk, I looked over at my surroundings and saw some books piled up from hours of studying, realizing I could use them as a switch.
A “Break Reminder Switch” activates when I close my books, triggering LED light to remind me to take a well-deserved break. And if you’re too tired, you can also use your head to activate the switch by resting it on top of the books.
When thinking about the idea of my switch, it reminded me of a Pomodoro Studying Technique. I could improve this project by adding a timer that lets users take breaks for a set amount of time, like 5 minutes, before an alarm reminds them to get back to studying. This way, they can study for as long as they like and use the switch to manage their own breaks without losing track of time.
Set-up
I attached jumper wires to the covers of two books — one connected to GND, the other to a digital pin on the Arduino. When the books close, the wires touch and make the LED light up.
This set-up + 2 wires on Arduino Board that light up LED once connected
Initially, the wires didn’t always make good contact, so I adjusted the wire positions by twisting and aligning them at the center and opposite to each other to ensure they touch properly and trigger the switch.
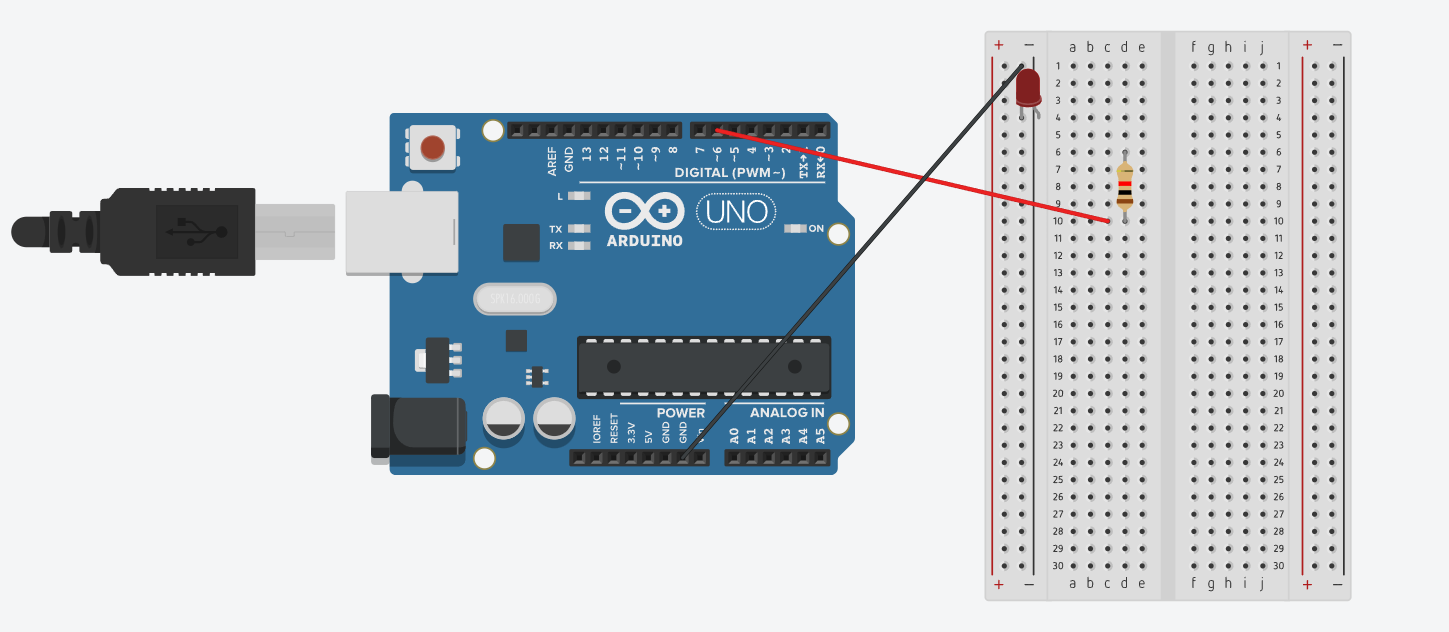
At first, I struggled for hours trying to get the external LED to light up. The issue was that I didn’t plug the short leg of the LED into the negative rail on the breadboard — this made only the internal LED light up. Then, it was the way I set up my project that kept causing problems.
I also learned that wire contact must be firm, so I tried different taping angles and even thought about using multiple wires for a better chance of contact.
Through all the trial and error, I realized how small details can cause big issues and that paying attention to them can save hours of frustration. Most importantly, I learned that good ideas often come from your surroundings, even something as simple as a stack of books.
If the experience looks static, please click on the ‘sketch’ version and run it. If you do not see the sketch to the entire width and height, please use the ‘sketch’ version instead.
2. Overall Concept
In my midterm project, the user takes on the role of a beta-tester of a 2D RPG casual adventure game “Tales of Avella” played on a fictional, futuristic ‘Playstation 9’ device. ‘Playstation 9’ is meant to be a much more state-of-the-art video game console than the currently available ‘Playstation 5’ (see Fig. 1). In “Tales of Avella,” the user has the opportunity to explore the world and help someone in need. Upon beginning the experience, the Playstation 9 apparently “turns on” and “loads” the game. The user is greeted with a welcome message from fictional PixelBloom Studios developers, as well as informed with background story for the game and instructions for controlling the user’s character, “Luke.” The background story of the game goes as follows: Luke has just moved into the charming village of Avella and is ready to discover what makes this town so special. The user can control “Luke” to explore the world in “Tales of Avella.” using the arrow keys (left, right, up, down). Depending on the user’s actions, the user could enter new areas and meet a non-playable character (NPC) farmer with a quest to harvest forty-five carrots. Upon completion of the quest, a congratulatory message is displayed, followed by a ‘memory’ snapshot of a gratitude dinner with the farmer and his daughter Lily is displayed. Finally, the user faces an option to restart the game, by pressing ‘Y’ for yes and ‘N’ for no.
Playstation 5 – Photo by Ben Iwara (https://unsplash.com/photos/white-printer-paper-on-brown-wooden-table-tnfbre82_hc)Playing the PlayStation 5, Photo by Yan Krukau: (https://www.pexels.com/photo/close-up-shot-of-person-holding-a-game-controller-9069305/)
The user has the opportunity to interact with the world in ways more than moving Luke around. The user could use mouse clicks to progress through the conversation between the farmer and Luke. At some point in the conversation, and if the user decides to accept the farmer’s quest, the farmer’s name is revealed from an initially mysterious title “???”. The user could have Luke grab a tool in Luke’s vicinity by pressing ‘i’. The user could also have a shovel-handling Luke harvest some carrots by pressing ‘i’ and replant some carrots by pressing ‘r.’
3. How Project Works & Good Parts
Good, major game design aspects can be found in project concept, project structure, dialogue flowchart, assets (video, image, audio), character design, story design, quest progress possibilities, quest progress feedback, as well as particular details of the game mechanics. Firstly, the project concept is an attempt on an innovative twist on a simply general game played on a browser on the PC – by simulating the experience of playing a game on a futuristic device, and creating a story for the user as a beta-tester of a game. Thus, there is a frame narrative entailing a story within a story; the character “Luke” within the game “Tales of Avella” has a story that can be played by a “beta-tester” that has a story in supporting the developers at a fictional PixelBloom Studios Inc. The juxtaposition of a pixelated game played in a futuristic device is another game design choice with the intention of bringing an interesting effect – whether it is raising questions, emphasizing contrast in technological development vs historical game interest, or something else. Second, the project has been structured in six stages from 0-5, namely: (0) Opening with Background Story and Instructions; (1) Game Landing Scene (Inside Luke’s House); (2) Game Scene 2 – Luke’s Neighbourhood Outside His House; (3) Game Scene 3 – Farm; (4) Game Scene 4 – Inside Farm Shed; (5) Quest Completion Congratulatory Message with Dinner Memory Fragment and Option to Restart. A gallery containing snapshots of the game progress may be seen below. Third, considering the complex nature of a dialogue between a quest-giving farmer and Luke, I decided to create a flowchart (see flowchart image below the gallery). Fourth, videos were personally designed through Canva, taking into consideration adherence to the concept of the futuristic device interface and visual appeal through positioning of text, etc. I also browsed through audio, considering its appropriateness to the scene at hand; ambient music when the Playstation 9 opens up, relaxing acoustic guitar for the dinner memory, and game atmosphere sounds based on my past experience with Playstation 4/5. Character spritesheets were taken from Spriter’s Resource, chosen based on their closeness to the ideas of the characters I had in mind: a young adult entering a new town and a farmer. Fifth, I spent time on character design (see character traits table below flowchart). Sixth, I designed the message from Pixelbloom Studios Team to the player. Seventh, quest progress possibilities were considered and quest progress feedback was implemented for enhanced user experience. Since the quest is on harvesting an exact amount of forty-five carrots, if the user harvested less than forty-five carrots, there is a prompt from the farmer to pull more carrots. If the user harvested more than forty-five carrots, the farmer “frowns” and tells Luke, “Over fourty-five. Go back.” At some point in development, I realized that only having the possibility to harvest carrots would impede the user from being able to complete the quest if the user has harvested more than forty-five carrots by accident, so I decided to add the option to replant some carrots – this is one of the changes in my project plan. Last but not least, I find certain little details in the game mechanics are crucial. For example, in Stage 3, the farmer NPC always “faces” Luke, whether Luke is to his right or to his left, mimicking real dialogue.
Stage 0: Opening – Playstation 9 “Starts Up”
Stage 0: Opening – Playstation 9 “Starts Up”
Stage 0: Opening – Playstation 9 “Loads Game”
Stage 0: “Tales of Avella” Message Part 1 (Includes Background Story)
Stage 0: “Tales of Avella” Message Part 2 (Includes Game Controls)
Stage 1: “Tales of Avella” Game Landing Scene – Inside Luke’s House
Stage 2: “Tales of Avella” Game Scene 2 – Luke’s Neighbourhood (Outside His House)
Stage 3: “Tales of Avella” Game Scene 3 – Farm (By travelling downward from Scene 2)
Stage 3: “Tales of Avella” Game Dialogue
Stage 3: “Tales of Avella” Game Player Choice Point
Stage 3: “Tales of Avella” Game Instructions
Stage 3: “Tales of Avella” Game – Luke Near Shed
Stage 4: “Tales of Avella” Game Scene – Inside Shed
Stage 3: “Tales of Avella” Game – Luke Harvesting Carrots
Stage 3: “Tales of Avella” Game – Farmer Giuseppe’s Feedback Informing Quest Progress (Too Few Carrots)
Stage 3: “Tales of Avella” Game – Farmer Giuseppe’s Feedback Informing Quest Progress (Too Many Carrots)
Stage 3: “Tales of Avella” Game – Luke Replanting Carrots
Stage 3: “Tales of Avella” Game – Farmer Giuseppe’s Feedback Informing Quest Completion Feedback
Stage 5: “Tales of Avella” Game – Congratulatory Message
Stage 5: “Tales of Avella” Game Scene – Dinner Memory with Farmer and Lily
Stage 5: “Tales of Avella” – Would you like to restart?
Flowchart on Dialogue between Luke and FarmerCharacter Traits Table
Good technical decisions include setting a game state for which actions happen, structuring characters and objects with behavior (namely Luke, Farmer Giuseppe, message box between Luke and Farmer Giuseppe, shovel, carrot) into classes, structuring code into functions, using arrays to store huge amounts of carrots, designing the game mechanics of the dialogue using if and else if statements, and useful variable names. The game state is crucial because depending on game state, the farmer, carrots and videos may or may not be displayed. Structuring Luke and the Farmer using OOP has been very helpful for organization and readability, and therefore aids in my problem-solving process. Using arrays to store huge amounts of carrots does not only save time, but also helps me control the behavior of certain carrots – whether it’s status is “picked”, “unpicked” or “replanted” based on user behavior. The dialogue is a particularly complex piece of code, thus I paste the snippets below. The first snippet shows the constructor of the message box, which contains x position, y position, image profiles (on the left part of message box to help indicate who is speaking), dialogue_states array, and more arrays containing the speech text of the character(s) for the relevant dialogue_state. The second snippet is a clever way of reducing lines and reusing code as I need to display the profiles as often as I display a dialogue message. The third snippet reveals part of a long function performing actions based on the current dialogue_state. For the “Character Introduction” state, as with many other states, translation has been applied to the message box image and setTimeout is used to have a 200ms cooldown between advances to prevent accidental skips/rapid firing.
Throughout the course of the project, I encountered many problems which allowed me to improve in my debugging and coding skills. Often, p5js gives feedback on code errors, which point to a line number. I refer to the line number and check the code around it and code associated to objects in that line. I think this has helped me solve many errors, like simple syntax errors involving a missing closing bracket (which can be easy to do when there are nested if conditions within a function within a class), to slightly more complex errors involving something “undefined” (which could be because I forgot to update the path to video/image in preload function). Personally, the very challenging problems are when the game runs without any error p5js throws out, but does not function as intended. These are logical errors. For example, I encountered this problem: the message box is displayed initially when Luke is in the vicinity of the farmer, and after a certain dialogue state is complete, the message box displays when Luke is farther away from the farmer. My intention was to have the message box display only when Luke is near the farmer. I think that this problem was resolved by being even more specific with my if conditions. One of the most challenging unresolved problems for me was that after the second video called in draw() plays, the video in the next chain of states won’t play. I tried to research online, use AI, try different ways (such as using image() in draw but this produced a static frame, using onended() functions, setting an if condition if the time of the video exceeds the duration-1 second of the video) but these all did not work. It was very difficult, and I may have tried to resolve this for about more than five hours, before deciding to give this idea up, and simply having videos that don’t play in consecutive game states.
A key area for improvement include expanding the affordances of the experience through multiple ways such as adding more characters. Another way is to add objects that are not simply part of the background but can interact with the user. By this, I mean objects similar to the tool that can be “grabbed” by the user and used to do something, such as pull carrots. Perhaps, add a painting that can be clicked on and zoomed in, which depicts a painting of the farmer and his family, along with text on their family history in Avella. A third way to expand affordances is to program the code to not only explore new places, but also go back to previously explored places.
Blade Havoc is the game I created, inspired by the early 2000s Japanese T.V series called ‘Beyblade’, which I grew up watching. For this project, I wanted to make use of ML5. Particularly hand tracking and voice detection. Due to limited dexterity with my left hand, I realized that an interactive design ins’t something limited to tangible means of input, but should be open to other ends as well. In my case, and of those who find it difficult or boring to play with the conventional design, this project is meant to be a step in a newer direction. A direction and approach made possible thanks to amazing libraries now available online.
Game-Play instructions : The game makes use of hand gestures and speech recognition. In order to able to play the game, click on the link above which will redirect you to another window. Zoom in using Command + or Ctrl + to zoom in and increase the size of the canvas for better viewing. Make sure to have adequate adequate lighting, sit about 70- 90 cm away from the laptop in order to be visible to your webcam’s field of vision. Controls are fairly simple. Pinch your Thumb and Index Finger together to click, and in order to move the on screen pointers, move your hand. You may use either left or right hand of yours, but make sure to use one at a time, as the program is designed to handle one hand at a time. Likewise, you cannot plug and play two peripheral devices of the same nature at the same time. Not that you cannot do it, but it isn’t practical! The game greats you with animations, sound, and interactive design. The pictures have been photoshopped together to create canvas for the background. Pictures and sounds such as the sound track are borrowed from the show, and I in no circumstance take credit for the ownership or production of these assets. However, I did happen to photoshop – remove background- and put them together in a specific manner alongside color scheming to meet the needs of the game.
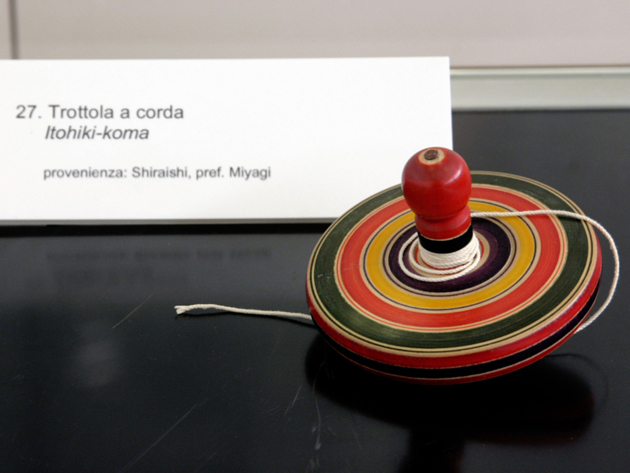
How the game works: The game is based on the story of spinning tops which collide with one another and run out of spin. In Japanese culture, this form of play has been quite popular.
The show takes cultural and historical inspiration from this, and so does my project. You can toggle the instructions button on the ‘Menu’ to understand how the game works.
Upon clicking, the game first takes you to the game rules window, and by clicking on the arrow at the bottom, it takes you to the game controls window. You can exit by pressing on the ‘close window’ button on the top right of the window pane.
Order of Events: The user first has to toggle the play button in order to proceed with the game.
The game starts with the view of the stadium, and commentator announcing the match between team USA and Japan. The two main characters are Tyson and Daitchi. Each scene proceeds after one of the character is done with their dialogue.
The match then begins with countdown and audio markers.
The beyblades are loaded into the dish, and the window shows the spin status of both the opponent and your beyblade. It shows special attack status to let the user know wether its active or not. In order to activate it , say ” Dragoon Galaxy turbo”. Each of the events, be it impact with other beyblade or activating special move, each has separate audio to it, which makes it even more interactive.
Since I happened to move my beyblade out of the stadium, I lost the game. You can try again by heading to the menu. Upon doing so the window will reload and all of the variables and states will be set to default status to avoid any conflict.
Game Controls: Pinch your finger to move your beyblade around. Open them to attack. If thumb and index finger close, you will be able to move, but cannot attack. In that case, you will take hits, untill you either get thrown out of the stadium, or lose out on spin.
Pinch to active virtual click
Proud moment: If there is something I am proud of, it is definitely making the sound-classifier and the image-classifier from the ML5 library to get to work. After spending three days trying my best to debug and make the conflict and errors go away, I was finally able to do so. Note that most of the tutorials on ML5.js are in conflict with newer versions of the sdk. Kindly make sure to go over the documentations to avoid any issues. Moreover, I managed to add physics to each blade as well. Upon impact, the opponent’s blade bounces off of the walls whilst yours upon impact either pushes the other one away or you get hit away. Moreover, if you leave the parameters of the stadium, you end up losing the game. This edge detection and getting it to work is another accomplishment of mine after the implementation of machine-trained classifiers.
The Code:
Reusability and ML5.js : The code is made with modularity and re-usability in mind. For ml5.js , all of the setup code and functions have been moved to common functions to call them inside draw and setup at an instance, without having to go through heaps of code, when choosing to turn off / on the ml5.js features.
function ml5_preload_function(){
    //importing the hand pose image classifier from ml5.js library
  handPose = ml5.handPose({flipped:true});
  //importing the sound classifier. Doesn't require additional argument.
 classifier =
   ml5.soundClassifier('https://teachablemachine.withgoogle.com/models/LHGCWnuCY/model.json', ()=>{
//     callback function for testing if the sound model is loaded as it wasn't working before.
   console.log ("sound model loaded");
 });
}


// arranges the setup for ml5
function ml5_setup_logic(){
    handPose.detectStart(video,gotHands);
    classifyAudio();

}


//the logic for ml5 which goes into draw function
function ml5_draw_logic(){
  if(hands.length >0){
    let hand = hands[0];
    let index =  hand.index_finger_tip;
    let thumb = hand.thumb_tip;
    fill(255,0,0);
    let d = dist(index.x,index.y,thumb.x,thumb.y);
    if (d <= 20){
      fill (0,0,255);
      virtual_click = true;
    } else if ( d > 20) {
      virtual_click = false;
    }
    noStroke();
    circle(index.x,index.y, 16);
    circle (thumb.x,thumb.y, 16);
    // virtual_click=false
    pointerX_pos = (index.x + thumb.x)/2;
    pointerY_pos = (index.y + thumb.y)/2;
  }
These functions are then conveniently called inside the draw and setup functions.
Object Oriented Code : The class ‘Beyblade’ was made use of, which is custom built. Has attributes like spin speed, coordinates, states which return true or false, and methods like checking for impact.
Training the Model: There were series of steps taken to get both the classifiers to get to work. First, I followed some tutorials online and referred to the Ml5.js documentations to get the hand classifier to work. I set the distance between the two fingers to detect when to consider the click and when not to. Daniel Schiffman’s videos were helpful, but a bit outdated.
After setting up the Hand-classifier, I inverted the video and drew in the backside of the canvas. As for the sound classifier, I had to go to Teachable Machine by Google to train a model for detecting specific words for game-control. Due to time constraints, this was more convenient way of training the model, as opposed to me training my own.
I had to train it for background noise and the special phrase that triggers the special move and changes the color and image of the beyblade.
Finally, the trained model was exported, and was implemented inside the sketch.js and html file to make it able to run.
Areas of improvement:
I am proud of the game as of now. It is interactive, helps me to relive my childhood memories, and share this joy with others. However, I wanted to add more levels, ability to change the settings and select different beyblades. This I will add in the future. As far as the game logic goes, I would like to work on the collision physics for the objects. I would like to tumble, roll and push back them forth even more, to make it even more realist.
Overall, I am proud of my work, and how the game turned out to be!
For this midterm project, I wanted to design something different. Something unique. Something meaningful to me in a way that I get to represent my perspective when it comes interactivity and design. Most of the games that I have played growing up, have been AAA gaming titles (top-notch graphics intensive games) on my PSP (Playstation Portable).
Be it Grand Theft Auto or God of War, I have played them all. However, if there is one game that I never got a chance to play on my PSP due to it not being released for that gaming platform , was Beyblade V-Force! It was available on Nintendo Go and other previous generation devices, but wasn’t there for the newer ‘PSP’ that I owned. I till this date, love that cartoon series. Not only was and am a loyal fan of the show, but I have collected most of the toy models from the show as well.
Brainstorming ideas + User interaction and game design:
This project started off with me wondering what is that one thing dearer to me. After spending an hour just short listing topics that I was interested in , I ended up with nothing. Not because I couldn’t think of any, but because I couldn’t decide upon the one single game. I started this project with a broken hand. My left hand is facing some minor issues, and due to which, I cannot type of hold on to things with the left hand. Particularly my thumb. This made me realize that not only does it make it difficult to program the game, but also to play it as well. My misery made me conscious of users who may struggle with the conventional controls offered typically in the gaming environment : a joystick and some buttons. It made me wonder what can I do different in my case and make this game more accessible to people like me who find it difficult to use a tangible medium to interact with the program. Hence I decided to use hand-tracking technology and sound classification. There is this whole buzz around A.I and I thought why not use a machine learning library to enhance and workout my project. Yet still, I couldn’t finalize a topic or genre to work on.
At first, I came up with the idea of a boxing game. Using head-tracking and hand tracking, the user will enter a face-off with the computer, where he/she will have to dodge by moving head left or right to move in the corresponding direction. To hit, they will have to close hand and move their whole arm to land a punch.
I drafted the basic visuals and what I wanted it to look like, but then as I started to work, I realized that violence is being portrayed and is not but un-befitting for an academic setting. Moreover, I wasn’t in a mood to throw punch and knock my laptop down, since I am a bit clumsy person. This was when my genius came into being. 1 day before, I decided to scrap the whole work and get started again on a new project. This time, it is what I love the most. You guessed it right – it is beyblade!
The whole idea revolves around two spinning metal tops with a top view, rotating in a stadium. These tops hit one another, and create impact. This impact either slows them down, or knocks one out , and even sometimes both out of the stadium. The first one to get knocked out or stops spinning loses, and the other one wins. I wanted to implement this, and give user the ability to control their blades using hand gesture. The user will be able to move their blade around using their index finger and thumb pointing and moving in the direction they would like their blade to move. The catch however, is that only when the thumb and index finger are closed, only then you will be able to move the blade, and to attack, only when your thumb and index finger are not touching, only then will you be able to attack and inflict damage on opponent. To save yourself from damage, you either dodge, or keeping fingers opened. These control constructs are unique and are not implemented in any game design of similar genre or nature before. I came up with this, because I cannot properly grab using my left thumb and index finger, and hence wanted to use them in the game.
I have decided to use states to transition between the menu, instruction screen, gameplay , showing win/lose screen, and returning back to the menu. This makes it convenient to use the modular code and use it inside the ‘draw’ function.
Stadium used in the game.
ML5:
To make the controls workout, I will have to rely on Ml5.js. ML5 allows machine learning for web-based projects. In my case, I will be making use of handPose and soundClassifier modules, which happen to be pre-trained models. Hence, I won’t have to go through the hassle of training a model for the game.
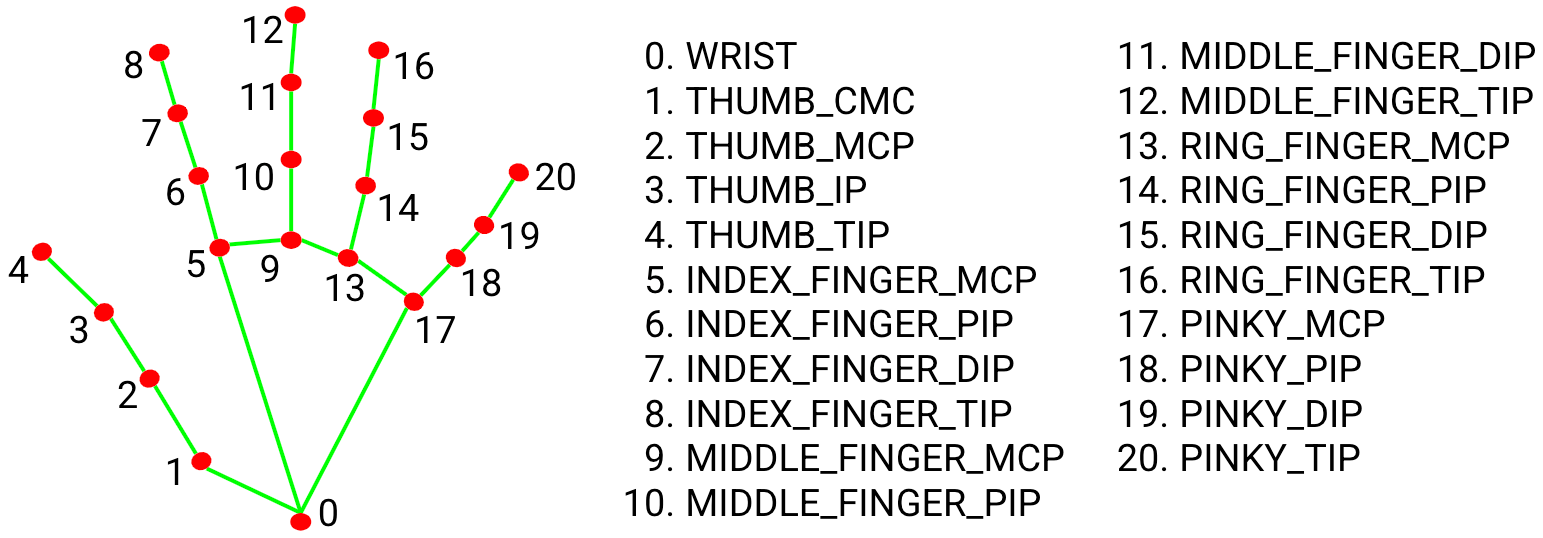
Using the key points 4 and 8, and by mapping out their relative distance, I plan on tracking and using these to return boolean values, which will be used to control the movement of the blade. I referred to coding-train’s youtube Chanel as well to learn about it, and implement it into my code.
I am yet to figure out how to use sound-classification, but will post in my final project presentation post.
Though I am yet to code, and due to limited mobility , my progress has been slowed. Nonetheless, I sketched out the basic class and constructor function for both objects (i.e player and the opponent). Each blade will have speed, position in vertical and horizontal directions, as well as methods such as displaying and moving the blade. To check for damage and control the main layout of the game, if and else statements will be used in a separate function, will then be called inside the ‘draw function’.
Complex and trickiest part:
The trickiest part is the machine learning integration. During my tests, hand gesture works, but despite training the sound classifier, it still doesn’t return true, which will be used to trigger the signature move. Moreover, I want there to be a delay between user’s hand -gesture and the beyblade’s movement in that particular direction. This implementation of ‘rag doll’ physics is what is to be challenging.
Tackling the problems and risks:
To minimize the mess in the p5 coding environment, I am defining and grouping related algorithmic pattern into individual functions, as opposed to dumping them straightaway into the ‘draw’ function. This helps me in keeping the code organized and clean, and allows me to re-use it multiple times. Secondly, using Ml5.js was a bit risky, since this hasn’t been covered in the class, and the tutorial series does require time and dedication to it. Cherry on top, limited hand mobility put me at disadvantage. Yet still, I decided to go with this idea, since I want it to simply be unique. Something which makes the player play the game again. To make this possible, I am integrating the original sound-track from the game, and am using special effects such as upon inflicting damage. Asides from the theming, I did face an issue with letting the user know wether their hand is being tracked or not in the first place. To implement it, I simply layers the canvas on top of the video, which solved the issue for me. As of now, I am still working on it from scratch , and will document further issues and fixes in the final documentation for this mid-term project.
Ever been at a wedding or party, locked in deep conversation, when suddenly—a balloon drifts by, practically begging to be popped? You hesitate. Would it be childish? Would people stare? Well, worry no more! Balloon Popper is here to satisfy that irresistible urge. No awkward glances, no judgment—just pure, unfiltered balloon-bursting joy.
Project Overview
Balloon Popper is a simple game that I worked on, though not always with ease. The objective is to pop balloons as they fall from the top of the canvas using a shooter that fires “bullets” from the bottom. The game consists of a start page, a game environment, and a finish page. It utilizes classes to define key elements such as the shooter, bullets, and balloons, each with specific properties that support collision detection, interaction, and display functions.
Implementation
The game begins with a start page where the player can view the instructions by clicking the instructions button or start the game by pressing the start button. Once the game starts, the player must shoot the balloons before they reach the bottom of the canvas. The player moves left and right along four paths using the arrow keys and fires bullets using the spacebar.
At the top of the canvas, three score trackers display the number of lives, balloons popped, and stray bullets. The lives counter tracks how many balloons have passed the bottom of the canvas, while the stray bullets counter keeps track of bullets that were fired but missed the balloons. If either the lives or stray bullets count reaches five, the game ends. The number of balloons popped is also displayed, but there is no specific win condition—the player can continue playing and challenge themselves to improve their score.
When the game ends, the finish page appears, displaying the reason for the loss, whether due to missing five balloons or using up all stray bullet allowances. The end screen also includes a restart button, allowing the player to reset the game and play again.
Code Highlights
function displayTextBox(textStr, x, y, textColor) {
  textSize(16);
  textStyle(BOLD);
  textFont("Poppins");
  let textWidthValue = textWidth(textStr);
  let padding = 5;

  fill(255, 255, 255, 200);
  rect(x - padding, y - 15, textWidthValue + 10, 20, 5);

  fill(textColor);
  textAlign(LEFT);
  text(textStr, x, y);
}
I particularly love the code snippet above that defines how I displayed the score trackers at the top of the canvas.
for (let i = balloons.length - 1; i >= 0; i--) {
  balloons[i].update();
  balloons[i].display();

  for (let j = bullets.length - 1; j >= 0; j--) {
    if (balloons[i].isHit(bullets[j])) {
      playPopSound();
      balloonsPopped++;
      balloons[i].reset();
      bullets.splice(j, 1);
      break;
    }
  }
The above two code snippets show how to detect collision between the bullet and the balloon.
Challenges and Areas for Improvement
One of the main challenges I faced was styling the game, including selecting colors, font sizes, and text styles. I realized that I need to work on improving my design skills. Loading the balloon images was another issue, but after consulting resources such as Stack Overflow and AI tools, I was able to find a solution and successfully display the images.
This project has been a great learning experience, and I plan to build on what I’ve learned. In the future, I want to improve button management, refine the game’s sound integration, and enhance the overall visual design to make the game even more engaging. Additionally, I would like to optimize the collision detection and fine-tune the difficulty scaling to provide a more dynamic challenge for players.
This project is a simple point and click game based on SpongeBob’s world. The player starts outside SpongeBob, Patrick, and Squidward’s houses and can click on them to enter different rooms. Each room has its own design and sometimes interactive elements like sounds, books, or TV screens. The goal is to explore different parts of their world and experience small interactions.
To make the game feel more personal, I drew all the rooms and the background instead of using images online. I tried making it so that all the drawings blend well with the objects I coded, so everything feels like part of the same world:
How it works
The game constantly checks where the user is and updates the background based on their location. When the player clicks on a house, the game detects which house was clicked and then changes the background to the correct room image. Some rooms also have extra interactive features, like playing specific sounds or changing visuals when clicked.
For example, the TV room cycles through different screens each time the player clicks, making it feel like the TV is actually changing channels. The book room has different pages that the player can flip through, and each page includes a funny SpongeBob quote. The game also manages background music, so when the player moves between different rooms, it plays the correct theme without overlapping sounds. Another thing I focused on was making sure the back button always works properly, so the player can return outside without any weird glitches.
Code highlight
One of the coolest parts that I’m proud about is the clarinet room, where the player can actually play Squidward’s clarinet. There are seven different notes, and clicking on different parts of the clarinet will play them. It’s like a mini music feature inside the game, and it makes Squidward’s room more interesting instead of just being another background.
function checkClarinetHoleClick(mx, my) {
  // all the clarinet holes coordinates (left to right) stored in array
  let clarinetHoles = [
    { x: 174, y: 153 },
    { x: 190, y: 153 },
    { x: 205, y: 153 },
    { x: 218, y: 153 },
    { x: 245, y: 152 },
    { x: 260, y: 152 },
    { x: 274, y: 152 },
  ];

  for (let i = 0; i < clarinetHoles.length; i++) {
    //distance between mouse click and centre of each hole
    let d = dist(mx, my, clarinetHoles[i].x, clarinetHoles[i].y);
    if (d < 5) { // within 5 pixels
      // hole clicked
      playClarinetSound(i); // play note
      break;
    }
  }
}
Improvement
One issue I ran into was getting the highlight effect to work when hovering over objects. I wanted players to see which items they could interact with, but at first, the effect wasn’t showing up correctly. After some testing, I made sure the game checks the mouse position and only highlights objects when the cursor is over them.
In the future, I would like to add more interactive elements, like clickable objects inside rooms that trigger animations or extra dialogues. Right now, the game works fine, but adding more details would make it feel more complete. Also, the game doesn’t have a clear goal, so maybe adding a small mission or hidden secrets to find would make it more fun.


 Ali being Ali
 Got the pointers to work

 Tuning for desired results.


 Basic Layout visualized.
 Flow chart of basic logic construct
 Basic gameplay features:
 Game states
![Legal Stadiums-[bc]These are the legal tournament stadiums that bladers can agree to battle on in Official Ranked Battles.[](https://pm1.aminoapps.com/7675/b2fd66ad6e358d1a334637c68041eff8616dd030r1-512-288v2_hq.jpg)

 Class and Objects – Pseudo code.
