
For my final project, I want to create a game called “Go Ichi-Go!”, something like the Chrome Dinosaur Game, but a bit different. So the game would have a character called Ichigo (strawberry), who runs and has to jump over obstacles like jumping puddles of whipped cream, and towers of chocolate, and slide under floating slices of cake. After each jump/dive, there would be randomised text giving cute strawberry themed puns. There would also be sound effects for each jump or dive. There would be two buttons to jump or dive, using Arduino, and a button to start/restart the game. The player wins after successfully overcoming ten obstacles. This would display a congratulations image and a restart option. If they fail to do so, then it would just go yo a Game Over state with a restart button. If I do have the time/skill set for it, I want to add a treat component, where when they win, a sweet will be ejected out, probably using DC motors, but I’m not sure about this yet (really really want to try this). I want to make this game in a very kawaii retro vibe, but also focus more on the interaction design on the game itself.
Category: S2025 – Mang
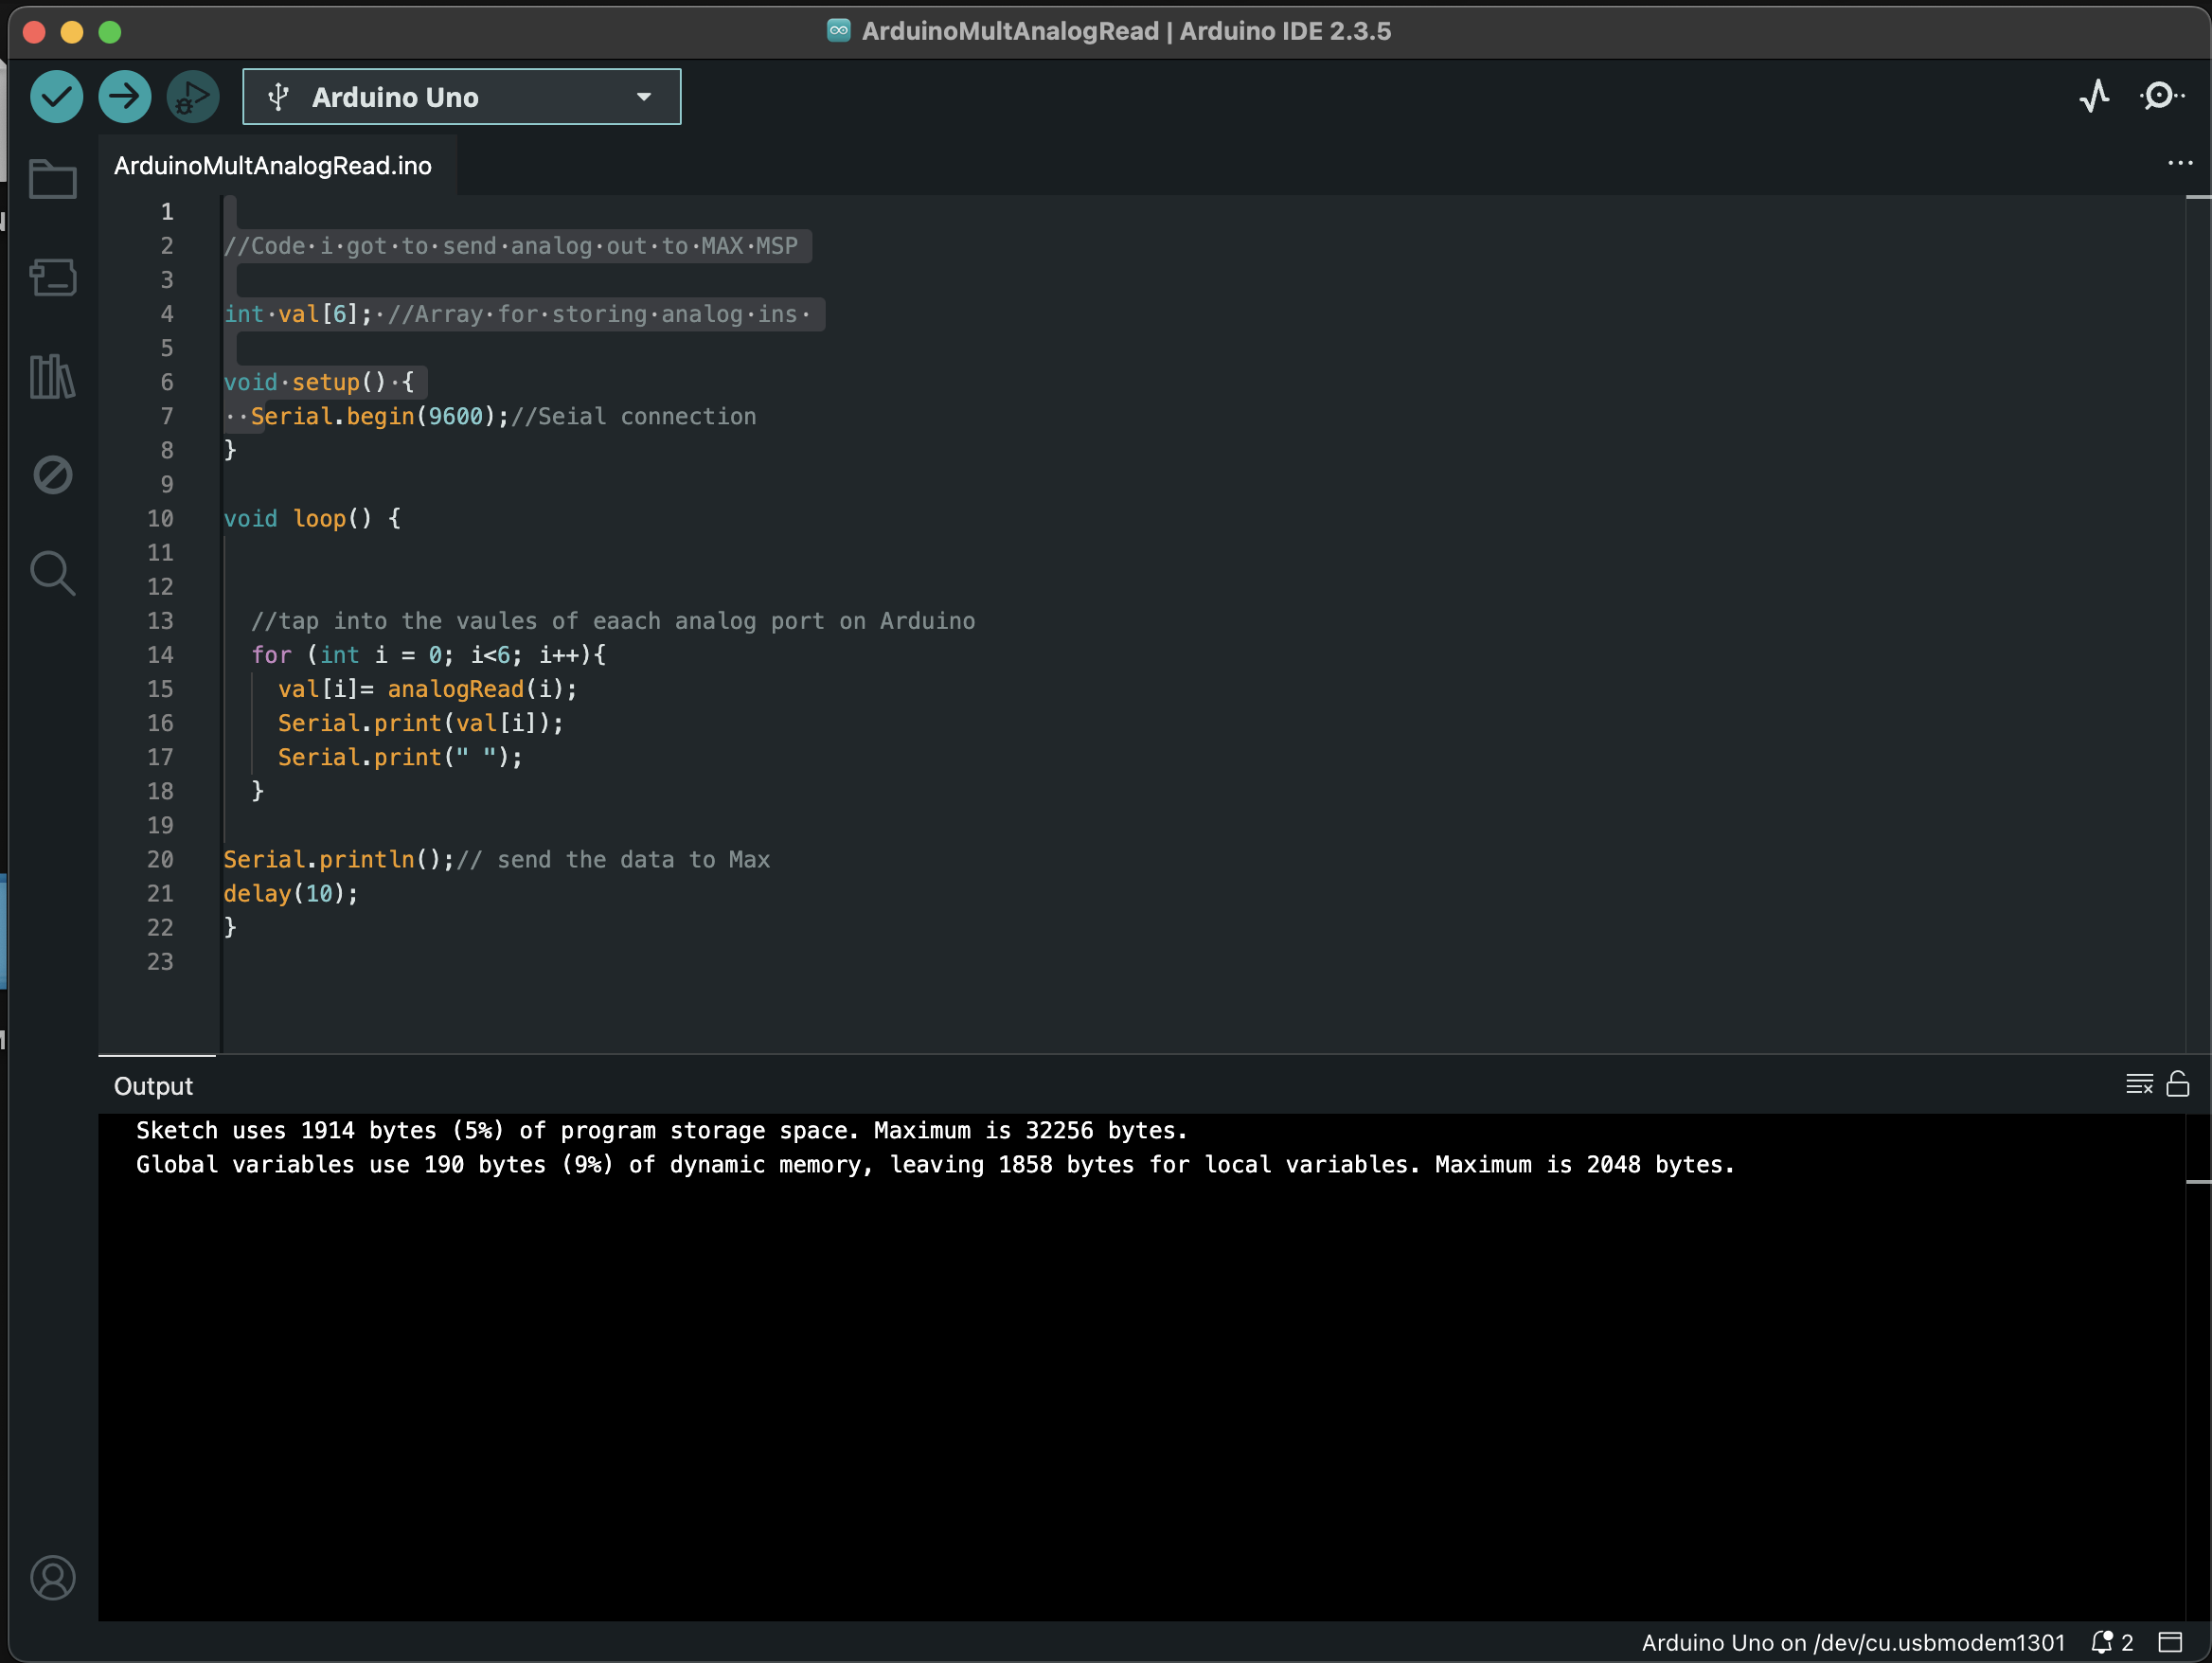
Week 11 – Serial Communication
Group members : Liya Rafeeq, Kashish Satija
Exercise 11.1 :
-
Make something that uses only one sensor on Arduino and makes the ellipse in p5 move on the horizontal axis, in the middle of the screen, and nothing on arduino is controlled by p5 – for this we used a potentiometer. We mapped the values of the potentiometer to change the X coordinate of the ellipse, making it move along the horizontal axis.
P5.JS CODE :
let port;
let connectBtn;
let baudrate = 9600;

function setup() {
  createCanvas(400, 400);
  background(220);

  port = createSerial();

//serial connection
  let usedPorts = usedSerialPorts();
  if (usedPorts.length > 0) {
    port.open(usedPorts[0], baudrate);
  }
  let connectBtn = createButton("Connect to Serial");
  connectBtn.mousePressed(() => port.open(baudrate));
}

function draw() {


  //read from the serial port, complete string till the ""
  let str = port.readUntil("\n");
  if (str.length > 0) {
    background("white");
    ellipse(int(str),200,40,40);
  }

}
ARDUINO CODE:
void setup() {
  Serial.begin(9600); // initialize serial communications
}

void loop() {
  // read the input pin:
  int potentiometer = analogRead(A1);
  // remap the pot value to 0-400:
  int mappedPotValue = map(potentiometer, 0, 1023, 0, 400);
  // print the value to the serial port.
  Serial.println(mappedPotValue);
  // slight delay to stabilize the ADC:
  delay(1);

  // Delay so we only send 10 times per second and don't
  // flood the serial connection leading to missed characters on the receiving side
  delay(100);
}
Exercise 11.2 :
2. Make something that controls the LED brightness from p5. For this, we made a circle that moves along the Y axis. According to the Y coordinates, the LED turns brighter or lower.
P5.JS. CODE:
let port;
let connectBtn;
let baudrate = 9600;

function setup() {
  createCanvas(255, 285);
  port = createSerial();

  // in setup, we can open ports we have used previously
  // without user interaction

  let usedPorts = usedSerialPorts();
  if (usedPorts.length > 0) {
  port.open(usedPorts[0], baudrate);
} else {
  connectBtn = createButton("Connect to Serial");
  connectBtn.mousePressed(() => port.open(baudrate));
}
}

function draw() {
  background(220);
  circle(128,mouseY,30,30)
  let sendtoArduino = String(mouseY) + "\n"
  port.write(sendtoArduino);
}
ARDUINO CODE:
int led = 5;

void setup() {
  // put your setup code here, to run once:
  Serial.begin(9600);
  pinMode(led, OUTPUT);
}

void loop() {
  // put your main code here, to run repeatedly:
  while (Serial.available())
    {
    digitalWrite(LED_BUILTIN, HIGH); // led on while receiving data
    int brightness = Serial.parseInt(); //get slider value from p5
     if (Serial.read() == '\n') {
       analogWrite(led, brightness);
    }
  }
}
Exercise 11.3:
Take the gravity wind example (https://editor.p5js.org/aaronsherwood/sketches/I7iQrNCul) and make it so every time the ball bounces one led lights up and then turns off, and you can control the wind from one analog sensor: For this, we used the potentiometer as the analog sensor.
P5.JS CODE:
let baudrate = 9600;
let velocity;
let gravity;
let position;
let acceleration;
let wind;
let drag = 0.99;
let mass = 50;
let str="";
let val;
let heightOfBall = 0;

function setup() {
  createCanvas(640, 360);
  noFill();
  position = createVector(width/2, 0);
  velocity = createVector(0,0);
  acceleration = createVector(0,0);
  gravity = createVector(0, 0.5*mass);
  wind = createVector(0,0);
  port = createSerial();

  // in setup, we can open ports we have used previously
  // without user interaction

  let usedPorts = usedSerialPorts();
  if (usedPorts.length > 0) {
  port.open(usedPorts[0], baudrate);
} else {
  connectBtn = createButton("Connect to Serial");
  connectBtn.mousePressed(() => port.open(baudrate));
}
}

function draw() {
  background(255);
  applyForce(wind);
  applyForce(gravity);
  velocity.add(acceleration);
  velocity.mult(drag);
  position.add(velocity);
  acceleration.mult(0);
  ellipse(position.x,position.y,mass,mass);
  if (position.y > height-mass/2) {
      velocity.y *= -0.9;  // A little dampening when hitting the bottom
      position.y = height-mass/2;
      heightOfBall = 1;
    } else {
      heightOfBall = 0;
    }
  str = port.readUntil("\n");
  val=int(str);
  if (!isNaN(val)) {
  breeze(val);
  }
}
function applyForce(force){
  // Newton's 2nd law: F = M * A
  // or A = F / M
  let f = p5.Vector.div(force, mass);
  acceleration.add(f);
}

function breeze(val){
  if (val<400){
    wind.x=-1;
  }
  else if (val>500 && val<900){
    wind.x=1;
  } else {
    wind.x=0
  }
  let sendToArduino = String(heightOfBall)  + "\n";
  port.write(sendToArduino);
}
function keyPressed(){
  if (key==' '){
    mass=random(15,80);
    position.y=-mass;
    velocity.mult(0);
  }
}
ARDUINO CODE:
int led = 5;

void setup() {
// put your setup code here, to run once:
Serial.begin(9600);
pinMode(led, OUTPUT);
}

void loop() {
// put your main code here, to run repeatedly:
while (Serial.available())
{
digitalWrite(LED_BUILTIN, HIGH); // led on while receiving data
int brightness = Serial.parseInt(); //get slider value from p5
if (Serial.read() == '\n') {
analogWrite(led, brightness);
}
}
}
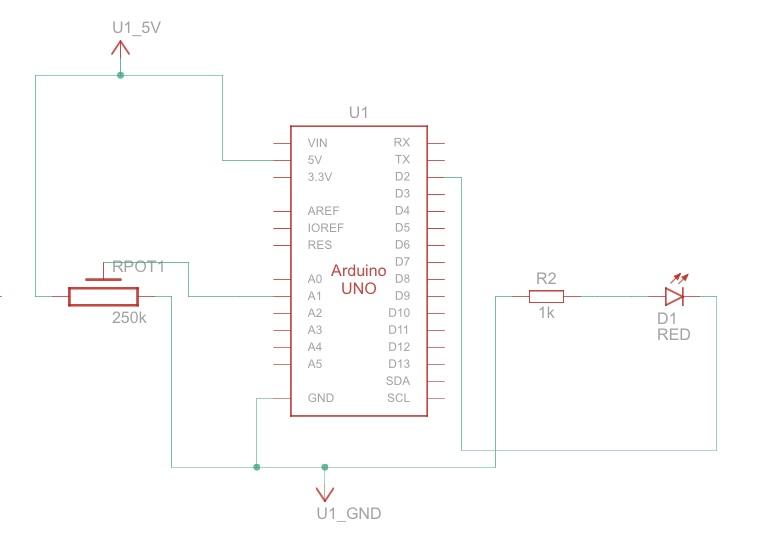
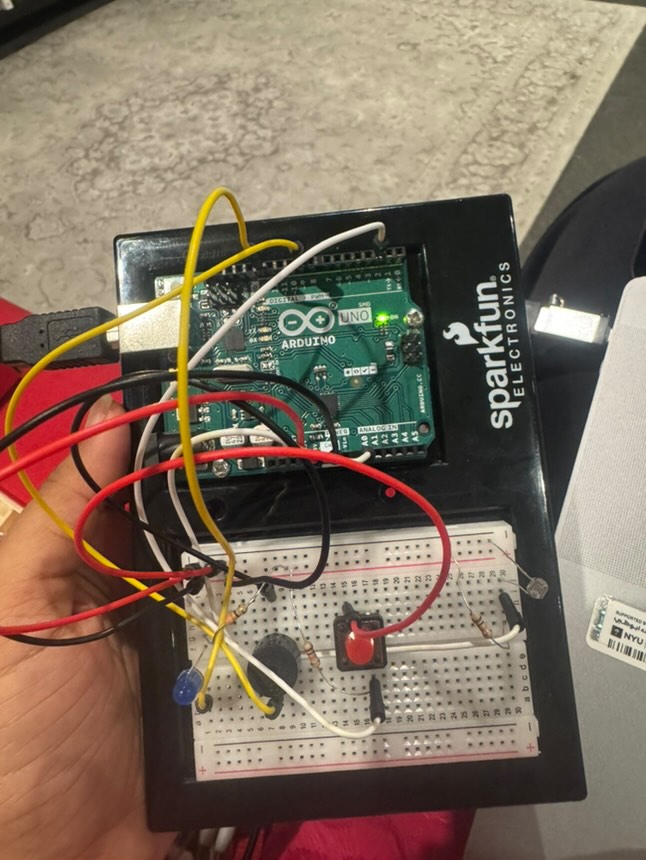
VIDEO and SCHEMATIC:
Week 11 Reading Response
Reading Design Meets Disability made me rethink how I’ve traditionally understood assistive devices—as purely functional tools. Pullin challenges that limited view by showing how design and disability can intersect in creative, expressive, and even fashionable ways. What stood out most to me was the idea that disability devices, like hearing aids or prosthetics, shouldn’t have to be hidden or neutral—they can be bold, beautiful, and part of someone’s personal identity. The example of Aimee Mullins using prosthetic legs designed by Alexander McQueen was especially powerful. It showed how design can shift perceptions of disability from something to be fixed or minimized to something that can be celebrated and uniquely expressed.
This reading made me reflect on how design influences the way we feel about ourselves and how others see us. It made me realize how much design has to do with dignity, pride, and empowerment—not just function. I found myself thinking about how many products I use daily that are designed to be sleek or stylish, and how unfair it is that many people with disabilities are given tools that feel like medical equipment instead. Pullin’s emphasis on co-design really resonated with me; involving disabled people directly in the design process isn’t just practical, it’s respectful. This reading left me inspired to think more inclusively about design and more critically about who gets to have choice, beauty, and individuality in the products they use.
Week 11 – Exercises
1: Ellipse
/*
 * Week 11 Production (1)
 *
 * Inputs:
 *   - A1 - 10k potentiometer connected to 5V and GND
 *
 */

int interval = 100;
int lastMessageTime = 0;

int potPin = A1;

void setup() {
  Serial.begin(9600); // initialize serial communications
}

void loop() {
  // read the input pin:
  int potentiometer = analogRead(potPin);
  // remap the pot value to 0-255:
  int mappedPotValue = map(potentiometer, 0, 1023, 0, 255);
  // print the value to the serial port.
  Serial.println(mappedPotValue);
  // slight delay to stabilize the ADC:
  delay(1);

  delay(100);
}
let port;
let connectBtn;
let baudrate = 9600;
let lastMessage = "";
let currX;

function setup() {
  createCanvas(400, 400);
  background(220);

  port = createSerial();

  let usedPorts = usedSerialPorts();
  if (usedPorts.length > 0) {
    port.open(usedPorts[0], baudrate);
  }

  connectBtn = createButton("Connect to Arduino");
  connectBtn.position(80, height-60);
  connectBtn.mousePressed(connectBtnClick);

  currX = width/2;
}

function draw() {
  background("white");
  fill('grey');
  circle(currX, height/2, 100);

  let str = port.readUntil("\n");
  if (str.length > 0) {
    // console.log(str);
    lastMessage = str;
  }

  // Display the most recent message
  text("Last message: " + lastMessage, 10, height - 20);

  // change button label based on connection status
  if (!port.opened()) {
    connectBtn.html("Connect to Arduino");
  } else {
    connectBtn.html("Disconnect");
  }

  // // Move shape based on received value
  if (!lastMessage) {lastMessage = "127"}
  currX = map(int(lastMessage), 0, 255, 0, width);
  currX = floor(currX);
  // console.log(currX);
}

function connectBtnClick() {
  if (!port.opened()) {
    port.open("Arduino", baudrate);
  } else {
    port.close();
  }
}
2: LED Brightness
/*
 * Week 11 Production (2)
 *
 * Outputs:
 * - 5 - LED
 *
*/

int ledPin = 5;

void setup() {
  Serial.begin(9600);

  pinMode(LED_BUILTIN, OUTPUT);
  pinMode(ledPin, OUTPUT);

  // Blink them so we can check the wiring
  digitalWrite(ledPin, HIGH);
  delay(200);
  digitalWrite(ledPin, LOW);

  // start the handshake
  while (Serial.available() <= 0) {
    digitalWrite(LED_BUILTIN, HIGH); // on/blink while waiting for serial data
    Serial.println("0,0"); // send a starting message
    delay(300);            // wait 1/3 second
    digitalWrite(LED_BUILTIN, LOW);
    delay(50);
  }
}

void loop() {
  // wait for data from p5 before doing something
  while (Serial.available()) {
    digitalWrite(LED_BUILTIN, HIGH); // led on while receiving data

    int brightness = Serial.parseInt();
    if (Serial.read() == '\n') {
      analogWrite(ledPin, brightness);
    }
  }
  digitalWrite(LED_BUILTIN, LOW);
}
let port;
let baudrate = 9600;

// Show button to connect / disconnect
let showConnectButton = false;

function setup() {
  createCanvas(640, 480);
  textSize(20);

  // Create the serial port
  port = createSerial();

  // If the user previously connected, reopen the same port
  let usedPorts = usedSerialPorts();
  if (usedPorts.length > 0) {
    port.open(usedPorts[0], baudrate);
  }

  // any other ports can be opened via a dialog
  if (showConnectButton) {
    connectBtn = createButton('Connect to Arduino');
    connectBtn.position(80, 350);
    connectBtn.mousePressed(setupSerial);
  }

}

// Show serial port connection dialog in response to action
function setupSerial() {
  if (!port.opened()) {
    port.open('Arduino', baudrate);
  } else {
    port.close();
  }
}

function draw() {
  background('white');
  fill('black');

  if (showConnectButton) {
    // changes button label based on connection status
    if (!port.opened()) {
      connectBtn.html('Connect to Arduino');
    } else {
      connectBtn.html('Disconnect');
    }
  }

  if (!port.opened()) {
    text("Disconnected - press space to connect", 20, 30);
  } else {
    text("Connected - press space to disconnect", 20, 30);

    // // Transmit brightness based on mouse position
    mappedX = floor(map(mouseX, 0, width, 0, 255));
    console.log(mappedX);
    let sendToArduino = mappedX + "\n";
    port.write(sendToArduino);
  }
}

function keyPressed() {
  if (key == " ") {
    setupSerial();
  }
}
3: Wind Gravity
/*
 * Week 11 Production (3)
 *
 * Inputs:
 *   - A1 - 10k potentiometer connected to 5V and GND
 *
 * Outputs:
 * - 5 - LED
 *
*/

int potPin = A1;
int ledPin = 5;

int interval = 100;
int lastMessageTime = 0;

void setup() {
  Serial.begin(9600);

  pinMode(LED_BUILTIN, OUTPUT);
  pinMode(potPin, INPUT);
  pinMode(ledPin, OUTPUT);

  // Blink them so we can check the wiring
  digitalWrite(ledPin, HIGH);
  delay(200);
  digitalWrite(ledPin, LOW);

  // start the handshake
  while (Serial.available() <= 0) {
    digitalWrite(LED_BUILTIN, HIGH); // on/blink while waiting for serial data
    Serial.println("127"); // send a starting message
    delay(300);            // wait 1/3 second
    digitalWrite(LED_BUILTIN, LOW);
    delay(50);
  }
}

void loop() {
  // wait for data from p5 before doing something
  while (Serial.available()) {
    digitalWrite(LED_BUILTIN, HIGH); // led on while receiving data

    // blink LED based on p5 data
    int status = Serial.parseInt();
    if (Serial.read() == '\n') {
      digitalWrite(ledPin, status);
      delay(10);
      digitalWrite(ledPin, LOW);
    }

    if (lastMessageTime > interval) {
      lastMessageTime = 0;
      // send mapped potentiometer reading to p5
      int potentiometer = analogRead(potPin);
      int mappedPotValue = map(potentiometer, 0, 1023, 0, 255);
      Serial.println(mappedPotValue);
      // slight delay to stabilize the ADC:
      delay(1);
    }
    else {
      lastMessageTime++;
    }

  }
  digitalWrite(LED_BUILTIN, LOW);
}
let velocity;
let gravity;
let position;
let acceleration;
let wind;
let drag = 0.99;
let mass = 50;

// // Arduino
let port;
let connectBtn;
let baudrate = 9600;
let lastMessage = "";
let showConnectButton = false;

function setup() {
  createCanvas(620, 400);
  noFill();
  position = createVector(width/2, 0);
  velocity = createVector(0,0);
  acceleration = createVector(0,0);
  gravity = createVector(0, 0.5*mass);
  wind = createVector(0,0);

  // // Arduino
  port = createSerial();
  let usedPorts = usedSerialPorts();
  if (usedPorts.length > 0) {
    port.open(usedPorts[0], baudrate);
  }
  if (showConnectButton) {
    connectBtn = createButton('Connect to Arduino');
    connectBtn.position(80, 300);
    connectBtn.mousePressed(setupSerial);
  }
}

function draw() {
  background(255);
  applyForce(wind);
  applyForce(gravity);
  velocity.add(acceleration);
  velocity.mult(drag);
  position.add(velocity);
  acceleration.mult(0);
  ellipse(position.x,position.y,mass,mass);
  if (position.y > height-mass/2) {
      velocity.y *= -0.9;  // A little dampening when hitting the bottom
      position.y = height-mass/2;
      flashLight();
    }

  // // Arduino
  if (showConnectButton) {
    if (!port.opened()) {
      connectBtn.html('Connect to Arduino');
    } else {
      connectBtn.html('Disconnect');
    }
  }
  fill('black');
  if (!port.opened()) {
    text("Disconnected", 20, 30);
  } else {
    text("Connected", 20, 30);
  }
  let str = port.readUntil("\n");
  if (str.length > 0) {
    // console.log(str);
    lastMessage = str;
  }

  // Display the most recent message
  text("Last message: " + lastMessage, 10, height - 20);

  // // Convert received value to wind.x value
  mappedPot = map(int(lastMessage), 0, 255, -1, 1);
  wind.x = mappedPot;
  let windSpeed = "Wind speed: " + wind.x
  text(windSpeed.substring(0,20), 10, height - 5);

  fill('white');
}

function applyForce(force){
  // Newton's 2nd law: F = M * A
  // or A = F / M
  let f = p5.Vector.div(force, mass);
  acceleration.add(f);
}

function keyPressed(){
  if (keyCode==LEFT_ARROW){
    wind.x=-1;
  }
  if (keyCode==RIGHT_ARROW){
    wind.x=1;
  }
  if (key==' '){
    mass=random(15,80);
    position.y=-mass;
    velocity.mult(0);
    port.write("0\n"); // reset light
  }
}

// // Arduino
function setupSerial() {
  if (!port.opened()) {
    port.open('Arduino', baudrate);
  } else {
    port.close();
  }
}

function flashLight() {
  if (port.opened()) {
    port.write("1\n");
    // port.write("0\n");
  }
}
Readings
The text “A Brief Rant on the Future of Interaction Design” takes a critical look at modern digital interfaces and points out how they often force users to adapt to strict, outdated design rules instead of the other way around. The author argues that interfaces should be more in tune with natural human thought processes, which could lead to more flexible and easier-to-use systems. For example, the text challenges the reliance on traditional metaphors in design that can limit how people interact with technology, suggesting that a rethinking of these strategies would better serve everyone.
In the responses, various designers and thinkers share their own views on what works and what doesn’t in today’s interaction design. Many contributors agree that sticking to rigid structures can suppress innovation and user engagement, while others offer practical examples from their work. One common point is that when interfaces are redesigned to be more intuitive, it often results in smoother and more productive user experiences, showing that a change in approach can have positive real-world benefits.
Overall, both readings encourage a move toward interaction design that feels more natural and accommodating to users. The discussion emphasizes the importance of creating technology that adapts to how people actually think and work, rather than forcing users to learn and conform to outdated digital patterns. This friendly call for change makes it clear that smarter design is not just a theoretical goal; it can lead to improvements in everyday technology that benefit us all.
Week 10 (Musical Instrument & Reading)
With YEVA SYNTH V1.0, I wanted to create a device that felt fun to play with, responded instantly to human input, and was built from the ground up using just an Arduino Uno, a few buttons, LEDs, and some imagination.
After sketching a few interface ideas, I settled on a layout using two buttons to trigger different sound effects, a potentiometer to switch between modes, and two small LCD screens—one for control feedback and one for visual flair. The FX selector (an analog potentiometer) lets the user scroll between different sound modes like “Laser,” “Melody,” “Wobble,” “Echo,” and more. Pressing a button instantly triggers the selected effect through a piezo buzzer. One LCD shows the current FX name, while the second displays an animated visualizer that bounces in response to sound activity. The LEDs tied to the Arduino’s analog pins light up during sound playback, giving a simple but satisfying burst of light that makes the synth feel alive.
Building it was both straightforward and occasionally frustrating. Wiring two LCDs in parallel required careful pin management to avoid conflicts, and the Arduino Uno’s limited number of usable pins meant I had to repurpose analog pins as digital outputs. The buzzer was a challenge at first because some FX didn’t make any audible sound until I discovered I had to hardcode appropriate pitch and modulation values and remove interrupt logic that was prematurely cutting playback short.
One major success was making the sound effects interruptible and responsive. Early versions of the code would lock the device into one sound effect until it finished, but I rewrote the logic to allow button spamming so users can mash buttons and get immediate feedback, making the instrument feel more playful.
Of course, there are limitations. The piezo buzzer is not exactly a high-fidelity speaker, and while it’s great for beeps and bleeps, it can’t produce anything resembling full-range audio. I also wanted the visualizer to respond to actual audio signal amplitude, but without analog audio input or FFT analysis, I had to simulate that based on pitch values and FX activity. That said, the effect is convincing enough to match the synth’s character. Another improvement would be to allow the synth to send commands to a computer so that real sound files could be played through the laptop’s speakers instead of the buzzer. I’ve already prototyped this using a Python script listening over serial.
#include <LiquidCrystal.h>

LiquidCrystal lcd1(12, 11, 5, 4, 3, 2);
LiquidCrystal lcd2(8, 7, 6, A4, A3, A2);

// Pins
const int fxSelector = A5;
const int button1 = 9;
const int button2 = 10;
const int buzzerPin = 13;
const int led1 = A0;
const int led2 = A1;

// FX Setup
int pitch = 440;  // A4
int mod   = 50;
int fxIndex = 0;
const int NUM_FX = 8;

String fxNames[NUM_FX] = {"Laser", "Melody", "Alarm", "Jump", "Sweep", "Wobble", "Echo", "Random"};

void setup() {
  lcd1.begin(16, 2);
  lcd2.begin(16, 2);
  pinMode(button1, INPUT_PULLUP);
  pinMode(button2, INPUT_PULLUP);
  pinMode(buzzerPin, OUTPUT);
  pinMode(led1, OUTPUT);
  pinMode(led2, OUTPUT);

  Serial.begin(9600); // Debug

  lcd1.setCursor(0, 0);
  lcd1.print("YEVA SYNTH V1.0");
  lcd2.setCursor(0, 0);
  lcd2.print("MAKE SOME NOISE");
  delay(1500);
  lcd1.clear();
  lcd2.clear();

  randomSeed(analogRead(A3));
}

void loop() {
  fxIndex = map(analogRead(fxSelector), 0, 1023, 0, NUM_FX - 1);

  lcd1.setCursor(0, 0);
  lcd1.print("FX: ");
  lcd1.print(fxNames[fxIndex]);
  lcd1.print("        ");

  lcd1.setCursor(0, 1);
  lcd1.print("Pitch:");
  lcd1.print(pitch);
  lcd1.print(" M:");
  lcd1.print(mod);
  lcd1.print("  ");

  if (buttonPressed(button1)) {
    triggerFX(fxIndex);
  }

  if (buttonPressed(button2)) {
    triggerAltFX();
  }

  drawVisualizer(0);
}

bool buttonPressed(int pin) {
  if (digitalRead(pin) == LOW) {
    delay(10); // debounce
    return digitalRead(pin) == LOW;
  }
  return false;
}

void showFXIcon(int index) {
  lcd2.setCursor(0, 0);
  lcd2.print("FX: ");
  switch (index) {
    case 0: lcd2.print(">>>>"); break;
    case 1: lcd2.print("♫♫");   break;
    case 2: lcd2.print("!!");   break;
    case 3: lcd2.print(" ↑");   break;
    case 4: lcd2.print("/\\");   break;
    case 5: lcd2.print("~");  break;
    case 6: lcd2.print("<>");   break;
    case 7: lcd2.print("??");   break;
  }
}

void drawVisualizer(int level) {
  lcd2.setCursor(0, 1);
  int bars = map(level, 0, 1023, 0, 16);
  for (int i = 0; i < 16; i++) {
    if (i < bars) lcd2.write(byte(255));
    else lcd2.print(" ");
  }
}

void triggerFX(int index) {
  lcd2.clear();
  showFXIcon(index);
  digitalWrite(led1, HIGH);
  Serial.println("Triggering FX: " + fxNames[index]);

  if (index == 7) {
    int randFX = random(0, NUM_FX - 1);
    triggerFX(randFX);
    return;
  }

  switch (index) {
    case 0: // Laser
      for (int i = 1000; i > 200; i -= (10 + mod / 20)) {
        tone(buzzerPin, i);
        drawVisualizer(i);
        delay(10);
      }
      break;

    case 1: { // Melody
      int notes[] = {262, 294, 330, 392, 440, 494, 523};
      for (int i = 0; i < 7; i++) {
        digitalWrite(led2, HIGH);
        tone(buzzerPin, notes[i] + mod);
        drawVisualizer(notes[i]);
        delay(200);
        digitalWrite(led2, LOW);
        delay(50);
      }
      break;
    }

    case 2: // Alarm
      for (int i = 0; i < 5; i++) {
        tone(buzzerPin, 400 + mod);
        drawVisualizer(600);
        delay(150);
        noTone(buzzerPin);
        delay(100);
      }
      break;

    case 3: // Jump
      tone(buzzerPin, pitch + 200);
      drawVisualizer(800);
      delay(150);
      break;

    case 4: // Sweep
      for (int i = pitch - mod; i <= pitch + mod; i += 5) {
        tone(buzzerPin, i);
        drawVisualizer(i);
        delay(5);
      }
      for (int i = pitch + mod; i >= pitch - mod; i -= 5) {
        tone(buzzerPin, i);
        drawVisualizer(i);
        delay(5);
      }
      break;

    case 5: // Wobble
      for (int i = 0; i < 15; i++) {
        int wob = (i % 2 == 0) ? pitch + mod : pitch - mod;
        tone(buzzerPin, wob);
        drawVisualizer(wob);
        delay(80);
      }
      break;

    case 6: // Echo
      int echoDelay = 200;
      for (int i = 0; i < 5; i++) {
        int toneFreq = pitch - i * 20;
        tone(buzzerPin, toneFreq);
        drawVisualizer(toneFreq);
        delay(echoDelay);
        noTone(buzzerPin);
        delay(echoDelay / 2);
        echoDelay -= 30;
      }
      break;
  }

  noTone(buzzerPin);
  digitalWrite(led1, LOW);
  drawVisualizer(0);
}

void triggerAltFX() {
  lcd2.clear();
  lcd2.setCursor(0, 0);
  lcd2.print("FX: BLIP");

  for (int i = 0; i < 3; i++) {
    tone(buzzerPin, 600 + mod);
    digitalWrite(led2, HIGH);
    drawVisualizer(600);
    delay(100);
    noTone(buzzerPin);
    digitalWrite(led2, LOW);
    delay(100);
  }

  drawVisualizer(0);
}
Reading response
A Brief Rant on the Future of Interaction Design by Bret Victor made me rethink how we use technology today. He argues that all these futuristic concept videos we see where everything is controlled by touchscreens or voice commands are actually super boring. Not because they’re unrealistic, but because they’re unimaginative. We’re just slightly upgrading what already exists instead of rethinking how we interact with tech in the first place.
Victor’s main point is that our current interfaces like the iPad might feel revolutionary now, but they’re still pretty limited. Everything is flat, behind glass, and designed for a single finger. It works, sure, but it’s kind of like if all literature was written at a Dr. Seuss level: accessible, but not exactly fulfilling for a fully grown adult. He’s asking, “why aren’t we building tools that take advantage of the full range of human abilities—our hands, our spatial awareness, our sense of touch?”
What I found really interesting is that he’s not anti-technology. He actually says the iPad is good for now, kind of like how black-and-white film was great in the early 1900s, but eventually color took over because people realized something was missing. He’s trying to get people, especially researchers and funders, to realize what might be missing in today’s tech and explore new directions, like dynamic tactile interfaces or haptic environments.
He also talks about how voice and gesture controls aren’t the answer either. Voice is fine for simple commands, but it doesn’t help if you want to build something or deeply explore a system. Same with waving your hands in the air. It’s cool in theory, but weird and disorienting in practice, especially without any physical feedback. His whole point is that we learn and create best when we can physically engage with things.
One thing that really stuck with me is this quote he includes from a neuroscientist about how important our fingers are for brain development. Like, if kids grow up only using touchscreens and never really using their hands, they miss out on a whole layer of understanding (physically and conceptually). That spoke to me. It’s not just about functionality, it’s about how tech shapes the way we think and grow.
So yeah, it’s not a rant in the sense of being angry for no reason. It’s more like a wake-up call. He’s saying, “We can do better. We should do better.” And honestly, I agree.
Week 10 – Reading responses
A Brief Rant on the Future of Interaction Design
The article, “A Brief Rant on the Future of Interaction Design” Criticizes the “Pictures Under Glass” approach in interaction design, where the author emphasizes the importance of tactile and hands-on engagement, which is frequently disregarded in preference to visual interfaces. The author asserts that touch is essential to our interactions with the world, highlighting the extensive tactile sensations we experience from common items such as books or glasses of water, and underlining the variety of hand motions required for activities like opening a jar. He analyzes the drawbacks of touchscreens, which primarily provide a flat, sliding motion that fails to reflect the depth of physical interaction we typically experience. Although he recognizes the visual energy of digital interfaces, Victor proposes that present technologies, such as the iPad, might not have lasting potential unless they develop to utilize more of our physical abilities. This made me think about how often we overlook tactile feedback in our daily activities and how digital interfaces, although visually engaging, frequently fail to deliver that deep physical interaction.
Week 10: Music Instrument
Concept
For this assignment, me and Maliha made an interactive light-sensitive sound device using an Arduino Uno, a photoresistor (LDR), a pushbutton, an LED, and a piezo speaker. When the button is pressed, the Arduino reads the surrounding light level using the LDR and maps that value to a specific sound frequency. The speaker then emits a tone depending on the brightness or darkness—darker settings yield higher-pitched tones, and brighter settings yield lower-pitched tones. Meanwhile, the LED lights up to signal that the system is reading and responding actively. This project taught us how sensors, inputs, and outputs are combined to build responsive circuits.

Code Highlights
const int ldrPin = A0;         // LDR connected to analog pin A0
const int buttonPin = 2;       // Button connected to digital pin 2
const int speakerPin = 9;      // Speaker connected to digital pin 9
const int ledPin = 13;         // LED connected to pin 13

// Dramatically different frequencies (non-musical)
int notes[] = {100, 300, 600, 900, 1200, 2000, 3000};

void setup() {
  pinMode(buttonPin, INPUT);         // Button logic: HIGH when pressed
  pinMode(speakerPin, OUTPUT);
  pinMode(ledPin, OUTPUT);
  Serial.begin(9600);
}

void loop() {
  int buttonState = digitalRead(buttonPin); // Read the button

  if (buttonState == HIGH) {
    int lightLevel = analogRead(ldrPin);         // Read LDR
    int noteIndex = map(lightLevel, 0, 1023, 6, 0); // Bright = low note
    noteIndex = constrain(noteIndex, 0, 6);      // Keep within range
    int frequency = notes[noteIndex];            // Pick frequency

    tone(speakerPin, frequency);                 // Play note
    digitalWrite(ledPin, HIGH);                  // LED on

    Serial.print("Light: ");
    Serial.print(lightLevel);
    Serial.print(" | Frequency: ");
    Serial.println(frequency);
  } else {
    noTone(speakerPin);            // No sound
    digitalWrite(ledPin, LOW);     // LED off
  }

  delay(100);
}
Video Demonstration
Challenges
One of the problems we faced was getting accurate light readings from the photoresistor since small changes in lighting at times caused big frequency jumps. We also had trouble keeping the wiring on the breadboard tidy and making sure each device was correctly connected to power and ground. Debugging the circuit and double-checking the connections fixed the issues and taught us about how analog inputs and digital outputs work together.
Week 10 Reading Response
Whilst reading a Brief Rant on The Future of Interactive Design I thought of the essential framework as controversial. Firstly the assumption that humans require tactile feedback and attributing the cause of high numbers of nerve endings in fingertips only reinforces concepts of evolutionary outcomes. Yes, by evolution we do have the most nerve endings in the tips of our fingers, that does not contradict the future of interactive design removing the necessity for human touch. Unlike Humans 5000 years ago, we will not need more tactile feedback in modern society. I prefer completely removing human touch when needed. We should not have to turn a light switch on, that should be automated. We should not have to turn the AC on through an outdated retro interface as well. Several things are way better without human touch. If we take the framework further, then we should rethink even current technology and not just future technology.
Whilst Reading Responses: A Brief Rant on the Future of Interaction Design, I realized that the author completely dismissed the reasoning behind the framework under the guise that it is just a rant. Perhaps the examples of solutions such as haptic holography and nanobot assemblies is conceptually useful, but not without a further explanation of the framework. Overall I disliked this reading for the above reasons but I found the response to provide some helpful
Week 10 Project
Initally, I wanted to something with potentiometers as they reminded me very much of the knobs we see on MIDI keyboards. I decided to use Max MSP, a digital music coding inteface to see what I could do with analog outputs coming from my two potentiometers. I had two projects.
The first one was using analog outputs from 0 to 1023 to modulate the pitch of a synthesizer. To do this, I mapped the values 0 to 1023 to output as the frequency of a combined sine and saw wave. The result was that the pitch of the wave could be changed by the first potentiometer. Next, the second potentiometer was mapped to volume that way I could control the volume of my synth. Lastly, I used the button as an octave changer. I programmed it so that holding the button down multiplied my frequency of the wave by 2, turning it up an octave.
The other creation was a DJ mixer. I programmed the first capcitor’s output to 1. map to the volume of the first piece of music you inserted, 2. inverse itself and map that to the volume of the second piece of music. This creater a simple fader I could swtich between the two tracks. The second potentiometer remained a volume control. The button allowed you to start/stop both tracks at once so you could play them in sync, and crossfade between them.
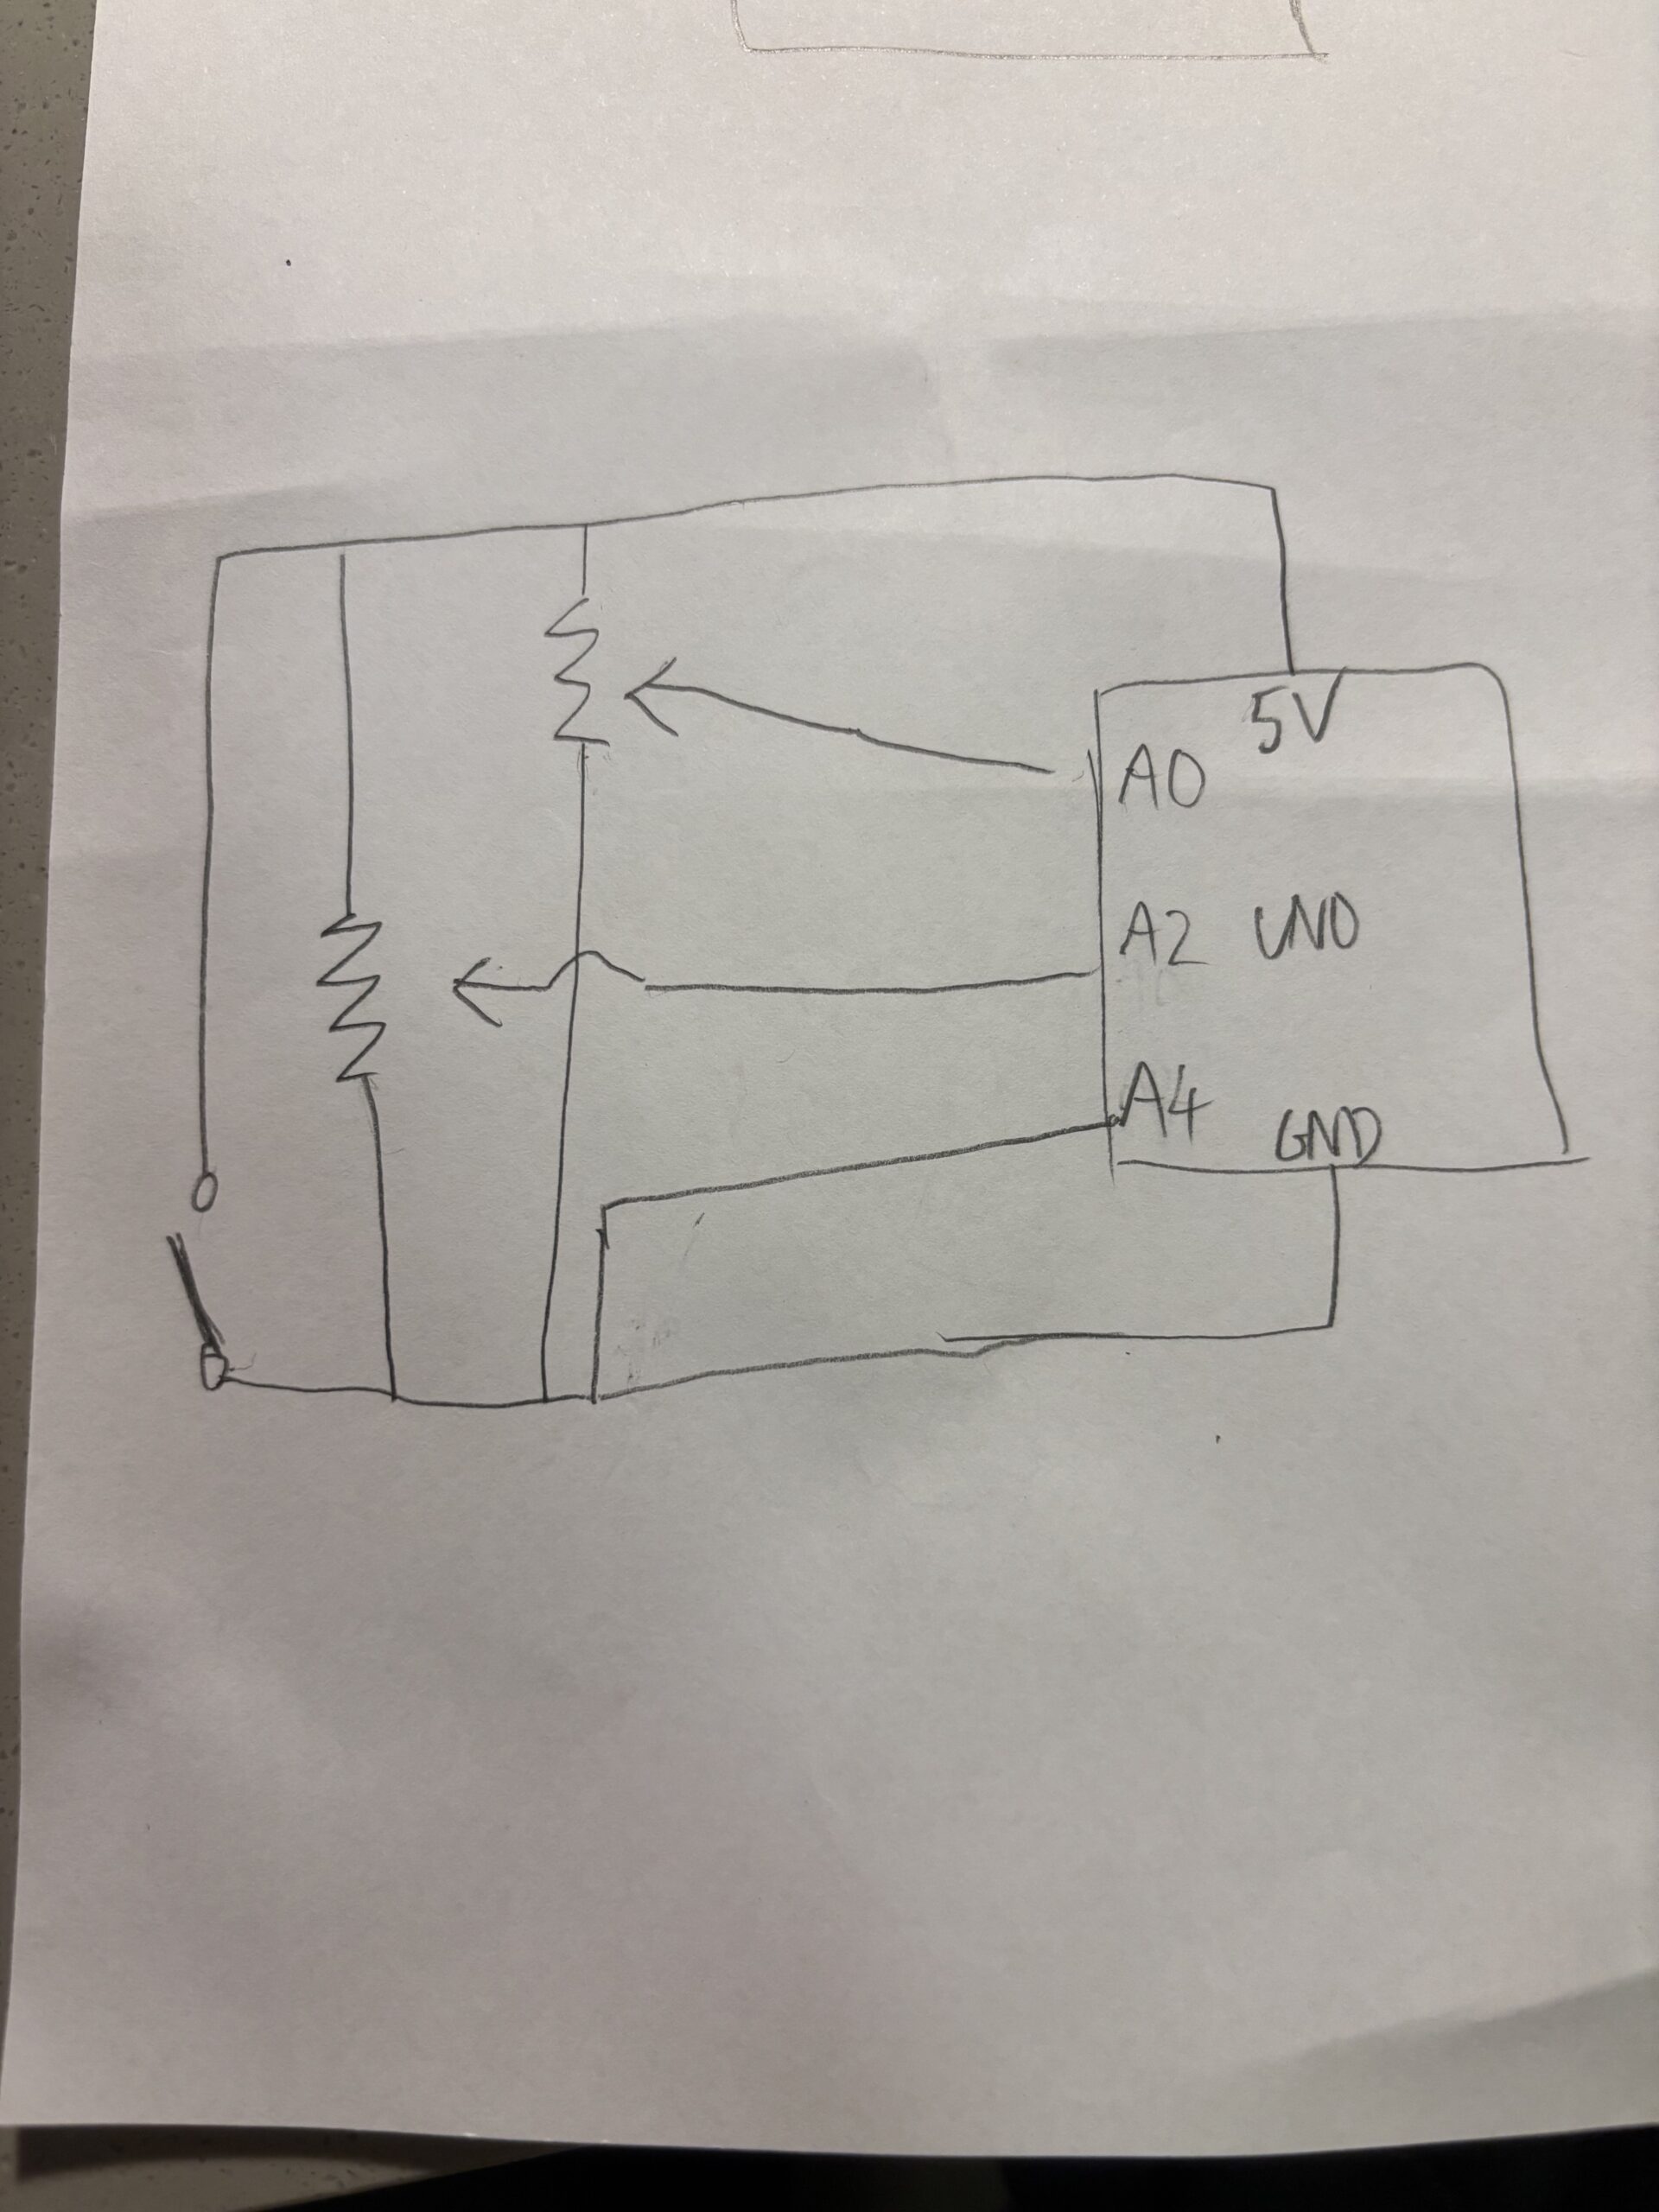
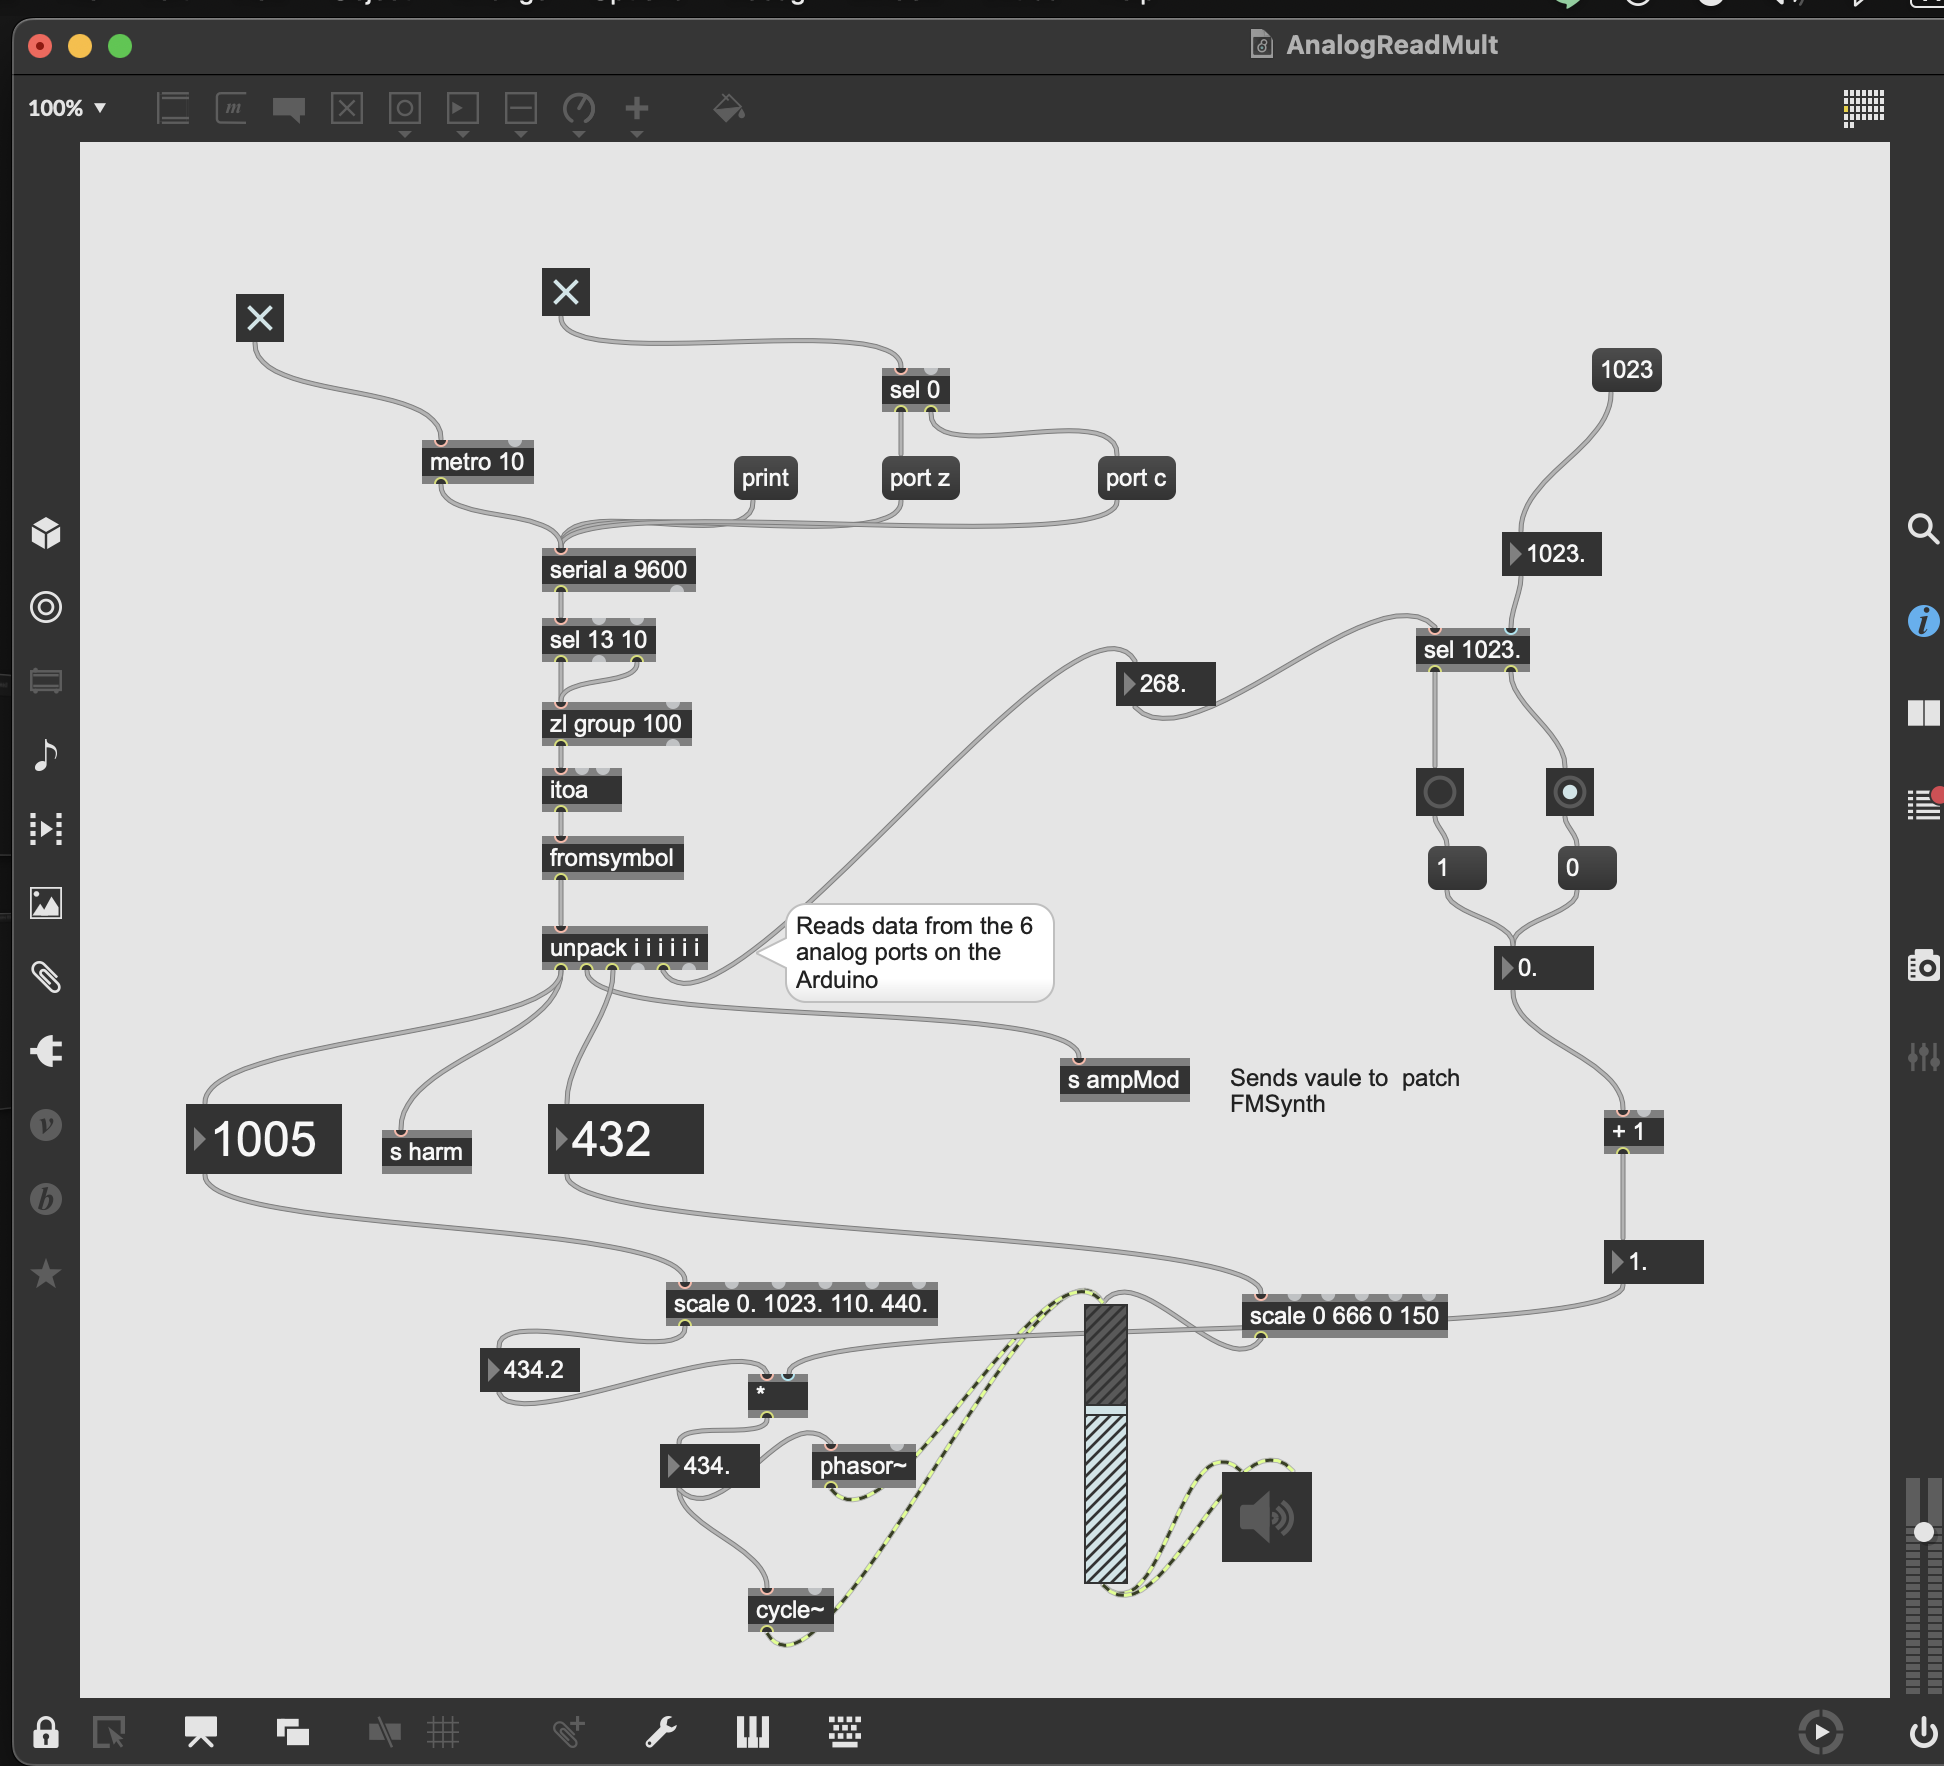

One of the issues that came up was the connections breaking. Sometimes I would not notice and the potentiometer would just stop working. To work around this, I made sure everything was on the table, and none of the wires were in tension. Another issue was that I ony had one 5V power supply. While I could link up both potentiometers in parallel, I found this made the analog outputs shaky. To fix this I actually instead connect one of the two potentiometers to the 1.5V power, then changed to scaling of inputs from 0 to 1023 to 0 to 666, allowing for the same range of volume control.
In the future I could defnitely add more knobs to modulate more aspects of my sound. And as for the DJ mixer, because we do no precieve sound linearly, when the crossfader was between the two songs, the msuic became way too quiet, a non-linear form of mapping for volume could probably fix this. Another thing to improve is to defnitely create some sort of housing, permanently connecting the electornics to create a box-like apparatus as a DJ crossfader.