For this project, I created an interactive system that integrates Arduino with p5.js, using Node.js for serial communication, allowing seamless interaction between the hardware (Arduino) and software (p5.js sketch).
The project consists of three tasks, each demonstrating different ways Arduino sensors and outputs can interact with visual and digital elements in p5.js. Below is a detailed description of each task, including the setup, code, and outcomes.
Task 1: Control Ellipse Horizontal Position with Arduino Sensor
Goal: Use a potentiometer connected to Arduino to control the horizontal position of an ellipse in p5.js.
Task 2: Control LED Brightness from p5.js Mouse Position
Goal: Use the mouse cursor in p5.js to control the brightness of an LED connected to Arduino.
Task 3: Gravity-Wind Sketch with LED Bounce Feedback
Goal: Modify the gravity-wind sketch (from Aaron Sherwood’s example) so that:
-A potentiometer controls the wind force.
-Each time the ball bounces, an LED lights up briefly.
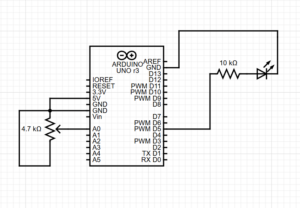
systemic diagram:

Conclusion:
This project showcased the flexibility of combining Arduino and p5.js via Node.js, enabling rich interaction between hardware and software. The local setup allowed full control over serial communication, overcoming the browser-based limitations.
Future Improvements:
-
Add sound effects when the ball bounces.
-
Use multiple sensors to control more aspects of the sketch.
-
Expand interaction with other hardware components (motors, buzzers).
p5.js
The codes:
let serial;
let sensorValue = 0;

function setup() {
createCanvas(400, 400);
serial = new p5.SerialPort();

serial.on('list', printList);
serial.on('connected', serverConnected);
serial.on('open', portOpen);
serial.on('data', gotData);
serial.on('error', serialError);
serial.on('close', portClose);

serial.list(); // get list of serial ports
serial.openPort('COM3'); // replace with your actual port
}

function gotData() {
let val = serial.readLine().trim();
if (val !== "") {
sensorValue = int(val);
print(sensorValue);
}
}

function draw() {
background(220);
ellipse(map(sensorValue, 0, 1023, 0, width), height / 2, 50, 50);
}

// Optional helper functions
function printList(portList) {
console.log("List of Serial Ports:");
for (let i = 0; i < portList.length; i++) {
console.log(i + ": " + portList[i]);
}
}

function serverConnected() {
console.log('Connected to server.');
}

function portOpen() {
console.log('Serial port opened.');
}

function serialError(err) {
console.log('Serial port error: ' + err);
}

function portClose() {
console.log('Serial port closed.');
let serial;

function setup() {
createCanvas(400, 400);
serial = new p5.SerialPort();

serial.on('open', () => console.log("Serial port opened"));
serial.openPort('COM3'); // change this if needed
}

function draw() {
background(220);

let brightness = int(map(mouseX, 0, width, 0, 255));
fill(brightness);
ellipse(width / 2, height / 2, 100, 100);

serial.write(brightness + "\n"); // send brightness to Arduino
void setup() {
Serial.begin(9600);
pinMode(9, OUTPUT); // LED on pin 9
}

void loop() {
int sensor = analogRead(A0);
Serial.println(sensor);
delay(10); // short delay

if (Serial.available()) {
char c = Serial.read();
if (c == 'B') {
digitalWrite(9, HIGH);
delay(100);
digitalWrite(9, LOW);
}
}
}
void setup() {
Serial.begin(9600);
pinMode(9, OUTPUT); // LED on pin 9
}

void loop() {
int sensor = analogRead(A0);
Serial.println(sensor);
delay(10); // short delay

if (Serial.available()) {
char c = Serial.read();
if (c == 'B') {
digitalWrite(9, HIGH);
delay(100);
digitalWrite(9, LOW);
}
}
}
let serial;
let sensorValue = 0;
let windForce = 0;
let ball;
let gravity;

function setup() {
createCanvas(400, 400);
serial = new p5.SerialPort();

// Open the correct serial port
serial.openPort('COM3'); // ← Change to your actual Arduino COM port!

// When data comes in from Arduino
serial.on('data', gotData);

gravity = createVector(0, 0.2);
ball = new Ball();
}

function gotData() {
let val = serial.readLine().trim();
if (val !== "") {
sensorValue = int(val);
windForce = map(sensorValue, 0, 1023, -0.2, 0.2);
print("Sensor:", sensorValue, "→ Wind:", windForce);
}
}

function draw() {
background(240);

// Apply wind from sensor and gravity
ball.applyForce(createVector(windForce, 0));
ball.applyForce(gravity);

// Update + show ball
ball.update();
ball.display();

// If ball bounced, tell Arduino to blink LED
if (ball.isBouncing()) {
serial.write('B\n');
}
}

class Ball {
constructor() {
this.position = createVector(width / 2, 0);
this.velocity = createVector();
this.acceleration = createVector();
this.radius = 24;
this.bounced = false;
}

applyForce(force) {
this.acceleration.add(force);
}

update() {
this.velocity.add(this.acceleration);
this.position.add(this.velocity);
this.acceleration.mult(0);

// Bounce off bottom
if (this.position.y >= height - this.radius) {
this.position.y = height - this.radius;
this.velocity.y *= -0.9;
this.bounced = true;
} else {
this.bounced = false;
}
}

isBouncing() {
return this.bounced;
}

display() {
fill(50, 100, 200);
noStroke();
ellipse(this.position.x, this.position.y, this.radius * 2);
}
}
Arduino code:
int sensorPin = A0; // Potentiometer connected to analog pin A0
int sensorValue = 0; // Variable to store the potentiometer value

void setup() {
Serial.begin(9600); // Start serial communication at 9600 baud rate
}

void loop() {
sensorValue = analogRead(sensorPin); // Read the potentiometer value (0-1023)
Serial.println(sensorValue); // Send the value to the computer
delay(10); // Short delay to prevent overloading serial data
}
void setup() {
Serial.begin(9600);
pinMode(9, OUTPUT); // LED connected to pin 9 (PWM)
}

void loop() {
if (Serial.available()) {
int brightness = Serial.parseInt();
brightness = constrain(brightness, 0, 255); // safety check
analogWrite(9, brightness);
}
}
void setup() {
Serial.begin(9600);
pinMode(9, OUTPUT); // LED on pin 9
}

void loop() {
int sensor = analogRead(A0);
Serial.println(sensor);
delay(10); // short delay

if (Serial.available()) {
char c = Serial.read();
if (c == 'B') {
digitalWrite(9, HIGH);
delay(100);
digitalWrite(9, LOW);
}
}
}
The videos:
https://drive.google.com/drive/u/0/folders/1Kk2lkQgoAyybXSYWVmY2Dog9uQVX_DMq


