For this assignment, I wanted to a create a simple piece of art with the emphasis of my understanding of it. Last time I got ahead of myself and was trying to do so much that I ended up doing very little. For inspiration I used a traffic light for no particular reason. It’s simple and I knew I at least had to use ellipse() and rect() if I wanted. I also knew I had to work with the colors black, green, red, and yellow. I looked up images for inspiration and found photographs of traffic lights with long exposure and decided to do a very simplified version. Below is the image I used for inspiration.
Initially, I was very confused with how loops worked. I watched a lot of YouTube videos, mainly from The Coding Train, and after I grasped the concept, I started building my for loop first. I copied the loop two more times to represent the three lights in the traffic light. I also used the createColorPicker() DOM from the p5.js reference page to randomize the colors and added a frame rate to try and visualize the exposure aspect.
I was satisfied with my understanding of the assignment, loops, and the overall art piece. However, for next time I would like to experiment and include more of what we have learned from previous lessons and create my own functions.
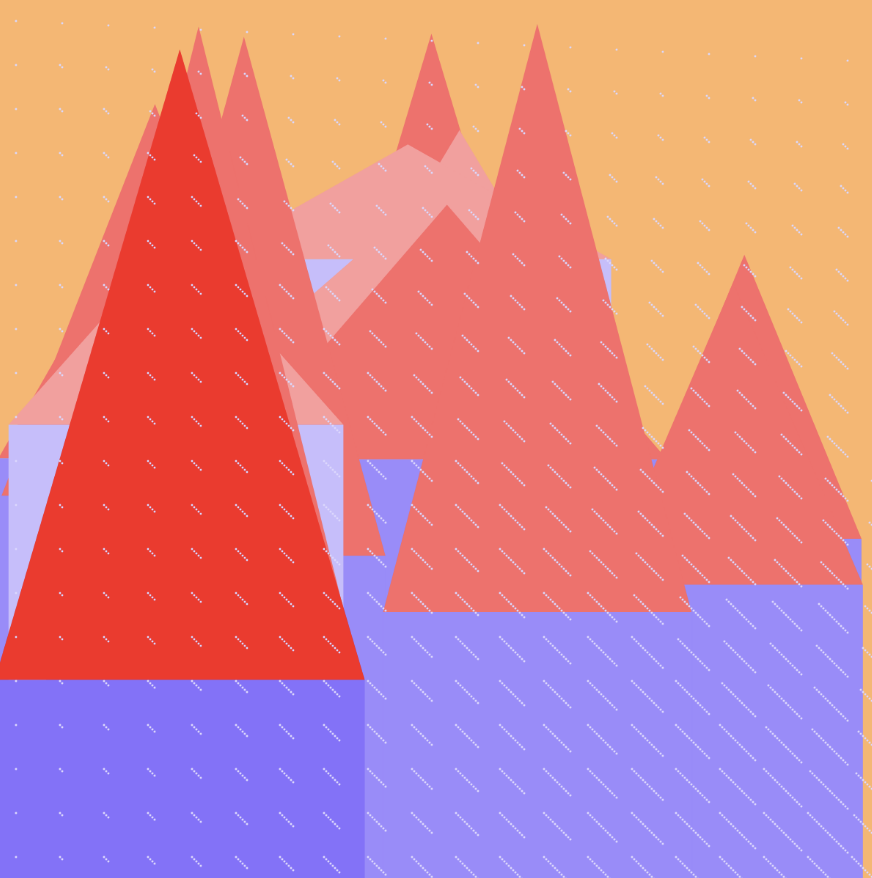
For this project, we were meant to experiment with using for and while loops.
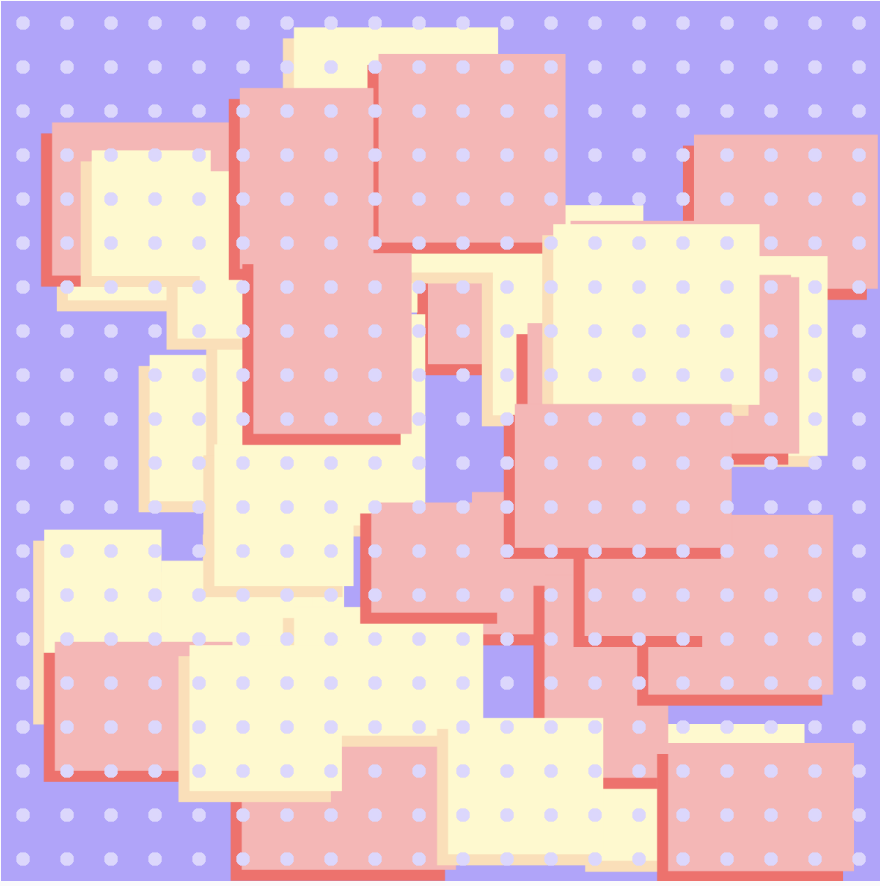
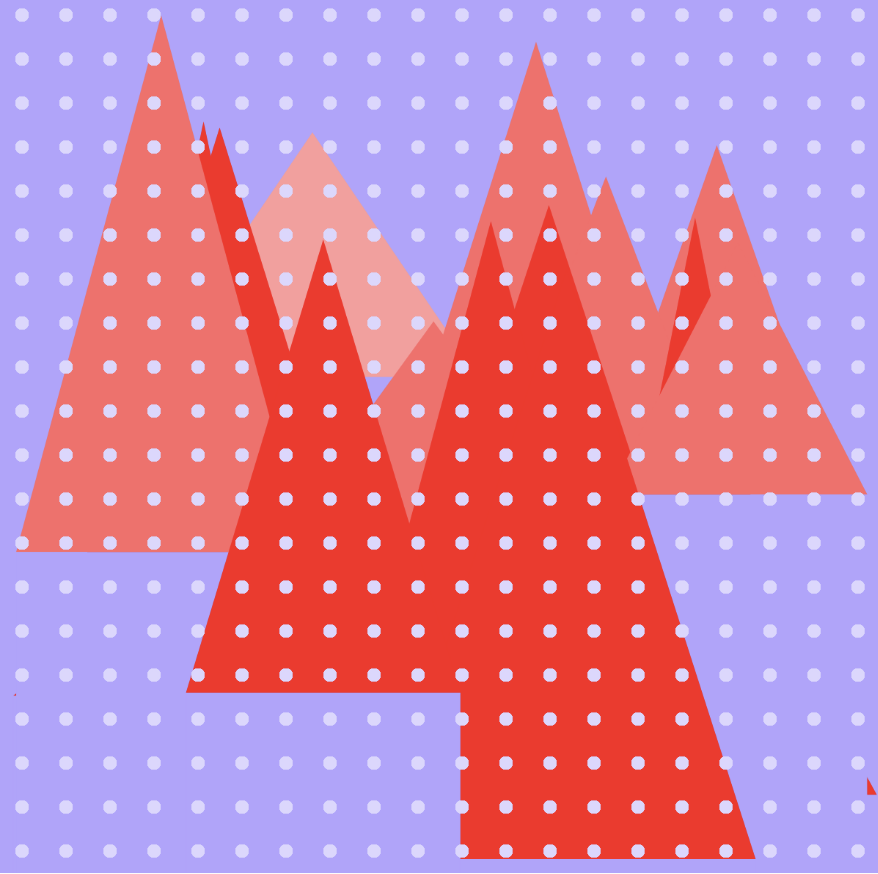
I really liked the dots that the professor created in class using nested for loops
So I experimented with using for loops to layer shapes with different colors under the dots.
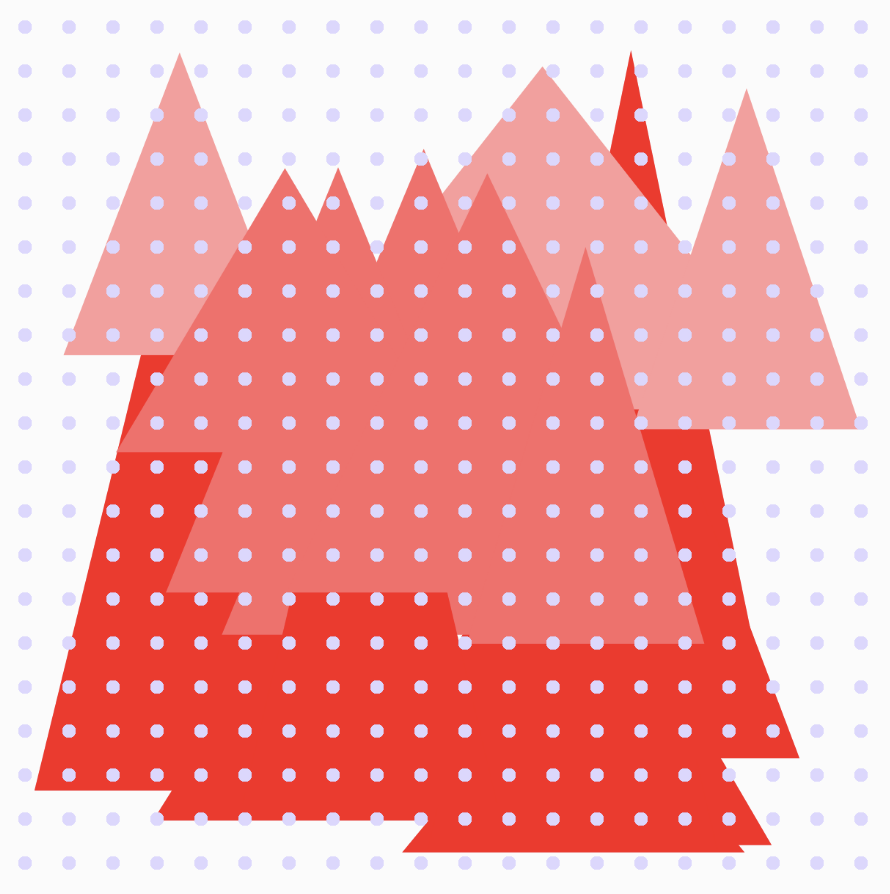
This reminded me of lego pieces, but I though it might be interesting for the colors of the shapes to be different based on their position on the canvas. I decided to change the shapes to mountains (triangles) and let shapes at the back to be lighter and the ones at the front to be darker to add depth.
The triangles overlapped each other in a way that I didn’t intend, so I decided to add a rectangle that stretched till the end of the page under them to mimic the ground so it would look more like a landscape.
This took a bit of time since I wasn’t sure which values would align the rectangles to the bottom of the triangle.
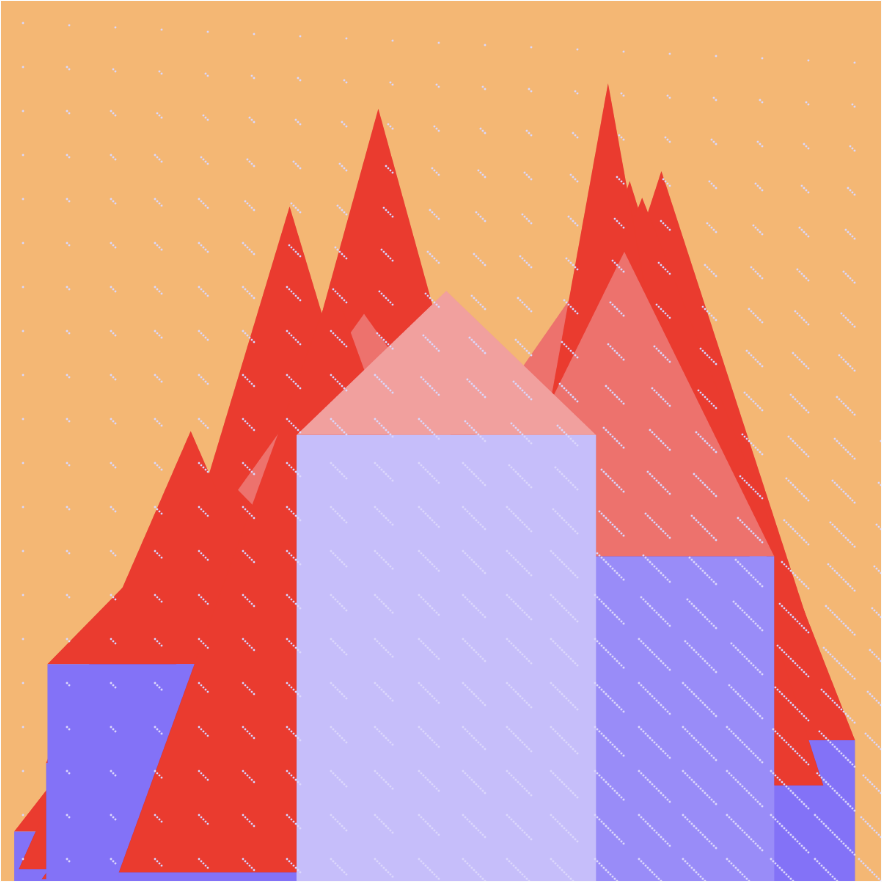
This is how it looked once I got that step done:
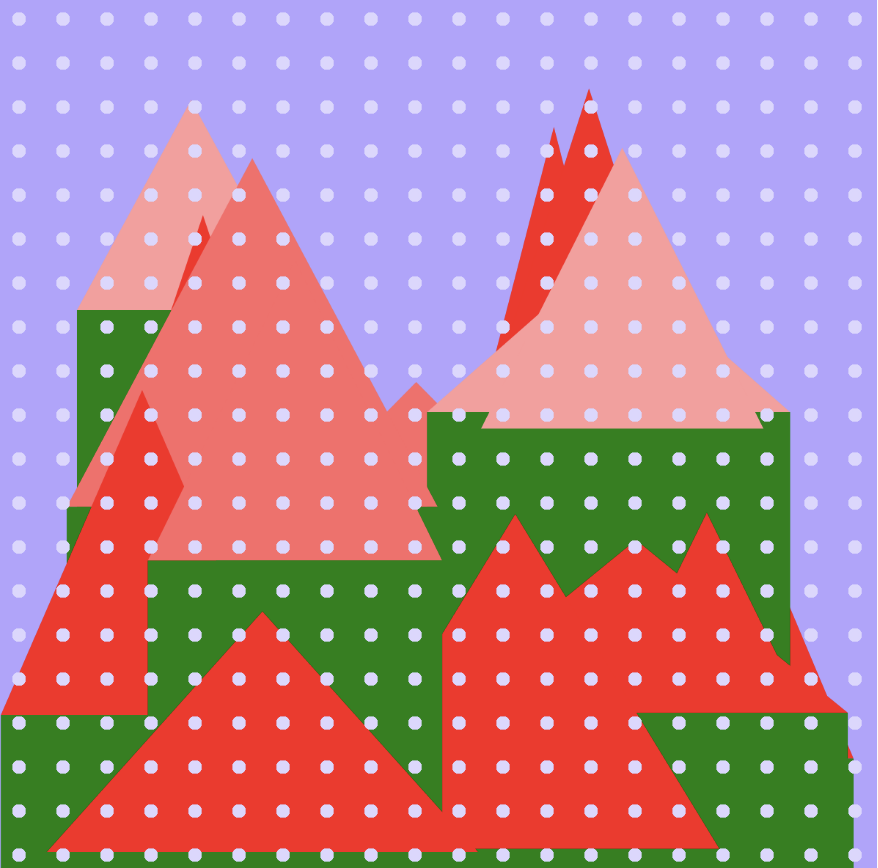
At this point, they didn’t look like how I wanted the mountains to look like but I felt like they might look more like houses. So I changed the color of the base and decided that they do look better as houses so I continued with that.
I changed the colors of the bases again to a color that matched the housetops and then decided to also let the color of the bases change based on their position.
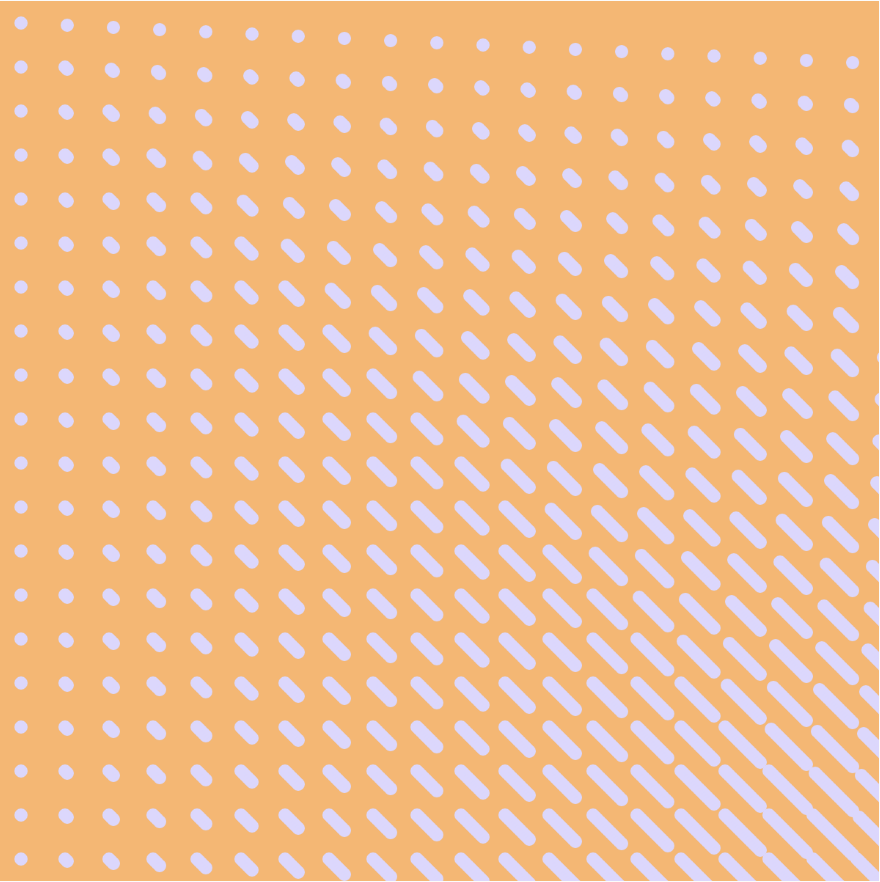
I also started experimenting with the repeating dots and the numbers in the 4 loop and realized that adding a value that continuously increments to the x and y position skewed them creating a diagonal line of circles that is shorted at some parts and longer at others. I made the dots really small and that resulted in rain like lines.
  fill("#ddd7ff")
  stroke("#ddd7ff")

  for (let row = 10; row < 400; row+= 20)
    {
    for (let col = 10; col < 400; col+= 20)
      {
      ellipse(row+b, col+b, 0, 0);
      }
      b++;
    }
I think it would’ve been interesting to add rain that continuously poured but I didn’t manage to figure out how to do that. I think would also be interesting to experiment with different colors, where if the person generated a village at night the colors would be darker vs if generated in the morning they would be lighter. Maybe there is a get time function that I could use for that.
I’d also like to experiment with creating patterns using lines, I think that this might be interesting.
A single line, judiciously placed around the main features, might suggest several moods. With this artwork, I wanted to display a variety of colours and lines that, when combined, display a range of emotions. Horizontal lines frequently convey a sense of stability, peace, and tranquility when utilized in conjunction with other shapes. The word “horizontal” comes from the word “horizon,” which is another symbol for perspective, separation, and tranquility. The possibility for mobility is strongly shown by vertical lines. When constructing perspective drawings and scenarios, vertical lines are frequently utilized in conjunction with horizontal lines as lines of reference.
Reflections and improvements:
Making this was enjoyable and relatively easy. But I wish there had been some kind of interactive component. Something that might change colours dependent on mouse movement. After this design was finished, I tried adding more visuals, but I ran into some problems. That is something that I would want to include in this sketch.
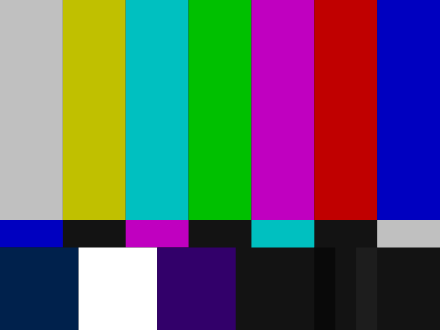
It took a little thought, but an image that soon sprung to mind for me was the pattern of multicolored rectangles that you see when a TV channel is off-air, the one that is accompanied by that awfully grating (and sometimes eerie) high-pitched beep. The one that looks like:
This pattern is called the SMPTE color bars (SMPTE stands for the Society of Motion Picture and Television Engineers). Image courtesy of its Wikipedia article: https://en.wikipedia.org/wiki/SMPTE_color_bars
I thought this would serve as good inspiration for my own artwork of patterns. After getting just a little invested in trivia (Did you know that that continuous beep is usually a 1000 Hz sine wave?), I set off to work.
Coding Highlights
I first sought to recreate the pattern. After a little tinkering, I was able to write up a function that would draw the pattern across the canvas when repeated.
//Set Variables
let x = 0;
let x2 = 0;
let i = 0;

//Function for Generating One Color Bar of Each Row
function colorBars(){
  noStroke();
  fill(random(255), random(255), random(255));
  rect(x, 0, 63, 220);
  fill(random(255), random(255), random(255));
  rect(x, 220, 63, 30);
  x = x + 63;
  fill(random(255));
  rect(x2, 250, 73.5, 80);
  x2 = x2 + 73.5;
}
This function is then embedded within a simple while() loop, which runs just enough times to make the pattern fill the canvas.
//Repeat for Pattern
function draw() {
  while (i < 7) {
    colorBars();
    i += 1;
  }
The x = x + 63; and x2 = x2 + 73.5; lines of code in the colorBars() function move the position of the future rectangles’ starting points to the end of the now-drawn rectangle, thus allowing for the pattern to be continued seamlessly when the function is repeated. I also chose to make the colors random (the bottom row is in grayscale for contrast and to match the feel of the reference image), which makes each iteration of my program unique. Here is the complete draft:
Draft in hand, I now wanted to add a layer of animation and make the bars change color (or more precisely, generate new bars over the preexisting ones). I also wanted to keep the animation from looking too stale by varying the cycle speeds of each row of bars—this meant that I had to break up the colorBars() function into three separate functions (one for each row) and establish separate variables for each function.
//Establish Variables

  let x1 = 0;
  let x2 = 0;
  let x3 = 0;
  let i1 = 0;
  let i2 = 0;
  let i3 = 0;

//Establish Functions for Each Row of Bars

function barTop(){
  noStroke();
  fill(random(255), random(255), random(255));
  rect(x1, 0, 63, 220);
  x1 = x1 + 63;
}

function barMid(){
  fill(random(255), random(255), random(255));
  rect(x2, 220, 63, 30);
  x2 = x2 + 63;
}


function barBot(){
  fill(random(255));
  rect(x3, 250, 73.5, 80);
  x3 = x3 + 73.5;
}
With the functions established, I could move on to the draw() function. First in line was the initial setup, which follows the same logic used for the while() loop in the draft (now with three functions looping within it).
//Initial Setup - This is in the draw() function.
while (i1 < 7) {
  barTop();
  barMid();
  barBot();
  i1 += 1;
  i2 += 1;
  i3 += 1;
}
The stage was set, and this was where the function separation came in handy. I was able to write three blocks of code that would determine the cycle speeds of each row, as well as reset their positions as needed:
//This is in the draw() function following the setup.
  //Top Bar Generation
  if (i1 % 5 == 0){
  barTop();
  }
  if (i1 % 35 == 0){
    x1= 0;
  }
  i1 += 1;

  //Middle Bar Generation
  if (i2 % 7 == 0){
    barMid();
  }
  if (i2 % 49 == 0){
    x2 = 0;
  }
  i2 += 1;

  //Bottom Bar Generation
  if (i3 % 6 == 0){
    barBot();
  }
  if (i3 % 36 == 0){
    x3 = 0;
  }
  i3 += 1;
The i1, i2, and i3 here act as counters for the number of draw() loops the program has gone through—by pairing them with the % remainder operator, I was able to vary the speeds at which the new bars are drawn over the preexisting ones. The first if() function in each block controls the rate at which a new bar is generated, while the second if() function resets the position of generation back to the beginning when the new pattern has gone across the width of the canvas. And finally, the result:
Reflections
Overall, this assignment was a fun one to work on! I was especially satisfied with how I was able to separate the initial bar-drawing function into three and make them run at differing intervals using the loop counters and the remainder operator. Each feature I want to implement in a project is a puzzle of its own, and it feels rewarding when I successfully devise a solution (sometimes after much frustration).
One feature I would have liked to adjust is to have the bars scroll across the screen rather than (seemingly) just change color. This was the initial idea I had, but I soon realized that making all the bars move, especially with each row at different speeds, was a much more complicated task than I had imagined. A task for a different time, perhaps.
Exploring the capabilities of p5.js—and that of my own with the editor—has been an exciting journey thus far, and I look forward to what more may lie in store!
Rugs have always amazed me. As a kid I remember zoning out and into the finite loops of perfection, thinking about the elaborate patterns, the subtle details, and the mesmerizing color palettes that bring so much life to our house. There is, however, one intentional, imperfect stitch in every traditional handwoven, otherwise perfect rug. Muslim artists honor the ‘Persian rug mistake’ as a reminder that only Allah is capable of creating perfection.
My generative artwork is inspired by rug patterns [which includes many unintentional flaws].
Rug pattern example
Code highlight
Lots of loops, lots of functions, and a little bit of OOP.
//\\//\\//\\//\\//\\//\\//\\//\\//\\//\\//\\//\\//\\//\\//\\//\\//\\//\\//\\//\\//\\
class Rectangle {
  constructor(x, y) {
    this.x = x;
    this.y = y;
    this.height = 500;
    this.width = 4;
  }

  move(m) {
    this.m = m;
    rotate(angle);

    if (freeze_flag == 1) {
      rotate(angle);
      angle += m;
    }
  }

  show(fill_color, stroke_color) {
    this.fill_color = fill_color;
    this.stroke_color = stroke_color;
    fill(fill_color);
    stroke(stroke_color);
    rect(this.x, this.y, this.height, this.width);
  }
}

function Dandelion(x, y) {

  // number of rectangles
  for(i=0; i<70;i++) {
    dandelion = new Rectangle(x,y);

    if(reverse_flag == 1) {
      dandelion.show("#87CEEB", 10);
    } else {
      dandelion.show("#f4c2c2", 10);
    }
    // you can control the speed of rectangles by changing the argument
    dandelion.move(0.0001);
  }
}

function draw() {
  if(reverse_flag == 1){
    background("#f4c2c2");
  } else {
    background("#87CEEB");
  }

  //this is where i want the rectangle to rotate from which is the center
  translate(width/2, width/2);
  // translate(300, 300);
  rectMode(CENTER);

  Dandelion(0,0);
  Dandelion(0,100);
  Dandelion(0,150);
  // Dandelion(0,200);
  // Dandelion(0,250);
}
//\\//\\//\\//\\//\\//\\//\\//\\//\\//\\//\\//\\//\\//\\//\\//\\//\\//\\//\\//\\//\\
Embedded sketch
Here is my pattern, using only rectangles.
Two of my saved patterns:
Reflection and ideas for future work or improvements
I would love to use more elaborate patterns by defining more classes of geometrical shapes and adding more layers/colors. I would also probably not use the move() function because when many layers are involved the constant movement of the objects are not very kind to the eyes. I think choosing a good color palette and getting the right width and height for the shapes would enhance the pattern significantly. There are lots of opportunities to make the work more interactive e.g. letting the user pick the geometrical shapes, control the size of different objects, try out different color combinations, etc.
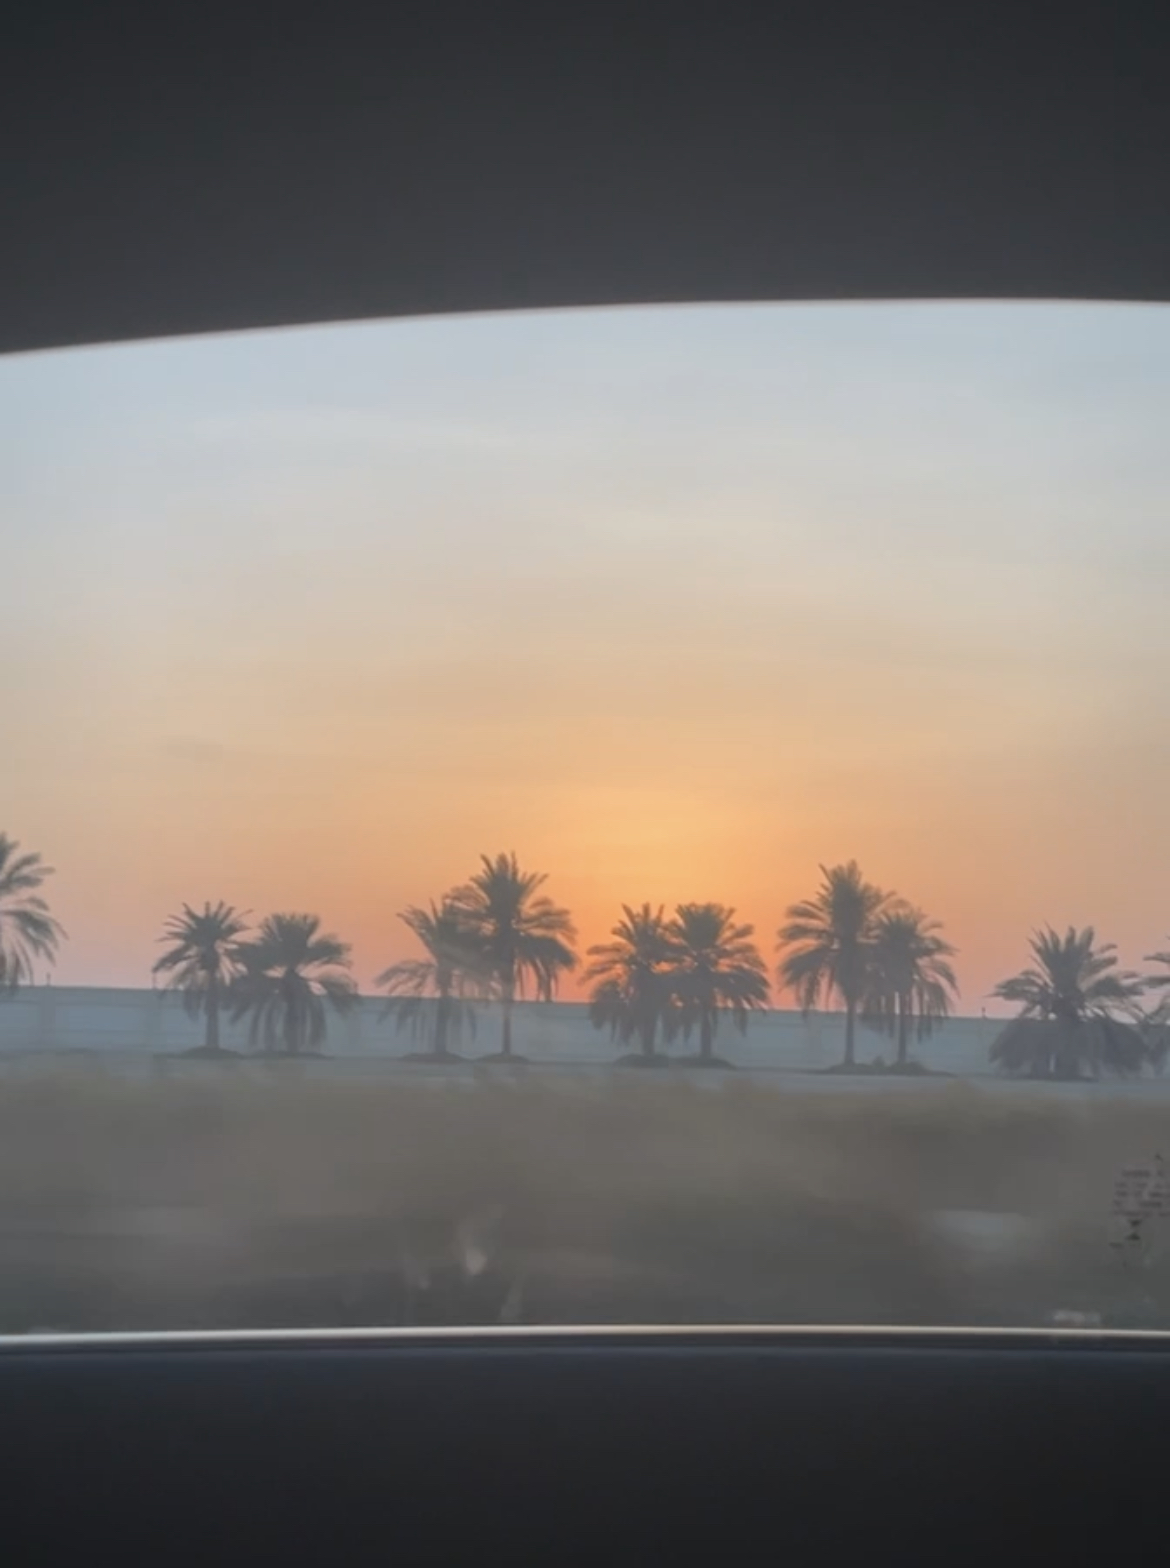
This artwork got inspired by a sunset drive two days ago. The view looked so pretty so I thought of recreating it through p5.js.
I started with drawing the palm trees using while() to have them all line up in the same line. I drew the leaves using arcs and lines.
//palm trees
  while (x < width) {
    stroke(149, 99, 71);
    strokeWeight(1.6);
    fill(136, 96, 77);
    rect(x, 53, 5, 45);
    noFill();
    stroke("green");
    strokeWeight(1);
    line(x + 5, 50, x + 20, 30);
    line(x, 50, x - 20, 30);
    line(x, 50, x + 20, 30);
    line(x - 3, 50, x + 15, 35);
    arc(x + 32, 70, 90, 70, PI, PI + QUARTER_PI);
    arc(x + 20, 70, 90, 70, PI, PI + QUARTER_PI);
    arc(x + 45, 55, 90, 100, PI, PI + QUARTER_PI);
    arc(x + 45, 55, 90, 120, PI, PI + QUARTER_PI);
    arc(x + 43, 50, 90, 40, PI, PI + QUARTER_PI);
    arc(x + 20, 70, 70, 40, PI, PI + QUARTER_PI);
    x = x + 50;
  }
I also wanted to create a sunset animation with a circle moving as the sun and the moon appearing slowly. To create a more night effect, I also added stars and it slowly disappears by dawn.
I really liked playing with loops and variables (global & local). For improvements, I would like to add more background objects (clouds, grass..) and play with more functions and loops.
Before working on my assignment I decided to keep practicing with loops to get myself comfortable with it. Once I did I began brainstorming some ideas and after doing research for inspiration I committed to an idea.
As a background, I used a for loop to add a pattern of multiple small lines to give a sort of grainy feeling to this piece of work. After I accomplished this, I used Jeff Thompson’s video on youtube to help me with the animation of the squares. I placed the larger square in the center and had a global variable ‘angle’ that made the shape continuously rotate. After this, I created two rings of squares around the initial square. However, instead of keeping it in the center, I made it move around as well as rotate. I’m not going to lie this wasn’t intentional I was just experimenting and I ended up liking it. This is the piece of code I’m most proud of:
// ring of squares rotating
 for (let a=0; a<radians(360); a+=radians(30)) {
   push();
   translate(140,140);
   rotate(a);   // rotate each by 30º
   translate(0, 80);  // puts it around the center square
   rotate(-angle);  // rotate the other way
   fill(random(0), random(255), random(255), random(255));
   rect(0,0, 25);
   pop();
 }

 for (let a=0; a<radians(360); a+=radians(30)) {
   push();
   translate(140,140);
   rotate(a);
   translate(0, 120);
   rotate(-angle);
   fill(random(0), random(255), random(255), random(255));
   square(0,0, 20);
   pop();
 }
My sketch:
Improvements for next time:
– What I wanted to do but couldn’t achieve in this assignment was change the colors by mousePressed. So next time I’d really like to achieve this.
-I’d also think I should slow down the framerate a bit as the colors are changing too quickly and could cause a headache if you look at it for a long time.
My initial design wanted to consist offer piece that is resembled modern art. I was trying to find loop designs to inspire what I had in mind. I decided to go with this piece of art since the lines dropping from the top kind of symbolize a cage. While the rain that flows shows the idea of gloominess that I was going for. the ball in the middle is vibrant and is just going back and forth Finally escapes the screen. The ellipses on top and on the bottom are constantly Still in the background I placed randomly put ellipses. so while the majority of the painting remains constant there is always something in the background that’s different for every individual.
Methodology
Firstly, I created the function for the ellipses I used in the background. Then I use the draw function to create both the lines and the rain. Additionally, I created the moving ellipses and give it the coordinates on where to start and stop and I did not want it to blend in with the background rather to create a line to show its path I kept in the print code I used to just give a bit of word play to the art piece
Things I Could Improve On
I initially wanted the rain pattern to go fall not only they diagonally to the right but also the diagonally to the left. I also wanted the major ellipses in the middle to have an opposing one falling from top to bottom. I was thinking of also making more ellipses Forming an X shape but I thought that would ruin the piece.
Concept:
For this assignment, I practiced a lot with the new features and made different digital artworks, just to try and play with all the different features and possibilities of loops. Thus, looking at different patterns, I remembered stained glass windows. Stained glass is a special kind of monumental and decorative art. .Stained-glass windows can be considered transparent paintings, drawings, patterns made of glass or on glass.
In the process of getting to know “loop” I discovered the random() function (which is my favorite due to its unlimited possibilities). Before getting to the idea itself, I played around with different shapes and “for” loops.
I tried to recreate like a stained glass picture. As a base, I took an autumn illustration from the internet and uploaded it into my code, after which I created something similar to a stained glass painting using the “for” loop. There were some tutorials from “The Coding Train” and a couple of other sources that I found helpful(https://www.youtube.com/watch?v=ig0q6vfpD38
https://www.youtube.com/watch?v=V56cH9R_X4k).
Reflections&future improvements:
I think that this task helped me a lot to understand correctly the work of for loop, random(), role of each variable and the importance of deep analysis before work. With more experience and practice, I hope to create similar interactive patterns with animations. For example, so that different stained-glass windows change when clicked. In the next works, I want to learn more advanced animations, like creating moving waves (in the form of patterns. )
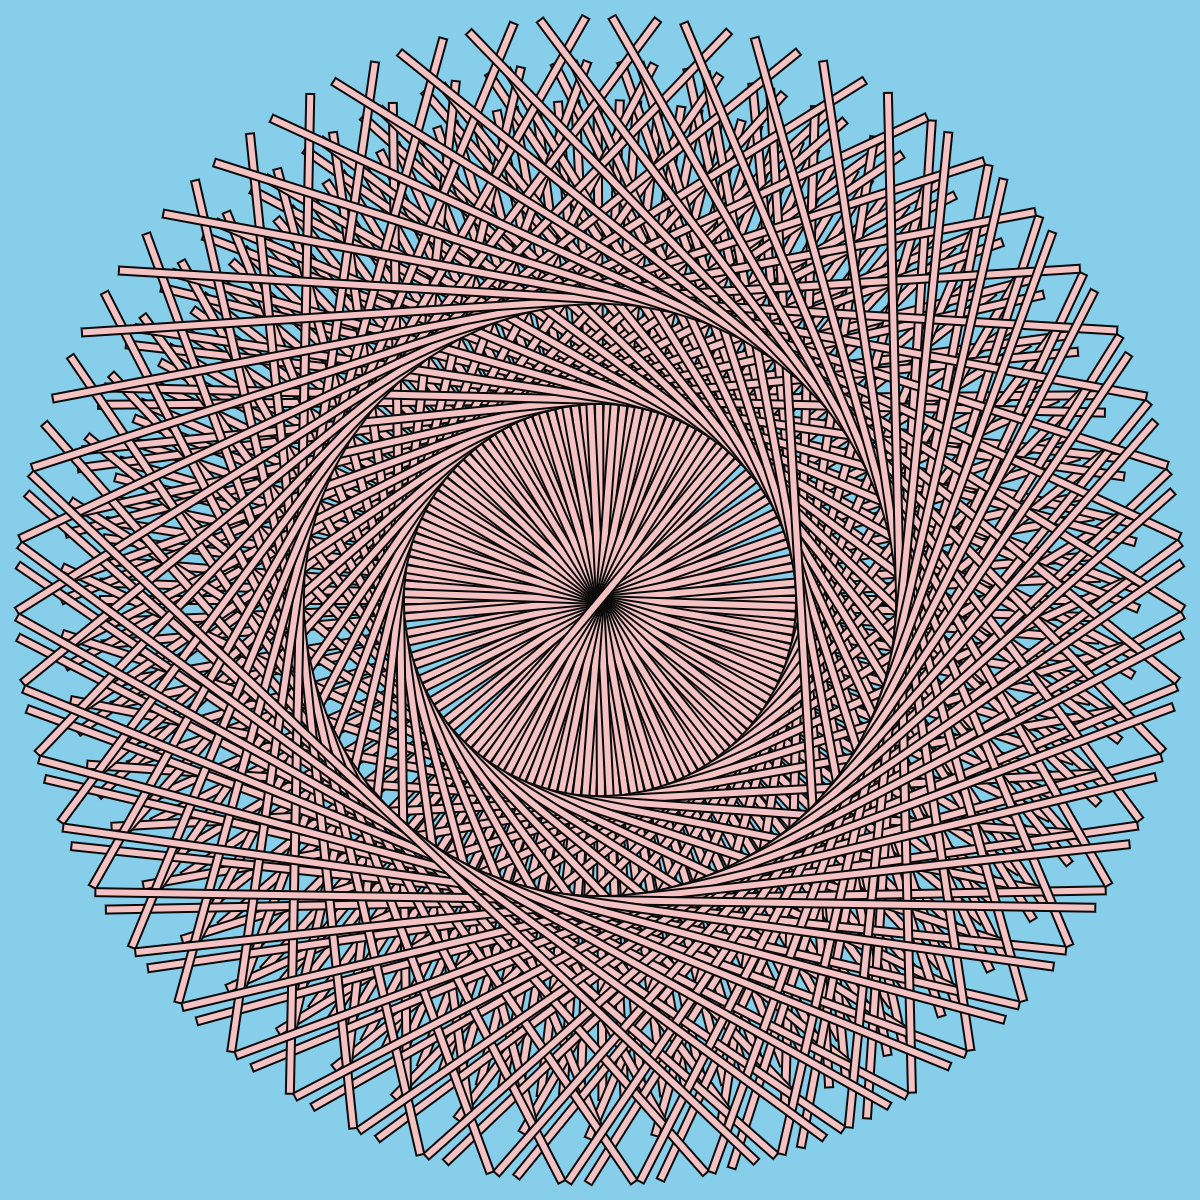
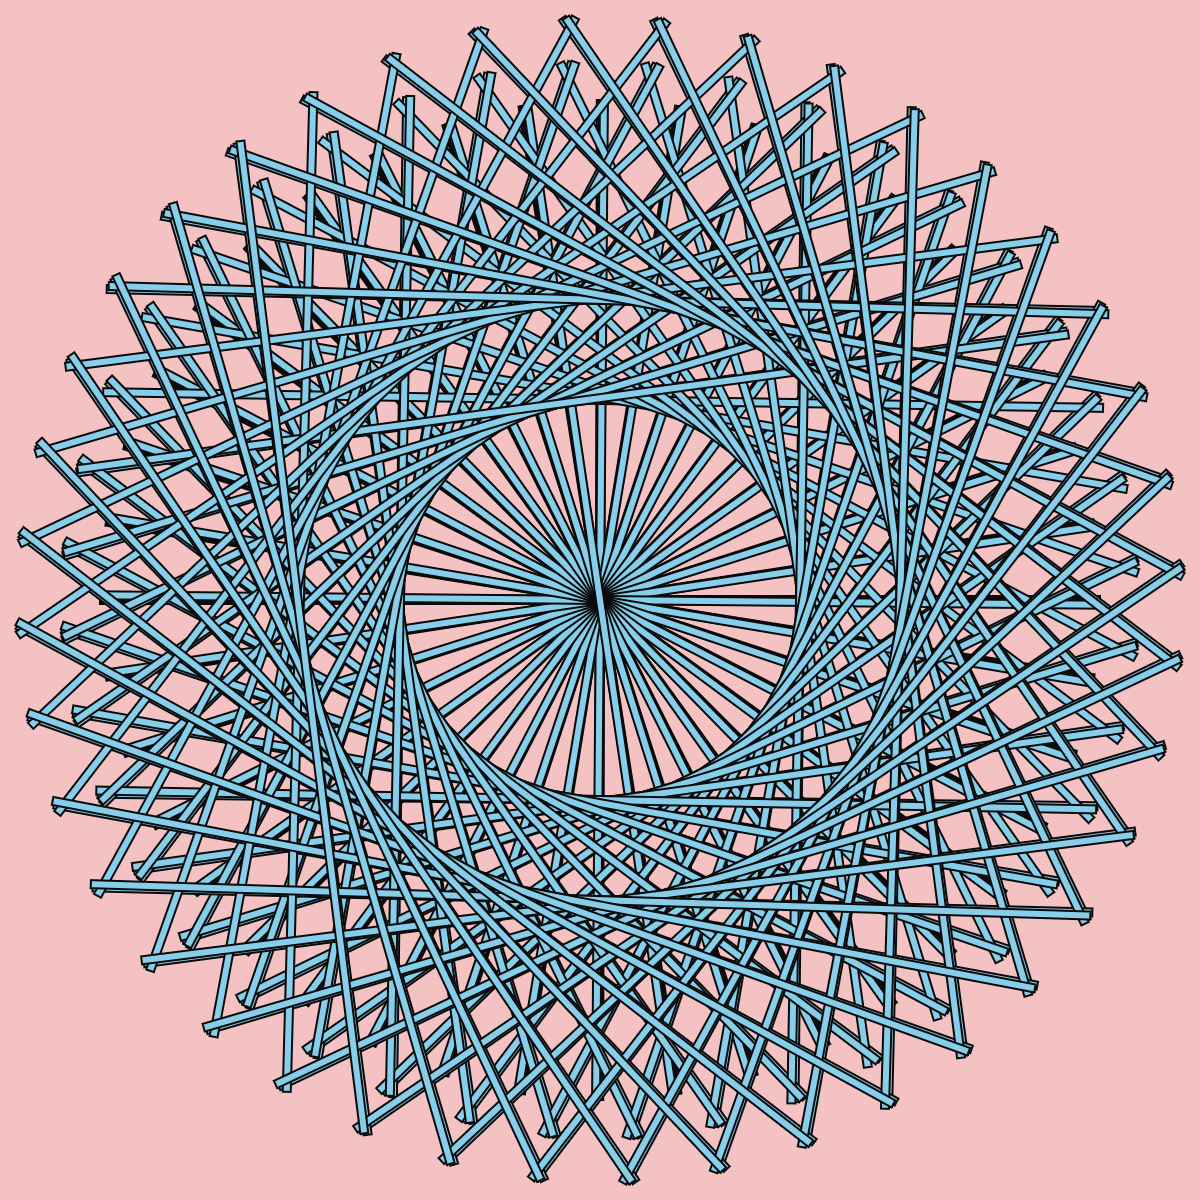
In this assignment, I decided to come up with a simple work of art that represents in some way a great board game that I like to play. Whenever I play chess, I feel that I get detached from this world and find myself in a completely different place. In that new place, I try to find the best strategies to win the game and while doing so I get drowned in my thought. Therefore, I believe that this drawing would show part of the experience I face while playing chess.
In the above drawing, I used squares of a repeating nature to be able to design a chessboard. On top of this board, I added a series of circles with a common center across the different parts of the chessboard. I wanted through these circles to visualize the kind of thought process and confusion that a chess player faces during the game. These circles form a whirlpool which is like what happens to me when my opponent plays a strong move in the game that puts me into a whirlpool of confusion.
Furthermore, I added these wavy-looking lines to the drawing to make it more appealing. I believe that these lines represent the line of thought of a chess player who tries to think about his next five moves before playing his current move. In addition, these lines look like a sound wave that is usually used as a means of communication between two people. This is because I find chess as a way for people’s minds to communicate without them even talking. I was very happy to be able to come up with these wavy lines, you can find the code for these lines attached below.
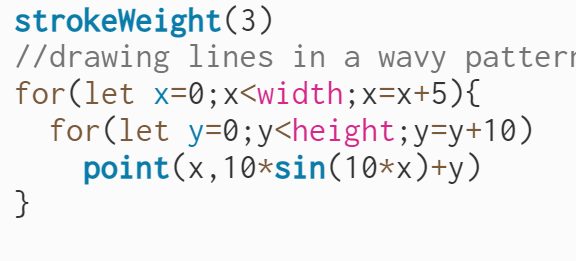
Code for drawing wavy lines
To draw the lines in this way I used two nested for loops and I began by drawing a point, the x-coordinate of this point increments by a value of 5 each iteration. While the y-coordinate is dependent on the x value as I used a sin function to control the position of the points in the next iterations. Using only one for loop I would have been able to come up with only one wavy line. However, to come up with these lines along the whole canvas I decided to use another for loop that controls the vertical translation of the sin function.
Possible Improvements
I was so satisfied to come up with this artwork and was not expecting it to look this way when I first thought about it. However, I believe that this drawing needs a bit more work to look better and more satisfying for the viewer. I feel that by looking at the drawing for a long time the viewer might find it confusing. Therefore, to make it look better to the eye I might decrease the number of lines intersecting each other in the drawing. In addition, by adding animation to the waving lines and being able to come up with spiral-looking whirlpools instead of circles I might be able to deliver my message in a better way.