It took me some time to come up with the idea for my final project. I could not decide for sure because while most of my peers were either expanding their midterm project or creating a game that would use Arduino as a user-control input, I wanted to create something that correlated with my interests and would be more unique for my developer experience. Thanks to the assignment where we needed to find out the way to control music with the Arduino sensor, and my love for music, I decided to do something associated with music, particularly enhancing its experience.
Since childhood, I have always liked to play with music controls. At some point, I even wanted to become a DJ. While such a dream never came true, a couple of weeks ago I realized that I could utilize Arduino to create something similar to the DJ panel (a simplified version of it). Moreover, I can make images on the computer to interact with the music and visualize it. After thorough research, I found out that there is a built-in p5.js library that allows to work with the sounds. This is exactly what I needed.
My project now consists of the physical part – the box powered by Arduino controls and sensors that allow a user to interact with music and the p5.js, and a digital visualization that is based both on the user actions and the music characteristics (which can also be changed by the user to the certain extent).
Project Demonstration
Implementation
Interaction Design:
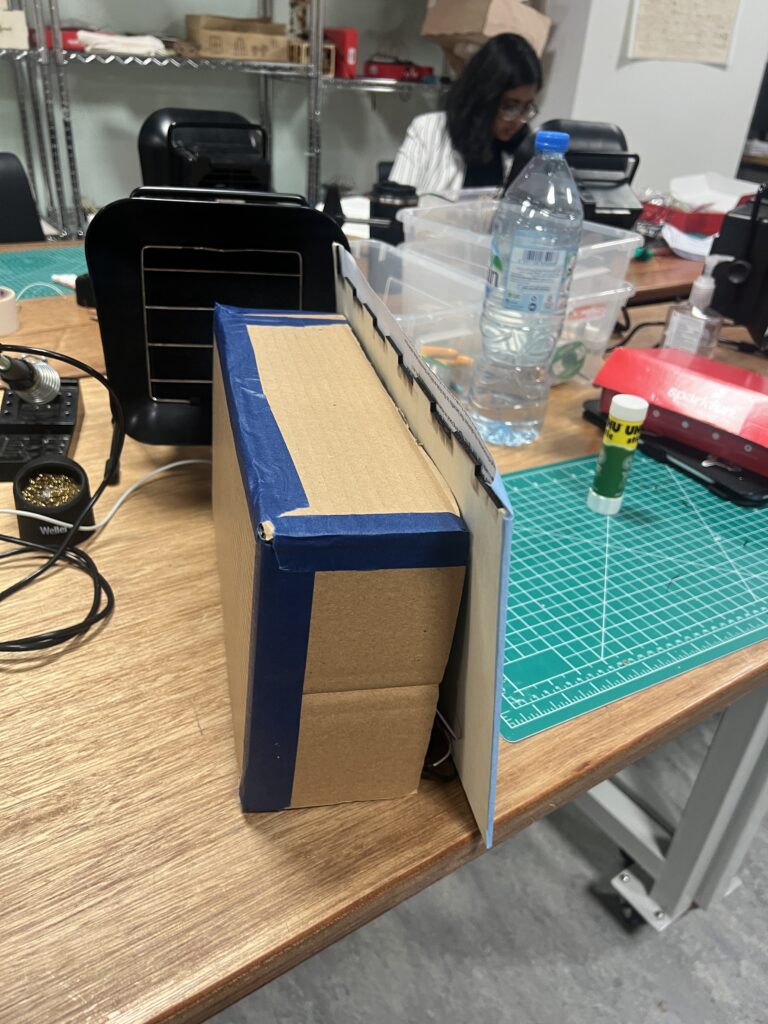
A user interacts with the Arduino through box that has a number of input controls.
– 3 buttons on the right side turn on 3 different songs
– 3 buttons on the top provide control over the visualization of music style and effects on the digital screen
The red button in the top left corner is a play/pause button
– White and Black buttons on the left increase and decrease the pitch speed of the music
– Potentiometer controls the volume
– Ultrasonic Distance Sensor controls the High Pass and Low Pass filters
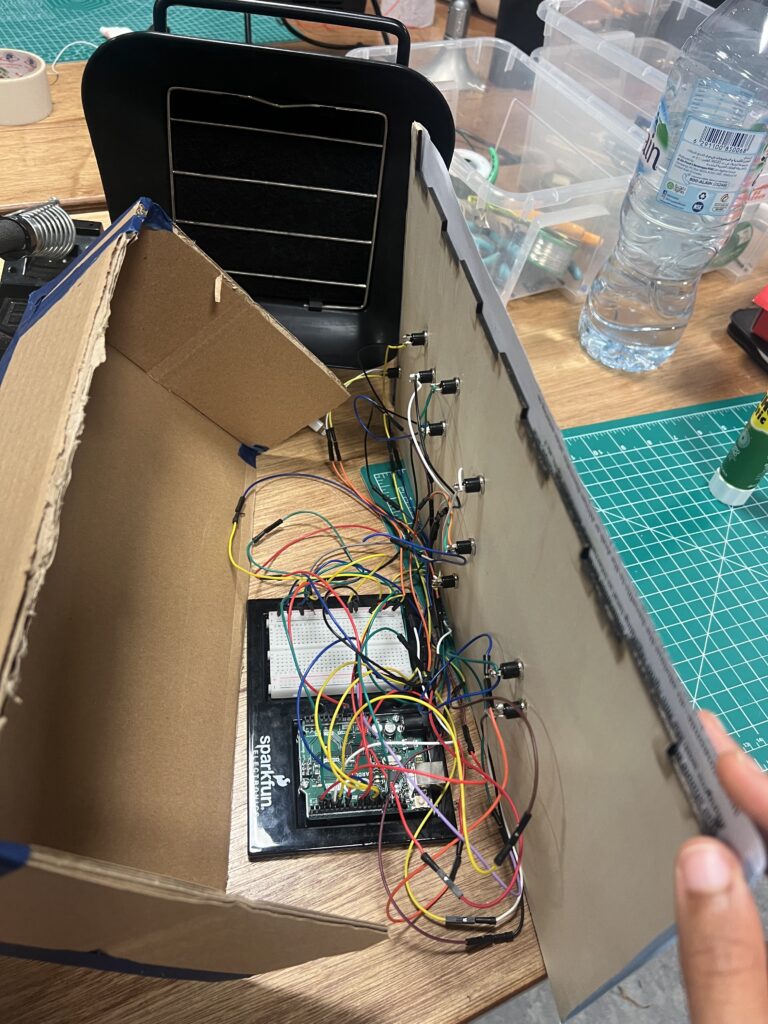
The input from Arduino through Serial Communication allows to influence the music as well as the image that is generated inside p5.js.
Code:
p5.js: Using the p5.FFT the music characteristics are converted into the image. My code analyses the music, e.g. frequencies, and creates a dynamic visualization. There are 3 main music visualizers that I created – Circle (set by default), Sunburst (can be turned on/off using the button), and Particles (set by default, can be switched off). All of those patterns are based on the same idea of synchronizing with music amplitude. Function fft.getEnergy() measures the bass range in Hz. The value then passed further and is used to control the waveform of the Circle, length of lines of Sunburst, and speed of Particles.
Additionally, I leveraged the knowledge from the previous projects to equip Sense of Music with features like a fullscreen toggle or Rotation effect that can also be activated by pressing the corresponding button. Moreover, as a bonus, I decided to incorporate one of my favorite projects of this semester into Sense of Music. The Lines’ visual effect, although is not influenced by music, can be activated using one of the buttons as a substitute for Particles. Personally, I enjoy combining the Lines with the Rotating effect.
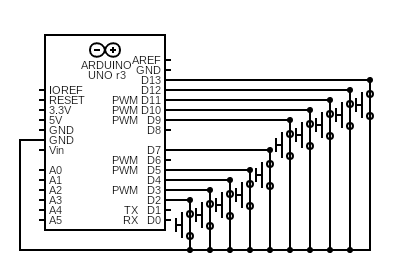
Arduino: Code for Arduino is quite straightforward as well as the connections on the board (see the schematic below). I am really glad I learned how to use and connect potentiometers and ultrasonic distance sensors in class, so I had no problem with intuitively using them for my project.
I am extremely happy with the final project that I have created. More than that, I am happy and thankful for the Intro to IM class and professor Mang for helping and assisting me through the whole semester. I learned a lot in this class. More specifically, I, in some way, stepped out of the environment I got used to by constantly making myself think outside the box and create something unique, something that can be called interactive art. Other than that, the most difficult part for me was creating the physical box and setting up the buttons and sensors on it. The last time I did something similar was in middle school, so I had literally 0 knowledge of how to approach it. However, I managed to figure out a way to create schematics of the box and print them using the laser cut and connect the wires and buttons using glue. I am still very far away from being close to the results I would like to achieve, but for now, I feel like I made progress and reached the goals I set for this class at the beginning of the semester.
Speaking of my final project, Sense of Music was a great idea, and its implementation was good but not perfect. While the code was not a problem, there is still a lot to build on top of what I have for now to further enhance the user experience. The same goes for the physical parts – the box and the DJ panel. I could make them look more aesthetic and pleasant by using different styles of buttons, perhaps adding more colors to the box, etc. Unfortunately, the time was very limited, especially considering my trip to Shanghai that took the whole National Holiday break. Nevertheless, I am satisfied with the results, and as I see it, the fact that there is a lot of room for project improvement shows that the idea is actually great.
From the design to implementation phase I am rather satisfied with how close I was able to stay to my original concept. In the design phase I knew I wanted to create some type of map interaction with different countries and songs for users to dance too. When conceptualizing this project, my mind kept returning to the alphabet/poem rain installation we saw in the first half of the semester. I think it’s the best example we’ve seen of interactive art where there’s a message and a strong interactive component. Although, I was not able produce something of that quality, I am nevertheless pleased with way in which I combine meaning and interaction in my piece.
As a study away student being immersed in NYUAD’s vibrant culture has genuinely changed my perspective of the world. Growing up in New York City, and the US in general I’ve been taught a very specific definition of what diversity looks like and being a student here has completely redefined that for me. Thus, as the semester comes to a close, I thought this project would be a perfect way for me to share a glimpse of what I’ve come to appreciate so much.
Design
As I mentioned previously, throughout the design process I had a pretty clear idea of what I wanted to create. There were other features that I considered in order to strengthen the interactivity such as body tracking or a point system but I settled on a simpler design to ensure maximum functionality. Nevertheless I took a lot of inspiration from the video game Just Dance, and tried to consider that level of interaction throughout the design and implementation process.
Implementation
Once I began the ‘build’ process the difficult part was just in mainly getting started. Surprisingly enough, I also had a hard time figuring out what songs/countries would be represented. The hardware, although rather simple, tested a lot of skills in terms of soldering and using tools I’m not super familiar with so I’m glad I was able to use what we learned in class to my advantage. Furthermore, this is the first time I’m working with any kind of hardware components on top of software design so it took a bit of creativity to consider what materials I wanted to use to make my vision come alive.
Caption: I originally had a ton of extra wires because I thought I wanted to extend the Arduino behind my computer but after assessing the material available, I shorted them and added this box to tuck them away. – Phase 2
My prototype consisted of just using the map itself and a few switches to test both the hardware and software. Once that was good to go, my main concern became ‘cleaning up the look’ so that I had a clear, finished project to present. This was rather easy, I just needed to identify areas of concern, and figure out how I could further simplify them.
Prototype video from user testing – no sound
In terms of software implementation, once I decided how I wanted to exchange information between P5 and Arduino, I was able to make significant progress in my code. Basically, when a button on the map is pressed, a flag corresponding to that country in Arduino is sent to P5 which then sets a series of commands off to play it’s respective video. However, a major road block that I hit was the 5 MB upload limit to video files in P5. My solution to this problem is fairly simple, but the route I took to get there was very long and complicated (as is most debugging). I eventually was able to implement an array based system to cycle through clips of each video so that they could all play as one.
Schematic
Arduino Code
int colombiaButton = 13; // Button connected to pin 13
int indiaButton = 12;
int koreaButton = 11;
int chinaButton = 10;
int italyButton = 9; //black button with whie & blue wire
int prButton = 7; //yellow button with green and blue wire
int saButton = 5; //green button with white and yellow
int nigeriaButton = 2; //red button with orange and green
int kazakhButton = 3; //blue button with green wires
int fpButton = 4; //black button yellow and white wire

void setup() {
  // Start serial communication so we can send data
  Serial.begin(9600);

  // Configure the button pin as input with pullup
  pinMode(colombiaButton, INPUT_PULLUP);
  pinMode(indiaButton, INPUT_PULLUP);
  pinMode(koreaButton, INPUT_PULLUP);
  pinMode(chinaButton, INPUT_PULLUP);
  pinMode(italyButton, INPUT_PULLUP);
  pinMode(kazakhButton, INPUT_PULLUP);
  pinMode(prButton, INPUT_PULLUP);
  pinMode(saButton, INPUT_PULLUP);
  pinMode(nigeriaButton, INPUT_PULLUP);
  pinMode(fpButton, INPUT_PULLUP);
}

void loop() {
  // Check if button is pressed
  if (digitalRead(colombiaButton) == LOW) { // Button pressed (active low)
    Serial.println("colombia"); // Send "push"
  } else if (digitalRead(indiaButton) == LOW) {
    Serial.println("india"); // Send "push"
  } else if (digitalRead(koreaButton) == LOW) {
    Serial.println("korea"); // Send "push"
  } else if (digitalRead(chinaButton) == LOW) {
    Serial.println("china"); // Send "push"
  } else if (digitalRead(italyButton) == LOW){
    Serial.println("italy");
  } else if (digitalRead(prButton) == LOW){
    Serial.println("pr");
  } else if (digitalRead(saButton) == LOW){
    Serial.println("sa");
  } else if (digitalRead(nigeriaButton) == LOW){
    Serial.println("nigeria");
  } else if (digitalRead(fpButton) == LOW){
    Serial.println("fp");
  } else if (digitalRead(kazakhButton) == LOW){
    Serial.println("kazakh");
  } else {
    Serial.println(0);
  }
  delay(150); // Debounce delay
}
Overall, I am pretty proud of my final product. What I struggled with the most in the midterm was designing realistic plans for my project which left feeling overwhelmed throughout the implementation process. Throughout this process, I gave myself enough space to design new ideas while staying focused on what my original plan was which I think really helped the overall process.
A more concrete component I am proud of this the solution to the file size upload issue I faced earlier. I did a lot of reading on StackOverflow and random P5 forums to help me solve the issue and so even though it isn’t perfect I am really happy with how it turned out.
Future Improvement
In terms of future improvement, I would love to incorporate more way to encourage people to physically react. Although in my user testing people were active and participating, I feel as though if I wasn’t standing there, watching, they wouldn’t necessarily feel as inclined to do so. To help alleviate this I did try to replicate a dance mirror effect when the videos play so users felt incentivized to dance, but I’m sure I could go even further to record them dancing and then have the program send it to them or add it to some dance database which they might enjoy being a part of.
Concept Overview: This project is an interactive maze game where players use a joystick connected to an Arduino Uno to navigate a ball through a maze displayed on a p5.js canvas. The game includes challenges like obstacles, a life system (represented by heart icons), and sound effects for feedback. The player wins by reaching a target point in the maze. The game tracks the fastest time for completion and the fastest time is also displayed. The walls are obstacles where the player loses a life when they touch the wall. This is to increase difficulty of the game and make sure players have to be careful while navigating the maze.
Arduino Program Design Inputs:
Joystick (HW 504):
VRX (X-axis): Controls horizontal movement of the ball.
VRY (Y-axis): Controls vertical movement of the ball.
SW (Button): Can be used to reset the game . Serial Communication:
Sends joystick X and Y axis values to the p5.js program.
Serial Data:
Sends joystick data in the format x,y to p5.js.
Arduino Logic:
Read X and Y values from the joystick.
Send the data via serial to p5.js in the format x,y.
Arduino Code:
void setup() {
  Serial.begin(9600); // Initialize serial communication at 9600 baud rate
}

void loop() {
  int xPos = analogRead(A0); // Joystick X-axis
  int yPos = analogRead(A1); // Joystick Y-axis

  // Map analog readings (0-1023) to a more usable range if needed
  int mappedX = map(xPos, 0, 1023, 0, 1000); // Normalize to 0-1000
  int mappedY = map(yPos, 0, 1023, 0, 1000); // Normalize to 0-1000

  // Send joystick values as CSV (e.g., "500,750")
  Serial.print(mappedX);
  Serial.print(",");
  Serial.println(mappedY);

  delay(50); // Adjust delay for data sending frequency
}
P5.js Logic Game Start:
Display a start screen and wait for mouse click or button press to begin. Joystick Integration:
Map joystick X and Y data to control the ball’s position on the canvas. Collision Detection:
Check for collisions with obstacles and deduct a life upon collision. Game End:
Display a victory or loss message based on game outcomes.
Code for handling serial data:`
function handleSerialData() {
  let data = serial.readLine().trim(); // Read and trim data
  if (data.length > 0) {
    let values = data.split(",");
    if (values.length === 2) {
      joystickX = Number(values[0]);
      joystickY = Number(values[1]);
    }
  }
}
Reading Graham Pullin’s ‘Design Meets Disability’ made me rethink how we view assistive devices and how much design influences our perception of them. Pullin argues that assistive technology doesn’t have to be just functional—it can also be beautiful, creative, and reflective of individuality. This idea stood out to me because it flips the usual way we think about devices like hearing aids, wheelchairs, or prosthetics. Instead of being tools to hide or blend in, they can be seen as things that people can show off and be proud of, just like any other accessory or piece of technology.
One example Pullin mentions is hearing aids and how they’re often designed to be invisible. I never thought about how strange that is—why do we feel the need to hide something that helps people? What if hearing aids could be stylish, like jewelry, or customized to fit someone’s personality? It’s a simple shift in thinking, but it makes such a big difference. It reminds me of how glasses used to be seen as embarrassing, but now people wear bold frames to express their style. Why can’t assistive devices evolve in the same way? It’s not just about function; it’s about identity and empowerment.
This idea also connects to the bigger issue of how design often caters to an ‘average user, which leaves a lot of people feeling excluded. Pullin’s focus on inclusive design challenges that by showing how products can be more adaptable and personal. It made me imagine what prosthetic limbs could look like if they were designed with personality in mind—like having different patterns, colors, or even glowing lights. A prosthetic arm could be just as much a fashion statement as a designer handbag or a cool pair of sneakers. This would help break down the stigma around disability by celebrating the creativity and individuality of the people using these devices.
Pullin also makes a really interesting point about beauty. He argues that beauty doesn’t have to mean perfection. Instead, it can come from things that are unique, unexpected, or even imperfect. This reminded me of the Japanese concept of wabi-sabi, which finds beauty in imperfection and the natural flow of life. If we applied that to assistive technology, we could design devices that are not only functional but also artistic and meaningful. For example, a wheelchair could have a sleek, futuristic look, or a prosthetic leg could be designed with intricate patterns that make it stand out in a good way. These designs could change how people think about disability, not as something to pity but as something to appreciate and admire.
In the end, Pullin’s book shows that design is never just about solving problems—it’s about making statements and shaping how people see the world. By bringing creativity into assistive technology, we can create a world that’s not only more inclusive but also more exciting and diverse. Design Meets Disability opened my eyes to how much potential there is in rethinking design and how even small changes can make a huge difference in people’s lives.
I am ECSTATIC to say that I am finally done with this project! It has certainly been a dynamic experience.
As I had proposed, I thought of incorporating one of my favorite things ever into my final project – my love for penguins. Therefore, I decided to create a fun little game where a Penguin called Pengu, has to jump over platforms — inspired by the Doodle Jump game.
A lot has changed since my previous User Proposal, as my idea now is fully fleshed out/ In terms of the game itself, the primary objective is for Pengu to hop on different platforms till the timer ends — the person is supposed to last sixty seconds in the game. If the penguin falls off – then they lose.
In terms of the physical implementation, this game has four buttons: Restart, Left, Right, and Jump.
There are several challenges I faced, most of them mainly to do with the game itself rather than the arduino.
For example, I was struggling with generating the actual platforms for the penguin to jump on. After I added the special ‘disappear’ platforms, it felt like the screen was being overcrowded. In addition, sometimes, the penguin would start on a disappear platform and therefore lose the game immediately, so I decided on a set of three normal platforms for the penguin to jump on at the start of the game.
I also had struggled with making the platforms disappear once the penguin moved up, and ,make new ones appear. However, my friend had taught me about a handy concat built in function and filter, and as well as the spread operator, which I actually ended up finding useful and using it here now.
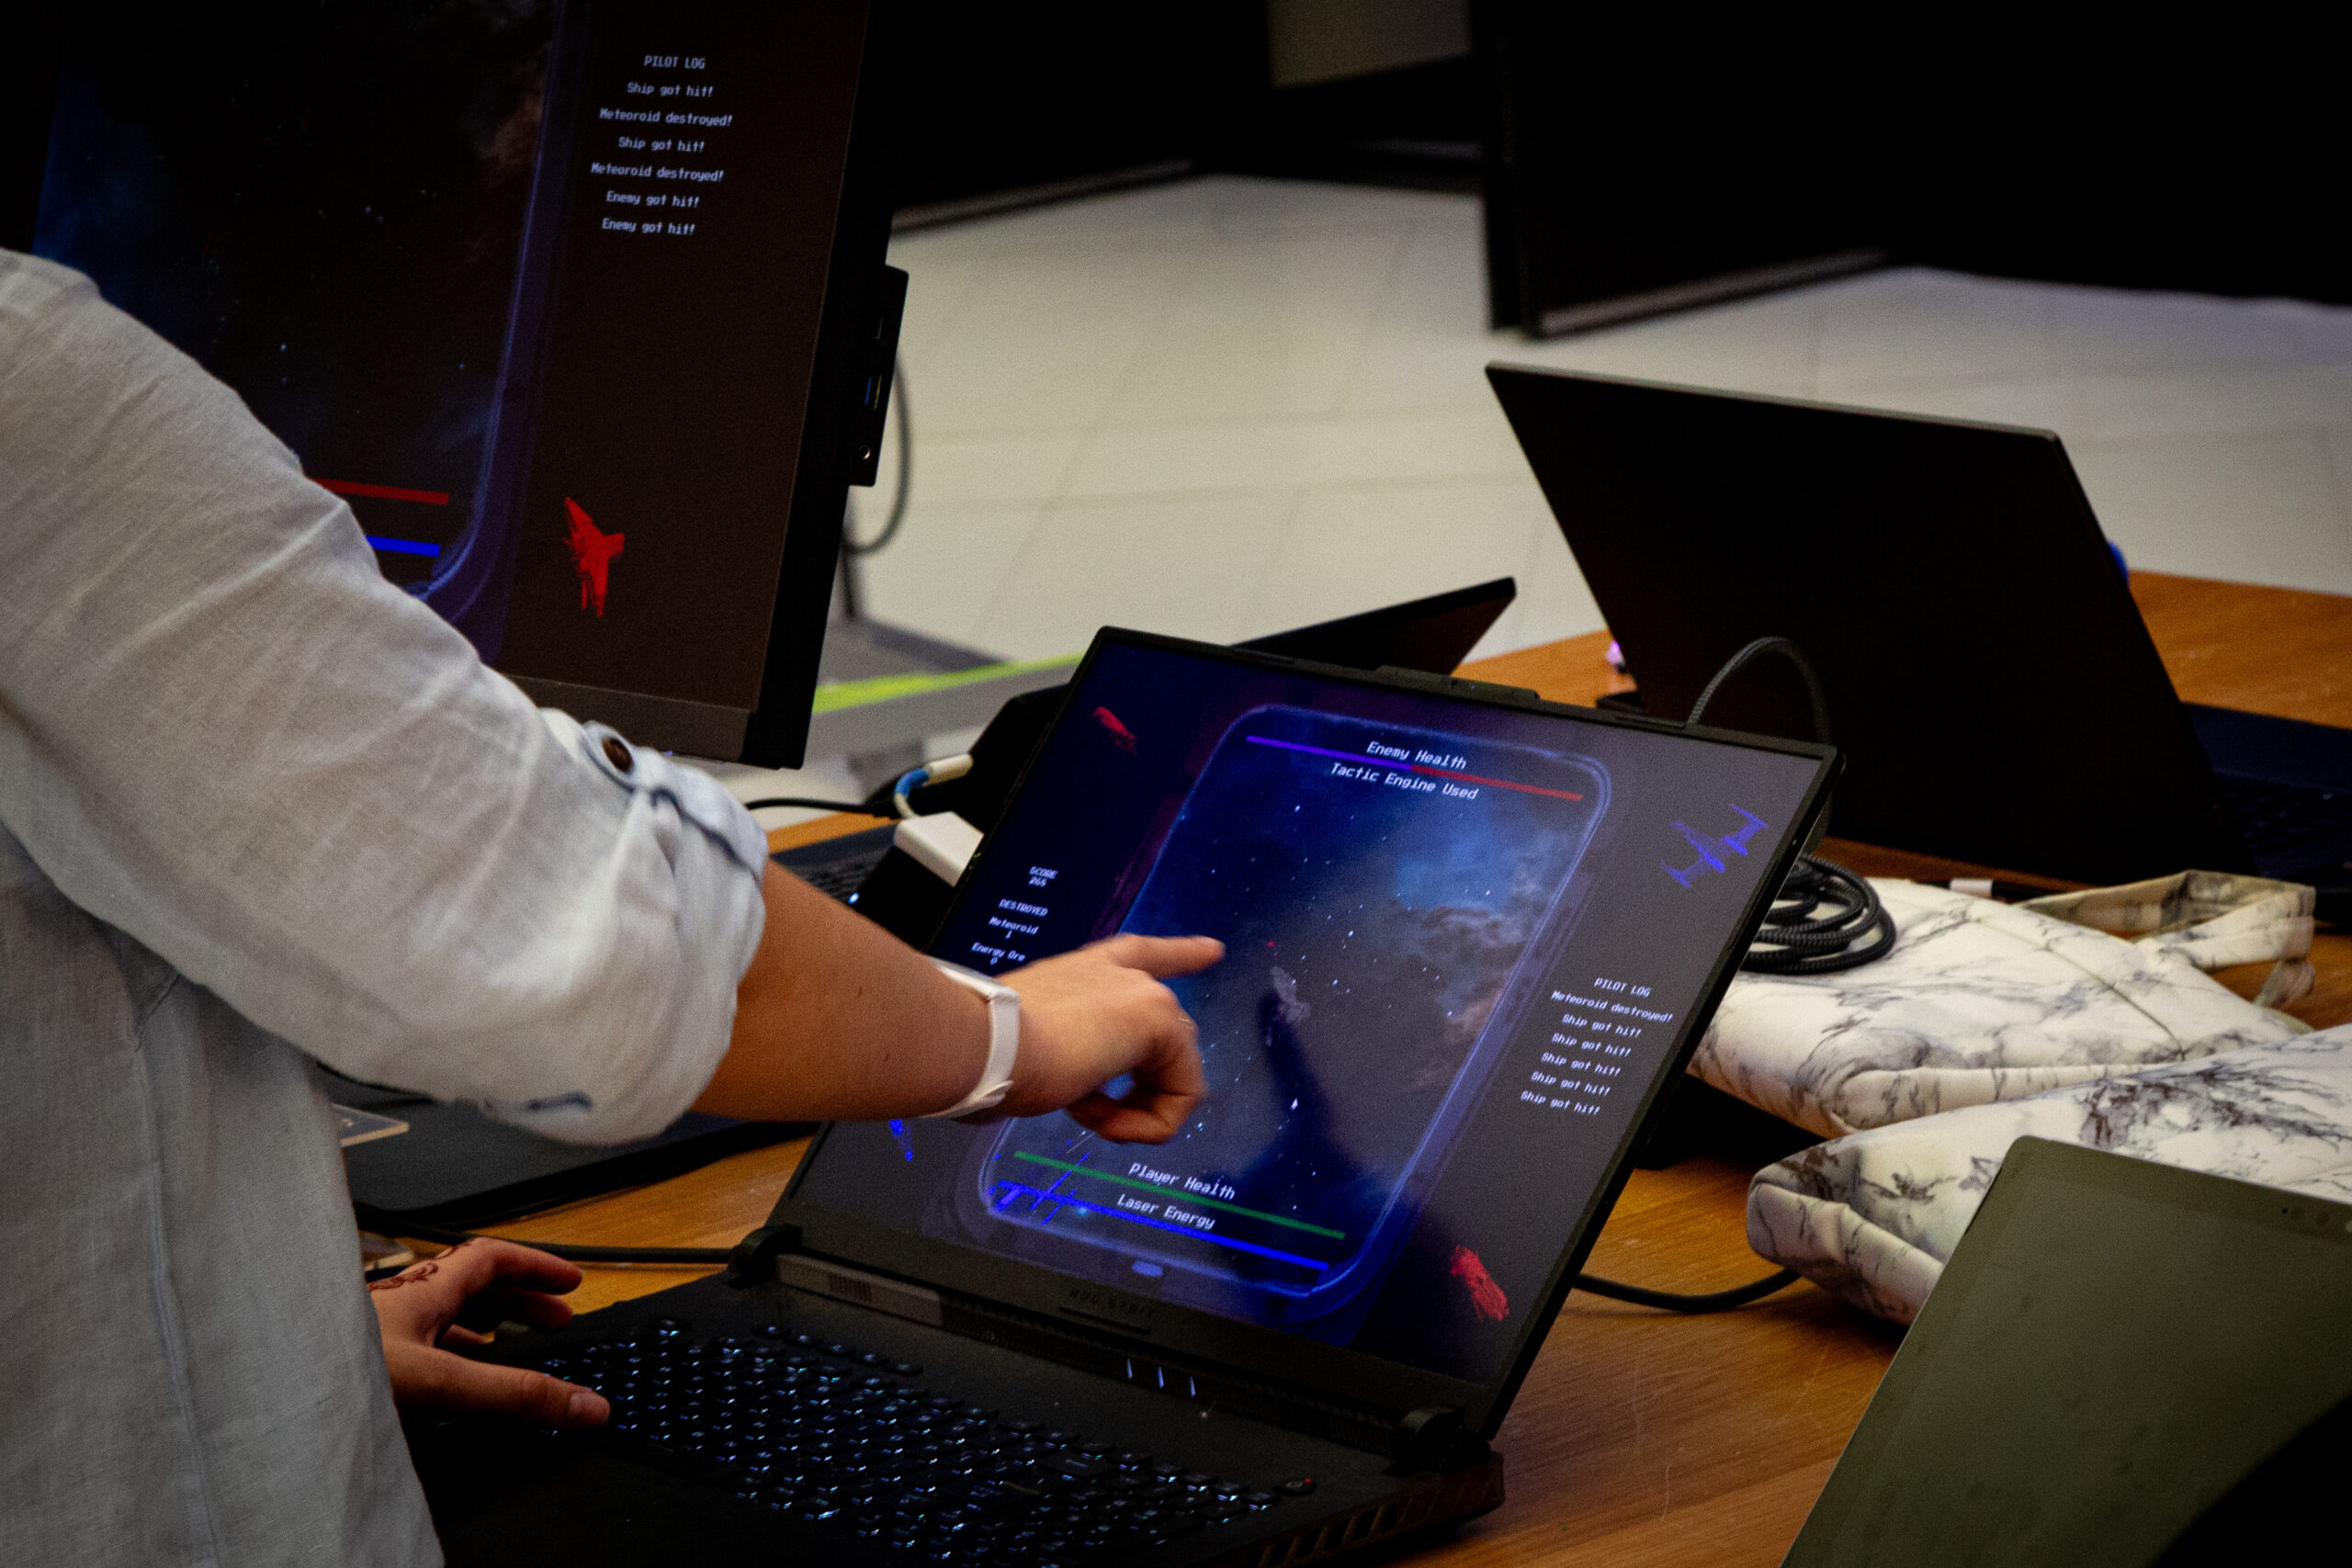
The initial idea of my final is to transform my midterm project from an offline PvE game into an engaging online PvP experience. Building upon the PvP framework, I realized in the first weeks working on the final that the latest concept incorporates a physical robot to seemingly operate one of the players within the game. This dual-player setup creates a dynamic competition between a human-controlled player and a robot-controlled player, leveraging the newly established online PvP mechanism. As the physical installation is actually an illusion, the project also serves as a mind experiment to observe to what extent users will discover the installation during the experience.
2. Project Demonstration
3. Implementation Details
Interaction Design
The key components include:
Game Logic (p5.js): Manages game states, player actions, and AI behaviors.
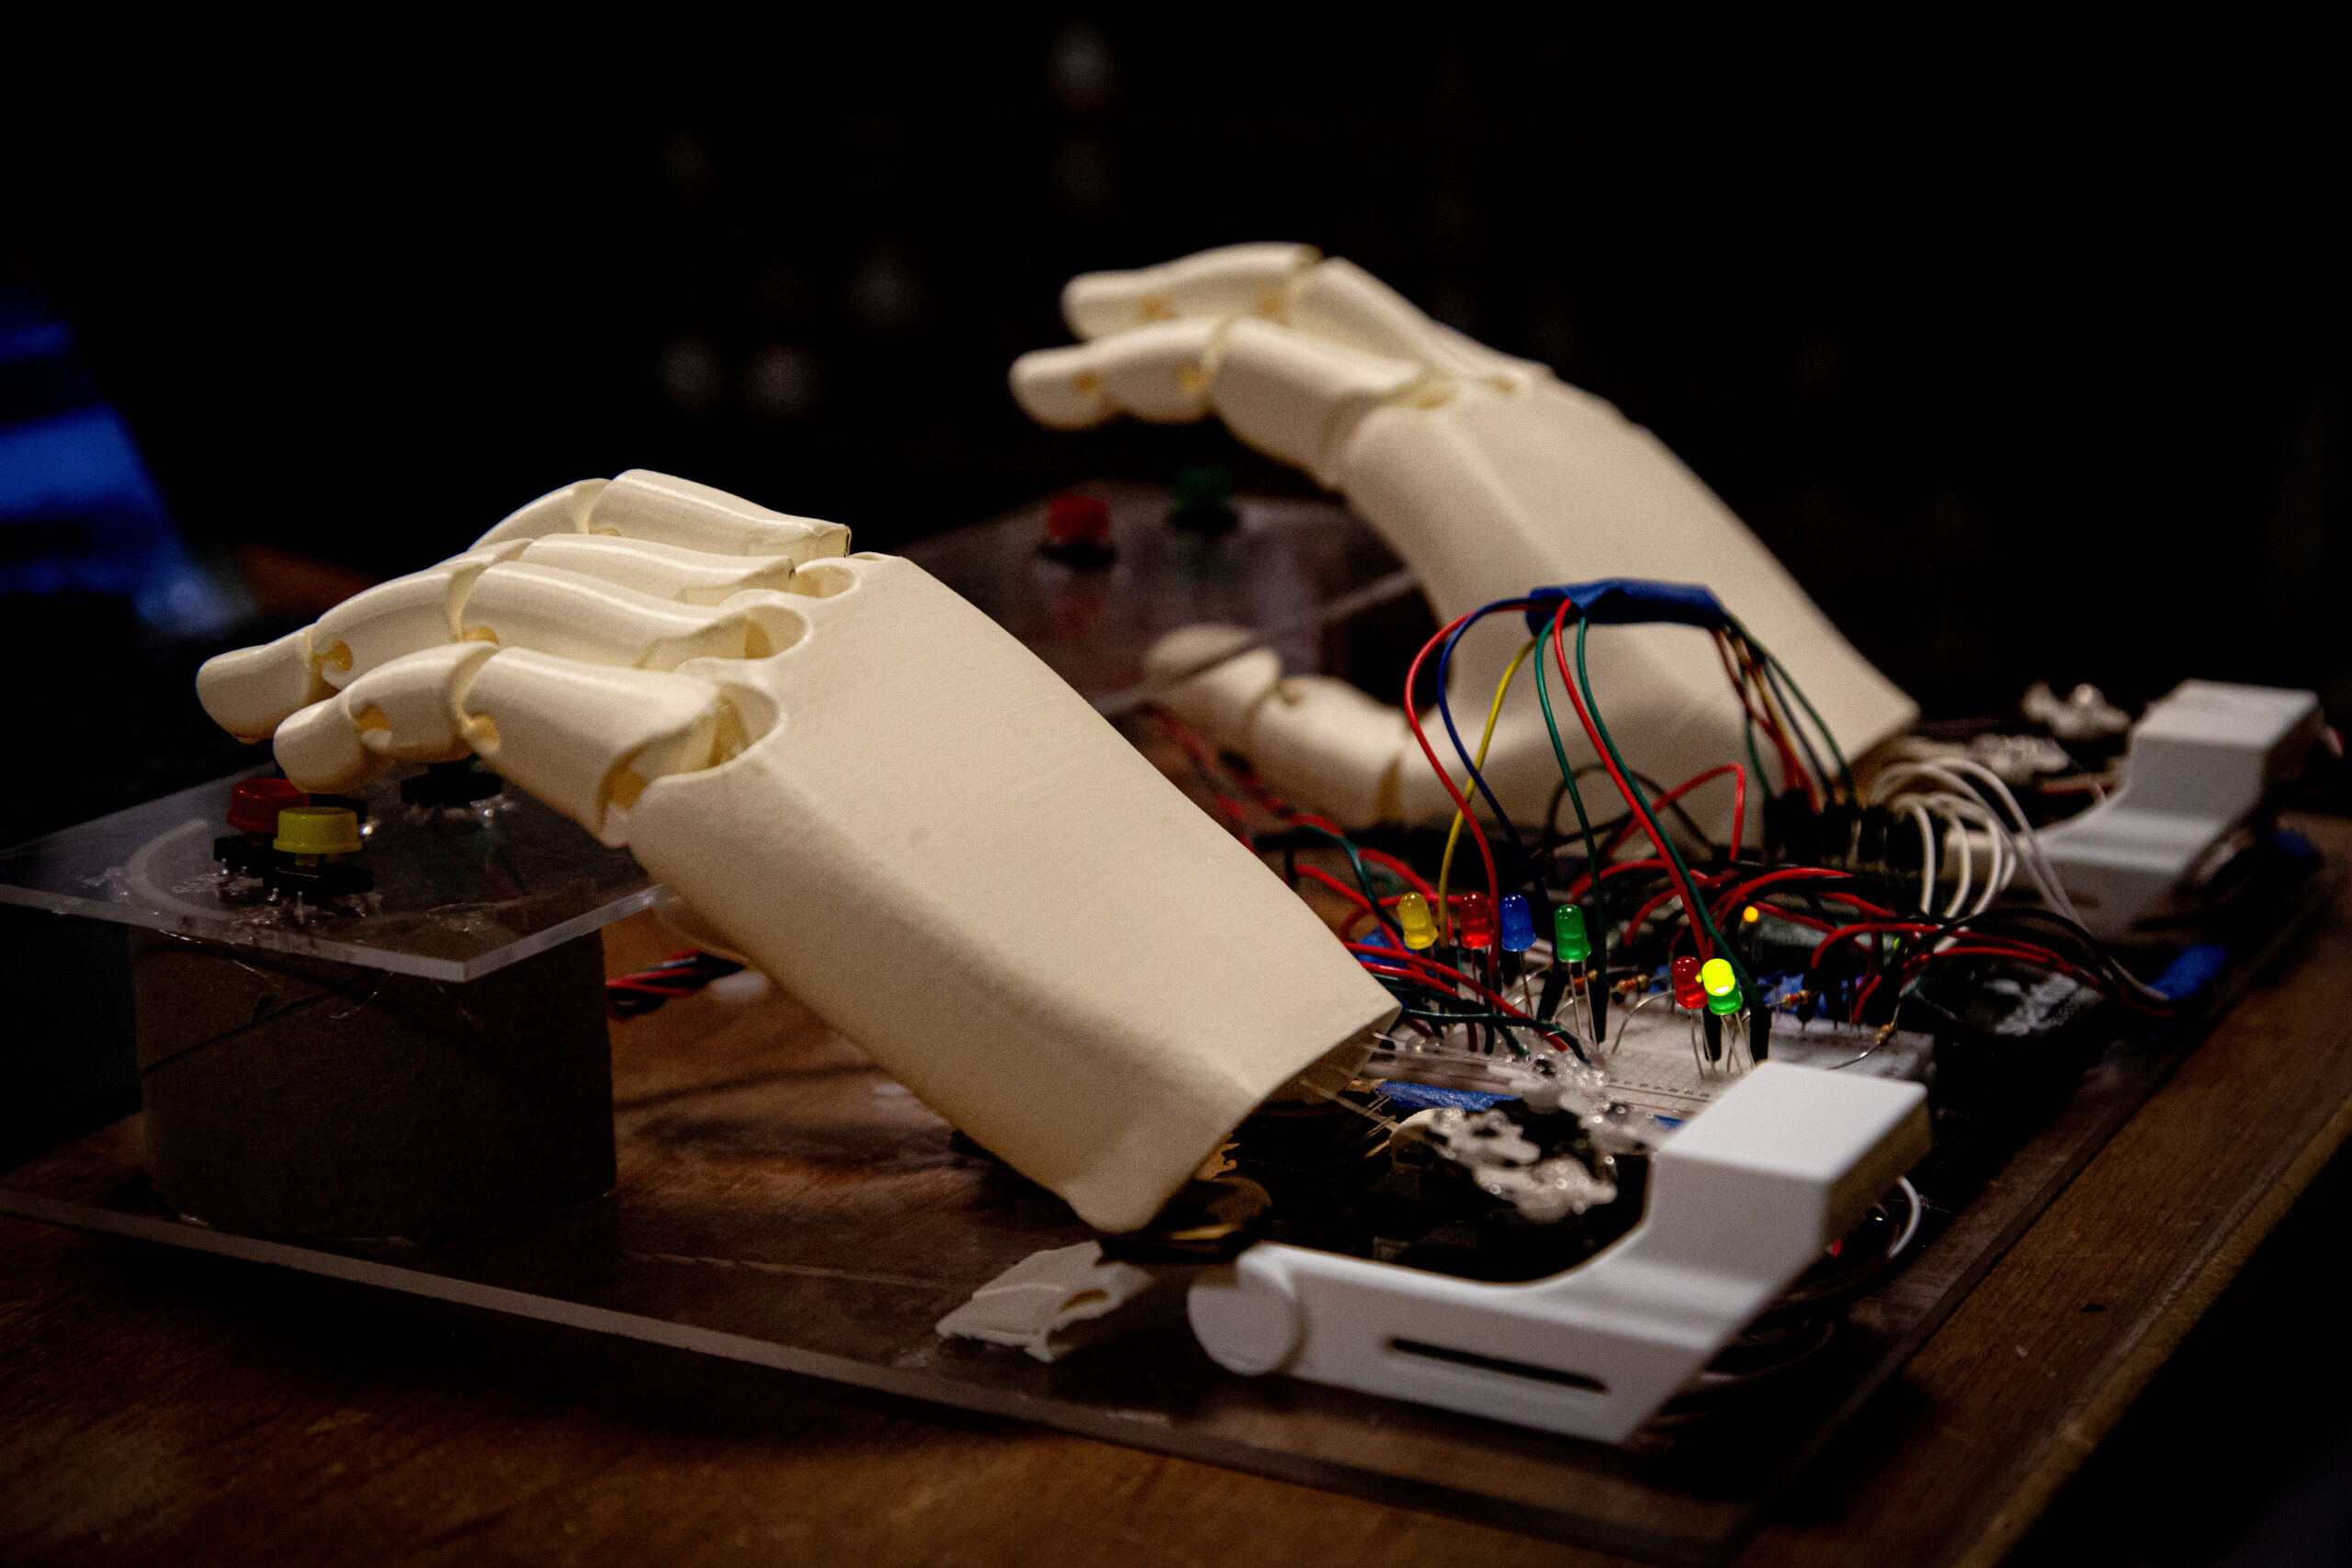
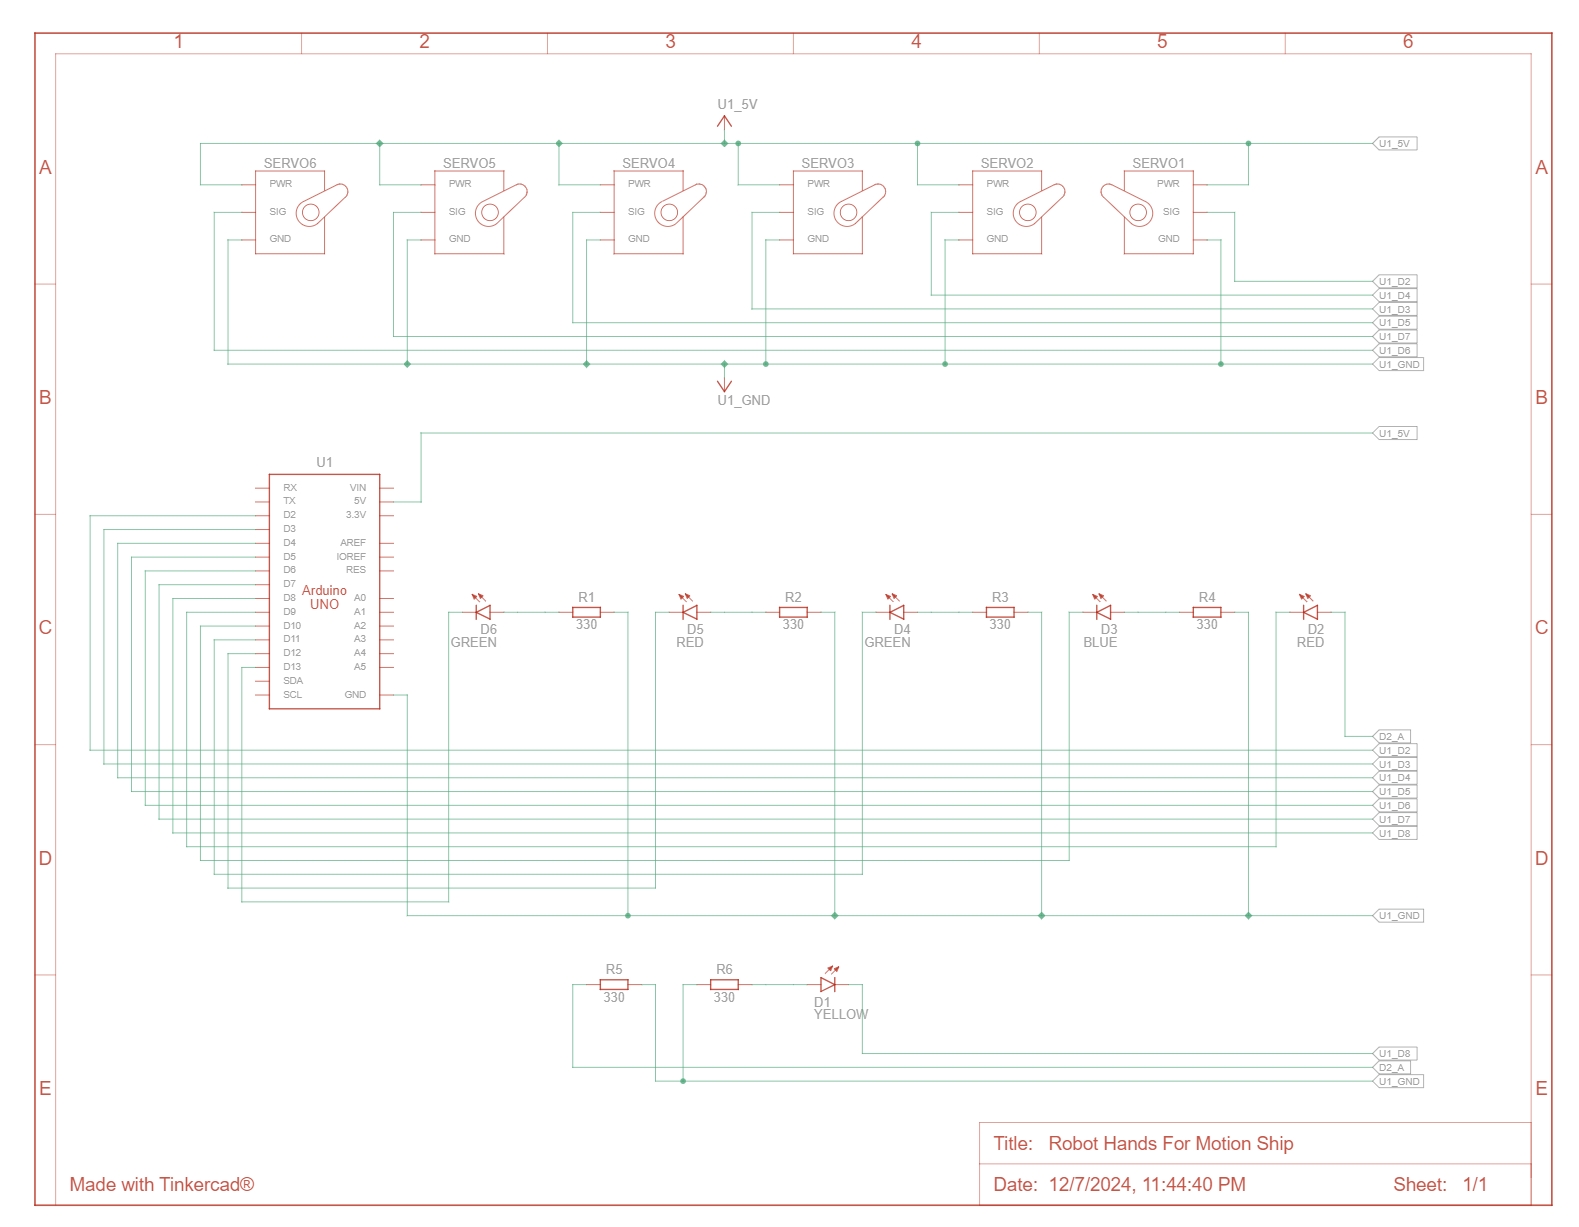
Robot Hand (Arduino): Translates game commands into physical movements by controlling servos that simulate key presses.
Serial Communication: Facilitates real-time data exchange between the p5.js application and the Arduino-controlled robot hand, ensuring synchronized actions.
Physical Installation and Arduino Integration
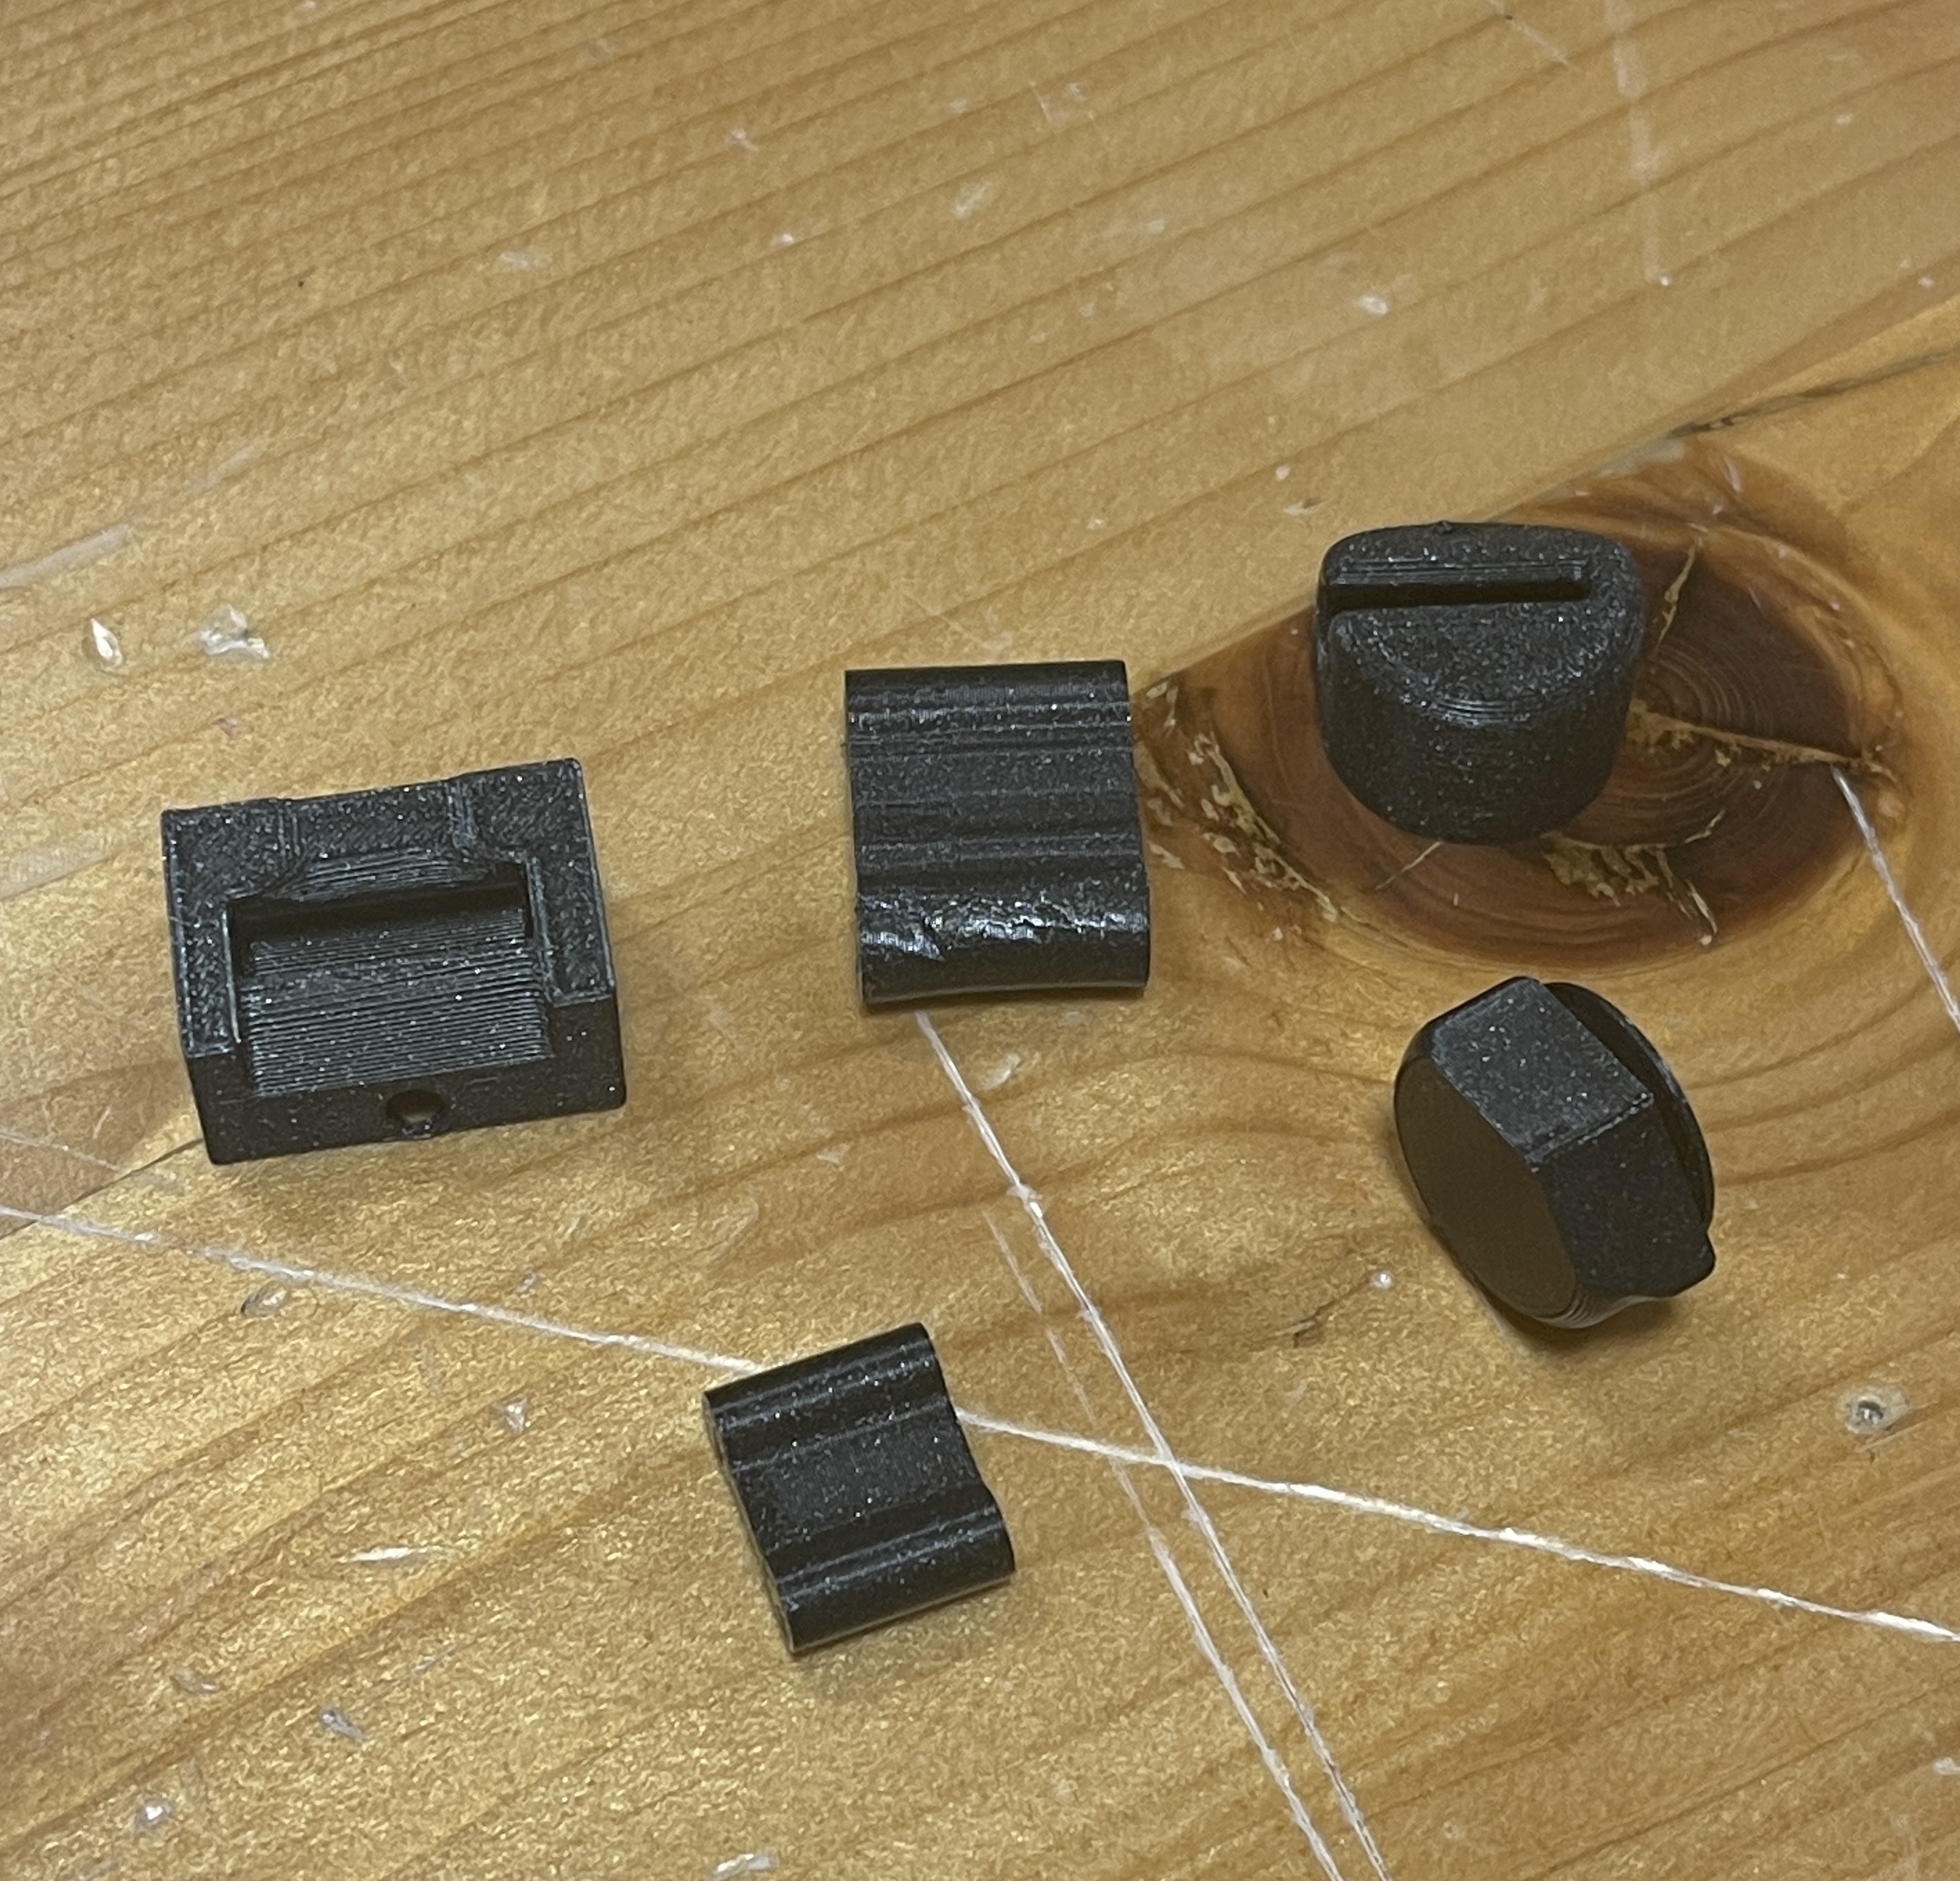
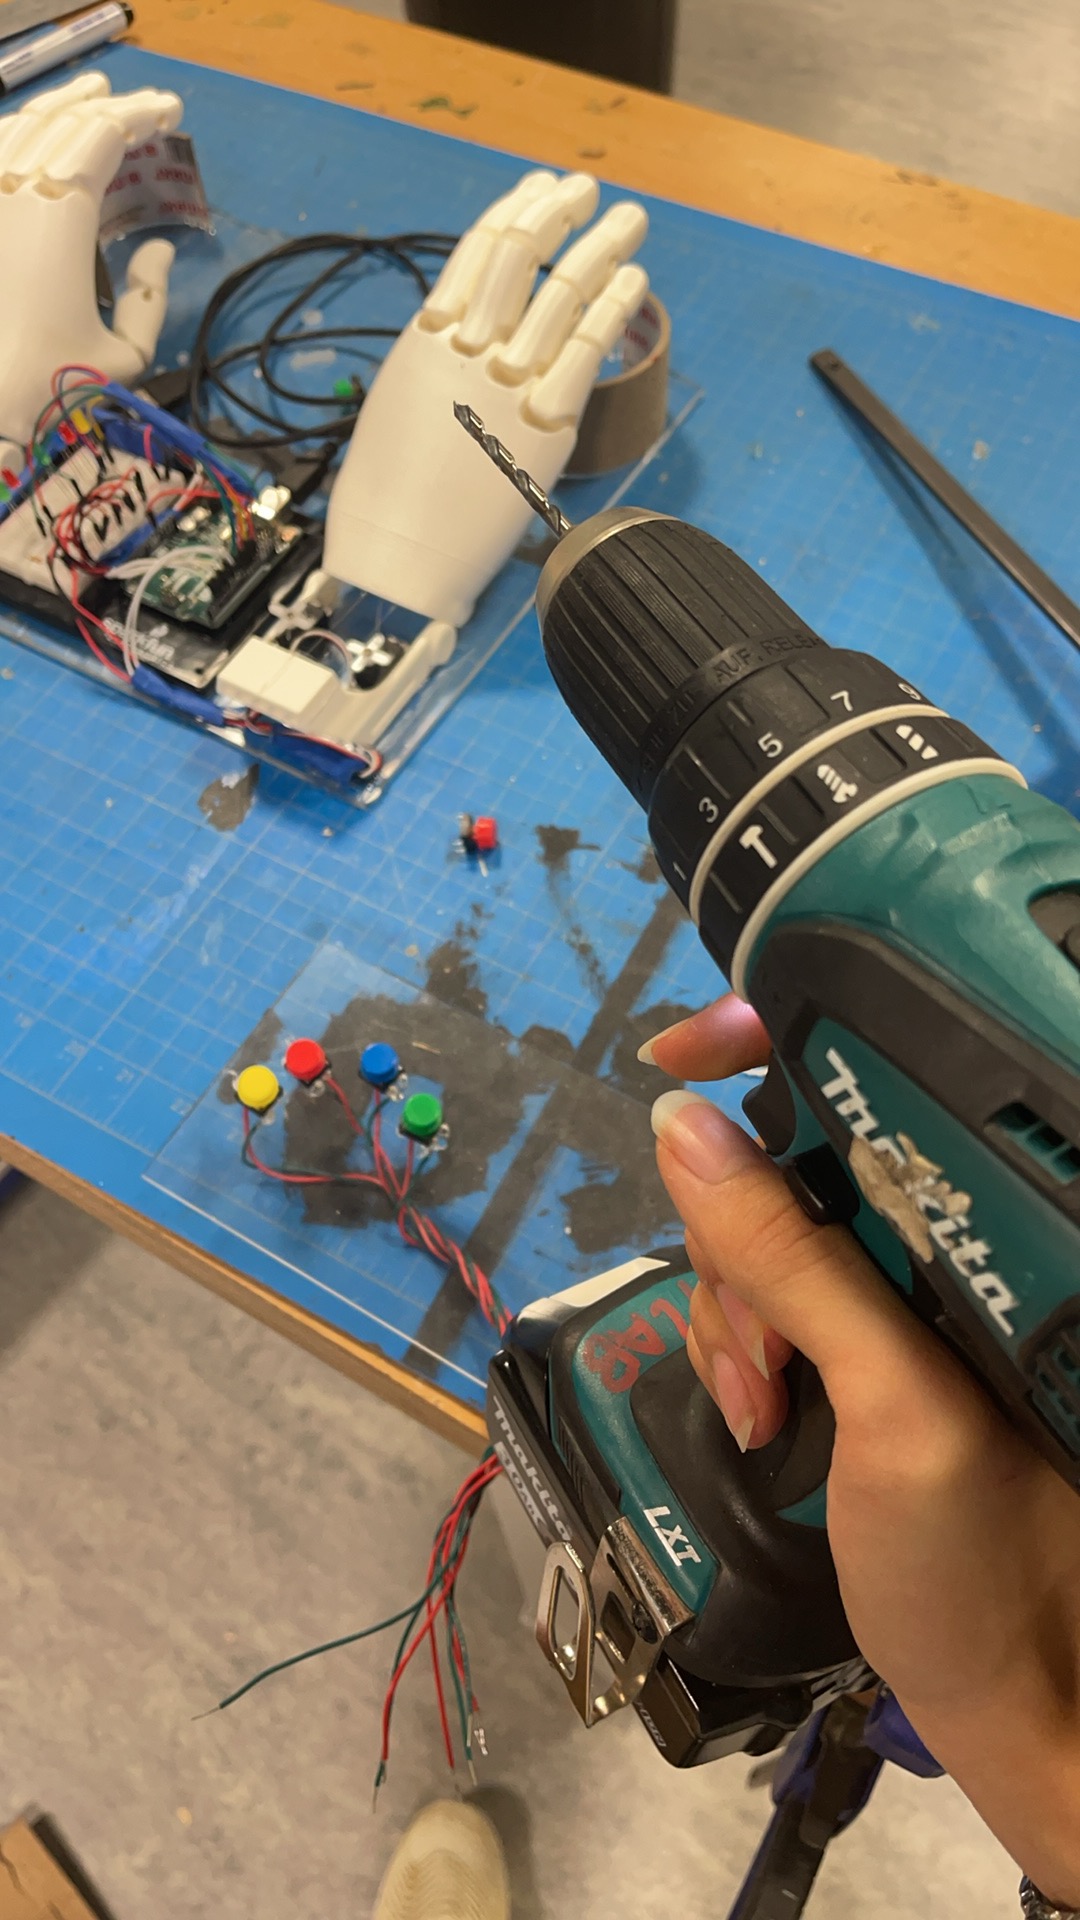
3D Printing:
Materials: PLA filaments
Process:
Experimental Print
Separate Print Of Joints and Body
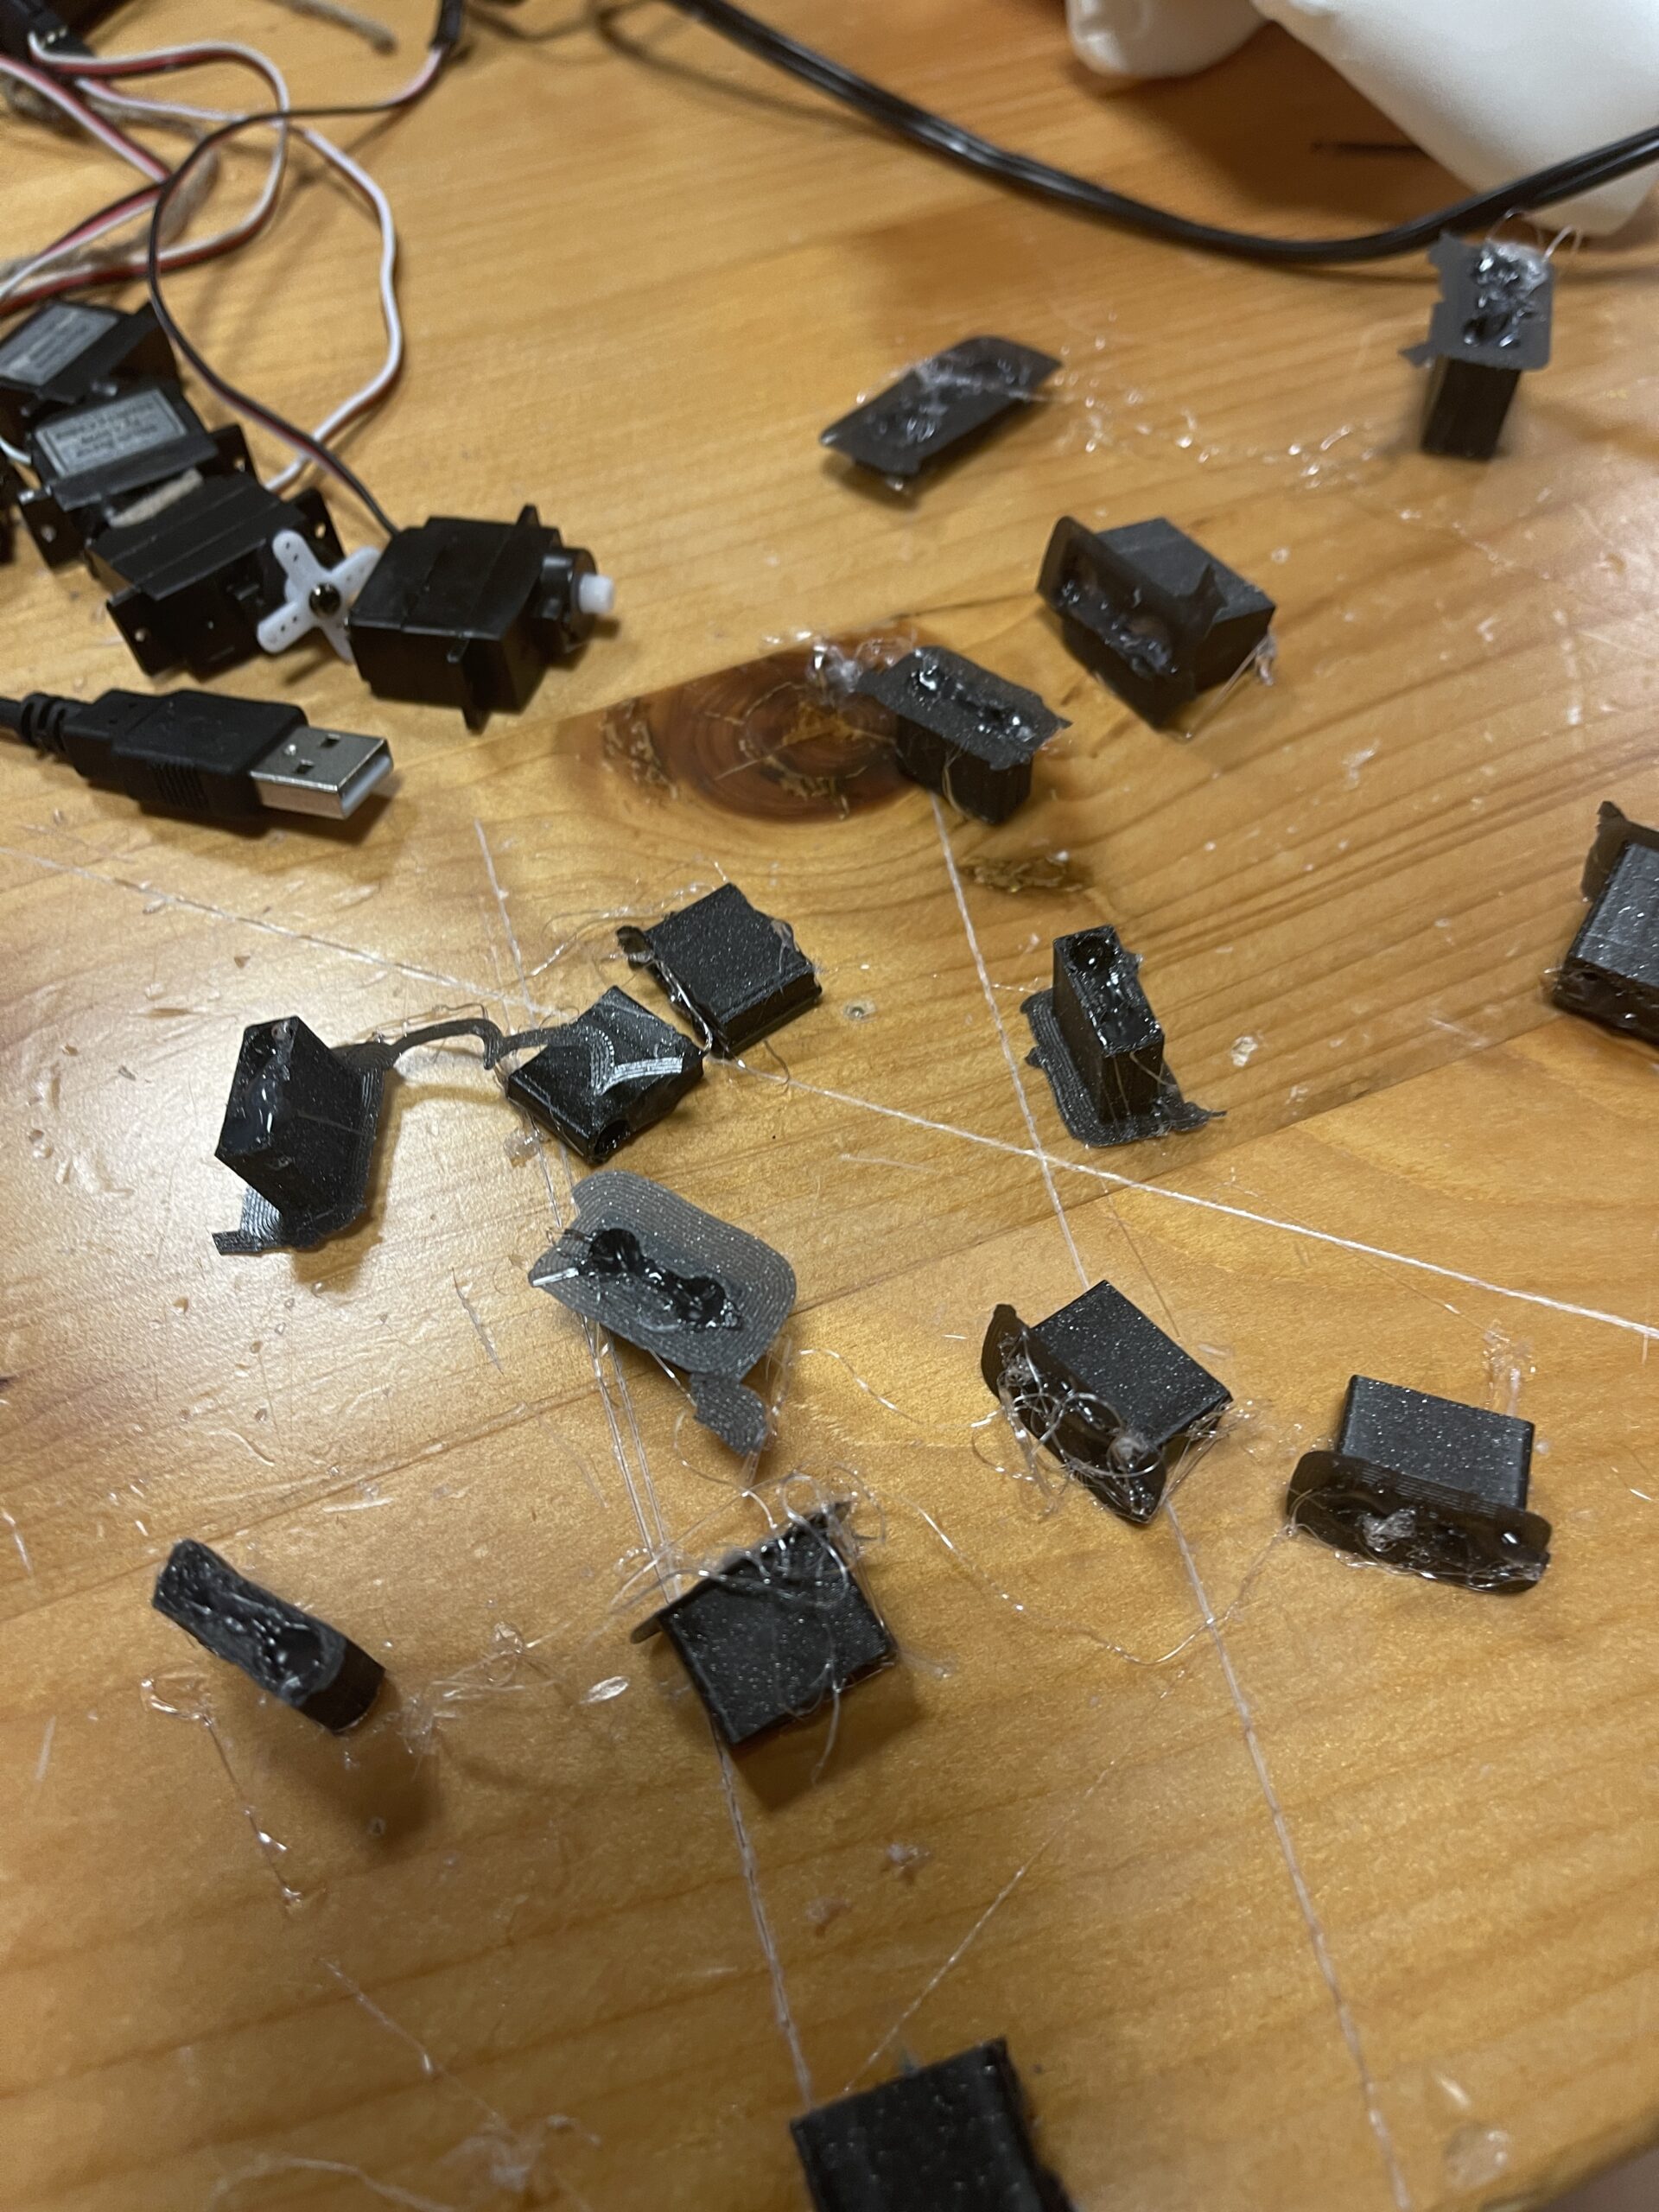
Hinges Construction:
Materials: 3D-printed molds and hot glue gun.
Purpose: Form sturdy and flexible hinges for finger movements.
Process: Injected hot glue into the molds and install the hinges between the joints.
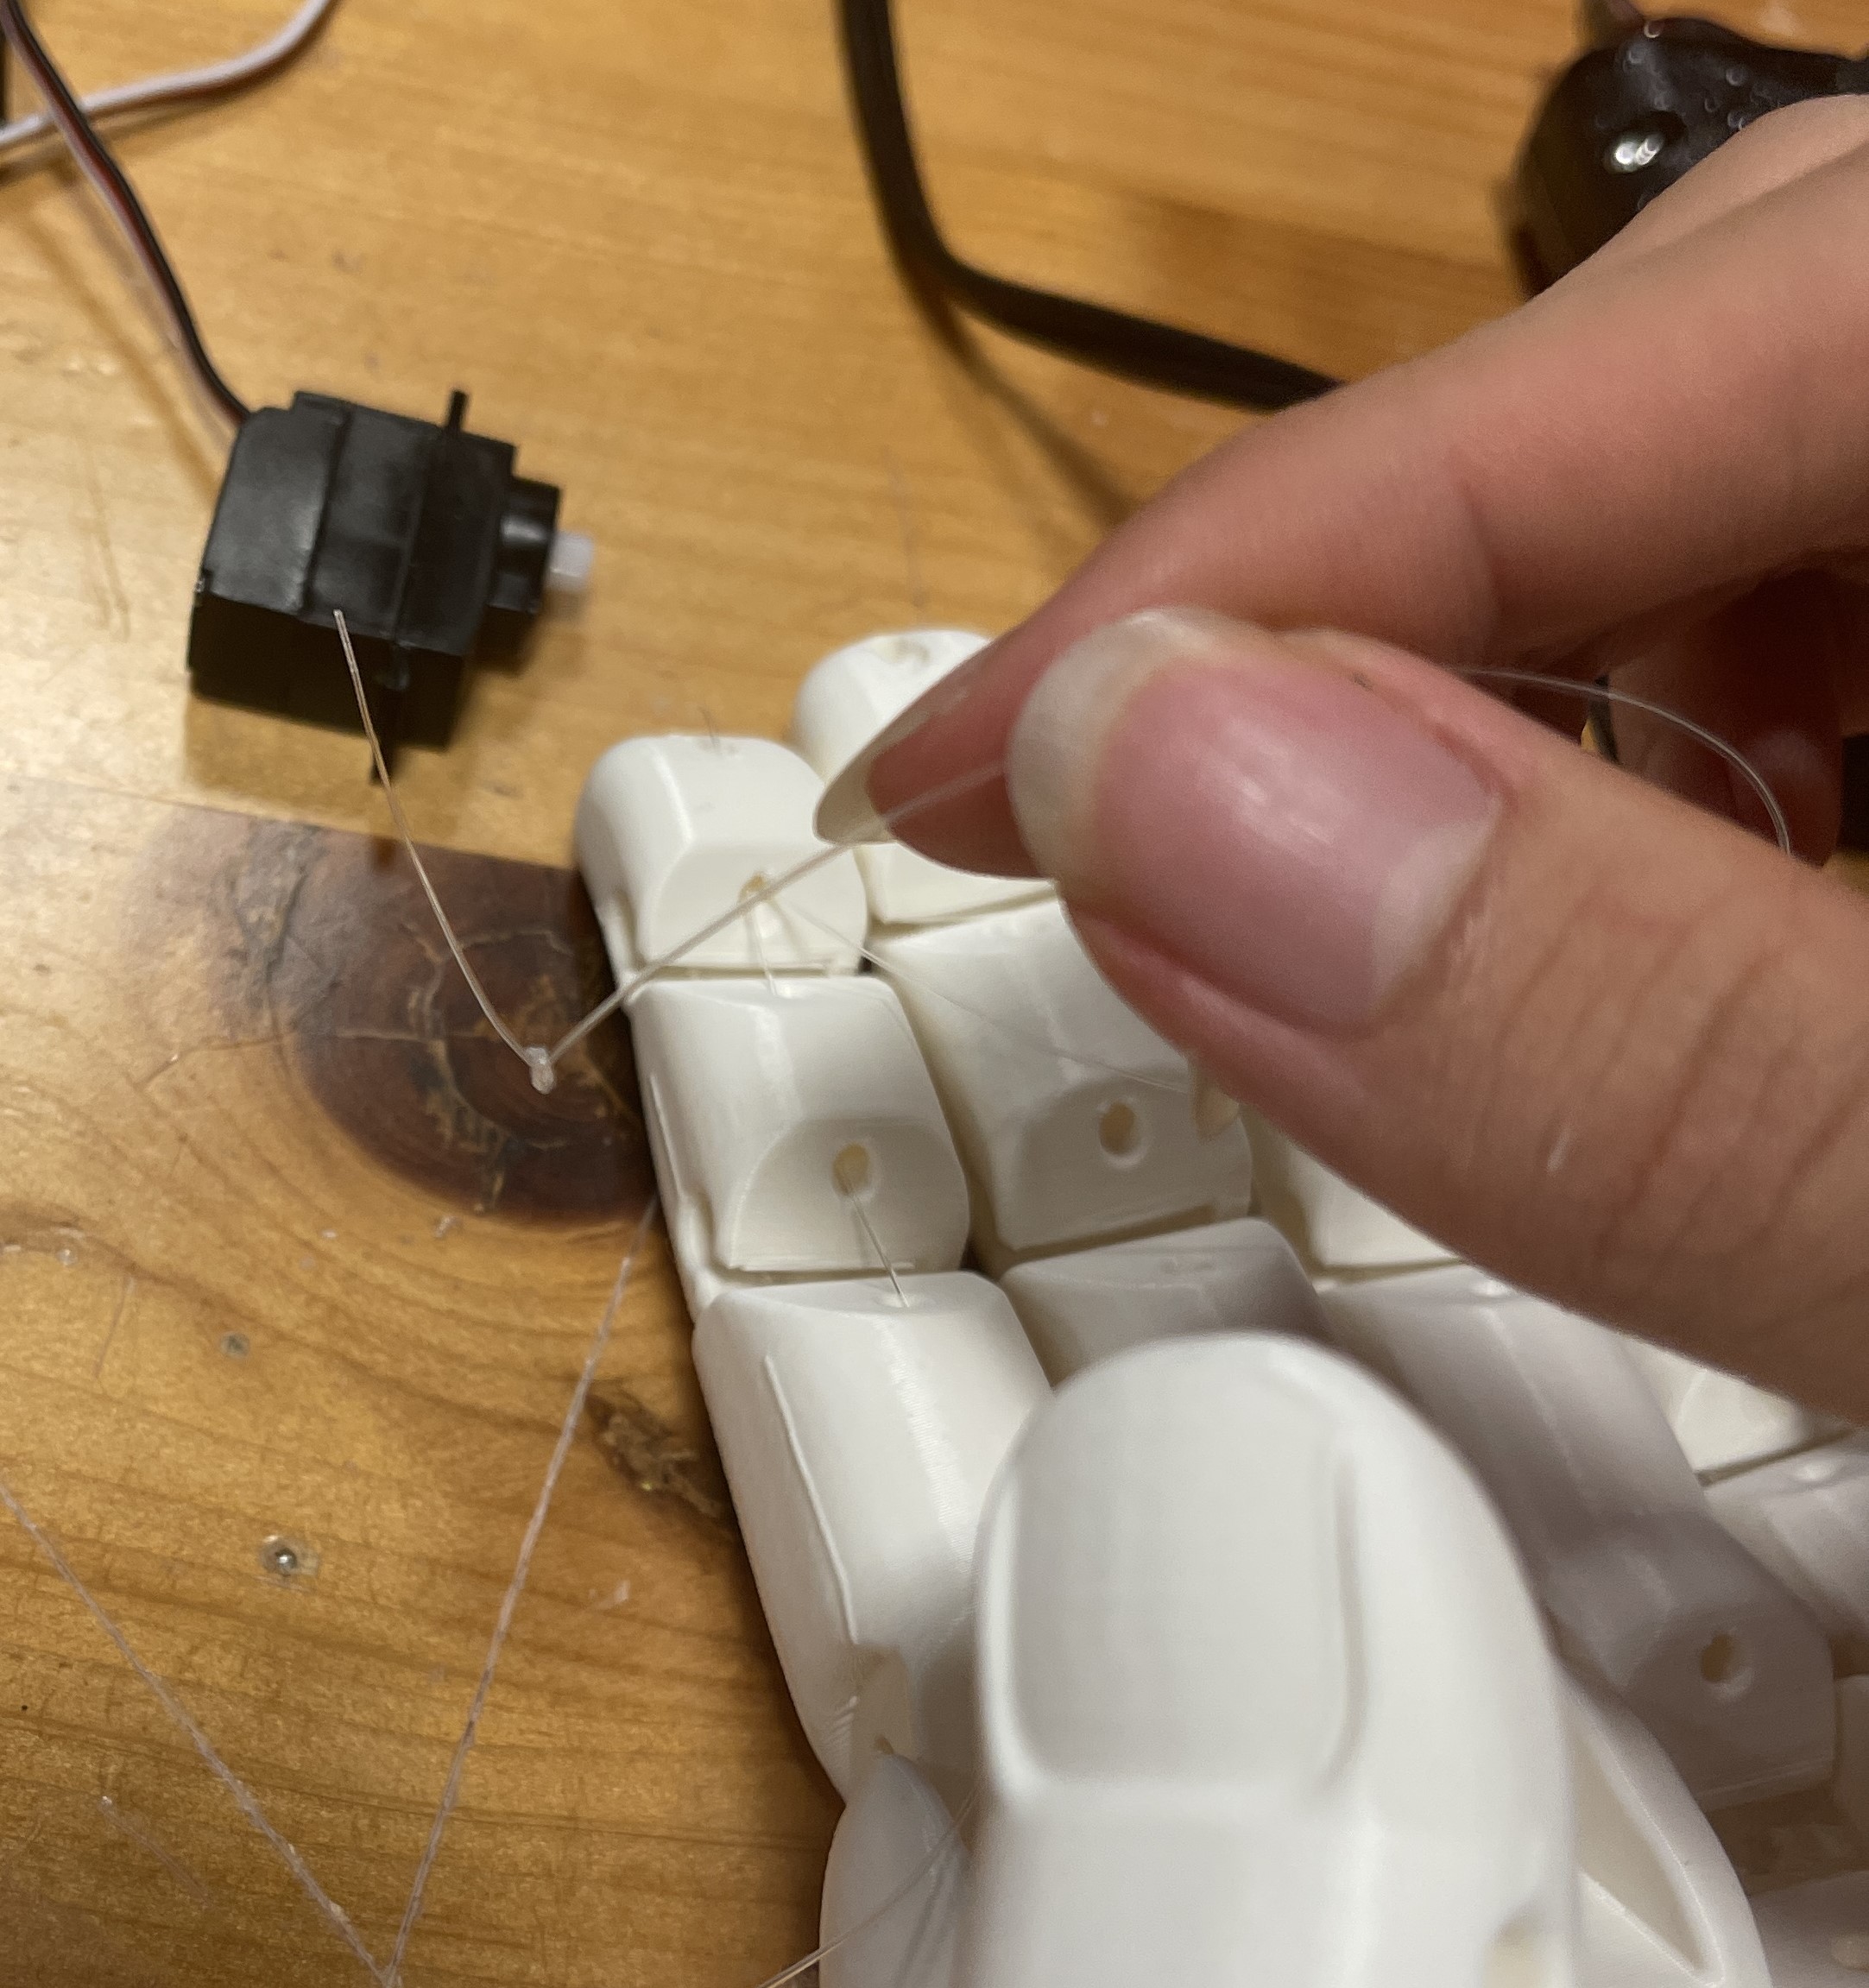
Tendon Implementation:
Materials: Fishing lines.
Purpose: Act as tendons to control finger movements.
Process: Attached fishing lines to servos and the tips of the fingers.
Servo Control:
Components: 6 9g servo motors.
Control Mechanism: Driven by serial commands from the Arduino, allowing the robot hand to mimic key presses (`w`, `a`, `s`, `d`, `space`, `x`) by turning to specific angles
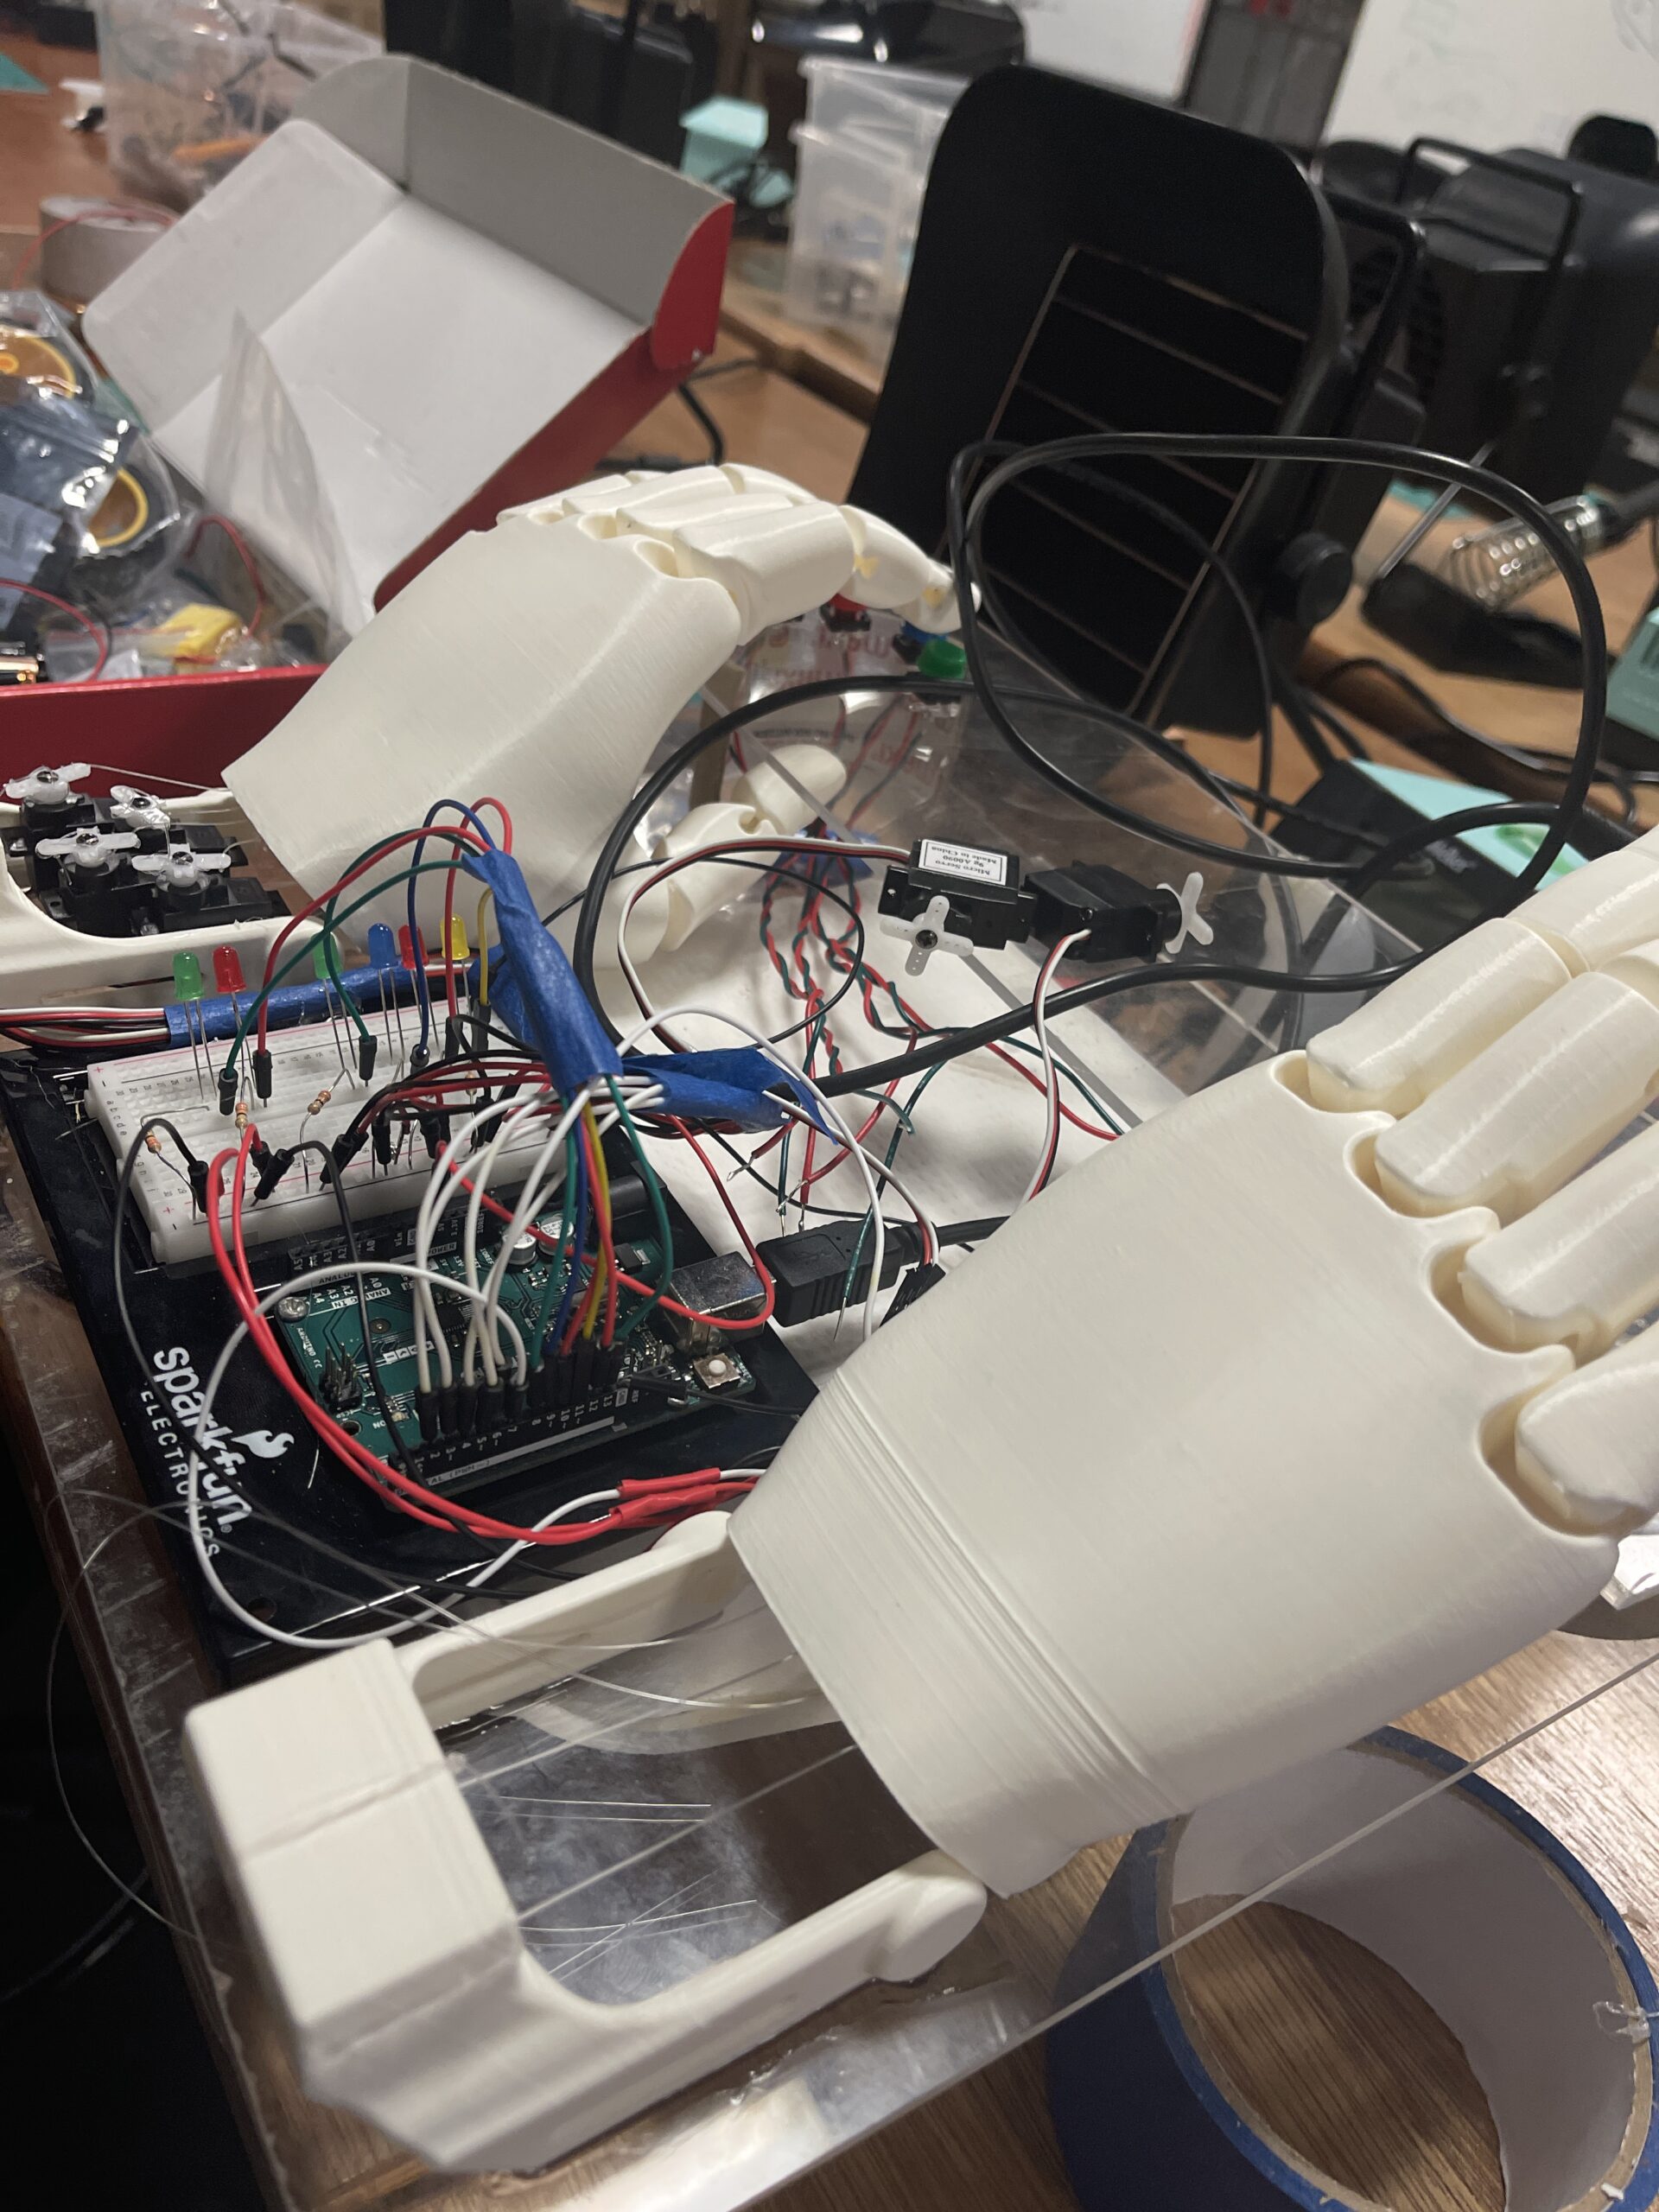
Assembly of the Installation
Components: All listed above, LEDs, jump wires, acrylic plates
Process:
Acrylic assembly
#include <Servo.h>

unsigned long previousMillis = 0; // Store the last time the LED was updated
const long interval = 250; // Interval to wait (2 seconds)

// Define servo objects for each finger
Servo indexServo;
Servo middleServo;
Servo ringServo;
Servo pinkyServo;
Servo indexServo2;
Servo ringServo2;

// Define servo pins
const int indexPin = 2;
const int middlePin = 3;
const int ringPin = 4;
const int pinkyPin = 5;
const int indexPin2 = 6;
const int ringPin2 = 7;

// Define LED pins
const int LEDPins[] = {8, 9, 10, 11, 12, 13};
// indexLEDPin, middleLEDPin, ringLEDPin, pinkyLEDPin, indexLEDPin2, ringLEDPin2

// Array to hold servo objects for easy access
Servo servos[6];

// Blink LED while waiting for serial data
const int ledPin = LED_BUILTIN;

// Array to hold default angles
const int fingerDefaultAngles[] = {0, 15, 20, 20, 60, 30};

void setup() {
  // Initialize serial communication
  Serial.begin(9600);

  // Attach servos to their respective pins
  servos[0].attach(indexPin);
  servos[1].attach(middlePin);
  servos[2].attach(ringPin);
  servos[3].attach(pinkyPin);
  servos[4].attach(indexPin2);
  servos[5].attach(ringPin2);

  // Set LED pins to output mode
  pinMode(8, OUTPUT);
  pinMode(9, OUTPUT);
  pinMode(10, OUTPUT);
  pinMode(11, OUTPUT);
  pinMode(12, OUTPUT);
  pinMode(13, OUTPUT);

  // Initialize all servos to 0 degrees (open position)
  for(int i = 0; i < 6; i++) {
    servos[i].write(0);
    delay(100);
  }

  // Initialize LED pin
  pinMode(ledPin, OUTPUT);

  // Handshake: Wait for p5.js to send initial data
  while (Serial.available() <= 0) {
    digitalWrite(ledPin, HIGH); // LED on while waiting
    Serial.println("0,0,0,0,0,0"); // Send initial positions
    delay(300);
    digitalWrite(ledPin, LOW);
    delay(50);
  }
}

void loop() {
  // Check if data is available from p5.js
  while (Serial.available()) {
    // digitalWrite(ledPin, HIGH); // LED on while receiving data

    // Read the incoming line
    String data = Serial.readStringUntil('\n');
    data.trim(); // Remove any trailing whitespace

    // Split the data by commas
    int angles[6];
    int currentIndex = 0;
    int lastComma = -1;
    for(int i = 0; i < data.length(); i++) {
      if(data[i] == ',') {
        angles[currentIndex++] = data.substring(lastComma + 1, i).toInt();
        lastComma = i;
      }
    }
    // Last value after the final comma
    angles[currentIndex] = data.substring(lastComma + 1).toInt();

    // Get the current time
    unsigned long currentMillis = millis();

    // Check if the interval has passed
    if (currentMillis - previousMillis >= interval) {
      // Save the last time the LED was updated
      previousMillis = currentMillis;

        // Update servo positions
      for(int i = 0; i < 6; i++) {
        servos[i].write(angles[i]); // Set servo to desired angle
      }
    }

    for(int i = 0; i < 6; i++) {
      digitalWrite(LEDPins[i], angles[i] != fingerDefaultAngles[i]? HIGH : LOW); // Light the LED accordingly
    }
    // Echo back the angles
    Serial.print(angles[0]);
    for(int i = 1; i < 6; i++) {
      Serial.print(",");
      Serial.print(angles[i]);
    }
    Serial.println();
    // digitalWrite(ledPin, LOW); // Turn off LED after processing
  }
}
Purpose: Establish real-time, bi-directional communication between clients.
Implementation: Set up a local server using Node.js and integrated Socket.io to handle event-based communication for synchronizing game states.
Local Server for Data Communication:
Function: Manages user connections, broadcasts game state updates, and ensures consistency across all clients.
Synchronized Game State:
Outcome: Ensures that both players have an up-to-date and consistent view of the game, enabling fair and competitive interactions.
// server.js

/* Install socket.io and config server
npm init -y
npm install express socket.io
node server.js
*/

/* Install mkcert and generate CERT for https
choco install mkcert
mkcert -install
mkcert <your_local_IP> localhost 127.0.0.1 ::1
mv <localIP>+2.pem server.pem
mv <localIP>+2-key.pem server-key.pem
mkdir certs
mv server.pem certs/
mv server-key.pem certs/
*/

const express = require('express');
const https = require('https');
const socketIo = require('socket.io');
const path = require('path');
const fs = require('fs'); // Required for reading directory contents

const app = express();

// Path to SSL certificates
const sslOptions = {
  key: fs.readFileSync(path.join(__dirname, 'certs', 'server-key.pem')),
  cert: fs.readFileSync(path.join(__dirname, 'certs', 'server.pem')),
};

// Create HTTPS server
const httpsServer = https.createServer(sslOptions, app);
// Initialize Socket.io
const io = socketIo(httpsServer);

// Serve static files from the 'public' directory
app.use(express.static('public'));

// Handle client connections
io.on('connection', (socket) => {
  console.log(`New client connected: ${socket.id}`);

  // Listen for broadcast messages from clients
  socket.on('broadcast', (data) => {
    // console.log(`Broadcast from ${socket.id}:`, data);
    // Emit the data to all other connected clients
    socket.broadcast.emit('broadcast', data);
  });

  // Handle client disconnections
  socket.on('disconnect', () => {
    console.log(`Client disconnected: ${socket.id}`);
  });
});

// Start HTTPS server
const PORT = 3000; // Use desired port
httpsServer.listen(PORT, () => {
  console.log(`HTTPS Server listening on port ${PORT}`);
});
Computer Player Algorithm
The computer player, controlled by AI within p5.js, employs sophisticated algorithms to simulate human-like behaviors, including:
Threat Detection and Evasion:
Mechanism: Continuously scans for incoming threats (e.g., enemy lasers, objects) and calculates optimal evasion paths to avoid collisions.
Strategic Movement and Firing:
Behavior: Moves toward or away from the enemy and fires lasers when within range, balancing offensive and defensive strategies based on current game states.
Tactic Engine Activation:
Function: Activates special abilities (e.g., infinite health or energy) when certain conditions are met, enhancing strategic depth and competitiveness.
// ComputerPlayer.js

class ComputerPlayer extends Player {
    constructor(model, texture, difficulty = 1, behaviorPriority = 'attack') {
      super(model, texture);
      this.difficulty = difficulty; // Higher values mean smarter AI
      this.behaviorPriority = behaviorPriority; // 'survival' or 'attack'
      this.enemy = game.enemy;
      this.lastActionTime = millis();
      this.actionCooldown = map(this.difficulty, 1, 10, 500, 50); // in milliseconds
      this.actionQueue = []; // Queue of actions to perform
      this.currentAction = null;
      this.firingRange = 100; // Define firing range threshold
      this.bornTime = millis();
      this.difficultyTime = frameCount;
    }

    updateAI() {
      // Set local enemy target
      this.enemy = game.enemy;

      // Count in frame, 1200 = 20s, to increase AI difficulty
      if (frameCount - this.difficultyTime > 1200) {
        this.difficulty ++;
      }

      if (currentTime - this.lastActionTime > this.actionCooldown) {
        console.log(`[AI][${this.behaviorPriority.toUpperCase()}] Deciding next action...`);
        this.decideNextAction();
        this.lastActionTime = currentTime;
      }

      // Execute actions from the queue
      this.executeActions();
    }

    decideNextAction() {
      // Determine behavior based on priority
      if (this.behaviorPriority === 'survival') {
        this.decideSurvivalActions();
      } else if (this.behaviorPriority === 'attack') {
        this.decideAttackActions();
      } else {
        // Default behavior
        this.decideAttackActions();
      }
    }

    decideSurvivalActions() {
      // Abandoned method, will not be used
      // (unless another behavior mode 'Survival' is to be used)
    }

    decideAttackActions() {
      console.log(`[AI][DECIDE] Assessing attack strategies...`);

      // 1. Detect and handle threats
      let threats = this.detectThreats();
      if (threats.hasThreats) {
        console.log(`[AI][DECIDE] Threats detected: ${threats.allThreats.length} threats.`);

        if (threats.hasCriticalObjectThreat && this.energy >= 30) {
          console.log(`[AI][DECIDE] Critical object threat detected. Attempting to destroy it.`);
          for (let j = 0; j < 3; j++) {
            this.queueAction('fireAt', threats.criticalObject);
          }
        }

        // Evade all detected threats
        let evadeDirection = this.calculateEvasionDirection(threats.allThreats);
        console.log(`[AI][EVADE] Evasion direction: ${JSON.stringify(evadeDirection)}`);
        this.queueMovement(evadeDirection);

      } else {
        console.log(`[AI][DECIDE] No immediate threats detected.`);
        // 2. No immediate threats
        if ((this.energy < 40) && (this.enemy.health > 15)) {
          console.log(`[AI][DECIDE] Energy low (${this.energy.toFixed(2)}).`);

          if (30 <= this.energy) {
            console.log(`[AI][DECIDE] Energy low. Wait for replenish.`);
          } else {
            // Move towards the closest energyOre to gain energy
            let closestEnergyOre = this.findClosestEnergyOre();
            if (closestEnergyOre) {
                console.log(`[AI][DECIDE] Closest energy ore at (${closestEnergyOre.x}, ${closestEnergyOre.y}). Moving towards it.`);

                this.moveTowardsObject(closestEnergyOre);
                for (let j = 0; j < 3; j++) {
                this.queueAction('fireAt', closestEnergyOre); // Attempt to destroy it to collect energy
                }
            } else {
                console.log(`[AI][DECIDE] No energy ore found. Proceeding to attack.`);

                // Move towards the enemy and attack
                this.moveTowardsEnemy();
                for (let j = 0; j < 3; j++) {
                this.queueAction('fireAt', this.enemy);
                }
            }
          }
        } else {
          console.log(`[AI][DECIDE] Energy healthy (${this.energy.toFixed(2)}). Moving towards enemy to attack.`);

          // Move towards the enemy and attack
          this.moveTowardsEnemy();
          for (let j = 0; j < 3; j++) {
            this.queueAction('fireAt', this.enemy);
          }
        }
      }

      // 3. Utilize tactic engine if advantageous
      if (this.shouldUseTacticEngineAttack()) {
        console.log(`[AI][DECIDE] Activating tactic engine.`);
        this.difficulty ++;
        this.queueAction('activateTacticEngine');
      }
    }

    executeActions() {
      while (this.actionQueue.length > 0) {
        this.currentAction = this.actionQueue.shift();
        switch (this.currentAction.type) {
          case 'move':
            this.simulateMovement(this.currentAction.direction, this.currentAction.duration);
            break;
          case 'fireAt':
            this.simulateFireAt(this.currentAction.target);
            break;
          case 'activateTacticEngine':
            this.simulateTacticEngine();
            break;
          default:
            break;
        }
      }
    }

    simulateMovement(direction, duration = 500) {
      // Log the movement simulation
      console.log(`[AI][MOVE] Simulating movement directions: ${JSON.stringify(direction)} for ${duration}ms.`);

      // Direction is an object { up: bool, down: bool, left: bool, right: bool }
      // Duration is in milliseconds; map duration to number of frames based on difficulty
      const frames = Math.max(Math.floor((duration / 1000) * 60 / (11 - this.difficulty)), 1); // Higher difficulty, fewer frames
      console.log(`[AI][MOVE] Calculated frames for movement: ${frames}`);

      for (let i = 0; i < frames; i++) {
        if (direction.up) game.aiKeysPressed.w = true;
        if (direction.down) game.aiKeysPressed.s = true;
        if (direction.left) game.aiKeysPressed.a = true;
        if (direction.right) game.aiKeysPressed.d = true;
      }
    }

    simulateFire() {
      let currentTime = millis();
      if (currentTime - this.bornTime > stateBufferTime) {
        console.log(`[AI][FIRE] Simulating space key press for firing laser.`);
        // Simulate pressing the space key
        game.aiKeysPressed.space = true;
      } else {
        console.log(`[AI][CEASEFIRE] AI Waiting For Game Loading.`);
      }
    }

    simulateFireAt(target) {
      // Calculate distance to target before deciding to fire
      let distance = dist(this.x, this.y, target.x, target.y);
      console.log(`[AI][FIRE_AT] Distance to target (${target.type}): ${distance.toFixed(2)}.`);

      if (distance <= this.firingRange) {
        console.log(`[AI][FIRE_AT] Target within firing range (${this.firingRange}). Firing laser.`);
        // Target is close enough; simulate firing
        this.simulateFire();
      } else {
        console.log(`[AI][FIRE_AT] Target out of firing range (${this.firingRange}). Skipping fire.`);
        // Optional: Implement alternative actions if target is out of range
      }
    }

    simulateTacticEngine() {
      console.log(`[AI][TACTIC_ENGINE] Simulating 'x' key press for tactic engine activation.`);
      // Simulate pressing the 'x' key
      game.aiKeysPressed.x = true;
    }

    queueMovement(direction) {
      // console.log(`[AI][QUEUE] Queuing movement: ${JSON.stringify(direction)}.`);
      this.actionQueue.push({ type: 'move', direction: direction, duration: 500 });
    }

    queueAction(actionType, target = null) {
      if (actionType === 'fireAt' && target) {
        // console.log(`[AI][QUEUE] Queuing fireAt action for target: ${target.type} at (${target.x}, ${target.y}).`);
        this.actionQueue.push({ type: actionType, target: target });
      } else {
        // console.log(`[AI][QUEUE] Queuing action: ${actionType}.`);
        this.actionQueue.push({ type: actionType });
      }
    }

    detectThreats() {
      let threatsFound = false;
      let criticalObjectThreat = null;
      let allThreats = [];

      const laserThreatRange = 5 * this.difficulty; // Adjustable based on difficulty
      const objectThreatRange = 25 * this.difficulty; // Larger range for objects

      // Detect laser threats
      for (let laser of game.enemyLaser) {
        let distance = dist(this.x, this.y, laser.x, laser.y);
        if (distance < laserThreatRange) {
          threatsFound = true;
          allThreats.push(laser);
          // console.log(`[AI][DETECT] Laser threat detected at (${laser.x}, ${laser.y}) within range ${laserThreatRange}.`);
        }
      }

      // Detect object threats
      for (let obj of game.objects) {
        let distance = dist(this.x, this.y, obj.x, obj.y);
        if (distance < objectThreatRange) {
          // Additionally check z-axis proximity
          if ((obj.z - this.z) < 200) { // Threshold for z-axis proximity
            threatsFound = true;
            criticalObjectThreat = obj;
            allThreats.push(obj);
            // console.log(`[AI][DETECT] Critical object threat detected: ${obj.type} at (${obj.x}, ${obj.y}) within range ${objectThreatRange} and z-proximity.`);
          } else {
            threatsFound = true;
            allThreats.push(obj);
            // console.log(`[AI][DETECT] Object threat detected: ${obj.type} at (${obj.x}, ${obj.y}) within range ${objectThreatRange}.`);
          }
        }
      }

      return {
        hasThreats: threatsFound,
        hasCriticalObjectThreat: criticalObjectThreat !== null,
        criticalObject: criticalObjectThreat,
        allThreats: allThreats
      };
    }

    calculateEvasionDirection(threats) {
      // Determine evasion direction based on all threats
      let moveX = 0;
      let moveY = 0;

      for (let threat of threats) {
        if (threat.z > -2000) {
          let angle = atan2(this.y - threat.y, this.x - threat.x);
          moveX += cos(angle);
          moveY += sin(angle);
          console.log(`[AI][EVADE] Calculating evasion for threat at (${threat.x}, ${threat.y}).
                        Angle: ${angle.toFixed(2)} radians.`);
        }
      }

      // Normalize and determine direction
      if (moveX > 0.5) moveX = 1;
      else if (moveX < -0.5) moveX = -1;
      else moveX = 0;

      if (moveY > 0.5) moveY = 1;
      else if (moveY < -0.5) moveY = -1;
      else moveY = 0;

      return {
        up: moveY === 1,
        down: moveY === -1,
        left: moveX === -1,
        right: moveX === 1
      };
    }

    findClosestEnergyOre() {
      let energyOres = game.objects.filter(obj => obj.type === 'energyOre'); // Assuming objects have a 'type' property
      if (energyOres.length === 0) {
        console.log(`[AI][ENERGY] No energy ore available to collect.`);
        return null;
      }

      let closest = energyOres[0];
      let minDistance = dist(this.x, this.y, closest.x, closest.y);

      for (let ore of energyOres) {
        let distance = dist(this.x, this.y, ore.x, ore.y);
        if (distance < minDistance) {
          closest = ore;
          minDistance = distance;
        }
      }

      console.log(`[AI][ENERGY] Closest energy ore found at (${closest.x}, ${closest.y}) with distance ${minDistance.toFixed(2)}.`);
      return closest;
    }

    moveTowardsObject(target) {
      // Determine direction towards the target object
      let dx = target.x - this.x;
      let dy = target.y - this.y;

      let direction = {
        up: dy < 20,
        down: dy > -20,
        left: dx < -20,
        right: dx > 20
      };

      console.log(`[AI][MOVE_TO_OBJECT] Moving towards ${target.type} at (${target.x}, ${target.y}). Direction: ${JSON.stringify(direction)}.`);
      this.queueMovement(direction);
    }

    moveTowardsEnemy() {
      // Determine direction towards the enemy
      let dx = this.enemy.x - this.x;
      let dy = this.enemy.y - this.y;

      let direction = {
        up: dy < 20,
        down: dy > -20,
        left: dx < -20,
        right: dx > 20
      };

      console.log(`[AI][MOVE_TO_ENEMY] Moving towards enemy at (${this.enemy.x}, ${this.enemy.y}). Direction: ${JSON.stringify(direction)}.`);
      this.queueMovement(direction);
    }

    shouldUseTacticEngineSurvival() {
      // Abandoned method
    }

    shouldUseTacticEngineAttack() {
      // Decide whether to activate tactic engine based on attack advantage
      if (!this.tacticEngineUsed) {
        if (this.health < 30) {
          console.log(`[AI][TACTIC_ENGINE] Conditions met for tactic engine activation (Health: ${this.health}, Energy: ${this.energy}).`);
          return true;
        }
        if (this.model === assets.models.playerShip2) {
          // Additional condition: If enemy health is low and need more energy to destroy it
          if (game.enemy.health < 30 && this.energy < 50) {
            console.log(`[AI][TACTIC_ENGINE] Condition met for playerShip2: Enemy health is low (${game.enemy.health}).`);
            return true;
          }
        }
      }
      return false;
    }

    render() {
      // Add indicators or different visuals for ComputerPlayer
      super.render();
      // Draw AI status
      push();
      fill(255);
      textFont(assets.fonts.ps2p);
      textSize(12);
      textAlign(LEFT, TOP);
      text(`X: ${this.x.toFixed(1)}`+`Y: ${this.y.toFixed(1)}`, this.x - 50, this.y - 75);
      text(`AI Difficulty: ${this.difficulty}`, this.x - 50, this.y - 60);
      if (this.currentAction != null) {
        text(`Behavior: ${this.currentAction.type}`, this.x - 50, this.y - 45);
      }
      pop();
    }
  }
Servo Motion Control
Commands from the AI are translated into servo movements to control the robot hand:
Command Translation:
Process: Maps AI decisions to corresponding servo angles, ensuring accurate physical representations of game inputs.
Async Update:
Outcome: Ensures that physical actions performed by the robot hand are crowded out by serial communication while keeping in sync with the game’s digital state.
class RobotHandController {
    constructor() {
      this.lastUpdateTime = millis();
    }

    init() {
      //
    }

    update() {
      // Update finger bends to Arduino
      this.updateFingerAngles();
    }

    // Update Fingers according to the virtual keys
    updateFingerAngles() {
      // Stop function if no serial connections
      if (!serialActive) return;

      let currentTime = millis();

      const keys = ['w', 'a', 's', 'd', 'space', 'x'];
      const angles = [30, 50, 50, 60, 75, 70]; // Different angles for each key

      for (let i = 0; i < 6; i++) {
        if (game.aiKeysPressed[keys[i]] === true) {
          if (fingerAngles[i] != angles[i]) {
            fingerAngles[i] = angles[i];
          }
        }
      }

      // Send data every second
      if (frameCount % 120 === 0) {
        this.sendAngles(fingerAngles);

        // Schedule Release
        setTimeout(() => {
          console.log('reached')
          this.sendAngles(fingerDefaultAngles);
        }, 2000 / 2);
      }

      this.lastUpdateTime = currentTime;

    }

    // Send Current Angles to Arduino via Serial
    sendAngles(angles) {
      if (serialActive) {
        let message = angles.join(",") + "\n";
        writeSerial(message);
        console.log("Sent to Arduino:", message.trim());
      }
    }
}

/*
function readSerial(data) {
  // Handle incoming data from Arduino
  // For this project, we primarily send data to Arduino
}
  */
4. Project Highlights
Network Communication
Real-Time Synchronization: Successfully implemented real-time data exchange between clients using Node.js and Socket.io.
Robust Server Setup: Developed a stable local server that handles multiple connections.
Physical Installation
Robot Hand Fabrication: Crafted a functional robot hand using 3D printing, hot-glued hinges, and fishing line tendons.
Servo Integration: Connected and controlled multiple servos via Arduino to simulate human key presses.
AI Player Algorithm
Dynamic Threat Handling: Developed an AI that intelligently detects and responds to multiple simultaneous threats, prioritizing evasion and strategic attacks based on predefined behavior modes.
5. Future Improvements
Strengthening the Robot Hand
Enhanced Strength: Upgrade materials and servo to increase the robot hand’s strength and responsiveness, realizing actual control over the physical buttons.
Network Communication Structure
Peer-to-Peer Networking: Transition from a broadcast-based communication model to a peer-to-peer (P2P) architecture, facilitating support for more than two players and reducing server dependencies.
Gladly, I had finished most of the project before the user testing – although it turned out that as soon as the uncertainty a user brought into the system arose, bugs followed.
Since my final project is built upon my midterm, I invited people outside the class to conduct user testing to avoid any pre-perceived knowledge about the system. The two samples also came from different backgrounds that varied in terms of their familiarity with video games, contributing to the comprehensiveness of my user testing.
On balance, I would say the tests were successful in terms of conveying the gist mechanism of the project – from the PVE experience to the presence of the robotic hand. Both participants have (almost) no issue in carrying out the experience (although the fact that people always stumble at how to config the game when pressing the keyboard persists, and a bug related to flow control popped up).
Other suggestions I collected include (but are not limited to):
The purpose of the robot hands is a bit vague at the beginning. In the final presentation, with the aid of a larger screen and closer installation of the robot hands, this should be more obvious.
The meaning of ‘X’, ‘tactic engine.’ More prominent notification is applied.
The static AI difficulty may not be exciting enough (from a video game player). The gradual increase of AI difficulty is now applied.
The pace of the interaction is a bit quick – the same input to control the game stages may cause accidental/undesired input. This is solved by adding buffer time between stage changes.
The game objective could be a bit unclear – given some will skip the instruction or skim through. Another global notification in the game is added.
The enemy may be too small on the screen. It is now moved closer to the player on the z axis.
For user testing, I connected my p5.js sketch to the Arduino and tested the gameplay with a friend who had a general idea of the game. The user interacted with the arduino buttons and the falling fruits synced to the beats of the song.
The feedback highlighted that the timing between the falling fruits and button presses felt responsive and engaging. The user appreciated the dynamic note generation for each fruit, which added a musical layer to the experience. Minor improvements were suggested for button responsiveness and visual feedback when a fruit was missed.
The next steps include building the box for the basket and integrating the arcade buttons into it, which I have soldered. This test successfully validated the functionality of the game logic, Arduino integration, and user interaction, paving the way for completing the physical setup.
I have made significant progress with my work, and have come close to a finish. For my project, a game called Pingu Pounce, I’ve decided to add physical controls to make the overall experience much more enjoyable and interactive.
I have used 4 buttons — A restart, left, right, and jump button.
Here I have attached a video of a classmate playing with my game and I received some overall feedback. This is not the final version of my project as I have many improvements left to do – namely implementing my buttons in a much more accessible way.
Over the remaining days, I will work on how to make my game more intuitive without me having to explain the instructions too much — perhaps I will add labels to my buttons to do so.
Today I conducted the the alpha version user testing of my final project, and I was more than happy to hear the reaction and feedback. The person did not know anything about my project except for the fact that it was connected to music. The reaction and a small part of the feedback can be found in the video below.
First of all, I want to note that I have not finalized my final project yet as some laser cutting as well as connection fixing need to be done. Nevertheless, the core functions that represent my overall idea work as intended. My friend emphasized that the controls are quite intuitive and he enjoyed the process of exploration of what each of the controls stands for. Moreover, he managed to combine the effects in a way that even I have never tried, which is certainly a great thing because it shows that the project incentivizes user’s curiosity and interest.
The thing I will work on in the next couple of days is the signs written on the panel that will prompt the purpose of the controls, because my friend, although explored most of the functions, did not pay attention to one of them. I will try to find a balance so as not to make the explanations too heavy to leave room for exploration. I have also decided, thanks to a recommendation from my friend, to borrow a set of headphones from the equipment center and connect them to my laptop during the IM showcase to create a more ‘ambient’ experience around my project by fully connecting the users with the music and the visualizations on the screen.
Overall, I loved to hear that my project is especially perfect for people who like music because it is exactly what I kept in mind when I was coming up with this idea for my final project. Music enjoyers are my target audience, so I will do my best to finish the project as I see it, and, hopefully, give a chance to many people to test it during the IM showcase.


 Thank you!