Final Project Documentation

Portal Clash is a two-player spaceship battle game that merges the physical and digital worlds. One player plays on a physical 16×16 NeoPixel LED grid using a custom hardware controller, and the second player plays on a digital p5.js canvas using the keyboard. The core idea is the “portal” mechanic: if the physical player shoots a bullet off the edge of their LED screen, it instantly teleports onto the digital screen to attack the other player, and vice versa. It’s a battle across dimensions.

The project relies on a heavy communication loop between the hardware and the browser. The p5.js sketch acts as the “brain” of the game, calculating all the physics, scoring, and portal logic for both worlds. The Arduino acts as a specialized display driver and input device.

Interaction Design
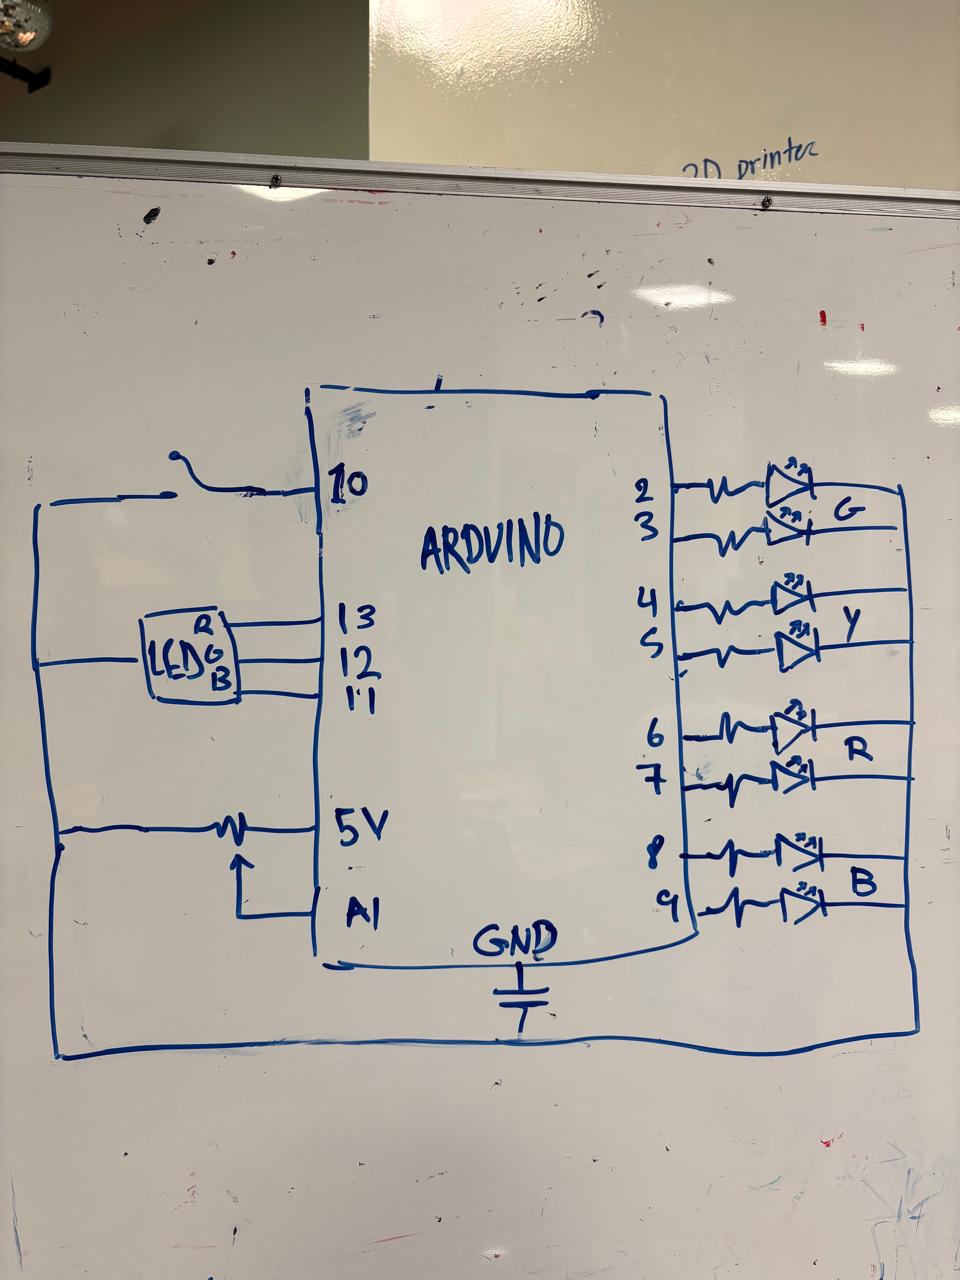
For the physical player, I built a controller with 5 push buttons: four for movement (Up, Down, Left, Right) and one for Firing. The digital player uses the computer keyboard (WASD for movement and ‘V’ for fire). The feedback is immediate—if you get hit, your ship explodes into particles on your respective screen.

Hardware & Circuit
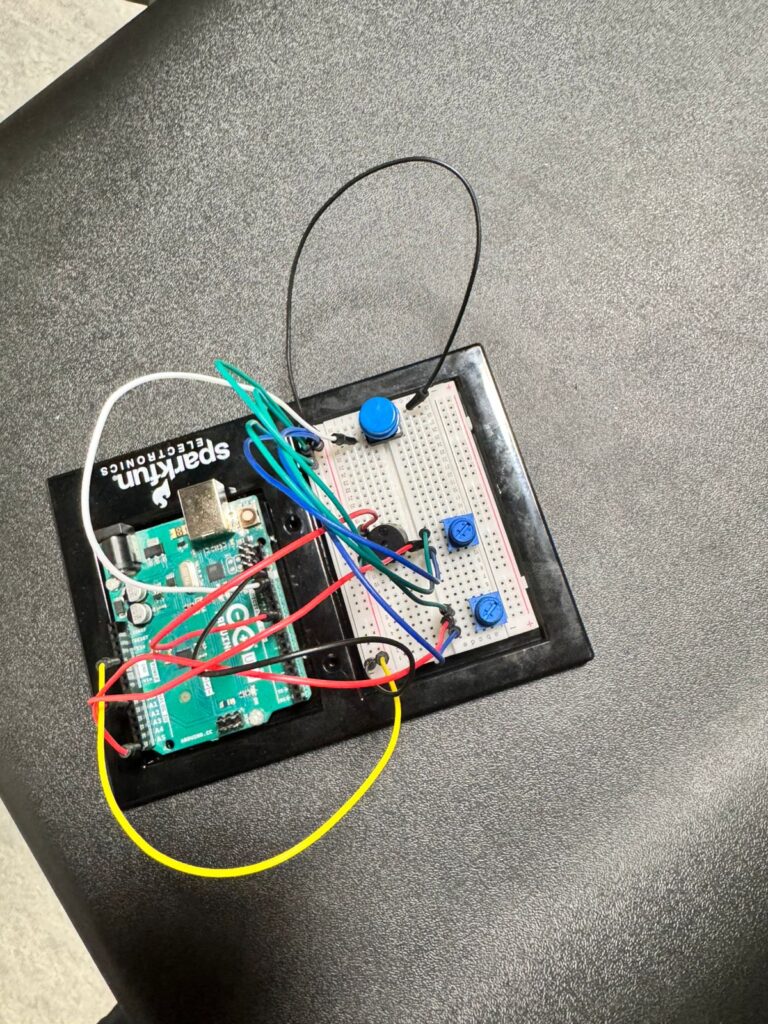
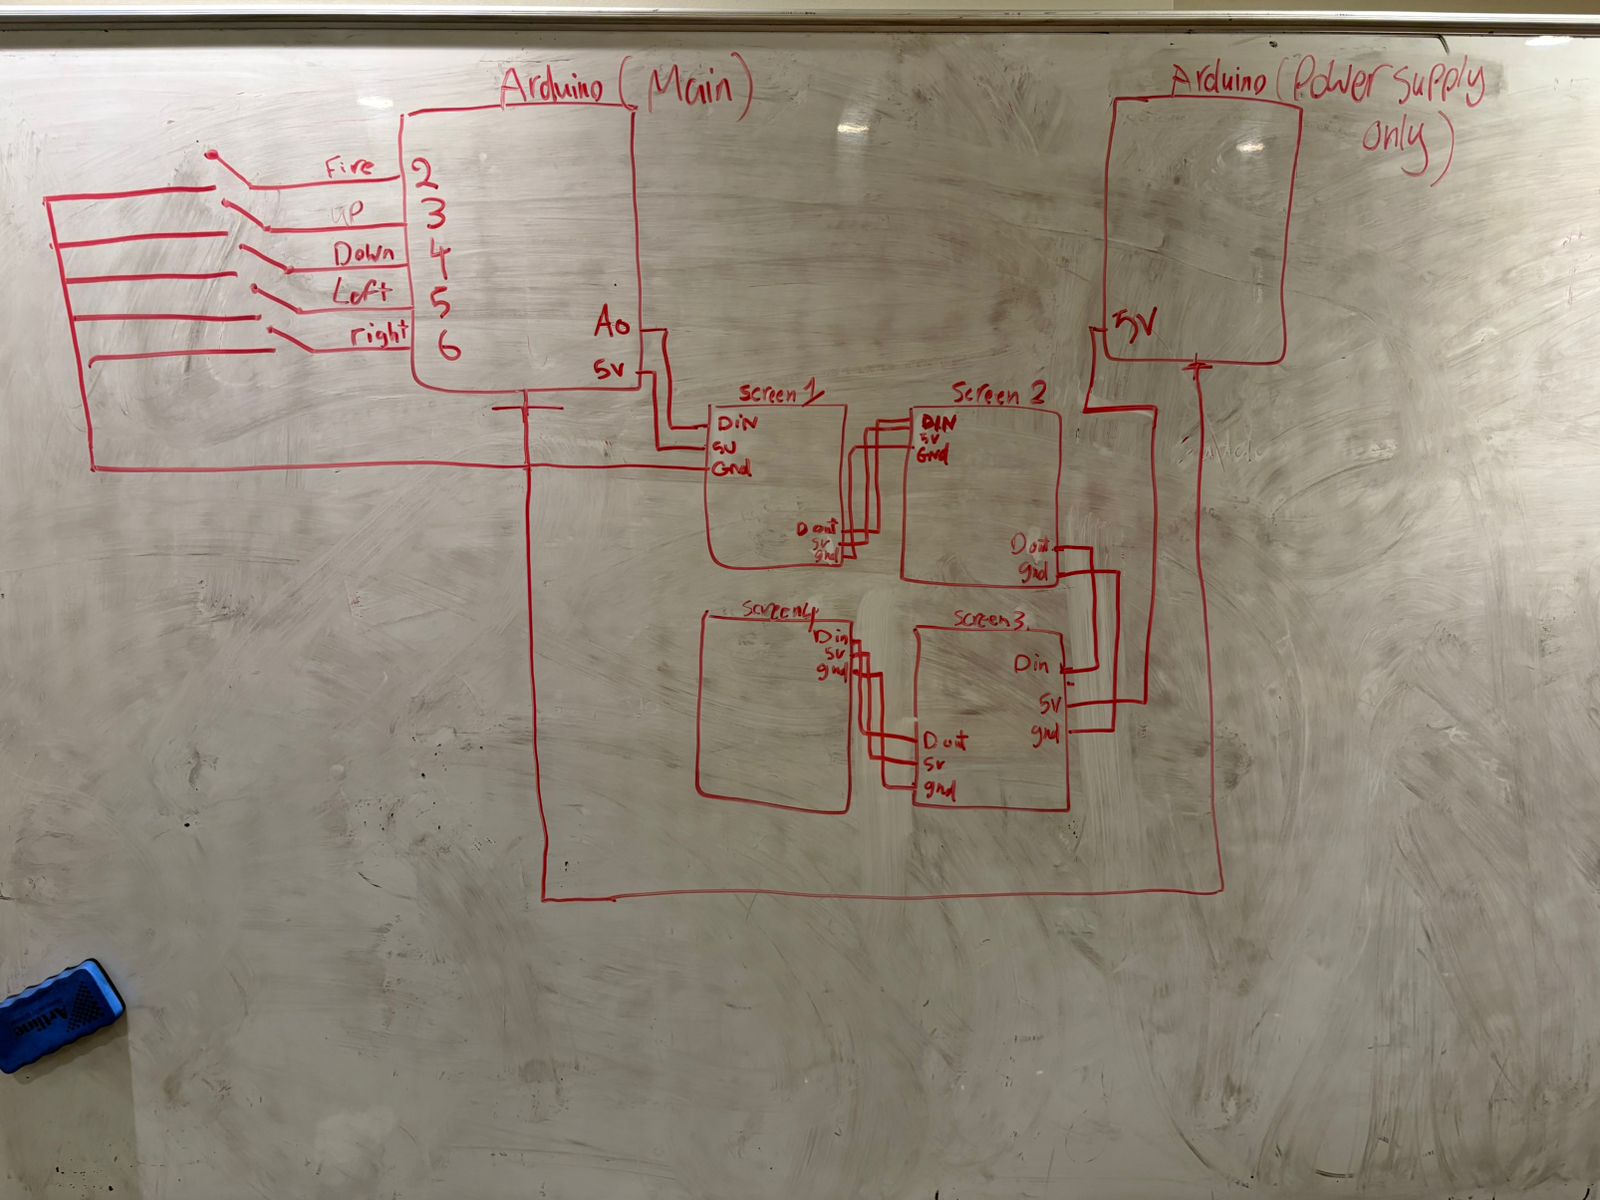
I used four 8×8 NeoPixel matrices tiled together to create a 16×16 grid. This was a bit of a pitfall at first. Powering 256 LEDs is heavy. I tried different wirings, but eventually, I figured out a parallel connection setup where I split the power . I actually used a second Arduino solely as a 5V power source to feed two of the screens while the main Arduino handled the data and powered the other two.

Arduino Code
The code on the Arduino is optimized to avoid lag. It listens for pixel data from p5 to light up the grid. At the same time, it reads the 5 buttons and sends their state back to p5. I had to implement a “state change” logic so it only sends data when I actually press or release a button, which kept the game smooth.

#include <Adafruit_NeoPixel.h>

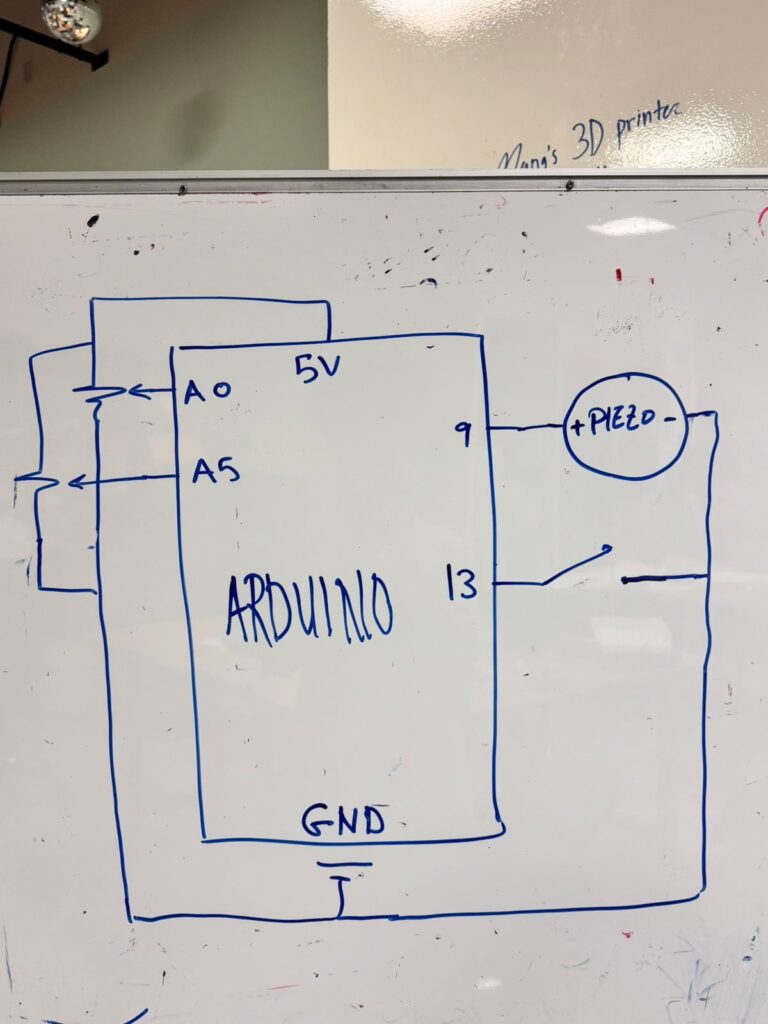
#define PIN_MATRIX A0 
#define NUMPIXELS  256

// WIRING: Pin -> Button -> Diagonal Leg -> GND
#define PIN_FIRE  2
#define PIN_UP    3
#define PIN_DOWN  4
#define PIN_LEFT  5
#define PIN_RIGHT 6

Adafruit_NeoPixel matrix(NUMPIXELS, PIN_MATRIX, NEO_GRB + NEO_KHZ800);

int lastU=0, lastD=0, lastL=0, lastR=0, lastF=0;
unsigned long lastHeartbeat = 0;

void setup() {
  Serial.begin(115200);
  matrix.begin();
  matrix.setBrightness(20); 
  matrix.show();
  
  pinMode(PIN_FIRE, INPUT_PULLUP);
  pinMode(PIN_UP,   INPUT_PULLUP);
  pinMode(PIN_DOWN, INPUT_PULLUP);
  pinMode(PIN_LEFT, INPUT_PULLUP);
  pinMode(PIN_RIGHT,INPUT_PULLUP);
}

void loop() {
  // 1. RECEIVE VIDEO DATA
  while (Serial.available() > 0) {
    char cmd = Serial.read();
    if (cmd == 'C') matrix.clear();
    else if (cmd == 'S') matrix.show();
    else if (cmd == 'P') {
      int x = Serial.parseInt();
      int y = Serial.parseInt();
      int r = Serial.parseInt();
      int g = Serial.parseInt();
      int b = Serial.parseInt();
      int idx = getPixelIndex(x, y);
      if (idx >= 0 && idx < NUMPIXELS) matrix.setPixelColor(idx, matrix.Color(r, g, b));
    }
  }

  // 2. SEND CONTROLLER DATA
  int u = !digitalRead(PIN_UP);
  int d = !digitalRead(PIN_DOWN);
  int l = !digitalRead(PIN_LEFT);
  int r = !digitalRead(PIN_RIGHT);
  int f = !digitalRead(PIN_FIRE);

  bool stateChanged = (u != lastU || d != lastD || l != lastL || r != lastR || f != lastF);
  
  if (stateChanged || (millis() - lastHeartbeat > 50)) {
    Serial.print("I:");
    Serial.print(u); Serial.print(",");
    Serial.print(d); Serial.print(",");
    Serial.print(l); Serial.print(",");
    Serial.print(r); Serial.print(",");
    Serial.println(f);
    lastU = u; lastD = d; lastL = l; lastR = r; lastF = f;
    lastHeartbeat = millis();
  }
  delay(2); 
}

int getPixelIndex(int x, int y) {
  if (x < 0 || x >= 16 || y < 0 || y >= 16) return -1;
  int screenIndex = 0;
  int localX = x; int localY = y;
  if (x < 8 && y < 8) { screenIndex = 0; }
  else if (x >= 8 && y < 8) { screenIndex = 1; localX -= 8; }
  else if (x < 8 && y >= 8) { screenIndex = 2; localY -= 8; }
  else { screenIndex = 3; localX -= 8; localY -= 8; }
  return (screenIndex * 64) + (localY * 8) + localX;
}


p5.js Code
This is where all the logic happens. The sketch manages two “SpaceShip” objects. It tracks which “World” a bullet is in. If a bullet crosses the boundary coordinate, the code swaps its world variable, causing it to stop rendering on the canvas and start rendering on the LED matrix (via Serial).

During development, I used a debugging trick where I mirrored the NeoPixel view onto the p5 canvas. This helped me figure out if the pixels were mapping correctly before I even looked at the LEDs.

Communication
I used the p5.webserial library. The challenge was timing; initially, there was a delay between pressing the button and the ship moving. I realized the serial buffer was getting clogged with old data. I fixed this by making p5 read all available data every frame and only using the most recent packet. Now, it feels instant. I knew from the beginning that the processing speed of the pixel traversing on the neoPixel screen relative to p5 might be a challenge big enough to make the idea not feasible; but I didn’t except good implementation tricks on p5 side would make it this smooth.


I am most proud of the idea and the gameplay itself. Seeing the bullet disappear from the physical LED screen and immediately pop up on the laptop screen feels really satisfying. It turned out exactly how I imagined it, and the competitive aspect makes people want to keep playing.

AI Section
I utilized Generative AI (ChatGPT) as a technical assistant to speed up the development process. The core game concept, the hardware design, and the logic flow were my own ideas. I used AI mainly to help me debug syntax errors in the Serial communication and to suggest optimizations for the lag I was experiencing. For example, when I struggled with the buffer bloat, the AI suggested clearing the buffer loop, which solved the issue. I also used it to help write the “Class” structure for the Spaceships to keep the code clean. The writing and documentation were done by me.

Future Improvements
To improve the experience, I would build a more permanent enclosure for the controller so the buttons are easier to hold. I also want to add a clear “Start Screen” with instructions, as user testing showed that people sometimes needed a moment to figure out the controls.

Also I want to elevate the gameplay and implement an advanced Idea I had in mind to randomize the sending and receiving edges of fires every 10 seconds. So that the users get surprised when the bullets attacking them start to portal from an unexpected direction and they also need to figure out which direction will send their own fires to the other world. 

User Testing

In the user testing most of the user figured out the idea without the need for me to explain; however, there were some pitfalls were the users were  a bit confused:

    • When the two users start to play at the same time and they start to fire they sometimes missed the effects happening and failed to get that the fire portals to the other screen.
    • The hardware setup I had during testing was not finished so some users failed to get which buttons correspond to which direction.
    • Button coloring: Some user recommended having the Fire button in different color so they know it’s supposed to perform a different action than movement.
    • Some users asked about the keyboard controls even though they suspected it’s either gonna be the arrows or WASD. Also the firing button ‘V’ wasn’t clear except for gamers.

What worked really well was the communication between p5 and the neoPixel screen. Once the users got the hang of the game they enjoyed the game so much and the animation of getting hit. They also liked the separation of colors between the player: Yellow and Blue including the fires color coming out of both of them. Some were impressed by the gameplay and how the pixels smoothly switch between the two screens.

To fix the earlier issues I would have a clear instructions page on the game startup that would clarify the controls on both sides and explain scoring system. I would also the core idea of the game to even get the users excited to try it out.

Final Project Proposal: Portal Clash


Concept

Portal Clash is a two-player, multi-platform spaceship battle game that merges the physical and digital aspects we learned in ourclass . One player commands their ship on a physical grid of NeoPixel LEDs controlled by an Arduino and a custom hardware console. The second player pilots their ship within a digital p5.js canvas on a computer.

The core of the game is the “portal” mechanic. Each player’s screen has a designated “sending” edge (colored green) and a “receiving” edge (colored red). When a player fires a projectile that hits their own green sending edge, the projectile teleports across dimensions, emerging from the opponent’s red receiving edge to continue its trajectory.

To create a dynamic and challenging experience, these portal edges are randomized every 10-15 seconds. Players must constantly adapt their strategy, re-evaluating their attack vectors and defensive positions as the rules of the arena shift beneath them. The goal is simple: land a set number of hits on your opponent before they can do the same to you.

Interaction Flow

The system main coding part is in p5.js sketch, which manages all game logic, physics, and state. The Arduino will act as a specialized display and controller for Player 1, translating physical inputs into data for p5 and rendering game state onto the NeoPixel matrix based on data received from p5.

Arduino Design & Hardware

The Arduino’s role is to be the physical interface for Player 1. It will continuously listen for input, send it to p5.js for processing, listen for display instructions from p5.js, and update the NeoPixel matrix accordingly.

Hardware Components:

  • Arduino Uno (or similar board)

  • 16×16 NeoPixel Matrix (or four 8×8 matrices tiled together for a 16×16=256 pixel display. An 8×8 grid is too small for meaningful movement).

  • 5x Push Buttons (for Up, Down, Left, Right, Fire)

  • Potentiometer (for rotation)

  • Breadboard and Jumper Wires

  • 5V, 4A+ External Power Supply (I need to experiment the power of this as the 16×16 matrix can draw significant current, more than USB can provide).

Arduino Pinout:

  • Digital Pin 2: Up Button

  • Digital Pin 3: Down Button

  • Digital Pin 4: Left Button

  • Digital Pin 5: Right Button

  • Digital Pin 6: Fire Button

  • Digital Pin 7: NeoPixel Matrix Data In

  • Analog Pin A0: Potentiometer Wiper

Reading Response Week 11

I’ve always been fascinated by the ways design can alter our everyday experiences, but this reading made me realize how deeply it can also impact dignity and independence. Design Meets Disability argues that assistive technologies aren’t just medical tools; they’re cultural objects that can express identity and empower people. That idea immediately reminded me of when I first discovered the Be My Eyes app.

The app enables people with visual impairments to call volunteers, open their phone camera, and request assistance with tasks such as locating items in the fridge or reading labels. I’ll never forget one call I had: the person asked me to help identify items in their kitchen, and while we were talking, he told me a story about how he once cooked an entire meal for his family using the app to double-check ingredients and instructions. I was amazed, not just by his resourcefulness but by how technology became a bridge for independence and creativity.

Reflecting on that experience alongside the reading, I realized how much design can influence confidence and joy. When assistive tools are thoughtfully designed, they don’t just solve problems; they open doors to new possibilities. Be My Eyes is a perfect example of inclusive design, empowering people by turning what might seem like a barrier into an opportunity for connection and creativity. My takeaway is that disability should never be viewed as a deficit in design, but rather as an opportunity to rethink and expand what technology can do for everyone.

Production Week 11

For this assignment, I worked with Bigo to connect p5.js with an Arduino. We completed three exercises to practice sending data back and forth between the physical and digital worlds.

Part 1: One Sensor to p5.js

In the first exercise, we used a potentiometer connected to the Arduino. This sensor controlled the horizontal position of a circle on the computer screen. The Arduino read the potentiometer value and sent it to p5.js, which then moved the circle left or right based on that input.

Schematic

Arduino Code

void setup() {
  Serial.begin(9600);
}

void loop() {
  // Read analog value and send it as a line of text
  int sensorValue = analogRead(A0);
  Serial.println(sensorValue);
  delay(20); 
}

p5.js Code

let port;
let connectBtn;
let ballX = 0;
let sensorVal = 0;

function setup() {
  createCanvas(600, 400);
  background(50);

  port = createSerial();

  // Open the port automatically if used before
  let usedPorts = usedSerialPorts();
  if (usedPorts.length > 0) {
    port.open(usedPorts[0], 9600);
  }

  connectBtn = createButton('Connect to Arduino');
  connectBtn.position(10, 10);
  connectBtn.mousePressed(connectBtnClick);
}

function draw() {
  // Check if port is open
  if (port.available() > 0) {
    let data = port.readUntil("\n");
    
    if (data.length > 0) {
      // Update value
      sensorVal = Number(data.trim()); 
    }
  }

  background(256);
  
  // Map sensor val to canvas width
  ballX = map(sensorVal, 0, 1023, 25, width - 25);
  
  // Draw ball
  fill(0, 255, 100);
  noStroke();
  ellipse(ballX, height / 2, 50, 50);
}

function connectBtnClick() {
  if (!port.opened()) {
    port.open('Arduino', 9600);
  } else {
    port.close();
  }
}

Part 2: p5.js to LED Brightness

For the second part, we reversed the direction of the data. Instead of sending information from the Arduino to p5.js, we sent it from p5.js back to the Arduino. The ball on the screen acted like a virtual light bulb; dragging it upward made the physical LED brighten, while dragging it downward caused the LED to dim.

Arduino Code

C++

void setup() {
  Serial.begin(9600);
  pinMode(9, OUTPUT); //pmw pin
}

void loop() {
  if (Serial.available() > 0) {
    String input = Serial.readStringUntil('\n');
    int brightness = input.toInt();    // convert str to int
    brightness = constrain(brightness, 0, 255);    // just in case data is weird
    analogWrite(9, brightness);
  }
}

p5.js Code

JavaScript

let port;
let connectBtn;

// Ball variables
let ballX = 300;
let ballY = 200;
let ballSize = 50;
let isDragging = false; 

// Data variables
let brightness = 0;
let lastSent = -1; 

function setup() {
  createCanvas(600, 400);
  
  port = createSerial();
  
  let usedPorts = usedSerialPorts();
  if (usedPorts.length > 0) {
    port.open(usedPorts[0], 9600);
  }

  connectBtn = createButton('Connect to Arduino');
  connectBtn.position(10, 10);
  connectBtn.mousePressed(connectBtnClick);
}

function draw() {
  background(50);

  // ball logic
  if (isDragging) {
    ballX = mouseX;
    ballY = mouseY;
    
    // Keep ball inside canvas
    ballY = constrain(ballY, 0, height);
    ballX = constrain(ballX, 0, width);
  }

  // map brightness to y pos
  brightness = floor(map(ballY, 0, height, 255, 0));

  // send data
  if (port.opened() && brightness !== lastSent) {
    port.write(String(brightness) + "\n");
    lastSent = brightness;
  }
  //draw ball
  noStroke();
  fill(brightness, brightness, 0); 
  ellipse(ballX, ballY, ballSize);
  stroke(255);
  line(ballX, 0, ballX, ballY);

}

// --- MOUSE INTERACTION FUNCTIONS ---
function mousePressed() {
  // check if mouse is inside the ball
  let d = dist(mouseX, mouseY, ballX, ballY);
  if (d < ballSize / 2) {
    isDragging = true;
  }
}

function mouseReleased() {
  // stop dragging when mouse is let go
  isDragging = false;
}

function connectBtnClick() {
  if (!port.opened()) {
    port.open('Arduino', 9600);
  } else {
    port.close();
  }
}

Part 3: Gravity Wind and Bi-directional Communication

For the final exercise, we brought all the concepts together using the gravity-and-wind example. We modified the code to add two new features.

First, a potentiometer was used to control the wind speed in real-time. Second, we programmed the Arduino so that whenever the ball hit the ground, an LED would turn on.

This part took some troubleshooting. I had to filter out very small bounces because the LED kept flickering while the ball rolled along the floor. Once that was fixed, I also added a visual arrow on the screen to show the current wind direction and intensity.

Arduino Code

void setup() {
  Serial.begin(9600);
  pinMode(9, OUTPUT); // LED on Pin 9
}

void loop() {
  // read & send pot value
  int potValue = analogRead(A0);
  Serial.println(potValue);


  if (Serial.available() > 0) {
    char inChar = Serial.read();
    
    // check for blink command
    if (inChar == 'B') {
      digitalWrite(9, HIGH);
      delay(50); 
      digitalWrite(9, LOW);
    }
  }
  
  delay(15);
}

p5.js Code

let port;
let connectBtn;

let velocity;
let gravity;
let position;
let acceleration;
let wind;
let drag = 0.99;
let mass = 50;
let sensorVal = 512; 

function setup() {
  createCanvas(640, 360);
  noFill();
  
  // Physics Setup
  position = createVector(width/2, 0);
  velocity = createVector(0,0);
  acceleration = createVector(0,0);
  gravity = createVector(0, 0.5*mass);
  wind = createVector(0,0);

  // Serial Setup
  port = createSerial();
  let usedPorts = usedSerialPorts();
  if (usedPorts.length > 0) {
    port.open(usedPorts[0], 9600);
  }
  
  connectBtn = createButton('Connect to Arduino');
  connectBtn.position(10, 10);
  connectBtn.mousePressed(connectBtnClick);
}

function draw() {
  background(255);
  
  // read for wind
  if (port.available() > 0) {
    let data = port.readUntil("\n");
    if (data.length > 0) {
      sensorVal = Number(data.trim());
    }
  }
  
  // map wind
  let windX = map(sensorVal, 0, 1023, -0.8, 0.8);
  wind.set(windX, 0);

  // apply physics
  applyForce(wind);
  applyForce(gravity);
  velocity.add(acceleration);
  velocity.mult(drag);
  position.add(velocity);
  acceleration.mult(0);
  
  // draw
  fill(0);
  ellipse(position.x, position.y, mass, mass);
  drawWindIndicator(windX);

  // detect bounce
  if (position.y > height - mass/2) {
      velocity.y *= -0.9; 
      position.y = height - mass/2;
      
      // send blink command
      if (abs(velocity.y) > 1 && port.opened()) {
        port.write('B');
      }
  }
  
  // collision detection
  if (position.x > width - mass/2) {
    position.x = width - mass/2;
    velocity.x *= -0.9;
  } else if (position.x < mass/2) {
    position.x = mass/2;
    velocity.x *= -0.9;
  }
}

function applyForce(force){
  let f = p5.Vector.div(force, mass);
  acceleration.add(f);
}

function connectBtnClick() {
  if (!port.opened()) {
    port.open('Arduino', 9600);
  } else {
    port.close();
  }
}

// helper to visualize the wind
function drawWindIndicator(w) {
  push();
  translate(width/2, 50);
  fill(150);
  noStroke();
  text("Wind Force", -30, -20);
  stroke(0);
  strokeWeight(3);
  line(0, 0, w * 100, 0); 
  fill(255, 0, 0);
  noStroke();
  if (w > 0.05) triangle(w*100, 0, w*100-10, -5, w*100-10, 5); // Right Arrow
  if (w < -0.05) triangle(w*100, 0, w*100+10, -5, w*100+10, 5); // Left Arrow
  pop();
}

function keyPressed(){
  // reset ball
  if (key==' '){
    mass=random(15,80);
    position.y=-mass;
    position.x = width/2;
    velocity.mult(0);
  }
}

Video Demonstration

Reading Response Week 10

I still remember the first time I used VR. I was so amazed by the experience that I didn’t touch my phone for the whole day. It felt completely different from the usual screen interactions I was used to; suddenly, I was moving, reaching, and using my body in ways that made the technology feel alive. Reading A Brief Rant on the Future of Interaction Design reminded me of that moment, because the author argues that our visions of the future are too focused on “Pictures Under Glass,” flat screens that limit the richness of human interaction.

The rant makes a strong case that our hands and bodies are capable of far more expressive actions than just tapping and swiping. The follow-up responses clarify that the point wasn’t to offer a neat solution, but to spark research into dynamic, tactile interfaces that embrace our physicality. I completely agree with this perspective, as VR demonstrates the power of technology when it engages the entire body. It’s entertaining, immersive, and feels closer to what interaction design should be.

At the same time, I know it would be hard to design everything this way. Not every task needs full-body interaction, and sometimes the simplicity of a phone screen is enough. But I do think it’s doable to push more technologies in that direction, blending practicality with embodied experiences. My main takeaway is that the future of interaction design shouldn’t settle for prettier screens; it should aim for interfaces that make us feel connected to our bodies and the environments around us. VR proves that this is possible, and even if it’s challenging to apply everywhere, it’s a direction worth pursuing.

Production Week 10

Project: The Arduino DJ Console

Assignment Description

For this assignment, we were tasked with designing and building a musical instrument using Arduino. The requirements were simple: the project had to include at least one digital sensor (such as a switch) and one analog sensor.

What We Built

Working with Bigo, we created a DJ-style sound console powered by an Arduino. This instrument enables users to experiment with sound by adjusting pitch and speed, providing a substantial amount of room for creativity.

Our setup included:

  • Two Potentiometers (Analog Sensors):
    One knob changes the pitch of the note, and the other controls the duration (speed).

  • One Button (Digital Sensor):
    This serves as a mute button, instantly silencing the sound.

  • Piezo Buzzer:
    The component responsible for producing the tones.

Schematic

The circuit uses analog pins A0 and A5 for the two knobs and digital pin 13 for the pushbutton.
The buzzer is connected to pin 9.

Video Demonstration

Code

We wrote code to read the sensors and play notes from a C Major scale. Here is the source code for the project:

C++

// Control a buzzer with two knobs and a button

// Define hardware pins
const int piezoPin = 9;
const int pitchPotPin = A0;
const int durationPotPin = A5;
const int buttonPin = 13;

// List of frequencies for C Major scale
int notes[] = {262, 294, 330, 349, 392, 440, 494, 523};

void setup() {
  // Start data connection to computer
  Serial.begin(9600);
  Serial.println("Instrument Ready! Note Stepping Enabled.");

  // Set pin modes
  pinMode(piezoPin, OUTPUT);
  pinMode(buttonPin, INPUT_PULLUP);
}

void loop() {
  // Check if the button is pressed
  int buttonState = digitalRead(buttonPin);

  // Mute sound if button is held down
  if (buttonState == LOW) {
    noTone(piezoPin);
  } else {
    // Read values from both knobs
    int pitchValue = analogRead(pitchPotPin);
    int durationValue = analogRead(durationPotPin);

    // Convert pitch knob value to a note index from 0 to 7
    int noteIndex = map(pitchValue, 0, 1023, 0, 7);

    // Select the frequency from the list
    int frequency = notes[noteIndex];

    // Convert duration knob value to time in milliseconds
    int noteDuration = map(durationValue, 0, 1023, 50, 500);

    // Play the sound
    tone(piezoPin, frequency, noteDuration);

    // Show information on the screen
    Serial.print("Note Index: ");
    Serial.print(noteIndex);
    Serial.print(" | Frequency: ");
    Serial.print(frequency);
    Serial.print(" Hz | Duration: ");
    Serial.print(noteDuration);
    Serial.println(" ms");

    // Wait for the note to finish
    delay(noteDuration + 50);
  }
}

Reading Response Week 9

What really stood out to me across these two readings was how much creativity in physical computing and interactive art depends on participation. In Physical Computing’s Greatest Hits (and Misses), I was struck by how many projects keep reappearing: theremin-like instruments, drum gloves, video mirrors, and interactive paintings. At first, it almost feels repetitive, but the point is that each version can still surprise us. The same theme can be reinvented in ways that feel fresh, because the interaction itself is what makes it unique. It’s less about inventing something completely new every time, and more about how the design invites people to play, explore, and discover.

That idea connected with my own love of music. I’ve always been fascinated by how instruments themselves are designed to invite interaction. Even something as simple as a guitar feels like it’s guiding you, its strings and frets practically tell you how to play, and once you start experimenting, you realize how much freedom you have to create your own sound. Reading about theremin-like instruments and drum gloves reminded me of that same feeling: the design doesn’t just produce music, it encourages you to participate, to experiment, and to find joy in the process.

Then, in Making Interactive Art: Set the Stage, Then Shut Up and Listen, the focus shifts to the artist’s role. Instead of dictating meaning, the artist’s job is to create an environment where the audience can respond and interpret for themselves. I liked the idea that interactive art is more like a performance than a finished statement; the audience completes the work through their actions. That perspective really changes how I think about design. It’s not about control, but about setting up the right conditions for discovery.

Taken together, both readings made me realize that physical computing and interactive art thrive on openness. Whether it’s a recurring project idea or a carefully staged environment, the real magic happens when people bring their own curiosity and interpretation to the table. Good design doesn’t just show us something, it gives us space to participate, and that’s what makes the experience meaningful.

Production Week 9

I designed a simple interactive game using LEDs, a potentiometer, and a digital switch. The setup has two rows of LED pairs, each pair matching in color. The potentiometer controls the start point. When I rotate it, the highlighted position shifts across the pairs and cycles through them.

When I press the digital switch, one of the two lit LEDs starts moving quickly along its row. Pressing the button again stops it. If the moving LED stops exactly on the matching position of the other fixed LED, a green verdict LED turns on to show success. If not, a red verdict LED lights up, and the game resets to the start point.

It’s a fun, simple matching game that combines timing, control, and basic electronics.

Code:

// — Pin Definitions —
// LED Rows (G, Y, R, B)
const int fixedRowPins[] = {2, 4, 6, 8};
const int cyclingRowPins[] = {3, 5, 7, 9};

// RGB Feedback LED Pins
const int RGB_RED_PIN = 11;
const int RGB_GREEN_PIN = 12;
const int RGB_BLUE_PIN = 13;

// Input Pins
const int POT_PIN = A1;
const int BUTTON_PIN = 10;

// — Game Logic Variables —
// Game State: false = waiting/potentiometer mode, true = cycling/active mode
bool gameIsActive = false;

// Stores the color index (0-3) when the game starts
int targetColorIndex = 0;

// Stores the current color index (0-3) of the cycling light
int currentCyclingIndex = 0;

// — Timing Variables for Non-Blocking Cycling —
unsigned long previousCycleMillis = 0;
const int CYCLE_SPEED_MS = 80; // How fast the light cycles (lower is faster)
const int VERDICT_DISPLAY_MS = 2000; // How long to show Red/Green verdict

void setup() {
Serial.begin(9600); // For debugging

// Set all 8 game LED pins to OUTPUT
for (int i = 0; i < 4; i++) {
pinMode(fixedRowPins[i], OUTPUT);
pinMode(cyclingRowPins[i], OUTPUT);
}

// Set RGB LED pins to OUTPUT
pinMode(RGB_RED_PIN, OUTPUT);
pinMode(RGB_GREEN_PIN, OUTPUT);
pinMode(RGB_BLUE_PIN, OUTPUT);

// Set button pin with an internal pull-up resistor
// The pin will be HIGH when not pressed and LOW when pressed
pinMode(BUTTON_PIN, INPUT_PULLUP);
}

void loop() {
// Read the button state
bool buttonPressed = (digitalRead(BUTTON_PIN) == LOW);

// — Main Game Logic: Two States —

// STATE 1: Game is NOT active. Control LEDs with the potentiometer.
if (!gameIsActive) {
handlePotentiometer(); // Light up LED pair based on pot

// Check if the button is pressed to START the game
if (buttonPressed) {
Serial.println(“Button pressed! Starting game…”);
// Lock in the current color from the potentiometer
targetColorIndex = getPotIndex();

gameIsActive = true; // Switch to the active game state
turnRgbOff(); // Ensure verdict light is off

// Wait for the button to be released to avoid misfires
while(digitalRead(BUTTON_PIN) == LOW);
delay(50); // Simple debounce
}
}
// STATE 2: Game IS active. Cycle the lights and wait for the player’s timing.
else {
cycleLights(); // Handle the light cycling logic

// Check if the button is pressed to STOP the cycle and check the verdict
if (buttonPressed) {
Serial.println(“Timing button pressed!”);
// The currentCyclingIndex is the player’s selection
checkVerdict();

gameIsActive = false; // Game is over, switch back to potentiometer mode

// Wait for button release
while(digitalRead(BUTTON_PIN) == LOW);
delay(50); // Simple debounce
}
}
}

// — Helper Functions —

// Reads potentiometer and lights up the corresponding LED pair
void handlePotentiometer() {
int potIndex = getPotIndex();
lightLedPair(potIndex);
}

// Reads the potentiometer and maps its value to an index from 0 to 3
int getPotIndex() {
int potValue = analogRead(POT_PIN); // Reads value from 0-1023
// Map the 0-1023 range to four sub-ranges (0, 1, 2, 3)
int index = map(potValue, 0, 1023, 0, 3);
return index;
}

// Lights one pair of LEDs based on an index (0-3)
void lightLedPair(int index) {
turnAllGameLedsOff();
digitalWrite(fixedRowPins[index], HIGH);
digitalWrite(cyclingRowPins[index], HIGH);
}

// Manages the fast, non-blocking cycling of the second row of LEDs
void cycleLights() {
// This uses millis() to avoid delay() so we can still read the button
unsigned long currentMillis = millis();

if (currentMillis – previousCycleMillis >= CYCLE_SPEED_MS) {
previousCycleMillis = currentMillis; // Reset the timer

// Move to the next LED in the cycle
currentCyclingIndex++;
if (currentCyclingIndex > 3) {
currentCyclingIndex = 0; // Loop back to the start
}

// Update the lights
turnAllGameLedsOff();
digitalWrite(fixedRowPins[targetColorIndex], HIGH); // Keep fixed LED on
digitalWrite(cyclingRowPins[currentCyclingIndex], HIGH); // Light the current cycling LED
}
}

// Checks if the player’s timing was correct and shows the verdict
void checkVerdict() {
if (currentCyclingIndex == targetColorIndex) {
Serial.println(“Verdict: CORRECT!”);
showVerdict(true); // Show green light
} else {
Serial.println(“Verdict: WRONG!”);
showVerdict(false); // Show red light
}
}

// Lights up the RGB LED Green for correct, Red for incorrect
void showVerdict(bool isCorrect) {
turnAllGameLedsOff(); // Turn off game lights to focus on verdict
if (isCorrect) {
// Light RGB GREEN
digitalWrite(RGB_RED_PIN, LOW);
digitalWrite(RGB_GREEN_PIN, HIGH);
digitalWrite(RGB_BLUE_PIN, LOW);
} else {
// Light RGB RED
digitalWrite(RGB_RED_PIN, HIGH);
digitalWrite(RGB_GREEN_PIN, LOW);
digitalWrite(RGB_BLUE_PIN, LOW);
}
delay(VERDICT_DISPLAY_MS); // Hold the verdict light
turnRgbOff(); // Turn off the verdict light before returning to the game
}

// — Utility Functions —

// Turns off all 8 game LEDs
void turnAllGameLedsOff() {
for (int i = 0; i < 4; i++) {
digitalWrite(fixedRowPins[i], LOW);
digitalWrite(cyclingRowPins[i], LOW);
}
}

// Turns off the RGB LED
void turnRgbOff() {
digitalWrite(RGB_RED_PIN, LOW);
digitalWrite(RGB_GREEN_PIN, LOW);
digitalWrite(RGB_BLUE_PIN, LOW);
}

Reading Response Week 8

Honestly, the biggest takeaway for me from these documentaries was realizing how much design and persistence shape not just how we use things, but also how we feel about using them. With Attractive Things Work Better, it hit me especially hard because of my situation at TikTok. I had never actually used the app before starting, and at first, I felt entirely out of place, as if I was missing some secret language that everyone else already spoke. But the more I explored, the more I noticed how the design itself was pulling me in. The smooth scrolling, the way videos fill the screen, and the clean interface all made me curious, rather than frustrated. Even though I didn’t know what I was doing, the app felt welcoming. That’s precisely what the documentary was talking about: attractive things don’t just look good, they change the way we experience them.

On the other hand, Her Code Got Humans on the Moon made me think about resilience and diving into challenges without a clear roadmap. It reminded me of when I joined the Hack My Robot cybersecurity competition. I had zero prior knowledge about network security, but I was so excited to participate that I didn’t even care about the results. I ended up bingeing on crash courses and tutorials, trying to absorb as much information as possible in a short amount of time. It was one of the most intensive learning experiences I’ve ever had, but also one of the most enjoyable. And in the end, our team actually placed second, which felt surreal given how unprepared I had been at the start.

By combining these two ideas, I’ve come to realize that good design and passionate persistence both have the power to transform intimidating experiences into something playful and rewarding. Attractive design makes me more patient and curious, while resilience in the face of uncertainty makes me more confident and adaptable. Whether it’s learning TikTok from scratch or throwing myself into a competition I wasn’t ready for, both experiences showed me that the way we feel while engaging with something can be just as important as the technical details.