Week 8 – Unusual Switch

Concept

Link: https://drive.google.com/file/d/19TgW5BmcVSER1t9MUOYlwJh5GEUXzX6o/view?usp=sharing

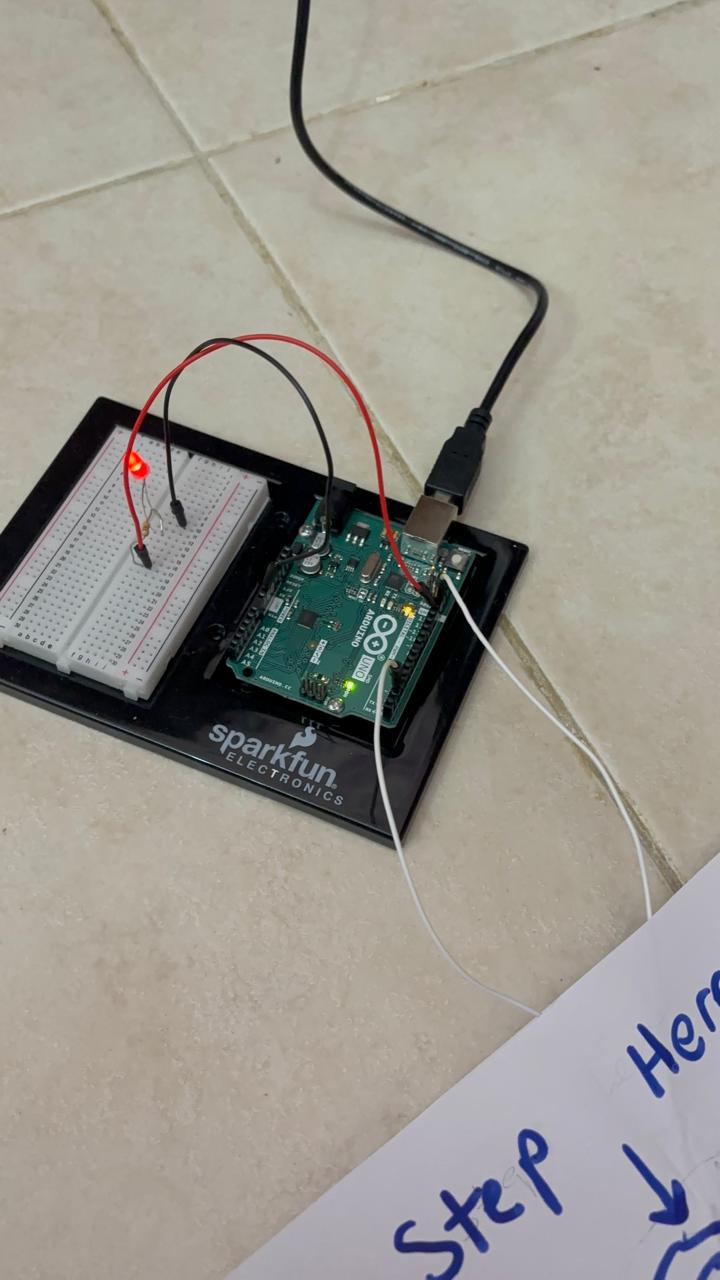
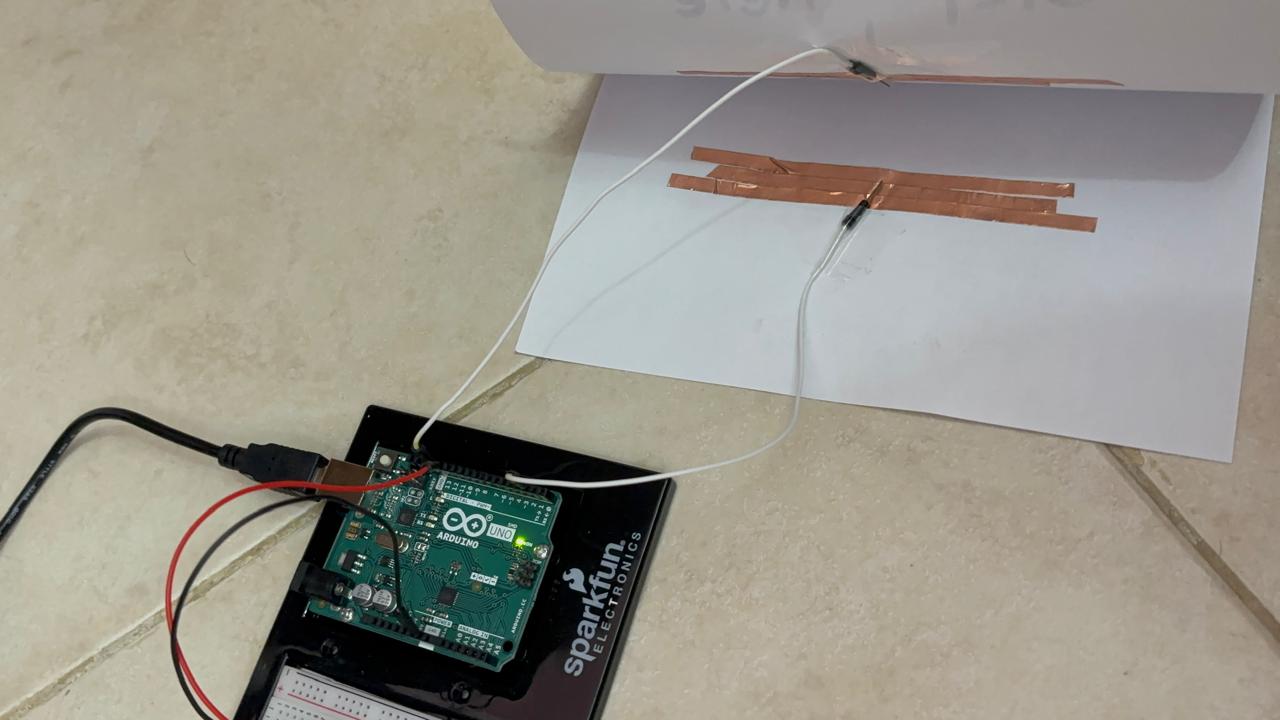
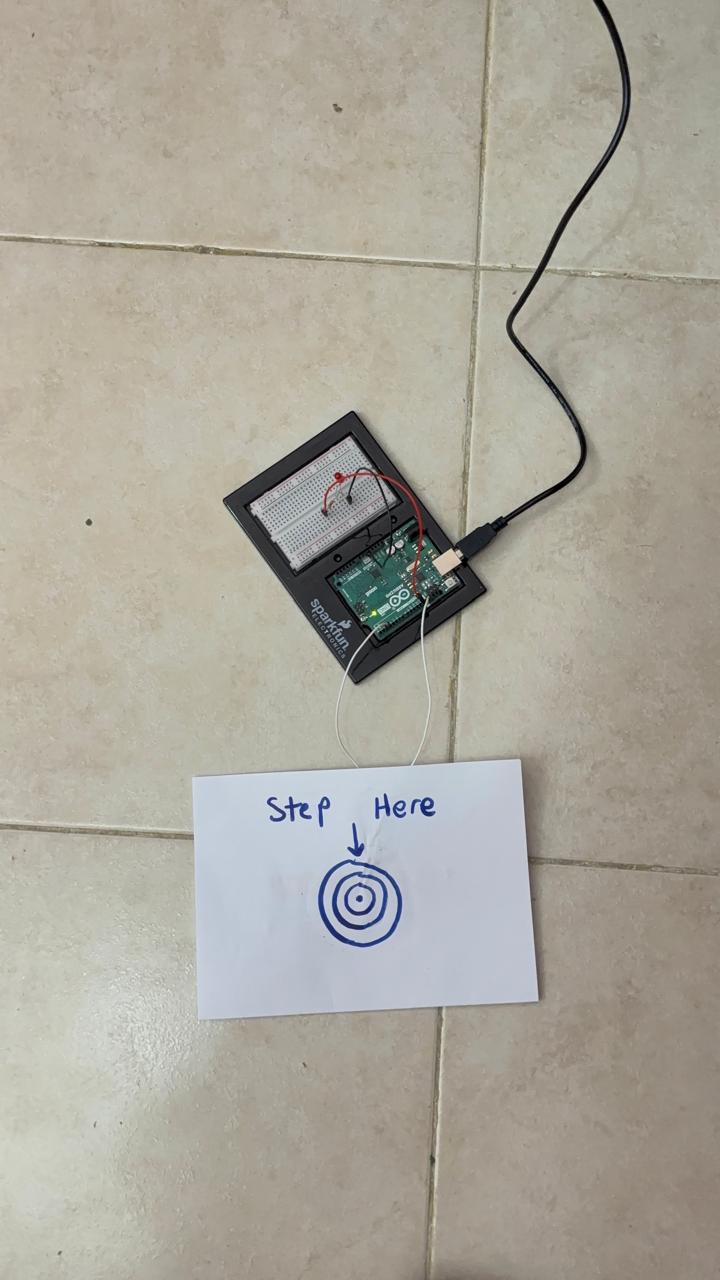
For this assignment, I decided to create a simple light-controlled system using a homemade pressure switch (A foot pedal). This is because I was curious to learn how basic, mundane materials like paper could be used to create an operational input device without using typical components like push buttons. By including this on the Arduino Uno, I could turn an LED on and off with a physical press, demonstrating how simple materials around the house can be repurposed to create interactive electronics projects.

Arduino Code

I changed the original Arduino “Blink” code to make the light not turn on and off by itself, but only turn on when I trigger it using my paper and copper tape switch:

int buttonPin = 2;
int ledPin = 13;

void setup() {
  pinMode(buttonPin, INPUT_PULLUP); // Enables internal pull-up resistor
  pinMode(ledPin, OUTPUT);
}

void loop() {
  if (digitalRead(buttonPin) == LOW) {
    digitalWrite(ledPin, HIGH); // LED ON when pressed
  } else {
    digitalWrite(ledPin, LOW);  // LED OFF when released
  }
}


I connected the switch to one of the Arduino’s pins that has the ability to sense if something is being touched. I also used a built-in function that helps the Arduino become aware when the switch is not being pressed. In the code, I instructed the Arduino to switch the light on when the switch is triggered, and off when it’s not. This ensures that the light will switch on directly due to my homemade pressure switch (A foot pedal).

Challenges

One of the main challenges was creating a functioning switch without a supply of crocodile clips, actual push buttons, or normal conductive material. I used paper, copper tape, and jumper wires with some trial and error to develop consistent electrical connection. Getting the copper strips into perfect alignment and holding them together in use took some experimentation. Also, getting a grasp on how to utilize the internal pull-up resistor is necessary to prevent false firing and ensure that the switch is reliable.

Midterm Project

Concept

Link to Sketch: https://editor.p5js.org/sa8831/sketches/R-3aQof8X

Inspired by a small app I made during high school (Refer to the blog about Midterm progress),  I decided that for the upcoming midterm project, to create an interactive visual novel game. The game takes place in a school of “The Periodic Table” where chemical elements are personified as classmates and teachers. Throughout the game, the user plays as a personified version of Carbon meets other elements like Hydrogen and oxygen to discuss who they are. However, there are 2 endings to this game, where after interacting with either characters, each gets a different ending and a different activity.

How the game works:

How the Periodic Table Academy Game Works (Updated Version):

  • Starting the Game:
    • When the game starts, a title screen with a Play button appears. Upon clicking the Play button, the game transitions to the instruction screen.
    • Instructions are displayed, welcoming the player to the Periodic Table Academy and explaining that the player can click the Play button again to begin the game. The player is presented with two characters to interact with: Oxygen and Hydrogen. The characters are displayed on the screen, and the player can choose who to talk to by selecting an option like “Talk to Oxygen” or “Talk to Hydrogen”.
    • If the player chooses to talk to Oxygen, they enter the oxygen-talk state. Oxygen responds with different dialogue options like:
      • How are you?
      • Tell me about yourself
      • Bye
    • Based on the selected option, the game displays different responses from Oxygen, with the dialogue box updating each time.
    • If the player selects “Bye”, the game moves into a cutscene where Oxygen says goodbye, and then the game transitions to one of the endings after a short delay (CO2).Hydrogen’s Dialogue:
      • Similarly, if the player chooses to talk to Hydrogen, they enter the hydrogen-talk state. Hydrogen responds with dialogue options such as:
        • How are you?
        • Tell me about yourself
        • Bye
      • The game progresses similarly as with Oxygen, with the player receiving different responses from Hydrogen.
      • Selecting “Bye” leads to a cutscene where Hydrogen says goodbye, followed by a transition to another ending (C-H).


Endings:

        • There are two possible endings:
          • CO2 (Carbon Dioxide): If the player interacts with Oxygen, they receive the CO2 ending. The game then displays a message congratulating the player for making CO2.
          • C-H (Hydrocarbon): If the player interacts with Hydrogen, they receive the Hydrocarbon ending. The game congratulates the player for making Hydrocarbons.Interactive Ending:
            • During the ending state, the player can click around the screen to generate particles that represent either CO2 or Hydrocarbons depending on the ending.
            • Particles are displayed on the screen, and each particle shows a label (either “CO2” or “C-H”) as it moves upward. These particles are generated when the player clicks anywhere on the screen.

Game Design

I initially wanted to draw a personified Carbon and allow the user to move using keys A and D to include a walking animation, to go either direction to the characters. However, due to breaking the screen and difficulty to link my spritesheet with the character, I removed that idea but instead made it inspired by the game Undertale:

Undertale Part #12 - Dating Start!

(inspiration for the dialogue)

In addition to this, the endings involves particles that resembles a “bond” between 2 characters. I aim for the particles to represent the compounds for reacting Carbon with either Oxygen or Hydrogen to create molecules (like C-H or Hydrocarbons, and Carbon Dioxide or CO2).


Highlights/ Challenges:
The highlights of this would be this snippet:

// Particle Class
class Particle {
  constructor(x, y, text) {
    this.x = x;
    this.y = y;
    this.size = random(20, 50);
    this.text = text;
    this.ySpeed = random(-2, -1);
  }

  move() {
    this.y += this.ySpeed; // Move upward
  }

  display() {
    fill('#ADD8E6');
    noStroke();
    ellipse(this.x, this.y, this.size);
    fill(255);
    textSize(this.size / 2);
    text(this.text, this.x, this.y);
  }
}

// Generate particles on click
function mousePressed() {
  if (state === 'ending') {
    let newParticle = new Particle(mouseX, mouseY, endingType);
    particles.push(newParticle);
  }
}

Because of clicking around the ending screen to get the needed “molecule” for each ending.

However, the challenges involves the following:

  1. Ensuring smooth user interaction with the character dialogues was challenging, especially with different choices for interactions such as “How are you?”, “Tell me about yourself?”, and “Bye.”
    • I structured the dialogue system using buttons that allow for straightforward user input. This kept the interactions clean, with each character giving distinct options based on the user’s previous choices. This helped in providing a more guided yet flexible experience.
  2. Since I wanted to integrate Object-Oriented Programming, handling multiple characters (Oxygen and Hydrogen) with unique behaviors, interactions, and background transitions was tricky, especially with the game requiring seamless transitions from one scene to another.
    • I utilized OOP principles to create classes for characters, backgrounds, and game states. This allowed for easy management of multiple elements interacting with each other, while ensuring that transitions and character interactions felt fluid and natural. The background changed dynamically as Carbon moved, which helped convey the progression of the game.
  3. Another challenge was implementing multiple endings depending on which character the player interacts with first and ensuring the game could be easily restarted without refreshing the page.
    • I included an instruction screen and a restart button after each ending. To handle game state management, I kept track of the character interactions and ensured the game’s ending sequences could be triggered based on the order of choices. The restart button was designed to reset the game state while keeping the experience accessible without needing to reload the page.
  4. The game’s concept of displaying chemistry information such as oxygen bonding with carbon, and visual representations of molecules like CO2 and hydrocarbons, needed to be both educational and engaging.
    • I decided to keep the visual representations simple, using floating shapes and rain animations to visually communicate the chemical reactions. This allowed players to understand the results of their choices (CO2 and hydrocarbons) in a non-overwhelming way.

Improvements

  • Enhancing Character Interactions:

    • Add more diverse dialogue options that react to previous choices, making conversations more personalized and dynamic.
  • Expanding the Periodic Table Academy Environment:

    • Introduce additional elements from the periodic table with unique interactions, personalities, and visual effects.
    • Create puzzles or mini-games based on chemical properties to increase educational value.
  • Improved Visual Effects for Chemical Reactions:

    • Implement particle effects, such as glowing or color-changing molecules when bonding occurs, to enhance visual appeal and illustrate chemical reactions more vividly.

Week 5 – Reading Response

Computer vision also differs from human vision in that it doesn’t “see” like humans do—it reads images as raw pixel data without reference to context or meaning. Where humans intuitively see objects, emotions, and intent, computers need algorithms to define patterns, edges, and movement. We naturally adjust for differences in light, angle, or occlusions, but computer vision generally needs to be programmed further to compensate. Humans also employ depth perception and prior knowledge to make sense of 3D space, while computers typically work on 2D images and need additional techniques like stereo cameras or depth sensors to estimate depth.

So that computers can more easily track what we’re interested in, we use techniques like frame differencing ( movement by detecting differences between frames of video), background subtraction (new objects are highlighted against a static scene), and brightness thresholding (objects are highlighted based on light contrast). More advanced techniques include edge detection, feature tracking, and deep learning algorithms that can detect faces, gestures, or objects. For interactive art, computer vision is frequently utilized by artists to explore themes of control and visibility, as seen in works like Sorting Daemon and Suicide Box.

Week 5 – Midterm Progress

Inspiration & Concept

During high school, I made a small “app” on Code.org using JavaScript (in blocks), where it shows off facts about elements within groups of elements (Gases, Metals, and Nonmetals). When pressing one of the buttons, it gives facts about that specific group, with drawings of my characters that are associated with each group, along with facts about that element (like how Carbon was associated within the Non-Metals group of the periodic table, and next to the drawing of him is facts about him)

Because of this, I decided that for the upcoming midterm project, to create an interactive visual novel game. The game takes place in a school of “The Periodic Table” where chemical elements are personified as classmates and teachers. Throughout the game, the user plays as a personified version of Carbon meets other elements like Hydrogen, Oxygen, Nitrogen learning about their properties, and behaviors, where it involves dialogue and branching choices that influence Carbon journey.


Design

For this project, I decided to keep the design minimal and simple where the color scheme would be muted, along with the characters be hand-drawn, while the background can be made using images and Adobe Photoshop. Backgrounds depict different areas of the hall, where the main character gets to pick either to meet with the other side characters, inspired by the older designs created:


The game will include a dialogue box at the bottom for text and choices, with animated character portraits appearing as they speak.

I decided to draw a sketch of the background on my phone to gain insight into what to include for the characters and how will the game proceed (Since I am planning on adding small characters within that same background to allow the main character to choose who to interact with).


Frightening/Challenging aspects

  1. Since visual novels rely on smooth transitions between scenes, it can be tricky to structure code so that dialogue, backgrounds, and choices update properly without breaking the game. If scene changes aren’t handled correctly, the game might get stuck on one scene, display the wrong text, or fail to update choices.
  2. Since p5.js runs in a continuous draw() loop, managing character dialogue, choices, and images dynamically can get messy if not structured well. If too many global variables or functions handle game logic, it may become hard to debug, leading to unexpected behavior (e.g., text not changing, buttons not working).
  3. The game must reset everything without refreshing the browser. If variables aren’t properly reset, restarting might carry over data from the previous playthrough. If objects are recreated incorrectly, images or dialogue might not load properly.
  4. I fear that sounds (like background music) may overlap, resulting in distorting my game

Prevention

  1. In order to ensure smooth transitions, I will use an OOP structure (Scene and Game classes) to manage transitions cleanly. I will also test each scene’s logic separately before adding more in case of any errors. I will also use classes based on the key aspects of the game:
    1. Character class to store element info
    2. Scene class to handle dialogues, backgrounds, and choices
    3. Game class to control transitions
  2. In order to make sure sound is used properly, I will Use sounds inside events like when the mouse is clicked or a key is pressed, along with stopping looping sounds before playing new ones to avoid overlap.


Week 4 – Reading Response

What’s something (not mentioned in the reading) that drives you crazy and how could it be improved?

What drive me crazy is the back of a normal wooden HB pencil once the eraser is finished. It is understandable that the metal band was designed to secure the eraser, but what if I excessively used it throughout handwriting and hear a screeching sound, similar to nails on a chalkboard? Nowadays with new materials used to secure erasers on pencils, I believe they should get rid of the metal band on the pencil end.

  1. The metal band itself can feel uncomfortable when touched or pressed against the skin. It’s often slightly sharp and can feel like it’s tugging at your fingers or the paper.
  2. When I have to erase something on a page unintentionally, it would be sharp enough to tear the paper apart.

I wish that these wooden pencils at least replace the metal bands with materials like rubber, silicon since to me, rubber and silicon would give the pencil a soft, smooth feel, and they’d be less likely to scratch or irritate your fingers.

How can you apply some of the author’s principles of design to interactive media?

To apply these principles, it ensures that technology aligns with human needs, making systems more intuitive, efficient, and enjoyable to use. With the use of his principle of affordances, it can help users understand what actions are possible, while signifiers provide clear cues to guide them, like buttons, links, and things the mouse can hover over, so that it can be accessible to the users. To me, a well-designed model for websites and apps helps users predict how a system works. While technology can make tasks easier, it can also add complexity, so designers must carefully balance functionality, usability, and aesthetics to create a smooth and engaging experience.

Week 4 – Generative Text

Concept

For the fourth assignment, I will present a sentence generator that provides new drawing ideas. When you hit the “Enter” key, the sentence displayed will be changed to a new randomly generated idea. The interface has a beige color to resemble a warm, inviting workspace. On the left, the text “Possible Drawing Ideas” is centered, and a small, cute pencil image is positioned just below it. On the right side, a large white rectangle looks like lined composition paper, with blue horizontal lines and a red border to make it look like a notebook page. The sentence generator uses three arrays—subjects, verbs, and objects—to construct new and random sentences whenever the “Enter” key is pressed. This is inspired by word generators online, more specifically the drawing generator below:

https://randomwordgenerator.com/drawing-ideas.php

I always wanted to know what to draw after a while of not doing so, so I hoped this generator could help me generate ideas on what to draw during my freetime.

Code Highlight

A a snippet i am proud of is this one:

function generateNewSentence() {
  let s = random(subjects);
  let v = random(verbs);
  let o = random(objects);
  currentSentence = `${s} ${v} ${o}.`;
}

This is because when I first started creating this, I struggled to get the sentence structured properly. At first, I couldn’t figure out how to manipulate the arrays and get the randomly selected items to fit properly into the structure of the sentence. I kept getting errors like missing spaces or syntax errors because I didn’t understand how important it was to use template literals for dynamically building strings. Upon discovering that, I was still struggling with randomization, e.g., getting an undefined result due to the arrays being accessed improperly. Eventually, after practicing with W3Schools and learning about template literals using this as reference:

https://www.w3schools.com/js/js_string_templates.asp  

I realized I needed to structure the string with it in a more precise way to avoid errors with spacing.

Embedded Sketch

(You can go to p5.js to see it clearly)

Reflection

Overall, this was a really fun project to play with texts and random words to generate one sentence. I really enjoyed testing my project by hitting “Enter” to transform the sentence to another random one. However, what had frustrated me sometimes is finding out the fonts for separate texts. I once tried to add another font but it ended up changing the size of the title “Possible Drawing Ideas” and caused some parts of the sentence to be chopped off (See below).

I can see myself using this feature in p5.js more and I can add extra details to make it seem a bit more realistic (shading, and details on the small pencil).

Week 3 – Reading Response

When Crawford mentions at the beginning of the chapter, “The term interactivity is overused and underunderstood” (3), it surprised me as I always believed interactivity involves physically engaging with technology and allowing them to respond to input. However, Crawford makes it clear with his definition being a “conversation,” since to him, a system isn’t truly interactive if it only delivers what it is supposed to respond; it has to listen, think and speak in a way that adapts over time. Additionally, as he asks questions, and even asked one, “Is interactivity utterly subjective?” It really made opened my perspective on what is interactivity, it suggests to me what feels interactive to one person might not feel that way to another, since it depends on their expectations and prior experiences. As a result, it made me realize that with some of my p5.js sketches and exercises, while technically reactive, it isn’t truly interactive.

With my sketches, they don’t have any aspect of interactivity, but they’re rather responsive, especially my previous assignment (for week 2 on loops), since within the sketch, hitting “Enter” would cause my sketch to go from a monochrome grayscale to random, simultaneous pops of color. With that, I aim for future projects to apply similar aspects of interactivity, rather than having them being responsive to user input.

Week 3 : Generative Art

Concept

For this assignment, I tried to incorporate OOP, arrays, and functions to present my work  as a rainy scene with a statue in front of it. As I watch videos from The Coding Train on this, and instantly knew what I can do for my assignment.

My assignment is heavily inspired by a video game called “Undertale” because it was a game I used to play that impacts me through its characters and themes of kindness and determination, and the statue in the game (see below) sits silently in rain alone, that really evokes a lot of emotions when looking at it.
Posts with replies by thekingmrturtle (@thekingmrturtle) / X

From my understanding of the videos and practices using p5.js, I used classes to create objects such as raindrops, the statue, and the umbrella, making sure everything was organized and reusable. The raindrops are held in an array so that continuous rain can be achieved, while the statue and umbrella are static, reinforcing the contrast between movement and stillness. With this, I aimed for this assignment to recreate similar feelings of peace and contentment like how the game does in that scene.

Code Highlights

One snippet I am proud of is this one:

display() {
  noStroke();
  fill(255);  // White color for the raindrop
  rect(this.x, this.y, 2, 10); // Draw the raindrop as a rectangle
  
  //Light shape and color
  fill('rgba(221,221,133,0.36)')
  triangle(50, 400, 200, -50, 350, 400);


This is because it adds a subtle lighting effect that improves the scene’s ambiance in addition to producing a straightforward but effective raindrop. As I wanted to add light within the background, I noticed that, when playing the animation, it started to illuminate, and I was surprised. Although the raindrop itself is simple, the triangle shape’s gentle glow creates the illusion of diffused light, similar to a street light.

Embedded Sketch

Reflections

Overall, this was a really simple project with the help of arrays keeping the raindrops structured yet drops at random points and time. I really enjoyed trying to make my project come close to my inspiration although i didn’t fully incorporate everything else. Despite this, I struggled with trying to allow the drops to hit the umbrella, resulting in what it seems to be raining in the background, than on top of the umbrella (like my inspiration). As a result, I can work around that, along with adding some additional details to the project, like moving the umbrella towards the statue.

Week 2 – Reading Response

Within Casey Raes’ talk on chance of operations, I find that it provided an intriguing perspective on the relationship between order and chaos when creating pieces of work. His idea that artists keep things in order within a chaotic world resonates with me, especially after creating my loop assignment in p5.js.  This is because by setting boundaries (the grid) while allowing for unexpected outcomes (the random colors), I was able to maintain a balance between order and chaos.  I find it interesting when he mentions “controlled randomness,” since it shows me that he believes that when randomness is controlled, it can be used to generating beautiful pieces of art.

As he discussed World War I art pieces, I was intrigued as I never knew there were connections between the artwork that represents the artist’s history and current history. As someone who is currently learning World War I for the first time, this has gave me a gist to what these artworks mean, and it is about symbolism and the historical context. After watching the video, I am excited to be a bit more “chaotic” with the pieces along with keeping things in order, just like my loop experiment on p5.js.


Week 2 – Loops Artwork

Concept

For the second assignment, I will present a  series of squares that show contrast between a structure  black and white gradient and vibrant colors. When pressing the “Enter” key, the orderly monochrome arrangement becomes a more random, colorful display. At the time, I aimed to explore how colors can change randomly and how it can change a perception of an artwork

Code Highlight

One snippet i am proud of is this one:

//Loop pattern
 for (var i = 0; i < 20; i++){ // Loop through 20 columns
   for (var j = 0; j < 20; j++){ // Loop through 20 rows
     //Position and Size of the square
     var x = i * 50 + 25
     var y = j * 50 + 25
     var d = 25

This is because I was working on repeating the same code of using Variables of x, y, and d except changing the values, then I later found out, through a p5.js  tutorial by The Code Train on “Arrays and Loops” that there can be another loop to incorporate instead of copying the same lines of code over and over for rows to better calculate the positions and dimensions for each square in the grid.

Embedded Sketch

Reflections

Initially, I wanted the squares to rotate or spin upon pressing “Enter” using the rotate() and rotateX() functions, but there are challenges in structuring the lines of code, since at some point there are mistakes that disrupted my entire layout, leading me to use an alternative to incorporate randomly generated colors within the cubes.

I also referenced snippets from my past p5.js experiments, like using this from my last experiment with p5.js:

function keyPressed() {
if (keyCode === ENTER)
// Clicking between two assets :)
showGif = !showGif;
}

However, I modified it to change colors instead of changing gifs.

Overall, this was a really insightful experience and I plan on revisiting more concepts on loop functions along with rotating functions to help understand more as I experiment more with p5.js.