week 8 reading – norman

The Role of Affect in Design

Norman’s research highlights that affect—both positive and negative—plays a significant role in how users interact with products. Positive affect enhances creativity and problem-solving, which allows users to approach tasks with an open mind. In contrast, negative affect can lead to focused attention, which is beneficial in high-stress situations but may limit creative thinking.

Aesthetics vs. Usability

Norman argues that aesthetics and usability should not be seen as opposing forces but rather as complementary aspects of design. Attractive designs can enhance usability by making users more engaged and tolerant of minor issues. This perspective challenges the notion that usability must come at the expense of beauty, which suggests that a harmonious blend of both can lead to beteter user experiences.

Implications for Design Practices

The findings from Norman’s research have significant implications for design practices across various industries. This emphasizes human-centered design that considers emotional responses can lead to more effective and enjoyable products. This approach encourages designers to think beyond functionality and consider the emotional journey of the user.

Week 8 – Unusual Switch – Wind Detector

Concept

I was initially very intimidated by this assignment, I couldn’t imagine using a switch without hands, but that was the problem, I was tunnel-visioned on the word “switch” that I associate with my index finger. I then saw some examples online and completely ditched the word “switch,” I tried to think about the assignment as linking to metal pieces together, then I started getting a lot of ideas! A couple of days later, I was going through some pictures from back home on my phone. In some picture, I saw a house in the background with a small wind turbine on it’s roof, and that gave me the idea!


Setting up

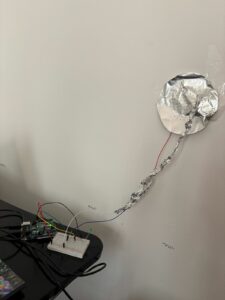
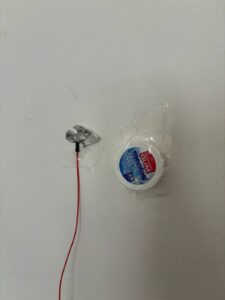
I taped a wire connected to the breadboard on the wall, and put a piece of aluminum foil behind it. The idea of the aluminum foil behind the wire its to create more area for contact with other conductors, that will be useful later on.

You probably are wondering what use is the mentos cap for this project, and to be honest, the mentos cap was probably one of the most important components of this project. It created just the perfect space for the conductor I will soon tape on the cap to not be too close to the wire so its on all the time, nor be too far so wind does not connect the two conductors together.

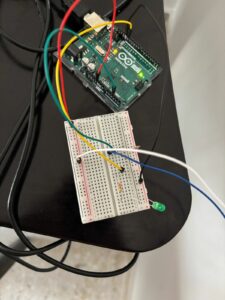
Here’s a full picture of the project with the circuit, well they’re not the prettiest, but they sure work.


 Video

Whenever I blow on the circular foil, the green LED turns on.


Code

The code to this project is honestly really really simple, I used  the same code for the button example from the examples dropdown, I just modified it a little bit.

void setup() {
  Serial.begin(9600);
  pinMode(A2, INPUT);
    pinMode(13, OUTPUT);

}

// the loop routine runs over and over again forever:
void loop() {
  // read the input pin:
  int buttonState = digitalRead(A2);
  Serial.println(buttonState); // debugging
  if (buttonState == 1) {
    digitalWrite(13, HIGH);  // LED ON
  } else {
    digitalWrite(13, LOW);   // LED OFF
  }


}


Webster – Midterm Project

Introduction and Concept

Welcome to Webster! This game comes from an inspiration of a very dear friend, a pet actually. You know what they say ” Do not kill that spider in the corner of your room, it probably thinks you are it’s roommate.” I saw a spider in the corner of a room we do not usually enter in my house, and I called it Webster.

This project is a labor of love that brings together some really fun game design. The game uses solid physics to simulate gravity and rope mechanics, making our little spider swing through a cave that’s so high it even has clouds! I broke the project into clear, modular functions so every bit of the physics—from gravity pulling our spider down to the rope tension that keeps it swinging—is handled cleanly. This means the spider feels natural and responsive, just like it’s really hanging from a web in a bustling cave (maybe IRL a cave of clouds doesn’t exist but its oki)

On the design side, Webster is all about variety and challenge. The game dynamically spawns clouds, flies, and even bees as you progress, keeping the environment fresh and unpredictable. Randomized placements of these elements mean every playthrough feels unique, and the parallax background adds a nice touch of depth. Inspired by classic spider lore and a bit of Spiderman magic, the game makes sure you’re always on your toes—eating flies for points and avoiding bees like your life depends on it (well, Webster’s life does)

Enjoy swinging with Webster!


Sketch!

Code Highlights

// --- Physics-related vars & functions ---
// global vars for gravity, rope stiffness, rope rest length, rope anchor, and damping factor
let gravity, ropeK = 0.5, ropeRestLength, ropeAnchor, damping = 1;

function setup() {
  createCanvas(640, 480);
  gravity = createVector(0, 0.08); // sets constant downward acceleration
}

class Spider {
  constructor(x, y) {
    this.pos = createVector(x, y); // starting pos
    this.vel = createVector(0, 0);   // starting vel
    this.radius = 15;
    this.attached = false; // not attached initially
  }
  update() {
    this.vel.add(gravity); // apply gravity each frame
    if (this.attached && ropeAnchor) {
      let ropeVec = p5.Vector.sub(ropeAnchor, this.pos); // vector from spider to rope anchor
      let distance = ropeVec.mag(); // current rope length
      if (distance > ropeRestLength) { // if rope stretched beyond rest length
        let force = ropeVec.normalize().mult((distance - ropeRestLength) * ropeK); // calculate tension force
        this.vel.add(force); // apply rope tension to velocity
      }
    }
    this.vel.mult(damping); // simulate friction/air resistance
    this.pos.add(this.vel); // update position based on velocity
  }
}

This snippet centralizes all physics computations. Gravity is set as a constant downward acceleration in setup and then applied every frame in the Spider class’s update() method, which makes the spider to accelerate downwards. When attached to a rope, a corrective force is calculated if the rope exceeds its rest length, which simulates tension; damping is applied to slow velocity over time, which mimics friction or air resistance.


// --- Spawning Elements Functions ---
// spawnObstacles: checks spider's x pos and adds cloud obs if near last obs; random spacing & y pos
function spawnObstacles() {
  if (spider.pos.x + width - 50 > lastObstacleX) { // if spider near last obs, spawn new one
    let spacing = random(200, 500); // random gap for next obs
    let cloudY = random(height - 50 / 2, height + 1 / 2); // random vertical pos for cloud
    obstacles.push({ // add new cloud obs obj
      x: lastObstacleX + 500, // x pos offset from last obs
      y: cloudY,             // y pos of cloud
      w: random(80, 150),    // random width
      h: 20,                 // fixed height
      type: "cloud",         // obs type
      baseY: cloudY,         // store base y for wobble effect
      wobbleOffset: random(100000) // random wobble offset for animation
    });
    lastObstacleX += spacing; // update last obs x pos
  }
}

// spawnWorldElements: calls spawnObstacles then spawns collectibles (flies/webPower) and enemies (bees)
// based on frame count and random chance, spawning them ahead of spider for dynamic environment growth
function spawnWorldElements() {
  spawnObstacles(); // spawn cloud obs if needed
  
  if (frameCount % 60 === 0 && random() < 0.6) { // every 60 frames, chance to spawn collectible
    collectibles.push({
      x: spider.pos.x + random(width, width + 600), // spawn ahead of spider
      y: random(50, height + 500),                   // random vertical pos
      type: random() < 0.7 ? "fly" : "webPower"       // 70% fly, else webPower
    });
  }
  
  if (frameCount % 100 === 0 && random() < 0.7) { // every 100 frames, chance to spawn enemy
    enemies.push({
      x: spider.pos.x + random(width, width + 600), // spawn ahead of spider
      y: random(100, height + 500),                   // random vertical pos
      speed: random(2, 4)                           // random enemy speed
    });
  }
}

This snippet groups all spawning logic for environment elements. The spawnObstacles() function checks if the spider is near the last obstacle’s x coordinate and, if so, adds a new cloud obstacle with randomized spacing, vertical position, and dimensions. Then spawnWorldElements() calls this function and also adds collectibles and enemies (bees) ahead of the spider based on frame counts and random chances, to ensure a dynamic and everchanging environment.

Problems I faced (there were many)

There were quite a few quirky issues along the way. One problem was with collision detection—sometimes the spider would bounce off clouds a bit jitterily or not land smoothly, which made the swing feel less natural.  And then there was that pesky web projectile bug where it would linger or vanish unexpectedly if the input timing wasn’t just right, which threw off the feel of shooting a web.

Another area for improvement is enemy behavior. Bees, for example, sometimes weren’t as aggressive as I’d like like, so their collision detection could be sharpened to ramp up the challenge. I also ran into occasional delays in sound effects triggering properly—especially when multiple actions happened at once—which reminded me that asset management in p5.js can be a bit finicky.

Another hiccup was with the custom font and web projectile behavior. Initially, every character was coming out as a single letter because of font issues. When I changed the font extension from ttf to otf, it worked out for some reason.

I also had a lot of problem with the cloud spawning logic, sometimes they would spawn under the spider itself which prevents it from actually swinging as it wont gain any horizontal velocity, this was a PAIN to solve, because I tried every complicated approach which did not work, but the solution was simple, I only had to add a constant (which i chose to be 500) to the initial spawning x coordinates for the clouds. YES! it was that simple, but that part alone took me around 3 hours.

All in all, while Webster is a fun ride, these little details offer plenty of room to refine the game even further!

 

Midterm concept and outline.

Initial concept

I initially wanted to make a top-down shooter game, I designed a lot of stuff, a collision algorithm for the bullets, obstacles, and enemies, a multitude of weapons with special traits, power ups, an infinitely-expanding map, and a bunch of other interactive elements. I got really frustrated with the implementation and gave up on the idea. I came back a day later and didn’t know whether I should abandon the game or not, so I changed to code to make it a horizontal shooter game,and  below is where i reached, before completetly abandoning the idea, even though I had almost all the logic and algorithms implemented, I just couldn’t work with a project a didn’t love.

Hence the delay of submitting this assignment. 

Current concept

I woke up 2 days after, I saw a spider on top in some corner no one goes to in my house with a small net. I decided it to befriend it and I called it Webster.

This sparked an idea in me, which is to make a game of a spider swinging around the world with a web. Then I drew my initial concept.

The most frightening part

This would probably be the implementation of gravity and the physics of the web/rope. I already implemented them though.

class Spider {
  constructor(x, y) {
    // store position & velocity in p5 vectors
    this.pos = createVector(x, y);
    this.vel = createVector(0, 0);
    // spider radius = 15 is used for collisions
    this.radius = 15;
    // track if spider is attached to rope or not
    this.attached = false;
  }

  update() {
    // apply gravity each frame
    this.vel.add(gravity);

    // if spider is attached, we do some rope physics
    if (this.attached && ropeAnchor) {
      // figure out how far spider is from anchor
      let ropeVec = p5.Vector.sub(ropeAnchor, this.pos);
      let distance = ropeVec.mag();

      // only if rope is stretched beyond rest length do we apply the spring force
      if (distance > ropeRestLength) {
        let stretch = distance - ropeRestLength;
        // hooke's law, f = k * x
        let force = ropeVec.normalize().mult(stretch * ropeK);
        // add that force to our velocity
        this.vel.add(force);
      }
    }

    // apply damping (which is basically air resistance)
    this.vel.mult(damping);

    // move spider according to velocity
    this.pos.add(this.vel);
  }

  show() {
    // draw the spider sprite instead of a circle
    push();
    imageMode(CENTER);
    image(spiderImg, this.pos.x, this.pos.y, this.radius * 2, this.radius * 2);
    pop();
  }
}


week 5 reading

Computer vision algorithms are not general-purpose and rely on specific assumptions about the video input, while human vision is adaptable and can interpret a wide range of visual stimuli. Unlike humans, computers cannot inherently understand or extract semantic information from visual data without additional programming. Additionally, computer vision systems may struggle with ambiguous or poorly defined scenes, whereas humans can often infer meaning from context.

Techniques to enhance computer vision include controlled illumination to improve contrast, using brightness thresholding to distinguish objects based on their brightness, and employing background subtraction to isolate moving objects. Additionally, surface treatments like high-contrast paints can make objects more detectable. Simple object tracking algorithms can also be implemented to follow specific features, such as the brightest pixel in a video frame.

Computer vision’s tracking and surveillance capabilities enable interactive art to engage audiences by responding to their movements and expressions, creating immersive experiences. However, this capacity raises ethical concerns regarding privacy and consent, as participants may be unaware of being monitored. Artists must balance the innovative use of tracking technology with responsible practices to ensure a respectful and enjoyable interaction.

week 4- reading response

One I thing I find frustrating is the lack of customization in close-source systems. My iphone that uses IOS for example, I like it, I think its great, but it lacks a lot of customizable features that other systems like android, which lets you customize almost everything in your phone, from keyboard appearance to even system functionalities.

When it comes to designing interactive media, applying key design principles can make all the difference in usability. First, affordances and signifiers should be clear—buttons and links need to look like what they are, so users don’t waste time guessing. Feedback is just as crucial; when a user taps a button, they should see or hear an immediate response that confirms their action. And then there’s mapping—controls should align naturally with their effects, like familiar gestures and intuitive layouts that make navigation feel seamless.

Week 4- Audio Visualizer

Music has always had a profound effect on me—it can transform my mood, inspire creativity, and even transport me to another place. But what if we could see music, not just hear it? That was the inspiration behind my music visualization project. I wanted to create something that would take raw audio data and turn it into a living, breathing visual experience.

I set out to design a program that listens to a song and dynamically generates visuals based on its frequencies. The goal was to make the visualization feel fluid, immersive, and organic—like the music itself. With a gradient background, floating particles, and an animated frequency bar display, the result is a captivating blend of movement and sound.


Code Highlight: Crafting the Visual Bars

At the core of this project is the drawVisualizer function. This function takes the Fourier Transform (FFT) data from the song and maps it to visual elements—essentially transforming audio frequencies into colorful, dynamic bars.

The function first analyzes the sound spectrum using fft.analyze(), which returns an array of frequency amplitudes. These values determine the height of the bars, making them respond dynamically to the beat of the song.

function drawVisualizer() { // draw bars
  let spectrum = fft.analyze(); // get spectrum data
  let barWidth = width / 60;
  let maxHeight = height / 4; 
  for (let i = 0; i < 60; i++) { // loop 60 bars
    let barHeight = map(spectrum[i], 0, 255, 10, maxHeight); // calc bar height
    let hue = map(i, 0, 60, 180, 360); // set hue
    let yPos = height - barHeight; // top pos of bar
    let xPos = i * barWidth + barWidth / 2; // center pos of bar
    fill(hue % 360, 80, 80, 80); // set fill color
    rect(xPos - barWidth / 2, yPos, barWidth * 0.8, barHeight, 5); // draw bar
    if (barHeight > maxHeight * 0.7 && frameCount % 5 === 0) { // add sparkle if tall
      fill(255, 255, 255, random(50, 100)); // sparkle color
      ellipse(xPos, yPos, random(3, 8)); // draw sparkle
    }
  }
}


One of my favorite touches is the conditional statement that adds “sparkles” to the taller bars. This subtle effect makes the visualization feel more alive, as if the bars are bursting with energy at their peaks.


Self-Reflection and Areas for Improvement

One of the biggest challenges was fine-tuning the balance between randomness and control. The bars needed to feel reactive but not chaotic, structured but not rigid.

Another area I’d like to explore is incorporating more interactive elements. Right now, the only interaction is toggling the song on and off with a mouse click. Adding features like changing color themes based on the song’s mood or allowing users to manipulate the bars with the mouse could make the experience even more engaging.

Sketch

Week 3, reading response, Mustafa Bakir

The essence of a highly interactive system lies in its ability to fluidly engage with the user, accommodating diverse input methods that extend beyond conventional interactions such as keyboard strokes and mouse clicks. True interactivity is achieved through multisensory engagement, fostering deeper immersion by allowing users to communicate with the system in a more intuitive and natural manner. However, interactivity is not merely about designing creative input methods—it is about the system’s capacity to interpret, respond to, and, in a sense, “perceive” the nature of the input it receives. A truly interactive system should not only register commands but also discern the context, intent, and even emotional nuances behind them, refining its responses accordingly.

In my approach to integrating interactivity within my p5.js sketches, I aim to incorporate machine learning principles that expand the range of possible user inputs beyond simple mechanical interactions. Rather than restricting engagement to direct physical actions like clicking or typing, my goal is to develop a system that can process complex, multidimensional input—such as emotional states, gestures, or vocal inflections—enabling a richer and more intuitive experience. One potential interactive art concept would involve a dynamic piece that changes color, form, or composition based on the emotional state of the person viewing it. By leveraging machine learning to analyze facial expressions, body language, or even biometric data, the artwork could evolve in real time, creating a deeply personal and immersive interaction between the observer and the digital medium.

Drawing with Fourier Transform, Polygon Guesser, Mustafa Bakir, Week 3 assignment

Inspiration

This idea initially was sparked by my a Youtube channel called 3Blue1Brown, from this video specifically.

Design

Initially, before implementing any program, you have to design proper psuedocode and sometimes a flowchart to aid with you coding your project.

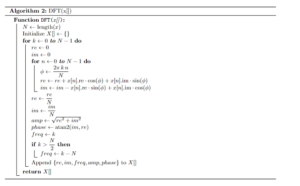
I first did my research on the topic, from a page in Wikipedia, this gave me some general ideas of the mathematical concepts used to utilize Discrete Fourier Transformation. I then watched this youtube video to give me a better idea to how to design and implement the DFT algorithm. Moreover, this article gave me more insight on the topic.

I didn’t need to do any sketches as the videos and blogs I watched and read gave me a rough idea, I only had to design the algorithms I am going to use.

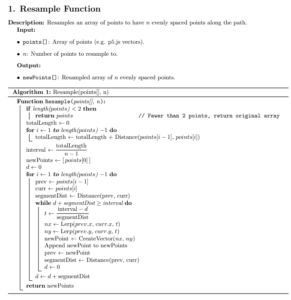
I used latex to design my algorithms.

I made use of the built in p5 functions to implement those mathematical notations as such:


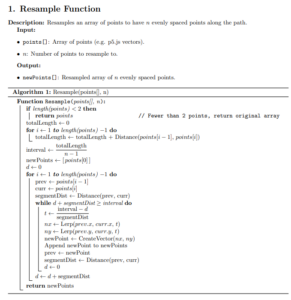
Then I implemented the resample function, which standardizes the distribution of points along a given path.


Lastly, I designed the draw function to keep the drawing animated.


Sketch

Creativity elements: what makes this different that other DFT projects?

The usage of DFT (Discrete Fourier Transformation) in video projects or art sketches is usually done by setting certain coordinates for pre-determined shapes and objects. For my project, the user gets to draw their own shape which will be traced by the epicycles, which revolutionizes DFT to be much more utilizable in different fields. The background, being plane black acts as a canvas for the user to not be influenced or distracted with background elements but rather truly unleash the original shape the user has in mind.

Moreover, the big center circle acts as a centralizer, if the user draws a triangle on the corner of the canvas for example, the exact same triangle will be traced but it will be in the middle of the canvas, this enhances user experience and avoids uninentional behavior. Lastly, It would be really hard for the user to precisely trace a fully enclosed shape if the user is using a mouse to draw, therefore, for aesthetic purposes and improved user experience, the shapes automatically close upon mouse release.

Code Highlights

// -------------- epicycle class --------------
// represents one epicycle for fourier reconstruction
class Epicycle {
  constructor(x, y, coeff) {
    this.x = x; // x coordinate of center
    this.y = y; // y coordinate of center
    this.freq = coeff.freq; // set freq from coefficient
    this.amp = coeff.amp * scaleFactor; // set amplitude with scaling
    this.phase = coeff.phase; // set phase from coefficient
  }
  // compute endpoint of epicycle at given time
  update(time) {
    let angle = this.phase + TWO_PI * this.freq * time; // calc angle using phase and freq
    let dx = this.amp * cos(angle); // calc x displacement
    let dy = this.amp * sin(angle); // calc y displacement
    return createVector(this.x + dx, this.y + dy); // return new endpoint as vector
  }
  // draw epicycle's circle on canvas
  display() {
    stroke(255, 100); // set stroke color with transparency
    noFill(); // no fill for circle
    ellipse(this.x, this.y, 2 * this.amp); // draw circle with diameter equal to 2 * amp
  }
}

This is the class I used that is used to create the epicycles to draw the the traced curves.

if (closedShape && path.length > 0) {
  // if closed shape flag set and path exists
  vertex(path[0].x, path[0].y); // close shape by connecting to first pt
}

This code ensures that the shape is closed by checking the distance between initial point and the last point of the array

Struggles I faced

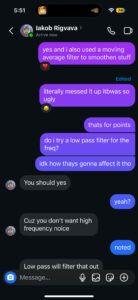
I was struggling with the smoothness of the curves, so I tried to implement a moving average filter, which is a filter for the coordinates. That was really bad so I texted my friend who is pretty smart at coding.

I remembered that a low pass filter is used to smoothen frequencies, and I did impelement that after my friend Iakob inspired me, it ended up so nice.

Future Improvements

The animation of how the shape closes is very fast in relation to the drawing animation, I need to enhance the algorithm to match the number of epicycles and control the speed of the closing animation accordingly

I really dislike how the speed has to change when the number of epicycles changes, and you basically have to trial-and-error your way through, I want to re-implement some stuff to combine those two things which would make anyone whos tweaking the code’s life much easier

AI usage declaration

I admit that I used artificial intelligence to help me with this assignment, especially with the resample function, but all the work, design, concept, and implementation was mine, I only used AI to help me debug and orient/guide me throughout the process of creating this art piece.

Everchaging, Never Still. (Week 2 Assignment)

Concept

This concept originated from the fact that our lives are never still, and I recently have been getting more and more aware and educated about the importance of mental health which inspired me to do this design. The initial idea was inspired from this piece of art.

The core of the design lies within the order of our lives, which I will represent using a grid of rectangles with varying sizes to represent life responsibilities and events with varying importance which is relevant to the size of the rectangles. The grid then, after a set period of time, begins to mosh into itself creating a sense of confusion and loss of control, which will reset after the user clicks on the screen. This resembles the idea that, mental problems will follow people despite them avoiding them or not trying to get them. Then, to reset the grid, the user has to take action, not just give in into the moshing effect and allow the mental problems to consume them. After the user clicks, the grid comes back and the timer resets, but the grid doesn’t come back to the same initial state as some mental problems are life changing and can leave a scar.

Sketch

Code Highlights

  for (let i = 0; i < 10; i++) { // using a for loop as a timer
    timer++; // increment timer
  }
  
   if (timer >= timerLimit) {
// randomly mosh over time
}

This is my usage of a for loop for a timer, where the variables timer and timerLimit have been initialized as global variables.


let randomX = random(width); // grab random x location
let randomY = random(height); // grab random y location

let moshedArea = get(randomX, randomY, 30, 30); // get the specific area with the random x and y positions with size 30
let offsetX = random(-10, 10); // move the area randomly between a range of 10 and -10
let offsetY = random(-10, 10); // same thing

   // redraw the image
image(moshedArea, randomX + offsetX, randomY + offsetY);  }

This is how I did the moshing effect by grabbing random blocks in the sketch and offsetting them between a range of -10 and 10 pixels each direction. Here’s the link for the code I found online to help me/inspire me to write my own moshing code.

I wanted to use a while loop but that crashes my browser for some reason, potentially due to ram usage or the browser i am using is not compatible with p5, so I used the draw function for this effect which I interpreted basically as a while(true) loop.


For the drawing of rectangles, I made a function that draws rectangles through a for loop, where indices i andindicate the amount of rectangles the loop is gonna draw. Since the time complexity is O(n * n), therefore the loop below with n = 30, will iterate 900 times, creating 900 rectangles. This could be changed to illustrate the drawing in a different way.

The and variables are set to the counters i and j respectively then multiplied by the value rectSize, which determines the spacing between the rectangles.

This is similar to the following:

where the n in this case in either  or  j.

function drawGrid() {
  let rectSize = 20; // base grid size
  timer =0; // reset timer
background(0);
  for (let i = 0; i < 30; i++) {
    // rows
    for (let j = 0; j < 30; j++) {
      // columns
      let x = j * rectSize; // X position
      let y = i * rectSize; // Y position
      let w = random(1, 20); // width between 1 and 20
      let h = random(7, 20); // height between 7 and 20

      fill(0);
      stroke(255);
      rect(x, y, w, h); // draw rectangle
    }
  }
}


Reflection and self improvement

I wanted to rotate each square, but the process of doing that seemed a little bit out of my knowledge scope and I did not want to just copy what I found online without understanding, so I assume the next step would be stepping out of my comfort zone and learning concepts I am not familiar with like the use of rotation when drawing shapes. This is also not the exact use of data moshing as it is sometimes used for transitions when video editing, I want to implement that using code but that is a little bit too hard with the limited knowledge I have right now.

I would also love to add an effect of pixel sorting, which I usually used to do when I used to create my motion graphics videos, but now with p5.js this is a new realm that I want to explore slowly and not rush, so I will probably come back to this sketch and improve it more when I have more experience with p5.js and implement the pixel sorting effect.


Thank you for reading.

-Mustafa Bakir