I am excited to present to you all the final video game I made for this class utilizing p5 js and Arduino which is called The Boy Who Fell:
The Boy Who Fell is a survival game where you must control a boy and keep him above by utilizing the platforms from floating in below. But be careful as some of the platforms are spikes which will decrease the number of lives, but you can replenish those by jumping onto the wooden platforms. Also be wary of the row of spikes on the top so don’t stick onto one platform for too long!
User Testing
Sanjana helped me in the user testing. She was able to figure out how to play the game using just the on-screen instructions. What she did needed help in explaining was the lives system and how it worked which was the spikes take away life points while wood restores them until a maximum of 10. I decided to make wood give life for balancing sake.
Implementation
I started out in p5 js by creating the game with different classes such as Game, Player, and Platforms. The p5 js handles different functions such as the gravity of the player, randomizing which platform will appear and the overall design of the game.
For the Arduino, I added buttons onto the solderless board as to emulate the feeling of holding a controller. The controller is used in order to move the boy left or right. I set it so pressing a specific button sends either 1 or 2, depending on the button, to p5 js through which it detects which input is being pushed the and the boy moves in that direction.
In the end, only the Arduino is sending data to p5 js which is the value of what button is being pressed which is then stored in a variable and then compared to in an IF statement in order to determine which direction the boy moves.
I’m particularly proud of how I implemented the different platforms and they come from the bottom and the interaction between the player and the platform. I had even more platforms ready with different interactions but it proved to be too difficult and too much according to some feedback, so I eased the game down.
For improvements, I can improve the controller used in order to play the game but making a controller out of boxes and using bigger and better buttons. The game graphics can be improved as well as the instructions describing the game.
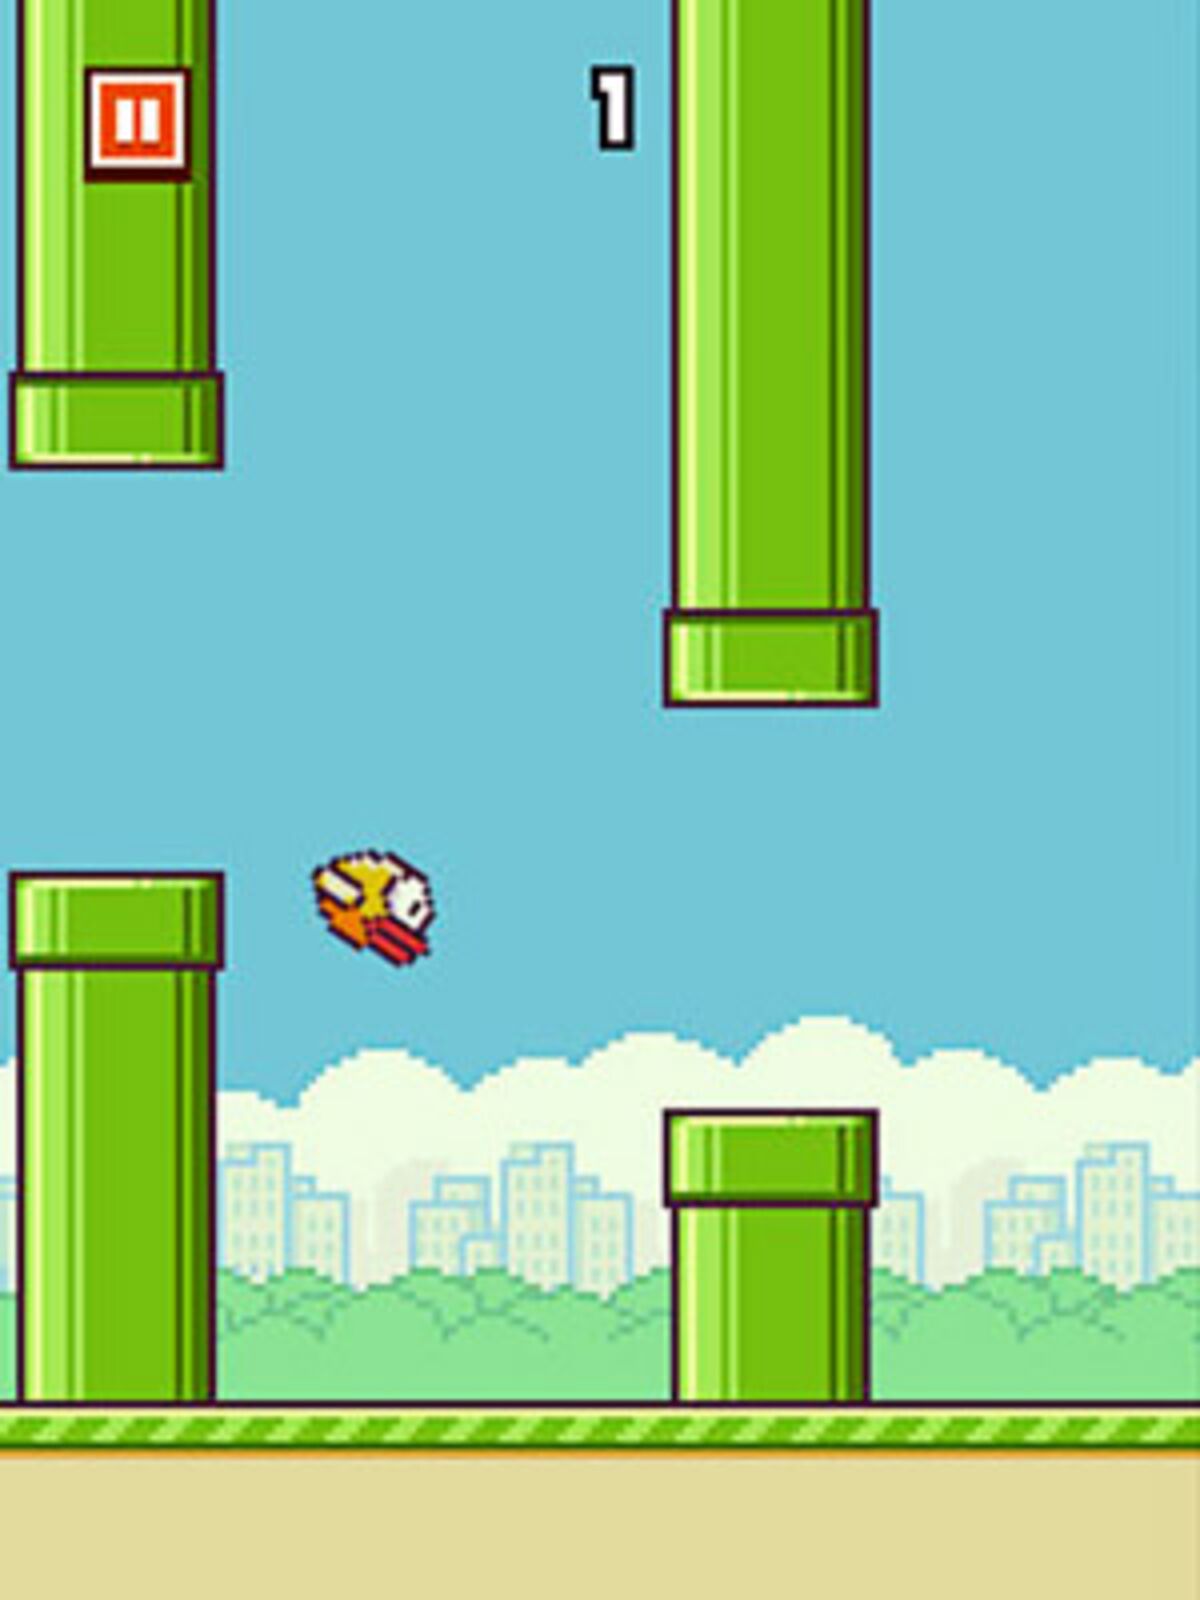
My inspiration is the old classic favourite bird of everyone: Flappy Bird! But I will be reimagining the game to better fit into the environment of Arduino and P5 js.
For starters, I plan on using a force sensor in order to make bird jump. I may also implement powerups that will be utilized through other external controls such as buttons. I will also be implementing LEDs of different colours in order to represent different games states or actions such as jumps or game overs.
Arduino
The Arduino code will handle all the input from the physical board such as the force sensor and also lighting up the different LEDs depending on the corresponding action. It will be communication with p5 js using serial connection. It will also be handling the different sound effects for the jumps and defeats.
P5 js
The P5 js code will be responsible for the looks and designs of the game. In order to start the game, the user will have to interact with the menu at the beginning of the program. It will also display the high score so different players can battle it out for who has the highest score!
For exercise 1, we used a light sensor. As brightness of light in the surrounding was changed, the ball moved along the horizontal axis in p5. Higher the brightness, the farther right the ball moved.
The values from the light sensor roughly ranged between 0 and 500,000 so we mapped them between 0 and width of the screen and used the mapped value as x-coordinate of the ellipse
//Exercise 1 P5js Code

let ellipseX; // Variable to store ellipse's x-coordinate

function setup() {
  createCanvas(400, 400); // Create a canvas of 800x400 pixels
  ellipseX = width / 2; // Set initial x-coordinate of ellipse to middle of the screen
  noStroke(); // No stroke for the ellipse
}

function draw() {

  background(220); // Refresh background on each frame
  fill(255, 0, 0); // Set fill color to red
  ellipse(ellipseX, height / 2, 50, 50); // Draw ellipse at current x-coordinate and middle of the screen

  if (!serialActive) {
    text("Press Space Bar to select Serial Port", 20, 30);
  } else {
    text("Connected", 20, 30);}
}


function keyPressed() {
  if (key == " ") {
    // important to have in order to start the serial connection!!
    setUpSerial();
  }
}

// this callback function
function readSerial(data) {
  ////////////////////////////////////
  //READ FROM ARDUINO HERE
  ////////////////////////////////////

  if (data != null) {
    // make sure there is actually a message
    // split the message
    console.log(data);
    console.log("fromArduino");

    let fromArduino = split(trim(data), ",");
    // if the right length, then proceed
    if (fromArduino.length == 1) {
      // only store values here
      // do everything with those values in the main draw loop
      console.log("working");
//values from light sensor roughly ranged between 0 and 500,000 so map them between 0 and width of the screen
//use the mapped value as x-coordinate of the ellipse
      ellipseX = map(data,0,500000, 0,width);
    }

    //////////////////////////////////
    //SEND TO ARDUINO HERE (handshake)
    //////////////////////////////////
   let sendToArduino = fromArduino + "\n";
   writeSerial(sendToArduino);
  }
}
//Exercise 1 Arduino Code

void setup() {
  Serial.begin(9600); // Start serial communication at 9600 bps

  pinMode(LED_BUILTIN, OUTPUT);
// start the handshake
  while (Serial.available() <= 0) {
    //digitalWrite(LED_BUILTIN, HIGH); // on/blink while waiting for serial data
    Serial.println("0,0"); // send a starting message
    delay(300);            // wait 1/3 second
    //digitalWrite(LED_BUILTIN, LOW);
    delay(50);
  }
}
void loop() {

  // wait for data from p5 before doing something
    while (Serial.available()) {
    digitalWrite(LED_BUILTIN, HIGH); // led on while receiving data

  // Read sensor value
  int sensorValue = analogRead(A0);
   Serial.print(sensorValue);
  // Map sensor value to screen width (e.g. 0 to 800 pixels)
  int screenValue = map(sensorValue, 0, 1023, 0, 800);

  // Send mapped value to p5.js
  Serial.println(screenValue);

  delay(50); //    for stability
}
digitalWrite(LED_BUILTIN, LOW);
}
Exercise 2
For this exercise, we used a slider in p5 to control brightness of the LED. Value of slider ranged between 0 and 255 and these values were sent to Arduino and used as brightness for the LED.
//Exercise 2 P5js Code
let slider;
function setup() {
   createCanvas(400, 400); // Create a canvas of 800x400 pixels
  slider = createSlider(0, 255, 0);
  slider.position(160,height/2); // Set the position of the slider
  slider.style('width', '80px'); // Set the width of the slider


  noStroke(); // No stroke for the ellipse
}
function draw() {

  background(255); // Refresh background on each frame

  if (!serialActive) {
    text("Press Space Bar to select Serial Port", 20, 30);
  } else {
    text("Connected", 20, 30);}
}
function keyPressed() {
  if (key == " ") {
    // important to have in order to start the serial connection!!
    setUpSerial();
  }
}
// this callback function
function readSerial(data) {
    ////////////////////////////////////
    //READ FROM ARDUINO HERE
    ////////////////////////////////////
    //////////////////////////////////
    //SEND TO ARDUINO HERE (handshake)
    //////////////////////////////////
    console.log(slider.value());
    let sendToArduino = slider.value() + "\n";
    writeSerial(sendToArduino);

}
//Exercise 2 Arduino Code

const int ledPin =3;
int brightness = 0;
void setup() {
  Serial.begin(9600); // Start serial communication at 9600 bps

  pinMode(LED_BUILTIN, OUTPUT);
  pinMode(ledPin, OUTPUT);
// start the handshake
  while (Serial.available() <= 0) {
    digitalWrite(LED_BUILTIN, HIGH); // on/blink while waiting for serial data
    Serial.println("0,0"); // send a starting message
    delay(300);            // wait 1/3 second
  }
}
void loop()
{
  // wait for data from p5 before doing something
    while (Serial.available())
    {
    digitalWrite(LED_BUILTIN, HIGH); // led on while receiving data
    int brightness = Serial.parseInt(); //get slider value from p5
    Serial.println(brightness); //just to view the value

     if (Serial.read() == '\n') {
       analogWrite(ledPin, brightness); //set brightness of LED

      }else
      {
        digitalWrite(LED_BUILTIN, HIGH);
      }
    }
}
Exercise 3
For this exercise, we used a potentiometer to control the wind. The potentiometer’s values ranged between 0 and 1023. So, for any value less than 500, wind moved the ball forward/wind blew to right. We added this layer that if value was between 500 and 600, wind stopped so the ball stopped. Finally, if value was above 600, wind blew in opposite direction moving the ball in the opposite direction.
For LED part, we used a flag called heightOfBall. Whenever ball touched the ground, this flag was set to zero. Otherwise, it was set to one. This was sent to Arduino to check whenever ball bounced. When this happened, LED would be turned on. Otherwise it would be turned off.
//Exercise 3 P5js Code

let velocity;
let gravity;
let position;
let acceleration;
let wind;
let drag = 0.99;
let mass = 50;
let heightOfBall = 0;

function setup() {
  createCanvas(640, 360); // Create a canvas of 800x400 pixels

  noFill();
  position = createVector(width/2, 0);
  velocity = createVector(0,0);
  acceleration = createVector(0,0);
  gravity = createVector(0, 0.5*mass);
  wind = createVector(0,0);
}

function draw() {
  background(215);
  fill(0);

  if (!serialActive) {
    text("Press Space Bar to select Serial Port", 20, 30);
  } else
  {
    text("Connected. Press s to jump.", 20, 30);

  applyForce(wind);
  applyForce(gravity);
  velocity.add(acceleration);
  velocity.mult(drag);
  position.add(velocity);
  acceleration.mult(0);
  ellipse(position.x,position.y,mass,mass);
  //heightOfBall set to zero whenever ball is touching the ground. Otherwise it is set to 1.
  if (position.y > height-mass/2) {
      velocity.y *= -0.9;  // A little dampening when hitting the bottom
      position.y = height-mass/2;
    heightOfBall = 0;
    } else {
      heightOfBall = 1;
    }
  }
}
function applyForce(force){
  // Newton's 2nd law: F = M * A
  // or A = F / M
  let f = p5.Vector.div(force, mass);
  acceleration.add(f);
}

function keyPressed() {
  if (key == " ") {
    // important to have in order to start the serial connection!!
    setUpSerial();
  }
  else if (key=='s'){
    mass=random(15,80);
    position.y=-mass;
    velocity.mult(0);
  }
}

// this callback function
function readSerial(data) {
    ////////////////////////////////////
    //READ FROM ARDUINO HERE
    ////////////////////////////////////

     if (data != null) {
    // make sure there is actually a message

    let fromArduino = split(trim(data), ",");

       // if the right length, then proceed
    if (fromArduino.length == 1) {
//sensor value is the input from potentiometer
      let sensorVal = int(fromArduino[0]);
      console.log("Sensor value: ")
      console.log(sensorVal);

//sensor values range between 0 and 1023
//for any sensor value less than 500, make wind move ball forward/wind blows to right
      if (sensorVal <500){
        wind.x=1
      }
//if sensorVal between 500 and 600, wind stops so ball stops
      else if(sensorVal >=500 && sensorVal < 600){
        wind.x = 0
      }
//if sensorVal over 600, wind blows in opposite direction moving ball to left
      else {
        wind.x =-1
      }
          //////////////////////////////////
          //SEND TO ARDUINO HERE (handshake)
          //////////////////////////////////
    }

//send heightOfBall to arduino to indicate if ball is on the floor or not
    let sendToArduino = heightOfBall  + "\n";
    writeSerial(sendToArduino);
  }
}
//Exercise 3 Arduino code

const int poten_pin = A0;
const int ledPin =3;

void setup() {

  Serial.begin(9600); // Start serial communication at 9600 bps
  pinMode(LED_BUILTIN, OUTPUT);
  pinMode(ledPin, OUTPUT);
  pinMode(poten_pin, INPUT);

  // start the handshake
  while (Serial.available() <= 0) {
    digitalWrite(LED_BUILTIN, HIGH); // on/blink while waiting for serial data
    Serial.println("0,0"); // send a starting message
    delay(300);            // wait 1/3 second
    digitalWrite(LED_BUILTIN, LOW);
    delay(50);
  }
}
void loop()
{
  // wait for data from p5 before doing something
    while (Serial.available())
    {
      digitalWrite(LED_BUILTIN, HIGH);
      digitalWrite(ledPin, LOW);
//read the position of ball from p5
      int position = Serial.parseInt();

      if (Serial.read() == '\n') {
        // Read potentiometer value
      int sensorValue = analogRead(poten_pin);
      //send value to p5
      Serial.println(sensorValue);
      }
//if ball is touching the ground i.e. height is zero, turn LED on
      if (position == 0)
      {
        digitalWrite(ledPin, HIGH);
      }
      else{
        digitalWrite(ledPin, LOW);
      }
    }
      digitalWrite(LED_BUILTIN, LOW);
    }
Video for Exercise 3:
Teammate: Ramsha Bilal
Final Project Proposal
I have decided to take inspiration from one of the classic mobile games of the past generations: Flappy Bird!
Flappy Bird became popular due to how made it made people when they could just never get the mechanics down for the game.
This of course led many people to break their phones and scream loudly. Well with my idea, you get to let out your energy while playing my game. I will be connecting a microphone up to my own version of this game where, in order to make the character fly, you have to scream into the mic!
SO best prepare your vocal cords and have a drink to soothe them afterwards for when my game eventually comes to fruitition!
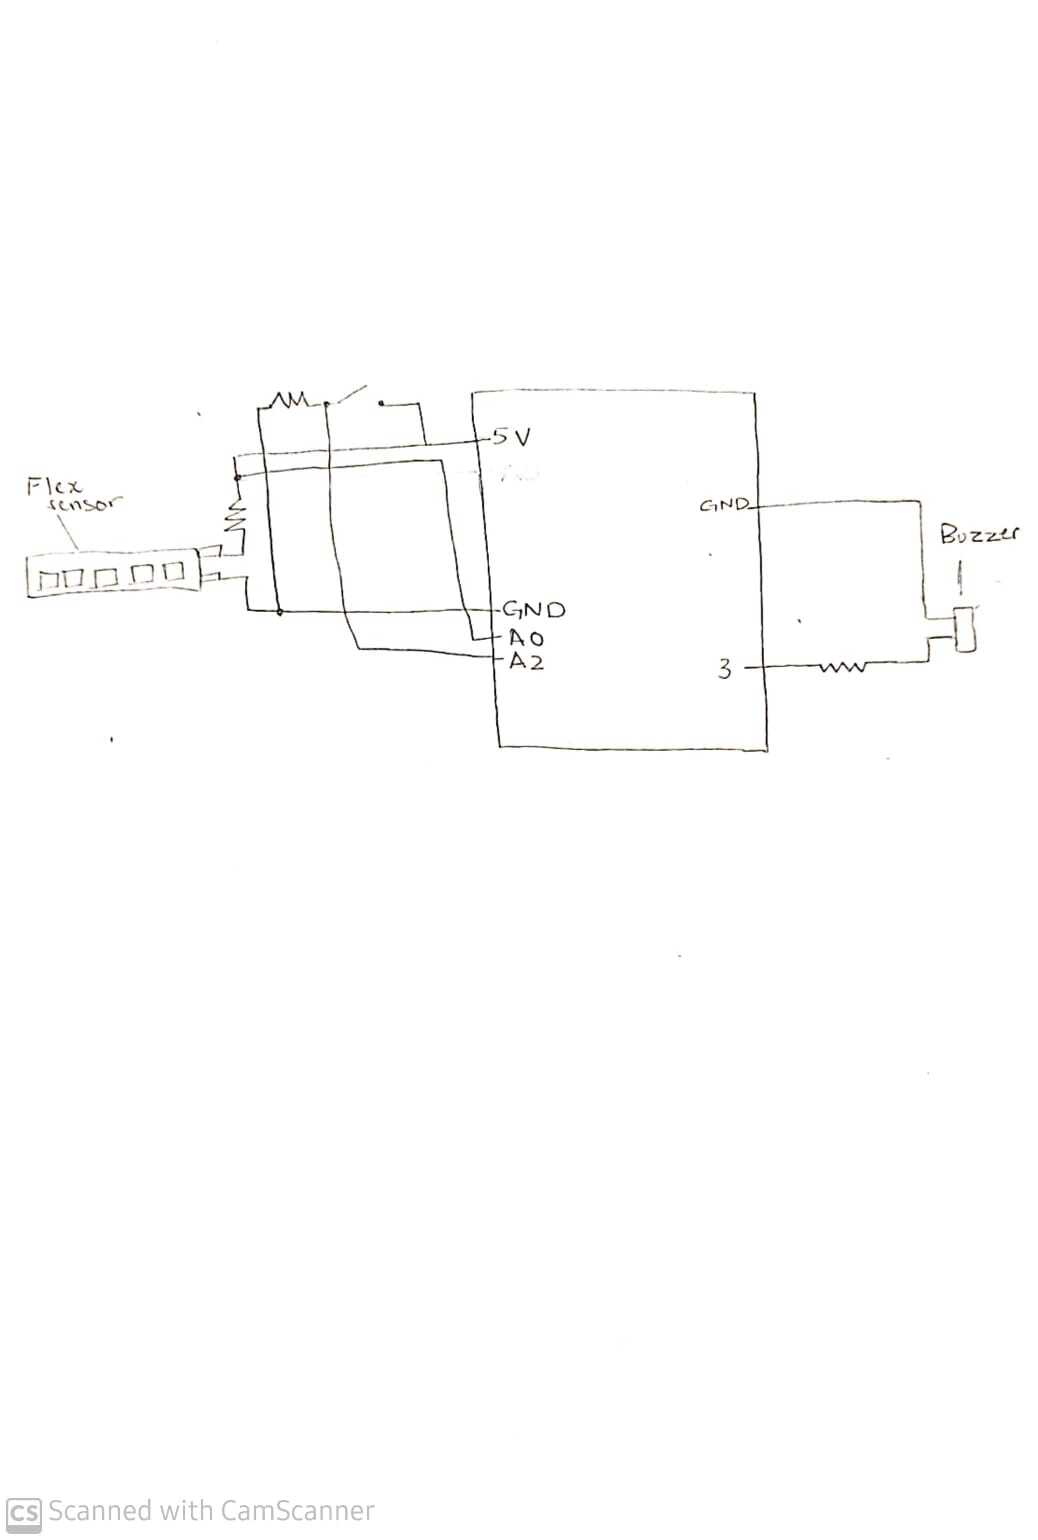
For this assignment, we wanted to make a musical instrument that was controlled by a user’s motion. So, we came up with the idea of changing the output tone based on the input from a flex sensor. For this, we attached a flex sensor to a glove so that when a user wears the glove and bends their hand, the input changes, and depending on how much the user bends their hand, the tone changes. To implement this, we saved a number of notes in an array. The input from the flex sensor is mapped to values between 0 and the size of the array so that for different measurements of the ‘bend’ of the hand, a different number is obtained after mapping and a note is picked from the array at that number. Moreover, we used a switch to play another tone, so that when the switch is turned on, a different tone made up of a set of notes is played. When the switch is turned off, the user can control the output melody using their hand. We played with different durations and frequencies until we found the one we liked.
Schematic
Video
Code
#include "pitches.h"
const int Buzzer1=3;
const int flexPin = A0;
int value;
//array of notes
int melody[] = {
  NOTE_E5, NOTE_D5, NOTE_C5, NOTE_D5, NOTE_E5, NOTE_E5, NOTE_E5,
  NOTE_D5, NOTE_D5, NOTE_D5, NOTE_E5, NOTE_G5, NOTE_G4, NOTE_E5,
  NOTE_D5, NOTE_C5, NOTE_D5, NOTE_E5, NOTE_E5, NOTE_E5, NOTE_E5,
  NOTE_D5, NOTE_D5, NOTE_E5, NOTE_D5, NOTE_C5
};
void setup()
{
  Serial.begin(9600);
  pinMode(Buzzer1, OUTPUT);
  pinMode(A2, INPUT);
}
void loop()
{
  int button = digitalRead(A2);
  //when button is pressed, play a predefined tone (happy brithday music)
  if (button == HIGH)
  {
    Serial.print("SWITCH ON\n");
    //tone(Buzzer1, 200, 1200);
    // play a melody using tone()
  tone(Buzzer1, NOTE_C4, 250); delay(250);
  tone(Buzzer1, NOTE_C4, 250); delay(250);
  tone(Buzzer1, NOTE_D4, 500); delay(500);
  tone(Buzzer1, NOTE_C4, 500); delay(500);
  tone(Buzzer1, NOTE_F4, 500); delay(500);
  tone(Buzzer1, NOTE_E4, 1000); delay(1000);

  tone(Buzzer1, NOTE_C4, 250); delay(250);
  tone(Buzzer1, NOTE_C4, 250); delay(250);
  tone(Buzzer1, NOTE_D4, 500); delay(500);
  tone(Buzzer1, NOTE_C4, 500); delay(500);
  tone(Buzzer1, NOTE_G4, 500); delay(500);
  tone(Buzzer1, NOTE_F4, 1000); delay(1000);
  }
  //if button is not pressed, read value from flex sensor
  //map the value to a number that is within 0 and the max index of array melody
  //use this mapped value as an index and play the note from that particular index
  else if (button == LOW)
  {
    Serial.print("OFF\n");

  value= analogRead(flexPin);
  // Serial.print("\nvalue is: ");
  // Serial.print(value);
  int size = sizeof(melody)/sizeof(melody[0]);
  value = map(value, 850, 1050, 0, size);

  tone(Buzzer1,melody[value],1200);
  //Serial.print("\n Note is: " );
  //Serial.print(melody[value]);
  delay(300);
  }
}
Future Improvements
For later, we can improve by first attaching the flex sensor inside the glove more securely so that the instrument produces more consistent sounds. Also, we can add an additional buzzer with the switch to play a sound continuously in the back while the user uses the flex sensor to add more sounds on top of it.
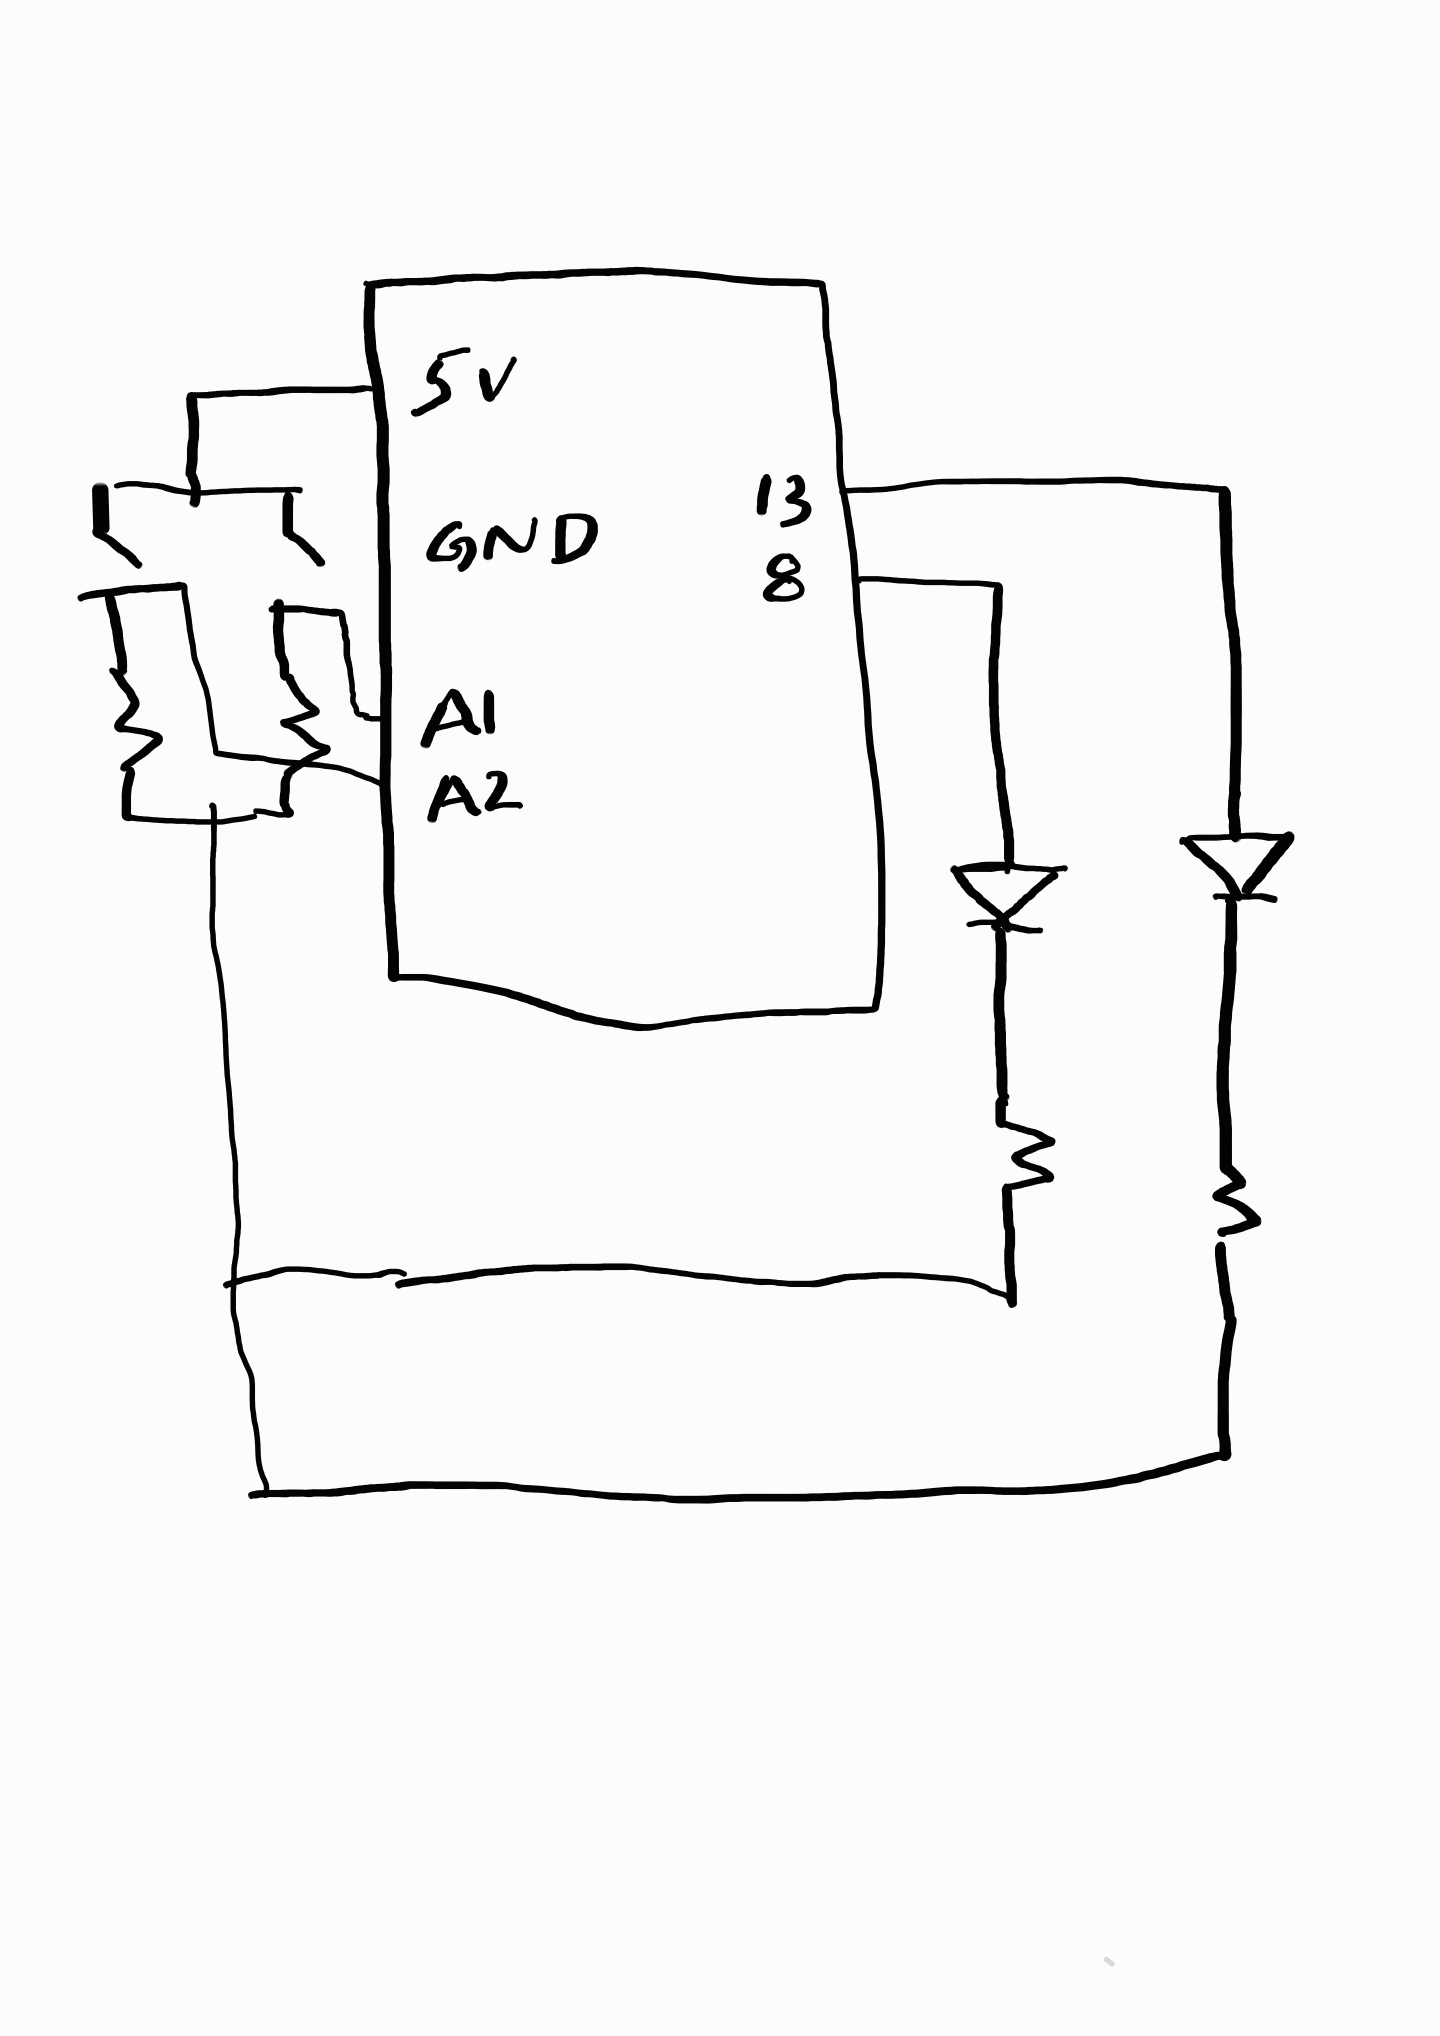
Utilizing 2 analog sensors, I created a double switch system with the LEDs and created flashing lights similar to what you might find in a disco!
I drew this rough schematic on my phone in order to get an understanding of how the power would move throughout my circuit. I had to make sure that the LEDs receive sufficient power as to not make their outputs too dull. After drawing the schematic, I created the circuit trying my best to keep it somewhat neat as to be able to quickly identify which wires leads to where. After that, I wrote down the code in order to bring the disco to life which you can find below:
All this hard work combined led to the final product below:
For future imrpovements, I can add more LEDs in order to further the feel of a disco. I can also add some variation in how the LEDs blink or how long they stay on or how bright they should be!
Below is the game I have created, a retro styled classic: Space Shooter!
and below is the code for this game:
//Declaring all variables to be used
let bullets = [];
let enemies = [];
let stars = [];
let powerups = [];
let gamestate;
let posterImage;
let fighter;
let player;
let laser;
let enemy;
let score = 0;
let title_screen_audio;
let playing_screen_audio;
let end_screen_audio;
let laser_sound_effect;
let enemySpawnRate =1;
let timeElapsed = 0;


function preload() {
  posterImage = loadImage('SpaceShooterBackground.png'); //Loading main menu
  fighter = loadImage('NicePng_spaceship-png_138961.png'); //Loading spaceship
  laser = loadImage('LaserBullet.png'); //Loading laser bullet
  enemy = loadImage('invader.png'); //Loading enemies
  font = loadFont('GameOverFont.ttf'); //Loading Game Over Screen Font
  title_screen_audio = loadSound("SkyFire (Title Screen).mp3");
  playing_screen_audio = loadSound("Battle in the Stars.mp3"); //Loading menu music
  end_screen_audio = loadSound("gameEndMusic.mp3");  //Load Game Over Screen Music
  laser_sound_effect = loadSound("lasershot.wav"); //Load laser sound effect
}

function setup() {
  createCanvas(400, 600);
  gamestate = 'menu'; //Setting gamestate menu
  player = new Spaceship(67, 61); //Initializing Sapceship class as the player

  for (let i = 0; i < 100; i++) {
    stars[i] = new Star(random(width), random(height), random(1, 5)); //Randomly generating stars
  }
}

function draw() {
  if (gamestate == 'menu') {
    image(posterImage, 0, 0, width, height); //Displaying menu screen if gamestate is menu
    if (!title_screen_audio.isPlaying())
      {
        title_screen_audio.play(); //Plays menu music
      }
  }
  if (gamestate == 'playing') {
    title_screen_audio.stop(); //Stops menu music when gamestate is playing
    if (!playing_screen_audio.isPlaying())
      {
        playing_screen_audio.play(); //Plays battle music
      }
    background(1, 22, 64);
    player.show();

    for (let star of stars) {
      star.show(); //Displaying stars
    }

    // Add enemies randomly
    if (frameCount % (60 / enemySpawnRate) == 0) {
      let enemy = new Enemy(random(width-50), -50, random(1, 4));
      enemies.push(enemy);
    }

    for (let i = 0; i < bullets.length; i++) {
      bullets[i].update(); //Adding velocity to bullets
      bullets[i].show(); //Displaying bullets
      for (let j = 0; j < enemies.length; j++) {
        let enemyHitbox = enemies[j].getHitbox(); //Initializing enemies with hitbox
        if (bullets[i].hits(enemyHitbox)) {
          bullets.splice(i, 1); //Remove bullets when it hits an enemy
          enemies[j].hits(); //Registers hit to enemy
          score += 1; //Incremements score on hit
          enemies.splice(j, 1); // remove the enemy object from the array
          break;
        }
      }
    }

    for (let i = 0; i < enemies.length; i++) {
      enemies[i].update(); //Makes enemies fall
      enemies[i].show(); //Displays enemies
    }

    let anyEnemyReachedBottom = false; // flag to indicate if any enemy has     reached the bottom
    for (let i = 0; i < enemies.length; i++) {
      if (enemies[i].reachedBottomFlag) {
        anyEnemyReachedBottom = true; //Turns true when enemy reaches bottom
        break;
      }
    }

    if (anyEnemyReachedBottom) {
      gamestate = 'gameover'; //Sets gamestate to gameover once enemy reaches the bottom
    }

    textSize(20);
    strokeWeight(1);
    textFont(font);
    fill(255);
    text("Score: " + score, 10, 30); //Displays score at top left
  }

  if (gamestate == 'gameover') {
    playing_screen_audio.stop(); //Stops battle music
    if (!end_screen_audio.isPlaying())
      {
        end_screen_audio.play(); //Plays defeat music
      }
    background(1, 22, 64);
    for (let star of stars) {
      star.show(); //Displays stars
    }
    textSize(30);
    strokeWeight(1);
    fill(255);
    textFont(font);
    text("Game Over", width / 2 - 80, height / 2 - 20);
    text("Score: " + score, width / 2 - 65, height / 2 + 20);
    text("Press Space to retry!", width / 2 - 150, height / 2 + 60);
  }

  timeElapsed += deltaTime / 1000;
  if (timeElapsed >= 40) { // increase spawn rate every 40 seconds
    enemySpawnRate++;
    timeElapsed = 0;
  }

}
function mouseClicked() {
  if (gamestate == 'menu') {
    gamestate = 'playing'; //Changes gameststate on mouseclick
  }
  if (gamestate == 'playing') {
    let bullet = new Bullet(mouseX + 3, height - 20, 10);
    bullets.push(bullet); //Fires bullet on every click
    laser_sound_effect.play(); //Plays laser sound on every click
  }
}

function keyPressed(){
  if (key == ' ' && gamestate == 'gameover'){
    score = 0;
    bullets = [];
    enemies = [];
    restartGame();
    end_screen_audio.stop(); //Restarts game by pressing space on game over screen
  }
}

function restartGame() {
  gamestate = 'playing';
  enemySpawnRate = 1;
}

class Bullet {
  //Setting variables
  constructor(x, y, velocity) {
    this.x = x;
    this.y = y;
    this.velocity = velocity;
    this.size = 20;
  }

  update() {
    this.y -= this.velocity; //Fires bullet upward
  }

  show() {
    image(laser, this.x - this.size/2, this.y - this.size/2, this.size, this.size); //Laser image
  }

  hits(hitbox) {
    let d = dist(this.x, this.y, hitbox.x + hitbox.width/2, hitbox.y + hitbox.height/2);
    if (d < (this.size + hitbox.width)/2) {
      return true; //Hitbox registration
    } else {
      return false;
    }
  }
}

class Spaceship {
  constructor(x,y) {
    this.x = x;
    this.y = y; // Setting variables
  }
  show(){
    //Prevents fighter from going out of bounds
    if (mouseX - 30 < 0)
      {
        image(fighter,0,height-50,this.x,this.y);
      }
    else if (mouseX - 30 > width)
      {
        image(fighter,width - this.x,height-50,this.x,this.y);
      }
    else
      {
        image(fighter,mouseX-30,height-50,this.x,this.y);
      }


  }
}
//Creates stars in background
class Star {
  constructor(x, y, size) {
    this.x = x;
    this.y = y;
    this.size = size;
  }

  show() {
    stroke(255);
    strokeWeight(this.size);
    point(this.x, this.y);
  }
}

class Enemy {
  constructor(x, y, velocity) {
    this.x = x;
    this.y = y;
    this.velocity = velocity;
    this.size = 30;
    this.reachedBottomFlag = false; // flag to indicate if this enemy has reached the bottom
  }

  update() {
    this.y += this.velocity;
    if (this.y >= height) {
      this.reachedBottomFlag = true; //Detects if enemy has reached bottom
    }
  }

  show() {
    image(enemy, this.x, this.y, this.size, this.size); //Creating enemies images
  }

  hits() {
    this.velocity = 0; //Sets velocity to 0 on hit
  }

  getHitbox() {
    return {
      x: this.x,
      y: this.y,
      width: this.size,
      height: this.size //Creates hitbox of enemies
    }
  }
}
I was inspired by the many retro classic games. These games bring a long a sense of nostalgia that no other games bring. Since I am an avid space enjoyer and all things sci-fi, I decided to combine these 2 concepts into the game Space Shooter. The story is you are a space fighter defending the human race from these purple invaders! Your mission is to prevent these invaders to breaking through into your back line.
Behind the scenes, I used Canva in order to create the opening menu of this game. I then created separate classes for the player’s spaceship, enemies, bullets, and stars. I tied the spaceship position and laser firing position to the mouseX coordinate while invaders fall between a random set of x values. I essentially created a hitbox for the enemies so the laser can register whether it hits an enemy or not. I also made it so that it tracks how long the game goes on and after every 30 seconds, the spawn rate of the enemies increasing making the game get progressively difficult. Just for some extra personalization, I made it so the stars in the background are randomly generated so there is always something that is a tiny bit new in every playthrough.
I am especially proud of making the hitbox method in order to deal with collision. I initially struggled with collision but after researching and messing around, I managed to finally solve it and in quite the efficient way I like to think. I’m also proud of the laser bullet and invader sprites. I managed to find a good vector sprite for the spaceship but importing different sized bullets and invaders could be messy. So, I made them on my own using online software allowing me to personalize them into whatever size or shape I need. This further simplified my work and going forward and gave it a bit more of my own touch and creativity into this project.
I still feel as there are many more improvements that can be made into this. For starters, I could add other enemy types where they require multiple hits in order to be destroyed. I can also add powerups where the game could be slowed for example. I was also told about adding a pause screen which I initially thought wouldn’t fit as it is a retro game where pause menus didn’t exist but still could be added as a quality-of-life improvement.
For my midterm game, I have decided to make the Starship Shooters game in p5 js!
It was a clicker shooter where you control a spaceship with your mouse allowing you to move and shoot the oncoming enemy attach. Your goal is to shoot them all and not let them get into your backline.
Here is the so far basic sketch of what I’ll be expanding upon:
Ill be designing classes for the ship, bullets, and enemies while defining functions for shooting and such. The game will track how many enemies you shoot essentially being the score for the player.
The most frightening thing I can imagine right now is accurately coding the collisions for the enemies and the bullets with respect to their individual hitboxes. I plan on using sprite so coding in their hitboxes may prove to be tricky. I will try utilizing the console.log or basically print debugging in order to test hitboxes and make sure collision works fine.
If all goes to plan, I’ll be able to make a retro-arcade styled shooter clicker game with a way to keep score!
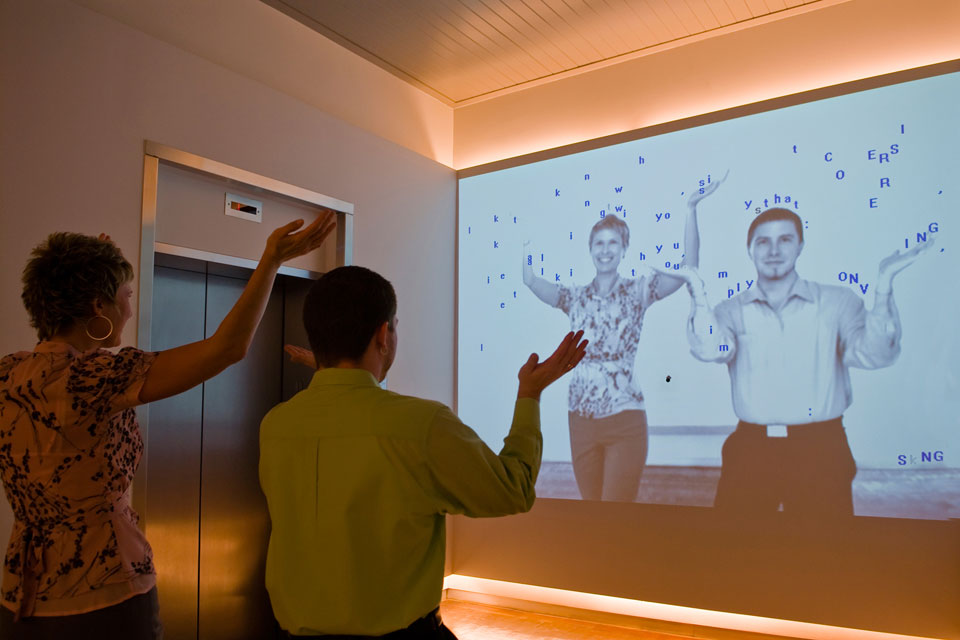
My inspiration for this project came from the art piece called “Text Rain” made by Camille Utterback in 1999 where on a projected screen, letters from the alphabet were falling randomly. Only, in Camille’s piece, people could stand in front of the projector and “catch” the letters in order to try and make a word.
Below you can find my own project:
and below you can find the code for this project:
let letters = []; // array to store falling letters
let slider; // slider to control letter frequency

function setup() {
  createCanvas(600, 600);
  slider = createSlider(0, 50, 10); // create slider with range from 0 to 50 and default value of 10
  slider.position(10, height + 10); // position slider below canvas
}

function draw() {
  background(220);
  // generate new letters based on slider value
  for (let i = 0; i < slider.value(); i++) {
    letters.push(new Letter(random(width), -20, random(65, 91))); // add new letter with random position and uppercase letter code
  }
  // draw and update all letters
  for (let letter of letters) {
    letter.draw();
    letter.update();
  }
}

class Letter {
  constructor(x, y, code) {
    this.x = x;
    this.y = y;
    this.code = code;
    this.speed = random(1, 5);
  }

  draw() {
    text(String.fromCharCode(this.code), this.x, this.y); // draw letter at current position
  }

  update() {
    this.y += this.speed; // move letter down based on speed
    if (this.y > height) {
      // remove letter from array when it goes off screen
      let index = letters.indexOf(this);
      letters.splice(index, 1);
    }
  }
}
While obviously I am nowhere near the level to add Camille’s interactivity nor do I have the resources to do so, I took inspiration from this piece and tried to recreate it on my own. While her letters are a bit more scattered in order to make them easier to catch, I wasn’t limited by this feature and so tried to create a waterfall like effect in order to create a bombardment of letters. My reason for this is because one day in class, professor Mang mentioned something interesting about randomness and infinity in where say if letters keep falling randomly and for an infinite amount of time, eventually, they will end up spelling out a word. The thought of such a possibility intrigued hence why I wanted to create a waterfall in order to try and maximize that chance.
I’m especially proud of my implementation with the slider allowing the user to control how many letters should fell if it feels over or underwhelming for them. You can turn the slider to 0 if you are tired of the letters or max it out though I wouldn’t maybe recommend that if you have an especially old laptop.
I could definitely improve on this by adding more color to the background or adding some audio such as maybe a waterfall audio or such. It would add more personality and touch to the project though I guess you could say the simplicity if this project adds to it as well.
After going through a creative block, I finally managed to create this:
Below is the code for the project:
let stars =[];
let rockets=[];


function setup() {
  createCanvas(600, 700);

  for (let i = 0; i < 100; i++) {
    stars[i] = new Star(random(width), random(height), random(1, 5));
  }

  rocket = new Rocket(width / 2, height, 5);
  moon = new Moon(500,100,50);

  // Add mouse click event listener
  mouseClicked = function() {
    let x = mouseX;
    let y = mouseY;
    let rocket = new Rocket(x, y, 5);
    rockets.push(rocket);
  }
}

function draw() {
  background(1,22,64);

  //Drawing the stars
   for (let star of stars) {
    star.show();
   }
  //Drawing the moon
  moon.show();

  //Drawing the rockets
  for (let i = 0; i < rockets.length; i++) {
    rockets[i].update();
    rockets[i].show();
  }
}

//Class making the randomized stars in the background
class Star {
  constructor(x, y, size) {
    this.x = x;
    this.y = y;
    this.size = size;
  }

  //Drawing the stars
  show() {
    stroke(255);
    strokeWeight(this.size);
    point(this.x, this.y);
  }
}

//Making the moon
class Moon {
  constructor(x, y, diameter) {
    this.x = x;
    this.y = y;
    this.diameter = diameter;
  }

  show() {
    //The main body
    noStroke()
    fill(254, 252, 215);
    ellipse(this.x, this.y, this.diameter, this.diameter);

    // Adding shadows
    fill(234, 232, 185);
    ellipse(this.x + this.diameter / 4, this.y, this.diameter / 2, this.diameter / 2);
    ellipse(this.x+5 - this.diameter / 4, this.y + this.diameter / 4, this.diameter / 2, this.diameter / 4);
  }
}


//Class making the rocket
class Rocket {
  constructor(x, y, velocity) {
    this.x = x;
    this.y = y;
    this.velocity = velocity;
  }

  update() {
    this.y -= this.velocity;
  }

  //Body of rocket
  show() {

    //Flames
    noStroke()
    fill(255,185,0)
    ellipse(this.x,this.y+35,20,60)

    //Side fins
    fill(30,144,255);
    arc(this.x,this.y + 36,40,40,PI,0,CHORD)

    // Body
    fill(255,0,0)
    ellipse(this.x,this.y,30,80)

    //Windows
    fill(255);
    ellipse(this.x,this.y-12.15,15)
    fill(255);
    ellipse(this.x,this.y+6.15,15)

    //Front fin
    fill(30,144,255);
    ellipse(this.x,this.y+32,5,30)

  }
}
I went through a creator’s block for a couple of days meaning I could not think what I should make for a project. Then one morning, during my CSO class, we watched a case study on a rocket ship: the Ariane 5. This gave me the idea of creating a rocket taking off into space as my project.
I’m especially proud of how my stars and rocket turned out. I always enjoyed looking at the night sky due to the presence of stars above and wanted to make sure the stars in my project would look at least somewhat pretty and I am quite happy with how they turned out. the rocket ship took some experimenting, but I finally settled on this design which gives a more cartoonish look, but I believe was the best one I made.
In the future, I can definitely add more by animating the flames in order to breath more life into the rocket. I also wanted to add sound effects, but I could not find any suitable sound effect for my rocket so ended up scrapping that idea though I am more than happy to revisit that in the future.
I decided to start with the For loop as that is the fundamental concept around which we were to build our program. After which, I decided on squares as my shapes due to their uniformity just being pleasant to look at for me. Once I had my rows and columns of squares, I started messing around with my values and variables, essentially experimenting what different effects I can achieve. I wanted to incorporate some sort of interactivity and decided to utilize the mouseIsPressed function in order to create some effect by clicking and holding the mouse. This led to me adding lines point to the cursor to give a sort of background light rays effect.
I am specifically impressed by how little lines of code it took me to create such a piece. I would initially think such an artwork would require many more lines of code but with some experimenting and utilization of functions, it took only around 30 lines.
There is definitely a lot more that can be done in order to improve this piece. I can definitely utilize different kinds of shapes and add more forms of interactivity. I look forward to seeing how I improve with time and what more I’ll be able to add in the future.