Curse Breakers! Final :D

It’s done, everyone !!!! I DID IT !!! I made a video game and it works wonderfully!!!

Aaaaand here’s how I did it!!

You can take a look at my previous posts  documenting my progress:
https://intro.nyuadim.com/2021/11/27/toomies-final-project-progress-jjk-video-game/
https://intro.nyuadim.com/2021/12/08/curse-breakers-user-testing-progress/

I’m not entirely sure where to start with this, but I’ll do my best to walk you through it!

Let’s go through the game mechanics first:

The object of the game is to shoot the ghosts or ‘curses’ and collect 5 fingers within the time limit to win!

As (I think) I mentioned in my previous posts, I made classes for the fingers, the curses and the bullets.

Here are the classes:

The curses:

class Curse {
  float curx, cury;
  float spx, spy;
  float curw, curh;
  boolean disp = true;

  Curse(float _curx, float _cury, float _spx, float _spy) {
    curx = _curx;
    cury = _cury;

    spx = _spx;
    spy = _spy;

    curw = 260;
    curh = 160;
  }

  void display() {
    if (disp) {
      image(leftghost, curx, cury, curw, curh);
    }
    // displays the enemies on screen
  }

  void move() {
    curx += spx;

    if (curx>width+200) {
      curx=0-100;
    }
  }
}// ghost class end

The curses have random x and y positions and they move at random speeds. Once they collide with Yuji (the character) they disappear and the player loses a life. (You start with 5 lives, and you can also lose a life when you allow the ghosts to go offscreen).  The curses also disappear when you shoot them. This class has two functions: display and move. Display shows the image if the boolean (disp) is true, and move makes the ghosts move in the x direction and come back on the left side of the screen if they leave the screen on the right.

This is the bullets class: (I have 2 in my code but they are essentially the same so I’ll only copy one onto here):

class Bullet {

  float posx, posy;
  float speed;
  float a; //acceleration
  float r;
  boolean disp = true;
  color col;

  Bullet(float _posx, float _posy, float _speed, float _a, color _col) {
    posx = _posx;
    posy = _posy;

    col = _col;

    speed = _speed;
    a = _a;
    r =50;
  }

  void display() {
    fill(col);
    if (disp) {
      circle(posx, posy, r);
    }
  }

  void move() {
    posx -= speed;
    speed += a;
  }

  float distance(float x, float y) {
    return dist(posx, posy, x, y);
  }


  boolean done() {
    // removing bullets once they leave the screen
    if (posx < 0-r) {
      return true;
    } else {
      return false;
    }
  }
}

The bullets have the same functions as the curses class, with the addition of a color argument in the constructor (since there are two types of bullets in the game , one for the fingers and the other for the curses).

There is a distance variable which measures the distance of each bullet, since the bullets are in an array list.

The boolean ‘done’ removes the bullets once they’re offscreen to save memory!

The ‘Sukuna’Class refers to the fingers, here it is:

class Sukuna {
  float posx, posy;
  boolean disp = true;
  float sizew, sizeh;
  float fingertimer;


  Sukuna(float _posx, float _posy) {
    posx = _posx;
    posy = _posy;

    sizew = 140;
    sizeh = 160;
  }


  void display() {
    if (disp) {
      image(finger, posx, posy, sizew, sizeh);
    }
  }
}

It only has a display function, which is exactly the same as the other classes display functions, since the finger doesn’t move on screen once it appears.

As for the main code, I’ll go through it bit by bit:

Here is my beginning code, which is mostly filled with initializing variables:

import ddf.minim.*;
Minim minim;
AudioPlayer powerup;
AudioPlayer theme;
AudioPlayer gameover;
AudioPlayer life;
AudioPlayer woosh;
AudioPlayer winsound;

import processing.serial.*;
Serial myPort;

int score = 0;
float analog;
float starttime;
int fingercount = 0;
int lives = 5;
float prevbullettime=0;
int yujix;
PImage yuji, yujishoot, yujiidle, logo, battlebg, leftghost, finger, win, lose;
PFont gamefont;
int direction = 1;
int yujiR = 70;
int ghostR =60;
int bulletR =40;
int fingerR =70;
int speed = 3;
float acc = .2;
float gamemode = 1;
float countdown=0;
float respawntimer=0;
float fingertimer;
boolean timerActivated = false;
ArrayList<Bullet> bullets;
ArrayList<SBullet> sbullets;
Curse[] curses;
Sukuna[] sukuna;

Here is my setup code:

void setup () {
  fullScreen(); 
  battlebg = loadImage("battlebg.png");
  battlebg.resize(displayWidth, displayHeight);
  translate((displayWidth-1425)/2, (displayHeight-780)/2 +100);
  
  yujix = width-100;
  yujiidle = loadImage("yujiidle.png");
  yujishoot= loadImage("yujishoot.png");
  logo = loadImage("logo.png");
 leftghost = loadImage("leftghost.png");
  finger = loadImage("finger.png");
  win = loadImage("win.jpg");
  lose = loadImage("losepic.png");

  bullets = new ArrayList<Bullet>();
  sbullets = new ArrayList<SBullet>();

  minim = new Minim(this);
  powerup =minim.loadFile("powerup.wav");
  theme = minim.loadFile("jjkop.wav");
  theme.loop();
  gameover = minim.loadFile("gameover.wav");
  life = minim.loadFile("life.wav");
  woosh = minim.loadFile("swoosh.wav");
  winsound = minim.loadFile("winsound.wav");


  gamefont = createFont("/Users/fatimaaljneibi/Library/Fonts/Anime Inept.otf", 32);
  imageMode(CENTER);
  textAlign(CENTER);

  //ghosts:
  curses = new Curse[8] ;
  for (int i = 0; i<curses.length; i++) {
    curses[i]= new Curse(0, random(200, height-200), random(2, 8), random(-5, 5) );
  }

  sukuna = new Sukuna[1] ;
  for (int i = 0; i<sukuna.length; i++) {
    sukuna[i]= new Sukuna(random(300, width-300), random(200, height-200));
    sukuna[i].disp = false;
  }

  //serial setup stuff :
  printArray(Serial.list());
  String portname=Serial.list()[17];
  println(portname);
  myPort = new Serial(this, portname, 9600);
  myPort.clear();
  myPort.bufferUntil('\n');
}

I set the game to be in fullscreen,  loaded all my images and fonts, and called my classes ( there are 8 ghosts, 1 finger, and array lists for the bullets).  I ended up using Minim instead of the processing sound library, because I found it easier to use for my sounds to play once.

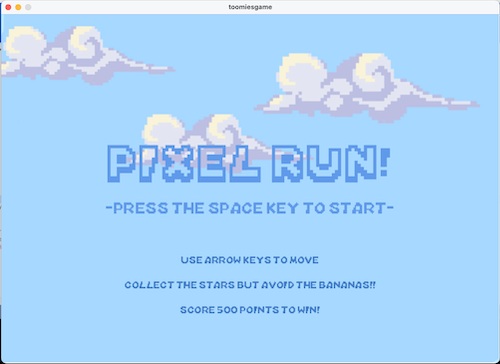
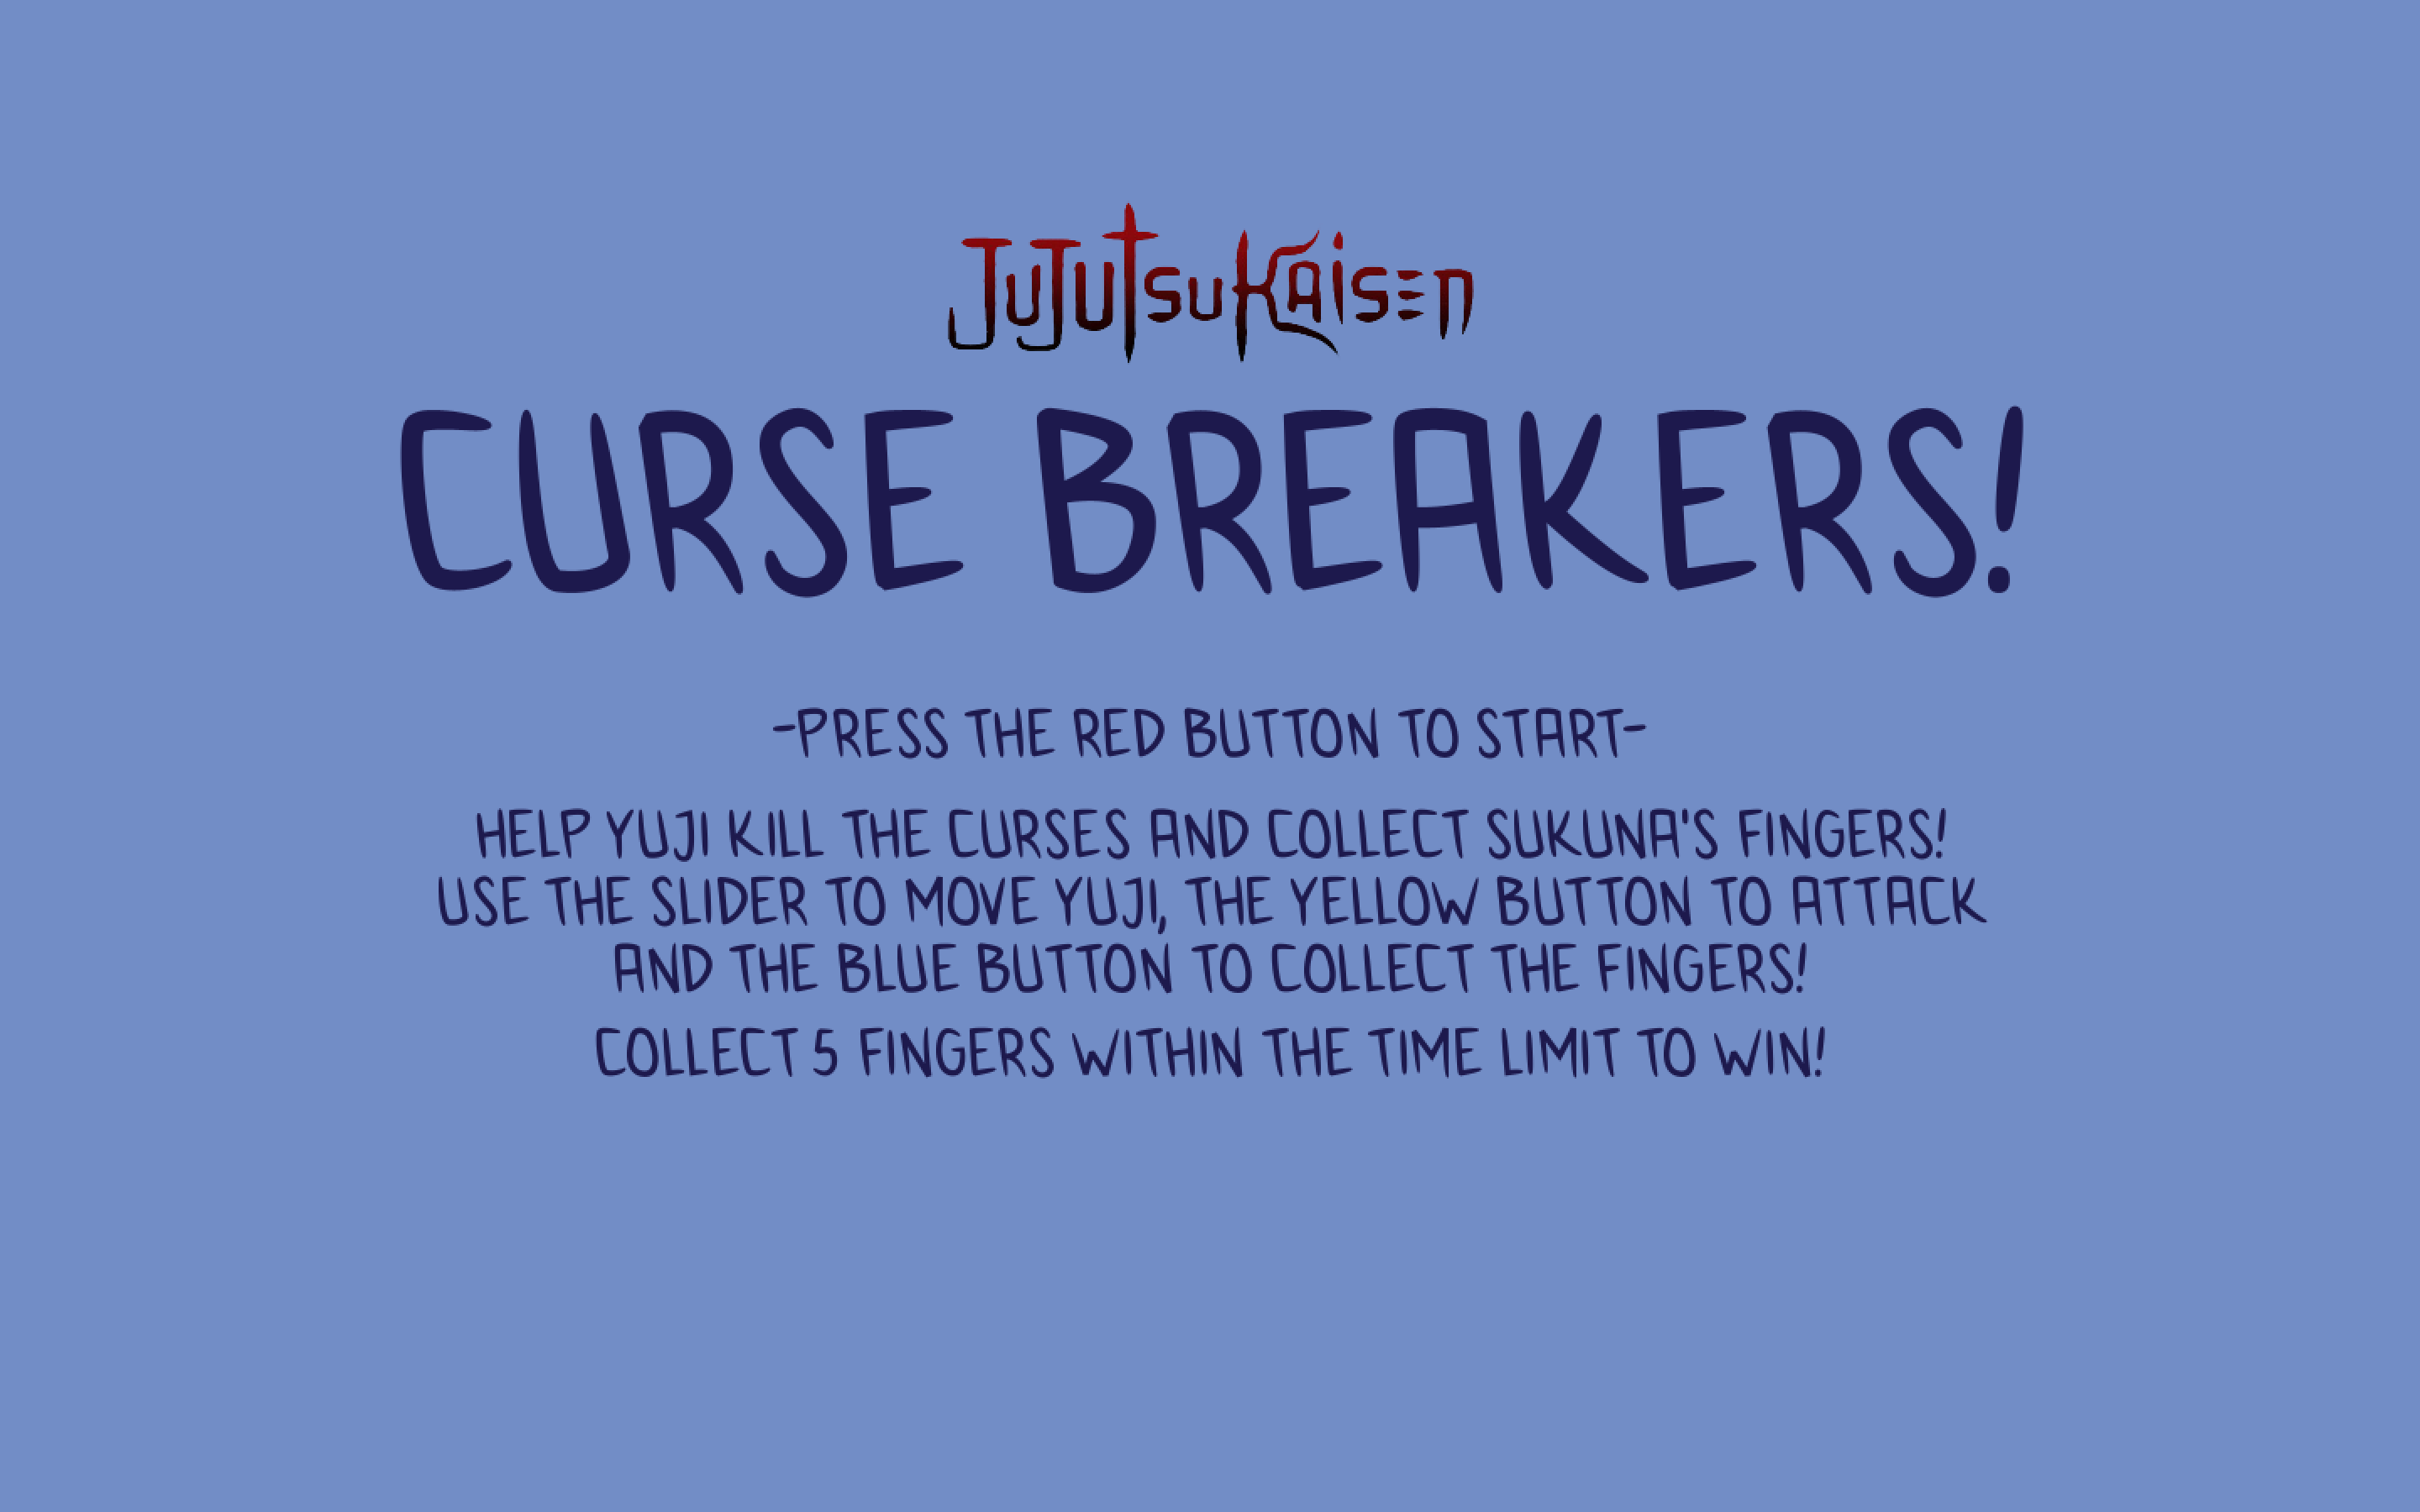
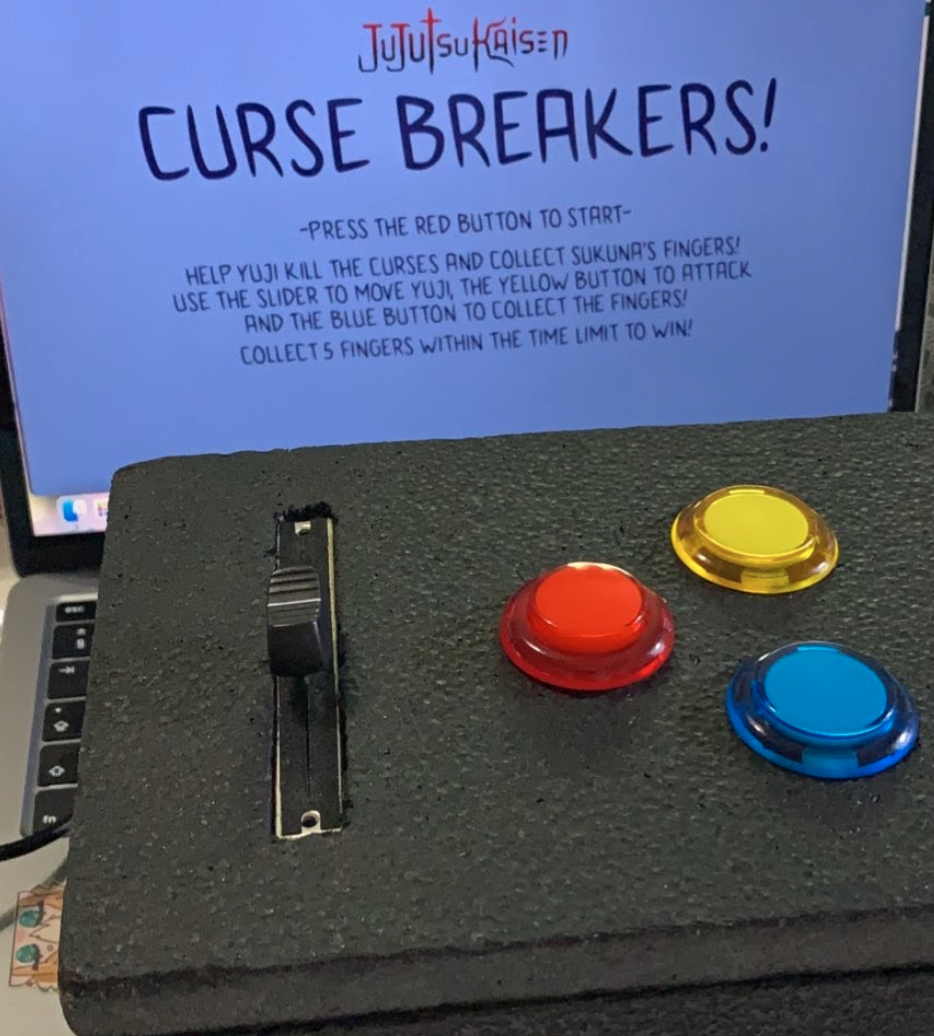
My void draw code has all 4 of my game screens, here’s the code for the starting screen:

// starting screen:
 if (gamemode == 1) {
   if (!theme.isPlaying()) {
     theme.rewind();
     theme.loop();
   }
   background(#728DC6);
   textFont(gamefont, 150);
   image(logo, width/2, height/2-270, 400, 200);
   fill(#1D194D);
   text("CURSE BREAKERS!", width/2, height/2-100);
   ////title ^^ instructions below
   textFont(gamefont, 40);
   text("-press the red button to start-", width/2, height/2);
   //personal note: might turn the controller instructions into an image
   text("help yuji kill the curses and collect sukuna's fingers!", width/2, height/2+60);
   text("use the slider to move yuji, the yellow button to attack", width/2, height/2+100);
   text("and the blue button to collect the fingers!", width/2, height/2+140);
   text("collect 5 fingers within the time limit to win!", width/2, height/2+190);
 } //start screen end

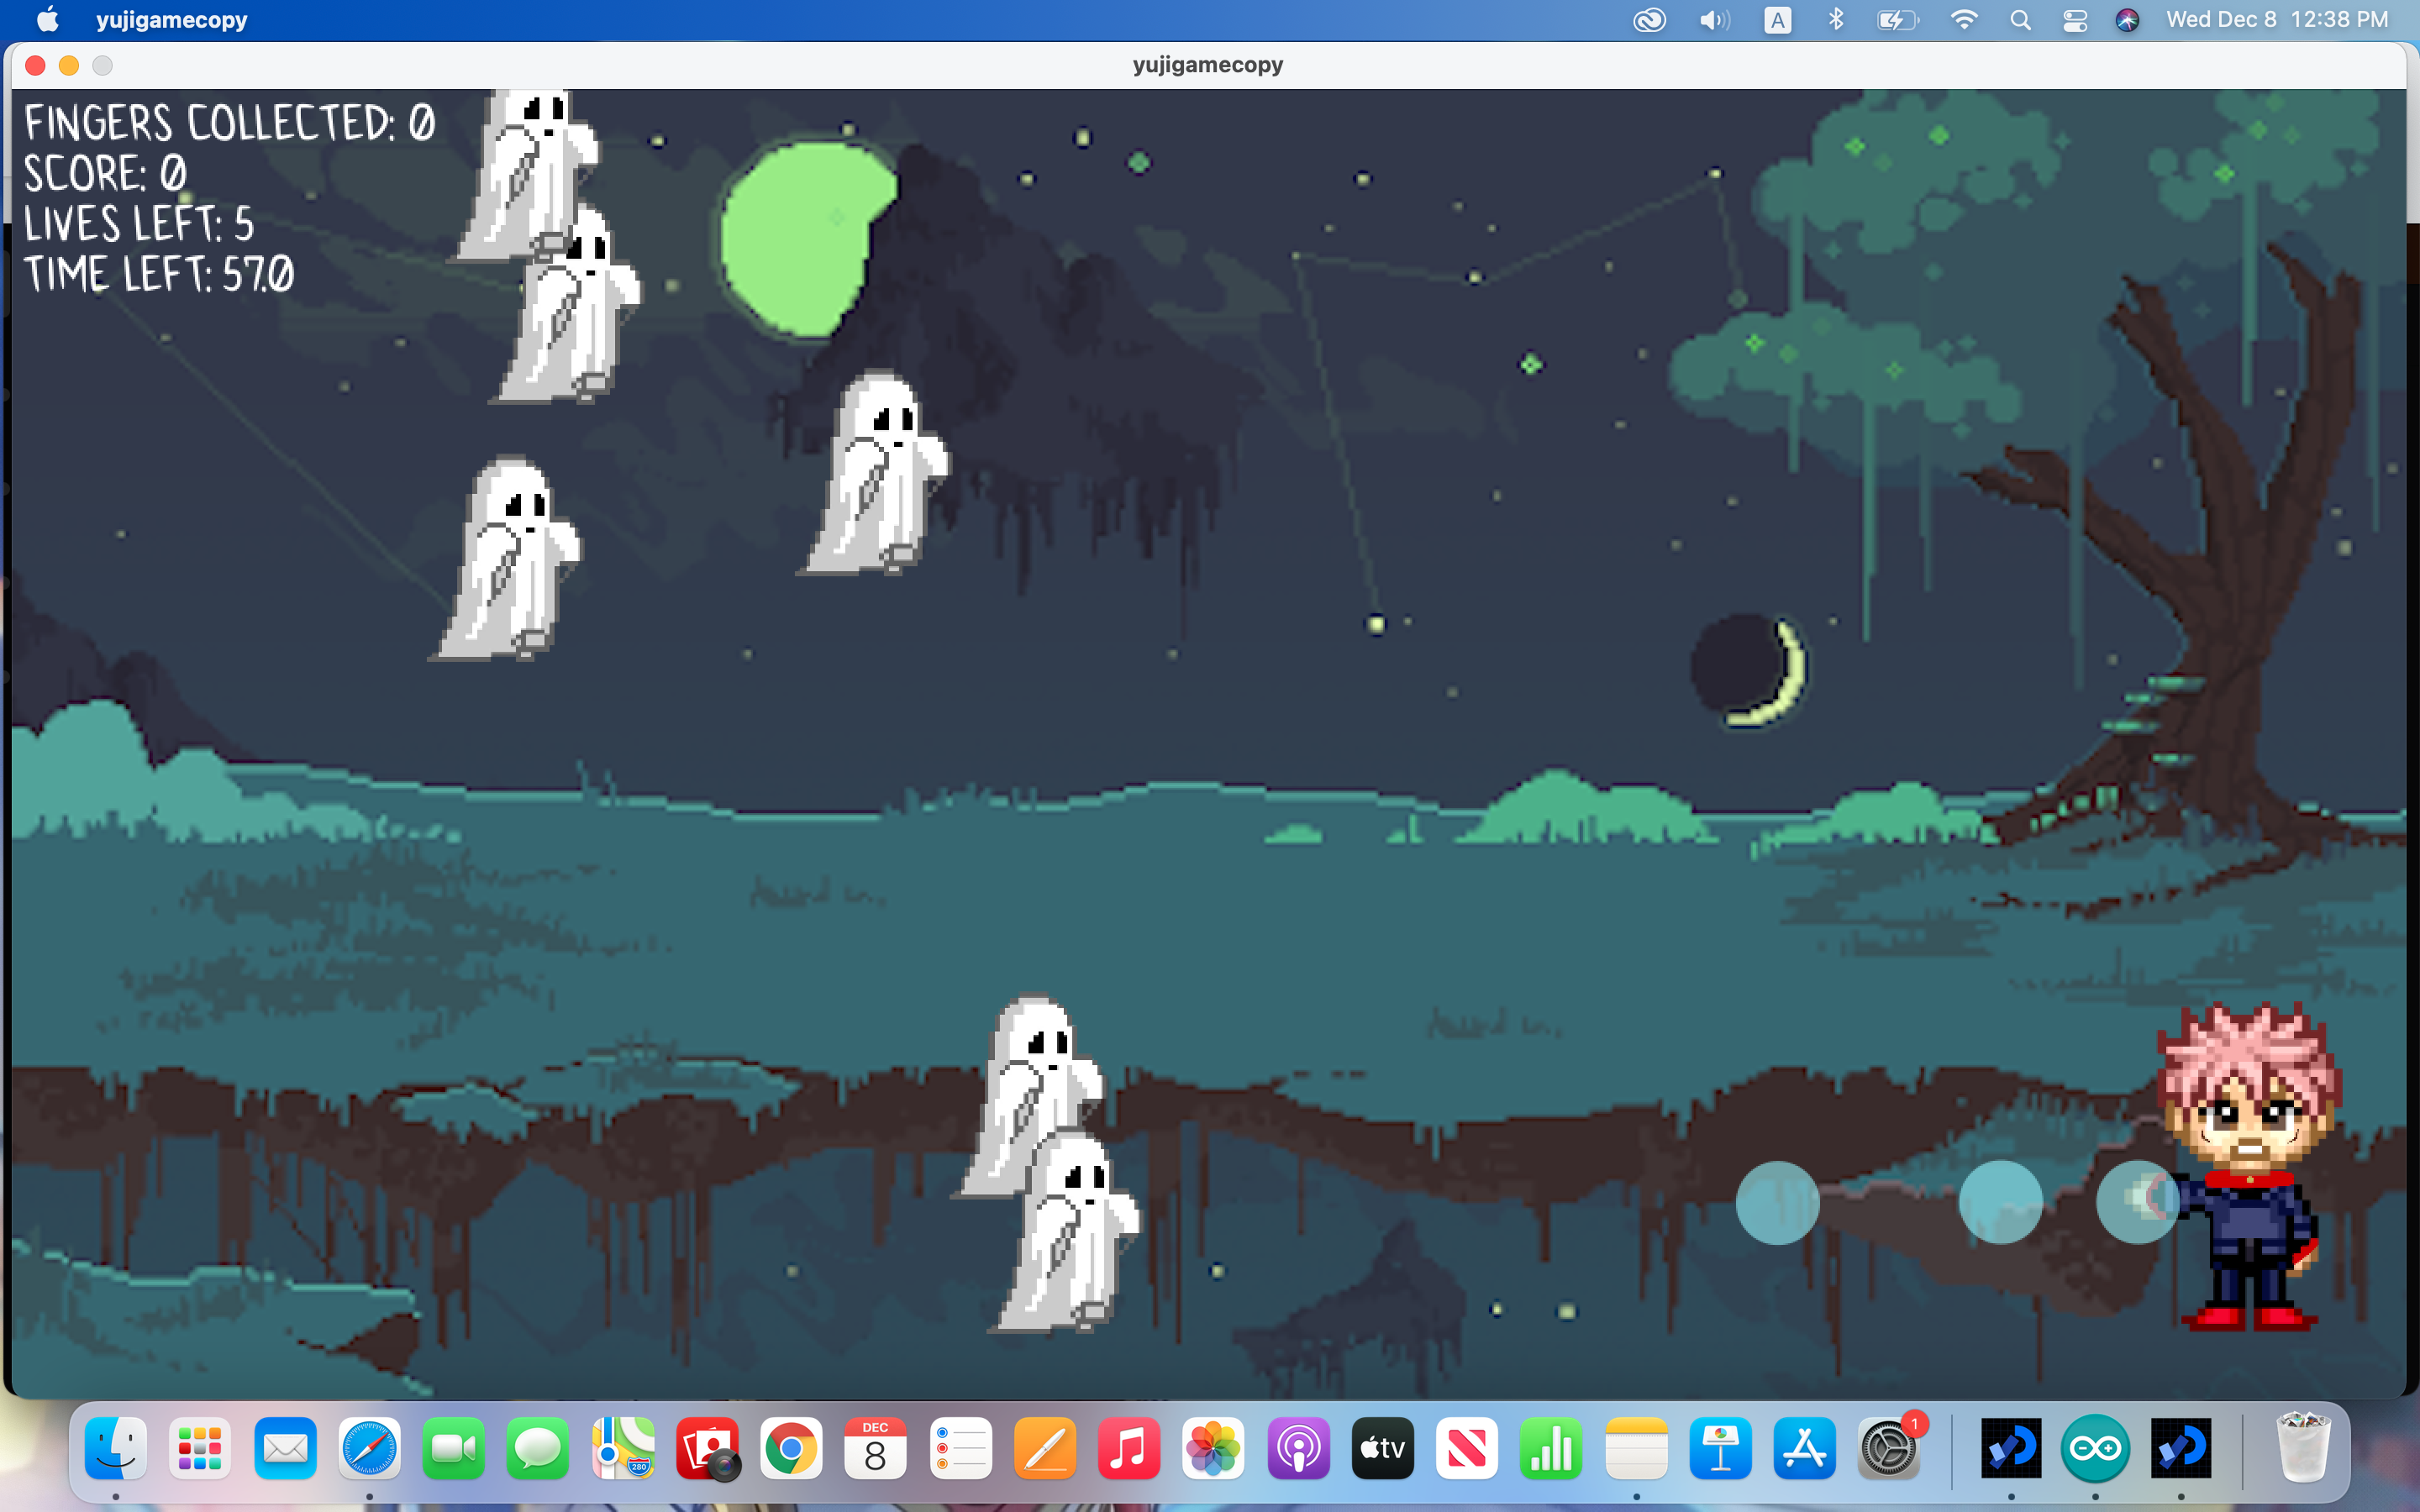
It’s mostly just instructional text and starting the theme song loop.  Here’s a screenshot of what it looks like in the game!

Here’s the main game code:

 //game screen:
  if (gamemode == 2) {
    background(battlebg);
    if (!theme.isPlaying()) {
      theme.loop();
    }
    image(yuji, yujix, analog, 140, 200);

    // respawn curses:
    if (timerActivated==true) {
      if (millis()>respawntimer ) {
        timerActivated = false;
        for (int i=0; i<curses.length; i++) {
          if (curses[i].disp == false) {
            curses[i].curx = random(-100, -10) ;
            curses[i].cury = random(200, height-200);
            curses[i].disp=true;
          }
        }
      }
    }
    if (timerActivated == false && gamemode == 2) {
      respawntimer = millis()+3000; // the curses reappear on screen
      timerActivated = true;
    }

    //collision detection:

    for (int i=0; i<curses.length; i++) {

      float d1 = dist(yujix, analog, curses[i].curx, curses[i].cury);
      if ( d1 <= ghostR + yujiR && curses[i].disp==true) {
        lives-= 1;

        life.rewind();
        life.play();

        curses[i].disp=false;  //subtracts a life from yuji when he gets in contact with a ghost and makes it disappear on contact
      }
      for (int j = bullets.size()-1; j >= 0; j--) {
        float d2 = bullets.get(j).distance(curses[i].curx, curses[i].cury);
        if ( d2 <= ghostR + bulletR && curses[i].disp==true) {
          curses[i].disp=false;
          bullets.get(j).disp=false;
          bullets.remove(j);
          score += 10;
          woosh.rewind();
          woosh.play();
        }
      }
    }

    //shooting the fingers:
    for (int i=0; i<sukuna.length; i++) {
      for (int j = sbullets.size()-1; j >= 0; j--) {
        float d2 = sbullets.get(j).distance(sukuna[i].posx, sukuna[i].posy);
        if ( d2 <= fingerR + bulletR && sukuna[i].disp==true) {
          sukuna[i].disp=false;
          sbullets.get(j).disp=false;
          sbullets.remove(j);
          fingercount += 1;
          powerup.rewind();
          powerup.play();
        }
      }
    }

    //scoreboard + timer:
    pushStyle();
    textAlign(LEFT);
    textFont(gamefont, 30);
    fill(255);
    text(" Fingers collected: " + fingercount, 0, 30);
    text(" Score: " + score, 0, 60);
    text(" Lives left: " + lives, 0, 90);
    countdown = 60 -int((millis()-starttime)/1000);
    text(" Time left: " + countdown, 0, 120);
    popStyle();

    // calling class functions for the curses + bullets:
    for (int i=0; i<curses.length; i++) {
      curses[i]. display();
      curses[i]. move();
    }

    for (int i = bullets.size()-1; i >= 0; i--) {
      Bullet bullet = bullets.get(i);
      bullet.display();
      bullet.move();
      if (bullet.done()) {
        bullets.remove(i);
        // removes the bullets from the arraylist once they leave the screen to save memory
      }
    }
    for (int i = sbullets.size()-1; i >= 0; i--) {
      SBullet sbullet = sbullets.get(i);
      sbullet.display();
      sbullet.move();
      if (sbullet.done()) {
        sbullets.remove(i);
        // removes the bullets from the arraylist once they leave the screen to save memory
      }
    }
//win condition:
    if (countdown<=0 && fingercount <5) {
      gamemode = 4;
      theme.pause();
      winsound.rewind();
      for (int i = sbullets.size()-1; i >= 0; i--) {
        sbullets.remove(i);
      }
      for (int i = bullets.size()-1; i >= 0; i--) {
        bullets.remove(i);
      }
      //lose condition 2: (if time runs out)
    } else if (countdown>=0 && fingercount == 5) {
      gamemode =3;
      theme.pause();
      for (int i = sbullets.size()-1; i >= 0; i--) {
        sbullets.remove(i);
      }
      for (int i = bullets.size()-1; i >= 0; i--) {
        bullets.remove(i);
      }
    }

    //finger mechanics:

    for (int i=0; i<sukuna.length; i++) {
      sukuna[i].display();
    }
    for (int i=0; i<sukuna.length; i++) {
      if (score % 100 ==0 && score >0) {
        fingertimer =3000+millis();
        sukuna[i].disp = true;
      }
      if (millis() > fingertimer) {
        sukuna[i].disp = false;
        fingertimer =0;
      }
    }
    // if the curses leave the screen without being shot, you lose 1 life
    for (int i=0; i<curses.length; i++) {
      if (curses[i].curx > width && curses[i].disp == true) {
        lives -= 1;
        life.rewind();
        life.play();
        curses[i].disp = false;
      }
    }

    // you lose if your lives are at 0
    if (lives <= 0) {
      gameover.rewind();
      gamemode = 4;
    }
  } // game screen end

There’s quite a lot going on here. The character is drawn here, with his Y position being the slider (analog input). We’ll go over the serial communication in a bit!

I made a respawn timer for the curses, basically the logic here is that if the curses disp = false ( i.e. they’re not visible on screen) and the current time > respawn timer, the curses will respawn at a new random height on screen, with the width being offscreen on the left, so they move forward to the right.

After that, there’s the code for collision detection. The logic here is that if the distance between the two objects is less than the sum of their radii (which are variables that I set at the very beginning of my code) then something happens! The code for what that ‘something’ is differs depending on what two objects they are. There’s collision detection for the bullets and the curses, and for the curses and yuji, and for the bullets and the fingers.

Then, there’s code for the scoreboard and the timer. You can see the scoreboard in the top left of this screenshot:
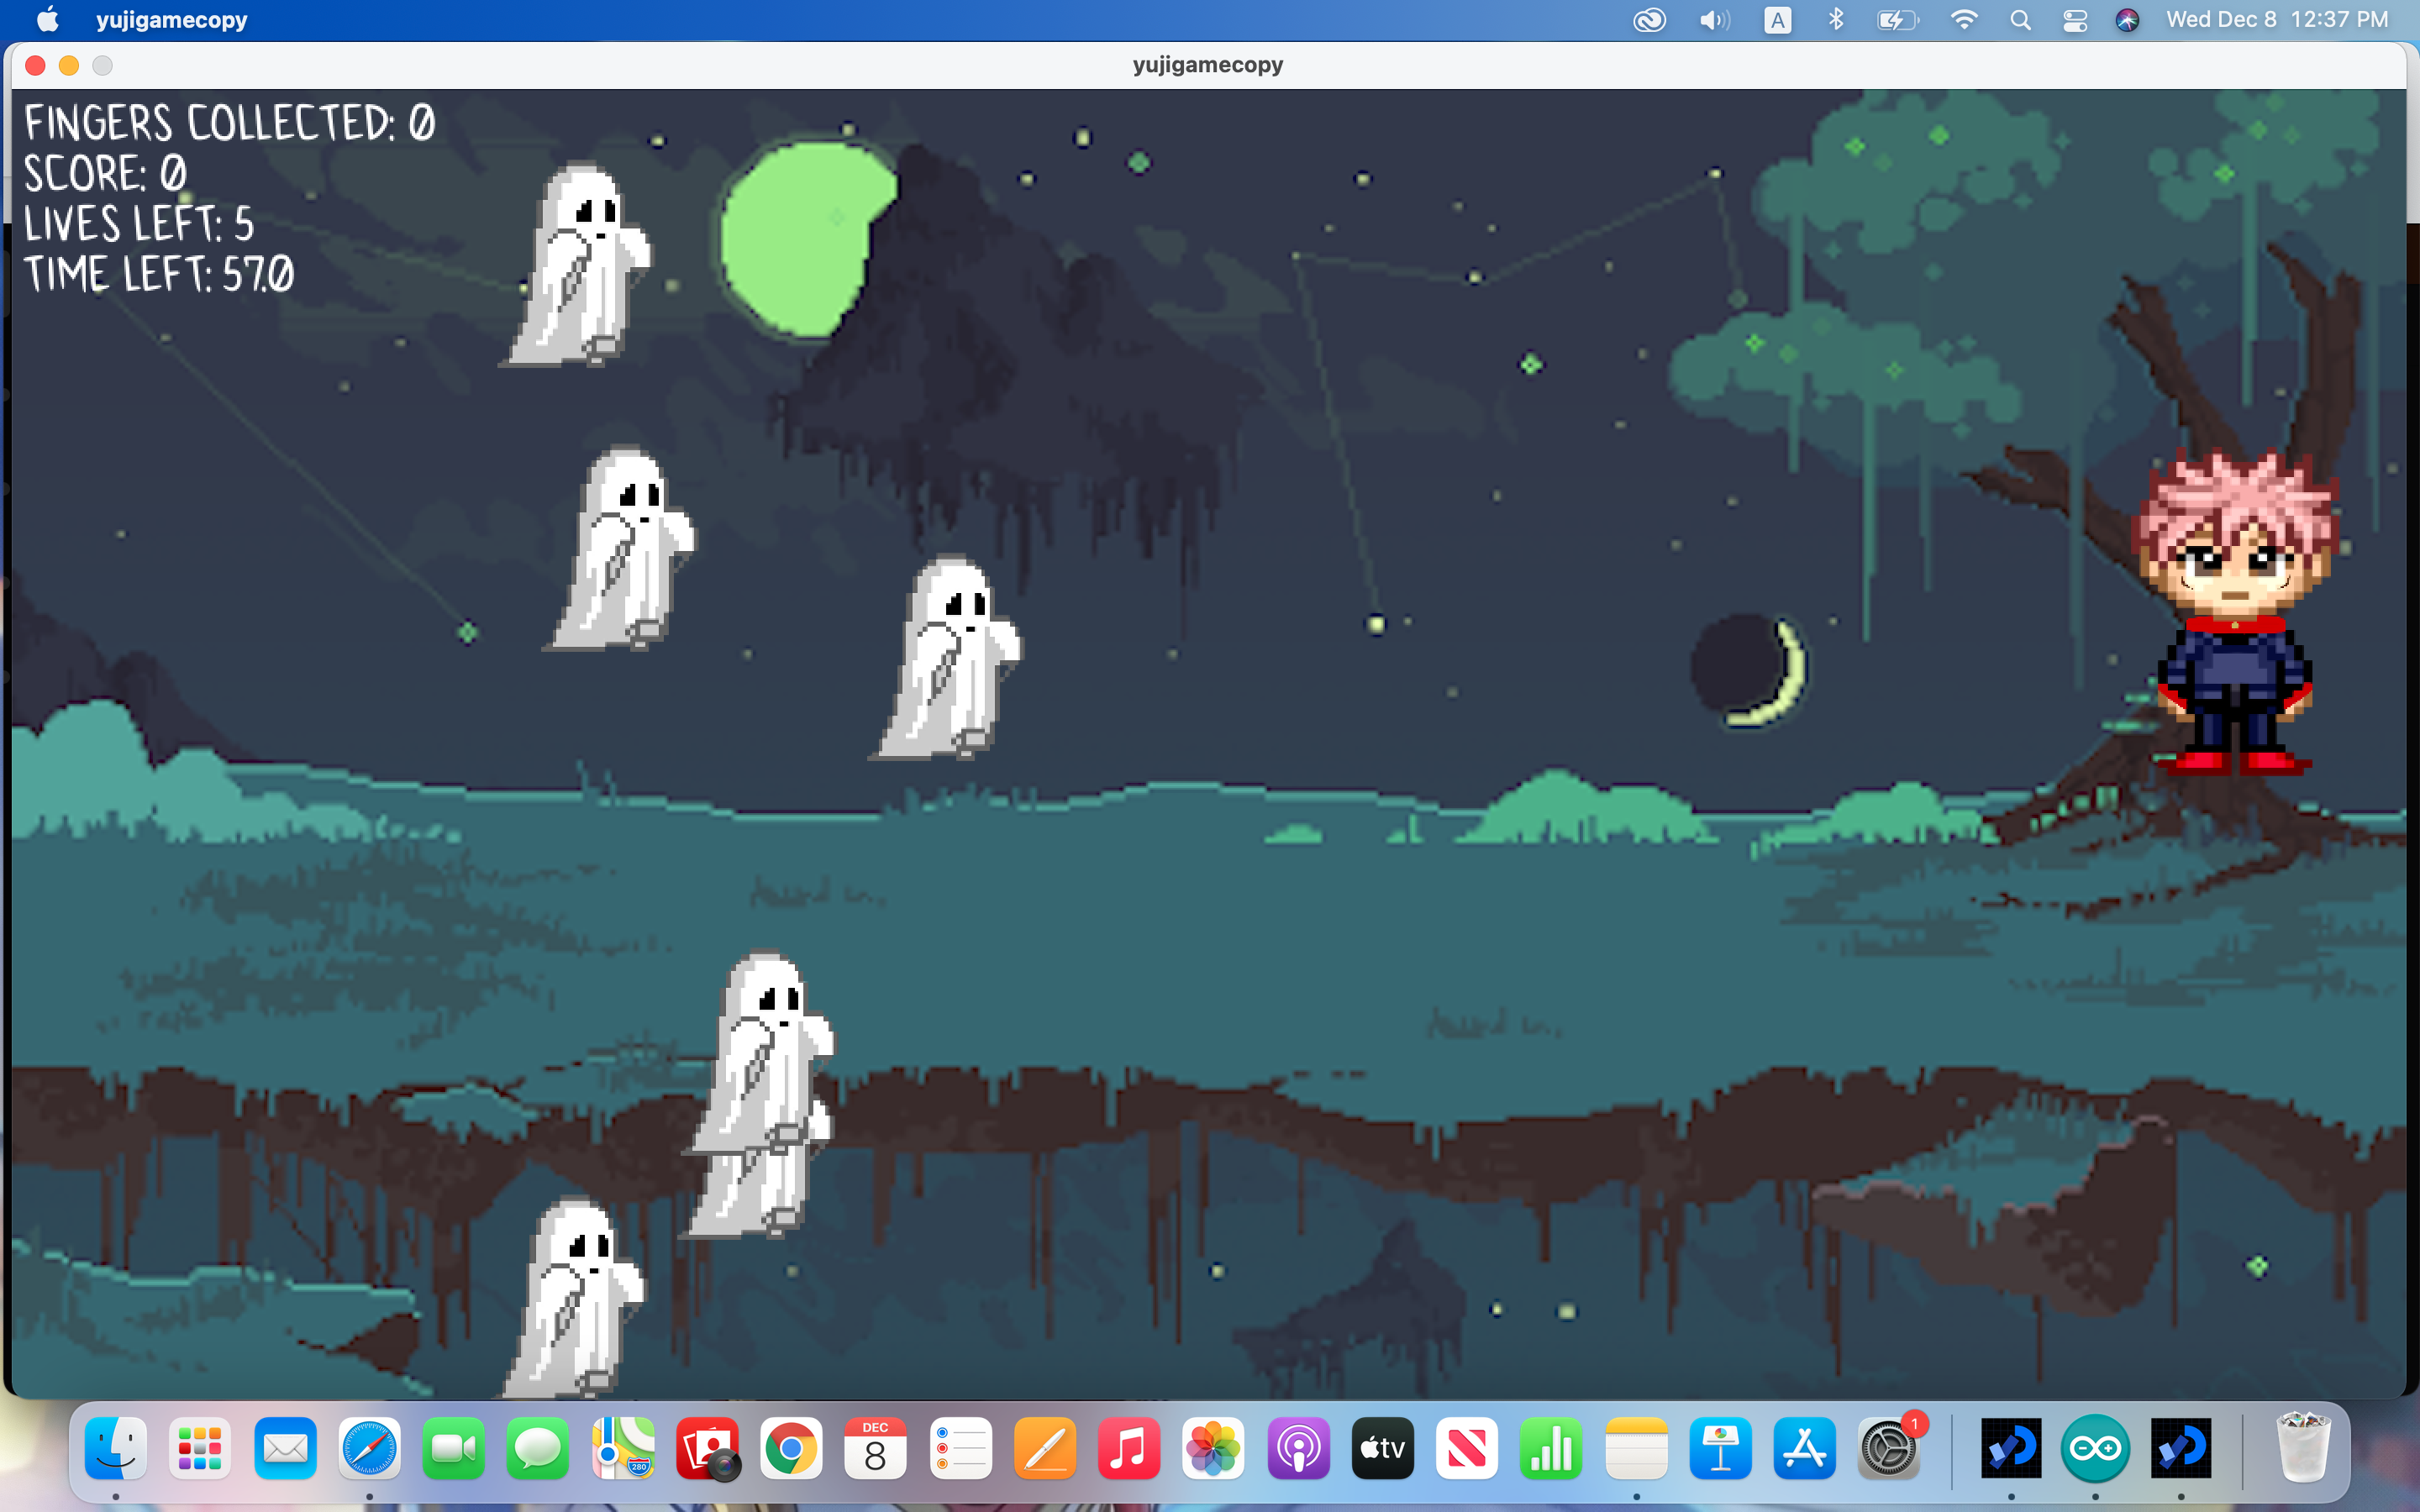
It has a finger counter(increases whenever you shoot a finger), a lives counter(starts at 5, decreases by one if Yuji gets hit by a ghost, or lets one get away), a score(based on the ghosts that you hit) and a timer! The timer is 60 seconds from the start of the game.

Following this code is the code to call class functions for the curses and bullets.

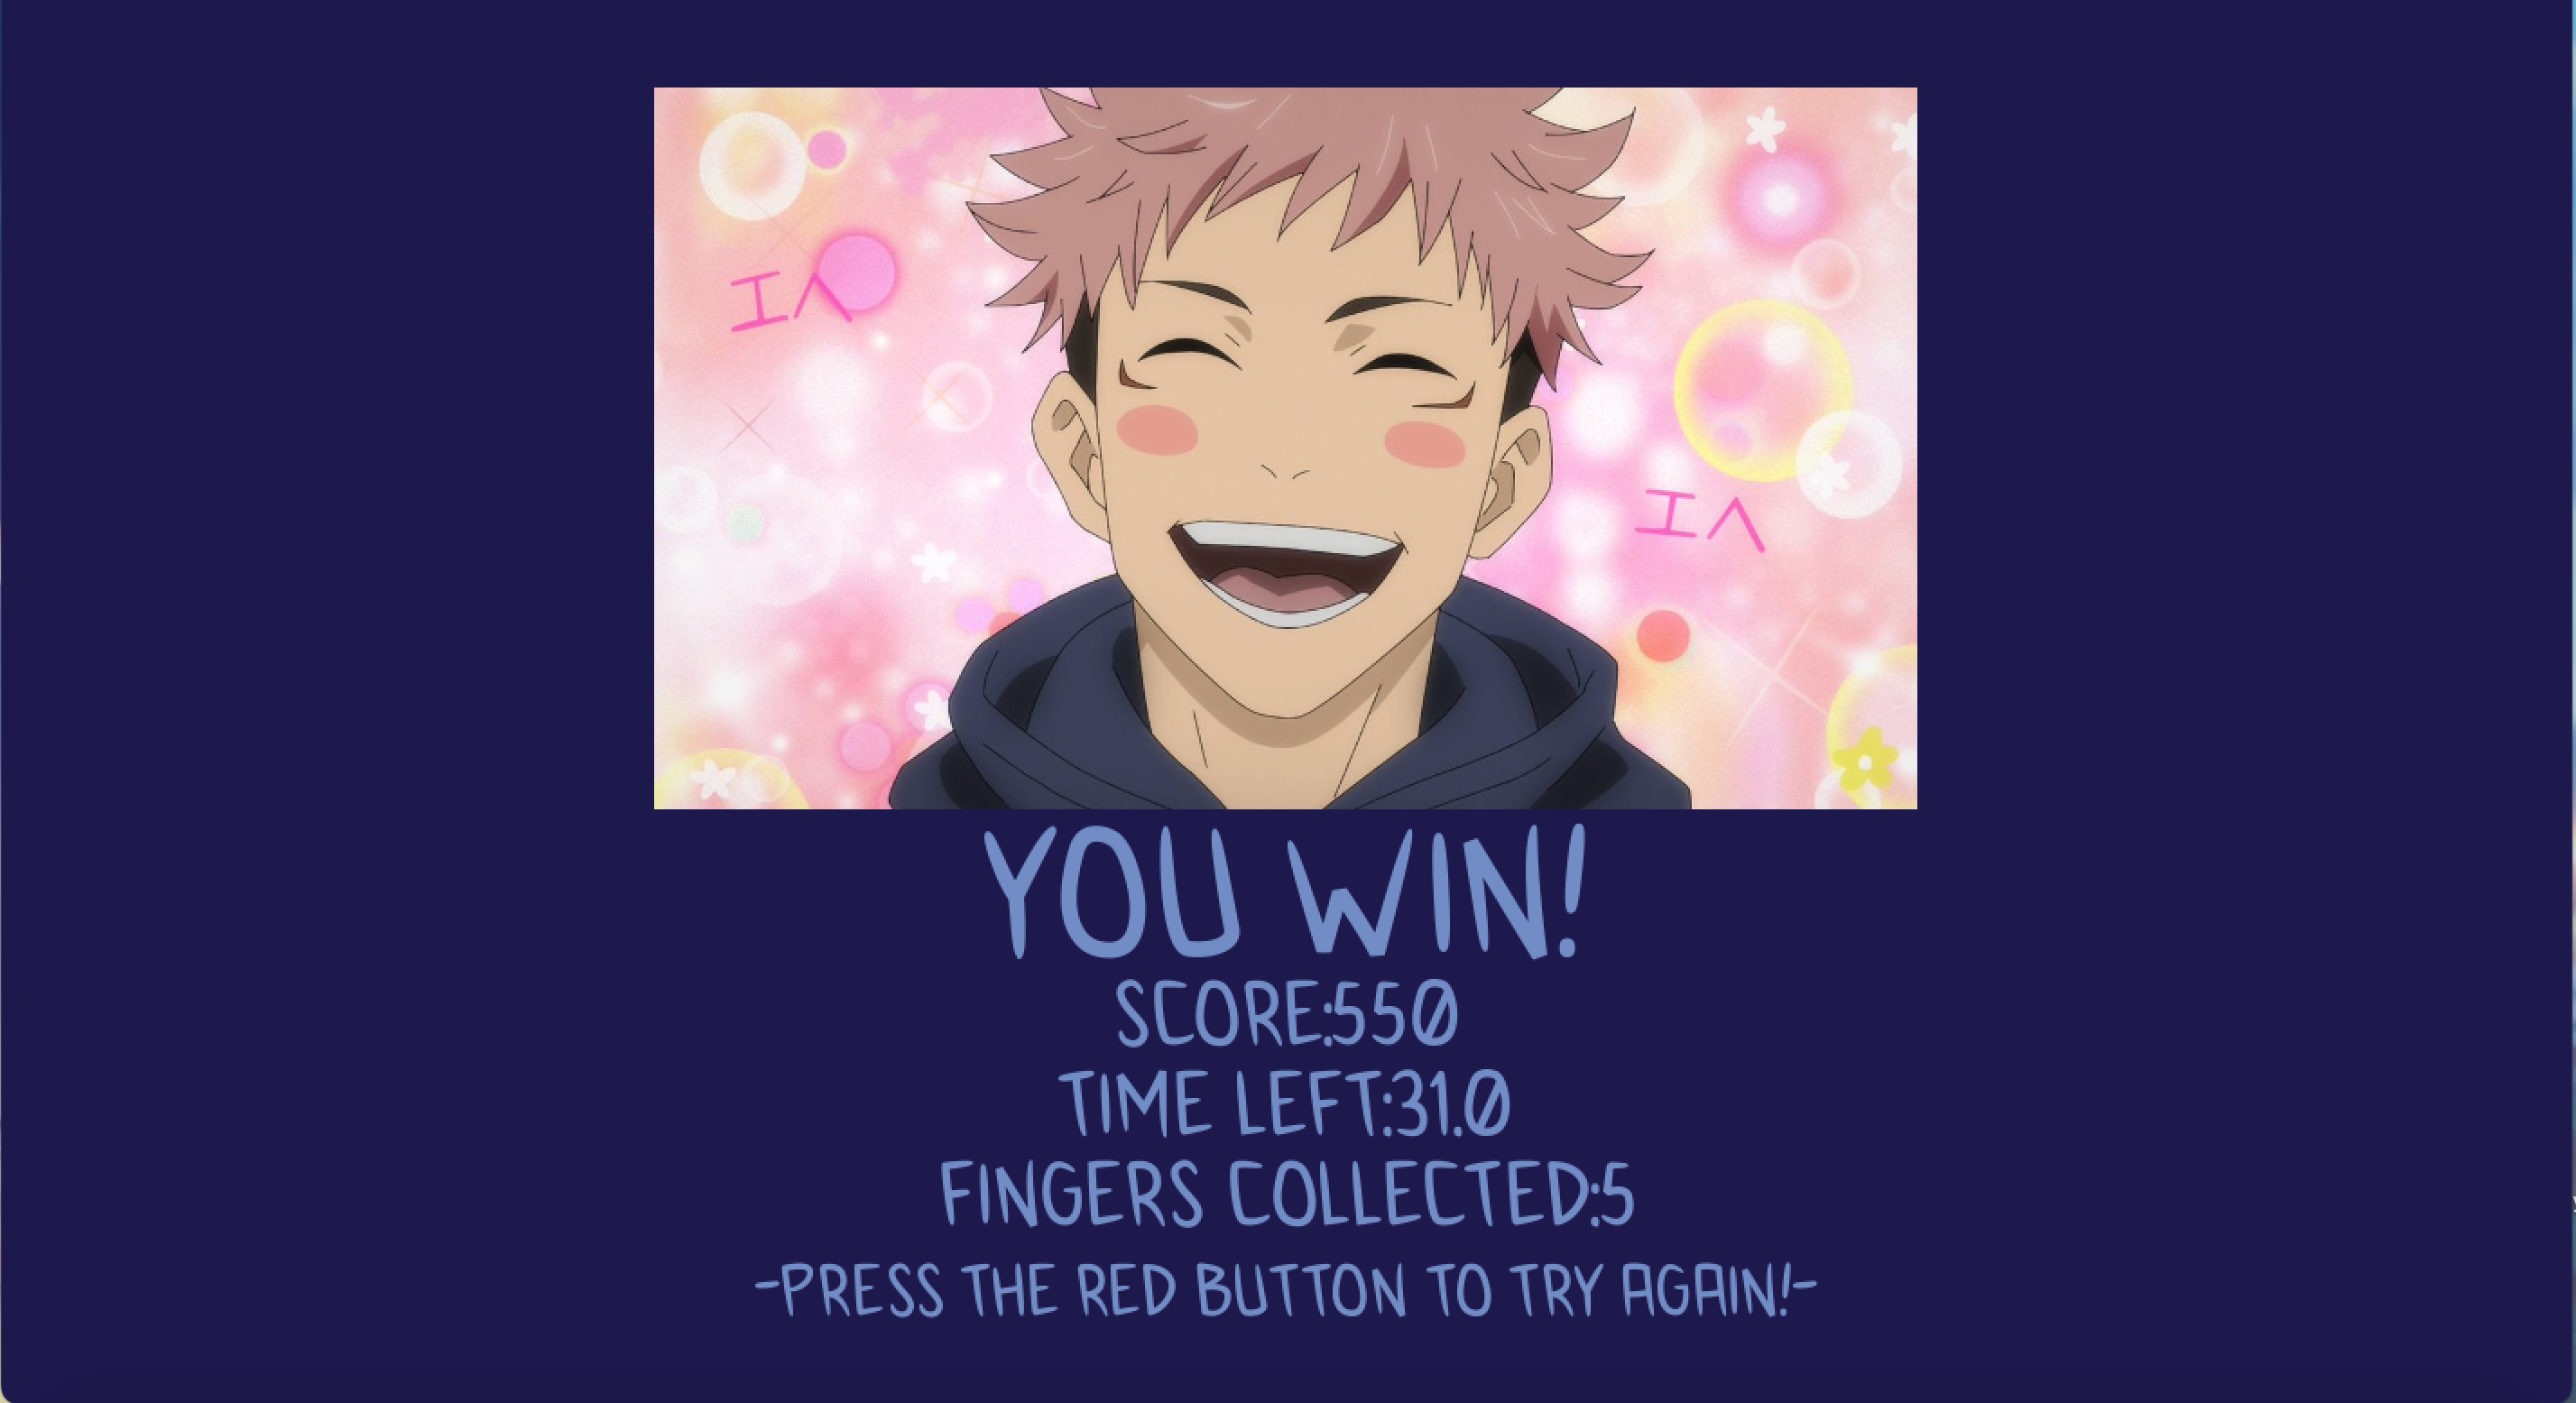
After this comes the code for win conditions. You can only win after collecting 5 of Sukuna’s fingers. A finger appears after you hit a score that’s divisible by 100, and it disappears after a few seconds if you don’t collect it in time! Once you win, you go to the winning screen!

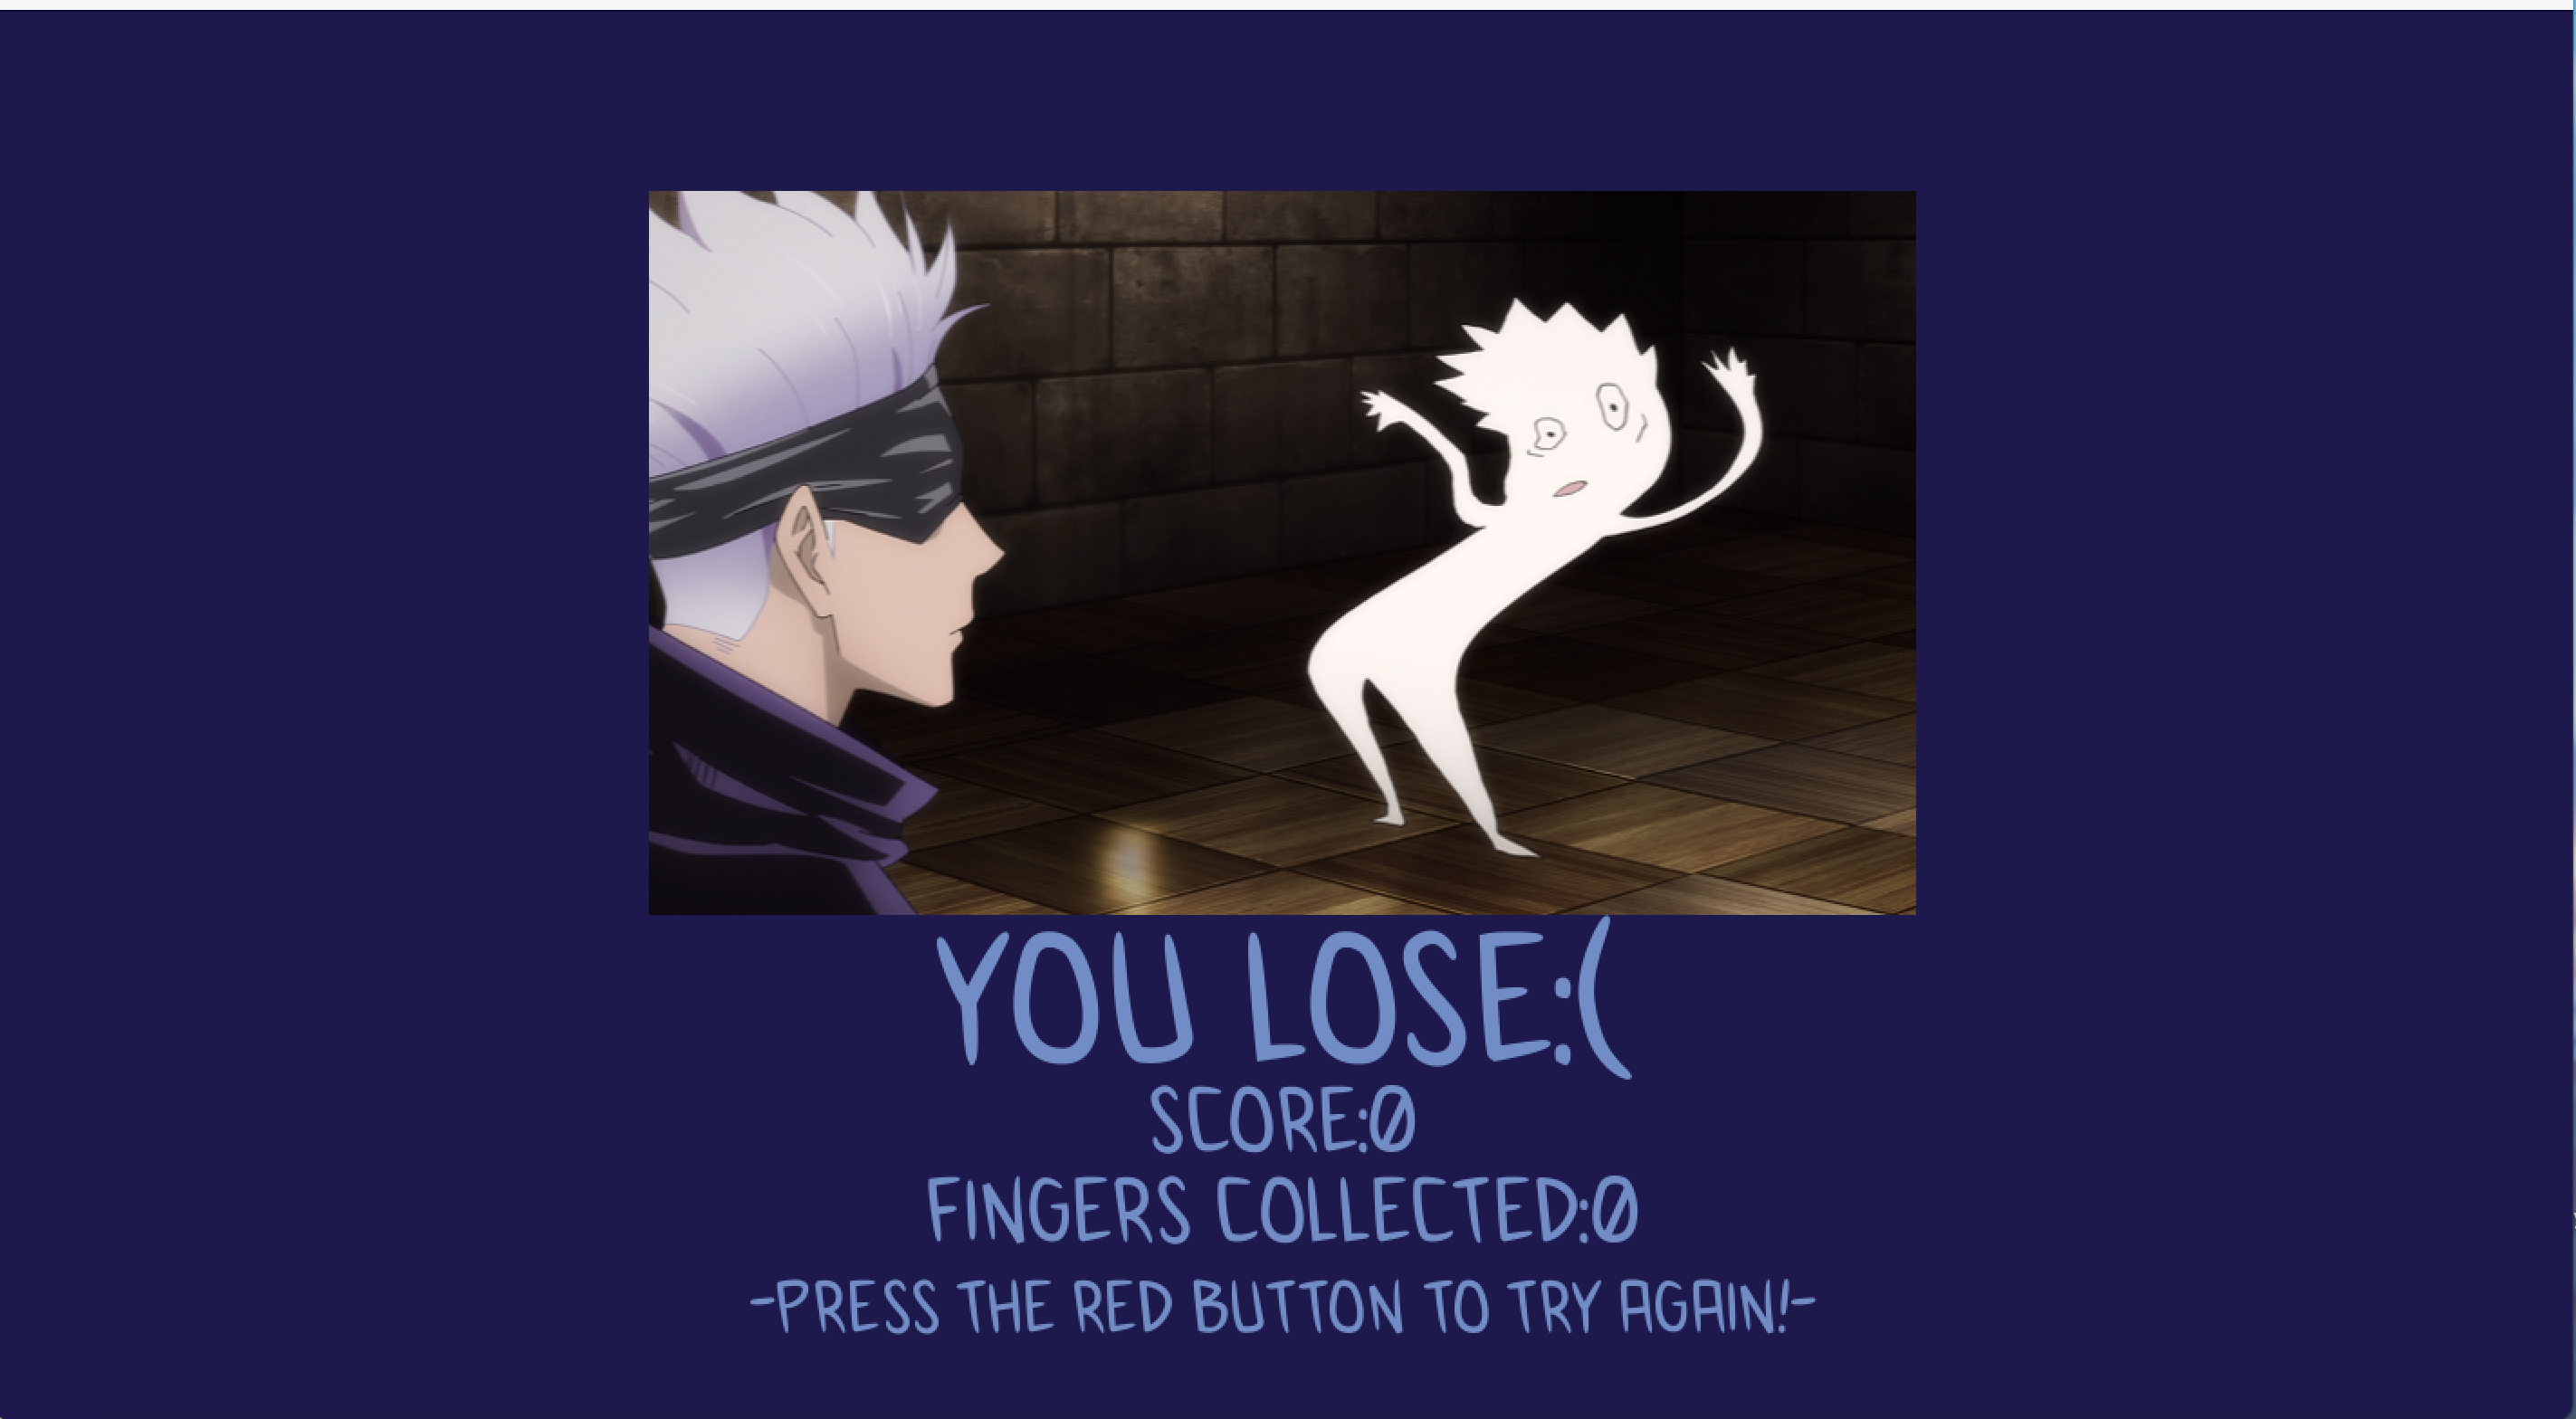
To lose the game, you either lose all of your lives or you don’t collect 5 fingers by the time the timer ends! Once you lose, you are taken to the losing screen ><.

Then, we have the code for the finger mechanics! It’s pretty simple, I called the display function for the finger, and the disp boolean is initially false. It becomes true once you hit a score divisible by zero, and disappears shortly after.

The code following that is to decrease the lives variable by 1 every time a ghost leaves the screen.

Heres the winning and losing screen’s code, accompanied by screenshots of both in-game:

 // winning & losing screens:

  //win screen, score/time , sound effect:
  if (gamemode == 3) {
    theme.pause();
    winsound.play();
    background(#1D194D);
    textFont(gamefont, 100);
    fill(#728DC6);
    text("YOU WIN!", width/2, height-250);
    //title ^^   info below
    textFont(gamefont, 50);
    text("score:"+score, width/2, height-200);
    text("time left:"+countdown, width/2, height-150);
    text("fingers collected:"+ fingercount, width/2, height-100);

    textFont(gamefont, 40);
    text("-press the red button to try again!-", width/2, height-50);
    image(win, width/2, 250, 700, 400);
  }//win screen end

  if (gamemode == 4) {
    //losing screen, click to try again, sound effect
    theme.pause();
    gameover.play();

    background(#1D194D);
    textFont(gamefont, 100);
    fill(#728DC6);
    text("YOU LOSE:(", width/2, height-200);
    //title ^^   info below
    textFont(gamefont, 50);
    text("score:"+score, width/2, height-150);
    text("fingers collected:"+ fingercount, width/2, height-100);
    textFont(gamefont, 40);
    text("-press the red button to try again!-", width/2, height-50);
    image(lose, width/2, 300, 700, 400);
  }//losing screen end
}//draw bracket


Also, I’ve added various sound effects to the game, I’ll list them here:
A ‘whoosh’ sound when you shoot the curses
A powerup sound effect when you collect a finger
The theme song (which plays only during the start screen and the game screen)
A victory sound plays in the win screen
A game over sound plays on the lose screen

Here is the serial communications code:

Processing:

void serialEvent(Serial myPort) {
  String s=myPort.readStringUntil('\n');
  s=trim(s);
  //int values = parseInt(s);
  //boolean shoottest = false;
  if (s!=null) {
    //println(s);
    int values[]=int(split(s, ','));

    // note: values: 0 = slider, 1= yellow, 2= blue, 3= red

    //slider:
    analog =map(values[0], 0, 1023, 100, height-70);
    yuji = yujiidle;
    //attacking (yellow) button:
    if (values[2] == 1 && gamemode == 2) {
      // not working:
      yuji = yujishoot;
      color Ccircle = color(#98F7FF, 150);
      noStroke();
      if (millis() - prevbullettime > 400) {
        bullets.add(new Bullet(width-150, analog+20, speed, acc, Ccircle));
        prevbullettime= millis();
      }
    }

    // start button:
    if (values[3] == 1 && gamemode == 1) {
      starttime=millis();
      fingercount = 0;
      score = 0;
      gamemode = 2;
      //replay : (red button)
    } else if (values[3] == 1 && gamemode == 3 || values[3] == 1 && gamemode ==4) {
      fingercount = 0;
      lives = 5;
      gamemode =1;
      delay(1000); // so you dont skip to the start screen too quickly after pressing the button
      for (int i=0; i<curses.length; i++) {
        curses[i].curx = random(-100, -10);
      }
    } //fingers (blue)
    if (values[1] == 1 && gamemode == 2) {
      yuji = yujishoot;
      color Scircle = color(#FF8B8B, 150);
      noStroke();
      if (millis() - prevbullettime > 400) {
        sbullets.add(new SBullet(width-150, analog+20, speed, acc, Scircle ));
        prevbullettime= millis();
      }
    }
    
  }

  myPort.write(int(0)+"\n");
}

Arduino:

int bluepin = 5;
int yellowpin = 3;
int redpin = 6;
int sliderpin = A5;

void setup() {
  pinMode(bluepin , INPUT);
  pinMode(yellowpin , INPUT);
  pinMode(redpin , INPUT);
  pinMode(sliderpin , INPUT);
  Serial.begin(9600);
  Serial.println("0,0,0,0");
}

void loop() {
  int bluebutton = digitalRead(bluepin);
  int yellowbutton = digitalRead(yellowpin);
  int redbutton = digitalRead(redpin);
  int slider = analogRead(sliderpin);

//checking if everything is connected properly:
//comment this out to run processing
//    Serial.print(bluebutton);
//    Serial.print(yellowbutton);
//    Serial.print(redbutton);
//    Serial.println(slider);

  while (Serial.available()) {
    int fromP = Serial.parseInt();

    if (Serial.read() == '\n') {
      Serial.print(slider);
      Serial.print(",");
      Serial.print(yellowbutton);
      Serial.print(",");
      Serial.print(bluebutton);
      Serial.print(",");
      Serial.println(redbutton);
    }

  }


}

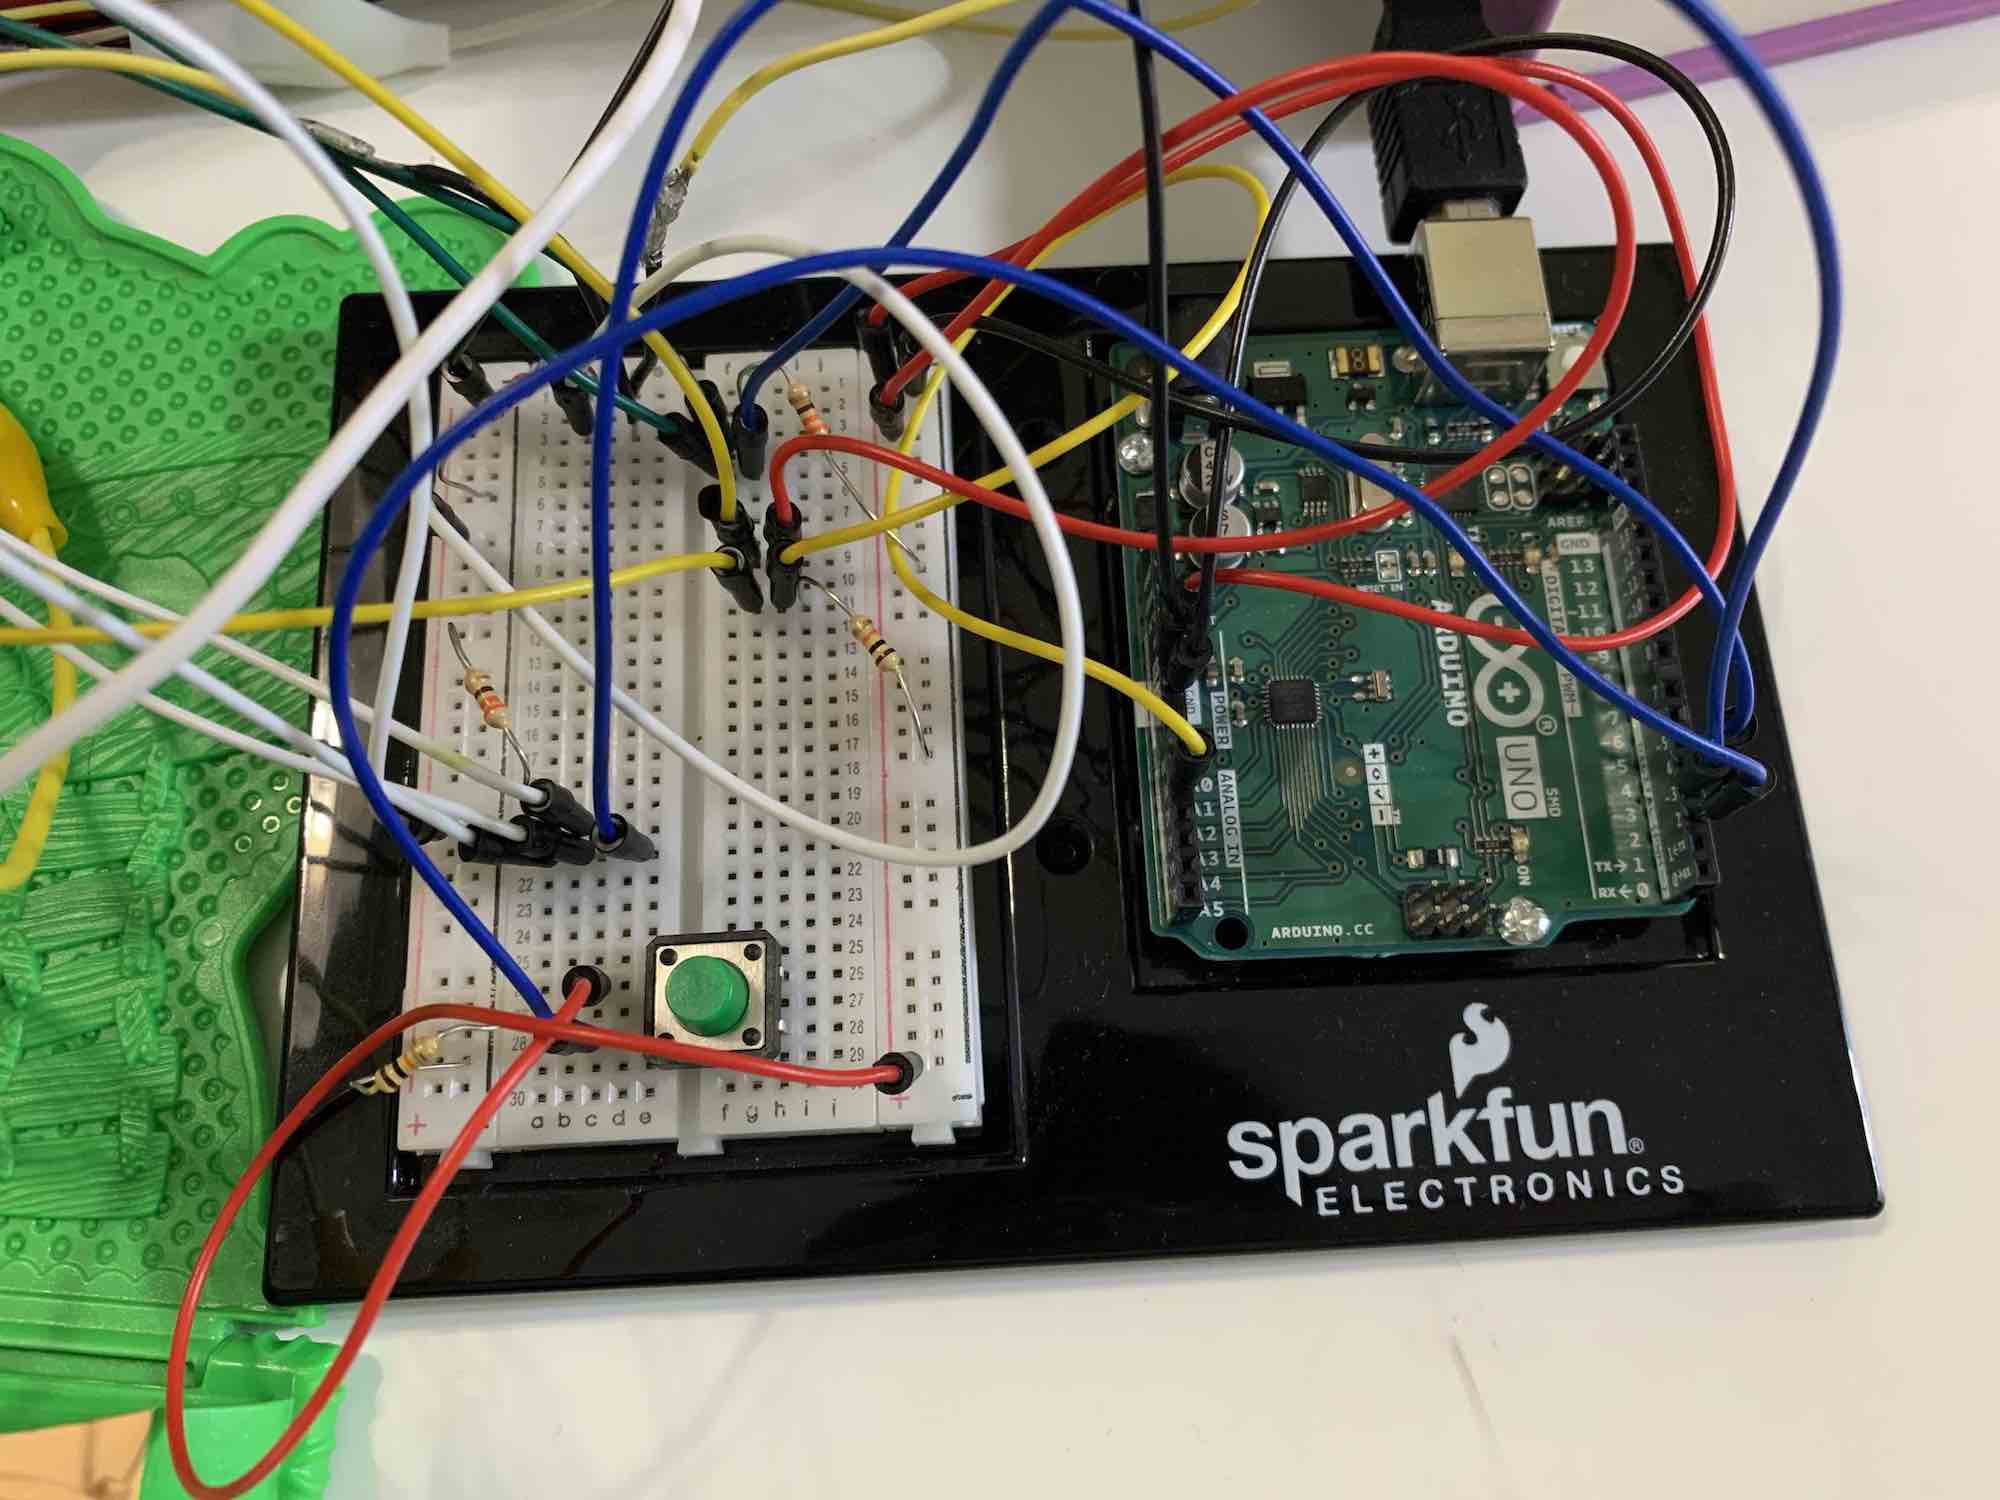
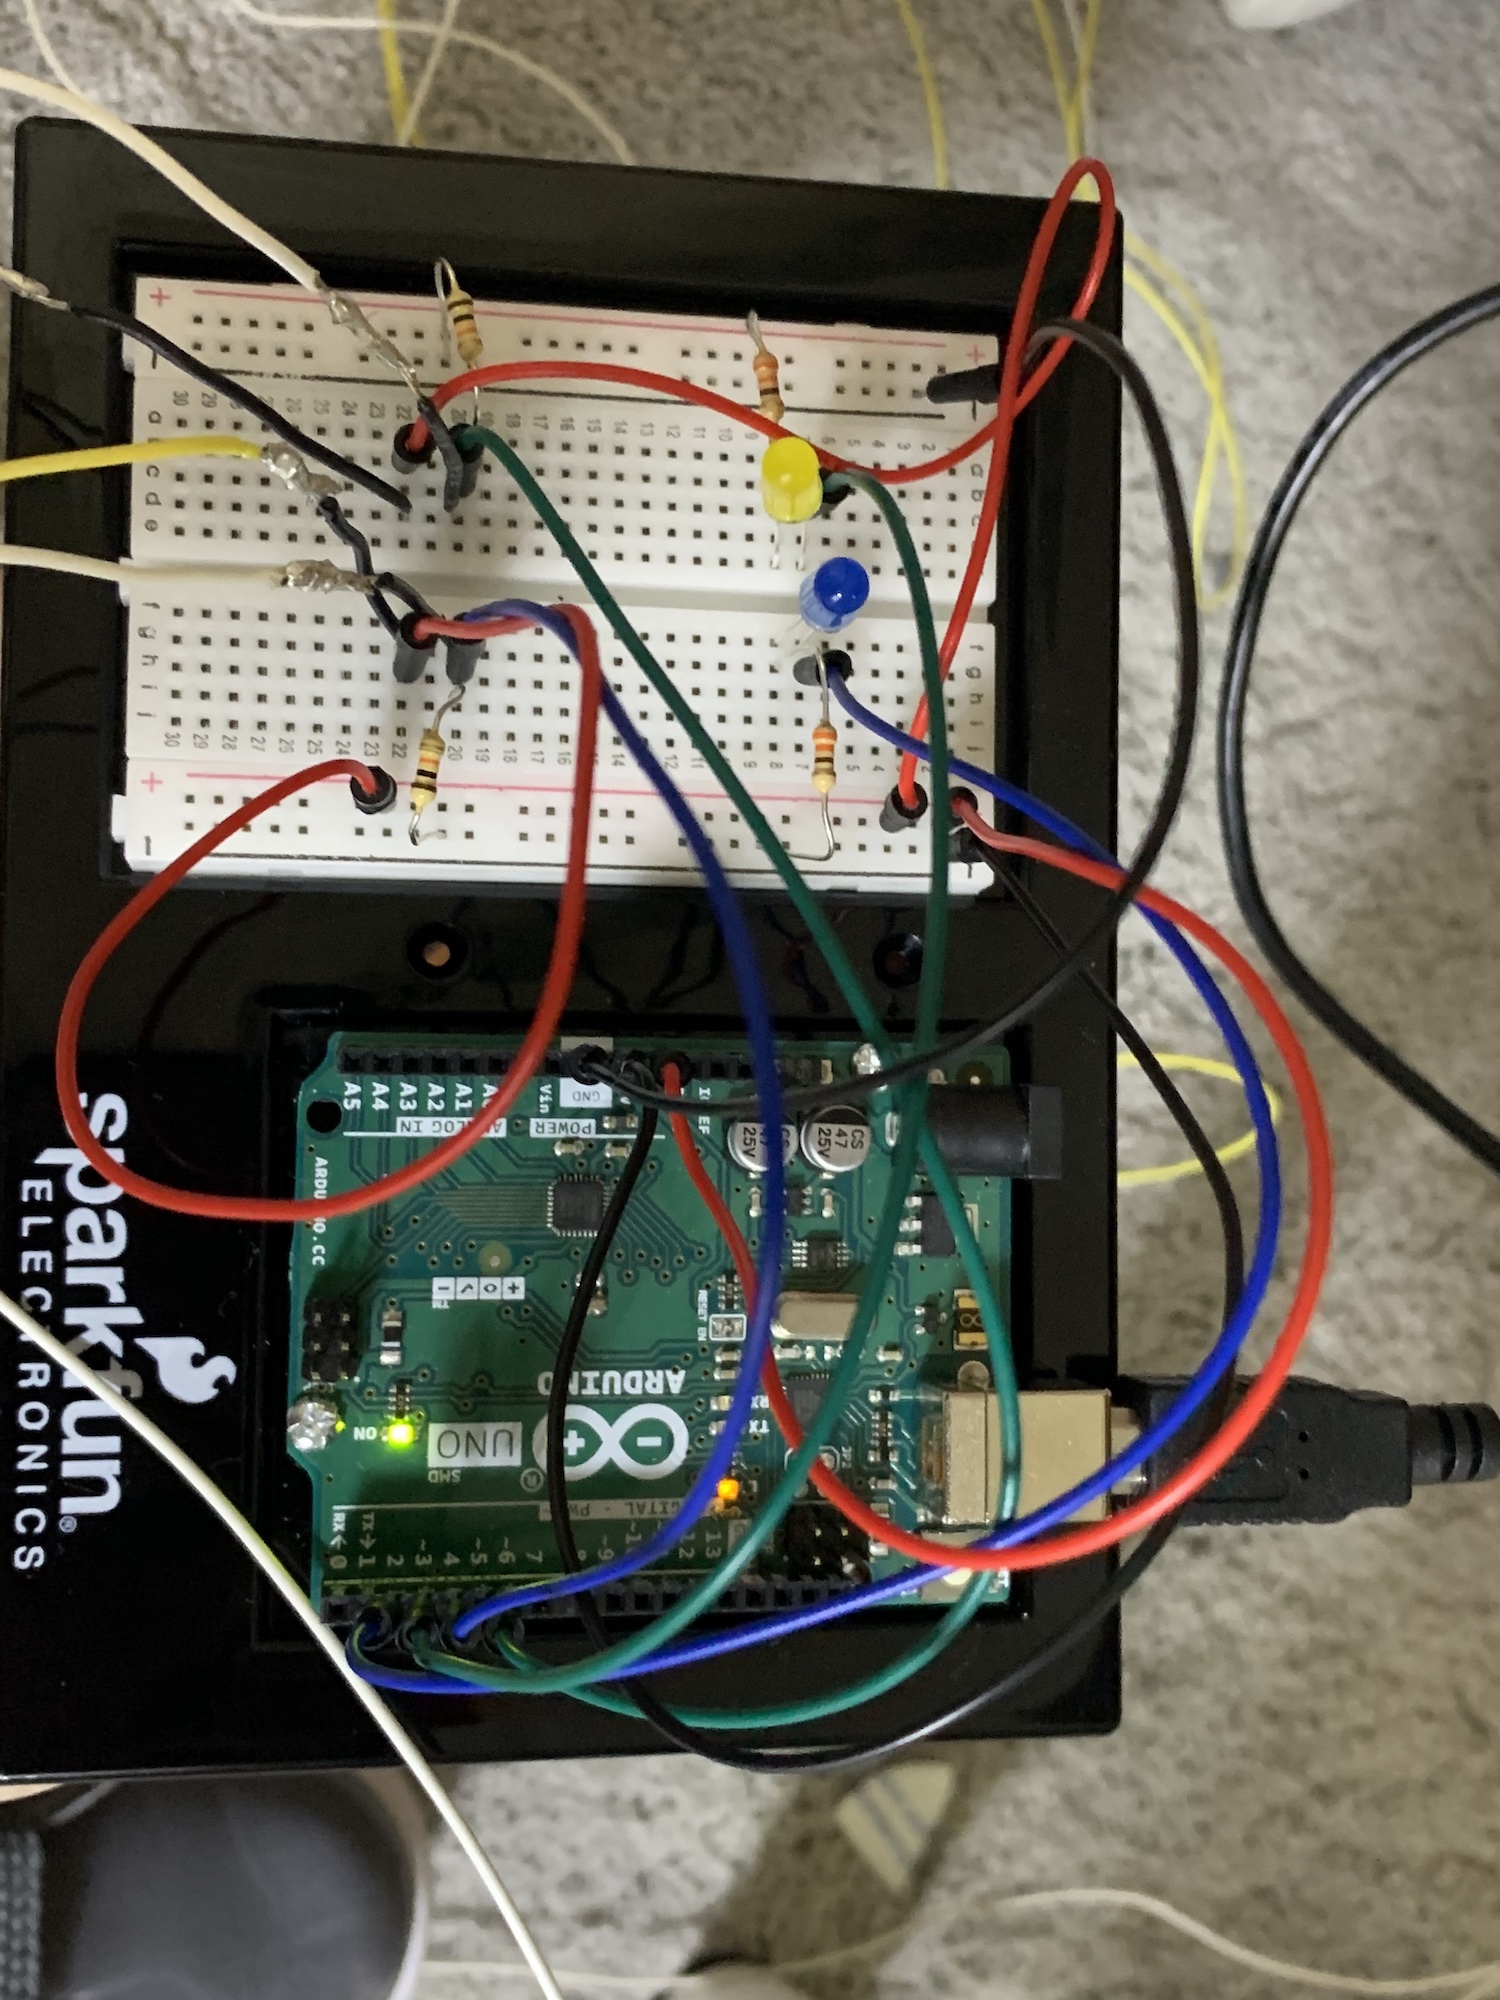
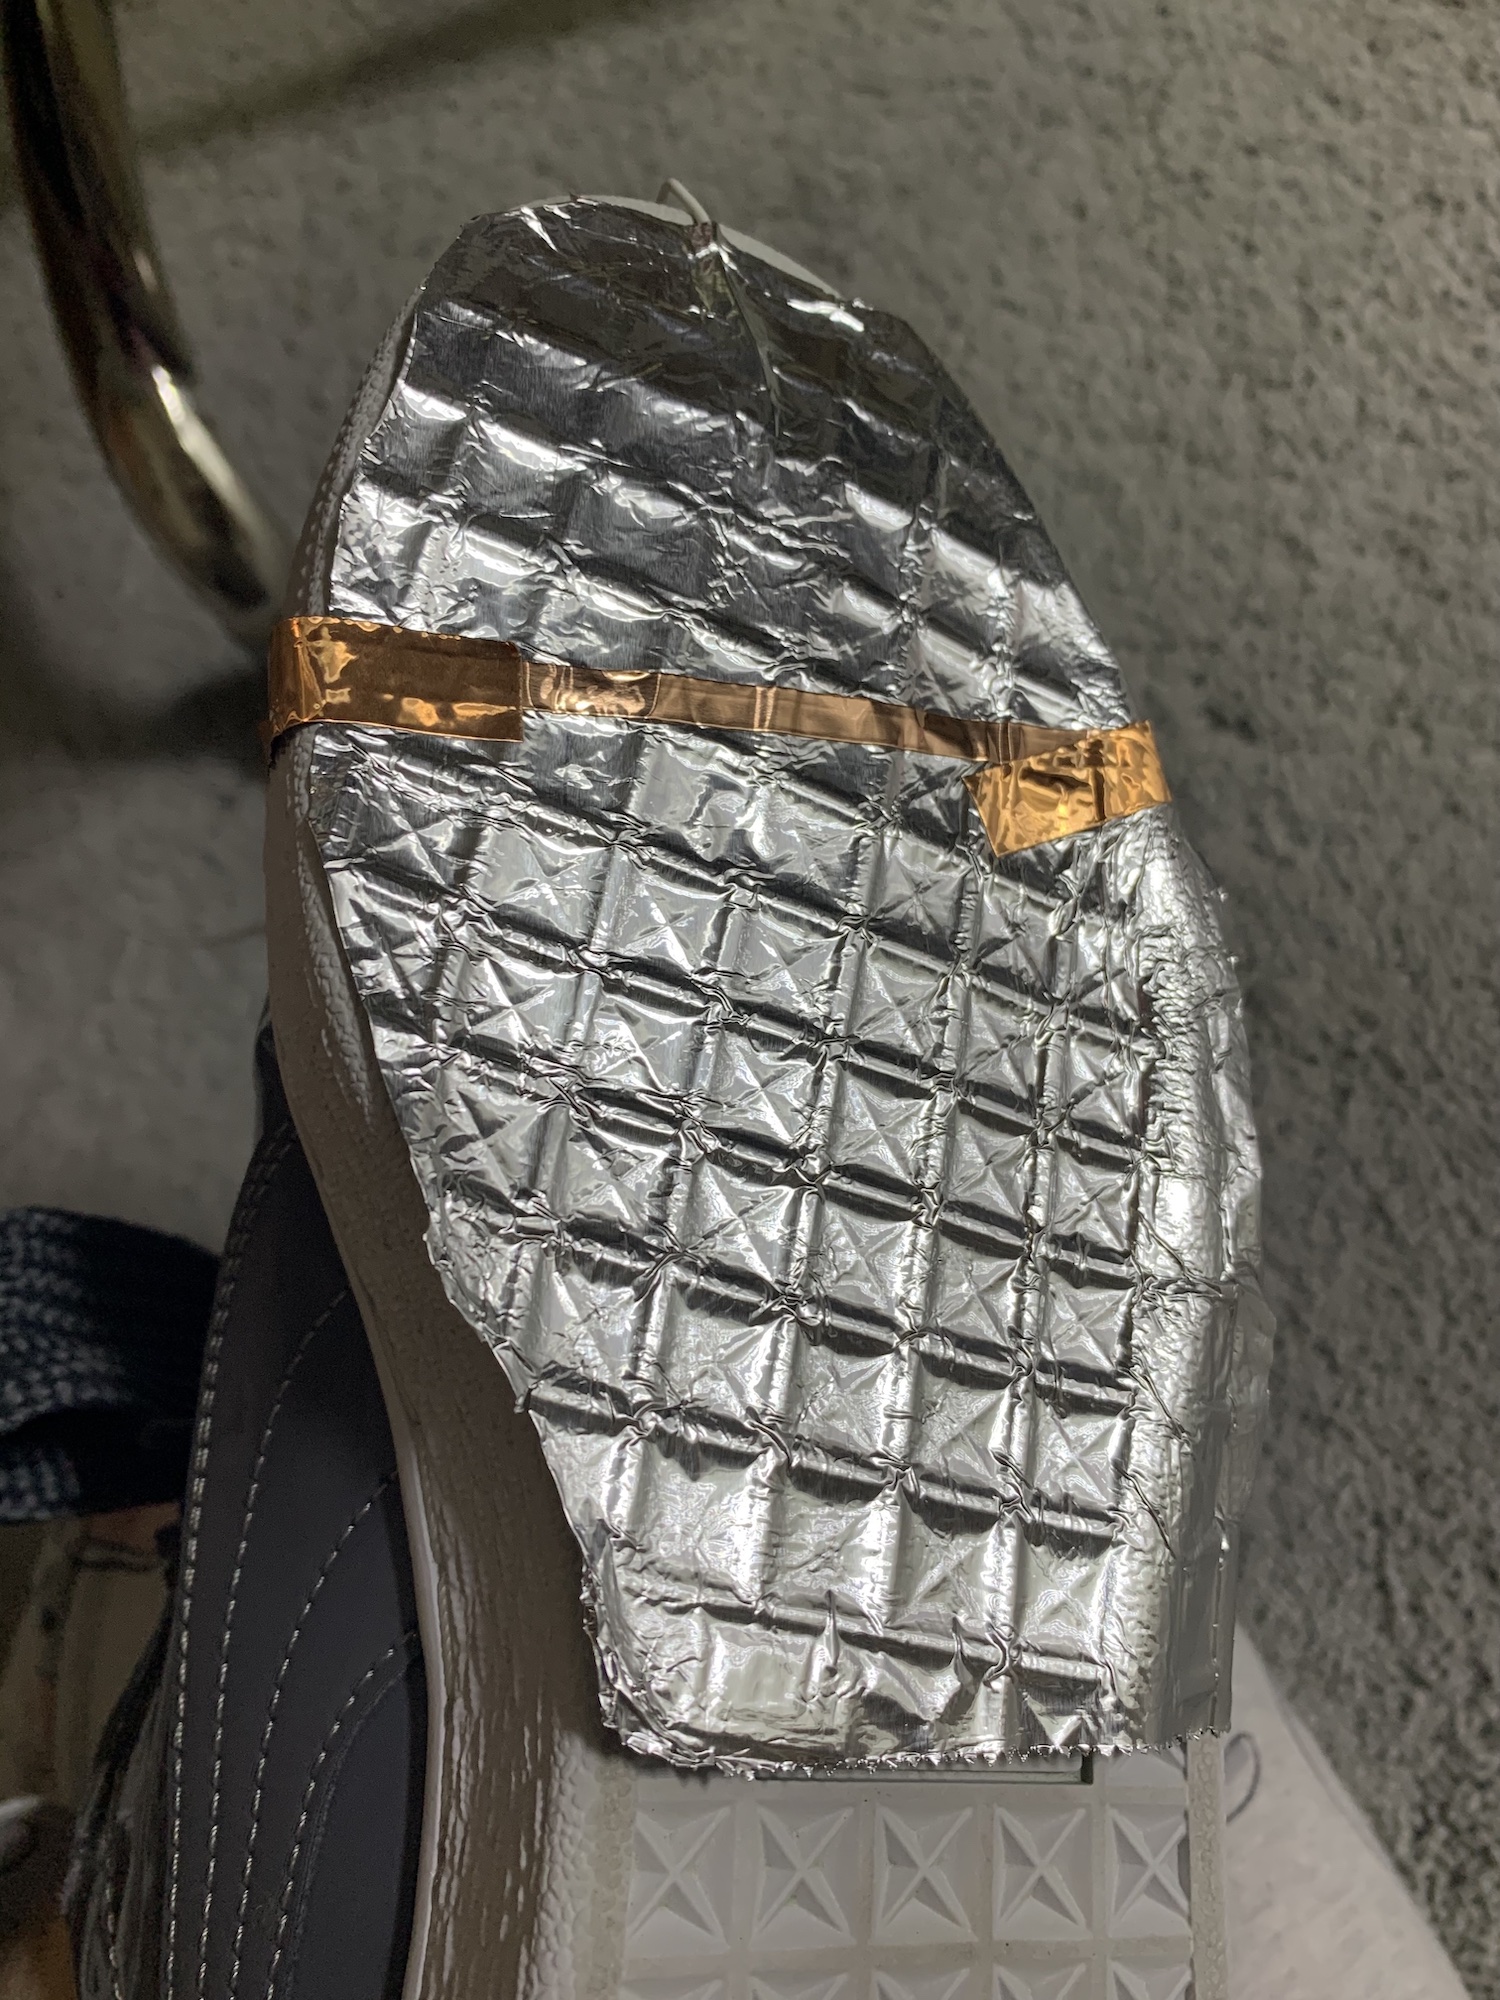
I have 4 parts connected to my circuit: 3 buttons and a slider. I built a controller box out of foam to safely conceal my circuit while also making it easy for players to use! Here is my process making that:

It looked like this at first, but I spray painted it black afterwards and added a 3rd button! (the red one, to start playing the game. initially, you would use either the blue or yellow to start playing the game and switch between screens, but that wasn’t giving me great results, so I decided to add a third button)

the button in this image was tiny because I couldn’t find one that looks like my other two, thankfully I asked on discord and got one!! (thank you bhavicka!!)

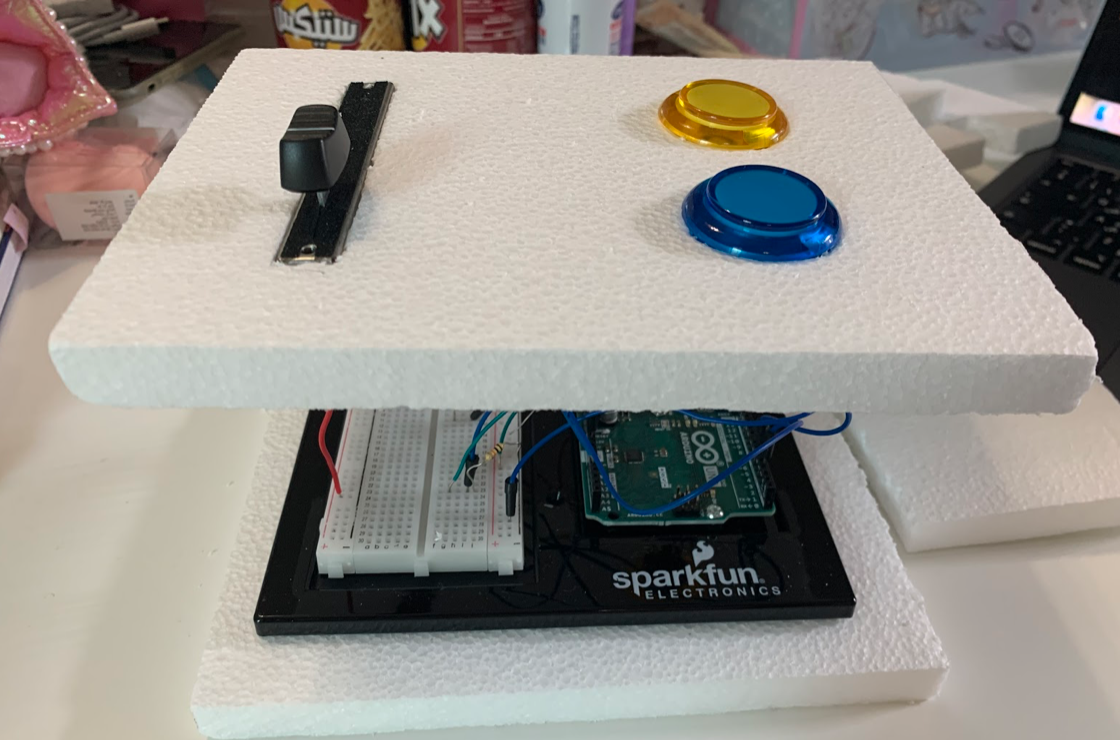
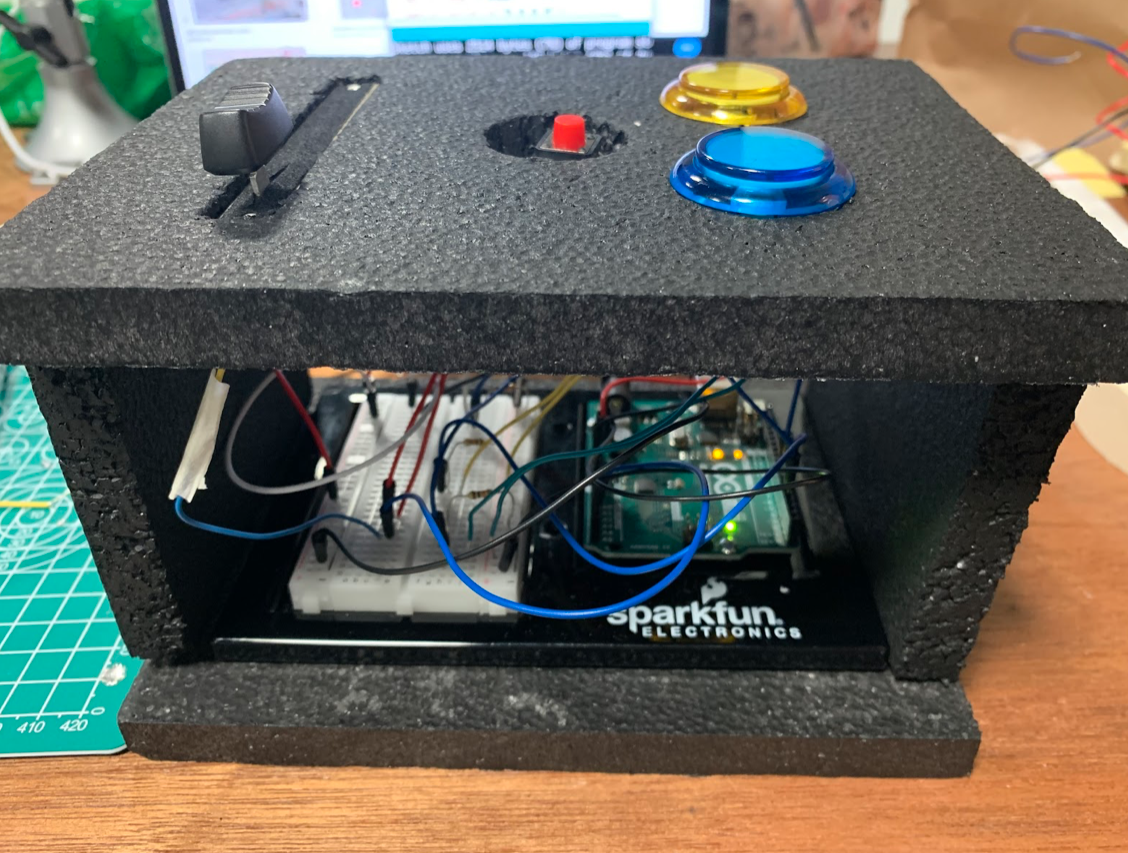
Here’s the final product!

Aaaaaand that’s it! TA-DA!! I’m very proud of what I’ve learned and achieved in this course, I had lots of fun!! Thank you 🙂

This is a gameplay video of the final game!!
https://youtube.com/shorts/cLE6tk_7XO4?feature=share


Curse Breakers! User Testing & Progress

Hello everyone!

As you might have seen in my previous posts, I am working on making a Jujutsu Kaisen- inspired video game for my final project! The object of the game is to shoot curses (ghosts) and collect Sukuna’s fingers. Collect 5 fingers without losing lives to win! (You lose lives by colliding with the ghosts).

Progress so far:
I’ve completely finished the Arduino code, and the processing code is almost done. The controller is functional, but it’s not stable yet, I’m planning on soldering the controller wires very soon! The user testing demo shows what it currently looks like.. The only thing left in the processing code is making the ghosts disappear when they’re shot, and making the fingers appear in intervals after you hit certain scores.

The first thing I worked on in processing was making the character move with the slider and preparing the code for the different game screens. After that, I worked on the serial communication code for the buttons, and made sure everything was communicating smoothly between processing and Arduino.

Here’s the Arduino code:

int bluepin = 5;
int yellowpin = 3;
int sliderpin = A1;

void setup() {
  pinMode(bluepin , INPUT);
  pinMode(yellowpin , INPUT);
  pinMode(sliderpin , INPUT);
  Serial.begin(9600);
  Serial.println("0,0,0");
}

void loop() {
  int bluebutton = digitalRead(bluepin);
  int yellowbutton = digitalRead(yellowpin);
  int slider = analogRead(sliderpin);

  while (Serial.available()) {
    int fromP = Serial.parseInt();

    if (Serial.read() == '\n') {
    Serial.print(slider);
    Serial.print(",");
    Serial.print(yellowbutton);
    Serial.print(",");
    Serial.println(bluebutton);
  }

  }
 
}

After that, I made an Arraylist for the “bullets” that the character shoots and modified the code to shoot the bullets (circles) at fixed intervals.

As for the avatar, instead of using a sprite sheet since I only have 2 images to switch between, I decided to make an if statement to switch between the two images when the attack button is pressed.  These are the two images Im using for the sprite:

idle and attack sprites


I made these using https://www.avatarsinpixels.com and added more details to the avatar with procreate to make it look more like the actual character from the anime.


Also, the curses disappear on contact with either a bullet or Yuji, the former adds points to the score while the latter subtracts 1 life from Yuji.

As for the game,  it currently looks like this:

Main Screen:(there  are  no  instructions  for  the  slider  so  ill  add  that  in soon)

game screen: (first pic is idle Yuji and the second is him while shooting)


And here’s my user testing!

Toomie’s final project progress: JJK Video Game


Hello everyone!

As you might remember from Wednesday, my final project idea is a Jujutsu Kaisen themed video game! As I mentioned in my previous post, the main character in the anime, Yuji, swallows a cursed finger and is now a vessel to a cursed spirit, Sukuna. Now, he has to collect all 20 of Sukuna’s fingers so he can exorcise the curse and save the world, I guess..

As of season 1, Yuji has eaten 4/20 fingers. So, in my game, the player is going to collect the remaining 16 fingers in a set time. I was thinking of adding an HP bar, but I think something like this would be more doable:

Pixel Heart Game Lives Images, Stock Photos &amp; Vectors | Shutterstock

The mechanics are quite simple, I plan on making a button for attacks towards curses, a joystick to move across the screen, and a button for collecting fingers. Every time an enemy is close to the sprite for more than 5 seconds without being defeated, the player will lose a heart. Lose 5 hearts to lose!

I’ve already started planning out the code on processing, but I haven’t actually started writing any code yet, I just typed out the general structure of my code and wrote down comments of my plan throughout.  I wrote down a few variable names and image names that I will use later on while coding, including a gamemode variable, which I used in my midterm project. I will use this variable to switch between pages in my game!

Im thinking of making the final layout of my project something like this:


Steve Aoki teamed up with Capcom on a Street Fighter arcade cabinet and  clothing line - The Verge
maybe I can build a cardboard box around my laptop?

Materials

I will need 2 buttons, a solderable breadboard , a joystick or a slider(depending on if the avatar will move across one axis or both axes, I still haven’t decided), and spare wires .  I might need a cardboard box as well.

So far, I think the materials I mentioned are all I’ll need, but we’ll find out soon if I need anything else…

Hardest Parts

I think serial communication might be a bit challenging for me to figure out, and making the Arduino components respond correctly with Processing.

Also, I think I might need to make my own sprite sheet for Yuji, as I couldn’t find a sprite sheet for his character online.

Other than that, I’ll have to figure out how to code the hearts system as well as the timer system, and how to make a finger appear after defeating a set number of curses.

As for the number of curses to beat per finger and the duration of the timer, I think I’ll decide on that after user testing.

Final Project Idea

GENERAL IDEA

I was thinking of making a game that was themed around an anime called Jujutsu Kaisen. In the anime, the main character swallows a cursed finger and is now a vessel to a cursed spirit, Sukuna. So for my game, I was thinking of making the player fight cursed spirits (with a controller) and collect one of Sukuna’s fingers after defeating a set amount of enemies. I might add a timer, and people can see how many fingers they can collect with the given time, OR it can be a challenge, like collect 5 fingers in the given time or you lose! Something like that.

PROCESSING

The processing code will be the game interface itself, and there will probably be code similar to collision detection whenever you are near a finger, so you press a button on the controller to collect it. Maybe I can add an HP bar and it keeps decreasing when enemies are near the sprite, so it’s taking damage. If it gets to 0, game over. But if I add an HP bar, maybe I don’t need the sprite to move around the screen, maybe similar to Space Invaders? I’m still not 100% sure how this will work..

ARDUINO

I’m planning on making a controller that is connected to Arduino, with buttons for fighting enemies and collecting fingers and maybe a joystick for moving. The buttons will work like an on/off switch , but I’m still not sure about how the joystick will work yet. Everything on the controller will send info to Processing so that the game can respond on screen.

That’s my idea!

Serial Communication Exercises

Exercise 1:

 //arduino exercise #1
void setup() {
  Serial.begin(9600);
  Serial.println("0,0");
}

void loop() {
  while (Serial.available()) {
    if (Serial.read() == '\n') {
      int sensor = analogRead(A0);
      delay(1);
      Serial.print(sensor);
      Serial.println(',');
    }
  }
}
//processing exercise #1

import processing.serial.*;
Serial myPort;
int xPos=0;
int yPos=height/2;

void setup() {
  size(960, 720);
  printArray(Serial.list());
  String portname=Serial.list()[3];
  println(portname);
  myPort = new Serial(this, portname, 9600);
  myPort.clear();
  myPort.bufferUntil('\n');
}

void draw() {
  background(255);
  ellipse(xPos, yPos, 30, 30);
}

void serialEvent(Serial myPort) {
  String s=myPort.readStringUntil('\n');
  s=trim(s);
  if (s!=null) {
    println(s);
    int values[]=int(split(s, ','));
    if (values.length==2) {
      xPos=(int)map(values[0], 0, 1023, 0, width);
    }
  }
  myPort.write(xPos+','+"\n");
}

//arduino exercise #2

int left = 0;
int right = 0;

void setup() {
  Serial.begin(9600);
  Serial.println("0,0");
  pinMode(3, OUTPUT);
}

void loop() {
  while (Serial.available()) {
    right = Serial.parseInt();
    left = Serial.parseInt();
    if (Serial.read() == '\n') {
      analogWrite(3, right);
      Serial.print(0);
      Serial.print(',');
      Serial.println(0);
    }
  }
}

Exercise 2:

//arduino exercise #2

int left = 0;
int right = 0;

void setup() {
  Serial.begin(9600);
  Serial.println("0,0");
  pinMode(3, OUTPUT);
}

void loop() {
  while (Serial.available()) {
    right = Serial.parseInt();
    left = Serial.parseInt();
    if (Serial.read() == '\n') {
      analogWrite(3, right);
      Serial.print(0);
      Serial.print(',');
      Serial.println(0);
    }
  }
}
//processing exercise #2 

import processing.serial.*;
Serial myPort;
int xPos=0;

void setup(){
  size(960,720);
  printArray(Serial.list());
  String portname=Serial.list()[3];
  println(portname);
  myPort = new Serial(this,portname,9600);
  myPort.clear();
  myPort.bufferUntil('\n');
}

void draw(){
  background(255);
}

void serialEvent(Serial myPort){
  String s=myPort.readStringUntil('\n');
  s=trim(s);
  if (s!=null){
    println(s);
    int values[]=int(split(s,','));
    if (values.length==2){
      xPos=(int)map(mouseX,0,width, 0, 255);
    }
  }
  myPort.write(xPos+","+0+"\n");
}
//arduino exercise #3
 
void setup() {
  Serial.begin(9600);
  Serial.println("0,0");
  pinMode(3, OUTPUT);
}
 
void loop() {
  while (Serial.available()) {
    int onOff = Serial.parseInt();
    if (Serial.read() == '\n') {
      digitalWrite(3, onOff);
      int sensor = analogRead(A0);
      delay(1);
      Serial.println(sensor);
    }
  }
}

Exercise 3:

//arduino exercise #3
 
void setup() {
  Serial.begin(9600);
  Serial.println("0,0");
  pinMode(3, OUTPUT);
}
 
void loop() {
  while (Serial.available()) {
    int onOff = Serial.parseInt();
    if (Serial.read() == '\n') {
      digitalWrite(3, onOff);
      int sensor = analogRead(A0);
      delay(1);
      Serial.println(sensor);
    }
  }
}
//processing exercise #3

import processing.serial.*;
Serial myPort;

PVector velocity;
PVector gravity;
PVector position;
PVector acceleration;
PVector wind;
float drag = 0.99;
float mass = 50;
float hDampening;
boolean onOff=false;
float analog;

void setup() {
  size(640, 360);
  String portname=Serial.list()[3];
  println(portname);
  myPort = new Serial(this, portname, 9600);
  myPort.clear();
  myPort.bufferUntil('\n');

  noFill();
  position = new PVector(width/2, 0);
  velocity = new PVector(0, 0);
  acceleration = new PVector(0, 0);
  gravity = new PVector(0, 0.5*mass);
  wind = new PVector(0, 0);
  hDampening=map(mass, 15, 80, .98, .96);
}
void draw() {
  background(255);
  if (!keyPressed) {
    wind.x= analog;
    velocity.x*=hDampening;
  }
  applyForce(wind);
  applyForce(gravity);
  velocity.add(acceleration);
  velocity.mult(drag);
  position.add(velocity);
  acceleration.mult(0);
  ellipse(position.x, position.y, mass, mass);
  if (position.y > height-mass/2) {
    velocity.y *= -0.9;  // A little dampening when hitting the bottom
    position.y = height-mass/2;
  }
  
  if (position.y >= height - mass){
  onOff = true;
  }
  else{
  onOff = false;
  }
}

void serialEvent(Serial myPort) {
  String s=myPort.readStringUntil('\n');
  s=trim(s);
  int values = parseInt(s);
  if (s!=null) {
    analog =map(values, 0, 1023, -3, 3);
  }
  myPort.write(int(onOff)+"\n");
}

void applyForce(PVector force) {
  // Newton's 2nd law: F = M * A
  // or A = F / M
  PVector f = PVector.div(force, mass);
  acceleration.add(f);
}

void keyPressed() {
  if (key==' ') {
    mass=random(15, 80);
    position.y=-mass;
    velocity.mult(0);
  }
}


Exercise 3 video:

https://www.youtube.com/shorts/TAmqSXp7FqE

Analog and Digital: Light up Dollhouse

This week’s assignment was to use 2 or more LEDs, one analog and one digital. My project for this assignment is a light-up mini dollhouse, I just used a dollhouse I borrowed from my sister and connected all my wires and LEDs to it!

First, I connected everything on the breadboard and made my code to make sure everything works properly. Once everything worked, I started removing the LEDs and the photoresistor (which is my analog component) one by one and attach them to my dollhouse. To attach them, I mainly used alligator clips, copper tape and washi tape.

The photoresistor makes the LED brighter as the sensor picks up dimmer light, in other words, as your finger gets closer to the sensor, the LED gets brighter. The other two LEDs are controlled by the button, and I connected them in parallel so that they can both be bright. Once I connected the LEDs and the photoresistor to the dollhouse and the button to the breadboard, it worked out! yay!

My circuit:

Demo Video:


Unusual Switch

This week, our assignment was to make an unusual switch that works without using our hands. For my project, I decided to make 2 switches that will turn on when the copper strip attached on the ground and the strip attached to your shoe touch (these are connected to the circuit via long wires). When they touch, the LED lights on either side will light up! So if you use your left foot, the yellow LED on the left will light up. If you use your right, the blue one on the right will light up.

I tried to make my circuit as neat as possible, so I organized my wires by color. Red ones are for power, black for GND, green for the left side, blue for the right. As for the longer wires, the ones connected to the strip on the ground are yellow, and the ones connected to your shoe are white. 

Here’s the code:

Basically, if the switch is on, the led will light up. If its not on (the strip in the floor and the shoe aren’t touching) the LED will turn off.

//R = right side, L= left side.

const int ledpinR = 2;
const int ledpinL = 3;

const int switchpinR = 4;
const int switchpinL = 5;

bool switchreadR;
bool switchreadL;

void setup() {
  // put your setup code here, to run once:
  pinMode(ledpinR, OUTPUT);
  pinMode(ledpinL, OUTPUT);

  pinMode(switchpinR, INPUT);
  pinMode(switchpinL, INPUT);

}

void loop() {
  // right LED code:
  
  switchreadR = digitalRead(switchpinR);

  if (switchreadR == true) {

    digitalWrite(ledpinR , HIGH );
  } else {
    digitalWrite(ledpinR , LOW);
  }

// left LED code:
  switchreadL = digitalRead(switchpinL);

  if (switchreadL == true) {

    digitalWrite(ledpinL , HIGH );
  } else {
    digitalWrite(ledpinL , LOW);
  }
}

Images:

The circuit
The bottom of the shoe


Video:

https://youtube.com/shorts/rRdpnEHXotk?feature=share

Midterm Project: Pixel Run!

For our midterm project, we were tasked with making a game!

The game I made is called Pixel Run! It’s a fun little game and I’m very proud of it!!

Concept

Basically, When you start the game (after you view the instructions) you will see your sprite in the center of the screen, which you can move with the arrow keys. There will be static stars at random places all around the screen and frantic bananas that move with random speeds across the screen. Your score is displayed at the top right corner of the screen.

Collect the stars!! They’re worth 20 points, but you must avoid the bananas! When your points are > 0 , they will take 10 points off your current score.

Goal of the game

To win, you must score 500 points! When you hit 500 or more points, you are taken to the end screen. You can press the space key to play again!

Different Screens

To make the different screens, I used an int variable called game mode.
I started by adding all my variables at the top of my code, then I loaded all my data like images, fonts and sounds.

I made 2 classes: one for bananas, one for stars. I made arrays for both classes and used a for loop in setup for each. I made it so that when you start the game, there are 20 stars and 10 bananas on screen.  This is also where I made the nested array for my sprite sheet. I set imageMode and textAlign to center.   I downloaded some theme music and made it loop while you play the game (The music keeps playing in all the game screens)

Here’s my setup code:

PImage linksprite, bg, star, banana, start; // all of the images
PImage[][] sprites;
PFont mario, score;
int direction = 1;
int step = 0;
int x, y;
int r1, r2;
int speed = 4;
int gamemode = 0; // for the diff screens
int pts = 0; // points in game
import processing.sound.*;
SoundFile file;
String audioName = "music.wav";
float timer=0;
boolean timerActivated = false;


Banana[] bananas;
Star[] stars;
// arrays for both objects

void setup() {
  size (1000, 700);
  //loading the images and fonts here :
  bg     = loadImage("bg.png");
  star   = loadImage("star.png");
  banana = loadImage("banana.png");
  start  = loadImage("start.png");
  mario  = createFont("/Users/fatimaaljneibi/Library/Fonts/Mario-Kart-DS.ttf", 32);
  score  = createFont("Courier New", 25);
  linksprite = loadImage("linksprite.png");

  //theme music loop:
  file = new SoundFile(this, "music.wav");
  file.loop();


  stars = new Star[20] ;
  for (int i=0; i<stars.length; i++) {
    stars[i]= new Star(random(width), random(height));
  }

  bananas = new Banana[10] ;
  for (int i=0; i<bananas.length; i++) {
    bananas[i]= new Banana(random(width), random(height), random(-5, 5), random(-5, 5));
  }

  sprites = new PImage[4][10]; // 12 images across, 4 down, in the spritesheet

  int w = linksprite.width/10;
  int h = linksprite.height/4;

  for (int y=0; y < 4; y++) {
    for (int x=0; x< 10; x++) {
      sprites[y][x] = linksprite.get(x*w, y*h, w, h);
    }
  }

  x = width/2;
  y = height/2;

  imageMode(CENTER);
  textAlign(CENTER);
}

When game mode = 0, (it starts at zero when you run the game) you can see the start screen, which looks like this:

Here’s the code for the first page: (it was inside void draw)

if (gamemode == 0) { // starting screen
  background(start);
  fill(#5F9AEA);
  textFont(mario, 100);
  text("PIXEL RUN!", width/2, height/2-25);
  // instructions
  textFont(mario, 40);
  text("-press the space key to start-", width/2, height-300);
  textFont(mario, 25);
  fill(#3F7CC9);
  text("use arrow keys to move", width/2, height-200);
  text("collect the stars but avoid the bananas!!", width/2, height-150);
  text("score 500 points to win!", width/2, height-100);


  if (keyPressed) {
    if (key == ' ' ) {
      gamemode = 1;
      pts = 0;
    }
  }


I made the background on Picsart, then I downloaded a Mario Kart font and added it to my data folder. I used createFont() to use this font in my game, I used the font for the title & instructions, as well as in the win screen. When you press the space key, game mode = 1 and the next screen loads! (the actual game screen!!)

It looks like this:

Here’s the code for this page!

else if (gamemode == 1) { // actual game code goes here

    background(bg);

    // makes the disappeared objects reappear every 5 seconds:
    if (timerActivated==true) {
      if (millis()>timer ) {
        println("timer done!");
        timerActivated = false;
        for (int i=0; i<15; i++) {
          if (stars[i].disp == false) {
            stars[i].starx = random(width);
            stars[i].stary = random(height);
          }
          stars[i]. disp=true;
        }
        for (int i=0; i<8; i++) {
          bananas[i]. disp=true;
        }
      }
    }


    if (timerActivated == false && gamemode == 1) {
      println("timer triggered");
      timer = millis()+5000; // more objects appear on screen every 5 seconds
      timerActivated = true;
    }


    // displays the initial stars & bananas, calls the functions from their classes
    for (int i=0; i<20; i++) {
      stars[i]. display();
    }
    for (int i=0; i<10; i++) {
      bananas[i]. display();
      bananas[i]. move();
    }


    //look at sprite sheet to determine which direction is which
    if (keyPressed) {
      if (keyCode == DOWN) {
        direction = 0;
        y+=speed;
      }
      if (keyCode == LEFT) {
        direction = 1;
        x-=speed;
      }
      if (keyCode == RIGHT) {
        direction = 3;
        x+=speed;
      }
      if (keyCode == UP) {
        direction = 2;
        y-=speed;
      }
      if (key == 'b' || key == 'B' ) {
        gamemode = 0;
      }
      if (keyCode == DOWN || keyCode ==  UP || keyCode == LEFT || keyCode == RIGHT) {

        if (frameCount%speed==0) { //the spritesheet images will loop only if the arrow keys are pressed
          step = (step+1) % 10;
        }
      }
    }

    image(sprites[direction][step], x, y); // the sprite


    // points system:
    for (int i=0; i<10; i++) {
      float d2 = dist(x, y, bananas[i].banx, bananas[i].bany);
      if ( d2 <= 50 && bananas[i].disp==true) {
        if (pts >=10)
          pts-= 10;
        // takes 10 points off for every banana collided w the sprite

        bananas[i].disp=false; //banana disappears
      }
    }

    for (int i=0; i<20; i++) {
      float d1 = dist(x, y, stars[i].starx, stars[i].stary);
      if ( d1 <= 50 && stars[i].disp==true) {
        pts+= 20;
        stars[i].disp=false;  //adds 20 pts per star and makes it disappear on contact w sprite
      }
    }


    if (y>height) {
      y=0;
    }
    if (y<0) {
      y=height;
    }
    if (x>width) {
      x=0;
    }
    if (x<0) {
      x=width;
    } // this is to keep the sprite always on screen

    //the score board:
    textFont(score);

    pushStyle();
    fill(255, 200);
    noStroke();
    rectMode(CENTER);
    rect(width-80, 22, textWidth("Score:" + pts)+10, 30);
    popStyle();
    fill(0);
    text("Score:" + pts, width-80, 30);
    pushStyle();
    fill(255, 180);
    noStroke();
    rect(2, height-20, 270, 15 );
    textAlign(LEFT);
    textFont(score, 15);
    fill(0);
    text("press 'b' to go back to start!", 2, height-8);
    popStyle();


    if (pts >= 500) {
      gamemode = 3;  //game ends when the player hits 500 pts
    }
  } // game code ends here

There’s a lot to unpack here:

When gamemode = 1, the background changes, the sprite appears at the center of the screen, the stars appear at random spots(they do not move) the bananas also appear at random spots, but they move with a random speed ranging from -5 to 5. This is because I added an extra argument for the bananas, which is spx and spy (speed x and speed y).

The sprite moves in directions 0-3, corresponding to the row on the sprite sheet image.  The sprite is always on screen because of this code:

if (y>height) {
     y=0;
   }
   if (y<0) {
     y=height;
   }
   if (x>width) {
     x=0;
   }
   if (x<0) {
     x=width;
   } // this is to keep the sprite always on screen

I used a similar code in the bananas class, so that the bananas always appear on screen as well.

The bananas and the stars classes have a display() function, which displays them at random spots on screen. The banana also has a move() function.

When the sprite collides with a star or a banana, it disappears and the pts variable adds or subtracts points depending on whether it is a star or a banana. These images disappear because of a boolean disp in their classes which makes them disappear on contact with the sprite.

The way collision detection works here is it checks to see if the image is displayed (the boolean disp I mentioned earlier) and if it is && the distance between the sprite’s x and y positions and the image’s x and y positions is less than 50 pixels, the image(star or banana) will disappear.

I also made a timer which will make the disappeared objects ( if their disp boolean =false and the 5 seconds have passed, the star or banana will reappear at a different spot. I made it so that 8 bananas and 15 stars can reappear every 5 seconds. This happens continuously.

Here’s the code for the timer:

// makes the disappeared objects reappear every 5 seconds:
    if (timerActivated==true) {
      if (millis()>timer ) {
        println("timer done!");
        timerActivated = false;
        for (int i=0; i<15; i++) {
          if (stars[i].disp == false) {
            stars[i].starx = random(width);
            stars[i].stary = random(height);
          }
          stars[i]. disp=true;
        }
        for (int i=0; i<8; i++) {
          bananas[i]. disp=true;
        }
      }
    }


    if (timerActivated == false && gamemode == 1) {
      println("timer triggered");
      timer = millis()+5000; // more objects appear on screen every 5 seconds
      timerActivated = true;

I also added a rectangle underneath the score counter & the bottom right text, it is not fully opaque so that you can see if there are any objects in that area of the screen. I used push & pop style here to make the rectMode= center for the score one.

When you hit 500 points or more, gamemode= 3 and the win screen is displayed. It looks like this :

As you can see from the image, clicking the space bar will reset the game.

Here is the code for the bananas class:

class Banana {
  float banx, bany;    // bananas position
  float spx, spy;     //  speed
  float banw, banh; //width & height of the image
  boolean disp = true;

  Banana(float _banx, float _bany, float _spx ,float _spy ) {
    banx = _banx;
    bany = _bany;

    banw = 40;
    banh= 40;

    spx = _spx;
    spy = _spy;

 
  }

  void display() {
    if (disp)
      image(banana, banx, bany, banw, banh);
    // displays the bananas on screen
  }

  void move() {
    banx += spx;
    bany += spy;

    if (bany>height) {
      bany=0;
    }
    if (bany<0) {
      bany=height;
    }
    if (banx>width) {
      banx=0;
    }
    if (banx<0) {
      banx=width;
      //banana is always moving on screen
    }
  }
}

Stars class:

class Star {
  float starx, stary;    // stars position
  float starw, starh; //width & height of the image
  boolean disp = true;


  Star(float _starx, float _stary) {
    starx = _starx;
    stary = _stary;

    starw = 40;
    starh= 40;

  }

  void display() {
    if(disp)
    image(star, starx, stary, starw, starh);
    // displays the stars on screen
  }
  
}


Here is the the gameplay! TA-DA!!

https://youtu.be/r99jzLBahlk

(the “press  ‘b’ to go back to start!” text is not in this recording, but its in the game code now! I added it in after I recorded this!)


Here’s the zip file for the whole game:

toomiesgame

Midterm Project Progress

For our midterm project, we were tasked with making a game on Processing, so I started by making a sketch of the layout for my game, and I wrote down a simple explanation about the game.

Idea:
Basically, the player will move a sprite around the screen with the arrow keys and collects the green circles, each worth 1 point. Alternatively, the player must avoid the pink ones. If you collide with a pink circle, you will lose 1 point. Get 10 points to win the game!

Here is my sketch of the layout-

Process:
So, my current plan is to make booleans so that I can switch between the different pages. And I think I’ll have to make 2 classes: one for the pink circles and one for the green. As for the point counter, I still haven’t figured out how to implement that.

Progress:
And so far, my sprite is moving with the arrow keys on screen, and I haven’t had time to start making separate pages, I will work on it over the weekend.

Sprite Code:
PImage linksprite , bg ; // all of the images 
PImage[][] sprites;
int direction = 1;
int step = 0;
int x;
int y;
int speed = 3;
int mode;
boolean start; // for the start screen 
boolean play; // game screen
int pts; // points in game


void setup() {
  size (1000,700);
//bg = loadImage("bg");
  
 // start = true; 
  
  //if (start == false){
  linksprite = loadImage("linksprite.png");
  sprites = new PImage[4][10]; // 12 images across, 4 down, in the spritesheet

  int w = linksprite.width/10;
  int h = linksprite.height/4;

  for (int y=0; y < 4; y++) {
    for (int x=0; x< 10; x++) {
      sprites[y][x] = linksprite.get(x*w, y*h, w, h);
    }
  }
 
//}
  x = width/2;
  y = height/2;
  
  imageMode(CENTER);
}

void draw() {
  background(255);
  //if (start == true){
  //background(bg);
 
  //}
  
  
  //look at sprite sheet to determine which direction is which
  if (keyPressed) {
    
    //if (keyCode == ){
    
    
    //}
    
    
    if (keyCode == DOWN) {
      direction = 0;
      y+=speed;
    }
    if (keyCode == LEFT) {
      direction = 1;
      x-=speed;
    }
    if (keyCode == RIGHT) {
      direction = 3;
      x+=speed;
    }
    if (keyCode == UP) {
      direction = 2;
      y-=speed;
    }
    if (frameCount%speed==0) { //the % is a modulo - its an easy way to make a loop 
      step = (step+1) % 10;
    }
  }

  image(sprites[direction][step], x, y);
  

}


week 5: data visualization

This week’s assignment was to either make a data visualization or generative text art. I decided to make a data visualization that involves text.

I went to Google Trends and found the most popular searches relating to anime, so I downloaded the csv file and added it to my sketch folder. I deleted the blank rows for my own convenience.

I made a for loop to display the searches in random places with random colors.  It looked like this:

As you can see, the texts overlap and they continue on the right side outside of the sketch.

I wasn’t sure how to fix this from happening, so I just ended up adding transparency to the fill and it looks like this now: (I’d like to add that the positions are random so it changes every time you run it)

Here’s the code!

Table table;
float spacing;
PFont f;
String searches;
int tw;

void setup() {
  size(1000, 720);
  loadData();
  //f= createFont("Franklin Goth Ext Condensed.ttf", 75);
  // didnt work^
  f = createFont("Courier New", 32);
textFont(f);
textSize(40);
}

void loadData() {
  table = loadTable("anime.csv", "csv");
  spacing = float(width)/(table.getRowCount());

}

void draw() {
  background(255);
  frameRate(0); //so it doesnt keep changing 
  for (int i = 0; i < table.getRowCount(); i++) {
    TableRow row = table.getRow(i);
    searches = row.getString(0);
    fill(random(230),random(230), random(230), random(100,240));
    text(searches, random(width), random(height));
  } //this for loop is going to loop through the table contents
}