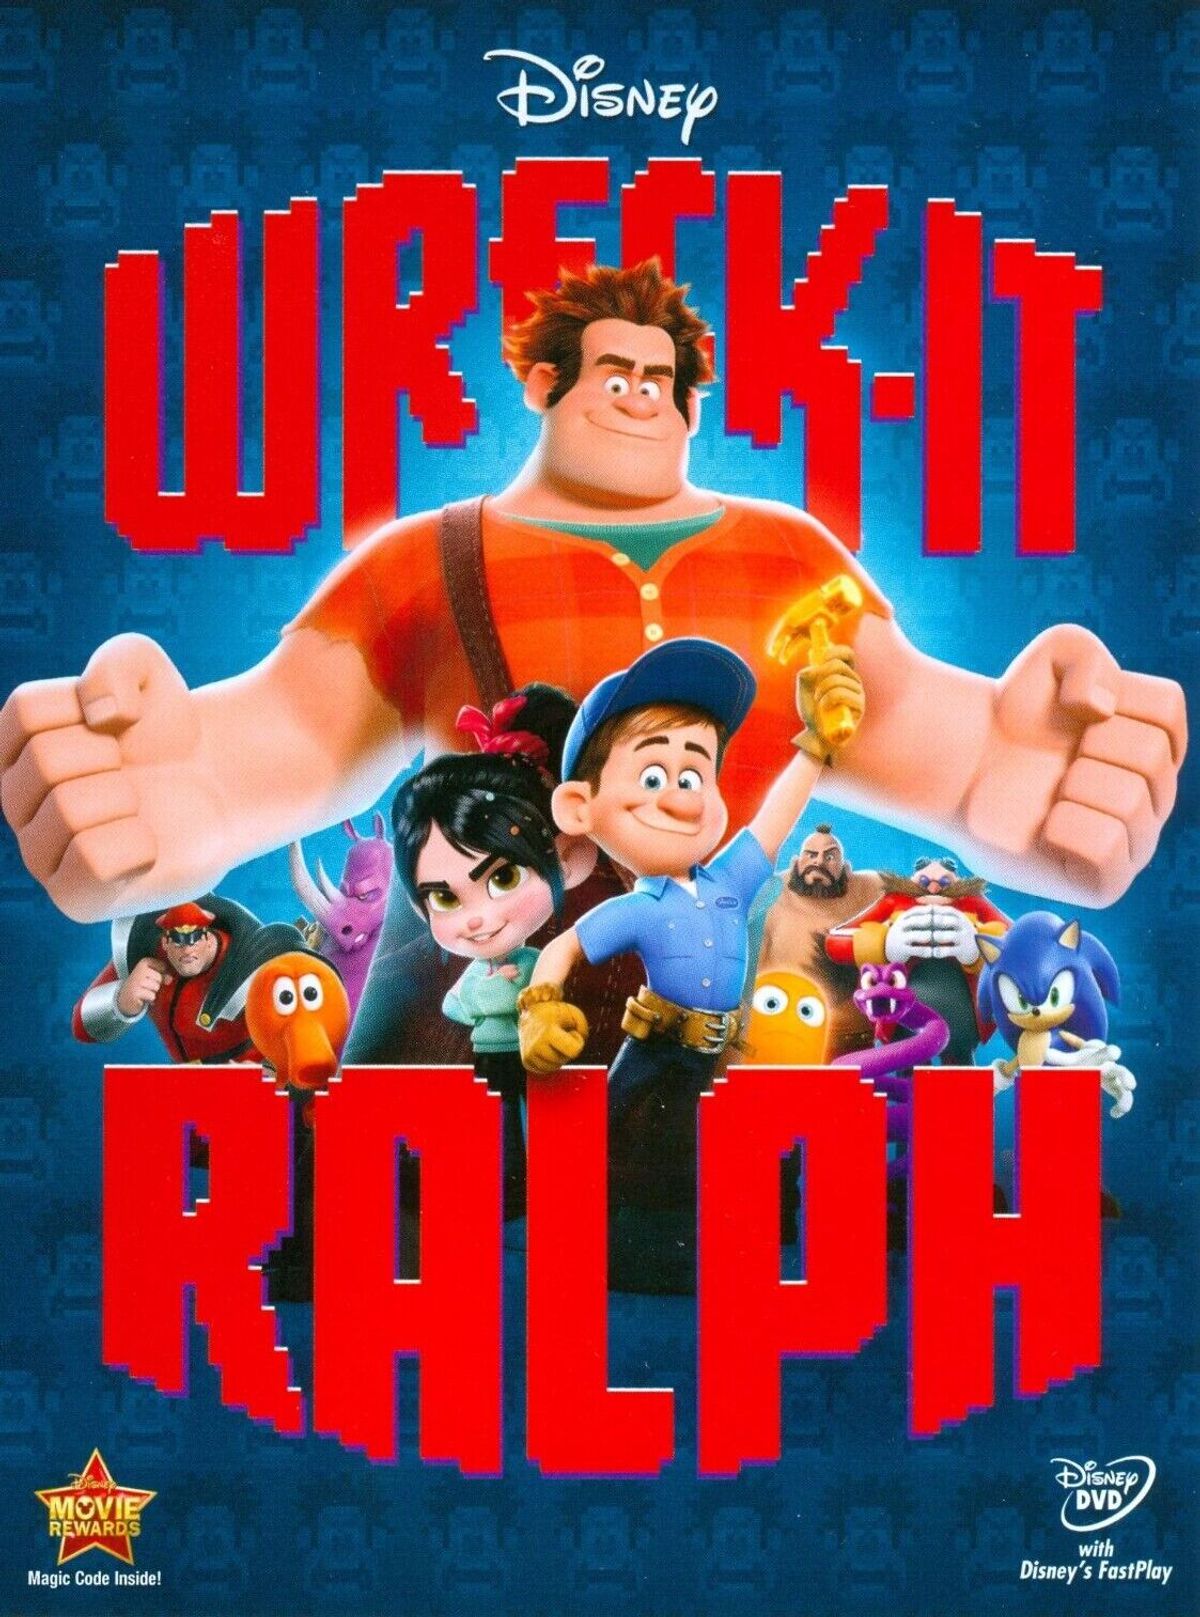
Candy Canon was an idea born from the movie ‘Wreck it Ralph’ where he ends up sneaking into a candy kingdom. Therein the movie, exists a canon that shoots out candy. Having seen the movie recently, I decided to build a prototype after it.
Concept and implementation:
For this assignment, we were tasked to make use of two LEDs , a digital sensor (switch), and an analogue sensor – one of each used at the very least. Given the requirement, I re-used the card-board canon I made by re-using the cardboard boxes lying around inside the IM lab. The canon was ok to use, and underneath inthere, the base was attached to a wheel and a 48:1 ratio geared motor. That motor would be controlled by 9 V battery with potentiometer adjusting the voltage fed in to a safer level. The potentiometer would start and speed up the rotation of the motor, hence that of the canon. The bulb will be connected in parallel to plates on breadboard carrying the output for the geared motor. The Yellow Led is alligned with polarity of geared motor when it rotates clockwise, and that of blue when it rotates anti-clockwise. Cleverly, the forward bias property of these diodes were used. Hence only one led would light up when the polarity matches its poles. The output from H-bridge motor driver would change when the ultra-sonic sensor would detect an object close to it or not. Hence the polarity of output can be changed, with H-bridge outputs swapping poles. The H-bridge is fed external voltage by 9 Volt battery which is the source of juice for the motor.
The voltage for motors is taken in from Vout of potentiometer, and the voltage to power and ground the ultra-sonic sensor is taken in from the ardruino itself. Rest of the port – pin mapping is shown on the schematic.
The code:
//pin declaration H-bridge
#define PWMA 11
#define AIN1 13
#define AIN2 12
#define STBY 4
// Pin declaration Ultra-sonic sensor
#define TRIG_PIN 6
#define ECHO_PIN 7
//variables used
long duration;
int distance;

void setup() {
  // A ports of motor driver used
  pinMode(PWMA, OUTPUT);
  pinMode(AIN1, OUTPUT);
  pinMode(AIN2, OUTPUT);
  pinMode(STBY, OUTPUT);

  // Ultrasonic sensor pins
  pinMode(TRIG_PIN, OUTPUT);
  pinMode(ECHO_PIN, INPUT);


  Serial.begin(9600);
}

void loop() {
  // Trigger the ultrasonic sensor
  digitalWrite(TRIG_PIN, LOW);
  delayMicroseconds(2);
  digitalWrite(TRIG_PIN, HIGH);
  delayMicroseconds(10);
  digitalWrite(TRIG_PIN, LOW);


  duration = pulseIn(ECHO_PIN, HIGH);

// formulation to calculate distance
  distance = duration * 0.034 / 2;


  Serial.print("Distance: ");
  Serial.print(distance);
  Serial.println(" cm");


  digitalWrite(STBY, HIGH);
  // if distance less than 10 cm,
  if (distance < 10) {
    // anti-clockwise with blue led
    digitalWrite(AIN1, HIGH);
    digitalWrite(AIN2, LOW);
  } else {
    // clockwise movement with yellow led.
    digitalWrite(AIN1, LOW);
    digitalWrite(AIN2, HIGH);
  }

  //full threshold supply to PWMA pin
  analogWrite(PWMA, 255);

  delay(200);
}
The code with if-else is shown above. The polarity for output A pins from motor-driver changes based on distance measured and stored by the ultra-sonic sensor.
For the future improvement, I am thinking of adding speaker, and adding resistors to prevent the motor from capping the maximum voltage fed into the motors , as well as the LEDs to prevent any damage. As for the wheelbase, while rotating, the wires of geared motor sometimes windup along with it. It stops it from rotating. Hence, I will have to redesign the canon’s base for future use.
The NYU library at peak hours , especially during the midterm week, turns into a Sunday bazaar with students pulling all nighters and some attending just for the vibes. It has been the case, that the number of students wanting to study always exceeds the number of study desks available. To address this, the library administration devised a policy – 25 minutes of unattended desk would result in transfer of that study place to another student. Many students toss in there belongings and go away. While the desk is not being used, it ends up not being utilized for studying. This way of booking and occupying places, is not only selfish but unethical. To address this issue, I wanted to resort to ‘out of the box thinking’. This is where I found a switch mechanism, apparently an usual one more befitting!
Working:
In order to be the switch to be unusual, it cannot be operated by hand. One of the indicators could have been the desk, but then I realized, that the chairs can be even more useful in the sense that it is definite that you have to sit down to work, compared to putting pressure over the desk with your items. Hence, as shown in the sketch, I utilized the pressure sensor, which has inverse relationship between its resistance and pressure applied onto its plate. Pressure decrease increases resistance. I added two leds, with one connected to pin-8 being red – indicating that the seat is occupied, and the other one connected to pin-12 indicating that the seat/workplace is free. The 10k resistors help prevent LEDs from burning and third resistor is connected to the pressure plate, to ground unnecessary voltage flux by the plate to 0V. This prevents anomaly and stops any non-necessary trigger sent over to A0 input. Since digitalRead had to be used, the simple ON or OFF state from the sensor was extracted and the state was sent over to the input ‘A0’. This input measures for 0s and 1s. When 1 detected, it triggers the logic inside the code.
Here is the schematic for the circuit:
Demo:
Code:
//alinoor

// declare variables
int sensorpin = A0;  // sensor pin
int sensor;
// sensor readings
// LED pins
int led1 = 8;
int led2 = 12;
bool person_was_sitting; // to check if it is still in use while person away

void setup() {
  // set LED pins as outputs
  pinMode(led1,OUTPUT);
  pinMode(led2,OUTPUT);


  // initialize serial communication
  Serial.begin(9600);
}

void loop() {
  // read sensor value
  sensor = digitalRead(sensorpin);
  // print sensor value
  Serial.println(sensor);
  // turn on the red led and keep it on until the person is pressing against it
  // against it or its been 25 minutes since the last press.

  if(sensor>0){
    digitalWrite(led2,LOW);  //green led turns off
    digitalWrite(led1,HIGH); //red led turns on
    person_was_sitting = true;

  }
  else if(sensor < 1 && person_was_sitting == true){ //checks out only if now seat is idle and person is away for less than 25 min
  		digitalWrite(led1,HIGH);
    	delay (1500000); // delay for 25 minutes
        digitalWrite(led1,LOW); // red led turns off
    	digitalWrite(led2,HIGH); //green LED turns on
    	person_was_sitting = false;


  }

}
The code is pretty much self-explanatory with the aid of the comments. To further explain the logic, the two LEDs are connected to pin 8 and 12. The sensor value store the digitalRead value measured for input to A0 pin. That value, either 0 or 1 (printed inside serial monitor as well for debugging), is used in if-else condition to perform certain task. The delay in else is in milliseconds equivalent of 25 minutes. For debugging 5000 millisecond was used which is equivalent to 5 seconds. If the sensor returns 1, bright red LED lights up to show ‘occupied’. It also sets the state of ‘person_was_sitting’ to true. When person no longer sitting, then else-if triggers and checks for both conditions. In the case that its been more than 25 minutes, and there hasn’t been any one sitting on the chair, then else-if isn’t checked for, and it continues to power the green LED. However, if a person just left, then a delay of 25 minutes is set in place, after which red light is turned off and the green one is toggled.
Future Improvements:
Potentially a brighter LED coupled with weight sensor to make it fool-proof. Students can swap chairs to prolong booking, which in my opinion would self-contradict their on idea of staying away from desk as they will have to comeback to swap again, but even then, adding in weight sensor can help monitor and record for previous weight. If someone else sits to prolong or to takeover someones space, an added buzzer can beep and notify the librarian of such act.
Her Code Got Humans On The Moon – And Invented Software Itself:
The story of Margaret Hamilton not only serves as great source of inspiration for woman in tech. but also to those who tend to walk a different path than the others. What was considered minute, soon ended up becoming center of attention as software oriented approach after the apparent success of Apollo launch, was placed emphasize on, and towards the implementation of software centric system. A mother whose intention was to serve her family first, and make a difference is commendable; however in addition to the heart touching story, what caught my attention was the stubbornness. Sometimes its ok to believe in yourself and be stubborn. Had it not been for her toying around and discovering the potential problem with the simulator regarding the P01 switch control, maybe they wouldn’t have been able to find a fix within 9-hours. This taught me the importance of putting things to the test, and always opting for a back-up, rather than putting things to luck. A good system always has back-up incase of failure. In general, I found a confidence booster through this story of hers, and made me realize missed venues where I could have had been a trend setter instead of being a follower. This class allows me to build by will, and it is what I want to utilize to break and make just like Margaret!
Attractive things Work Better:
The reading discusses the universal cognitive bias where attractive items are interpreted as easy to use. Intelligently designed products allow producers to veil the flaws behind the curtain of attractiveness that products imposes onto its operators. In addition, that veil not only covers over the flaws, but also does the same to hide stressful, bottle-neck, and irritating situations as per what was described in the reading. As mentioned in the reading, ”pleasurable aspects of the design will make them more tolerant of difficulties and problems in the interface”. Come to think of it, I completely agree with this. Computers, despite complex algorithmic runtimes and clock-timings coupled with rising edges to get the minimal task carried out to a human mind may seem stressful. For those who develop, not so much so, but even then to process everything in our short term memory, can overwhelm any of the mind on the planet earth. Even its creator’s. Therefore we interact with what’s on the front-end. Even then, the interface differs. This is where I noticed contrast between iOS and Android operating systems. Both are very well capable, however, the minimalistic flat icon layout of iOS seems so clean and smooth, that we end up blaming android as a flawed system, even though both considerably have their own downsides. Moving away from non-tangible to tangible, the minimalistic aluminum body of Apple’s products make them pleasing to eyes and touch, despite the heaps missing array of sensors and functionalities that you can find on a 200$ android phone. To make my point clear, there is preference for both products, but Apple manages to hide its downsides with better design philosophy. The reading does argue ‘Beyond Beauty’, and to that I think ‘reliability’ is the word I would reply back with. Not just the functionality, but a reliable functionality is also a core component, without which the age of product would short live, and its beauty would lead it to be decorated on a shelf. Personally relating to it, my Parker ballpoint, after running out of ink, became of no such use. Nonetheless, I enjoyed the reading and believe, something reliable, functional, and soothing for the eye makes for a good product.
Blade Havoc is the game I created, inspired by the early 2000s Japanese T.V series called ‘Beyblade’, which I grew up watching. For this project, I wanted to make use of ML5. Particularly hand tracking and voice detection. Due to limited dexterity with my left hand, I realized that an interactive design ins’t something limited to tangible means of input, but should be open to other ends as well. In my case, and of those who find it difficult or boring to play with the conventional design, this project is meant to be a step in a newer direction. A direction and approach made possible thanks to amazing libraries now available online.
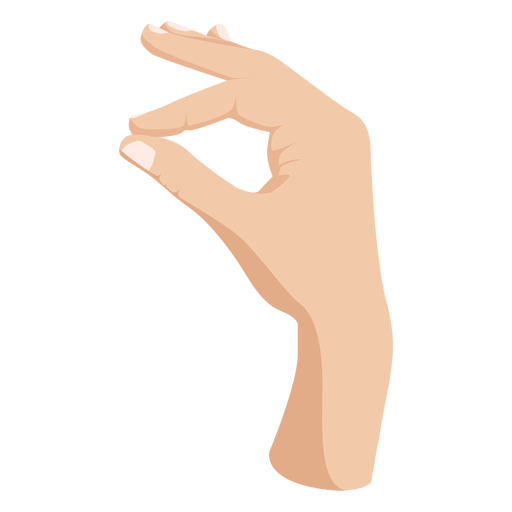
Game-Play instructions : The game makes use of hand gestures and speech recognition. In order to able to play the game, click on the link above which will redirect you to another window. Zoom in using Command + or Ctrl + to zoom in and increase the size of the canvas for better viewing. Make sure to have adequate adequate lighting, sit about 70- 90 cm away from the laptop in order to be visible to your webcam’s field of vision. Controls are fairly simple. Pinch your Thumb and Index Finger together to click, and in order to move the on screen pointers, move your hand. You may use either left or right hand of yours, but make sure to use one at a time, as the program is designed to handle one hand at a time. Likewise, you cannot plug and play two peripheral devices of the same nature at the same time. Not that you cannot do it, but it isn’t practical! The game greats you with animations, sound, and interactive design. The pictures have been photoshopped together to create canvas for the background. Pictures and sounds such as the sound track are borrowed from the show, and I in no circumstance take credit for the ownership or production of these assets. However, I did happen to photoshop – remove background- and put them together in a specific manner alongside color scheming to meet the needs of the game.
How the game works: The game is based on the story of spinning tops which collide with one another and run out of spin. In Japanese culture, this form of play has been quite popular.
The show takes cultural and historical inspiration from this, and so does my project. You can toggle the instructions button on the ‘Menu’ to understand how the game works.
Upon clicking, the game first takes you to the game rules window, and by clicking on the arrow at the bottom, it takes you to the game controls window. You can exit by pressing on the ‘close window’ button on the top right of the window pane.
Order of Events: The user first has to toggle the play button in order to proceed with the game.
The game starts with the view of the stadium, and commentator announcing the match between team USA and Japan. The two main characters are Tyson and Daitchi. Each scene proceeds after one of the character is done with their dialogue.
The match then begins with countdown and audio markers.
The beyblades are loaded into the dish, and the window shows the spin status of both the opponent and your beyblade. It shows special attack status to let the user know wether its active or not. In order to activate it , say ” Dragoon Galaxy turbo”. Each of the events, be it impact with other beyblade or activating special move, each has separate audio to it, which makes it even more interactive.
Since I happened to move my beyblade out of the stadium, I lost the game. You can try again by heading to the menu. Upon doing so the window will reload and all of the variables and states will be set to default status to avoid any conflict.
Game Controls: Pinch your finger to move your beyblade around. Open them to attack. If thumb and index finger close, you will be able to move, but cannot attack. In that case, you will take hits, untill you either get thrown out of the stadium, or lose out on spin.
Pinch to active virtual click
Proud moment: If there is something I am proud of, it is definitely making the sound-classifier and the image-classifier from the ML5 library to get to work. After spending three days trying my best to debug and make the conflict and errors go away, I was finally able to do so. Note that most of the tutorials on ML5.js are in conflict with newer versions of the sdk. Kindly make sure to go over the documentations to avoid any issues. Moreover, I managed to add physics to each blade as well. Upon impact, the opponent’s blade bounces off of the walls whilst yours upon impact either pushes the other one away or you get hit away. Moreover, if you leave the parameters of the stadium, you end up losing the game. This edge detection and getting it to work is another accomplishment of mine after the implementation of machine-trained classifiers.
The Code:
Reusability and ML5.js : The code is made with modularity and re-usability in mind. For ml5.js , all of the setup code and functions have been moved to common functions to call them inside draw and setup at an instance, without having to go through heaps of code, when choosing to turn off / on the ml5.js features.
function ml5_preload_function(){
//importing the hand pose image classifier from ml5.js library
handPose = ml5.handPose({flipped:true});
//importing the sound classifier. Doesn't require additional argument.
classifier =
ml5.soundClassifier('https://teachablemachine.withgoogle.com/models/LHGCWnuCY/model.json', ()=>{
// callback function for testing if the sound model is loaded as it wasn't working before.
console.log ("sound model loaded");
});
}
// arranges the setup for ml5
function ml5_setup_logic(){
handPose.detectStart(video,gotHands);
classifyAudio();
}
//the logic for ml5 which goes into draw function
function ml5_draw_logic(){
if(hands.length >0){
let hand = hands[0];
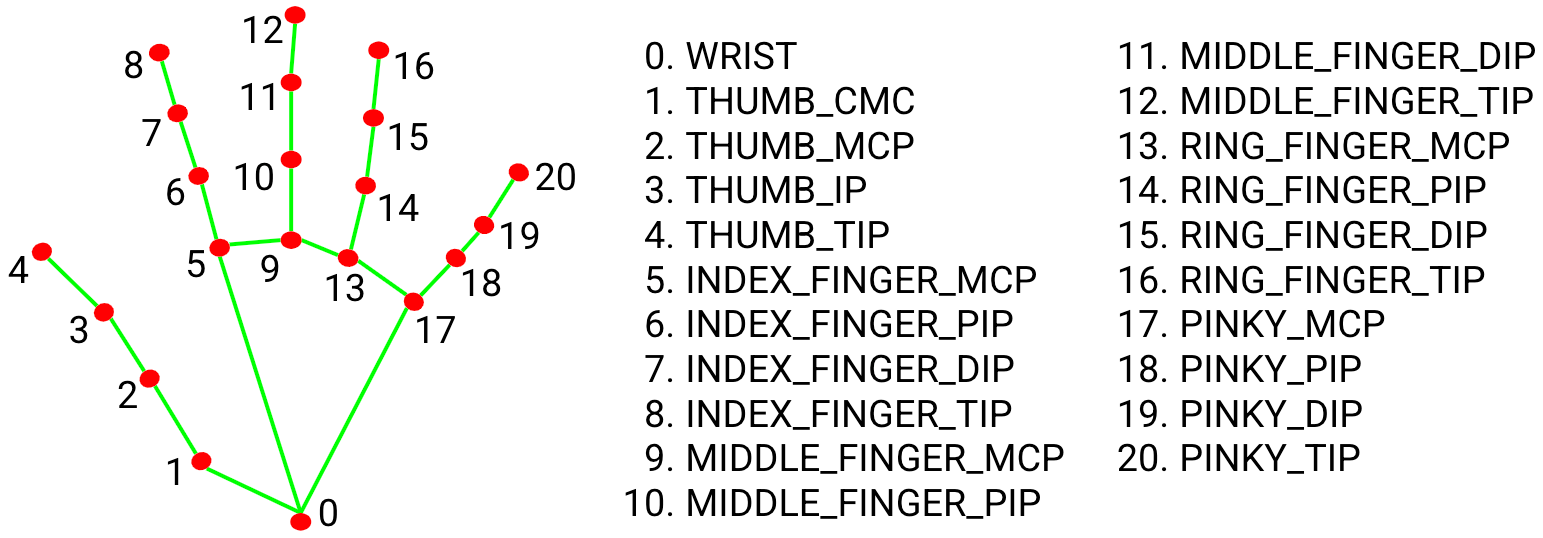
let index = hand.index_finger_tip;
let thumb = hand.thumb_tip;
fill(255,0,0);
let d = dist(index.x,index.y,thumb.x,thumb.y);
if (d <= 20){
fill (0,0,255);
virtual_click = true;
} else if ( d > 20) {
virtual_click = false;
}
noStroke();
circle(index.x,index.y, 16);
circle (thumb.x,thumb.y, 16);
// virtual_click=false
pointerX_pos = (index.x + thumb.x)/2;
pointerY_pos = (index.y + thumb.y)/2;
}
These functions are then conveniently called inside the draw and setup functions.
Object Oriented Code : The class ‘Beyblade’ was made use of, which is custom built. Has attributes like spin speed, coordinates, states which return true or false, and methods like checking for impact.
Training the Model: There were series of steps taken to get both the classifiers to get to work. First, I followed some tutorials online and referred to the Ml5.js documentations to get the hand classifier to work. I set the distance between the two fingers to detect when to consider the click and when not to. Daniel Schiffman’s videos were helpful, but a bit outdated.
After setting up the Hand-classifier, I inverted the video and drew in the backside of the canvas. As for the sound classifier, I had to go to Teachable Machine by Google to train a model for detecting specific words for game-control. Due to time constraints, this was more convenient way of training the model, as opposed to me training my own.
I had to train it for background noise and the special phrase that triggers the special move and changes the color and image of the beyblade.
Finally, the trained model was exported, and was implemented inside the sketch.js and html file to make it able to run.
Areas of improvement:
I am proud of the game as of now. It is interactive, helps me to relive my childhood memories, and share this joy with others. However, I wanted to add more levels, ability to change the settings and select different beyblades. This I will add in the future. As far as the game logic goes, I would like to work on the collision physics for the objects. I would like to tumble, roll and push back them forth even more, to make it even more realist.
Overall, I am proud of my work, and how the game turned out to be!
For this midterm project, I wanted to design something different. Something unique. Something meaningful to me in a way that I get to represent my perspective when it comes interactivity and design. Most of the games that I have played growing up, have been AAA gaming titles (top-notch graphics intensive games) on my PSP (Playstation Portable).
Be it Grand Theft Auto or God of War, I have played them all. However, if there is one game that I never got a chance to play on my PSP due to it not being released for that gaming platform , was Beyblade V-Force! It was available on Nintendo Go and other previous generation devices, but wasn’t there for the newer ‘PSP’ that I owned. I till this date, love that cartoon series. Not only was and am a loyal fan of the show, but I have collected most of the toy models from the show as well.
Brainstorming ideas + User interaction and game design:
This project started off with me wondering what is that one thing dearer to me. After spending an hour just short listing topics that I was interested in , I ended up with nothing. Not because I couldn’t think of any, but because I couldn’t decide upon the one single game. I started this project with a broken hand. My left hand is facing some minor issues, and due to which, I cannot type of hold on to things with the left hand. Particularly my thumb. This made me realize that not only does it make it difficult to program the game, but also to play it as well. My misery made me conscious of users who may struggle with the conventional controls offered typically in the gaming environment : a joystick and some buttons. It made me wonder what can I do different in my case and make this game more accessible to people like me who find it difficult to use a tangible medium to interact with the program. Hence I decided to use hand-tracking technology and sound classification. There is this whole buzz around A.I and I thought why not use a machine learning library to enhance and workout my project. Yet still, I couldn’t finalize a topic or genre to work on.
At first, I came up with the idea of a boxing game. Using head-tracking and hand tracking, the user will enter a face-off with the computer, where he/she will have to dodge by moving head left or right to move in the corresponding direction. To hit, they will have to close hand and move their whole arm to land a punch.
I drafted the basic visuals and what I wanted it to look like, but then as I started to work, I realized that violence is being portrayed and is not but un-befitting for an academic setting. Moreover, I wasn’t in a mood to throw punch and knock my laptop down, since I am a bit clumsy person. This was when my genius came into being. 1 day before, I decided to scrap the whole work and get started again on a new project. This time, it is what I love the most. You guessed it right – it is beyblade!
The whole idea revolves around two spinning metal tops with a top view, rotating in a stadium. These tops hit one another, and create impact. This impact either slows them down, or knocks one out , and even sometimes both out of the stadium. The first one to get knocked out or stops spinning loses, and the other one wins. I wanted to implement this, and give user the ability to control their blades using hand gesture. The user will be able to move their blade around using their index finger and thumb pointing and moving in the direction they would like their blade to move. The catch however, is that only when the thumb and index finger are closed, only then you will be able to move the blade, and to attack, only when your thumb and index finger are not touching, only then will you be able to attack and inflict damage on opponent. To save yourself from damage, you either dodge, or keeping fingers opened. These control constructs are unique and are not implemented in any game design of similar genre or nature before. I came up with this, because I cannot properly grab using my left thumb and index finger, and hence wanted to use them in the game.
I have decided to use states to transition between the menu, instruction screen, gameplay , showing win/lose screen, and returning back to the menu. This makes it convenient to use the modular code and use it inside the ‘draw’ function.
Stadium used in the game.
ML5:
To make the controls workout, I will have to rely on Ml5.js. ML5 allows machine learning for web-based projects. In my case, I will be making use of handPose and soundClassifier modules, which happen to be pre-trained models. Hence, I won’t have to go through the hassle of training a model for the game.
Using the key points 4 and 8, and by mapping out their relative distance, I plan on tracking and using these to return boolean values, which will be used to control the movement of the blade. I referred to coding-train’s youtube Chanel as well to learn about it, and implement it into my code.
I am yet to figure out how to use sound-classification, but will post in my final project presentation post.
Though I am yet to code, and due to limited mobility , my progress has been slowed. Nonetheless, I sketched out the basic class and constructor function for both objects (i.e player and the opponent). Each blade will have speed, position in vertical and horizontal directions, as well as methods such as displaying and moving the blade. To check for damage and control the main layout of the game, if and else statements will be used in a separate function, will then be called inside the ‘draw function’.
Complex and trickiest part:
The trickiest part is the machine learning integration. During my tests, hand gesture works, but despite training the sound classifier, it still doesn’t return true, which will be used to trigger the signature move. Moreover, I want there to be a delay between user’s hand -gesture and the beyblade’s movement in that particular direction. This implementation of ‘rag doll’ physics is what is to be challenging.
Tackling the problems and risks:
To minimize the mess in the p5 coding environment, I am defining and grouping related algorithmic pattern into individual functions, as opposed to dumping them straightaway into the ‘draw’ function. This helps me in keeping the code organized and clean, and allows me to re-use it multiple times. Secondly, using Ml5.js was a bit risky, since this hasn’t been covered in the class, and the tutorial series does require time and dedication to it. Cherry on top, limited hand mobility put me at disadvantage. Yet still, I decided to go with this idea, since I want it to simply be unique. Something which makes the player play the game again. To make this possible, I am integrating the original sound-track from the game, and am using special effects such as upon inflicting damage. Asides from the theming, I did face an issue with letting the user know wether their hand is being tracked or not in the first place. To implement it, I simply layers the canvas on top of the video, which solved the issue for me. As of now, I am still working on it from scratch , and will document further issues and fixes in the final documentation for this mid-term project.
Computer Vision is the amalgamation of various mathematical formulae and computational algorithms accompanied by several computational tools – capable of carrying out the procedure. What was once deemed to expensive and high level (limited to experts such as on AI and signal processing), computer vision now has become readily available. Various software libraries and suites provide student programmers with the ability to run and execute those algorithms required for the object detection to work. The cherry on top, with mass refinement and larger availability of computer hardware, at a fraction of cost of what would have been in the early 1990’s, now anyone, and by anyone I mean all of the institutions can access it and tinker around with it.
Difference between computer and human vision:
Computer Vision has a designated perimeter, where it scans for array of objects vertically and horizontally. Upon detecting a change in shade of pixel, it infers detection. By using complex algorithmic thinking, which is applied in the back-end, it is able to analyze and detect movement among various other traits such as character recognition etc. Various techniques like “Detection through brightness thresholding” are implemented. Alongs the similar lines happens to be the human vision. Our retinas capture the light reflecting from various surfaces, using which our brain translates the upside down projection into a comprehensible code. Our brain is trained to interpret objects, while computer vision requires algorithmic understanding and aid of Artificial intelligence. With AI, amongst a data set, training is done be it supervised or not, to teach the computer how to react to a certain matrix of pixels i.e image scanned.
Ways to make computer vision efficient:
As mentioned in the reading and the paper, one of the things that I love is ‘background subtraction’. The capability to isolate the desired object. In my opinion, tracking several objects using this technique, and having a variety on the trained data set helps with more accurate and precise judgment. Especially if many objects are present at the same time. However, other techniques such as ‘frame differencing’ and ‘brightness thresholding’ exist as well. Also, from other readings, the larger the data set, and training time, the more the accuracy. However, to acquire image data, it comes with ethical dilemmas and added cost.
Computer Vision’s surveillance and tracking capability, and its implementation in interactive Media:
Works like Videoplace and Messa di Voce are example of earlier demonstration of interactive media and computer vision’s combination. Installations can track and respond to human input. This ‘feedback loop’ triggers a sense of immersion and responsiveness. In my humble opinion, the use of computer graphics takes away the user from traditional input techniques and gives them freedom to act as they will. Though it is also true, that the computer will make the sense out of the input, adjacent to the trained data set, and a totally random input might lead the system to fail. This is where the idea of ‘degree of control’ comes into play. Personally, I believe, as long as we have a combination of interactive components, user will never get tired of running inside the same tiring maze, but the use of computer vision definitely makes it seem less tangible and more user centered. Hence, I decided to use it for my midterm project as well!
I have always found bar graphs to be quite fascinating. The ability to stack and compare data visually allows it to be easily perceived. In my case, I wanted to make sure, that I can log my study hours, as an extrinsic motivation. Something which will give me visual overview of my efforts in the form of time put into studying.
Concept:
In theory, I wanted the data visualization and bar graph to be based on weekly basis. A snapshot of just one week as opposed to a complete log since the dawn of time. Each day in the week will have a bar , extending from top to bottom axis, and will vary in height, to signify which day was the most productive (I know this isn’t exactly considered productivity, but we might just pretend). Each bar will have designated study hours listed on top of it, and will give a quantitive and qualitative visual of study pattern.
The user will be greeted by start page, then taken to a page to log in study hours, and then again upon a button click, will see the graphs appear.
Code Highlight:
function setup() {

}

function startProgram() {

  }

}

function submitData() {
  // check and store if
  for (let i = 0; i < studyInputs.length; i++) {
    //cycle through the inputs to verify the nature of data.
    let val = parseFloat(studyInputs[i].value());
    // parseFloat is a javascript function, which parses
    // a value as string and then converts it to number
    studyHours.push(isNaN(val) ? 0 : val);
    /*
    isNaN is 'Not a number' function which returns true if the value is     passed is not a number. in our case if the value passed is a
    number, then its true, and pushes 'val' into study hours. and for
    the one where if there is no number entered for instance a letter /
    character instead, this will push the value '0' for the hours.
    */
    studyInputs[i].hide(); // hide the input field after submission
  }
  submitButton.hide();
  state = "graph";  // change state so that draw() will call drawGraph()
}

function drawGraph() {

}

//atlas draw function which keeps on cycling, and only draws graph when the state has been changed to draw graph.
function draw() {
  // if state is "graph" continuously draw the graph.
  if (state === "graph") {
    drawGraph(); // custom function
  }
}
The code in submit data is what I am proud of. At first, I encountered the possibility where the user might not enter a numerical value, but rather a string or character. Hence I made use of ‘parseFloat’ and ‘isNaN’ javascript functions paired with a inline if-else logic statement to check for the nature of input. If the input happened to be other than a number, then push a ‘zero’ value into the ‘studyHours’ array.
Things I struggled with:
I struggled the most with the placement and sizing of the bar graphs. There coordinates were inconsistent, and the spacing was off. Hence, I decided to use mathematical formulation to calculate the division of space on the spot , and keep its coordinates and their margin consistent.
let margin = 60;
 let gap = 20; //gap between days
 let availableWidth = width - 2 * margin;
 let barWidth = (availableWidth - (days.length - 1) * gap) / days.length;
 let maxHours = max(studyHours); // maxiumum value in the array
 if (maxHours === 0) {
   maxHours = 1;  // to avoid division by zeor
 }
 let graphHeight = height - 100;
 stroke(0);
 //horizontal bar
 line(margin, height - 50, width - margin, height - 50);

 // For each day, draw the corresponding bar and label its study hours and name
 for (let i = 0; i < days.length; i++) {
   let x = margin + i * (barWidth + gap);
   let barHeight = map(studyHours[i], 0, maxHours, 0, graphHeight);

   // Draw a blue bar representing the study hours
   fill(50, 150, 200);
   rect(x, height - 50 - barHeight, barWidth, barHeight);
Instruction on How to Use:
Click on ‘start’ to proceed to data logging stage.
Then, enter numerical values for the hours studied each day.
Once pressed on ‘submit’, the user will see visualized pattern of data entered.
Since ‘ali’ is not a numerical value, it shows zero, and for the rest, it visualizes the trend and numbers entered.
Embedded Sketch:
Future Improvements:
In the future, I want to make it even more dynamic. For instance 7 is not far away from hitting the title. Even though the current program is able to resize depending on the maximum and the minimum relative to other bars, and the graph, yet still, better margins and specific coloration to each bar can make it more sybmolic. For instance hot red can refer to the most hours studied, and simple greenish can refer to the least.
Complete code:
The complete code is extremely lengthy, not really but can be accessed via clicking on the sketch.
I thoroughly enjoyed this reading. I had no idea the famous ‘Norman Door’ was literally named after a personality named Norman! The reading touches upon various concepts and examples such as doors and teapot for masochists. By using the example of his friend and his struggle with an aesthetically pleasing array of doors, the author made and argument that ‘discoverability’ and ‘understanding’ are two of the most critical elements of design, which are often neglected. Discoverability means the how easy it is for users to discover possible actions and understanding refers to what extent user can understand the meaning of those actions.
What’s something (not mentioned in the reading) that drives you crazy and how could it be improved?
If there is one thing, that I happened to have been struggling with recently are the plastic latches. To be more precise, the battery latches on cameras.
Turns out, I am not the only one, many folks over the internet have been struggling with these latches. The latch mechanism works by pulling a small protruded lever. Instead, those unfamiliar, end up pooling the whole latch backwards, which ends up damaging , loosening, or even breaking it. No wonder, why they have so many spare plastic latches lined up on amazon:
In order to improve, I think a release mechanism can be designed, based on a simple push mechanism, rather than a pull mechanism. A simple button, which releases the hatchet rather than you having to pry it with your nails, making it extremely difficult and scratching the plastic in the process. Most importantly, memory card has to be removed every time to transfer images, and with latch being this annoying, it is bound to be damaged and broken in the long run. Therefore, a push to open mechanism would be more important than a push / pry to open mechanism.
Note: I am not referring to the movement of the latch (wouldn’t make any different to door), but rather the release mechanism that works in latches and sometimes say’s push to open or ‘pull’ but reality results in user confused which axis to apply force in.
Solution: A press to open and press to release mechanism, similar to kitchen drawers.
How can you apply some of the author’s principles of design to interactive media?
Feedback mechanism is one of the main visual or multi-sensory cue (signifier) that can be implemented to interactive media projects. Upon user input, the designed system should either inform the user after an adequate amount of time wether his/her action has been negated or accepted. I personally like the idea of sound or haptics. For instance on Macintosh mousepad, when user is performing a drag or drop action with the mouse which is beyond the graphical constraints of that program, the springs in the mousepad harden and vibrate. This gives the simulation of difficulty when dragging . Similarly that annoying sound from windows 7, when prompt window not dealt with are some of the examples.
Secondly affordances such as designs which allow for ‘easy’ discoverability is something that I would like to work upon. Easy to understand designs, which prompts user in the right direction, such as drawing borders in the game selectively to direct the player in the right direction.
Interactivity is just like having conversation over a cup of tea. That might be an exaggeration, unless of course if you happen to be a Brit!
After having done the reading, I could almost immediately sense that the author is try to compare interactivity to conversation. In the reading, the author describes it as a ‘cyclic process’ which happens like a conversation does between more than 1 person, which involves ‘listening’,’thinking’, and ‘speaking’. Interactivity deals with all 3 spaces, therefore isn’t just limited to user input. Just like the metaphorical example of having a conversation, the computer too should interact with the user. It requires a purposeful exchange. Interactivity within itself is not a boolean value, therefore isn’t limited to a confined standard (objectiveness), but should however perform as per the context of information being provided! Some designs are bound to be interactive such as game media. while for some, interactivity is kept a low level to give user time to ‘think’. Overall, I think a strong interactive media shouldn’t limited to a certain logical function. Creativity and rationale go hand in hand , and in my opinion should complement each other, rather one snubbing away the other. Therefore a strong interactive system should be clear in its approach and interaction, should incorporate multimodal output to an appropriate extent, and should resonate emotions to the user, as well as perceive them just like a conversation!
Since the start, I have made sure to incorporate certain extent of interactivity into my sketches by including animations, color variance, mouse-click, spontaneity, etc. Yet still, after having read the reading, I realized that I do happen to miss out on opting for other media domains like sound and more importantly, the fluidity! Despite the mouse click, I should work on timing towards feedback to users input, and add certain constraints along side parameters to avoid haphazard response by the design incase the user makes mistake such as a double click! By incorporating textual elements and walking users through a manual or something, built into the sketch can also improve my sketches. Last but not the least, the conversation/ interaction should be open to all. Therefore, people with conditions like ‘photo-phobia’, ‘color-blindness’, ‘partial-vision’ can also be accommodated in my future design by providing options to adjust the graphics to a certain manner to their liking.
Being an extrovert doesn’t come in as easy as it seems to be. Everyday we meet new people at different places, be it at the bus stand, mall, university, etc. With some of these, we end up forming some sort of relationship, whilst with some, that meeting ends that very day of having met them. I love talking to new people and getting to know them. Some people resonate with the same energy and others simply happen to pass over the opportunity.
Inspiration and ideation (Basic Hand-Drawn Sketch):
With this assignment, I wanted to communicate the idea of our lives ‘circling around the lives of others’. Sometimes it circles for longer, sometimes for very short period of time. During class we learnt how to draw balls bouncing within a confined space. I wanted to use the same aesthetics, represent people’s lives with circles. However, there is a catch! The circles themselves should circle around other circles circling inside a circle! Unintentional tongue twister? I guess so! I drafted a basic sketch on my iPad and hoped right onto my computer to code my idea.
The basic sketch I drew:
The static drawing couldn’t fill my appetite, so I switched over to using math. I recall watching certain tutorial video by our beloved ‘Coding Train’ youtube channel. You can watch the video by clicking on the link. I borrowed some coding inspiration from him, but had to draft my own coding logic to adapt to a much more dynamic style of spiral. I used the following mathematical logic to construct the clockwise spiral:
How to interact:
The program starts off with just ten spirals. Upon mouse click, it adds 5 more spirals (peoples) into our lives. The black canvas color represents the back of our mind.
Result:
Code I am proud of:
let spirals = []; // global array variable
let totalSpirals = 10; //start wtih 10 spirls.
// The Spiral class draws shapes along an outward spiral path
class Spiral {
  constructor(xpos, ypos) {
    // Center of the spiral
    this.cx = xpos;
    this.cy = ypos;
    // Starting angle and radius
    this.angle = random(TWO_PI);
    this.radius = 0; // begins with a zero radius

    this.rotationSpeed = random(0.05, 0.2); // speed of the spiral
    this.radiusIncrement = random(1, 3); // increases the cirlce radius

    this.shapeDim = random(10, 30); // size of each circe

    this.r = floor(random(255)); // random color assigned
    this.g = floor(random(255));
    this.b = floor(random(255));
  }

  update() {
    this.angle += this.rotationSpeed;
    this.radius += this.radiusIncrement;

    //math formula to calculate the circular movement
    let x = this.cx + this.radius * cos(this.angle);
    let y = this.cy + this.radius * sin(this.angle);

    if (x < 0 || x > width || y < 0 || y > height) {
      this.radius = 0;
      this.cx = random(width); // when circle moves.  out of the scren,
                              // randomly place it
      this.cy = random(height);
    }
  }

  display() {

    let x = this.cx + this.radius * cos(this.angle);
    let y = this.cy + this.radius * sin(this.angle);

    noStroke();
    fill(this.r, this.g, this.b);
      circle(x, y, this.shapeDim); // drawing circle
  }
}

function setup() {
  ///
}

function draw() {
//

}

function mouseClicked() {
 //
}
In particular, the class and constructor function is something I got right after debugging and going through trial and error. To be even more precise, increase the angle depending on the speed as well planting a new circle is my greatest achievement in this assignment, demonstrated by the following code :
  update() {
    this.angle += this.rotationSpeed;
    this.radius += this.radiusIncrement;

    //math formula to calculate the circular movement
    let x = this.cx + this.radius * cos(this.angle);
    let y = this.cy + this.radius * sin(this.angle);

    if (x < 0 || x > width || y < 0 || y > height) {
      this.radius = 0;
      this.cx = random(width); // when circle moves.  out of the scren,
                              // randomly place it
      this.cy = random(height);
    }
  }
My mental state:
Future Improvements:
Make the trail pattern more visible, and use a different color scheme to give a glowing neon-like effect.

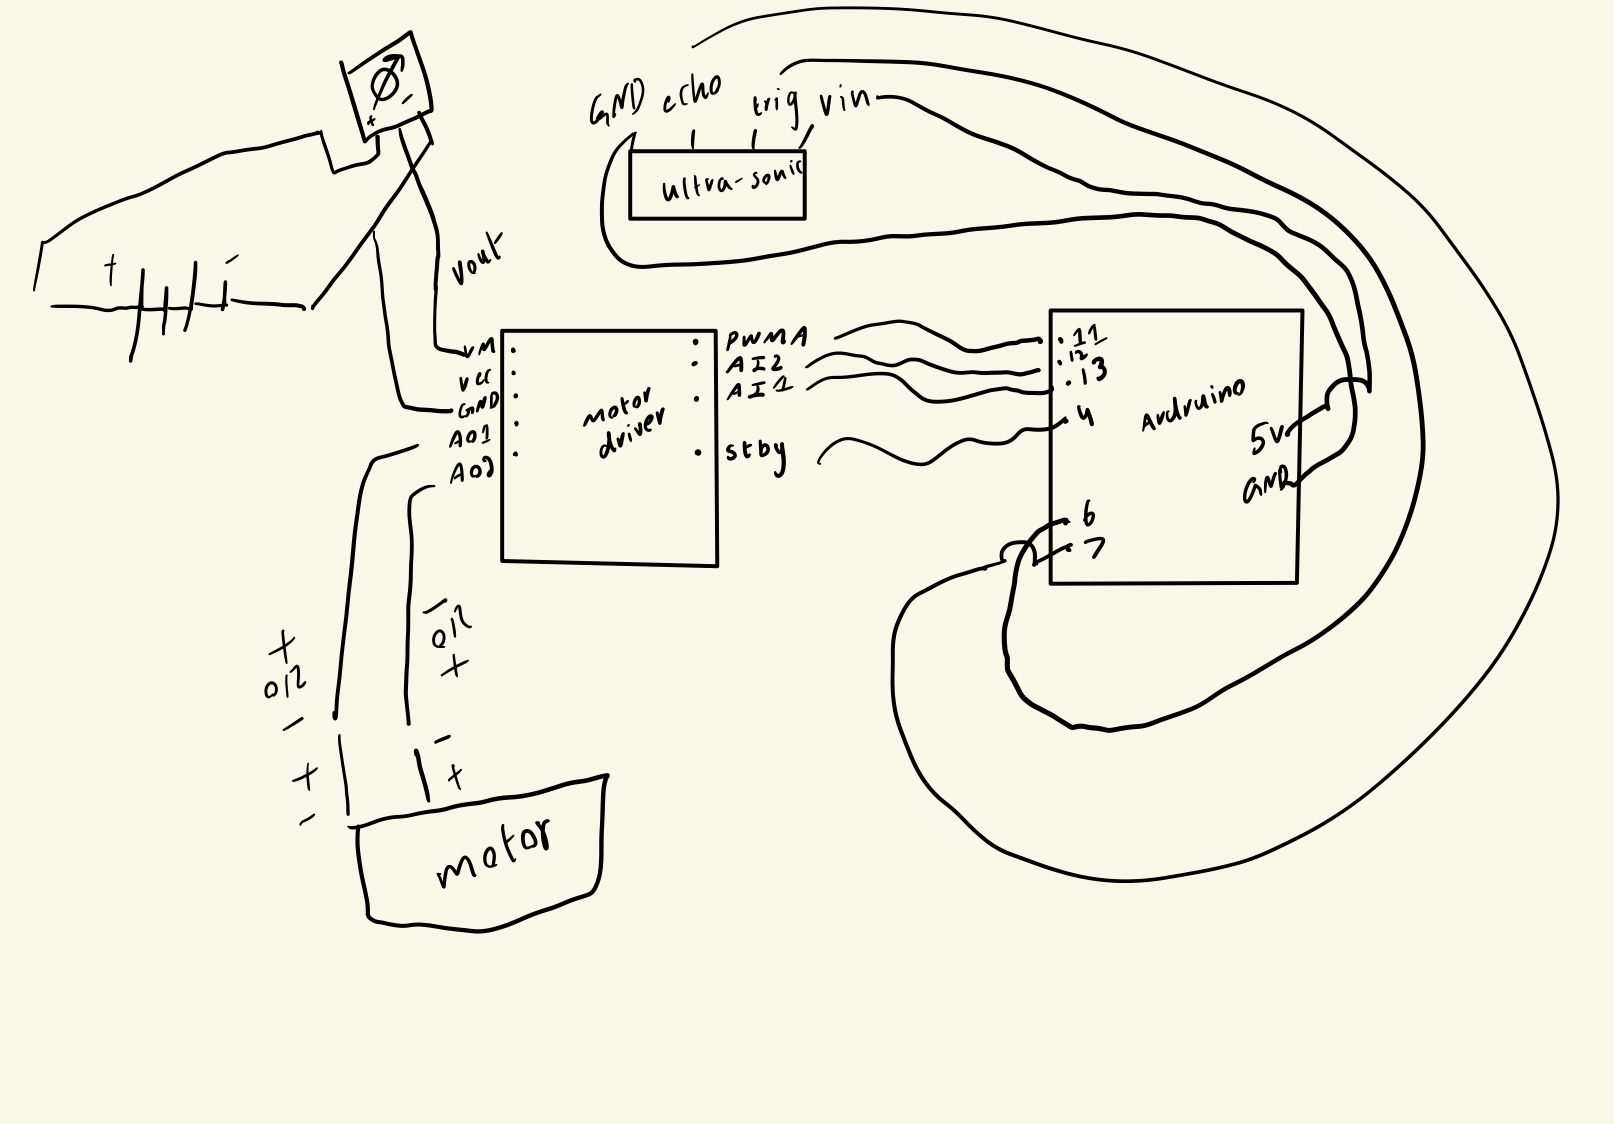 The schematic shows the connection between the components
 The overview of the circuit.
 The H-bridge motor-driver and both leds.
 The potentiometer used.
 The 9V battery in use with battery cap.
 Ultra-sonic sensor.
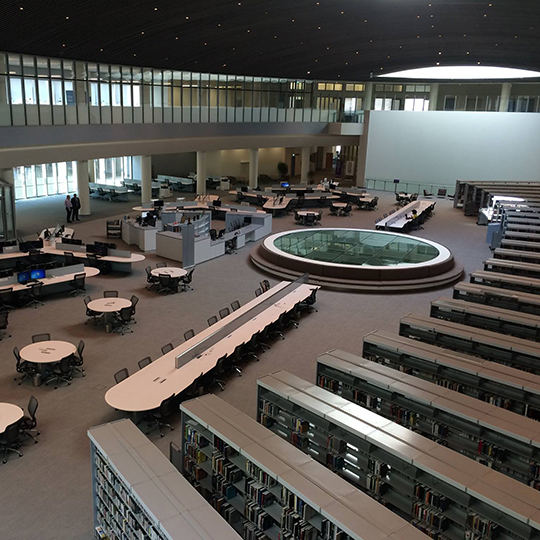


 Ali being Ali
 Got the pointers to work

 Tuning for desired results.


 Basic Layout visualized.
 Flow chart of basic logic construct
 Basic gameplay features:
 Game states
![Legal Stadiums-[bc]These are the legal tournament stadiums that bladers can agree to battle on in Official Ranked Battles.[](https://pm1.aminoapps.com/7675/b2fd66ad6e358d1a334637c68041eff8616dd030r1-512-288v2_hq.jpg)

 Class and Objects – Pseudo code.


