Catching Particles

For the OOP project, I recreated the catching ball game. To make it simple, I made a rectangular bar which is essentially the basket that is suppose to catch the ellipses that are falling from the sky. Each of these balls are made from the Ball class, which has the attributes xPos, yPos, speed, and size. Every time the ball is not caught by the rectangular bar, the number of missed balls increased and the speed of the ball increases. This basically means the game gets harder at each level because the ball is moving at a random(0.1, 0.3) speed faster than before. I had trouble making the balls come down at different times and position, but I fixed it by starting each of the balls’ yPos to be between random(-width, 0), so that the balls don’t show up all at once. Once a ball reaches the bottom of the screen, I reset its x,y position to a new location on the screen, so that it looks like there’s always new balls coming from the sky.

There a 5 levels to this game. If they reach it, they win.

Every time the user catches 10 balls, it turns into a new level.

If the user misses out on 15 balls, they lose (does not reset at each level).

int level = 0;
int totBall = 10;
int caughtBalls = 0;
int missedBalls = 0;
Ball balls[] = new Ball[totBall];
Catcher catcher;

void setup() {
  size(640, 640);
  catcher = new Catcher();
  for (int i = 0; i < totBall; i++) {
    balls[i] = new Ball(random(width - 20), random(-width, 0), 1.2);
  }
}

void draw() {
  background(0);
  fill(255);
  
  if (level < 6 && missedBalls < 15) {
    text("Level: ", 20, 20);
    text(level, 60, 20);
    
    text("Caught:  ", 20, 40);
    text(caughtBalls, 75, 40);
    
    text("Missed: ", 20, 60);
    text(missedBalls, 70, 60);
    
    for (int i = 0; i < totBall; i++) {
      balls[i].run();
      if (balls[i].isTouchingBar(mouseX, height - 20)) {
        caughtBalls++;
      } else if (balls[i].yPos >= height - 10) {
        missedBalls++;
        balls[i].resetIfEnd(height - 10);
      }
    }
    
    if (caughtBalls % totBall == 0 && caughtBalls != 0) {
      level++;
      caughtBalls = 0;
    }
    
    catcher.display();
  } else if (level > 5) {
    text("YOU WIN", width/2 - 20, height/2);
  } else if (missedBalls >= 15) {
    text("GAME OVER", width/2 - 20, height/2);
    text("LEVEL: ", width/2 - 20, height/2 + 20);
    text(level, width/2 + 20, height/2 + 20);
  }
}


class Ball {
  float xPos, yPos, spd, size;
  color clr;
  
  Ball(float x, float y, float speed) {
    xPos = x;
    yPos = y;
    spd = speed;
    size = random(5, 20);
    clr = color(random(0, 255), random(0, 255), random(0, 255));
  }
  
  void display() {
    fill(clr);
    ellipse(xPos, yPos, size, size);
  }
  
  void move() {
    yPos += spd;
  }
  
  void resetIfEnd(int y) {
    if (yPos > y) {
      yPos = random(-width, 0);
      xPos = random(width);
      spd = spd + random(0.1, 0.3);
    } 
  }
  
  void run() {
    move();
    resetIfEnd(height);
    display();
  }
  
  boolean isTouchingBar(float barXPos, float barYPos) {
    if (xPos >= barXPos && xPos <= barXPos + 90 &&  
        yPos >= barYPos && yPos <= barYPos + 20) {
      resetIfEnd(height - 20);
      return true;
    }
    return false;
  }
}


Response to Eyeo2012

Casey Reas’ talk about Chance Operation really brought into light the possibilities chaos and order can create. As I was looking through the art pieces he created, I had a hard time thinking about how he coded such a design. They were messy, but in an orderly way, and it really made me focus on the piece. One of the concepts he mentioned was the use of “jittering” to create an organic movement and that was very intriguing because a small movement of particles created so many different pieces that looked nothing alike. For me, it’s exactly this randomness that makes it hard for me to think of the code he used to make the piece.

When Reas’ started talking some of the art pieces that actually represented the artist’s current time, I was surprised because I never knew there was a connect between the art and current history (e.g. World War I art pieces). I’ve never really understood art museums and there are many times where I’m in museums thinking “how did they get famous from this piece? I could make that, too.” However, since watching this video, I’ve realized that it’s what the art represents / the meaning behind the art that’s made it less simple than it seems.

After watching this, I’m more excited about experimenting with randomness and getting more comfortable with understanding how it works. I want to get to a point where I can understand how some of the small changes in noise() or random() can change up my piece (e.g. frequency, sin(), cos(), rotate()).

Generative Art

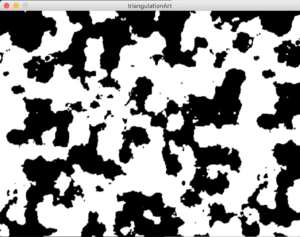
I picked the computer generated art designed by Hiroshi Kawano for my recreation. Looking at it, I realize that it is black and white only. It also looks random, but there is a certain pattern to it, which reminds me of noise. I thought about how each pixel in the grid is either black or white. I attempted the design by doing a double for loop through the height and width of the screen size. I was able to create noise with the x, y values and multiplying it with a freq of 0.03 ((The image looks tighter if the freq was too high and sparse when the freq is too low)). Depending on whether the noise value is above 0.5 or below, I gave it stroke of either black or white. For each of those pixel in the screen, I made it a point(x, y) so that it would draw something.

From Triangulation:

My Recreation:

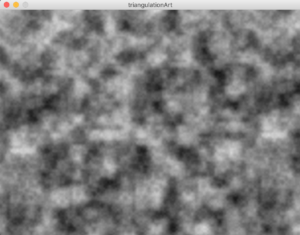
If I play with colors and adjust based on grey scale (without (if noiseVal < 0.5)):

The Code:

void setup() {
  size(640, 480);
}

void draw() {
  for (int i = 0; i < width; i++) {
    for (int j = 0; j < height; j++) {
      float freq = 0.03;
      float noiseVal = noise(i * freq, j * freq);
      if (noiseVal < 0.5) {
        stroke(255);
      } else {
        stroke(0);
      }
      strokeWeight(map(noiseVal, 0, 1, 1, 3));
      point(i, j);
    }
  }
}

I then tried to make the noise move since it has a x, y:

2 Blog Post on Readings

Her Code Got Humans on the Moon

I’m surprised I’ve never heard of Margaret Hamilton and what she was able to accomplish. With all the hardware (punching holes in stacks, hardwired, and indestructible memory, etc) and barely established software, Margaret was able to create an entire industry with her colleagues. The point about how Margaret wanted to extra features that could handle error was interesting. The way it was explained in the article, it seems like the P01 button was unnecessary, so I didn’t really understand why it was there in the first place if all it did was erase data which preventing the astronauts from getting back home. All in all, the main focus of this article seems to focus on how a women engineer was able to revolutionize a whole new industry.

“Emotion & Design: Attractive things work better”

I’ve realized that attractive things work better, but I’ve never looked or realized how that might be. What Norman claims about how being in a better positive state can result in people thinking of better solutions to use a product makes a lot of sense to me. Whenever someone is anxious or mad, they seem to not think about other solutions and instead continue to do the same thing over and over again and expect something to be different. When a design is unattractive, it can possibly put someone in a bad mood, which results in them not figuring out how to use something.

I thought the idea of using sound to break focus was very interesting because I never realized that it actually works (calling “fire” to get someone to notice that something bad is happening, having buzzing noises once something bad happens). I think these are all great ideas to get someone out of the negative affect.

Overall, from this reading, I feel more confused about how to create better designs since there’s so many aspects that I have to keep in mind. All the emotions that one feels when using a new product can change depending on ones mode makes it difficult to design. Norman says the reflective aspect is the hardest to work with especially since it prolongs with time. The visceral and behavioral levels are about the present, but the reflective one stretches into the future.

Self Portrait

For this “self portrait”, I mainly just tried to add face features and use the right colors for them, but I wasn’t able to actually draw it the way it actually looks since that was a hard. The one additional aspect I added was that the eyes sort of blinks after a few seconds. This was achieved by modulating the frameCount and whenever the value is between 0 and 50, the eyes will not show, therefore, creating the visual effect of blinking. This project just involved a lot of trial and error for placing shapes and it was a great learning experience. I think the arcs are still a bit confusing but after remembering middle school math, I think I’ve gotten the hang of it.

void setup() {
  size(460, 500);
  frameRate(30);
}

void draw() {
  noStroke();
  background(104, 193, 200);
  fill(0);
  rectMode(CENTER);
  rect(width/2, height/2 + 30, 270, 300);
  
  //shirt
  fill(17, 103, 168);
  ellipse(width/2, height/2 + 285, 280, 300);
  
  //face and neck
  fill(239, 198, 107);
  ellipse(width/2, height/2 - 30, 250, 300);
  rect(width/2, height/2 + 130, 50, 50);
  arc(width/2, height/2 + 140, 90, 50, 0, PI);
  
  //eyes
  if (frameCount % 50 > 0 && frameCount % 50 < 50) {
    noStroke();
    fill(255);
    ellipse(width/2 - 55, height/2 - 50, 50, 20);
    ellipse(width/2 + 55, height/2 - 50, 50, 20);
    fill(102, 82, 34);
    ellipse(width/2 - 55, height/2 - 50, 20, 20);
    ellipse(width/2 + 55, height/2 - 50, 20, 20);
  } else {
    noFill();
    arc(width/2 - 55, height/2 - 70, 50, 10, 0, PI);
    arc(width/2 + 55, height/2 - 70, 50, 10, 0, PI);
  }
  
  //nose, arm line
  stroke(0);
  line(width/2, height/2, width/2, height/2 - 35);
  line(width/2 + 80, height/2 + 250, width/2 + 80, height/2 + 180);
  line(width/2 - 80, height/2 + 250, width/2 - 80, height/2 + 180);
  
  //eyebrow
  noFill();
  arc(width/2 - 55, height/2 - 70, 50, 10, PI, TWO_PI);
  arc(width/2 + 55, height/2 - 70, 50, 10, PI, TWO_PI);
  
  //mouth
  fill(0);
  arc(width/2, height/2 + 40, 100, 70, 0, PI);
  arc(width/2, height/2 -100, 270, 230, PI, TWO_PI);
  fill(229, 87, 87);
  arc(width/2, height/2 + 59, 80, 30, 0, PI);
}

Response to Physical Computing’s Greatest Hits (and misses)

As a computer science student, I always think about what else to make especially when a lot of what I come up with has already been created in some way or another. Nothing seems revolutionary and I still think that way after reading the blog post.

I love how a lot of the project themes that were mentioned on the post were already created by us and there were so many variations of it. We’ve done musical instruments, floor pads from the first week, tilty stands, things you yell at, remote hugs, etc. I’ve also done video mirrors with Microsoft Kinect, and hand/body as cursor projects in my other classes. There are definitely room for many additions so that they become very elaborate and complicated projects. In terms of technicality, the projects seem to narrow down to similar code.

For me, it’s especially hard to come up with projects because I still have that mindset of “it’s already been done. The project I want to make won’t be very unique.” Therefore, I think the hardest part of creating projects is having the creativity to make something great.

Response to Making Interactive Art: Set the Stage, Then Shut Up and Listen

I found this blog post to be particularly interesting from the standpoint of someone who would say they do not understand art. When I go to art museums, I have no particular interest or understanding of the piece. However, when it comes to more interactive pieces, I always gravitate towards it because I don’t have to interpret the piece.

I definitely agree with Tigoe’s statement about once you have the initial statement, you should shut up. I don’t think there’s much to explain and I personally won’t bother with reading what they have to say about the piece. There’s no need to explain and offer their own interpretation on the side. It’s kind of like writing code and making a comment about what each line of the code does even though it’s obvious.

Timoe says that “if you’re thinking of an interactive artwork, don’t think of it like a finished painting or sculpture. ” I think that’s a great idea and it goes well with the listening aspect of it because it gives the artist a chance to see what people see the art piece as rather than spending so much time on convincing people to think of an art piece like the way they want them to. It’s so hard to make everyone feel the same way about a piece so the best an artist can do is listen, watch and then maybe change some aspects if they really don’t like what they are seeing.

Midterm Boat Afloat

Inspiration:

After our class discussion about breaking circuits with water, I stupidly thought I should make a boat just to see whether I could short circuit it. Unsurprisingly, I spent most of my time being worried about putting my boat in the water in the case that it would just sink and burn.

What: 

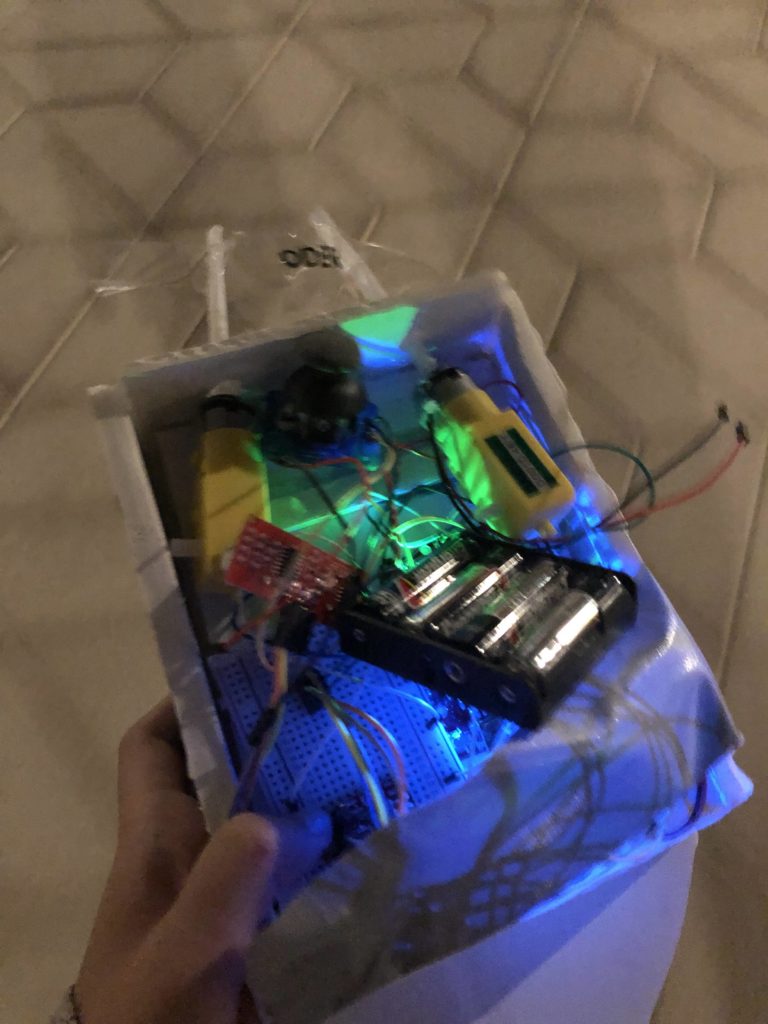
Simply, it is my attempt at create a remote controlled boat without the remote, but instead replaced by a joystick. It detects when the boat is too close to surrounding walls and stops the motor from moving. The joystick allows the boat to go backward, forward, left and right. If there is no interaction with the joystick, then the boat does not move.

Problems I Faced:

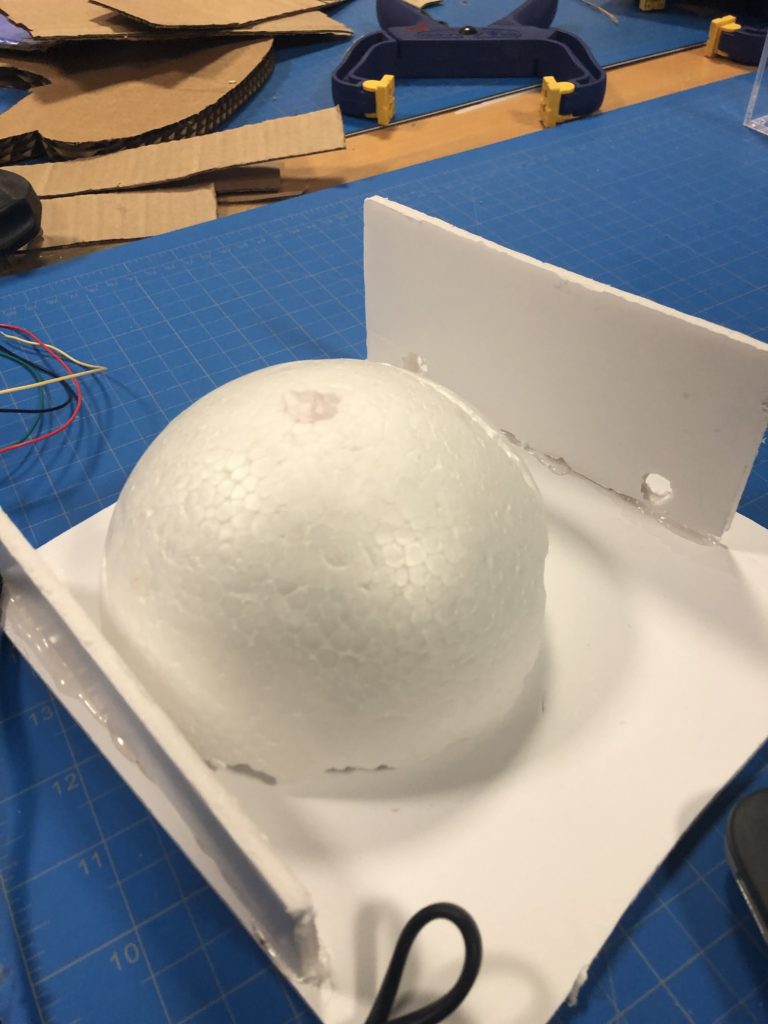
The first problem I had was trying to make the boat float. My original plan was to use half a styrofoam ball, which would hold the DC motors. However, the motor would easily touch water and when I tried it in a tub of water, the styrofoam ball would always tip over. To fix it, I decided to put that on top of a flat styrofoam surface, but it was very awkward and nothing fit well. 

I finally decided to stack multiple foam planes on top of each other to give it enough height to stay away from the water and to carve out a tip in the front to make it resemble a boat. Although this was not the best solution, it still stopped water from touching any of the circuits. Water, however, still leaked through if it stays in water for too long. I ended up duct taping the bottom, but it was definitely just a temporary solution.

I also had trouble with figuring out how to use the motor driver especially in terms of how to hook it up to the breadboard and where the wires for the DC motors should go. I also had to learn about PWMs and how they work and how to make the DC motor turn left/right using digitalWrite(). It took a bit of time to configure everything correctly, but it worked in the end. Unfortunately, I still couldn’t figure out why the motor driver isn’t giving me the full 255 value for PWM. It did not give me the max speed I needed to turn the propeller under water.

If I had more time: 

The boat is, ascetically speaking, not a boat. It’s just styrofoam with a tip that makes it look like a boat. To improve on that, I would probably make the boat out of some lightweight wood that is curved correctly on the tip and sides so that it floats. There would be a hollow area for the breadboard and SparkFun circuit to sit on. It would also be covered in some way so that the water from the propeller would not accidentally carry water over the circuit.

For the joystick, I would detach it from the circuit and create a wireless board that has a joystick attached to it. By doing so, I would not have to follow the boat with the joystick and I wouldn’t have to worry about pulling out a wire by accident.

Additionally, if I have more Ultrasonic sensors, I would attach one on each side of the boat so it can detect all sides. In that way, I could either control the boat to stop completing if it’s close to anything or I could disable one of the directions to prevent the boat from hitting the side.

Last Thoughts:

I really enjoyed creating this project, although I spent a majority of the time figuring out the motor power, which led to a not-so-well designed boat. I enjoyed making the propellers and figuring out a way to extend the legs of the propeller so that it wouldn’t touch the water. It was also frustrating because I spent a long time trying to make a propeller out of a different material because I thought the plastic was too weak. However, it was because the motor wasn’t giving enough current to push the water.

const int leftMotor1 = 13, leftMotor2 = 12, PWMLeft = 11;
const int rightMotor1 = 8, rightMotor2 = 9, PWMRight = 10;

int trigPin = 2, echoPin = 3;

int x_direction, y_direction;
int X_PIN = A1, Y_PIN = A0;


int motorControl = 5;
int boatSpeed = 100;
int distanceInches = 0;

void setup() {
  pinMode(X_PIN, INPUT);
  pinMode(Y_PIN, INPUT);

  pinMode(leftMotor1, OUTPUT);
  pinMode(leftMotor2, OUTPUT);
  pinMode(PWMLeft, OUTPUT);

  pinMode(rightMotor1, OUTPUT);
  pinMode(rightMotor2, OUTPUT);
  pinMode(PWMRight, OUTPUT);

  pinMode(echoPin, INPUT);
  pinMode(trigPin, OUTPUT);

  pinMode(motorControl, OUTPUT);

  Serial.begin(9600);
}

void loop() {
  if (millis() % 100 == 0)
    distanceInches = getCurrentDistance();

  x_direction = analogRead(X_PIN);
  y_direction = analogRead(Y_PIN);

  int xSpeed = 0, ySpeed = 0;

  if (x_direction < 460) {
    xSpeed = map(x_direction, 0, 300, 255, 0);
  } else if (x_direction > 530) {
    xSpeed = map(x_direction, 530, 800, 0, 255);
  } else if (y_direction < 460) {
    ySpeed = map(y_direction, 0, 300, 255, 0);
  } else if (y_direction > 530) {
    ySpeed = map(y_direction, 530, 800, 0, 255);
  }

  Serial.print(distanceInches);
  Serial.print(" ");
  Serial.print(x_direction);
  Serial.print(" ");
  Serial.println(y_direction);

  if (distanceInches < 3) { //stop if too close to border
    analogWrite(PWMRight, 0);
    analogWrite(PWMLeft, 0);
  } else if (y_direction > 530) { //forward
    digitalWrite(leftMotor1, LOW);
    digitalWrite(leftMotor2, HIGH);
    digitalWrite(rightMotor1, LOW);
    digitalWrite(rightMotor2, HIGH);
    analogWrite(PWMRight, ySpeed);
    analogWrite(PWMLeft, ySpeed);
  } else if (y_direction < 460) {  //backward
    digitalWrite(leftMotor1, LOW);
    digitalWrite(leftMotor2, HIGH);
    digitalWrite(rightMotor1, HIGH);
    digitalWrite(rightMotor2, LOW);
    analogWrite(PWMRight, ySpeed);
    analogWrite(PWMLeft, ySpeed);
  } else if (x_direction < 460) {  //left
    digitalWrite(leftMotor1, LOW);
    digitalWrite(leftMotor2, HIGH);
    digitalWrite(rightMotor1, HIGH);
    digitalWrite(rightMotor2, LOW);
    analogWrite(PWMRight, 0);
    analogWrite(PWMLeft, xSpeed);
  } else if (x_direction > 530) {  //right
    digitalWrite(leftMotor1, HIGH);
    digitalWrite(leftMotor2, LOW);
    digitalWrite(rightMotor1, LOW);
    digitalWrite(rightMotor2, HIGH);
    analogWrite(PWMRight, xSpeed);
    analogWrite(PWMLeft, 0);
  }

}

float getCurrentDistance() {
  float dist;
  float echoT;

  digitalWrite(trigPin, LOW);
  delayMicroseconds(2);
  digitalWrite(trigPin, HIGH);
  delayMicroseconds(10);
  digitalWrite(trigPin, LOW);

  echoT = pulseIn(echoPin, HIGH);
  dist = echoT / 148.0;

  return dist;
}


Midterm Proposal — Bottled Boat

My midterm project was inspired while we were talking about having water on our projects and exploding.

I want to make a boat that has an Arduino attached to it. The boat will be made of plastic material so that it doesn’t sink (maybe inside a water bottle?) and will be enclosed so wires are not expose to the water.

For the sensor, I would be using an ultrasonic sensor for distance sensing, so that the boat knows to not go any further if it is near the surrounding wall of the box. I will attach two servo motors that is attached to some propeller looking object (I’d probably make the propeller myself from plastic). These two servo motors will control the direction the boat will move in.

  1. Moving forward — left moves counter clockwise, right moves clockwise
  2. Moving backwards — left moves clockwise, right moves counterclockwise
  3. Moving left — left motor rotates
  4. Moving right — right motor rotates

Users will press different buttons to move whichever motor. For example, if you want to go left, you would press a button for the left motor and another button for the direction of the motor.

Musical Instrument

For this week’s assignment, Steven and I created a machine that plays the drum and the piano.

To create the drum, we attached pairs of chopsticks on each servo motor and super-glued it together. We used a potentiometer to control the speed of the drumming; one hit the Pringles can and another was attached to a paper ball that made noise.

Some of the problems we came across was trying to make the piezo buzzer louder and also being able to control the speed of the servo motor based on the analog input of the potentiometer.  We are still unsure about how to make the piezo buzzer louder, but we think it might be because there isn’t enough voltage going through to the buzzer.

The Tone library and Servo library were also not allowed to be in the same program, which we did not know about in the beginning, so we had one Arduino program for controlling the servo and another to control the piezo buzzer.