Our project idea has been modified a bit now and is about creating a driving experience for the user in which the user chooses a circuit in processing and uses a joystick to drive a car (made using arduino) and attempts to finish the circuit shown on their processing screens.
For this week, we managed to figure out how to make the core of our project work. We found out a way to use a joystick as an input and then send that information to processing which then communicates it to the Arduino causing a change in it which we can then use as an output. This was actually so time consuming and we had to wrap our brains around how we could make this possible but eventually we found a library on processing called Game Control Plus and G4P which allowed us to configure processing so that we can design what each button in our joystick would do and this would be stored as a separate library which we could then import into our main processing code and use within it.
Meanwhile, we also started working on our processing interface and set up the following game screens:
menu()
Contains the main menu for the game in which the player can choose to play the game or read the instructions or change settings
choose_circuit()
The playable component of the game wherein the player chooses the circuit they want to race their car in
instruction()
Details game instructions
setting()
To change game settings
gameover()
To signify end of game
Code
The following is the code that we have written till now:
For the Joystick:
int ledPin = 4;

float brightness = 0;

void setup() {
  Serial.begin(9600);
  Serial.println("0");
  pinMode(ledPin, OUTPUT);
}

void loop() {
  while (Serial.available()) {
    //get the brightness value from processing
    brightness = Serial.parseFloat();

    if (Serial.read() == '\n') {
    //turn on the LED with the given brightness
      analogWrite(ledPin, brightness);
      Serial.println(brightness);
    }
  }
}
Arduino code to test out the effect of a joystick on an LED light and toggle it on or off
import net.java.games.input.*;
import org.gamecontrolplus.*;
import org.gamecontrolplus.gui.*;

import processing.serial.*;

Serial myPort;

ControlDevice cont;
ControlIO control;

float press;

void setup()
{


  size(360, 200);
  control = ControlIO.getInstance(this);
  cont = control.getMatchedDevice("LED_Input");

  if (cont == null)
  {
    println("not today champ");
    System.exit(-1);
  }


   printArray(Serial.list());
  String portname=Serial.list()[0];
  println(portname);
  myPort = new Serial(this, portname, 9600);
  myPort.clear();
  myPort.bufferUntil('\n');
}

void draw()
{
  background(press);
  getInput();
}

public void getInput()
{
  press = map(cont.getSlider("analog").getValue(), -1, 1, 0, 255);
  println(press);
}


void serialEvent(Serial myPort) {
  String s=myPort.readStringUntil('\n');
  s=trim(s);

  //write brightness so that Arduino can use it
  myPort.write(press + "\n");
}
We also created a library called “LED_Input” using the GCP Configurator Example of the GCP Library
Housekeeping
We set up a notion page to better manage our work flow
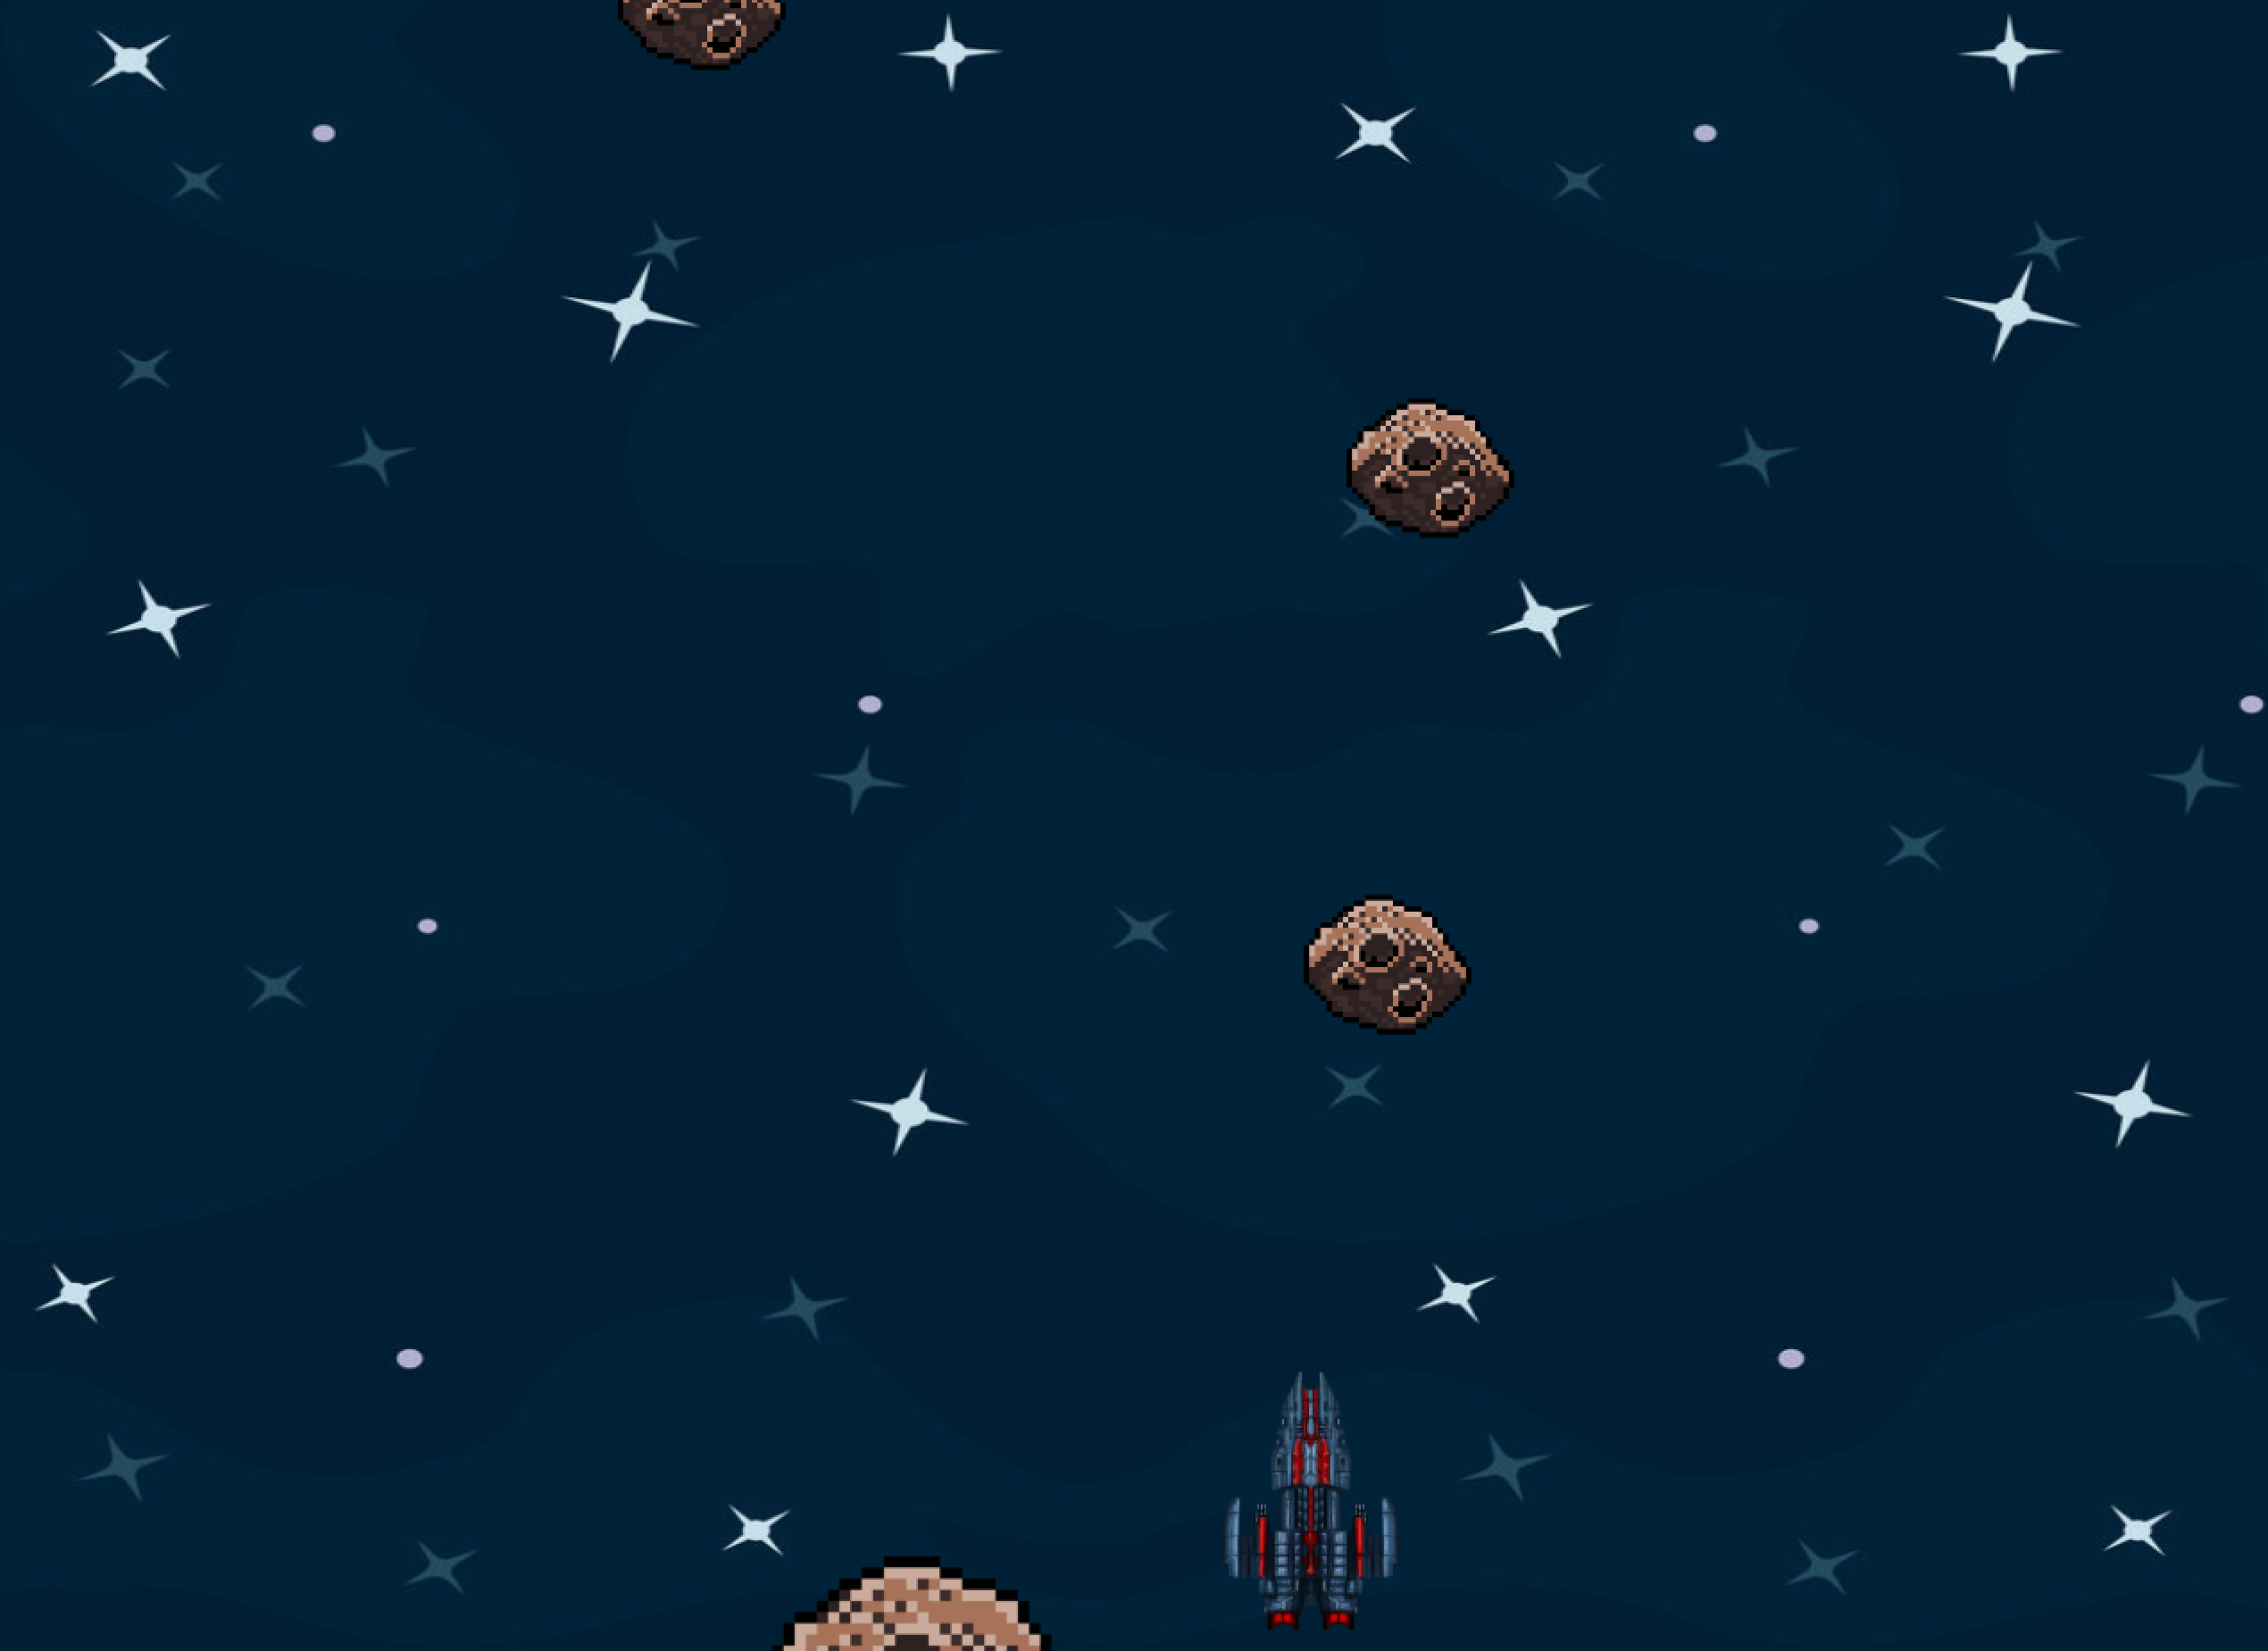
For this extra credit project, I wanted to test my knowledge of the handshake between processing and arduino and so I came up with a space shooter game. It is a pretty basic game in which the space ship has to shoot the incoming meteoroids and if it shoots 10 of them the game is over.
Processing
The processing part is basically the interface of the game, which includes the start screen, the space ship, the asteroid and the whole shooting mechanism and also the end screen.
The game starts with the start screen in which the player clicks within a box to start playing.
The code basically spawns random sizes of asteroids, that fall at random speeds too. If the player is able to shoot 10 asteroids, the game is over and the player is prompted to either restart the game or click on game over to return to the start screen.
Processing Code:
import processing.serial.*;
Serial myPort;
ArrayList<Asteroid> asteroids = new ArrayList<Asteroid>(); //gives the list of asteroids
Player player; //player object
boolean shoot = false; // ensures that the player only shoots when commanded
ArrayList<Player.Bullet> bullets = new ArrayList<Player.Bullet>(); //bullet list
float timer = 0;
float timerlength  = 4000;
boolean game_over = false;
boolean start = false;
int count = 0;
int currentButtonState = 0;
int prevButtonState = 0;
float mover = width/2;

void setup()
{
  size(1280, 960);

  imageMode(CENTER);
  //asteroids.add(new Asteroid(random(width*0.25, width*0.75), 0, int(random(1, 3)))); //initialising the list of asteroids to spawn in between the roads of the game
  player = new Player();
  printArray(Serial.list());
  String portname=Serial.list()[6];
  println(portname);
  myPort = new Serial(this,portname,9600);
  myPort.clear();
  myPort.bufferUntil('\n');

}

void draw()

{
  PImage bg;
  bg = loadImage("space.jpeg");
  bg.resize(int(width),int(height));
  background(bg); //background is the top down view of a road
  if (start == false)
  {
    textAlign(BASELINE);
  rectMode(CENTER);
  fill(255);
  stroke(230,153,0);
  rect(width/2,height/2,700,500,10);
  rect(width/2, height/2,680,480,10);

  fill(0);
  textSize(50);
  text("Welcome", 480, 410);
  fill(255);
  rect(625,580,600,100,10);
  fill(0);
  text("Click to Play", 420, 610);
  if ((mouseX >= 325 && mouseX <= 925) && (mouseY >= 530 && mouseY <= 630) && (mousePressed == true))
   {
     start = true;
   }
  }

  else{
  if(game_over == false)
  {

    Player_Mechanics();
    Asteroid_Mechanics();
    Shoot();
    Mover();

    if( millis() > timer)
    {
      asteroids.add(new Asteroid(random(width*0.25, width*0.75), 0, int(random(1, 3)))); //initialising the list of asteroids to spawn
      timerlength = random(1000,5000);
      timer = millis() + timerlength;
    }
  }

  else{
   textAlign(BASELINE);
  rectMode(CENTER);
  fill(255);
  stroke(230,153,0);
  rect(width/2,height/2,700,500,10);
  rect(width/2, height/2,680,480,10);

  fill(0);
  textSize(50);
  stroke(0);
  text("Game Over!", 420, 410);
  fill(255);
  rect(625,580,600,100,10);
  fill(0);
  text("Restart", 420, 610);
  if ((mouseX >= 325 && mouseX <= 925) && (mouseY >= 530 && mouseY <= 630) && (mousePressed == true))
   {
     game_over = false;
     count = 0;
   }

   if ((mouseX >= 325 && mouseX <= 925) && (mouseY >= 330 && mouseY <= 430) && (mousePressed == true))
   {
     start = false;
   }

  }
  }
}

void serialEvent(Serial myPort){
  String s=myPort.readStringUntil('\n');
  s=trim(s);
  if (s!=null){
    println(s);
    int values[]=int(split(s,','));
    if (values.length==3){
      currentButtonState=(int)values[0];
      prevButtonState=(int)values[1];
      mover = map(values[2], 0, 1023, player.size/2, width-player.size/2);
    }
  }
  myPort.write("\n");
}

void Player_Mechanics()
{

  player.drawPlayer();  //draws the Player on Screen

  for(int i =0; i< bullets.size(); i++)
  {

    bullets.get(i).draw_Bullet();
    bullets.get(i).shoot_Bullet();  //if bullets are present, draws them and shoots them
    if(bullets.get(i).bullet_posY_1 < 0 )
      bullets.remove(i); //removes the bullet once they are out of frame
  }


}


void Asteroid_Mechanics()
{
  for (int i = 0; i < asteroids.size(); i++)
  {
    asteroids.get(i).drawAsteroid();
    asteroids.get(i).moveAsteroid(); //draws and moves asteroids on screen
    if(asteroids.get(i).posY > height + asteroids.get(i).size)
      asteroids.remove(i);  //removes the asteroids once they are out of frame
    if( bullets.size() > 0 && asteroids.size() > 0 )
    {
      for(int j=0; j<bullets.size(); j++)
      {
        if( bullets.size() > 0 && asteroids.size() > 0 )
        {
          if(asteroids.get(i).vicinty_check(bullets.get(j).bullet_posX,bullets.get(j).bullet_posY_2))
            {
              asteroids.remove(i); //destroys the asteroid and removes it once bullet touches it
              count++;
            }
        }
      }
    }
  }
  if (count == 10){
    game_over = true;
  }
}

void keyPressed()
{
  if (key == ' ')
  {
    asteroids.add(new Asteroid(random(width*0.25, width*0.75), 0, int(random(1, 3)))); //spawns an asteroid
  }

  if (key == 'a')
  {
    player.moveLeft(); //player goes left
  }

  if (key == 'd')
  {
    player.moveRight(); //player goes right
  }

  if (key == 'f')
  {
    bullets.add(player.new Bullet(0));  //shoots bullets
  }
}

void Shoot()
{
  if (currentButtonState == 1 && prevButtonState == 0) {
    bullets.add(player.new Bullet(0));
    println("cheeky");
  }
}


void Mover()
{
  player.posX = mover;
}
class Asteroid {

  float posX;
  float posY;
  int speed = (int)random(2,6);
  int size;
  PImage asteroid;


  Asteroid(float x, float y, int s)
  {
    posX = x;
    posY = y;
    size = s*100;
    asteroid = loadImage("asteroid_brown.png");
    imageMode(CENTER);
  }

  void drawAsteroid()
  {

    asteroid.resize(size, 0);
    image(asteroid, posX, posY);  //resizes and draws the asteroid
  }

  void moveAsteroid()
  {
    posY += speed;  //moves the asteroid
  }

  boolean vicinty_check(float x, float y)
  {
    if ((x < posX+size/2 && x > posX-size/2) && (y < posY+size/2 && y > posY-size/2))  //checks if anything exists in the vicintiy of the asteroid's body
      return true;
    else
      return false;
  }
}
class Player {

  public float posX = width/2;
  public float posY = height-100;
  PImage player;
  int movement=20;
  int size =100;


  Player()
  {

    player = loadImage("Spaceship_tut.png");
    imageMode(CENTER);
  }


  void drawPlayer()
  {
    player.resize(size, 0);
    pushMatrix();
    translate(posX, posY);
    //rotate(radians(270));
    image(player, 0, 0);
    popMatrix(); //resizes and rotates the image of the player on screen so that it is appropriate for the game
  }

  void moveLeft()
  {

    if (posX > size/2)
      posX -= movement; //player moves left
  }

  void moveRight()
  {

    if (posX < width-size/2)
      posX += movement; //player moves right
  }


  class Bullet {    //nested bullet class in player class

    float  bullet_posX = posX ;
    float  bullet_posY_1 = posY - size/2;
    float  bullet_size = size * 0.1;
    float  bullet_posY_2 = posY - size/2 - bullet_size;
    int bullet_speed = 20;


    Bullet(float y)
    {
      bullet_posY_1 -= y;
      bullet_posY_2 -= y;    //assigns intial position to bullet
    }
    void draw_Bullet()
    {
      stroke(102,255,102);
      strokeWeight(6);
      line(bullet_posX, bullet_posY_1, bullet_posX, bullet_posY_2);  //draws a line for a bullet
    }

    void shoot_Bullet()

    {
      bullet_posY_1 -= bullet_speed;
      bullet_posY_2 -= bullet_speed;  //moves bullet
    }
  }
}
Game Display
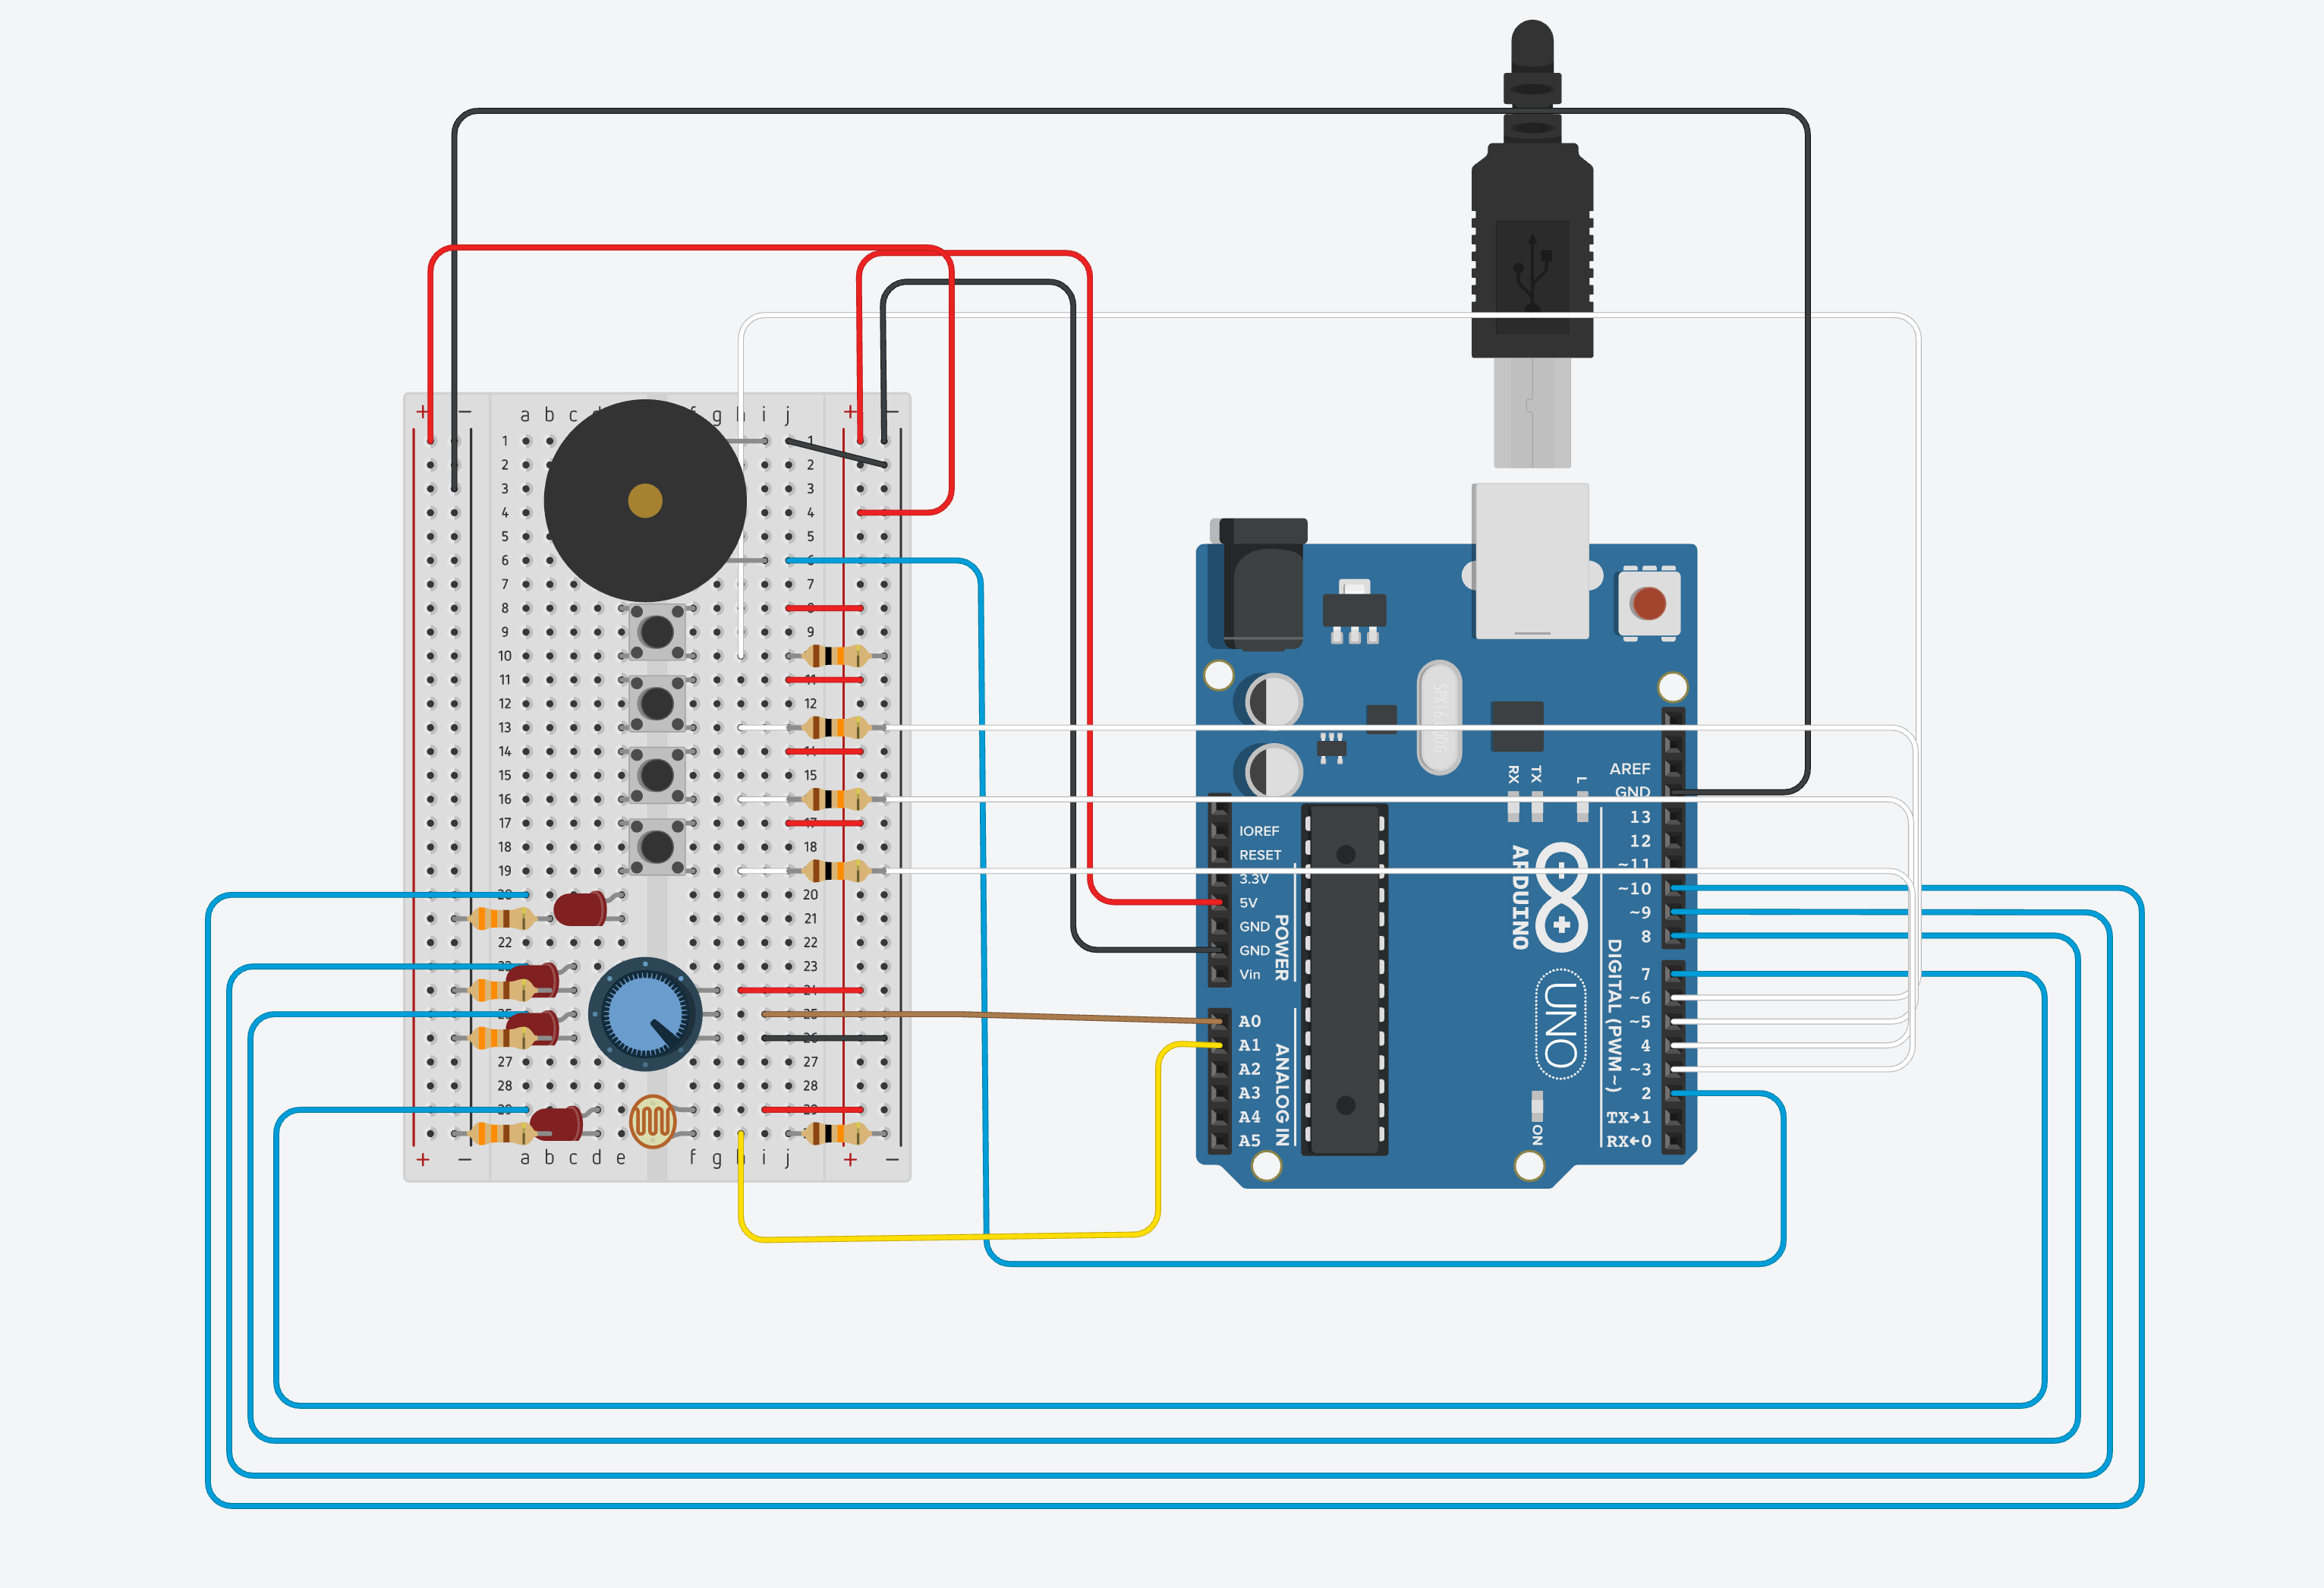
Arduino
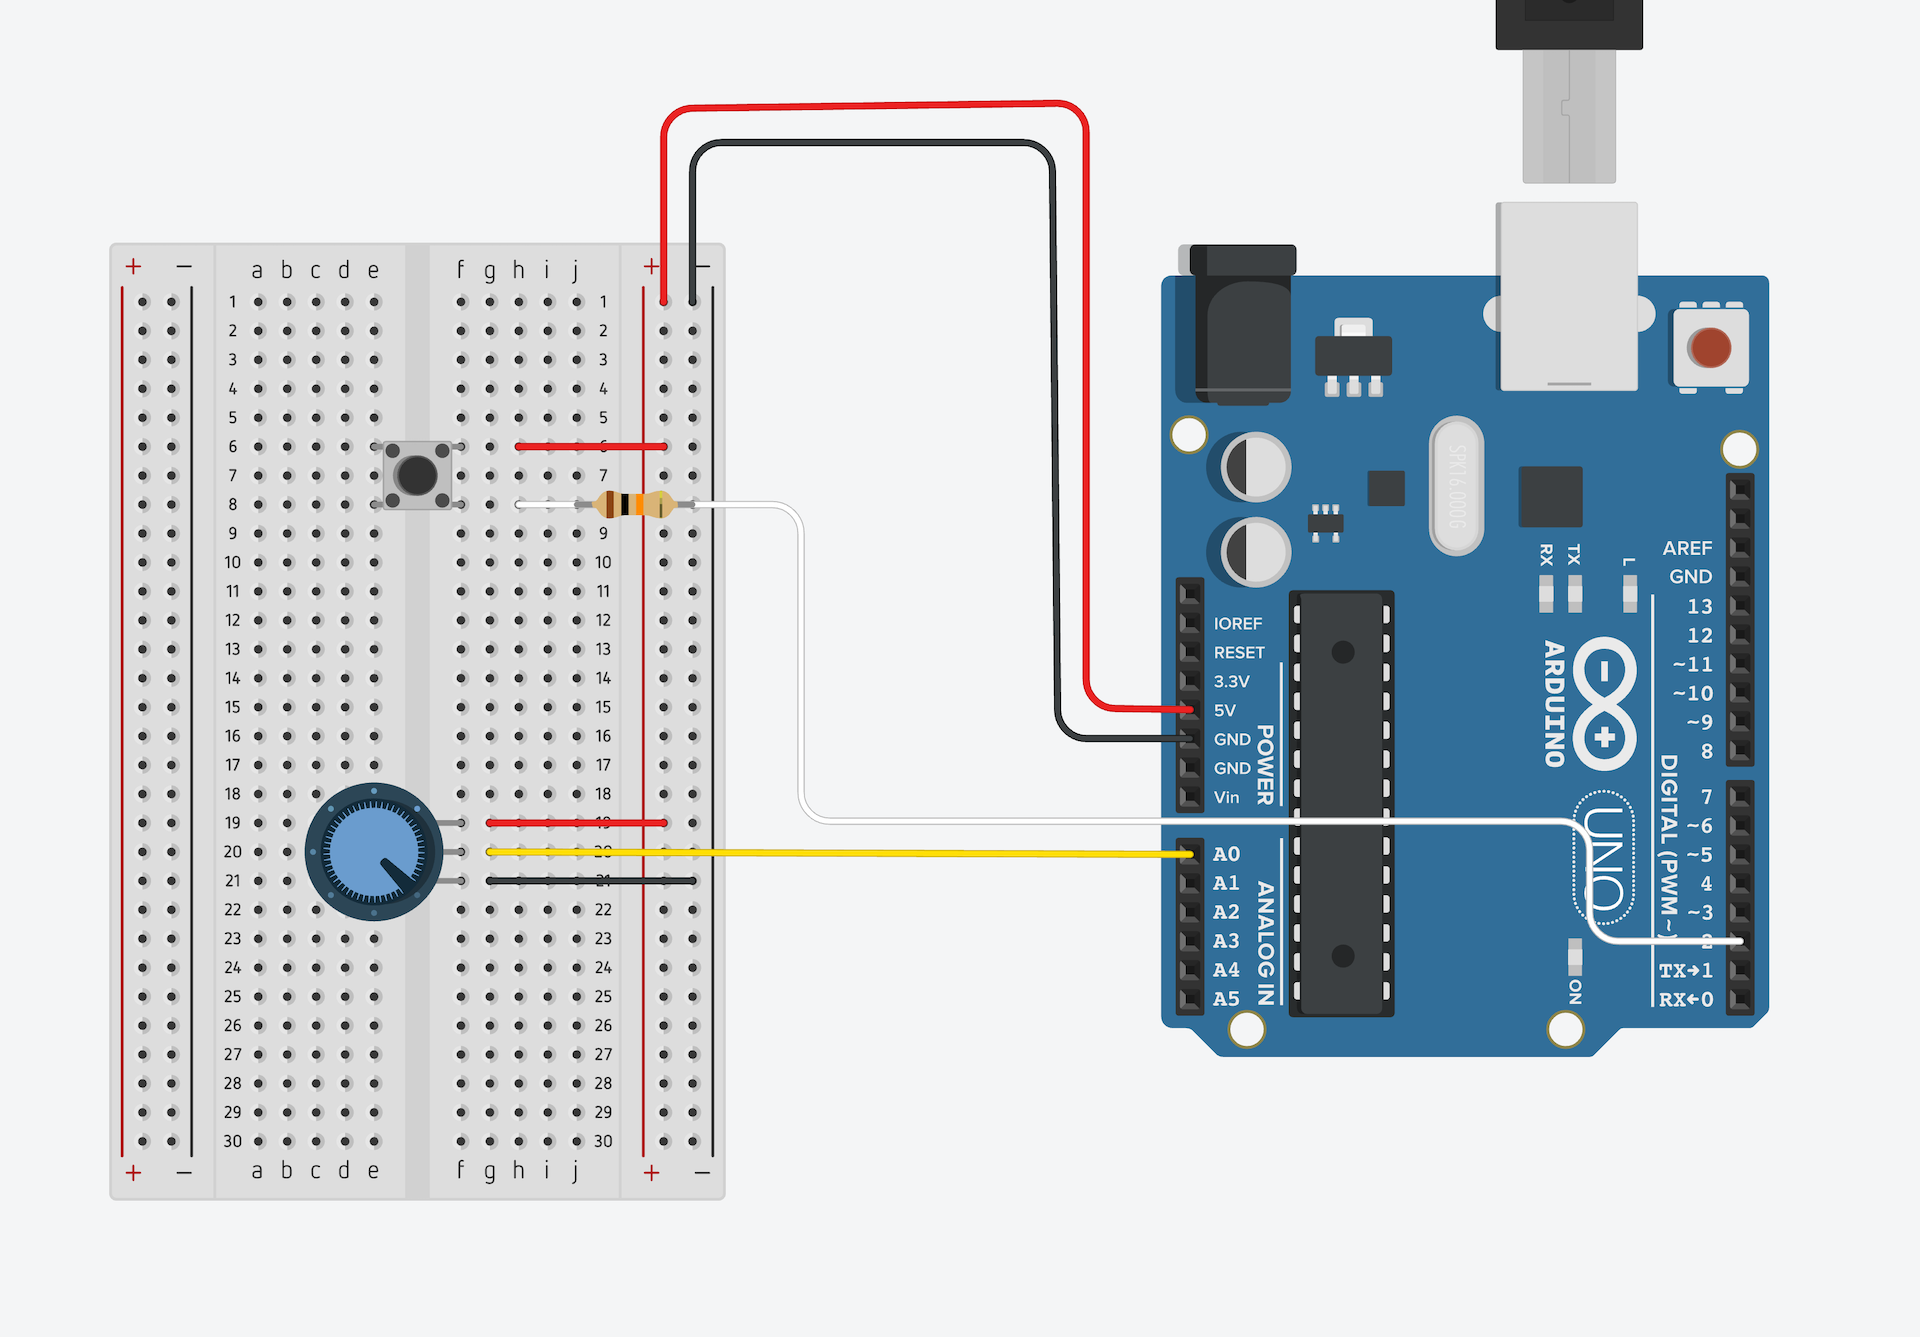
The Arduino part involves the controls for the game in which the potentiometer is used to move the spaceship around and the push button is used to shoot the missiles from the spaceship.
Arduino Code:
int buttonPin = 2;
int prevButtonState = LOW;

void setup() {
  pinMode(buttonPin, INPUT);
  Serial.begin(9600);
  Serial.println("0,0");
}

 void loop() {
  while (Serial.available()) {
    if (Serial.read() == '\n') {
      int currentButtonState = digitalRead(buttonPin);
      delay(1);
      Serial.print(currentButtonState);
      Serial.print(',');
      Serial.print(prevButtonState);
      Serial.print(',');
      prevButtonState = currentButtonState;
      int mover = analogRead(A0);
      delay(1);
      Serial.println(mover);
    }
  }

  //Serial.println(sensor);

}
Circuit:
Arduino Circuit
Videos:
This is the video of me showing the way the game works:
This is a video of me actually playing the game:
Difficulties:
In certain instances, I felt that the button was not responding in the way I wanted it to but I believe that is primarily because I hadn’t plugged it well or the communication of information was slow.
Overall:
This project was actually really fun and it made me feel so cool to create my own joystick for my game. This has also motivated me quite a lot for my final project which I am really looking forward to!
For our final project, we came up with around 5 ideas of how we could incorporate Arduino and Processing to make something cool and interesting! We still haven’t zeroed down on what to choose because we feel that we need to discuss it first with Professor Aaron to see which one is the perfect balance of feasibility and creativity but the following list is ordered according to which one we are looking forward to from our most to our not so much.
A First Person Racing Game
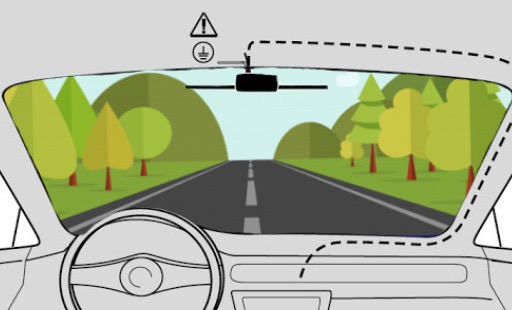
This is the one project that we are most excited about. For this project, we intend to use Arduino and Processing to create the experience of racing a F1 car for the user. We intend to use the Arduino as an input and output piece in which we could use the buttons, distance sensors, potentiometers to drive the car around and also use the DC motor and wheels to construct a car-like object on the screen which would replicate the car that will be made on our processing interface. We plan on using the processing as a platform to welcome the users into the game and display the screen in such a way that they are inside a car and are driving it (see picture below). The upcoming scenery seen through the window screen in the car can keep changing to create the illusion of a race.
A prospective interface for the game
We were also thinking of converting this into a spaceship game in which the player rides a spaceship and avoids meteorites and is again, a first person experience!
A Horror Game
In our horror game, we thought of using the photo-resistor in Arduino to work in tangent with a flashlight that we imagined our character would be using to explore our horror landscape in processing. We also thought of using the LED lights to signal if there are ghosts nearby (red lights to indicate this) or batteries for the flash light (green lights for this). This idea was inspired from Five Nights at Freddy’s basically.
A Pin Ball based game
Basically, a game that works the classic pin ball game we all know and love except that the buttons are on arduino and the interface is in processing. We could then use the potentiometer to control the switches on either side to hit the ball.
An “Episode” based RPG interactive movie/game
This one is more like a movie than a game in which we first plan on making separate room-like compartments using cardboard and then using Arduino and Processing to tell a story. This story would involve interactivity in which lets say the user presses a button to lit up a room and then that signals processing to inform the user of this other room that he can check out and we can craft a story using this.
Minigame Collection
This is basically a collection of minigames in which we plan on including games like Smack the Mole and a memory game in which you have to remember the sequence of LED lights and a bunch of other minigames.
void setup() {
  Serial.begin(9600);
  Serial.println("0"); //CRITICAL sends a start of communication between arduino and processing
}

void loop() {
  while (Serial.available()) {
   if (Serial.read() == '\n') {
      int sensor = analogRead(A0);
      delay(1);
      Serial.println(sensor);
   }
 }
}
Processing Code:
import processing.serial.*;
Serial myPort;
int xPos=0;


void setup(){
  size(960,720);
  printArray(Serial.list());
  String portname=Serial.list()[5];
  println(portname);
  myPort = new Serial(this,portname,9600);
  myPort.clear();
  myPort.bufferUntil('\n');
}

void draw(){
  background(255);
  ellipse(xPos,height/2,30,30);
}

// there can only one serial connection
void serialEvent(Serial myPort){ //callback function; if there is anything in the serial, this function gets called
  String s=myPort.readStringUntil('\n');
  s=trim(s);
  if (s!=null){
    println(s);
    int value = int(s);
    if (value>=0){
      xPos=(int)map(value,0,1023,0, width);
    }
  }
  myPort.write("\n");
}
Comments: I feel like this was a pretty simple exercise and the one part where I was stuck was to figure out how to get the processing to communicate back with the arduino but it didnt take much time as all I had t o include was the myPort.write(“\n”); line
Second Exercise
Arduino Code:
int brightness = 0;

void setup() {
  Serial.begin(9600);
  Serial.println("0"); //CRITICAL sends a start of communication between arduino and processing
  pinMode(3, OUTPUT);
}

void loop() {
  while (Serial.available()) {
      brightness = Serial.parseInt();
   if (Serial.read() == '\n') {
      analogWrite(3, brightness);
      int sensor = analogRead(A0);
      delay(1);
      Serial.println(sensor);
   }
 }


}
Processing Code:
import processing.serial.*;
Serial myPort;
int xPos = 0;
int brightness = 0;


void setup(){
  size(960,720);
  printArray(Serial.list());
  String portname=Serial.list()[5];
  println(portname);
  myPort = new Serial(this,portname,9600);
  myPort.clear();
  myPort.bufferUntil('\n');
}

void draw(){
  background(255);
  ellipse(xPos,height/2,30,30);
  brightness = (int)map(mouseX, 0, width, 0, 255);
}
// there can only one serial connection
void serialEvent(Serial myPort){ //callback function; if there is anything in the serial, this function gets called
  String s=myPort.readStringUntil('\n');
  s=trim(s);
  if (s!=null){
    println(s);
    int value = int(s);
    if (value>=0){
      xPos=(int)map(value,0,1023,0, width);
    }
  }
  myPort.write(brightness + "\n");
}
Comments: Following up from the first exercise, this was much easier because I retained the code of the first one which made the communication much easier.
Third Exercise
Arduino Code:
int brightness = 0;
int previousValue = 0;
int moving = 0;
int onOff = 0;

void setup() {
  Serial.begin(9600);
  Serial.println("0");
  pinMode(3, OUTPUT);

//  pinMode(5, OUTPUT);
}

void loop() {
  while (Serial.available()) {
    onOff = Serial.parseInt();
    if (Serial.read() == '\n') {


      int sensor = analogRead(A0);
      delay(1);


      Serial.print(sensor);
      Serial.print(",");
      Serial.println(previousValue);

      previousValue = sensor;


      if (onOff == 1){
        analogWrite(3, 255);
      }
      else{
        analogWrite(3, 0);
      }
    }
  }
}
Processing Code:
PVector velocity;
PVector gravity;
PVector position;
PVector acceleration;
PVector wind;
float drag = 0.99;
float mass = 50;
float hDampening;
int Mover = 0;

import processing.serial.*;
Serial myPort;
int wind_speed;

int xPos=0;
int yPos=0;
boolean onOff=false;
//boolean onOff2=false;

void setup() {
  size(640,360);
  printArray(Serial.list());
  String portname=Serial.list()[5];
  println(portname);
  myPort = new Serial(this,portname,9600);
  myPort.clear();
  myPort.bufferUntil('\n');

  noFill();
  position = new PVector(width/2, 0);
  velocity = new PVector(0,0);
  acceleration = new PVector(0,0);
  gravity = new PVector(0, 0.5*mass);
  wind = new PVector(0,0);
  hDampening=map(mass,15,80,.98,.96);
}

void draw() {
  background(255);
  if (!keyPressed){
    wind.x=wind_speed;
    velocity.x*=hDampening;
  }
  applyForce(wind);
  applyForce(gravity);
  velocity.add(acceleration);
  velocity.mult(drag);
  position.add(velocity);
  acceleration.mult(0);
  ellipse(position.x,position.y,mass,mass);
  if (position.y > height-mass/2) {
      velocity.y *= -0.9;  // A little dampening when hitting the bottom
      position.y = height-mass/2;
    }


  println(velocity.y);
}

void applyForce(PVector force){
  // Newton's 2nd law: F = M * A
  // or A = F / M
  PVector f = PVector.div(force, mass);
  acceleration.add(f);
}

void keyPressed(){
  if (keyCode==LEFT){
    wind.x=-1;
  }
  if (keyCode==RIGHT){
    wind.x=1;
  }
  if (key==' '){
    mass= random(15,80);
    position.y=-mass;
    velocity.mult(0);
  }
}

void serialEvent(Serial myPort){
  String s=myPort.readStringUntil('\n');
  s=trim(s);
  if (s!=null){
    //println(s);
    int values[] = int(split(s,','));


    if (values.length == 2){
      if (values[0] > values[1]){
        wind_speed = 20;
      }
      else if (values[0] < values[1]){
        wind_speed = -20;
      }
      else if (values[1] == values[1]){
        wind_speed = 0;
      }
    }

  }
    if (round(position.y + mass) >= height && round(velocity.y) != 0){
    onOff = true;
    }
    else{
      onOff = false;
    }

    myPort.write(int(onOff) + "\n");

}
Comments: This was by far the toughest of the lot and actually took Maaz and me a long time to figure this out but ultimately we decided to do it by using one sensor to send two values from arduino to processing, working on the mechanics of the previous Button state as explained by professor Aaron. For the LED, we just performed a check for the position and velocity of the ball to determine whether to turn on the LED or not. It is also important to note that there can be discrepancies based on the individual components on the board as both me and Maaz would often get differing results although our wiring and codes were similar.
While thinking about this assignment, I wanted to make something tangible that would actually feel like musical instrument and act like one too. Initially, I gravitated towards trying to make a sort of MIDI player because I wanted to press a button that would play a beat and another one to layer the first beat with another beat (sort of like the Groovepad App) but after many failed attempts I realized that it was quite hard to create a harmony using the buzzer and so eventually I had to abandon the idea. However, I kept up with the spirit and then thought of mimicking an electric bass guitar using the Arduino and I feel I was somewhat able to do it but not completely because of certain difficulties which I will be explaining later on.
🤩 Implementation
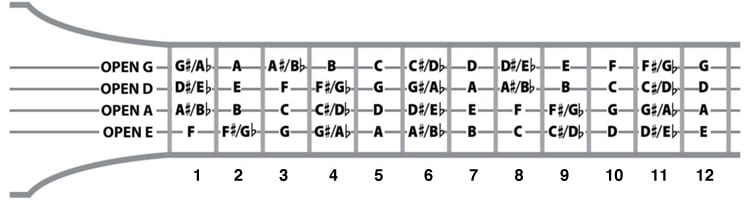
So the way I saw it, the electric bass seemed to be the most convenient instrument to implement through the Arduino as all it consists of is 4 strings and 12 sections along with the sound of just playing the strings. Obviously, mimicking the strumming patterns of the bass would be unfeasible or too time taking for this assignment but at least I could mimic the act of playing the individual notes. And I did so by first storing the notes in a 2D array based on how they are arranged in a bass guitar (see image below) and then having the four buttons mimic the four strings and using the potentiometer as a tool to change between sections. For added ease, I also added LED lights that would turn on when you are in a particular section so that you could get the experience of playing notes on a bass. Basically I replace the act of putting your finger on the string with pressing a button and then choosing a note by moving your finger along the string with choosing a note by turning a potentiometer.
Bass Notes
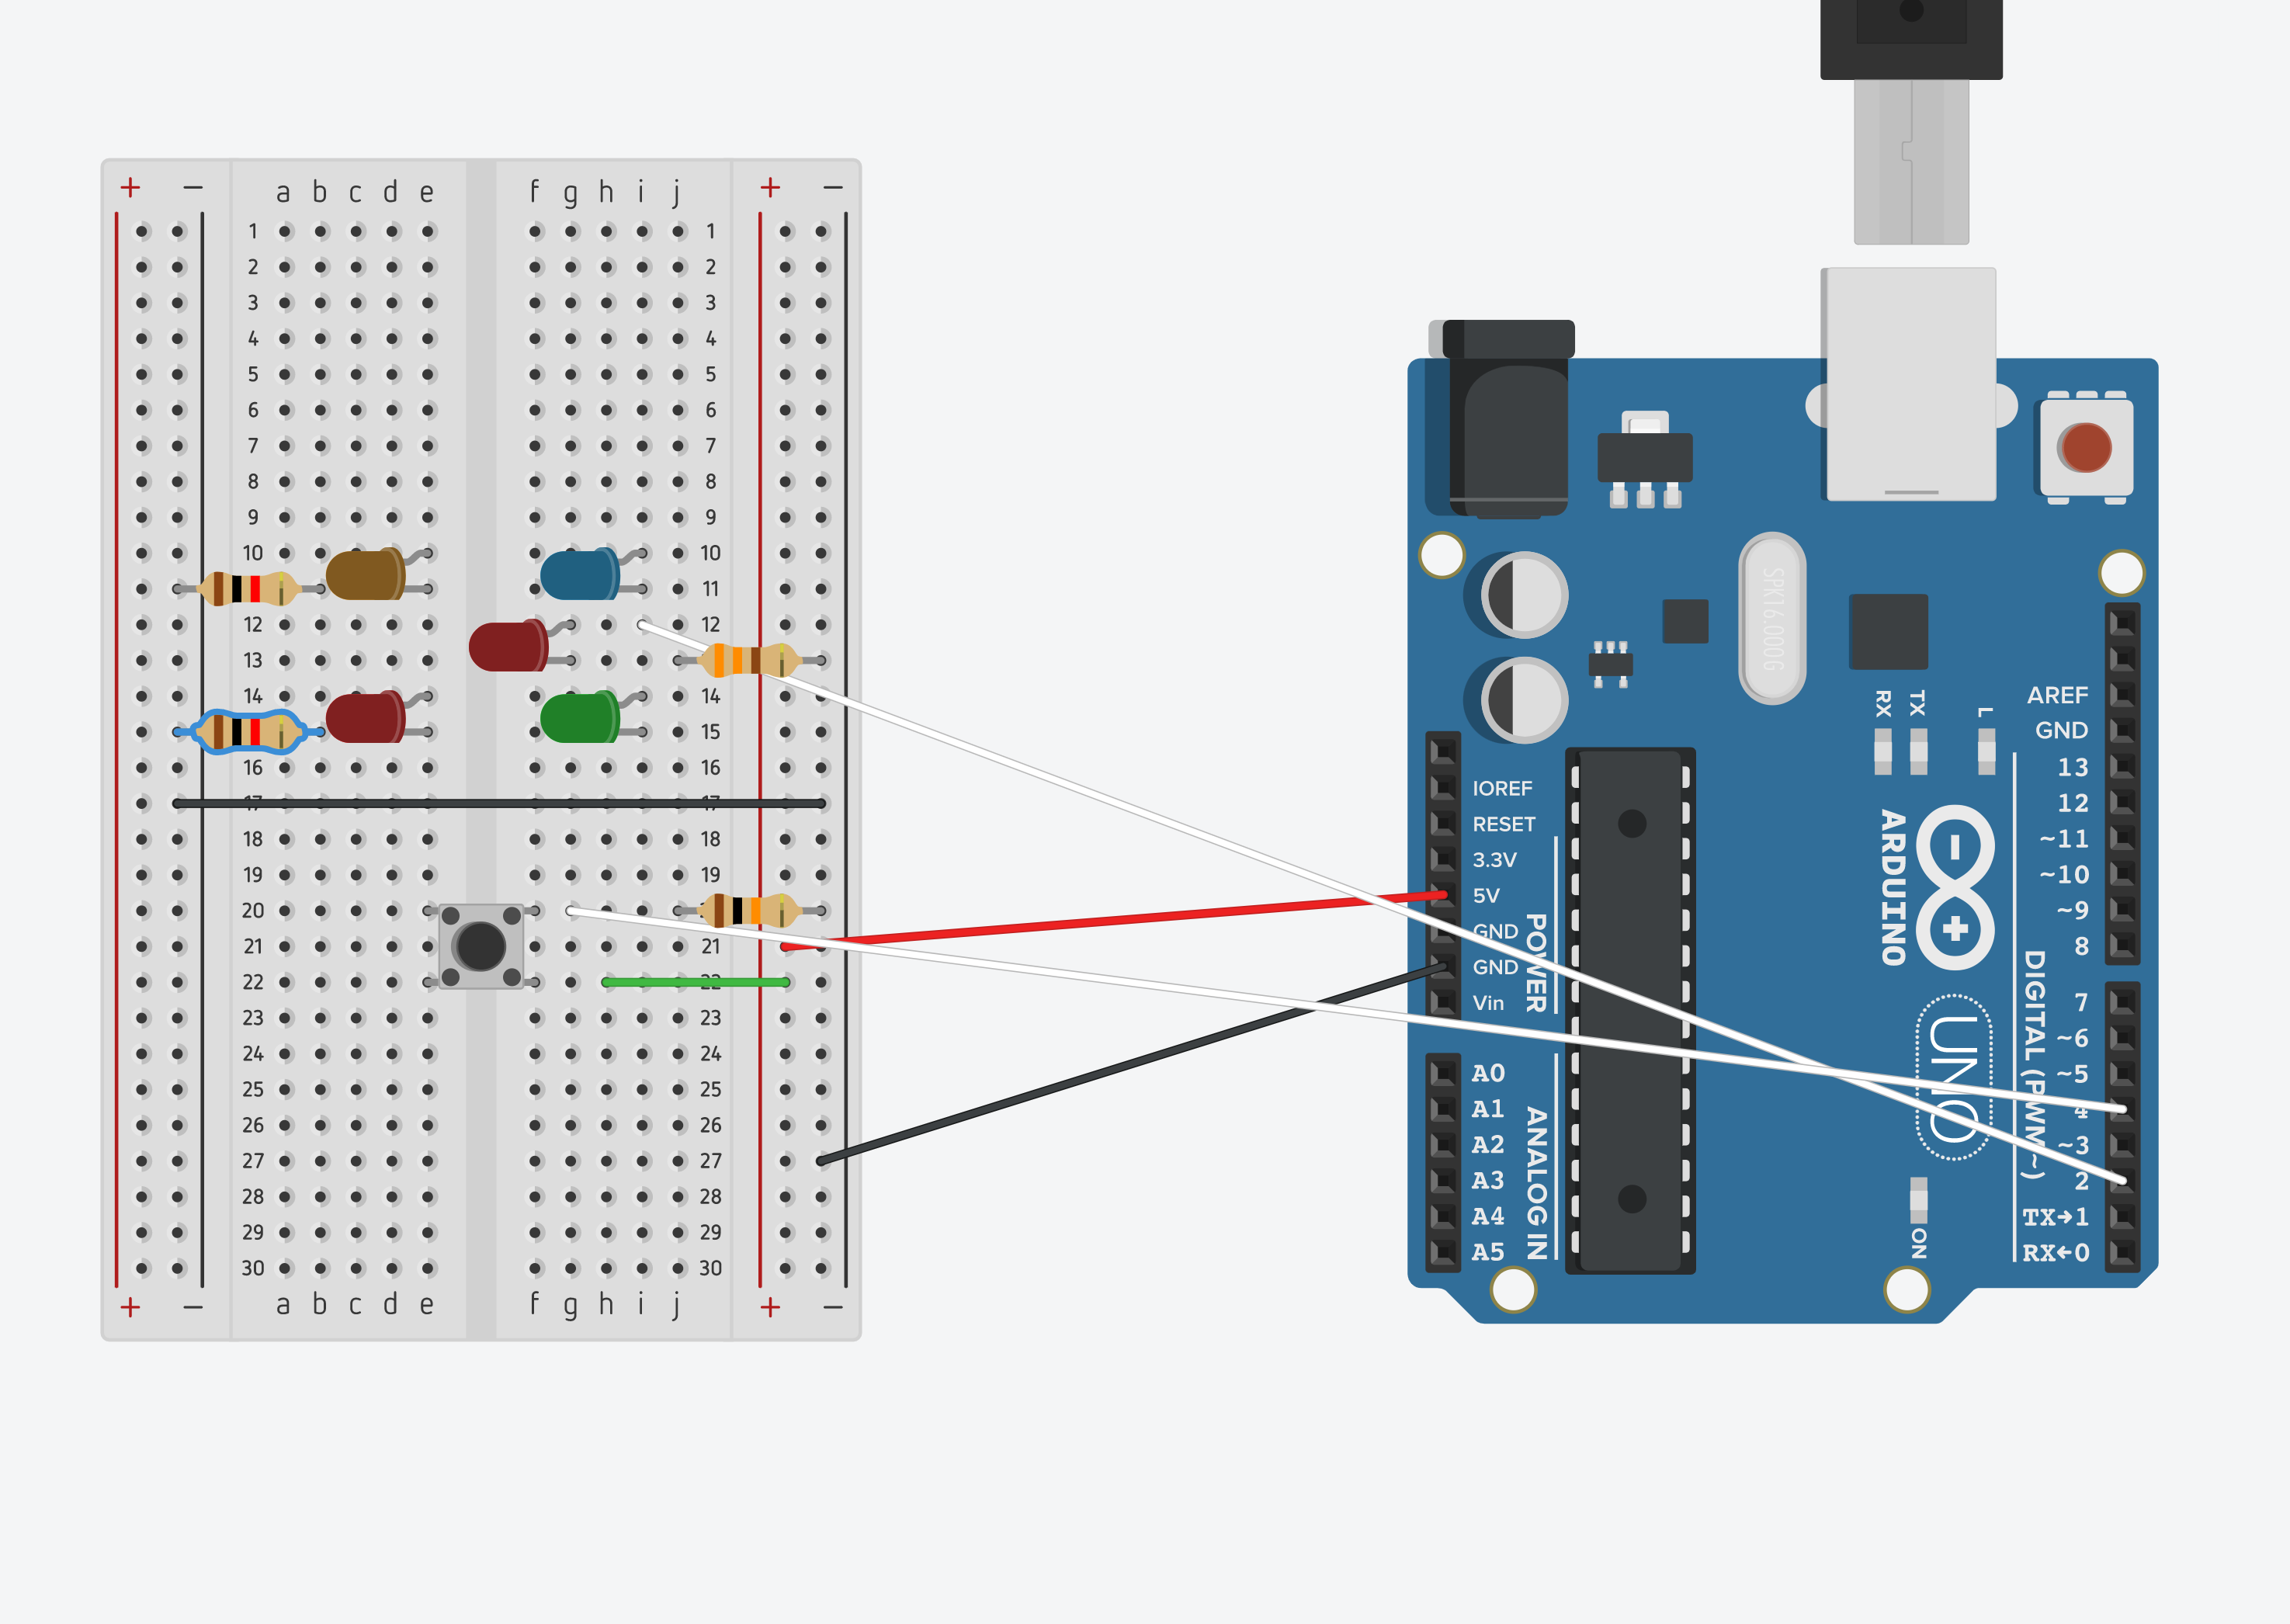
This was the circuitry involved to implement this assignment
As you can see there are four LEDs involved with the one connected to the 7th Pin signifying that this is the open string being played on the bass. The LED connected to 8th pin is for strings from 1-4 and the one connected to the 9th Pin is for strings from 5-8. The last LED is for strings from 9-12. Initially I wanted to have a separate LED for each string but this was not possible due to the small size of the board.
There are four buttons connected that operate as the strings
A potentiometer to change between notes within a string.
A buzzer that emits sound.
A photo-resistor (of which I will talk in the difficulties section).
The code:
#include "pitches.h"

const int NO_PINS = 4;
const int NO_BUTTONS = 4;
const int STRINGS = 4;
const int SECTIONS = 13;
const int BUZZER_PIN = 2;

int notes[STRINGS][SECTIONS] = {NOTE_E5, NOTE_F5, NOTE_FS5, NOTE_G5, NOTE_GS5, NOTE_A5, NOTE_AS5, NOTE_B5, NOTE_C6, NOTE_CS6, NOTE_D6, NOTE_DS6, NOTE_E6,
                          NOTE_A4, NOTE_AS4, NOTE_B4, NOTE_C4, NOTE_CS4, NOTE_D4, NOTE_DS4, NOTE_E4, NOTE_F4, NOTE_FS4, NOTE_G4, NOTE_GS4, NOTE_A4,
                            NOTE_D3, NOTE_DS3, NOTE_E3, NOTE_F3, NOTE_FS3, NOTE_G3, NOTE_GS3, NOTE_A3, NOTE_AS3, NOTE_B3, NOTE_C3, NOTE_CS3, NOTE_D3,
                          NOTE_G2, NOTE_GS2, NOTE_A2, NOTE_AS2, NOTE_B2, NOTE_C2, NOTE_CS2, NOTE_D2, NOTE_DS2, NOTE_E2, NOTE_F2, NOTE_FS2, NOTE_G2 };   // THE NOTES AS ON THE BASS

int whichNote = 9;
int buttonPins[NO_BUTTONS] = {3,4,5,6};
int ledPins[NO_PINS] = {7,8,9,10};
int ledSwitches[NO_PINS];
int currentButtonState[NO_BUTTONS];
int previousButtonState[NO_BUTTONS];
int whichString;

void setup() {
  Serial.begin(9600);

  for(int i = 0; i< NO_PINS; i++)
  {
  pinMode(ledPins[i], OUTPUT);   //SETTING OUTPUT PINS
  }

  for(int i = 0; i< NO_BUTTONS; i++)
  {
  pinMode(buttonPins[i], INPUT);  //SETTING INPUT PINS
  }

  for(int i = 0; i< NO_BUTTONS; i++)
  {
  previousButtonState[i] = 0;  //SETTING ALL PREVIOUS BUTTONS TO OFF
  }


void loop() {


  int knobValue = analogRead(A0);
  int whichSection = map(knobValue, 0, 1023, 0, 12);
 // SECTION SPECIFIC LIGHTING OF LEDs
  if(whichSection == 0){
    ledSwitches[0] = 1;
    ledSwitches[1] = 0;
    ledSwitches[2] = 0;
    ledSwitches[3] = 0;
  }
  if(whichSection > 0 && whichSection < 5){
    ledSwitches[0] = 0;
    ledSwitches[1] = 1;
    ledSwitches[2] = 0;
    ledSwitches[3] = 0;
  }
  if(whichSection > 4 && whichSection < 9){
    ledSwitches[0] = 0;
    ledSwitches[1] = 0;
    ledSwitches[2] = 1;
    ledSwitches[3] = 0;
  }
  if(whichSection > 8 && whichSection < 13){
    ledSwitches[0] = 0;
    ledSwitches[1] = 0;
    ledSwitches[2] = 0;
    ledSwitches[3] = 1;
  }

  for (int i =0; i<NO_PINS; i++)
  {
    digitalWrite(ledPins[i],ledSwitches[i]);
  }


// SWITICHING THE BUTTON ON OR OFF TO OBTAIN THE STRING

  for(int i = 0; i< NO_BUTTONS; i++)
  {
  currentButtonState[i] = digitalRead(buttonPins[i]);
  Serial.println(currentButtonState[i]);
    if (currentButtonState[i] == 1 && previousButtonState[i] == 0){
      whichString = i;
//    tone(BUZZER_PIN, notes[whichString][whichSection], 400);      OPTION 2
//    delay(1);
  }
  previousButtonState[i] = currentButtonState[i];
  }


  int volumeValue = analogRead(A1);    //ATTEMPT AT MANIPULATING VOLUME
  int pwm = map(volumeValue, 54, 970, 0, 125);

  unsigned long currentTime = millis();


    tone(BUZZER_PIN, notes[whichString][whichSection], 50);
    delay(1);    //                                                 OPTION 1
    //analogWrite(11,pwm);
 // }

}
🧐 Process
While coding this project, I was confused on two design choices available to me. In the first one, the notes would be continuous and would not stop but just change. In the second one, the notes could only be heard if the button was pressed. In the end I could not make up by mind and so decided to showcase both of them instead 🙂
👀 Demo
This is the youtube video where I go in depth about the project (sorry for the length!).
😅 Difficulties and what’s next
At first, along with the whole bass guitar idea, I had also decided to add a feature in which you could control the volume of the tone being played out and after seeing a bunch of YouTube videos on it, I thought I would give it a shot. However, even after multiple events I was not able to implement it. I had thought of using the photo-resistor for this but either the wires would come along the way or the lights were not easy to manoeuvre, something or the other would not let the whole thing happen smoothly.
Another big issue was the smoothening of the tone heard, as is evident from the video, when I try the first method, the 8bit tune can get really annoying after sometime and so I would want to figure out how I can eliminate that, whenever I work on this project again.
🥳 But overall, it was quite fun and learned a lot about the tone reference and understood the concepts of the buttons, LED, potentiometer and even the electricity flowing in the circuit, much better!
The experiences I had with the LED light in class reminded me of the character of HAL 9000 from the classic film ‘2001: A Space Odyssey’ and so for this week’s project I wanted to do something surrounding that.
After spending quite sometime brainstorming, I decided to use the LEDS and the digital and analog sensors to make an interactive movie wherein the player/audience defeats HAL and sabotages his attempts to conquer the world.
Implementation
In order to implement this idea, I decided to play out a famous dialogue from the movie which HAL says in the climax and convert it into Morse so that the dialogue can be communicated through the LED and that it would appear as if HAL is saying this. And then in order to show that HAL is attempting to destroy the world, I decided to show a sequence of LEDs light up as if HAL has now gained access to nuclear codes or something and then the player has to turn off the LEDs using a potentiometer to beat HAL. This entire sequence from the narration of the dialogue by HAL and his defeat at the hands of player commences when the player presses the button and can be played over and over again.
The defeat of HAL is signified by his LED turning dimmer and finally off (showing that he dead).
Phases of the Project
In order to make things easier for me, I decided to test everything out in tinkercad and then once I was sure everything worked the way i wanted it to, i implemented it on my Arduino UNO.
So the phases of the project were as follows:
Morse Code
For this I searched up a morse code letter translator (see image) and represented the dots with short bursts of brightness on the LEDs and the dashes as long bursts.
Morse Code translator
The dialogue to be converted was “I am sorry Dave.”
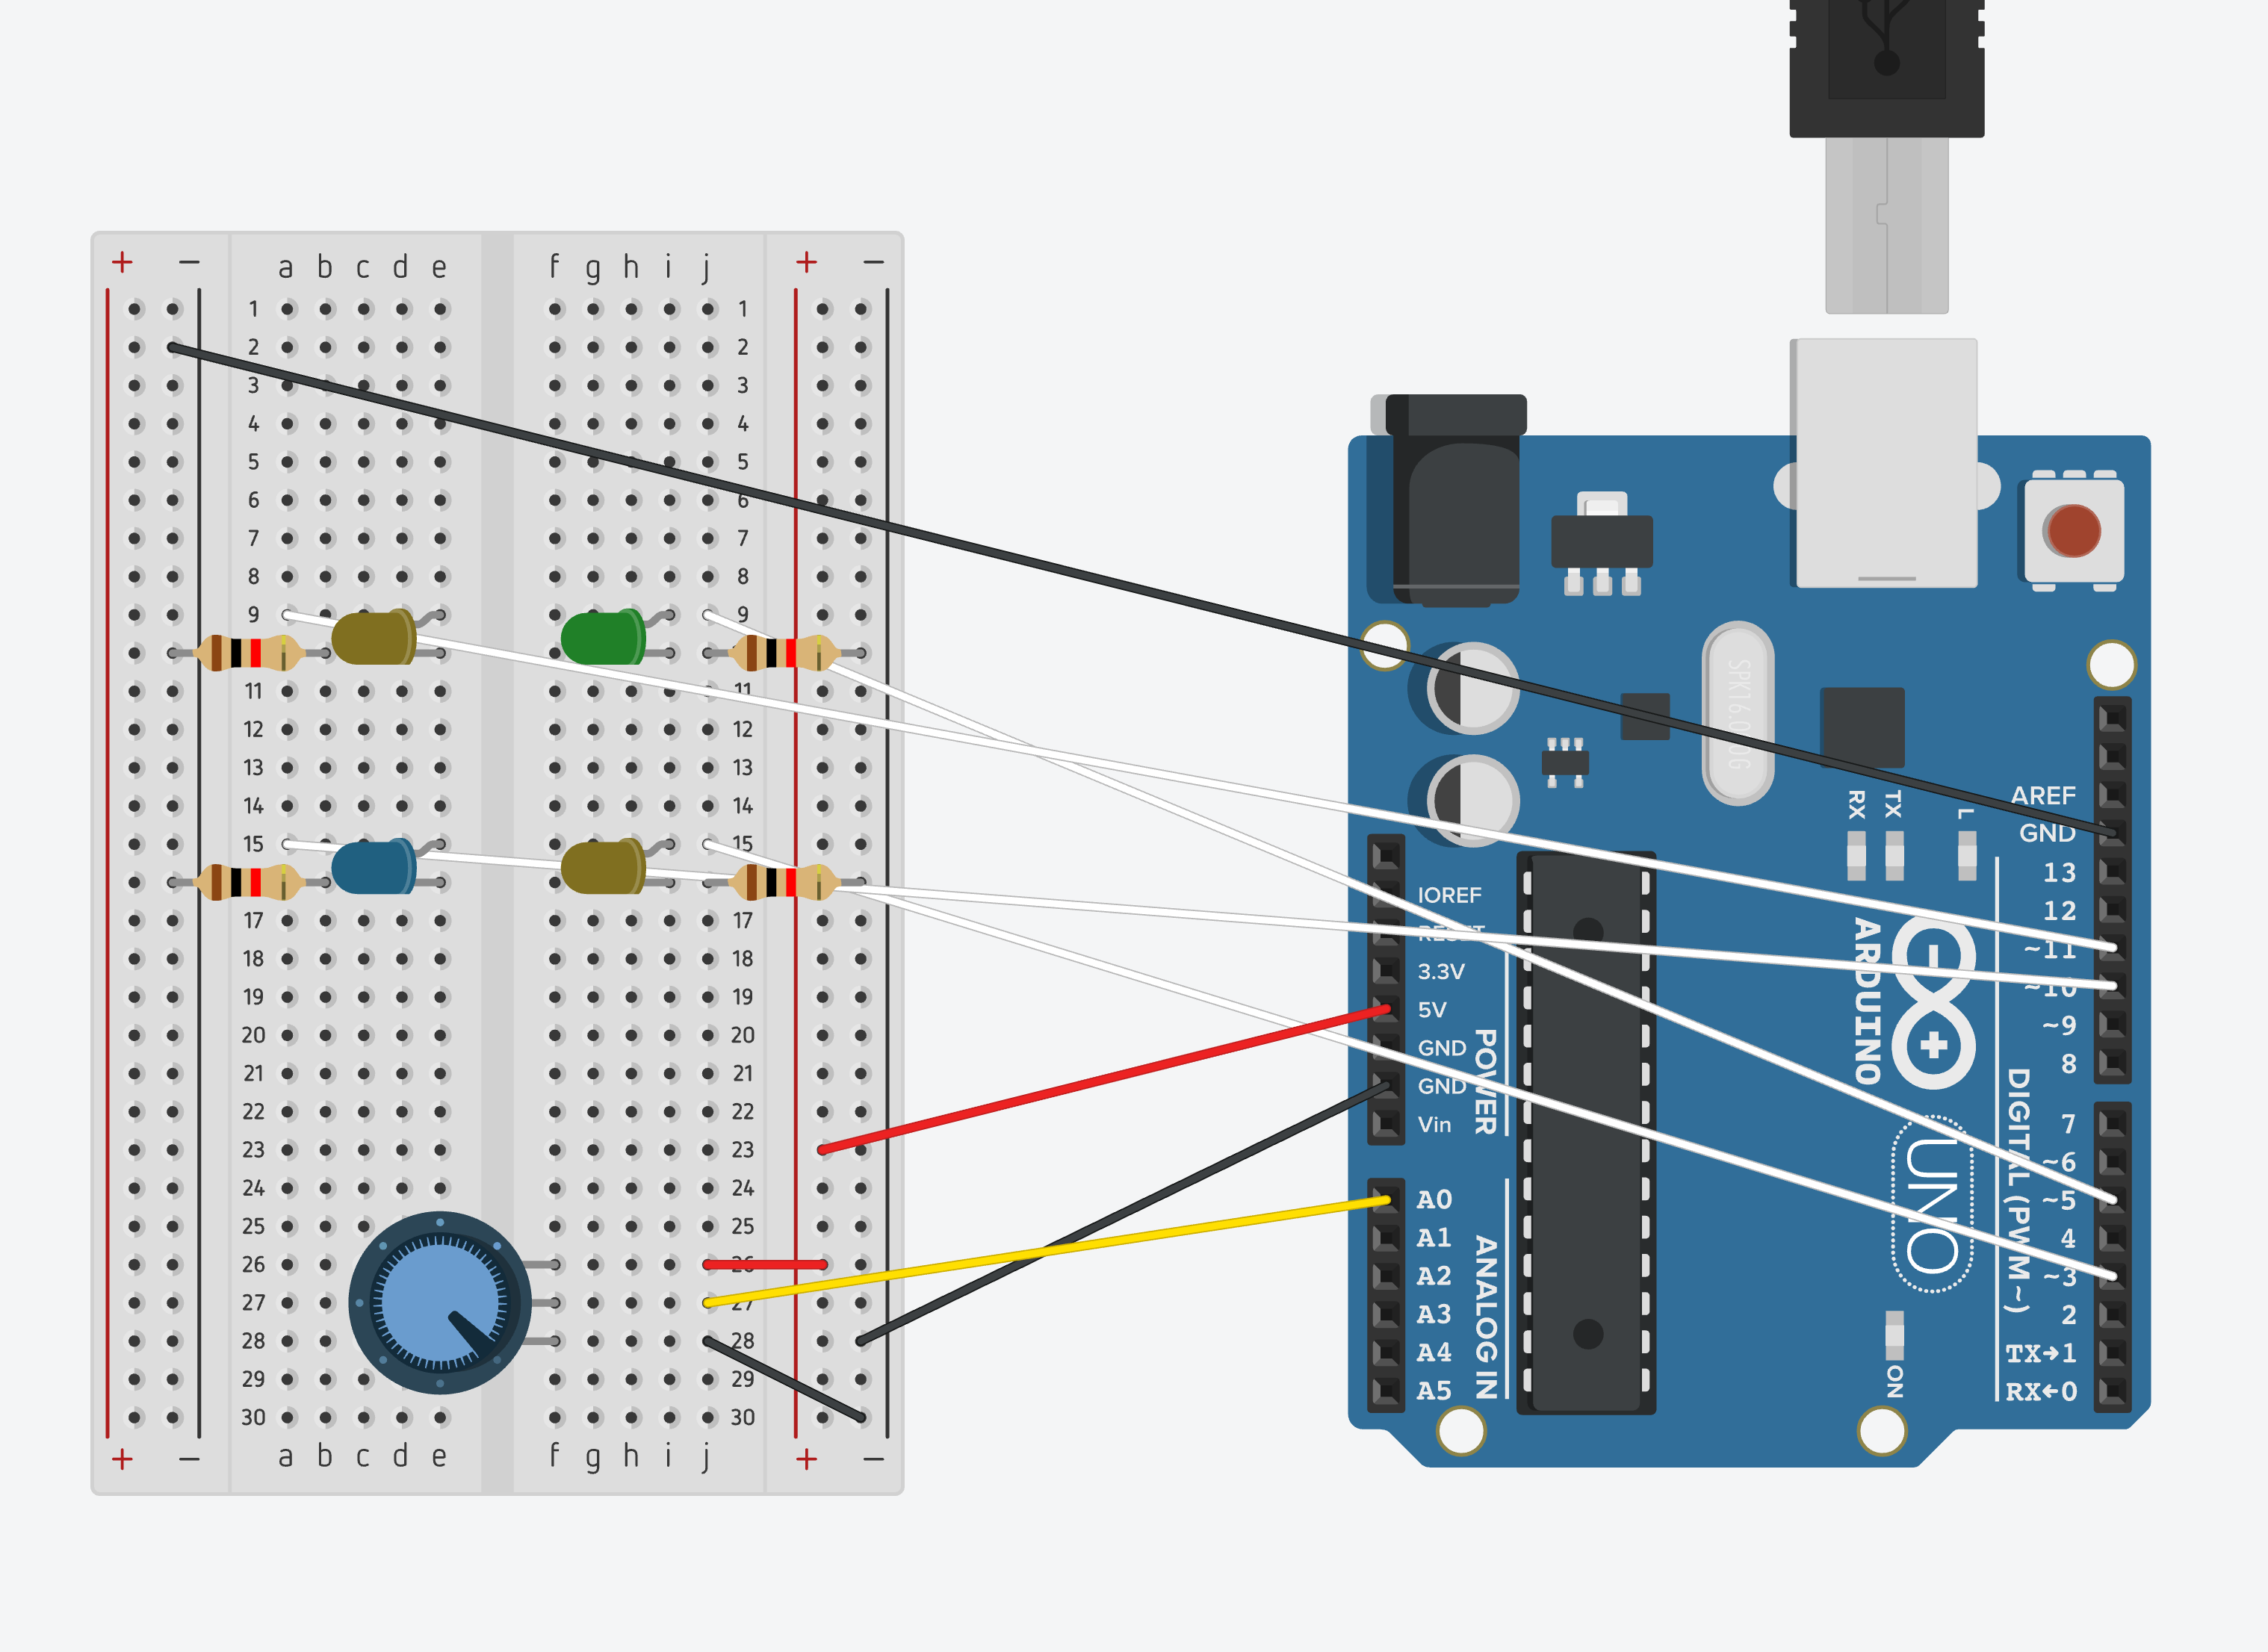
The below code and circuit outlet helped do this.
Morse Circuit
Code:
int ledPin = 2;
int buttonPin = 4;
int shortTime = 300;
int longTime = 900;
int prevButtonState = LOW;
int play_dialogue = 0;

void flash_led(int timing)
{
  digitalWrite(ledPin, HIGH);
  delay(timing);
  digitalWrite(ledPin, LOW);
  delay(shortTime);
}


void to_morse(int order, int code0 =0, int code1 = 0, int code2 = 0, int code3 = 0)
{
 	int code_array[4];
 	code_array[0] = code0;
   	code_array[1] = code1;
    code_array[2] = code2;
  	code_array[3] = code3;

  for (int i = 0; i <order; i++)
  {
    flash_led(code_array[i]);
  }
  delay(longTime);

}

void setup()
{
  pinMode(ledPin, OUTPUT);
  pinMode(buttonPin, INPUT);
}

void loop()
{
   int currentButtonState = digitalRead(buttonPin);

  // if the button is currently being prssed down, AND during the last frame is wasn't pressed down
  if (currentButtonState == HIGH && prevButtonState == LOW) {
      // flip the LED state
      if (play_dialogue == HIGH){
        play_dialogue = LOW;
      } else if (play_dialogue == LOW){
        play_dialogue = HIGH;
      }
  }

  if(play_dialogue){
	to_morse(2, shortTime, shortTime); //I

  	to_morse(2, shortTime, longTime); //A
  	to_morse(2, longTime, longTime); //M

  	to_morse(3, shortTime, shortTime, shortTime); //S
  	to_morse(3, longTime, longTime, longTime); //O
  	to_morse(3, shortTime, longTime, shortTime); //R
  	to_morse(3, shortTime, longTime, shortTime); //R
  	to_morse(4, longTime, shortTime, longTime, longTime); //Y

  	to_morse(3, longTime, shortTime, shortTime); //D
  	to_morse(2, shortTime, longTime); //A
  	to_morse(4, shortTime, shortTime, shortTime, longTime); //V
  	to_morse(1, shortTime); //E
    digitalWrite(ledPin, HIGH);
  	play_dialogue = 0;
  }


}
Carousel
The carousel had two components:
Showing the code by lighting all the LEDS in a sequence
This was implemented using a digitalWrite and delay
Turning off the LEDS using a potentiometer
For this specific parts of the knobValue had to section (divided into four parts) and the brightness of each LED was dependent on the particular section of the knobValue (see code for reference)
Below is a circuit and the accompanying code for this part
Carousel
int ledPin1 = 3;
int ledPin2 = 5;
int ledPin3 = 11;
int ledPin4 = 10;
int knobPin = A0;
int b_led1 = 255;
int b_led2 = 255;
int b_led3 = 255;
int b_led4 = 255;

void setup()
{
  pinMode(ledPin1, OUTPUT);
  pinMode(ledPin2, OUTPUT);
  pinMode(ledPin3, OUTPUT);
  pinMode(ledPin4, OUTPUT);
  Serial.begin(9600);
}

void loop()
{
  int knobValue = analogRead(knobPin);

  if(knobValue <= 255)
  b_led4 = map(knobValue,0,255,255,0);

  if(knobValue > 255 && knobValue <= 511)
  b_led3 = map(knobValue,256,511,255,0);

  if(knobValue > 511 && knobValue <= 767)
  b_led2 = map(knobValue,512,767,255,0);

  if(knobValue > 767 && knobValue <= 1023)
  b_led1 = map(knobValue,768,1023,255,0);


  Serial.println("This is knobValue: ");
  Serial.println(knobValue);


  Serial.println("This is brightness of LED4 ");
  Serial.println(b_led4);

  Serial.println("This is brightness of LED3 ");
  Serial.println(b_led3);

  Serial.println("This is brightness of LED2 ");
  Serial.println(b_led2);

  Serial.println("This is brightness of LED1 ");
  Serial.println(b_led1);

  digitalWrite(ledPin1, HIGH);
  delay(1500); // Wait for 1000 millisecond(s)
  digitalWrite(ledPin2, HIGH);
  delay(1500); // Wait for 1000 millisecond(s)
  digitalWrite(ledPin3, HIGH);
  delay(1500); // Wait for 1000 millisecond(s)
  digitalWrite(ledPin4, HIGH);
  delay(1500); // Wait for 1000 millisecond(s)

  	analogWrite(ledPin1, b_led1);
  	analogWrite(ledPin2, b_led2);
	analogWrite(ledPin3, b_led3);
	analogWrite(ledPin4, b_led4);
}
Bringing them Together
Finally here is a video showing how it all came together (included outputs in the serial Monitor to make it more fun!)
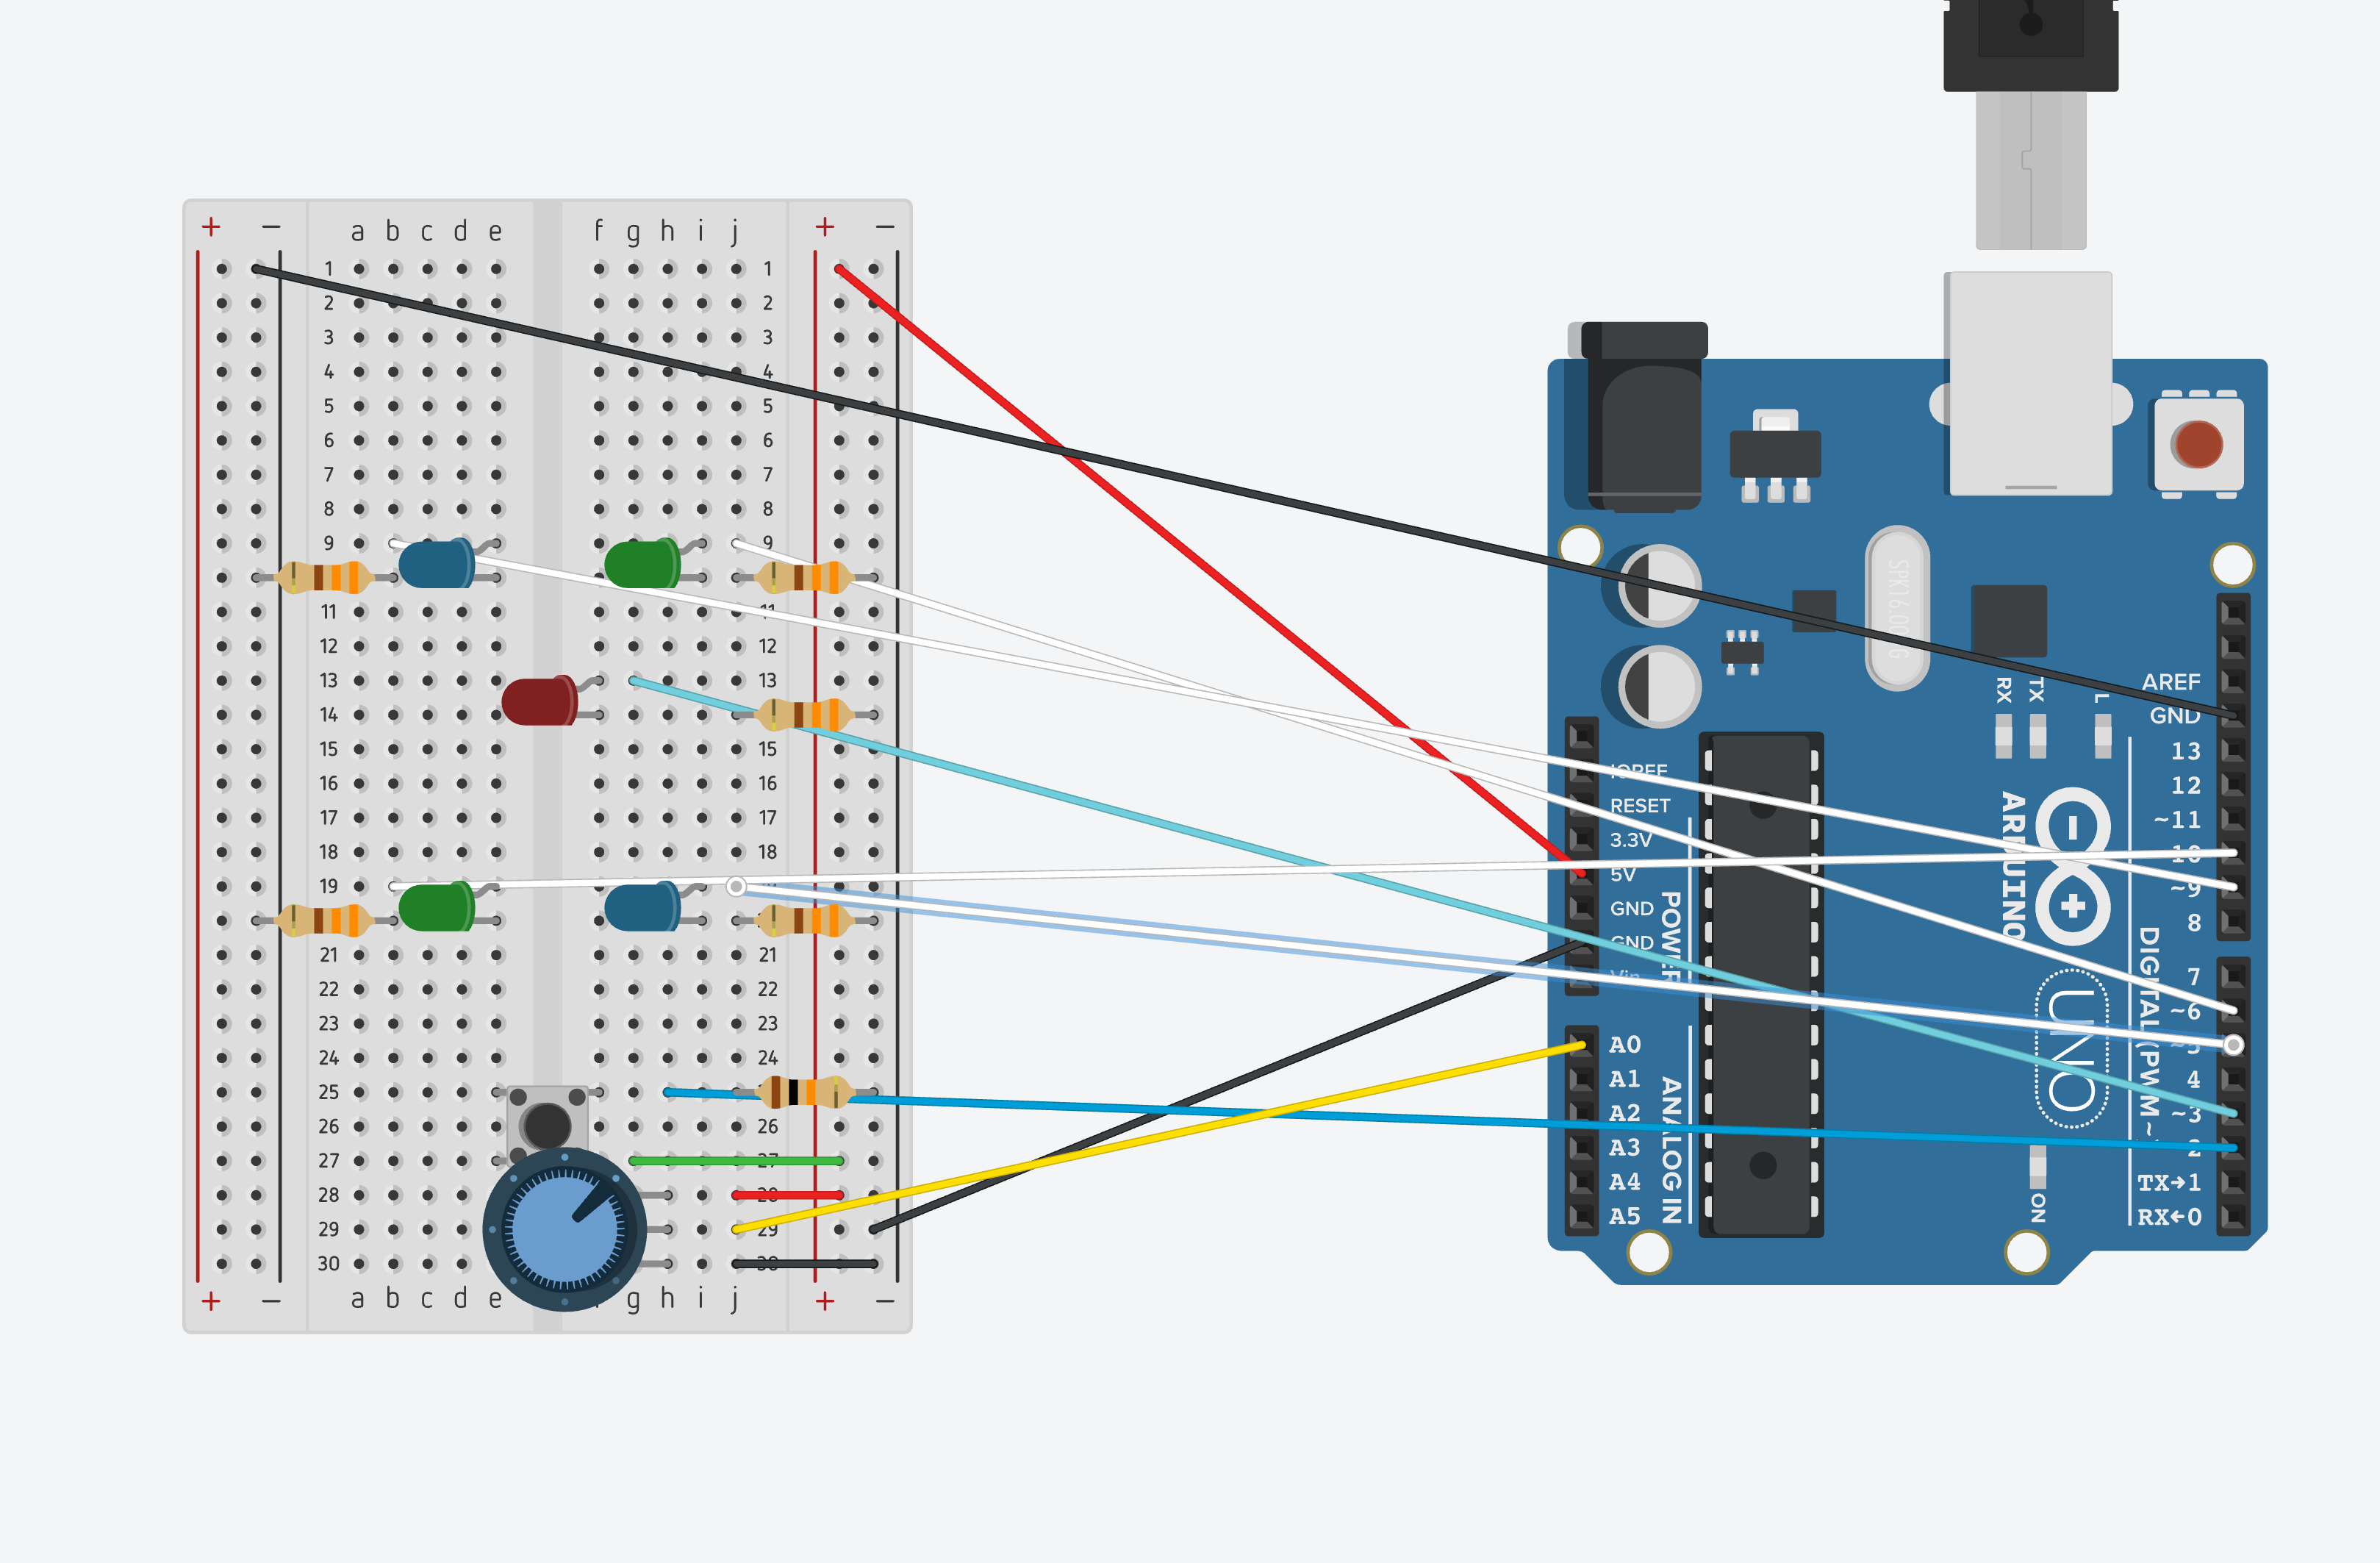
And here is the final code and circuit
Final Circuit
int halPin = 3;
int buttonPin = 2;
int ledPin1 = 5;
int ledPin2 = 6;
int ledPin3 = 9;
int ledPin4 = 10;
int knobPin = A0;
int b_led1 = 255;
int b_led2 = 255;
int b_led3 = 255;
int b_led4 = 255;
int shortTime = 225;
int longTime = 675;
int prevButtonState = LOW;
int play_dialogue = 0;
int stop_carousel = 0;
int hal_destruction =0;
int hal_defeated =0;


void flash_led(int timing)
{
  digitalWrite(halPin, HIGH);
  delay(timing);
  digitalWrite(halPin, LOW);
  delay(shortTime);
}


void to_morse(int order, int code0 =0, int code1 = 0, int code2 = 0, int code3 = 0)
{
   int code_array[4];
  code_array[0] = code0;
    code_array[1] = code1;
    code_array[2] = code2;
    code_array[3] = code3;

  for (int i = 0; i <order; i++)
  {
    flash_led(code_array[i]);
  }
  delay(longTime);

}

void setup()
{
  pinMode(halPin, OUTPUT);
  pinMode(buttonPin, INPUT);
  pinMode(ledPin1, OUTPUT);
  pinMode(ledPin2, OUTPUT);
  pinMode(ledPin3, OUTPUT);
  pinMode(ledPin4, OUTPUT);
  Serial.begin(9600);
}

void loop()
{
   int currentButtonState = digitalRead(buttonPin);

  // if the button is currently being prssed down, AND during the last frame is wasn't pressed down
  if (currentButtonState == HIGH && prevButtonState == LOW) {
      // flip the LED state
      if (play_dialogue == HIGH){
        play_dialogue = LOW;
      } else if (play_dialogue == LOW){
        play_dialogue = HIGH;
        b_led1 = 255;
    b_led2 = 255;
    b_led3 = 255;
    b_led4 = 255;
      }
  }

  if(play_dialogue){
    Serial.println("Dave: Welcome to the.....oh my god it is Hal");
    hal_defeated = 0;
    Serial.print("Hal: ");
    to_morse(2, shortTime, shortTime); //I
    Serial.print("I");
    Serial.print(" ");

    to_morse(2, shortTime, longTime); //A
    Serial.print("A");
    to_morse(2, longTime, longTime); //M
    Serial.print("M");
    Serial.print(" ");

    to_morse(3, shortTime, shortTime, shortTime); //S
    Serial.print("S");
    to_morse(3, longTime, longTime, longTime); //O
    Serial.print("O");
    to_morse(3, shortTime, longTime, shortTime); //R
    Serial.print("R");
    to_morse(3, shortTime, longTime, shortTime); //R
    Serial.print("R");
    to_morse(4, longTime, shortTime, longTime, longTime); //Y
    Serial.print("Y");
    Serial.print(" ");

    to_morse(3, longTime, shortTime, shortTime); //D
    Serial.print("D");
    to_morse(2, shortTime, longTime); //A
    Serial.print("A");
    to_morse(4, shortTime, shortTime, shortTime, longTime); //V
    Serial.print("V");
    to_morse(1, shortTime); //E
    Serial.print("E");
    Serial.println(" ");
    digitalWrite(halPin, HIGH);

    play_dialogue = 0;
    //start_carousel = 1;
    hal_destruction = 1;
  }

  //if (start_carousel){

    if (hal_destruction){
      digitalWrite(ledPin1, HIGH);
      delay(1500); // Wait for 1000 millisecond(s)
      digitalWrite(ledPin2, HIGH);
      delay(1500); // Wait for 1000 millisecond(s)
      digitalWrite(ledPin3, HIGH);
      delay(1500); // Wait for 1000 millisecond(s)
      digitalWrite(ledPin4, HIGH);
      delay(1500); // Wait for 1000 millisecond(s)

      Serial.println("Dave: Oh No! Hal has started the code that would blow up the planet! You must stop him! ");
      stop_carousel = 1;
    }

  while(stop_carousel){
    int knobValue = analogRead(knobPin);


    if(knobValue > 0)
      hal_destruction = 0;

    if(knobValue > 0 && knobValue <= 255){
      b_led4 = map(knobValue,0,255,255,0);
    }

    if(knobValue > 255 && knobValue <= 511){
        b_led4 = 0;
        b_led3 = map(knobValue,256,511,255,0);
    }

    if(knobValue > 511 && knobValue <= 767){
      b_led3 = 0;
      b_led2 = map(knobValue,512,767,255,0);
    }

    if(knobValue > 767 && knobValue <= 1023){
        b_led2 = 0;
      b_led1 = map(knobValue,768,1023,255,0);
    }


    analogWrite(ledPin1, b_led1);
    analogWrite(ledPin2, b_led2);
  analogWrite(ledPin3, b_led3);
  analogWrite(ledPin4, b_led4);

    if(knobValue == 1023) {
        hal_defeated = 1;
        stop_carousel = 0;
    }
  }
  //}

  if(hal_defeated){
     //start_carousel = 0;
    digitalWrite(halPin, LOW);
    //if(ending_dialogue){
    Serial.println("Dave: Thank God! You defeated Hal!");
    Serial.println("To play again, press the button.");
    //}
    hal_defeated = 0;
  }


}
Hurdles along the way
To be honest, there weren’t many. This project went forth pretty smoothly and really helped me solidify the concepts we learned in week 8 and 9. And I had lots of fun making this!
For my midterm project, I decided to do something related to sports because I was really amused by the kinetic physics models that Professor Aaron had showed us in class. And so building on top of that, I made a simple 2d basketball game wherein the player can control the force applied on the ball and the direction of its trajectory, with the goal being to score at least 15 points in a given time frame. The time frame can be decided by the user and offers them three levels: beginner wherein the ticker is quite slow, intermediate, ticker is pacy but still doable and advanced, it would be a genuine achievement if you can win this level.
Here is the video for my game:
Here is my Git for this project:
https://github.com/Armaan-Agrawal/IntrotoIM.git
For this project, I really wanted to focus on a 90s video cassette type feel to it and so I curated the animations keeping that in mind. I purposely made th audio and timer controls slow so as to accentuate the feel of that old era gaming.
For the audio slider, I basically implemented it using maps
For the animation, I did it through assigning variables to manioulate location and direction.
For the bounce in the ball, I achieved it by dampening the velocity of the ball upon collision.
The physics of the ball is based on the Newtonian laws of motion.
I found most of the game art online but had to curate certain pieces like the baskeball and the player through photoshop to get the desired effect.
This week we had to experiment with text and how we can manipulate them and I thought the best way to do so was to illustrate it in the form of a word game. And so I created this word game which involves both geomerative points as the backdrop of the text behind and the original text which can be manipulated by the use of a house causing the characters to move up and down. It was not what I had in mind as my first idea for the project but since I was late and couldn’t bring my first idea to fruition I thought of settling for this.
In this project, other than the regular Rfunctions we learned in class, I learned about RShape and how they can be used to identify letters in a text.
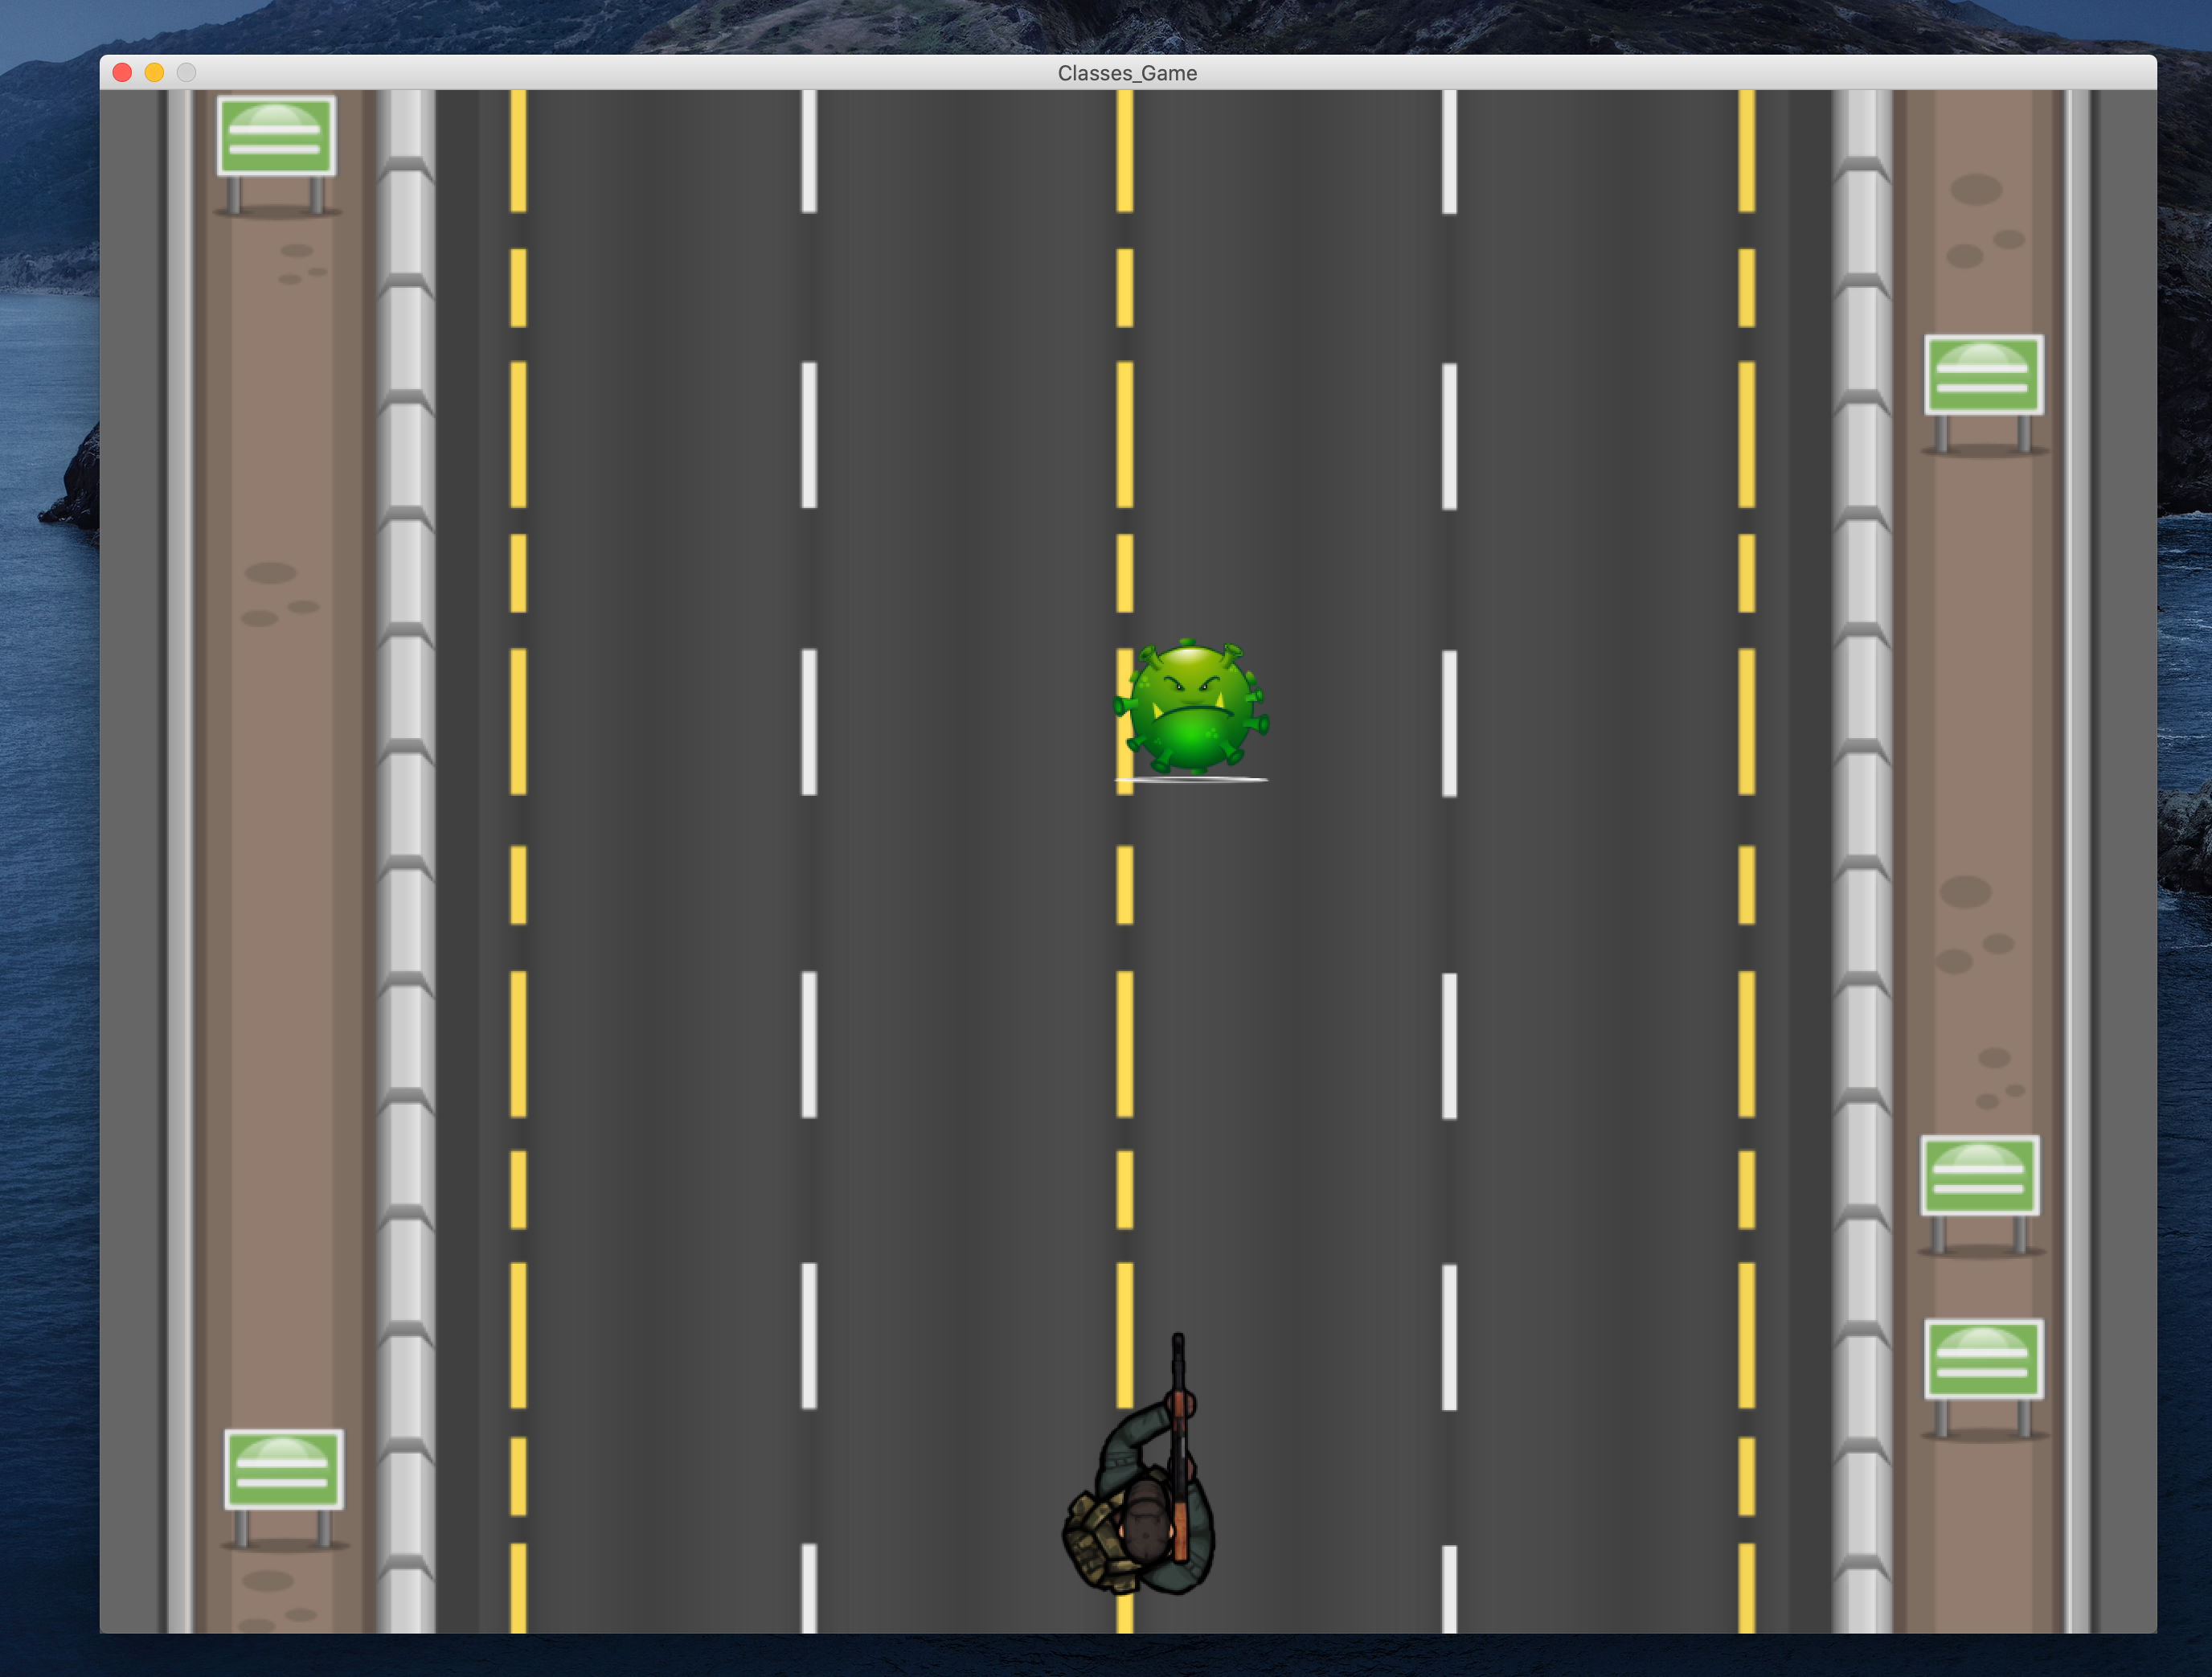
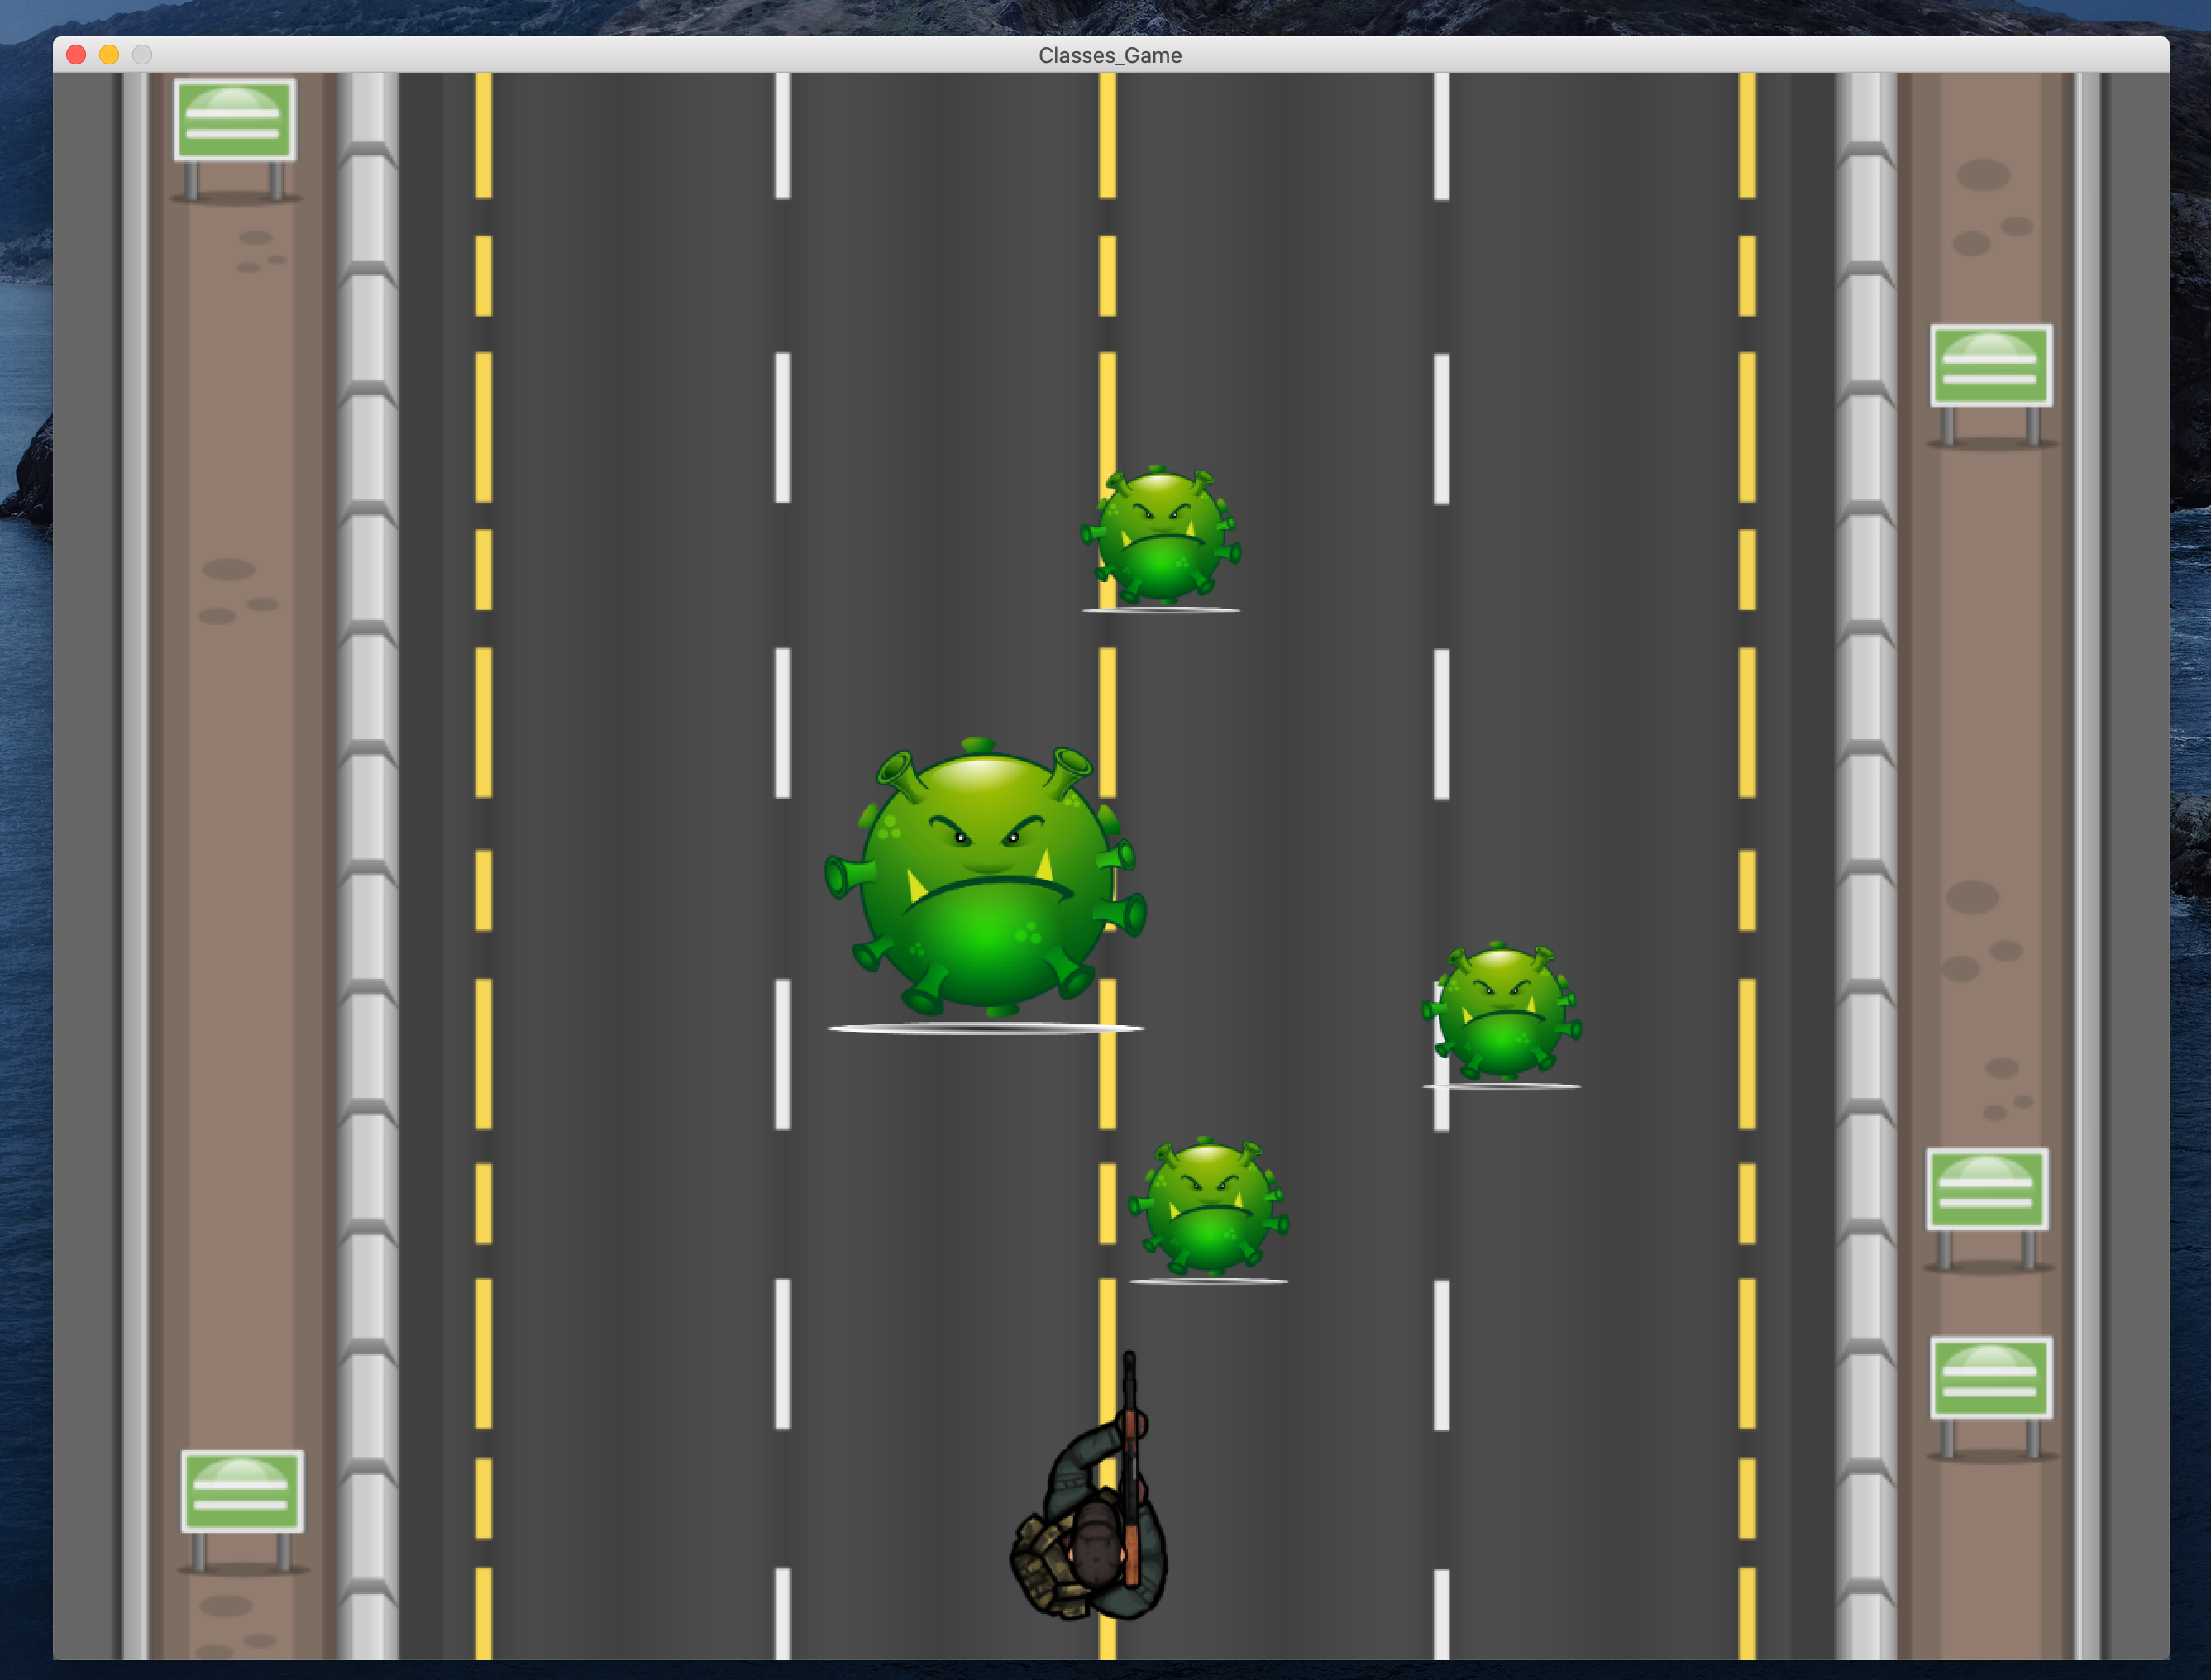
I was quite excited for this week’s project as it was about making a game and thought of the ideas that I could pursue to make a game that would be fun to play. I was initially thinking of something where the user has a specific time limit to book the gym slot and if he is unable to do so, he loses the slot. But then I realized that the game does not implement the concept of classes that well and hence won’t be that relevant to this week’s topic. Therefore, I thought of making a shooter game in which you battle the world’s number one enemy, the Corona virus!
Difficulties:
Although this game was really fun to make, I did run into a bunch of really annoying problems. The first major problem I ran into was to make bullets that would appear and shoot on my command. In my first attempt of doing so, I had created something in which when I would press the command to shoot, the bullet would just extend indefinitely and not work as a bullet does. After this was resolved, I faced another challenge of aligning the movement of the bullet with that of the player. Initially, when I would move the player, the bullet would not move accordingly and hence I needed to figure a way around that.
The next major challenge that I faced was to actually find a game mechanic that would allow the bullet to kill the virus when it touched it. I was struggling to find a clean and simple solution to this problem as I was going with the incorrect approach of emphasizing the fact that whether a bullet has gone through many viruses or not and making checks for that. This logic obviously did not work as it was actually the viruses that needed to be checked and seen if the bullet passed through them or not. Once I changed my logic and coded accordingly, the function began to work.
Resolution:
In order to properly implement the bullet mechanics, I decided to nest the bullet class in the player class. This allowed to easily link the data of the player with that of the bullet and made it easy to correlate their positions. Previously, I had experimented with the bullet class inheriting from the player class but realized that the player and bullet do not have a Is-a relationship but have a Has-a relationship and therefore nesting would work best for this problem (I could have used composition but decided to go with nesting).
The way I tackled the problem of killing the virus with the bullet was by creating a function that would check if the bullet is in the vicinity of the virus and then running it to check for every virus and every bullet.
Ideation:
My ideation for this task primarily involved the following:
Game Concept Idea
Game Play Idea
Game Concept:
For the concept, as I had mentioned before, I was inclined towards making a game for the gym slots but this idea of a shooting game, dawned upon me when I was siting in a cafe and just being frustrated over the fact that my mask was irritating me.
Game Play:
As I started building this game, I knew that I would be building a top down game wherein the virus appears to be falling down the screen and the player is positioned in the end of the screen and can only move in the horizontal direction while his bullets travel vertically up and can interact with the virus to kill them. I believe that for the time being the top down approach works well but I would like to experiment with different view points of playing the game. I tried looking at the first person perspective but apparently that required P3D rendering. However, this could be something I could try out for my midterm project.
Notes:
While this game solves the purpose of this week’s assignment, I am hopeful that I can develop this much better than this and probably turn it into my midterm project. This version is therefore a prototype that will be worked upon as I learn more about processing in the following weeks.
Concepts Learned:
This project taught me how to nest classes and how to better link one class to the next.
It taught me to scout for game art and then effectively apply them in my own projects using the PImage, img and images() functions in Processing.
This project taught me how to work with the ArrayList function.
Game Art
Project Video:
Project Code:
Main draw() Class
ArrayList<Virus> viruses = new ArrayList<Virus>(); //gives the list of viruses
Player player; //player object
boolean shoot = false; // ensures that the player only shoots when commanded
ArrayList<Player.Bullet> bullets = new ArrayList<Player.Bullet>(); //bullet list

void setup()
{
  size(1280, 960);

  imageMode(CENTER);
  viruses.add(new Virus(random(width*0.25, width*0.75), 0, int(random(1, 3)))); //initialising the list of viruses to spawn in between the roads of the game
  player = new Player();
}

void draw()

{
  PImage bg;
  bg = loadImage("background-1.png");
  bg.resize(int(width),int(height));
  background(bg); //background is the top down view of a road
  Player_Mechanics();
  Virus_Mechanics();
}


void Player_Mechanics()
{

  player.drawPlayer();  //draws the Player on Screen

  for(int i =0; i< bullets.size(); i++)
  {

    bullets.get(i).draw_Bullet();
    bullets.get(i).shoot_Bullet();  //if bullets are present, draws them and shoots them
    if(bullets.get(i).bullet_posY_1 < 0 )
      bullets.remove(i); //removes the bullet once they are out of frame
  }


}


void Virus_Mechanics()
{
  for (int i = 0; i < viruses.size(); i++)
  {
    viruses.get(i).drawVirus();
    viruses.get(i).moveVirus(); //draws and moves virus on screen
    if(viruses.get(i).posY > height + viruses.get(i).size)
      viruses.remove(i);  //removes the virus once they are out of frame
    if( bullets.size() > 0 && viruses.size() > 0 )
    {
      for(int j=0; j<bullets.size(); j++)
      {
        if( bullets.size() > 0 && viruses.size() > 0 )
        {
          if(viruses.get(i).vicinty_check(bullets.get(j).bullet_posX,bullets.get(j).bullet_posY_2))
            {
              viruses.remove(i); //kills the virus and removes it once bullet touches it
            }
        }
      }
    }
  }
}

void keyPressed()
{
  if (key == ' ')
  {
    viruses.add(new Virus(random(width*0.25, width*0.75), 0, int(random(1, 3)))); //spawns a virus
  }

  if (key == 'a')
  {
    player.moveLeft(); //player goes left
  }

  if (key == 'd')
  {
    player.moveRight(); //player goes right
  }

  if (key == 'f')
  {
    bullets.add(player.new Bullet(0));  //shoots bullets
  }
}
Player Class
class Player {

  public float posX = width/2;
  public float posY = height-100;
  PImage player;
  int movement=20;
  int size =200;


  Player()
  {

    player = loadImage("player_rifle.png");
    imageMode(CENTER);
  }


  void drawPlayer()
  {
    player.resize(size, 0);
    pushMatrix();
    translate(posX, posY);
    rotate(radians(270));
    image(player, 0, 0);
    popMatrix(); //resizes and rotates the image of the player on screen so that it is appropriate for the game
  }

  void moveLeft()
  {

    if (posX > size/2)
      posX -= movement; //player moves left
  }

  void moveRight()
  {

    if (posX < width-size/2)
      posX += movement; //player moves right
  }


  class Bullet {    //nested bullet class in player class

    float  bullet_posX = posX + size*0.15;
    float  bullet_posY_1 = posY - size/2;
    float  bullet_size = size * 0.1;
    float  bullet_posY_2 = posY - size/2 - bullet_size;
    int bullet_speed = 20;


    Bullet(float y)
    {
      bullet_posY_1 -= y;
      bullet_posY_2 -= y;    //assigns intial position to bullet
    }
    void draw_Bullet()
    {
      stroke(195,153,83);
      strokeWeight(6);
      line(bullet_posX, bullet_posY_1, bullet_posX, bullet_posY_2);  //draws a line for a bullet
    }

    void shoot_Bullet()

    {
      bullet_posY_1 -= bullet_speed;
      bullet_posY_2 -= bullet_speed;  //moves bullet
    }
  }
}
Virus Class
class Virus {

  float posX;
  float posY;
  int speed = 2;
  int size;
  PImage corona;


  Virus(float x, float y, int s)
  {
    posX = x;
    posY = y;
    size = s*100;
    corona = loadImage("corona.png");
    imageMode(CENTER);
  }

  void drawVirus()
  {

    corona.resize(size, 0);
    image(corona, posX, posY);  //resizes and draws the virus
  }

  void moveVirus()
  {
    posY += speed;  //moves the virus
  }

  boolean vicinty_check(float x, float y)
  {
    if ((x < posX+size/2 && x > posX-size/2) && (y < posY+size/2 && y > posY-size/2))  //checks if anything exists in the vicintiy of the virus's body
      return true;
    else
      return false;
  }
}
This week was an especially difficult one because I had a lot of deadlines and tasks and responsibilities that needed to be done within the short time period of a week and adding to that I was just finding it quite hard to get the inspiration to create a piece of art. But thankfully it finally dawned on me and I decided to pursue a rather cliche idea but give it a twist thanks to all that I have learned in the recent days about Processing.
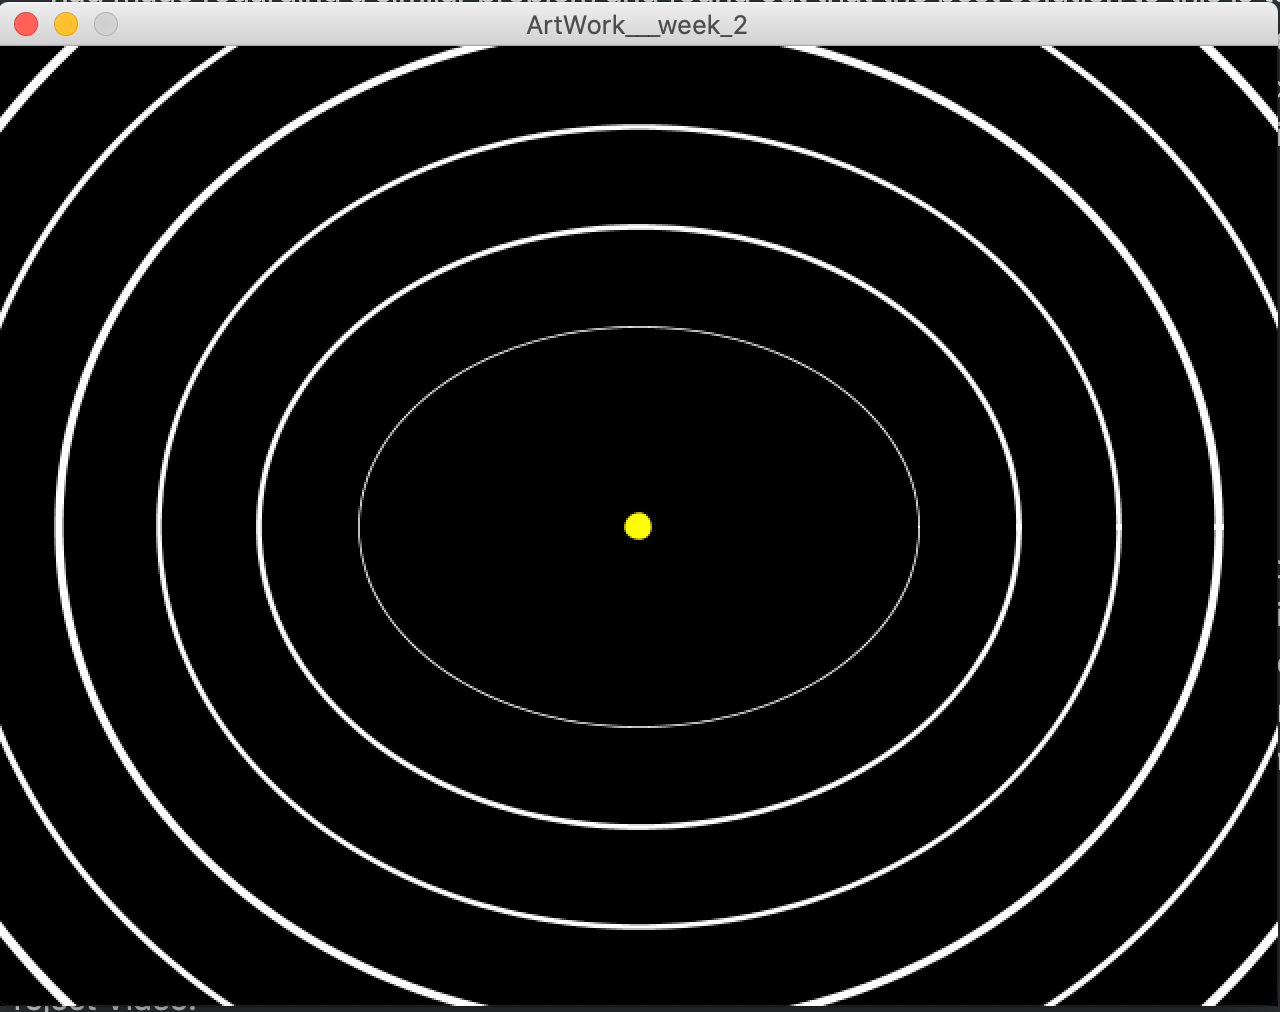
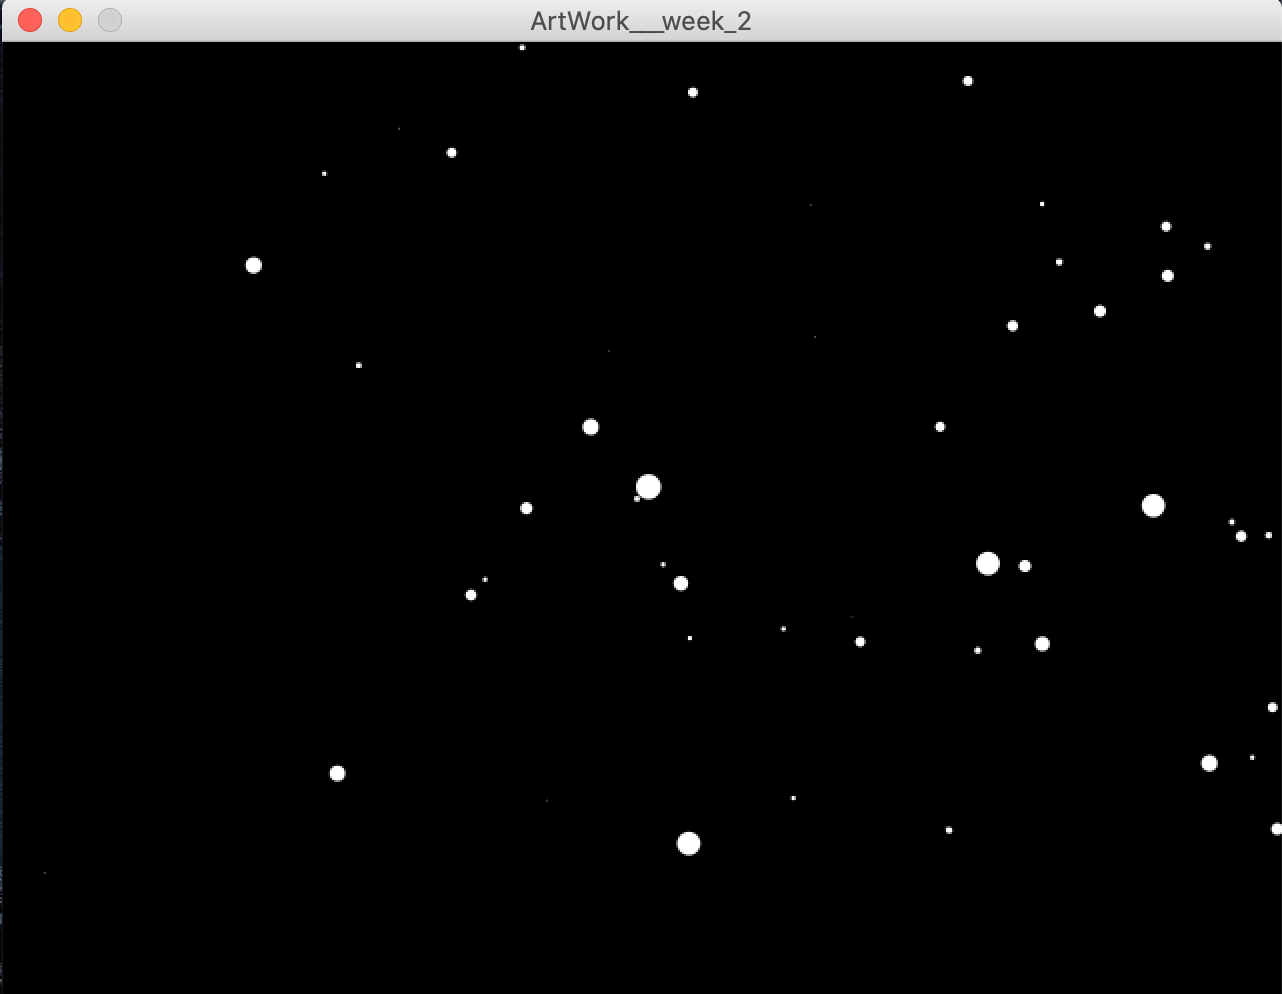
So I ended up creating my own idea of the big bang and created a star that can be controlled to be bigger or smaller and if it is bigger than a specific size, it erupts and ends up in an asteroid blast.
Difficulties:
As I mentioned before, I was really struggling to get an idea this week and tried coming up with multiple ideas to see what might work. However, none of them seem to really appeal to me but thankfully I decided to pursue the Big Bang Idea in the end.
The big challenge that I was facing apart from actually getting an idea to make something, was to get the asteroids to work. I had experimented with multiple different ways of trying to make them appear out of the screen but every time I tried a technique I would run into some kind of problems. Sometimes, the asteroids would not spawn properly, other times they would not move the way I wanted them to (appear out of a screen in a 3D sort of fashion) and basically would not give out the right sense of an asteroid blast that I had imagined.
Resolution:
In order to solve the asteroid problem, I decided to watch some videos that TheCodingTrain had made regarding a similar problem and found out that the best solution to this is to actually use the concept of classes. And so to implement that I made an asteroid class and added the functions, show and update to it. This allowed me to create multiple asteroids and then manipulate them in the way I wanted. Thus, the utilization of OOP helped me solve this problem.
Elements in the project
The project has two scenes – one of an exploding star and the other that of an asteroid blast. It revolves around the concept of a big star bursting so as to create an asteroid shower. The player can control the size of the star – making it bigger or smaller. Once the star reaches a certain limit of the size, going beyond that would cause it to explode and release an asteroid shower. At every point in the visual, the user can pause the animation and play it again and can also make it go faster or slower (done by altering the Frame Rate). During the asteroid shower, the user can control the speed by which the asteroids come using the mouse. Sliding it to the right will increase the speed whereas going to the left will decrease it.
Start Screen of a small starStar getting biggerAsteroid Shower
Concepts Learned:
This project taught me how to better utilize the random and noise functions better along with obviously teaching me how to use loops to create art works. By using random and noise in this project, I sort of got this understanding that a noise is a more controlled expression of generating a random number between a specified range and the fact that its value is retained (or remembered) whereas in random I feel like the generation of random numbers is more uncontrolled and more dispersed if I were to say.
I learned to implement the concepts of OOP in processing.
Project Video:
I will be uploading a vlog about my experience with this project soon by tonight!
Project Code:
//this artwork is a depiction of a big bang and the asteroids that come after that
float speed = 0.01;   //for noise value of the star, determines the pace of the vibration like movement
float extent = 0.7;  //for noise value of the star, determines the limit to which size comes up and goes down
int StarSize = 10;   // variable star size that increases and decreases

float StrokeSpeed = .01;
float StrokeExtent = 0.7;
int StrokeSize = 5;     //for the throbbing effect of orbits

float noiseStrokeValue;
float noiseStarValue;

color bg_color;


float Asteroid_speed;    //to determine speed of asteroid


class Asteroid
{
  float Asteroid_x;
  float Asteroid_y;
  float Asteroid_d;


  Asteroid()
  {
    Asteroid_x = random(-width, width);
    Asteroid_y = random(-height, height);
    Asteroid_d = random(width);  //helps create an illusion that it is a 3d space
  }

  void update() {
    Asteroid_d -= Asteroid_speed;
    if (Asteroid_d < 1)
    {
      Asteroid_x = random(-width, width);
      Asteroid_y = random(-height, height);
      Asteroid_d = width;
    }
  } //allows for movement

  void show_Asteroid() {
    fill(255);
    noStroke();
    float sx = map(Asteroid_x/Asteroid_d, 0, 1, 0, width);
    float sy = map(Asteroid_y/Asteroid_d, 0, 1, 0, height); //taking a ratio and then increasing and decreasing it to make it look 3d
    float size = map(Asteroid_d, 0, width, 16, 0);
    ellipse(sx, sy, size, size);
  }  //shows random asteroids on screen
};

//Asteroid class to create asteroids and to update and show them on screen


Asteroid[] asteroids = new Asteroid[400]; // 400 Asteroids created
void setup() {
  size(640, 480);

  for (int i = 0; i<asteroids.length; i++)
  {
    asteroids[i] = new Asteroid();    // each element is made into an instance of the Asteroid class
  }
}

void draw() {

  background(bg_color);
  Asteroid_speed = map(mouseX, 0, width, 0, 20); //speed controlled by mouse Pointer
  if (StarSize < 510)  //first star gets bigger
    Big_Bang();
  else
    AfterMath();  //after a certain size it bursts and asteroids follow
}


void Big_Bang() {
  bg_color = color(0);
  noFill();
  translate(width/2, height/2);
  stroke(255);
  noFill();


  for (int s=2; s<8; s++)
  {

    strokeWeight(random(s));
    arc(0, 0, s*100+80, s*100, 0, TWO_PI);  //6 orbits created
  }

  noiseStrokeValue = noise(frameCount*StrokeSpeed);
  noiseStrokeValue += StrokeExtent;
  noiseStrokeValue *= StrokeSize;  //adding flashing effect to orbit

  noiseStarValue = noise(frameCount*speed);
  noiseStarValue += extent;
  noiseStarValue *= StarSize;  //adding movement to star


  stroke(255, 255, 0);
  fill(255, 255, 0);
  strokeWeight(noiseStrokeValue);
  circle(0, 0, noiseStarValue); //making star
}


void AfterMath()
{

  translate(width/2, height/2);
  for (int i = 0; i<asteroids.length; i++)
  {
    asteroids[i].update();
    asteroids[i].show_Asteroid();
  }
}


void keyPressed()
{
  if (key == 'a') //slow
  {

    frameRate(frameRate-20);
  }

  if (key == 'b') //pause
  {
    noLoop();
  }

  if (key == 'c') //play
  {
    loop();
  }

  if (key == 'k') //fast
  {

    frameRate(frameRate+20);
  }

  if (key == 'w') //increase_Star_size
  {
    StarSize += 50;
    print(StarSize);
  }

  if (key == 's') //decrease_Star_size
  {
    StarSize -= 50;
    print(StarSize);
  }
}

void keyReleased()
{
  frameRate(60);
}