
Concept
For this project, I used one analog sensor and one digital sensor (switch) to control two LED lights.
The analog sensor I used was a photoresistor (light sensor). It changes how much electricity passes through it depending on how bright the light in the room is. The Arduino reads this change and adjusts the brightness of one LED when it’s dark, the LED gets brighter, and when it’s bright, the LED becomes dimmer.
For the digital sensor, I used a pushbutton connected to a digital pin. When I press the button, it turns the second LED on or off.
To make it different from what we did in class, I added a “night light” feature. When the photoresistor detects that the room is very dark, the button-controlled LED automatically turns on, like a small night light. When the light comes back, the button goes back to working normally.
This made my project more interactive and closer to how real sensors are used in everyday devices.

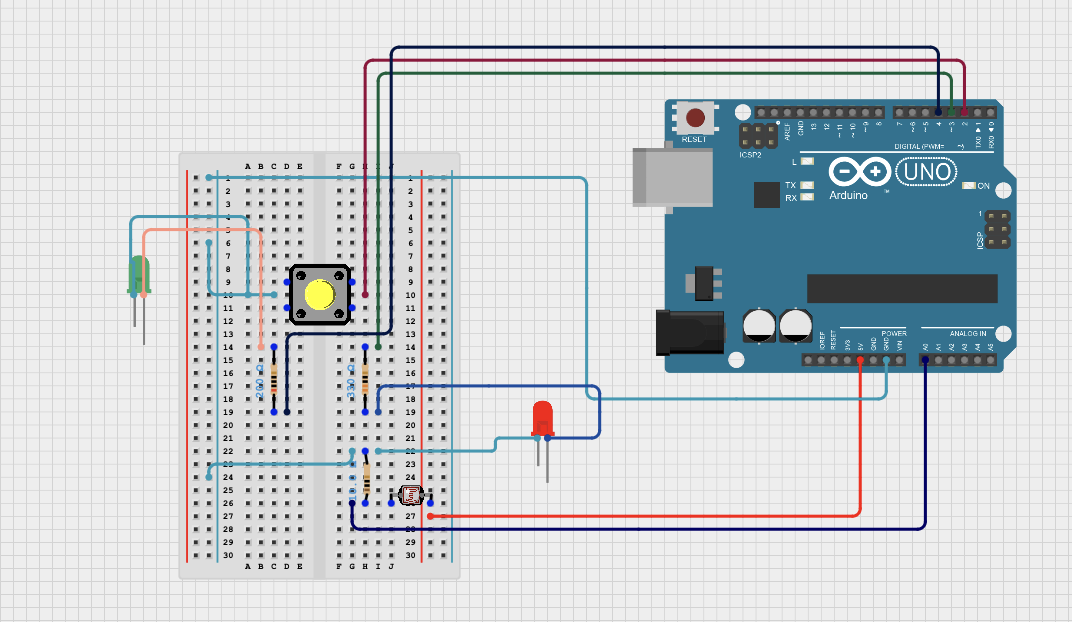
Schematic of my circuit
It shows the Arduino connected to:
-
A photoresistor and 10 kΩ resistor forming a voltage divider to read light levels.
-
A pushbutton connected to a digital pin.
-
Two LEDs , one controlled by the light sensor and the other controlled by the button
Final Results
When I tested the circuit:
-
The first LED smoothly changed its brightness depending on how much light the photoresistor sensed.
-
The second LED turned on and off with the button as expected.
-
When the room got dark, the second LED automatically turned on, working like a night light.
It was a simple but satisfying project, and the extra feature made it stand out from the class example.
Video: video-url
Arduino Code
Part of Cold I am proud of
void loop() {
  // --- Read photoresistor ---
  int lightValue = analogRead(lightPin); // 0–1023
  int brightness = map(lightValue, 0, 1023, 255, 0);
  analogWrite(ledAnalog, brightness);

  // --- Button toggle ---
  if (digitalRead(buttonPin) == LOW) {
    ledState = !ledState;
    delay(200);
  }

  // --- Night light feature ---
  if (lightValue < 300) { // If it's dark, auto turn on LED
    digitalWrite(ledDigital, HIGH);
  } else {
    digitalWrite(ledDigital, ledState ? HIGH : LOW);
  }

  // --- Print readings ---
  Serial.print("Light: ");
  Serial.print(lightValue);
  Serial.print(" | Brightness: ");
  Serial.print(brightness);
  Serial.print(" | LED State: ");
  Serial.println(ledState ? "ON" : "OFF");

  delay(200);
}
Github url: Github
Challenges and Further Improvements
While I was able to make both the analog and digital sensors work, I struggled a bit with arranging all the wires and resistors neatly on the breadboard. It took a few tries to get everything connected correctly.
I also had to test different threshold numbers for the night light feature to decide when the LED should automatically turn on. Once I found the right value, it worked well.
For my next project, I want to try using other kinds of sensors, like sound or temperature sensors, and make the circuit respond in new ways. I’ll also practice reading the code line by line to understand how each part works better before adding new features.