
Concept
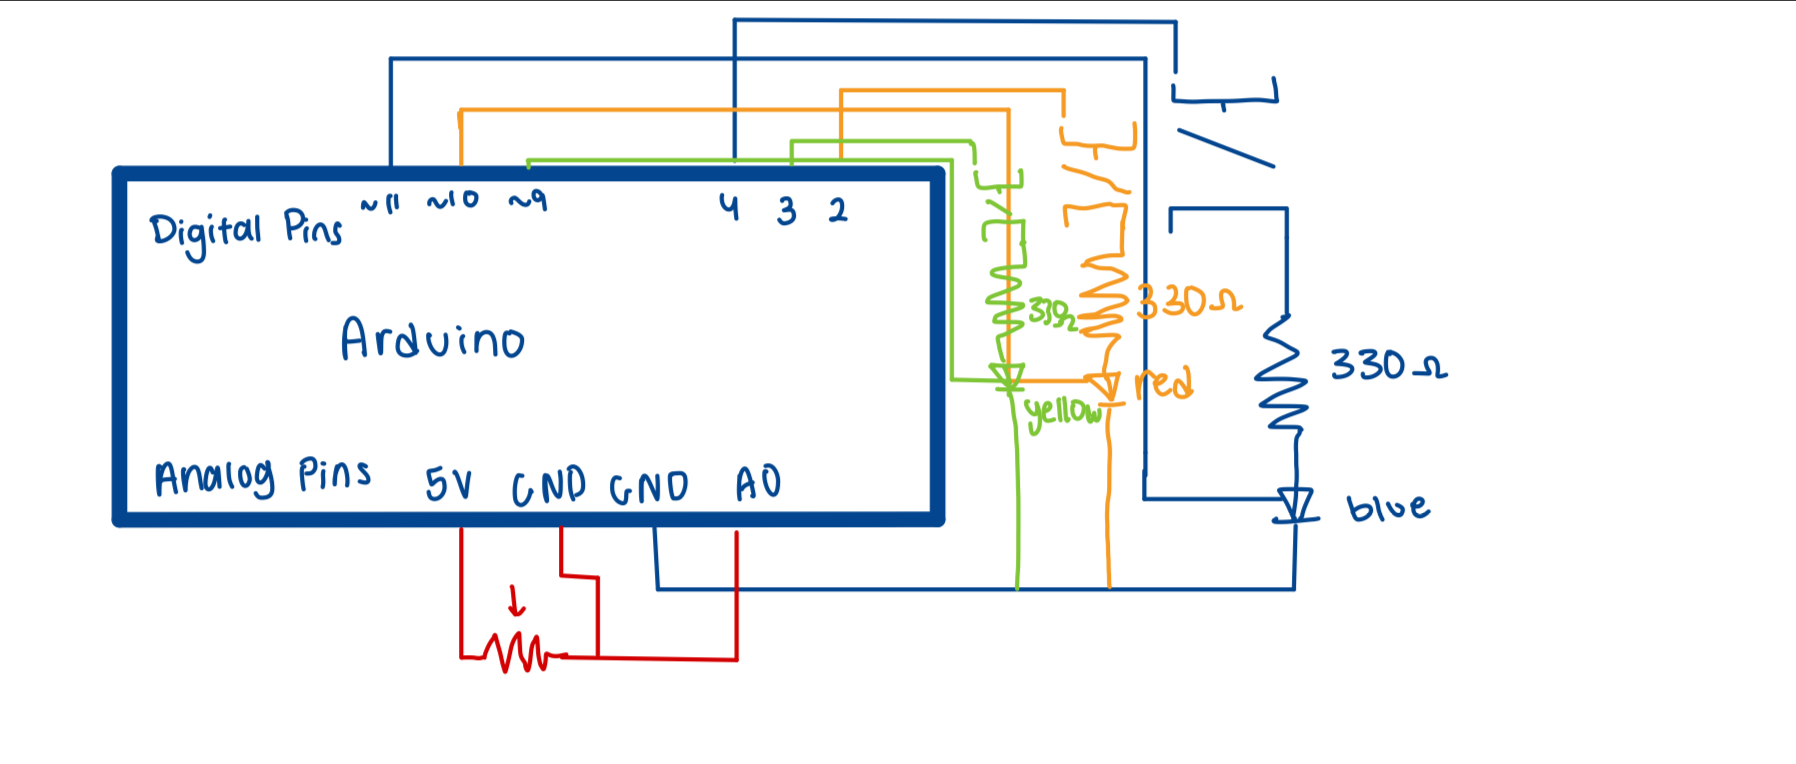
The idea behind this project is to create a simple mood lamp. You can switch between different colors using buttons and control the brightness with a potentiometer.
An important feature is that when you set a certain brightness for one color, that same brightness carries over when you switch to a different color. This makes the lamp feel intuitive to use. For example, if the lamp is set to 50% brightness on blue, switching to red keeps it at 50% instead of jumping to full brightness. This allows smooth color transitions without having to constantly readjust brightness.
The project combines digital inputs (buttons) and an analog input (potentiometer) to control analog outputs (LED brightness) in a simple but effective way.
https://github.com/kzeina/Intro-To-IM
Code I’m Proud of
//use internal pull-up resistor (button connects to 5v when pressed)

   //default state is high, pressed = low

   pinMode(buttonPins[i], INPUT_PULLUP);
I used INPUT_PULLUP, which is a built-in resistor in Arduino that helps stabilize button inputs. It works by keeping the pin in a known state , HIGH when unpressed and LOW when pressed, preventing it from randomly floating between readings. I discovered it through ChatGPT while debugging an issue where my LEDs were turning on unexpectedly. I learned that because my setup only used buttons as inputs (without any pull-up resistors), the readings were unstable, causing the LEDs to light up when they shouldn’t.
void loop() {

 //loop through each button to check if it’s pressed

 for (int i = 0; i < 3; i++) {

   //button pressed (low because of input_pullup)

   if (digitalRead(buttonPins[i]) == LOW) {

     //set this led as the active one

     activeLED = i;

     //turn off all other leds

     for (int j = 0; j < 3; j++) {

       if (j != i) analogWrite(ledPins[j], 0);

     }

   }

 }

 //if an led is active, adjust its brightness based on the potentiometer

 if (activeLED != -1) {

   //read analog value from potentiometer (0–1023)

   int sensorValue = analogRead(A0);

   //control brightness of the active led

   analogWrite(ledPins[activeLED], sensorValue/4);

 }

}
Frankly, I’m proud of almost all my code for this project. My background in computer science definitely helped me figure out the logic more easily. I used a nested loop that goes through each button (which I stored in an array, along with the LED pins) and checks its state. When a button is pressed, its corresponding LED turns on while all the others turn off. To let the potentiometer control the brightness of the active LED, I created a variable called activeLED. As long as it’s not set to -1 (meaning no LED is active), the code reads the potentiometer’s value and uses it to adjust the LED’s brightness.
Future Improvements
For future improvements, I’d like to make the interaction feel smoother and more dynamic. One idea is to add a toggle feature so pressing the same button again turns its LED off instead of just switching between them. I’d also love to make the LEDs fade in and out when changing colors to create a softer transition effect. It could be interesting to display which LED is currently active on an LCD screen or even through the Serial Monitor. Finally, adding sound feedback, like a small beep when an LED is switched, would make the experience more interactive and responsive.